


 Loading...
Version 1.0 | 06/15/2016
User Manual
HD Wi-Fi Camera
DCS-936L

Manual Overview
D-Link reserves the right to revise this publication and to make changes in the content hereof without obligation to notify any person or organization of such revisions or changes. Information in this document may become obsolete as our services and websites develop and change. Please refer to the www.mydlink.com website for the most current information.
|
|
Manual Revision |
|
|
|
|
|
Revision |
Date |
|
Description |
1.0 |
06/15/2016 |
|
DCS-936L Revision A1 with firmware version 1.00 |
|
|
|
|
Trademarks
D-Link and the D-Link logo are trademarks or registered trademarks of D-Link Corporation or its subsidiaries in the United States or other countries. All other company or product names mentioned herein are trademarks or registered trademarks of their respective companies.
Copyright ©2016 by D-Link Corporation.
All rights reserved. This publication may not be reproduced, in whole or in part, without prior expressed written permission from D-Link Corporation.

Table of Contents
Table of Contents
Product Overview.............................................................. |
4 |
Package Contents......................................................................... |
4 |
System Requirements.................................................................. |
4 |
Introduction.................................................................................... |
5 |
Features............................................................................................ |
5 |
Hardware Overview...................................................................... |
6 |
Installation.......................................................................... |
7 |
Wireless Installation Considerations...................................... |
8 |
Mobile App Setup......................................................................... |
9 |
Zero Configuration Setup........................................................ |
10 |
Placing Your Camera.................................................................. |
13 |
Mounting the Camera............................................................... |
14 |
mydlink........................................................................................... |
16 |
Configuration................................................................... |
17 |
Accessing the Web Configuration Utility............................ |
17 |
Live Video....................................................................................... |
18 |
Setup............................................................................................... |
20 |
Wizard...................................................................................... |
20 |
Network.................................................................................. |
28 |
Wireless Setup...................................................................... |
30 |
Dynamic DNS ....................................................................... |
31 |
Image Setup.......................................................................... |
32 |
Audio and Video.................................................................. |
33 |
Time and Date...................................................................... |
35 |
Video Clip............................................................................... |
36 |
Snapshot................................................................................. |
37 |
IP Filter..................................................................................... |
38 |
HTTPS Setup.......................................................................... |
39 |
SD Recording........................................................................ |
40 |
Motion Detection................................................................ |
42 |
Sound Detection................................................................. |
43 |
SD Management.................................................................. |
44 |
Maintenance................................................................................. |
45 |
Admin...................................................................................... |
45 |
System..................................................................................... |
46 |
Firmware Upgrade.............................................................. |
47 |
Status............................................................................................... |
48 |
Device Info............................................................................. |
48 |
Log............................................................................................ |
49 |
Troubleshooting............................................................... |
50 |
Technical Specifications................................................... |
51 |
Regulatory Statements.................................................... |
53 |
D-Link DCS-936L User Manual |
3 |
Section 1 - Product Overview
Product Overview
Package Contents
•DCS-936L HD Wi-Fi Camera
•Power Adapter
•Mounting Kit
•Quick Installation Guide
•Quick Install Card
Note: Using a power supply with a different voltage than the one included with your product will cause damage and void the warranty for this product.
If any of the above items are missing, please contact your reseller.
System Requirements
•802.11ac/n/g router (a D-Link Cloud Router is recommended)
•A broadband Internet connection
•iPhone, iPad, Android, or Windows smartphone or tablet (please refer to the mobile app’s store page to check whether your device is compatible)
D-Link DCS-936L User Manual |
4 |

Section 1 - Product Overview
Introduction
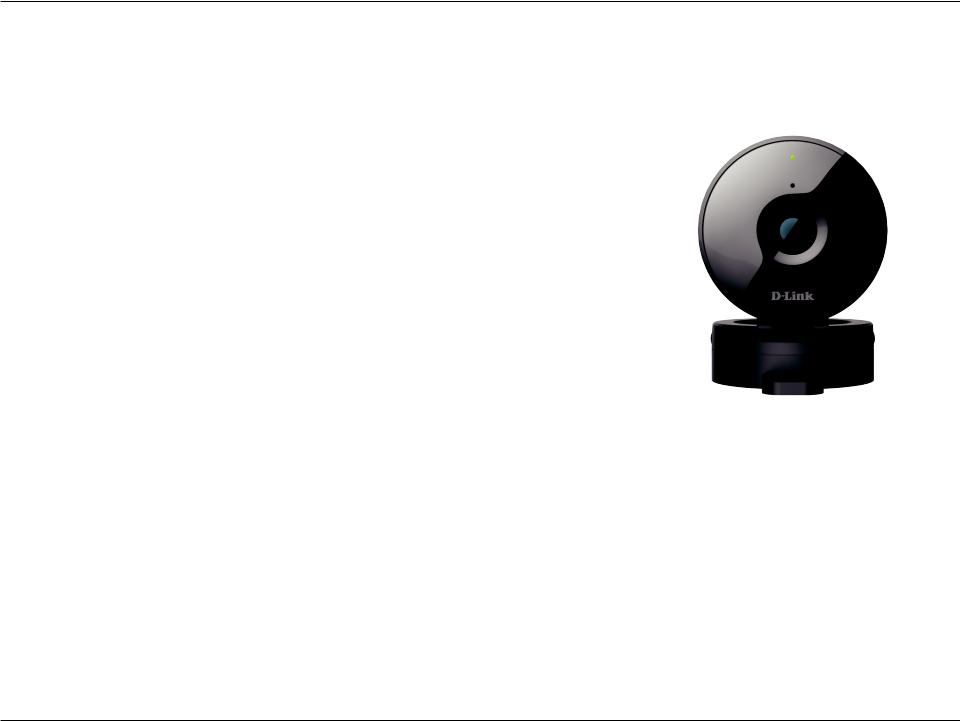
The DCS-936L HD Wi-Fi Camera boasts a wide angle lens that easily captures a large area in high-quality 720p. Its rotatable head makes ceiling installations easy, and the built-in night vision, motion detection, and handy mobile app empower you with knowing exactly what is happening, day or night.
Features
Wide Angle Lens
The DCS-936L provides large area coverage with a wide angle lens, eliminating the need for multiple cameras to cover a single room.
720p HD Video
The 720p HD sensor provides crisp detail and clarity for high-quality snapshots and video.
Comprehensive Day/Night Surveillance
The built-in infrared LEDs enable night time viewing of up to 16 feet (5 meters), giving you all-day surveillance. The microSD card slot allows the camera to record snapshots and video directly to onboard storage for a complete surveillance solution.
Wireless N
The DCS-936L uses high-speed Wireless N to connect to your wireless router, and is backwards compatible with 802.11g.
Web Configuration
Using a standard web browser, you can configure and manage the DCS-936L through the mydlink website, so you can access your DCS-936L anytime, anywhere in the world.
Broad Range of Applications
With today’s high-speed Internet services, the Network Camera can provide the ideal solution for delivering live video images over the Intranet and Internet for remote monitoring. The Network Camera allows remote access using a Web browser for live image viewing, and allows the administrator to manage and control the Network Camera anytime, anywhere in the world. Many applications exist, including industrial and public monitoring of homes, offices, banks, hospitals, child-care centers, and amusement parks.
D-Link DCS-936L User Manual |
5 |
Section 1 - Product Overview
|
|
|
|
|
|
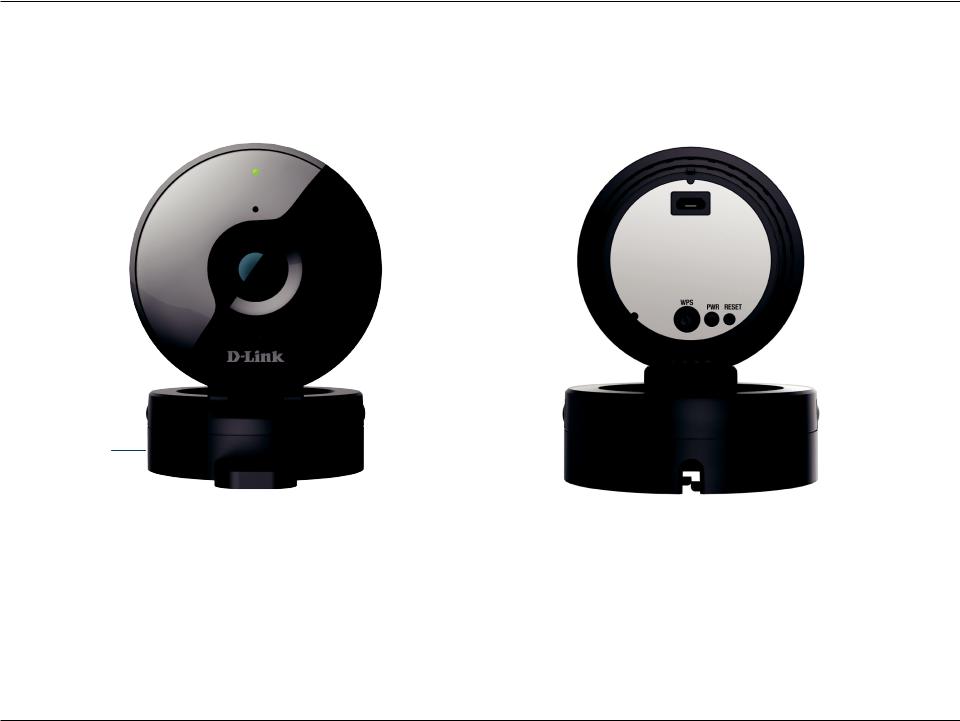
Hardware Overview |
|||||||
|
|
Front View |
|
|
Back View |
||||||||
Wireless Signal |
|
|
|
|
|
|
|
|
|||||
Strength LED |
|
|
|
|
|
|
|
|
|
|
|||
|
|
|
|
|
|
|
|
|
|||||
Microphone |
|
|
|
|
|
|
|
|
|
|
|
||
|
|
|
|
|
|
|
|
|
|
|
|
||
|
|
|
|
|
|
|
|
|
|
||||
Camera Lens |
|
|
|
|
|
|
IR LEDs |
|
|||||
|
|
|
|
|
|
|
|||||||
|
|
|
|
|
|
||||||||
|
|
|
|
|
|
|
|
(behind cover) |
|||||
Light Sensor |
|
|
|
|
|
|
|
|
|
|
|||
|
|
|
|
|
|
|
|
|
|
|
|
|
|
|
|
|
|
|
|
|
|
|
|
|
|
||
|
|
|
|
|
|
|
|
|
|
|
|
||
|
|
|
|
|
|
|
|
|
|||||
|
|
|
|
|
|
|
|
|
|
|
|
|
|
|
|
|
|
|
|
|
|
|
|
|
|
|
|
Camera Stand
Micro USB Port (for power)
microSD Card Slot (on side)
Reset Button
Power LED
WPS Button
D-Link DCS-936L User Manual |
6 |

Section 2 - Installation
Installation
There are two ways to set up your camera:
mydlink Lite Mobile App: You can use the mydlink Lite mobile app to guide you through setup and initial configuration of your camera. Refer to Mobile App Setup on page 9.
Zero Configuration Setup: If you have a mydlink-enabled router (D-Link Cloud Router), this is the easiest way to set up your camera. Refer to Zero Configuration Setup on page 10.
D-Link DCS-936L User Manual |
7 |

Section 2 - Installation
Wireless Installation Considerations
The DCS-936L lets you access your network using a wireless connection from anywhere within the operating range of your wireless network. However, the number, thickness and location of walls, ceilings, or other objects that the wireless signals must pass through, may limit the range. Typical ranges vary depending on the types of materials and background RF (radio frequency) noise in your home or business. The key to maximizing wireless range is to follow these basic guidelines:
1.Minimize the number of walls and ceilings between your adapter and other network devices (such as your Network Camera) - each wall or ceiling can reduce your adapter’s range from 3-90 feet (1-30 meters).
2.Be aware of the direct line between network devices. A wall that is 1.5 feet thick (.5 meters), at a 45-degree angle appears to be almost 3 feet (1 meter) thick. At a 2-degree angle, it looks over 42 feet (14 meters) thick. Position your devices so that the signal will travel straight through a wall or ceiling (instead of at an angle) for better reception.
3.Building Materials make a difference. A solid metal door or aluminum studs may weaken the wireless signal. Try to position your access points, wireless routers, and other networking devices where the signal passes through drywall or open doorways. Materials and objects such as glass, steel, metal, walls with insulation, water (fish tanks), mirrors, file cabinets, brick, and concrete will degrade your wireless signal.
4.Keep your product at least 3-6 feet or 1-2 meters away from electrical devices or appliances that generate RF noise.
5.If you are using 2.4 GHz cordless phones or other radio frequency sources (such as microwave ovens), your wireless connection may degrade dramatically or drop completely. Make sure your 2.4 GHz phone base is as far away from your wireless devices as possible. The base transmits a signal even if the phone in not in use.
D-Link DCS-936L User Manual |
8 |

Section 2 - Installation
Mobile App Setup
You can configure your camera through the mydlink Lite mobile app. On your mobile device, download mydlink Lite by searching for mydlink Lite in the iTunes App Store, Google Play, or the Windows Store.
Launch the mydlink Lite app and create a new account or sign in to your existing account. Follow the onscreen instructions to set up your camera.
When you are asked to scan a QR code, use the code on the Quick Install Card in your package, or on the label attached to your device.
Congratulations, your DCS-936L is now ready to use! Be sure to check the mydlink.com website periodically for the latest firmware updates to keep your product secure and up to date with the latest features.
D-Link DCS-936L User Manual |
9 |
Section 2 - Installation
Zero Configuration Setup
If you have a mydlink-enabled Cloud Router, you can take advantage of Zero Configuration Setup. Zero Configuration automatically configures your camera’s settings for you, and adds the camera to your mydlink account automatically. This type of setup allows you to set up your camera by simply plugging it in and connecting it to your router.
Connect your camera to your mydlink-enabled Cloud Router and Zero Configuration will automatically configure your DCS-936L and add the camera to your mydlink account. After the short time it takes to do this you can remotely access your camera from the website (http://www.mydlink.com) to manage and monitor your DCS-936L.
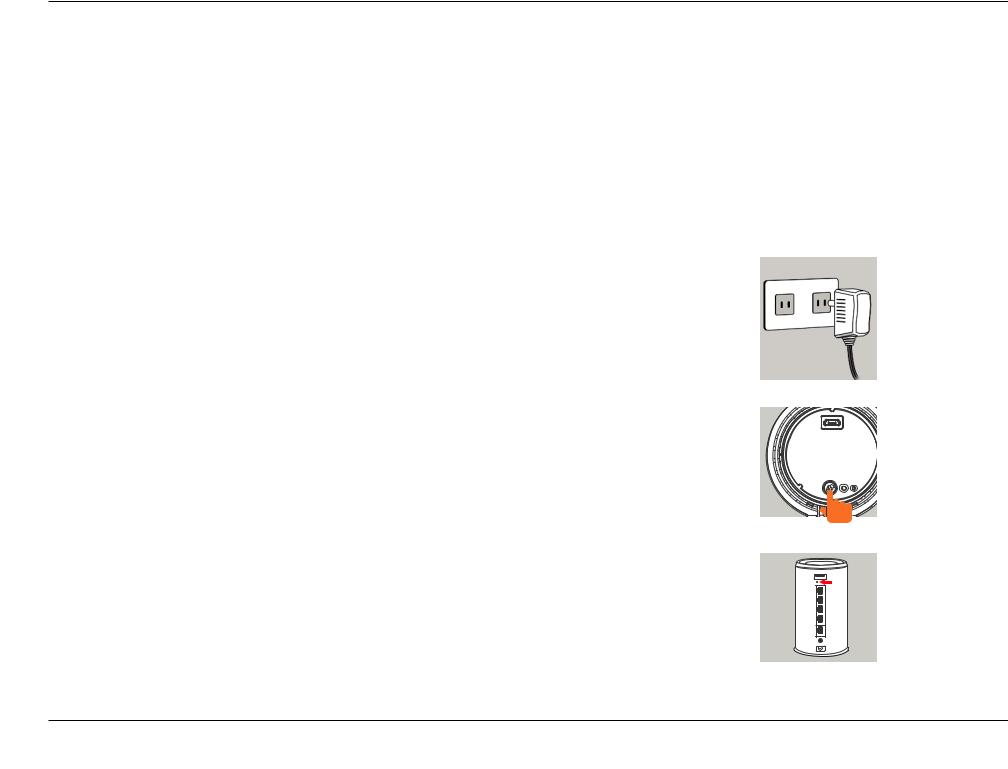
Plug in the External Power Adapter
Connect the power adapter to the microUSB port on the back of the camera. Plug the power adapter in to a wall outlet.
Press the WPS button on your camera
Press and hold theWPS button for three seconds.The blueWPS status LED will start blinking.
Press the WPS button on your Cloud Router
Press the WPS button on your router within 60 seconds. The WPS button is usually on the side or back of your Cloud Router. The DCS-936L will automatically create a secure wireless connection to your router and reboot. When it has successfully connected, the Power LED will be lit green.
D-Link DCS-936L User Manual |
10 |
Section 2 - Installation
Check Your mydlink Account
From any computer with an Internet connection, open a web browser and login to your mydlink account. The mydlink page will check for new devices and display a New device Found! pop-up notification in the bottom-left corner. Click the notification to continue.
DCS-936L
A summary and confirmation notification will appear with the automatically configured details. Make a note of the details and click Yes to add the camera to your account.
DCS-936L
D-Link DCS-936L User Manual |
11 |
Section 2 - Installation
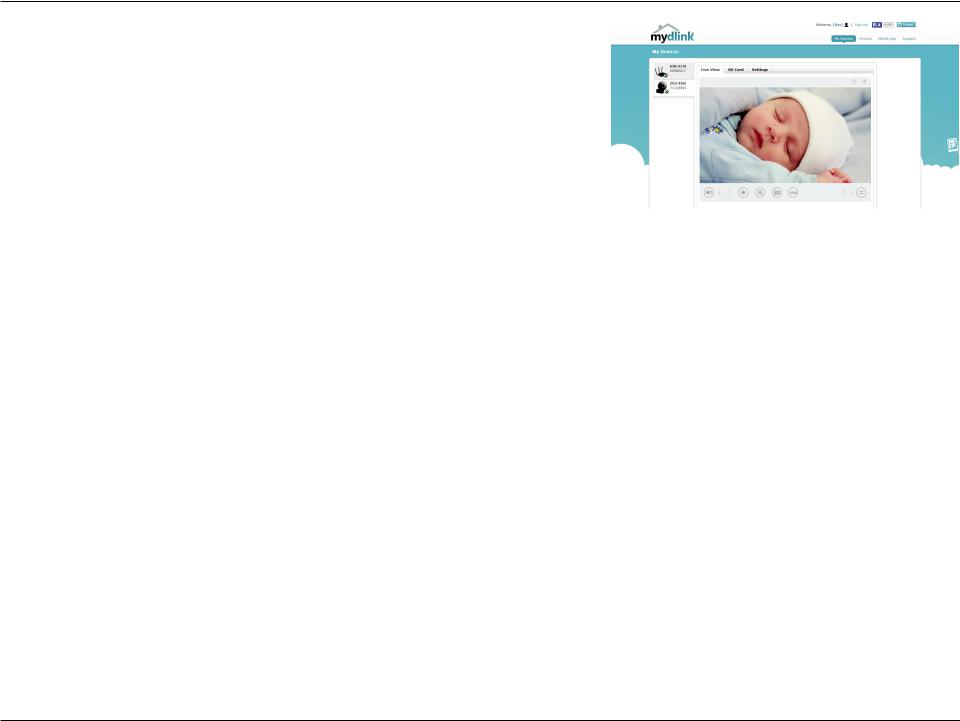
Zero Configuration will navigate to the mydlink Live View tab for your camera where you will see a screen similar to the following.
Your camera is now set up, and you can skip to mydlink on page 16 to learn more about the mydlink features of this camera, or to Configuration on page 17 for advanced configuration of your camera.
Note: If you see a white haze when viewing in night vision mode, the night vision light on the camera may be reflecting off a nearby surface.Try repositioning and aiming the camera.
D-Link DCS-936L User Manual |
12 |
Section 2 - Installation
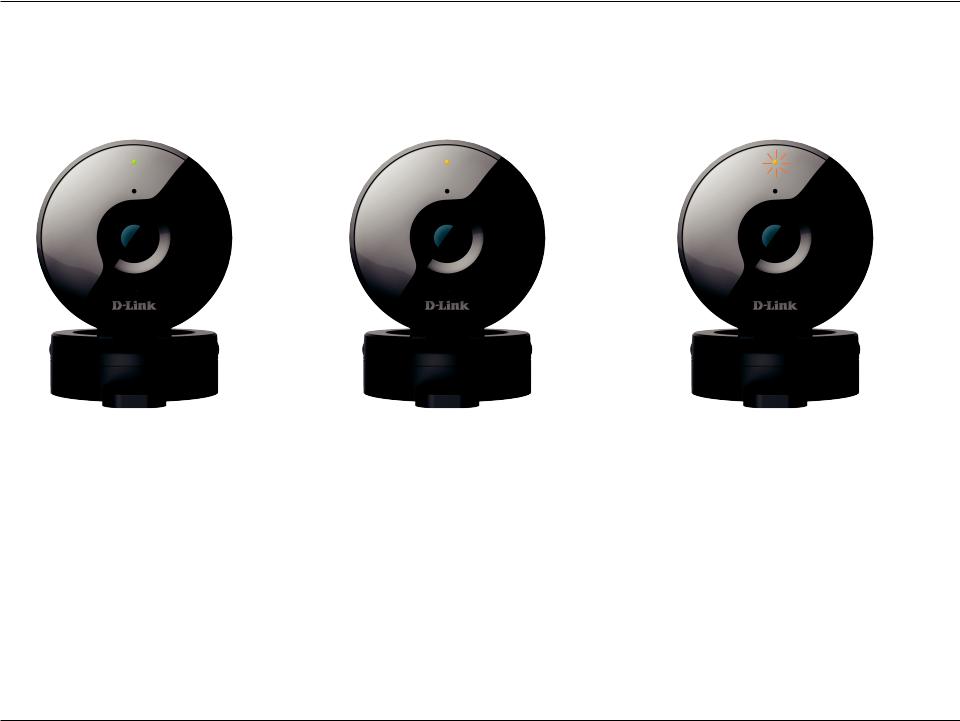
Placing Your Camera
When placing your camera, you can use the wireless signal strength LED on the front of your camera to see whether your camera has a strong wireless connection to your router.
Solid Green: |
Solid Orange: |
Flashing Orange: |
Strong wireless connection |
Fair wireless connection |
Weak wireless connection |
If the wireless signal strength LED is flashing orange, try moving the camera to a location closer to your router, or you can try purchasing a wireless extender to extend the range of your wireless network.
D-Link DCS-936L User Manual |
13 |

Section 2 - Installation
Mounting the Camera
To mount your camera on a wall or ceiling, please follow the steps below. It is recommended that you configure the camera before mounting.
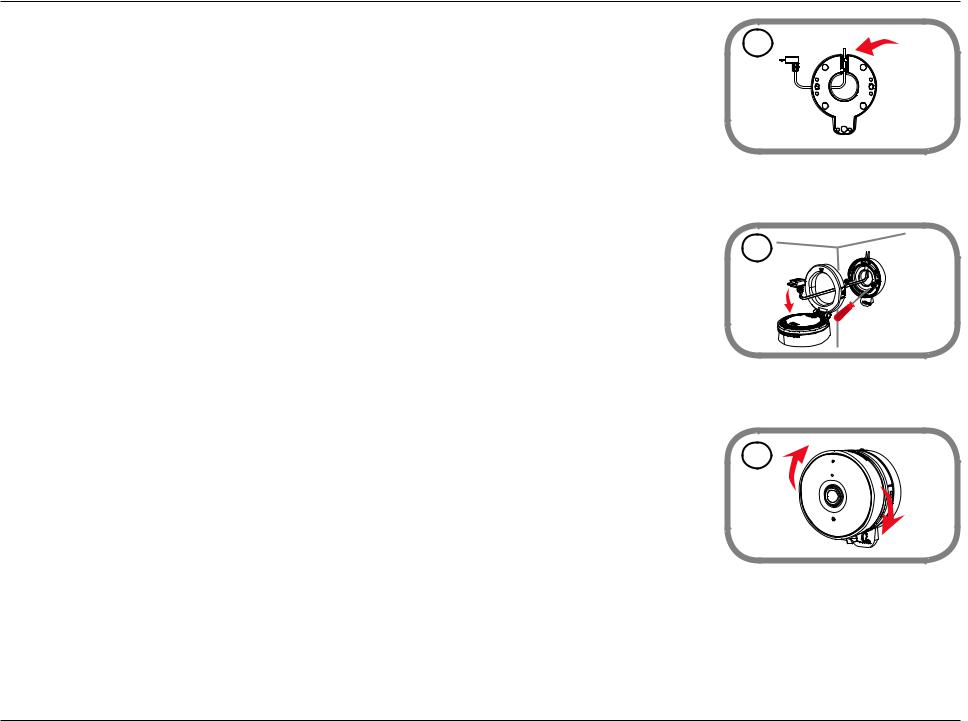
Step 1
Hold the base of the camera with one hand placing your thumb on the tab, then press down on the release 1 buttons with your other hand and pull the camera from the camera base.
Step 2 |
2 |
Place the camera base where you want to position the camera and use a pencil to mark the holes. Make sure |
that the cable channel on the camera base is facing in the direction you want.
Step 3
Depending on the material of the wall or ceiling, use proper tools to drill two holes 25 mm deep with a 3 6 mm drill bit where you marked. If the wall is made out of concrete, drill the holes first, then insert the plastic anchors to support the screws.
D-Link DCS-936L User Manual |
14 |
Section 2 - Installation
Step 4 |
4 |
Pull the power cable through the middle of the camera base and through the cable channel as shown. |
Step 5
Place the camera base over the holes that are in the wall and use the supplied screws to attach the camera 5 base to the surface of the wall. Plug in the microUSB power cable to the camera.
Step 6
Attach the camera to the camera base and pull the power cable to remove the extra cable. Adjust the angle 6 of the camera as desired.
D-Link DCS-936L User Manual |
15 |
Section 2 - Installation
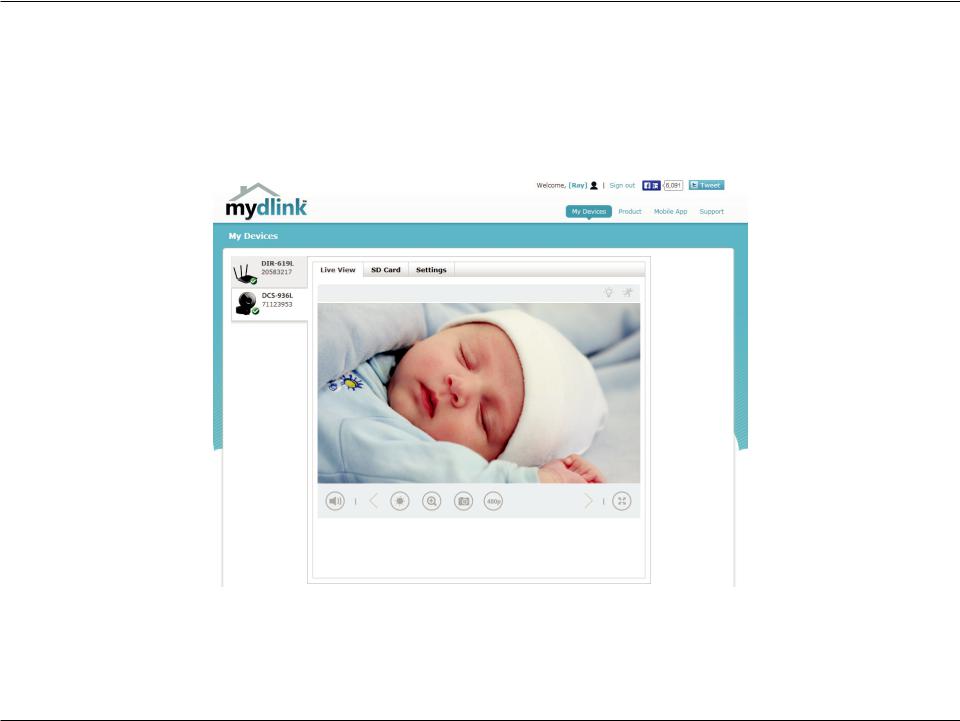
mydlink
After registering your camera with a mydlink account, you will be able to remotely access your camera from the www.mydlink.com website. After signing in to your mydlink account, you will see a screen similar to the following:
For more details on using your camera with mydlink, go to the Support section of the mydlink website and check the User Manual section for your product to find the latest instruction guide for your camera’s mydlink features.
D-Link DCS-936L User Manual |
16 |
Section 3 - Configuration
Configuration
Accessing the Web Configuration Utility
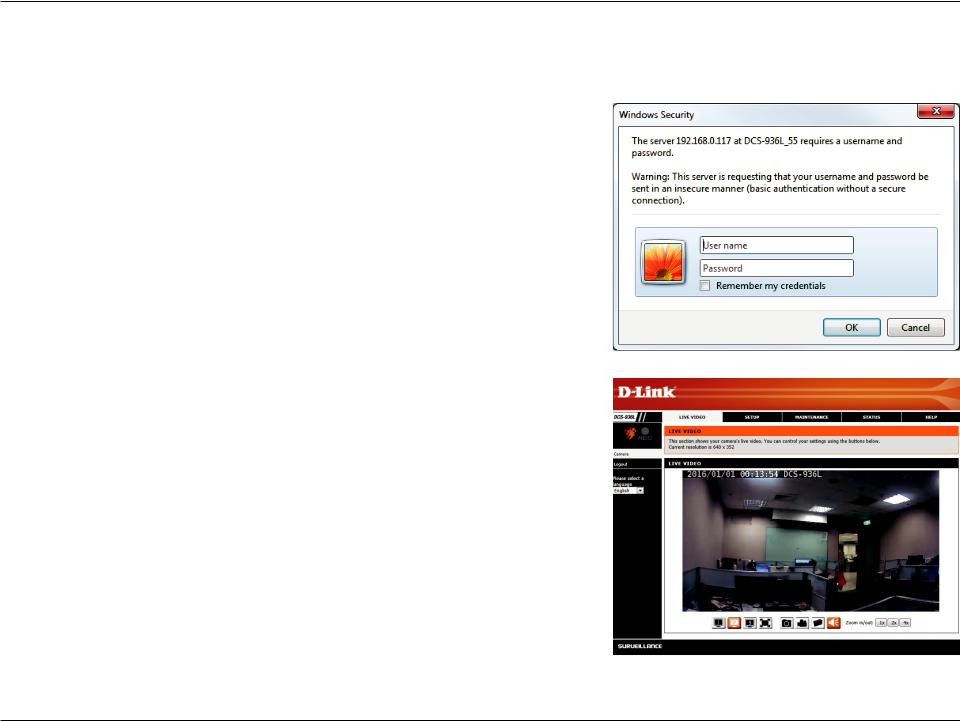
After completing setup through the mydlink Lite mobile app or Zero Configuration Setup, you are ready to use your camera. The camera’s built-in Web configuration utility is designed to allow you to easily access and configure your DCS-936L.
To access your camera’s configuration utility, use a web browser to log in to the mydlink.com website, select your camera from your device list, then click on the Settings tab for your camera.
Use the User name admin and the password you created during the setup process. If you did not create a password, the default password is blank. After entering your password, click OK.
Note: If you are directly connecting your PC to the camera, or if you are using the camera on a closed network, the default IP is 192.168.0.20.
After logging in to your camera, the Live Video page will open.
D-Link DCS-936L User Manual |
17 |

Section 3 - Configuration
Live Video
The Live Video page lets you view the live video stream from your camera. You can also switch between video streams, take snapshots, and record video to your hard drive from this page.
D-Link DCS-936L User Manual |
18 |
Section 3 - Configuration
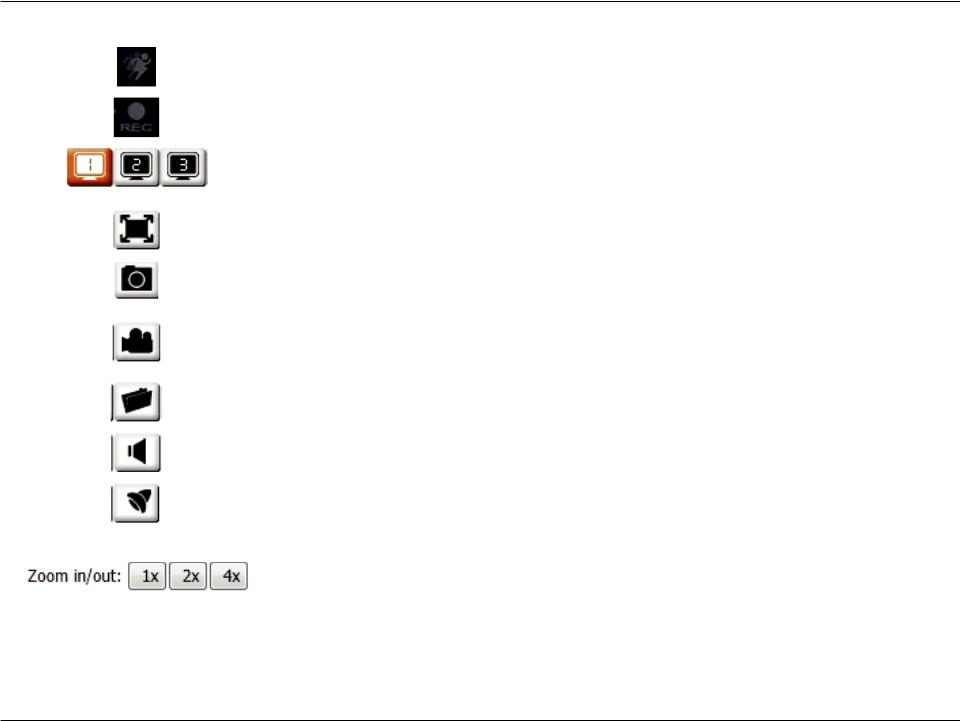
Icon |
Button Name |
Function |
|
Event Trigger Indicator |
This indicator will change color when a trigger event occurs, |
|
|
such as when motion or sound is detected. |
|
|
|
|
Recording Indicator |
When a recording is in progress, this indicator will change |
|
|
color. |
|
|
|
|
Profile buttons |
Use these buttons to switch between video profiles. Refer |
|
|
to Audio and Video on page 33 for more information on |
|
|
setting up profiles. |
|
Full Screen button |
Switches to a full screen view of the camera video. |
|
|
|
|
Snapshot button |
Takes a snapshot of the image currently displayed on the |
|
|
screen and saves it to the hard drive in the folder specified |
|
|
using the Storage folder button. |
|
Video recording button |
Triggers the camera’s recording function. This will record the |
|
|
video displayed on the screen and saves it to the hard drive in |
|
|
the folder specified using the Storage folder button. |
|
Storage folder button |
Sets the storage folder for snapshots and video recordings. |
|
|
|
|
Listen button |
Sends the audio received from the camera’s microphone |
|
|
through to the PC’s speakers. |
|
|
|
|
IR LED On/Off button |
Turns the Infrared lights on or off. |
|
|
(The icon only appears when you activate the manual IR |
|
|
option. Refer to Day/Night Mode in Audio and Video on |
|
|
page 33 for more.) |
|
Zoom buttons |
Zooms in or out of the picture. |
|
|
|
v |
|
|
D-Link DCS-936L User Manual |
19 |
Section 3 - Configuration
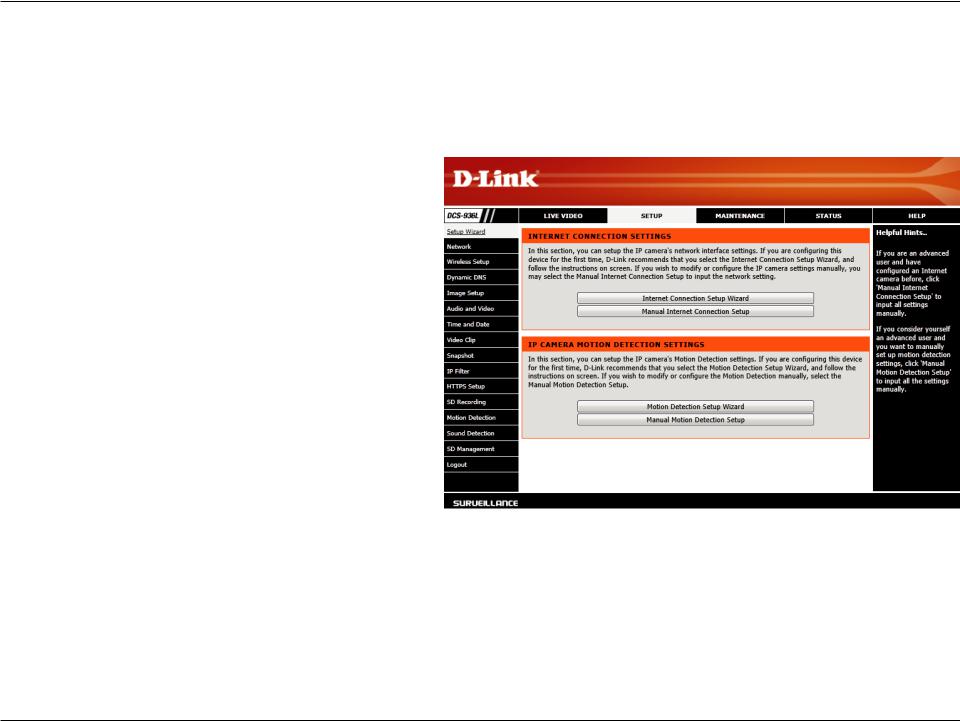
Setup
Wizard
This section allows you to begin setup wizards which will guide you through the process of getting your camera’s various functions configured. If you comfortable with adjusting the settings manually, you may skip the wizards and adjust settings manually as needed.
Internet You may choose to configure your network by
Connection using the Internet Connection Setup Wizard
Setup Wizard: that includes step-by-step instructions.
Please refer to Internet Connection Setup
Wizard on page 21 for more details.
Manual If you would rather manually set up the
Internet camera Internet connection, you can refer to
Connection Network on page 28 which provides more
Setup: details on the information required.
Motion You may choose to configure motion Detection detection by using the Motion Detection Setup Wizard: Setup Wizard that includes step-by-step instructions.PleaserefertoMotionDetection
Setup Wizard on page 24 for more details.
Manual Motion If you would rather manually set up the Detection camera’s motion detection features, you Setup: can refer to Motion Detection on page 42 which provides more details on the
information required.
D-Link DCS-936L User Manual |
20 |
Section 3 - Configuration
Internet Connection Setup Wizard
This wizard will guide you through a step-by-step process to configure your new D-Link Camera and connect the camera to the Internet.
Click Next to continue.
Select how the camera will connect to the Internet.
If you are unsure how your camera will connect to the Internet, select Automatic IP Address.
If your ISP has assigned you a static IP, select Static IP Address and enter the information provided by your ISP or network administrator.
D-Link DCS-936L User Manual |
21 |
Section 3 - Configuration
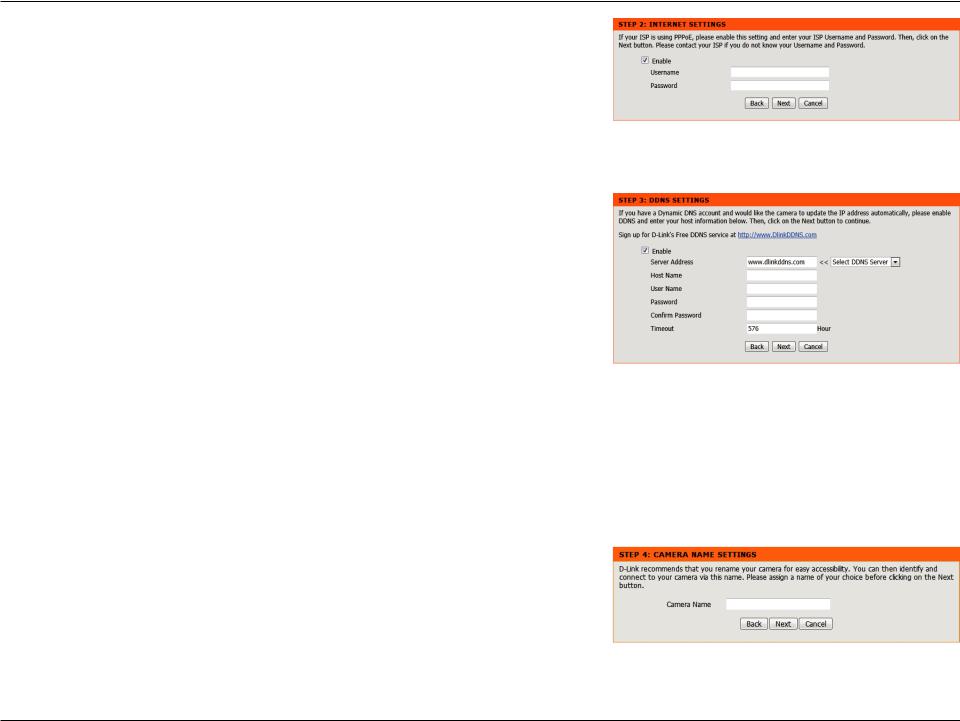
If you are required to connect using PPPoE, select Enabled and enter the Username and Password for your PPPoE connection.
A Dynamic DNS account allows you to access your camera over the Internet when you have an IP address that changes each time you connect to the Internet. If you have a Dynamic DNS account, click Enable and enter the following details:
Server Address: Select your Dynamic DNS Server from the pull down menu.
Host Name: Enter the host name of the DDNS server.
User Name: Enter your username or e-mail address used to connect to the DDNS.
Password: Enter your password used to connect to the DDNS server.
Timeout: You can setup how often the camera notifies the DDNS server of its current global IP address by entering a whole number in hours.
Click Next to continue.
Enter a name for your camera. Click Next to continue.
D-Link DCS-936L User Manual |
22 |
Loading...