


Quick Installation Guide
12X Speed Dome Network Camera
This document will guide you through the basic installation process for your new D-Link Network Camera.
DCS-6616
Quick Installation Guide
Installationsanleitung
Guide d’installation
Guía de instalación
Guida di Installazione
Documentation also available on CD and via the D-Link Website

DCS-6616 Quick Install Guide
This installation guide provides basic instructions for installing the DCS-6616 Network Camera on your network. For additional information about how to use the camera, please see the User’s Manual which is available on the CD included in this package or from the D-Link support website.
Installation Steps
1.Verify the package contents against the list below.
2.Hardware Overview
3.Hardware Installation
4.Configuration with Wizard
1. Package Contents
DCS-6616 Network Camera
Manual and Software on CD-ROMQuick Install Guide
Power Adapter
AV & Power Cables
Mounting Bracket and Screws
If any of the above items are missing, please contact your reseller.
Safety Notice:
Installation and servicing should be done by certified technicians so as to conform to all local codes and prevent voiding your warranty.
ENGLISH
D-Link DCS-6616 Quick Install Guide |
1 |
|
|
ENGLISH
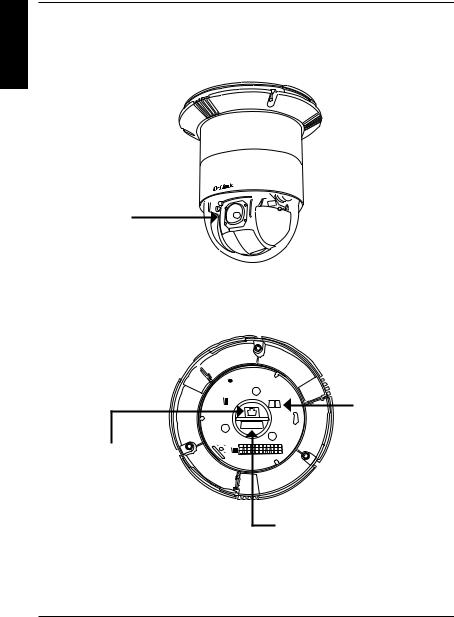
2. Hardware Overview
Camera Lens
Motorized varifocal autofocus lens
Ethernet 10/100
RJ45 Socket
Reset Button
Press and hold the reset button for approximately 10 seconds to reset to factory default settings
Cable Connector Socket
2 |
D-Link DCS-6616 Quick Install Guide |
|
|
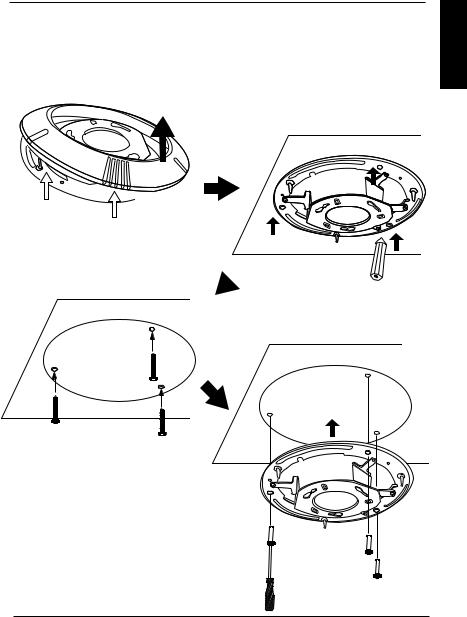
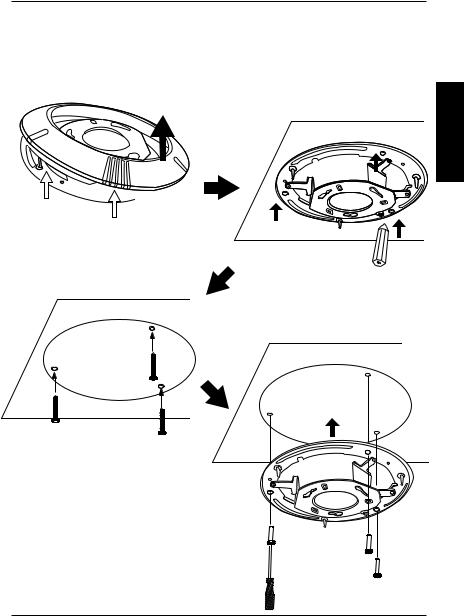
3. Mounting Instructions
Detach the Decoration Ring from the Hard Ceiling Mount Bracket.
 Align the three holes on the Mount Bracket, mark the screws locations on the ceiling
Drill three pilot holes into the ceilling and hammer the plastic anchors into the holes
ENGLISH
Fix the Mount Bracket with three screws
D-Link DCS-6616 Quick Install Guide |
3 |
|
|

ENGLISH
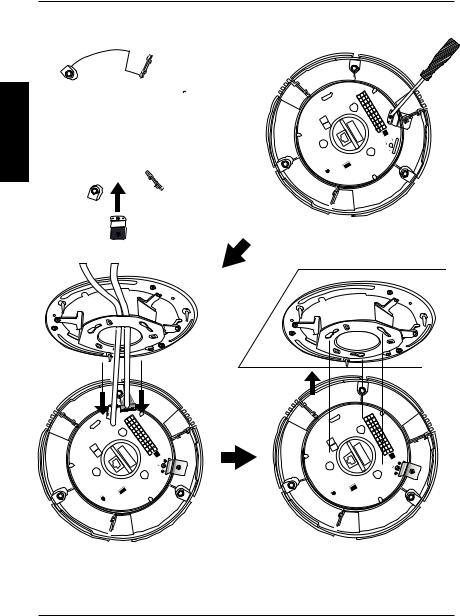
Insert the fixing plate into the groove as shown below
Align the three holes to screw the fixing plate to the dome bas
B |
A
Connect the cable connector and Ethernet cable to the dome base
Align plate A and plate B, then use those three hole to hook the Network Camera on the ceiling mount bracket
4 |
D-Link DCS-6616 Quick Install Guide |
|
|

Tighten the screw on the fixing plat
Align the three holes to mount the decoration ring.
D-Link DCS-6616 Quick Install Guide
ENGLISH
5
ENGLISH
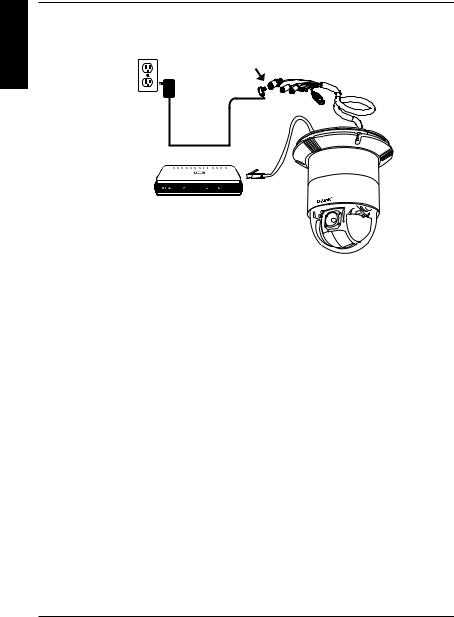
General Connection Using 12 V DC Power Adapter
1.Connect the network camera to a hub via an Ethernet cable.
2.Connect the supplied power cable from the camera to a power outlet.
6 |
D-Link DCS-6616 Quick Install Guide |
|
|

4. Configuration with Wizard
Insert the DCS-6616 CD into your computer's CD-ROM drive to begin the installation. If the Autorun function on your computer is disabled, or if the D-Link Launcher fails to start automatically, click Start > Run. Type D:\autorun.exe, where D: represents the drive letter of your CD-ROM drive.
Click Setup Wizard to begin the installation.
After clicking Setuop Wizard, the following window will open.
Click Next to continue.
Click Yes to accept the License Agreement. 
To start the installation process, click Next.
Note: The installation may take several minutes to finish.
Click Finish to complete the installation.
D-Link DCS-6616 Quick Install Guide
ENGLISH
7
ENGLISH
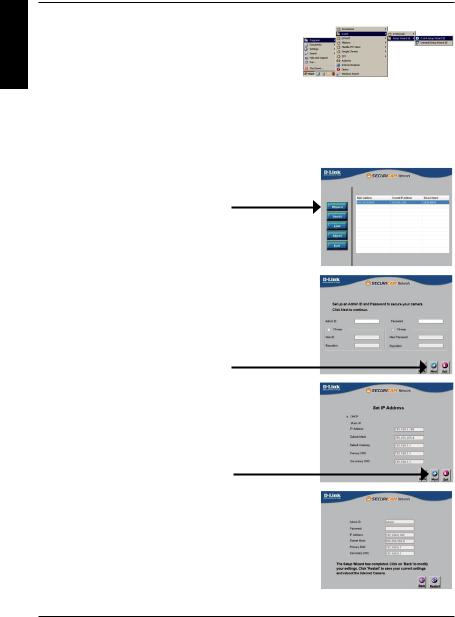
Click on the D-Link Setup Wizard SE icon that was created in your Windows Start menu.
Start > D-Link > Setup Wizard SE
The Setup Wizard will appear and display the MAC address and IP address of your camera(s). If you have a DHCP server on your network, a valid IP Address will be displayed. If your network does not use a DHCP server, the network camera's default static IP 192.168.0.20 will be displayed.
Click the Wizard button to continue.
Enter the Admin ID and password. When logging in for the first time, the default Admin ID is admin with the password left blank.
Click Next, to proceed to the next page.
Select DHCP if your camera obtains an IP address automatically when it boots up. Select static IP if the camera will use the same IP address each time it is started.
Click Next, to proceed to the next page.
Take a moment to confirm your settings and click Restart. 
8 |
D-Link DCS-6616 Quick Install Guide |
|
|
Viewing Camera via Web Browser
Click on the D-Link Setup Wizard SE icon that was created in your Windows Start menu.
Start > D-Link > Setup Wizard SE
Select the camera and click the button labeled "Link" to access the web configuration.
The Setup Wizard will automatically open your web browser to the IP address of the camera.
Enter admin as the default username and leave the password blank. Click OK to continue.
This section shows your camera’s live video. You can select your video profile and view or operate the camera. For additional information about web configuration, please refer to the user manual included on the CD-ROM or the D-Link website.
ENGLISH
D-Link DCS-6616 Quick Install Guide |
9 |
|
|

ENGLISH
TECHNICAL SUPPORT
United Kingdom (Mon-Fri) website: http://www.dlink.co.uk FTP: ftp://ftp.dlink.co.uk Home Wireless/Broadband 0871 873 3000 (9.00am–06.00pm, Sat 10.00am-02.00pm) Managed, Smart, & Wireless Switches, or Firewalls 0871 873 0909 (09.00am05.30pm) (BT 10ppm, other carriers may vary.)
Ireland (Mon-Fri)
All Products 1890 886 899 (09.00am-06.00pm, Sat 10.00am-02.00pm)
Phone rates: €0.05ppm peak, €0.045ppm off peak times
10 |
D-Link DCS-6616 Quick Install Guide |
|
|

DCS-6616 Installationsanleitung
Diese Installationsanleitung bietet Ihnen grundlegende Anleitungen zur Installation der DCS-6616 Netzwerkkamera in Ihrem Netzwerk. Zusätzliche Informationen zur Verwendung der Kamera finden Sie im Benutzerhandbuch, das Ihnen auf der CD, die diesem Paket beiliegt, oder über die D-Link Support-Website zur Verfügung steht.
Installationsschritte
1.Prüfen Sie den Packungsinhalt, ob er mit den auf der Liste unten aufgeführten Artikeln übereinstimmt.
2.Hardware-Überblick
3.Hardware-Installation
4.Konfiguration mithilfe des Assistenten
1. Packungsinhalt
DCS-6616 Netzwerkkamera
CD-ROM mit Software und HandbuchInstallationsanleitung
Stromadapter/Netzteil
AV- & Stromkabel
Befestigungsklammern und Schrauben
Sollte einer der oben aufgeführten Artikel fehlen, wenden Sie sich bitte an Ihren Fachhändler.
Sicherheitshinweis:
Installation und Wartungsarbeiten sollten nur von zertifizierten Technikern vorgenommen werden, zu jeder Zeit allen örtlich geltenden Richtlinien und Anforderungen entsprechen sowie verhindern, dass Ihr Garantieanspruch erlischt.
DEUTSCH
D-Link DCS-6616 Quick Install Guide |
11 |
|
|

2. Hardware-Überblick
DEUTSCH
Kameraobjektiv
Motorisiertes
Autofokus-
Gleitsichtobjektiv
Ethernet 10/100
RJ45 Anschluss
Rücksetztaste  (Reset)
Drücken und halten Sie diese Taste etwa 10 Sekunden
lang gedrückt, um die werkseitigen Standardeinstellungen wiederherzustellen.
Kabelanschlussbuchse
12 |
D-Link DCS-6616 Quick Install Guide |
|
|
3. Montageanleitung
Nehmen Sie den Zierring von der
Deckenhalterung.
DEUTSCH
Richten Sie die drei Löcher an der Deckenhalterung aus und kennzeichnen Sie die Stellen für die Befestigungsschrauben an der Wand
Bohren Sie drei Führungslöcher in die Decke und drücken Sie die Plastikdübel in diese Löcher ein
Befestigen Sie die Deckenhalterung mithilfe der drei Schrauben
D-Link DCS-6616 Quick Install Guide |
13 |
|
|
Setzen Sie die Befestigungsplatte, wie unten zu sehen, in die Nut ein
DEUTSCH

Richten Sie die drei Löcher zum Festschrauben der Platte am Dome-Sockel aus
B |
Schließen Sie den Kabelanschlussstecker und das Ethernet-Kabel an den Dome-Sockel an
A
Richten Sie Platte A und B aus und hängen Sie die Netzwerkkamera an der Deckenmontagehalterung in jenen drei Löchern ein
14 |
D-Link DCS-6616 Quick Install Guide |
|
|

Ziehen Sie die Schrauben an der
Befestigungsplatte an
DEUTSCH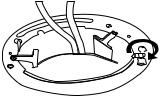
Richten Sie die drei Löcher zur Anbringung des
Zierrings entsprechend aus.
D-Link DCS-6616 Quick Install Guide |
15 |
|
|
 Loading...