


DCS-3716

Documentation also available
on CD and via the D-Link
Website
Quick Installation Guide
Installations-Anleitung
Guide d’installation
Guía de instalación
Guida di Installazione
This document will guide you through the basic installation
process for your new D-Link Network Camera.
DCS-3716
Quick Installation Guide
Full HD Day & Night WDR Network Camera

D-Link DCS-3716 Quick Install Guide
2
ENGLISH
DCS-3716 Quick Install Guide
This installation guide provides basic instructions for installing the DCS-3716 Network
Camera on your network. For additional information about how to use the camera,
please see the User’s Manual which is available on the CD include in this package or
from the D-Link support website.
Installation Steps
1. Verify the package contents against the list below.
2. Hardware Overview
3. Hardware Installation
4. Conguration with Wizard
5. Adjust the Zoom/Focus
1. Package Contents
DCS-3716 Network Camera
Camera Stand
Manual and Software on CD-ROM
CAT5 Ethernet Cable
Power Adapter
Quick Install Guide
C-CS Mount Adapter (5mm Ring)
If any of the above items are missing, please contact your reseller.
D-Link DCS-3716 Quick Install Guide
3
ENGLISH
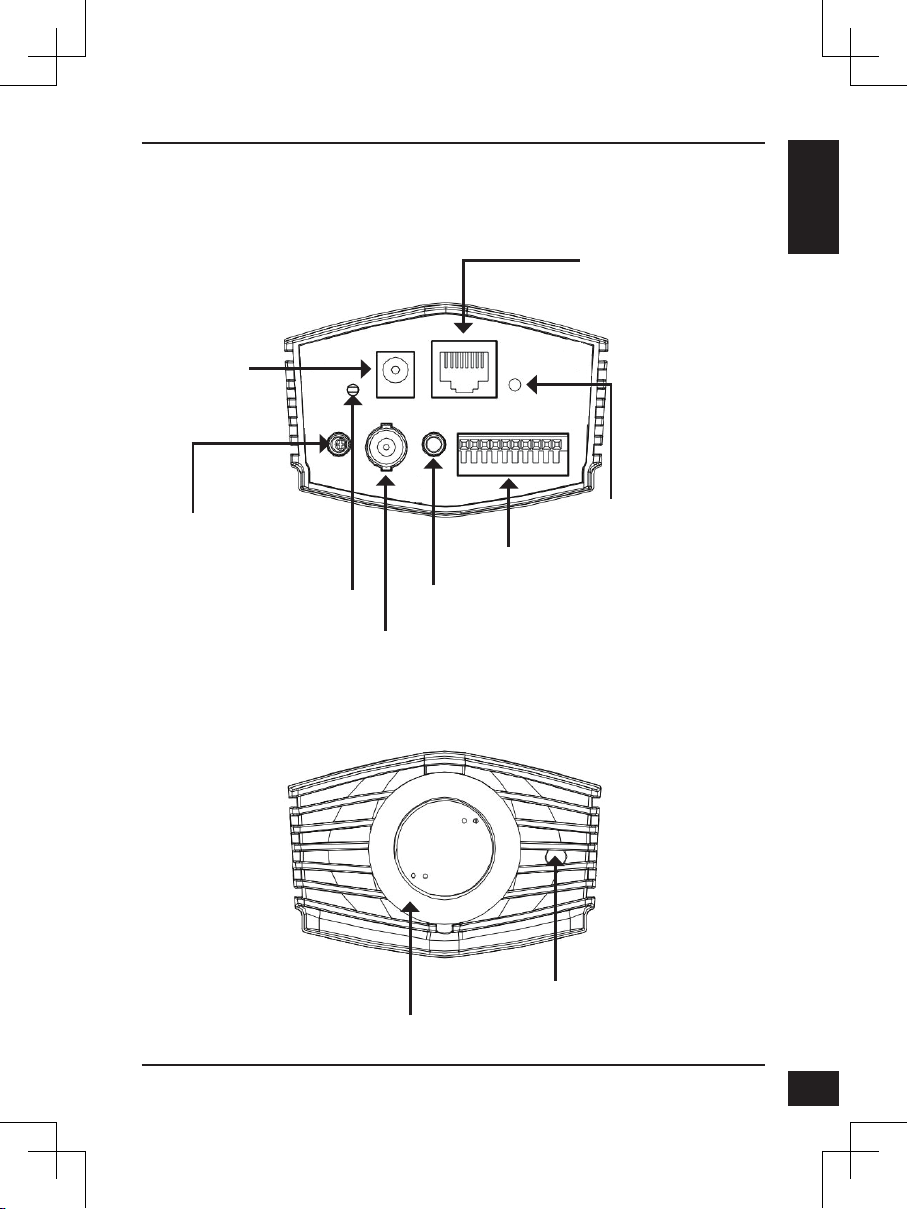
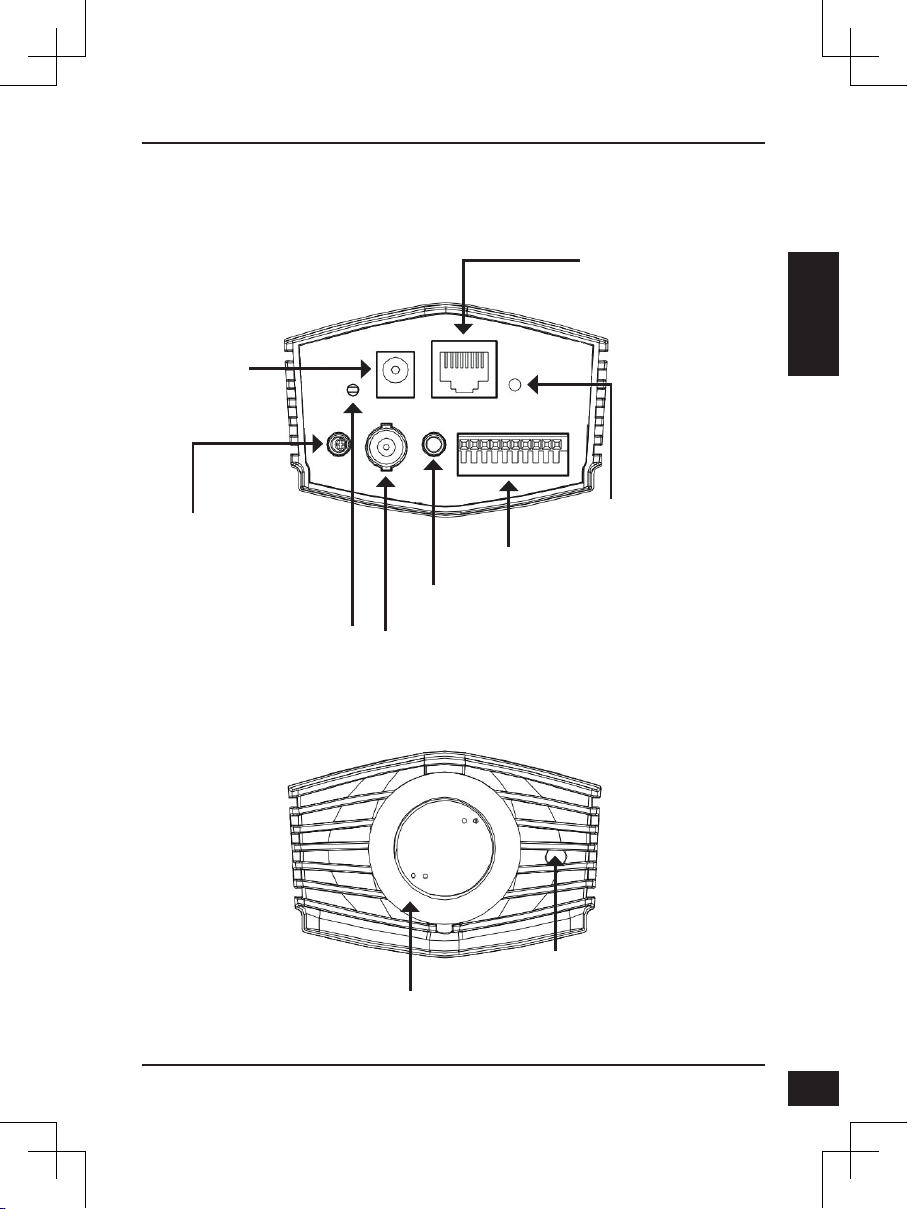
2. Hardware Overview
LED
Power and network indicator
I/O Connector
I/O connectors for external devices
BNC
Analog video output
Reset
Press and hold this button for
5 seconds to reset the camera
Audio In
Audio input connector for a
microphone
DC Power
12V DC
Audio Out
Audio output for external speakers.
Ethernet (PoE)
RJ-45 connector for Ethernet
which can also be used to power
the camera using PoE
Lens Connector
Connect to a CS mount
ICR Sensor
The IR-Cut Removable sensor judges
lighting conditions and switches from
color to infrared accordingly
Rear Panel
Front Panel
D-Link DCS-3716 Quick Install Guide
4
ENGLISH
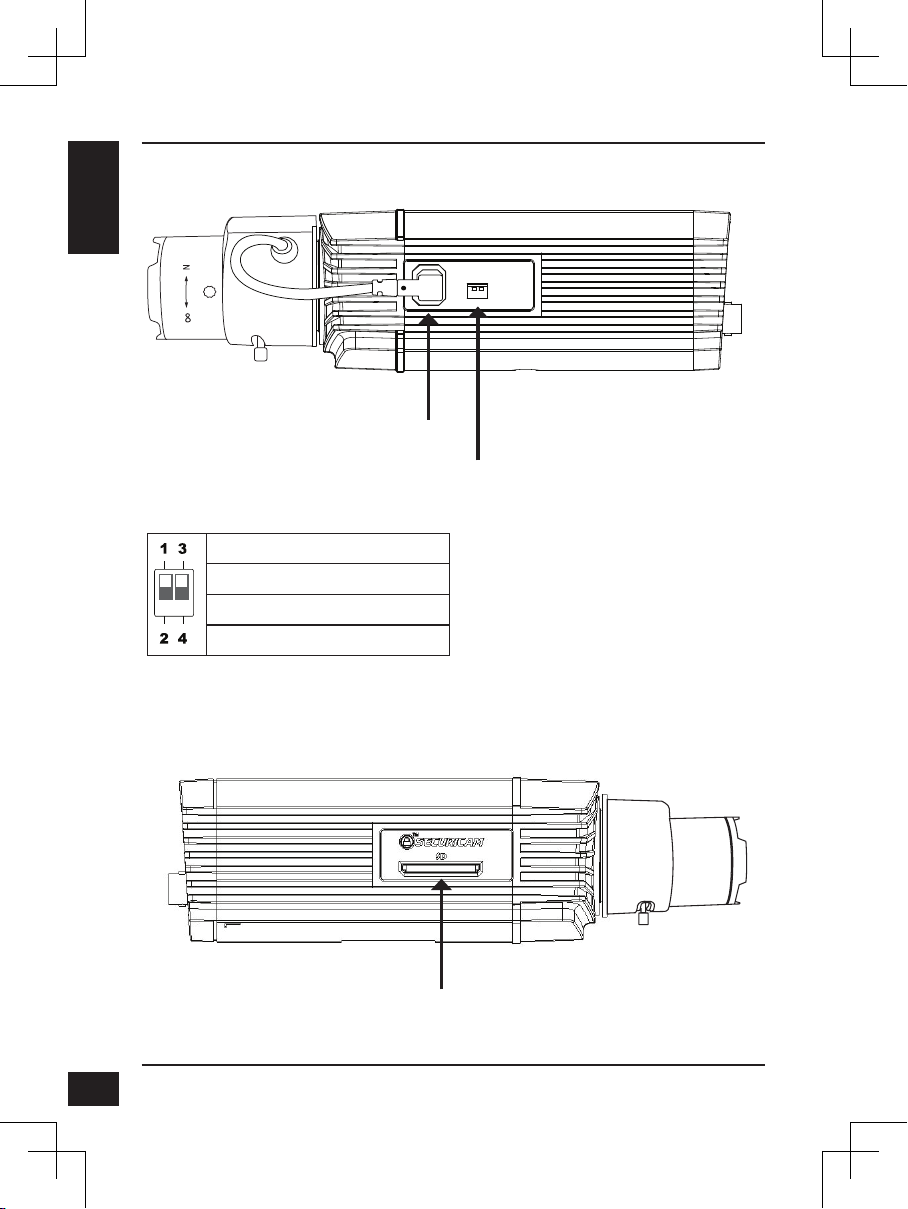
1 AES
2 DCIRIS
3 NTSC
4 PAL
1
2
3
4
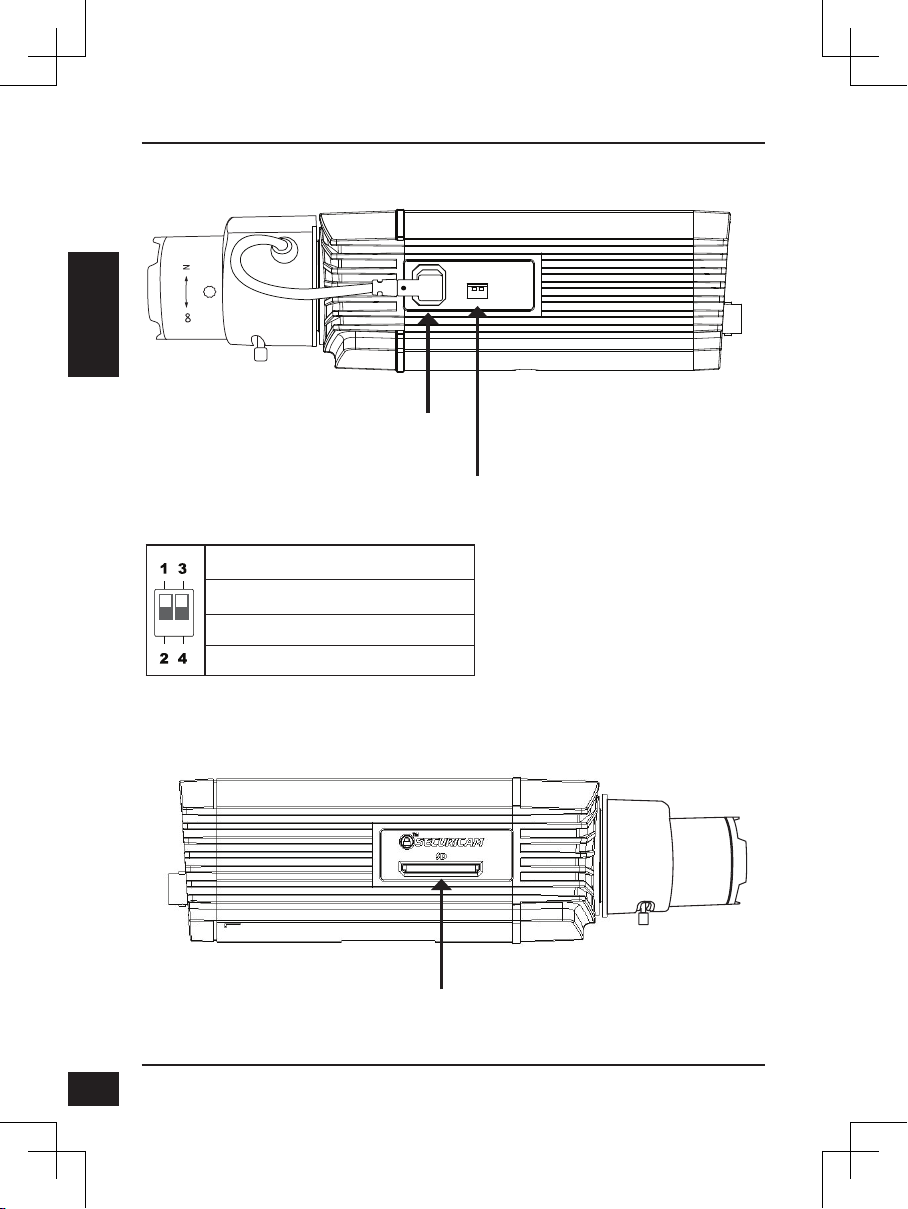
DC-Iris Connector
Connector for DC auto
iris lens
DIP Switch
Toggles between several regional formats.
1. AES: Auto Electric Shutter
2. DC IRIS: Toggle auto iris (DC drive)
3. NTSC: TV output signal selector
4. PAL: TV output signal selector
SD Card Slot
Local SD card for storing
recorded images and video
Right Panel
Left Panel
D-Link DCS-3716 Quick Install Guide
5
ENGLISH
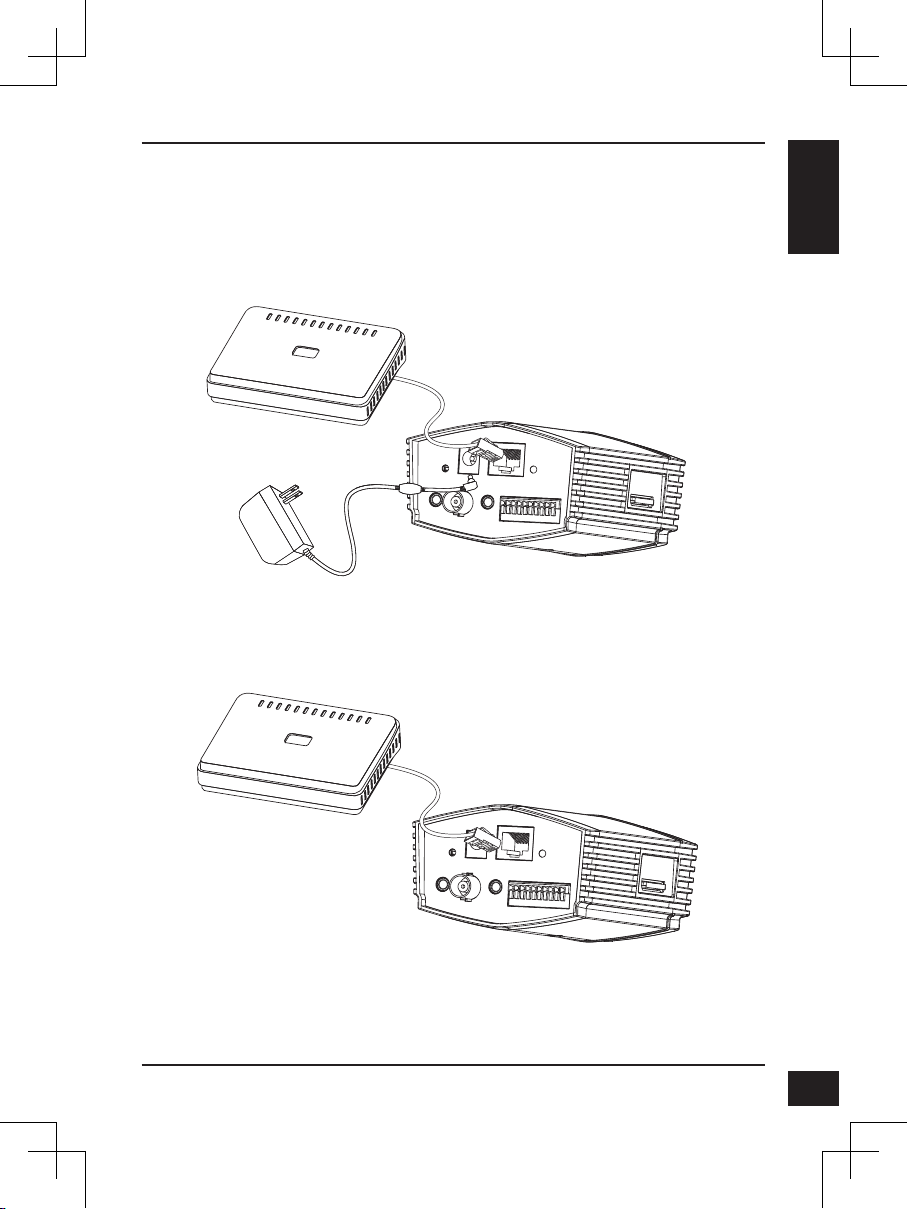
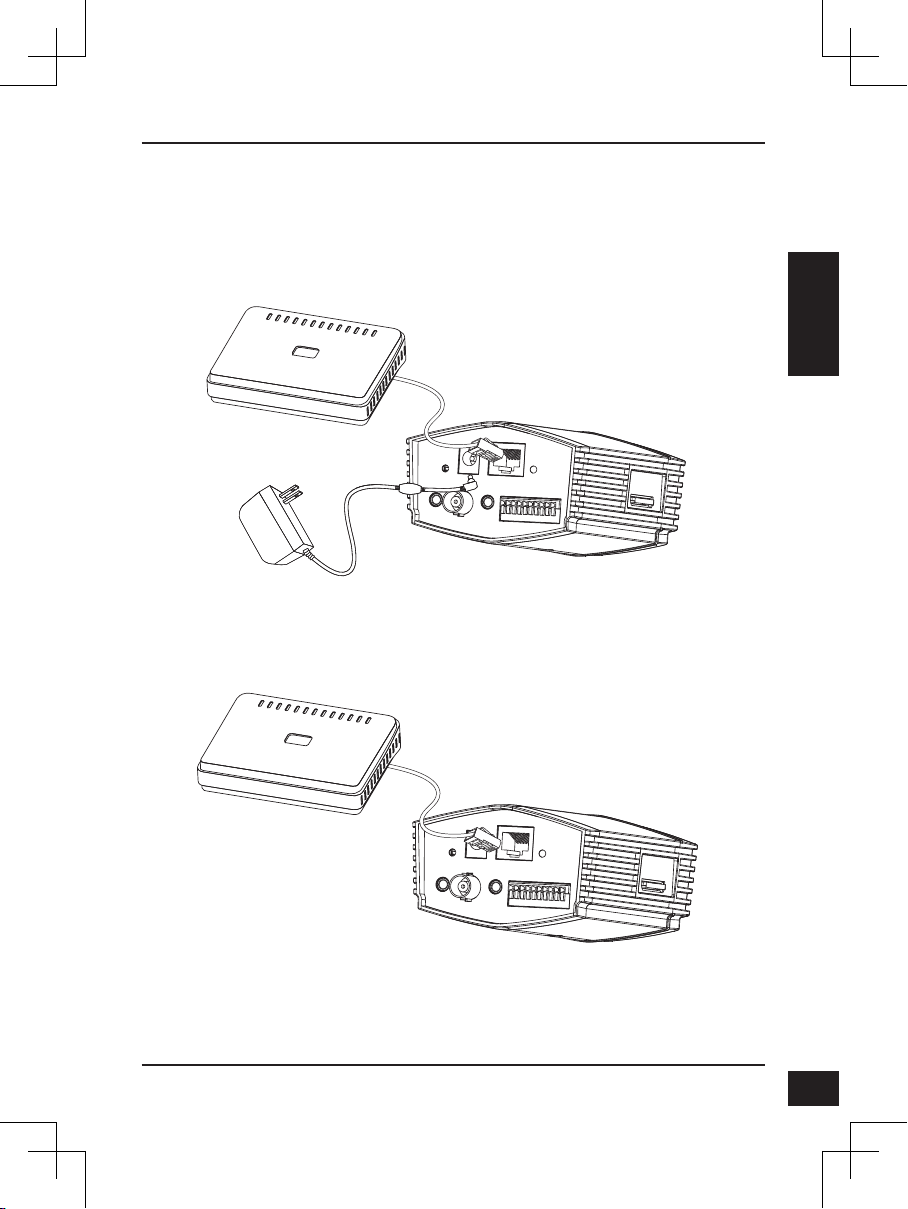
3. Hardware Installation
Basic Connection (without PoE)
Connect the camera to your switch or router via Ethernet cable.
Connect the supplied power cable from the camera to a power outlet.
Connection Using a PoE Switch
If using a PoE switch or router, connect the network camera via Ethernet cable.
PoE will transmit both power and data over a single cable.
Note: Once power has been established, the LED will turn red. When the device has
obtained an IP address and is accessible, the LED will turn green.
D-Link DCS-3716 Quick Install Guide
6
ENGLISH
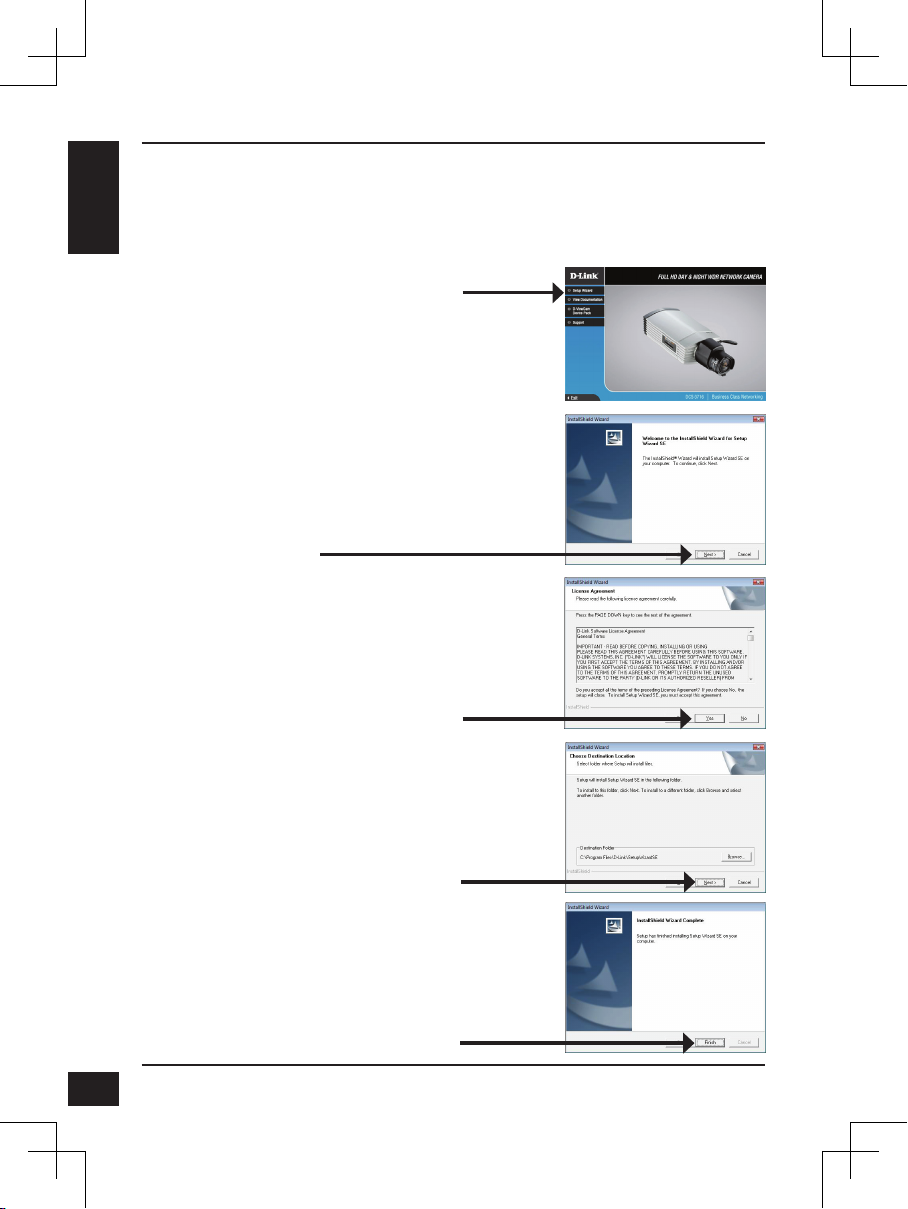
4. Conguration with Wizard
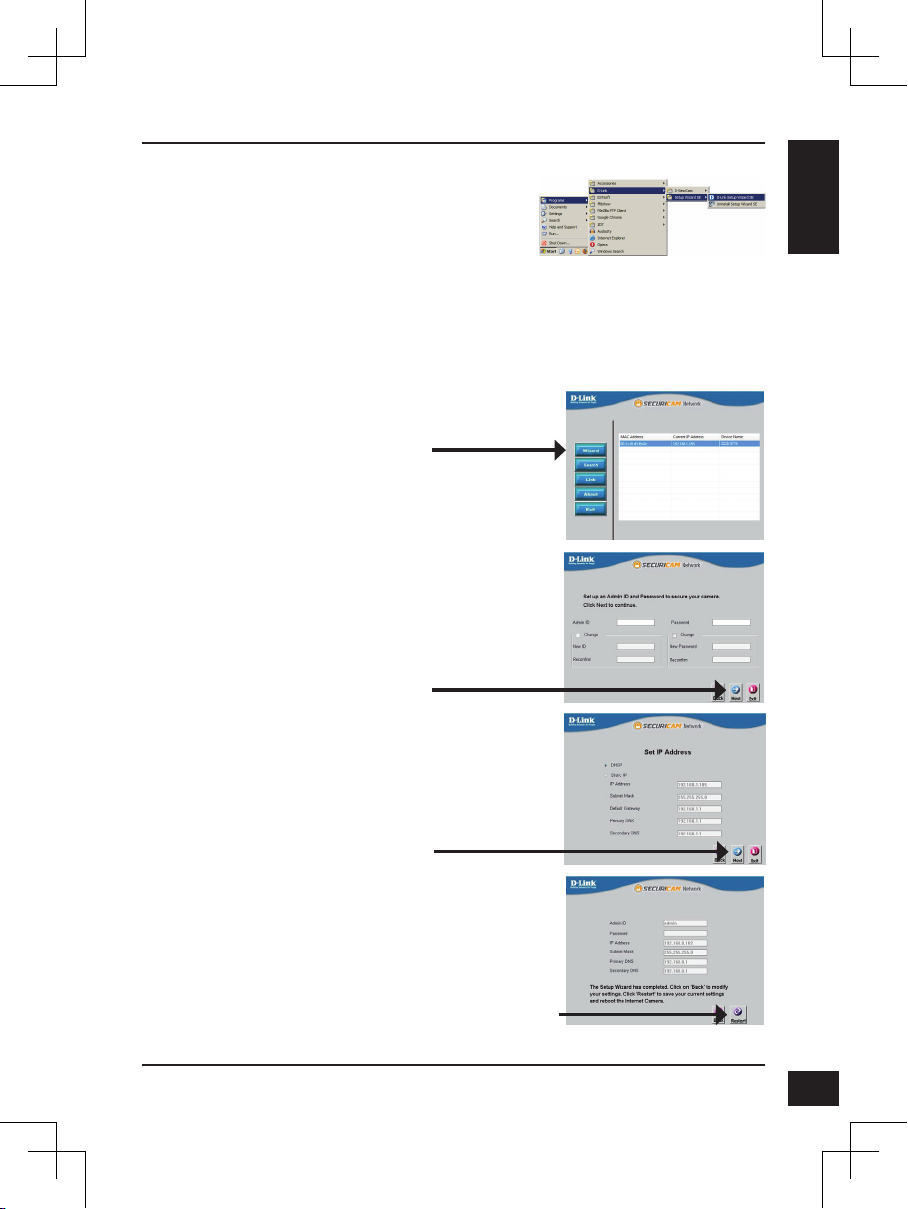
Click Setup Wizard to begin the installation.
Insert the DCS-3716 CD into your computer's CD-ROM drive to begin the installation. If
the Autorun function on your computer is disabled, or if the D-Link Launcher fails to start
automatically, click Start > Run. Type D:\autorun.exe, where D: represents the drive
letter of your CD-ROM drive.
After clicking Setup Wizard, the following window will
open.
Click Next to continue.
Click Yes to accept the License Agreement.
Click Finish to complete the installation.
To start the installation process, click Next.
Note: The installation may take several minutes to
nish.
D-Link DCS-3716 Quick Install Guide
7
ENGLISH
Click on the D-Link Setup Wizard SE icon that was
created in your Windows Start menu.
Start > D-Link > Setup Wizard SE
Take a moment to conrm your settings and click Restart.
Select DHCP if your camera obtains an IP address
automatically when it boots up. Select static IP if the
camera will use the same IP address each time it is
started.
Click Next, to proceed to the next page.
Enter the Admin ID and password. When logging in for
the rst time, the default Admin ID is admin with the
password left blank.
Click Next, to proceed to the next page.
The Setup Wizard will appear and display the MAC
address and IP address of your camera(s). If you have
a DHCP server on your network, a valid IP Address
will be displayed. If your network does not use a
DHCP server, the network camera's default static IP
192.168.0.20 will be displayed.
Click the Wizard button to continue.
D-Link DCS-3716 Quick Install Guide
8
ENGLISH
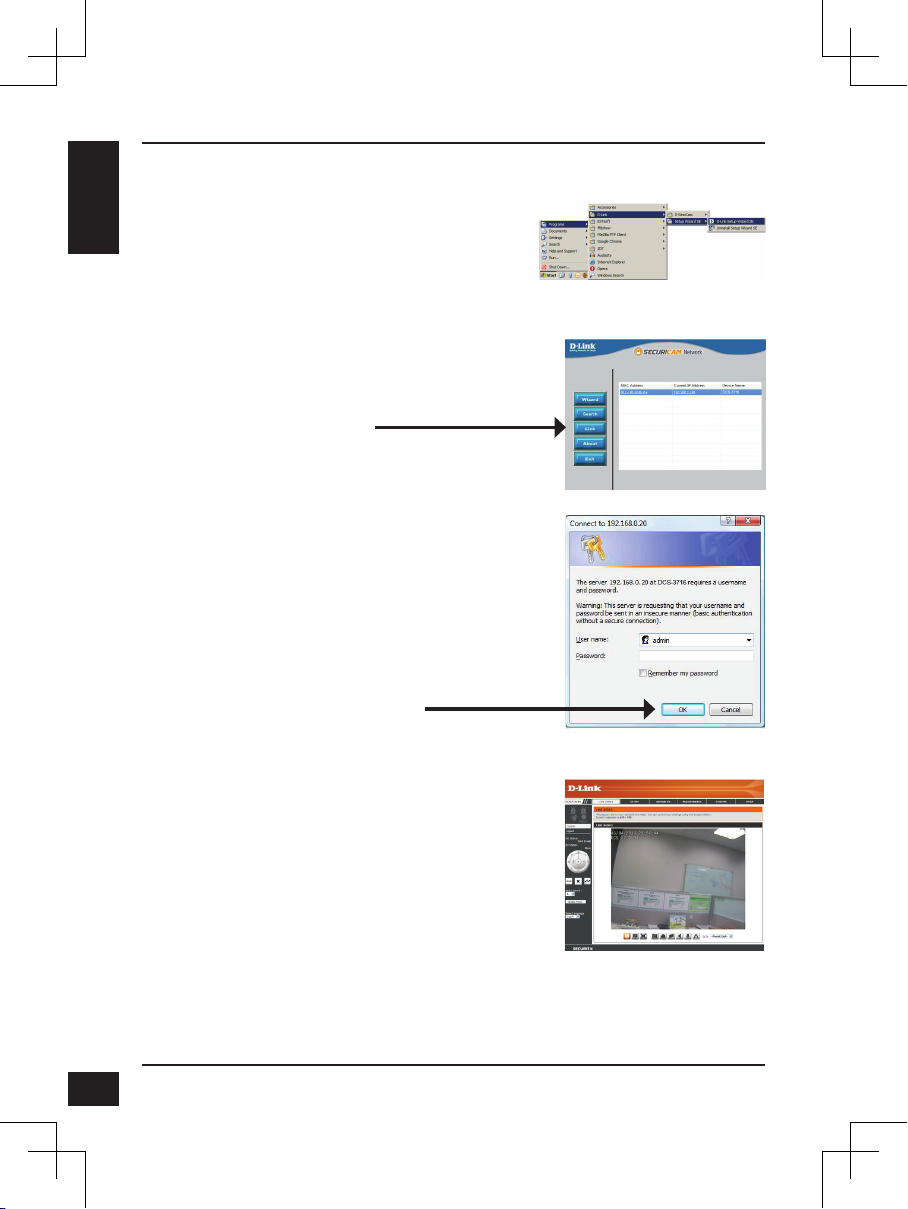
Click on the D-Link Setup Wizard SE icon that was
created in your Windows Start menu.
Start > D-Link > Setup Wizard SE
Viewing Camera via Web Browser
This section shows your camera’s live video. You
can select your video prole and view or operate
the camera. For additional information about web
conguration, please refer to the user manual included
on the CD-ROM or the D-Link website.
Enter admin as the default username and leave the
password blank. Click OK to continue.
Select the camera and click the button labeled "Link"
to access the web conguration.
The Setup Wizard will automatically open your web
browser to the IP address of the camera.
D-Link DCS-3716 Quick Install Guide
9
ENGLISH
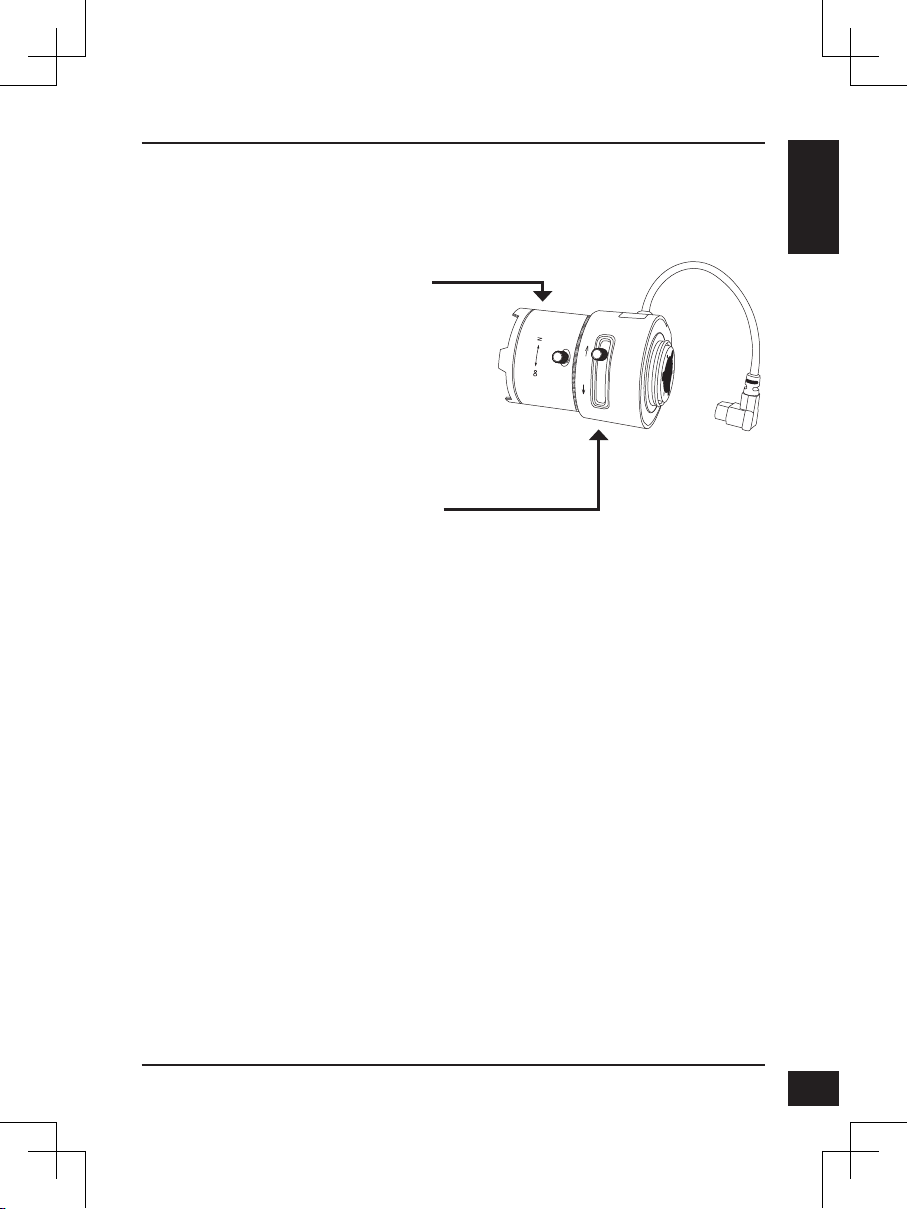
5. Adjust the Zoom/Focus
Adjust Zoom Ratio
Unscrew the focus controller to loosen
the zoom controller. Adjust the zoom
factor by moving the controller the left or
right until the desired range is achieved.
Tighten the zoom controller once
completed.
Adjust Focus
Unscrew the focus controller to loosen
it. Adjust the focal range by moving
the controller to the left or right until
the image is clear. Tighten the focus
controller once completed.

D-Link DCS-3716 Quick Install Guide
10
ENGLISH
United Kingdom (Mon-Fri) website: http://www.dlink.co.uk FTP: ftp://ftp.dlink.co.uk
Home Wireless/Broadband 0871 873 3000 (9.00am–06.00pm, Sat 10.00am-02.00pm)
Managed, Smart, & Wireless Switches, or Firewalls 0871 873 0909 (09.00am- 05.30pm)
(BT 10ppm, other carriers may vary.)
Ireland (Mon-Fri)
All Products 1890 886 899 (09.00am-06.00pm, Sat 10.00am-02.00pm)
Phone rates: €0.05ppm peak, €0.045ppm off peak times
Technical Support

Notes

D-Link DCS-3716 Quick Install Guide
12
DEUTSCH
DCS-3716 Installationsanleitung
Diese Installationsanleitung bietet Ihnen grundlegende Anleitungen zur Installation
der DCS-3716 Netzwerkkamera in Ihrem Netzwerk. Zusätzliche Informationen zur
Verwendung der Kamera nden Sie im Benutzerhandbuch, das Ihnen auf der CD, die
diesem Paket beiliegt, oder über die D-Link Support-Website zur Verfügung steht.
Installationsschritte
1. Vergewissern Sie sich, dass der Packungsinhalt mit den Angaben auf der Liste
unten übereinstimmt.
2. Hardware-Überblick
3. Hardware-Installation
4. Konguration mithilfe des Assistenten
5. Bildschärfen- und Zoom-Einstellung
1. Packungsinhalt
DCS-3716 Netzwerkkamera
Kamerafuß
Handbuch und Software auf der CD-ROM
Kat.5 Ethernetkabel
Stromadapter
Installationsanleitung
C-CS Mount-Adapterobjektiv (5 mm Zwischenring)
Sollte einer der oben aufgeführten Artikel fehlen, wenden Sie sich bitte an Ihren
Fachhändler.
D-Link DCS-3716 Quick Install Guide
13
DEUTSCH
2. Hardware-Überblick
LED
Strom- und Netzwerkanzeige
E/A-Anschluss
E/A-Anschlüsse für externe Geräte
BNC
Analoger Videoausgang
Rücksetzen
Um die Kameraeinstellungen
zurückzusetzen, halten Sie die
Rücksetztaste 5 Sekunden lang gedrückt.
Audio-Eingang
Audio-Eingang für ein Mikrofon
Gleichstrom
12V Gleichstrom
Audio-Ausgang
Audio-Ausgang für externe Lautsprecher.
Ethernet (PoE)
RJ-45-Anschluss für Ethernet, der
auch für die Stromzufuhr (PoE)
verwendet werden kann
Objektivanschluss
Für den Anschluss an einen
CS-Mount
ICR-Sensor
Der ICR-Sensor (IR-Cut Removable
Sensor/Entfernbarer Infrarot-Sperrlter)
beurteilt die jeweiligen Lichtverhältnisse
und wechselt entsprechend von Farbe
auf Infrarot.
Rückseite
Vorderseite
D-Link DCS-3716 Quick Install Guide
14
DEUTSCH
1 AES
2 DCIRIS
3 NTSC
4 PAL
1
2
3
4
DC-Iris-Anschluss
Anschluss für spannungsgesteuerte
autom. Blende (DC-Auto-Iris-Objektiv)
DIP-Schalter
Wechselt zwischen verschiedenen
regionalen Formaten.
1. AES: Auto Electric Shutter/Autom.
elektron. Kameraverschluss
2. DC IRIS: Auto-Iris (Autom. Blende) ein/
aus (DC Laufwerk)
3. NTSC: TV-Ausgang-Signalwähler
4. PAL: TV-Ausgang-Signalwähler
SD-Karteneinschub
Lokale SD-Karte zum Speichern von
Bildern und Videoaufnahmen
Rechte Seite
Linke Seite
D-Link DCS-3716 Quick Install Guide
15
DEUTSCH
3. Hardware-Installation
Allgemeine Verbindung (ohne PoE)
Schließen Sie die Kamera über das Ethernetkabel an Ihren Switch oder Router an.
Schließen Sie die Kamera mit dem mitgelieferten Stromkabel an eine Steckdose an.
Anschluss mit einem PoE Switch
Wenn Sie einen PoE-Switch oder Router verwenden, schließen Sie die
Netzwerkkamera über das Ethernetkabel an.
PoE (Power over Ethernet) liefert sowohl Strom als auch Daten über ein einziges Kabel.
Hinweis: Sobald die Stromzufuhr hergestellt ist, leuchtet die LED rot auf. Wenn das
Gerät dann eine IP-Adresse erhalten hat und darauf zugegriffen werden
kann, leuchtet die LED grün.
 Loading...