


USER MANUAL
DCS-932L
VERSION 1.0

Table of Contents
Table of Contents
Product Overview.............................................................. |
4 |
Package Contents......................................................................... |
4 |
System Requirements................................................................. |
4 |
Introduction ................................................................................... |
5 |
Features............................................................................................ |
6 |
Hardware Overview..................................................................... |
7 |
Front View................................................................................ |
7 |
Rear View ................................................................................. |
8 |
Installation ......................................................................... |
9 |
Hardware Installation.................................................................. |
9 |
Wireless Installation Considerations.................................... |
10 |
Camera Installation Wizard ..................................................... |
11 |
WPS - Push Button Setup......................................................... |
12 |
mydlink Portal ................................................................. |
13 |
Camera Status.............................................................................. |
14 |
Live Video ...................................................................................... |
15 |
Camera Settings.......................................................................... |
16 |
Camera Info .................................................................................. |
17 |
WEB Coniguration .......................................................... |
18 |
Using the WEB Coniguration Menu.................................... |
18 |
Live Video .............................................................................. |
20 |
Setup....................................................................................... |
20 |
Wizard .............................................................................. |
20 |
Internet Connection Setup Wizard........................ |
21 |
Network Setup.............................................................. |
23 |
Wireless............................................................................ |
24 |
DDNS ............................................................................... |
25 |
Image Setup .................................................................. |
26 |
Video ................................................................................ |
27 |
Video Coniguration.................................................... |
27 |
Audio................................................................................ |
28 |
Motion Detect............................................................... |
29 |
Mail.................................................................................... |
30 |
Time Schedule .............................................................. |
31 |
FTP..................................................................................... |
32 |
Time Schedule .............................................................. |
33 |
Time and Date............................................................... |
34 |
Day/Night Mode........................................................... |
35 |
Maintenance......................................................................... |
36 |
Admin............................................................................... |
36 |
System.............................................................................. |
37 |
Firmware Upgrade....................................................... |
38 |
Device Info ..................................................................... |
39 |
Active User ..................................................................... |
40 |
Wireless Security ............................................................. |
41 |
What is WEP? ................................................................................ |
41 |
What is WPA?................................................................................ |
42 |
Coniguring the DCS-932L with a Router .......................... |
43 |
D-Link DCS-932L User Manual |
2 |

Table of Contents
Troubleshooting .............................................................. |
49 |
Wireless Basics ................................................................. |
52 |
Wireless Modes............................................................................ |
56 |
Networking Basics........................................................... |
57 |
Check your IP address............................................................... |
57 |
Statically Assign an IP Address .............................................. |
58 |
Technical Speciications.................................................. |
59 |
D-Link DCS-932L User Manual |
3 |

Section 1 - Product Overview
Product Overview
Package Contents
DCS-932L Wireless N Day/Night Home Network Camera
• CAT5 Ethernet Cable
• Power Adapter
• Manual and Software on CD
• Quick Install Guide
• Mounting Kit
Note: Using a power supply with a diferent voltage than the one included with your product will cause damage and void the warranty for this product.
If any of the above items are missing, please contact your reseller.
System Requirements
Computer with Microsoft Windows® 7, Vista®, or XP
•PC with 1.3GHz or above; at least 128MB RAM
•Internet Explorer 6 or above , Firefox 3.5 or above, Safari 4 and Chrome
•Existing 10/100 Ethernet-based network or 802.11b/g/n wireless network
D-Link DCS-932L User Manual |
4 |

Section 1 - Product Overview
Introduction
ongratulations on your purchase of the DCS-932L Wireless N Day/Night Home Network Camera. The DCS-932L is a versatile
C
and unique solution for your small oice or home. Unlike a standard webcam, the DCS-932L is a complete system with a builtin CPU and web server that transmits high quality video images for security and surveillance. The IR LED provides around the clock surveillance regardless of the lighting conditions. The DCS-932L can be accessed remotely, and controlled from any PC/ Notebook over your local network or through the Internet via a web browser. The simple installation and intuitive web-based interface ofer easy integration with your Ethernet/Fast Ethernet or 802.11 b/g/n wireless network. The DCS-932L also comes
with remote monitoring and motion detection features for a complete and cost-efective home security solution.
D-Link DCS-932L User Manual |
5 |

Section 1 - Product Overview
Features
o Use
S
The DCS-932L is a stand-alone system with a built-in CPU, requiring no special hardware or software such as PC frame grabber cards. The DCS-932L supports both ActiveX mode for Internet Explorer and Java mode for other browsers such as Firefox® and Safari®.
Supports a Variety of Platforms
Supporting TCP/IP networking, HTTP, and other Internet related protocols. The DCS-932L can also be integrated easily into other Internet/Intranet applications because of its standards-based features.
802.11b/g/n Wireless or Ethernet/Fast Ethernet Support
The DCS-932L ofers wireless 802.11b/g/n and Ethernet/Fast Ethernet connectivity, making the DCS-932L easy to integrate into your existing network environment. The DCS-932L works with a 10Mbps Ethernet based network or 100Mbps Fast Ethernet based network for traditional wired environments, and works with 802.11b/g/n routers or access points for added lexibility. The Site Survey feature also allows you to view and connect to any available wireless networks.
Web Coniguration
Using a standard Web browser, administrators can conigure and manage the Network Camera directly from its own Web page via Intranet or Internet. This means you can access your DCS-932L anytime, anywhere in the world.
Broad Range of Applications
With today’s high-speed Internet services, the Network Camera can provide the ideal solution for delivering live video images over the Intranet and Internet for remote monitoring. The Network Camera allows remote access using a Web browser for live image viewing, and allows the administrator to manage and control the Network Camera anytime, anywhere in the world. Many applications exist, including industrial and public monitoring of homes, oices, banks, hospitals, child-care centers, and amusement parks.
Remote Monitoring Utility
The D-ViewCam application adds enhanced features and functionality for the Network Camera and allows administrators to conigure and access the Network Camera from a remote site via Intranet or Internet. Other features include image monitoring, recording images to a hard drive, viewing up to 32 cameras on one screen, and taking snapshots.
IR LED for Day and Night functionality
The built-in infrared LEDs enables night time viewing of up to 16 feet (5 meters).
D-Link DCS-932L User Manual |
6 |
Section 1 - Product Overview
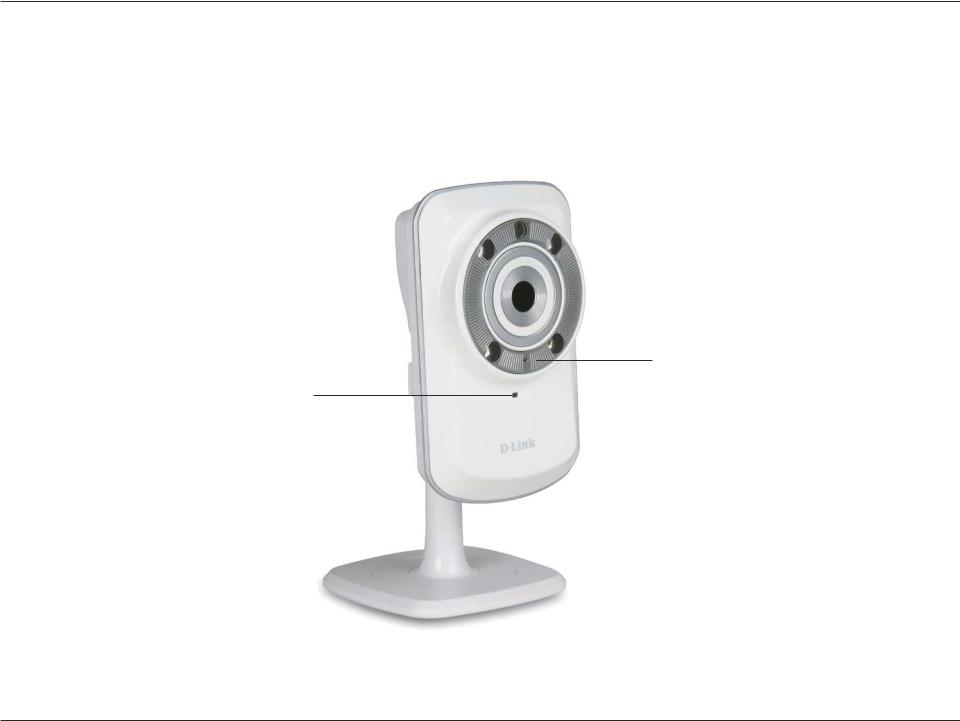
Hardware Overview
Front View
t Sensor |
|
|
|
|
|
IR LED |
|
|
|
|
|
||
|
|
|
|
|
||
L |
|
|
|
|
|
|
Camera Lens |
|
|
|
|
|
|
|
|
|
|
|
|
Microphone
Power and Link LED
D-Link DCS-932L User Manual |
7 |

Section 1 - Product Overview
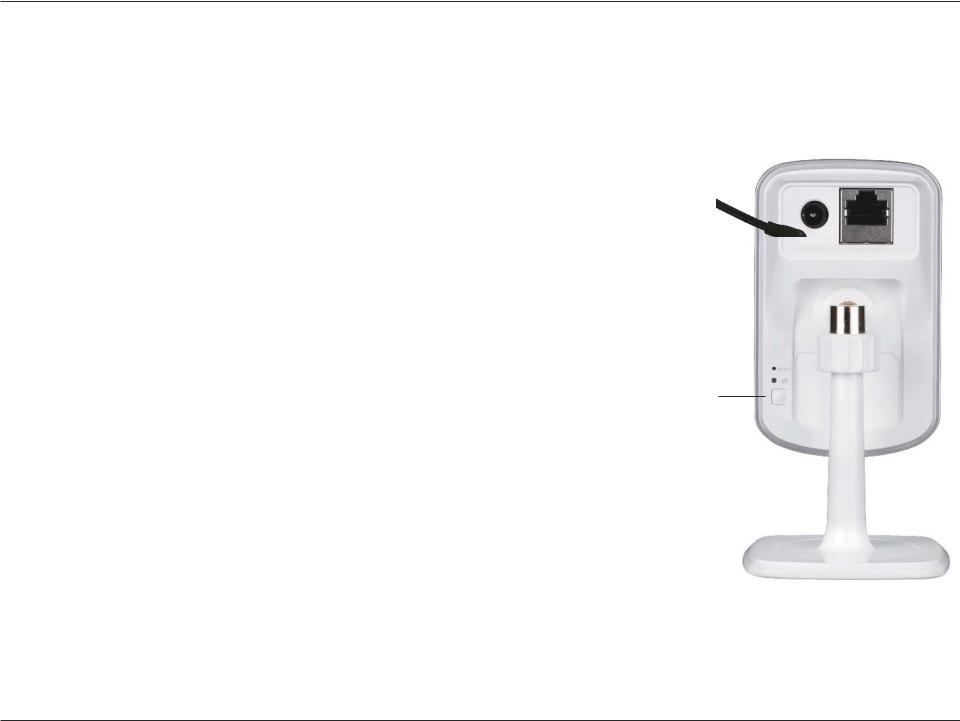
Rear View
Power Receptor |
|
|
|
Ethernet Port |
|
|
Reset
WPS LED
WPS Button
Camera Stand
D-Link DCS-932L User Manual |
8 |
Section 2 - Installation
Installation
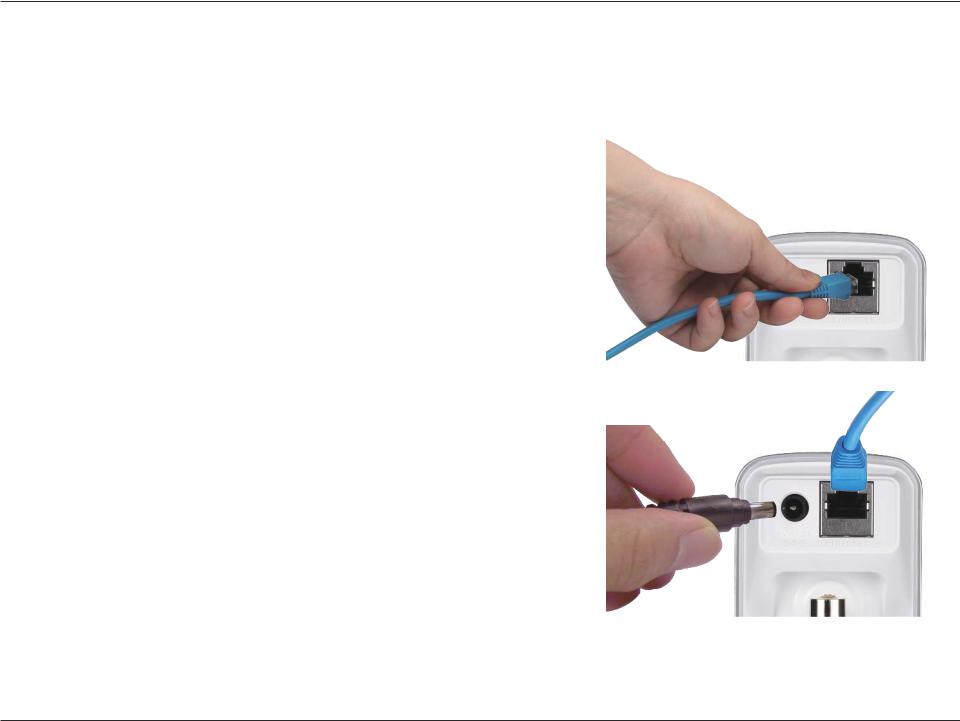
Hardware Installation
Connect the Ethernet Cable
Connect the included Ethernet cable to the network cable connector located on the back panel of the DCS-932L and attach it to the network.
Attach the External Power Supply
Attach the external power supply to the DC Power receptor located on the rear back panel of the DCS-932L and connect it to your wall outlet
or power strip. Power is conirmed when the green LED Power Indicator located below the lens on the DCS-932L is illuminated.
D-Link DCS-932L User Manual |
9 |

Section 2 - Installation
Wireless Installation Considerations
he D-Link Wireless Network Camera lets you access your network using a wireless connection from anywhere within the operating range of your
T
wireless network. However, the number, thickness and location of walls, ceilings, or other objects that the wireless signals must pass through, may limit the range. Typical ranges vary depending on the types of materials and background RF (radio frequency) noise in your home or business. The key to maximizing wireless range is to follow these basic guidelines:
1.Minimize the number of walls and ceilings between your adapter and other network devices (such as your Network Camera) - each wall or ceiling can reduce your adapter’s range from 3-90 feet (1-30 meters).
2.Be aware of the direct line between network devices. A wall that is 1.5 feet thick (.5 meters), at a 45-degree angle appears to be almost 3 feet (1 meter) thick. At a 2-degree angle, it looks over 42 feet (14 meters) thick. Position your devices so that the signal will travel straight through a wall or ceiling (instead of at an angle) for better reception.
3.Building Materials make a diference. A solid metal door or aluminum studs may weaken the wireless signal. Try to position your access points, wireless routers, and other networking devices where the signal passes through drywall or open doorways. Materials and objects such as glass, steel, metal, walls with insulation, water (ish tanks), mirrors, ile cabinets, brick, and concrete will degrade your wireless signal.
4.Keep your product at least 3-6 feet or 1-2 meters away from electrical devices or appliances that generate RF noise.
5.If you are using 2.4GHz cordless phones or other radio frequency sources (such as microwave ovens), your wireless connection may degrade dramatically or drop completely. Make sure your 2.4GHz phone base is as far away from your wireless devices as possible. The base transmits a signal even if the phone in not in use.
D-Link DCS-932L User Manual |
10 |
Section 2 - Installation
Camera Installation Wizard
nsert the Installation CD-ROM into your computer’s optical drive to start the autorun program.
I
The CD-ROM will open the Camera Installation Wizard. Simply click Start to go through the Installation Wizard, which will guide you through the installation process from connecting your hardware to coniguring your camera.
D-Link DCS-932L User Manual |
11 |
Section 2 - Installation
WPS - Push Button Setup
lternatively, you may create a secure wireless connection using the WPS Button on the back of the camera.
o create a WPS connection:
Step 1
Press and hold the WPS button for three seconds. The blue WPS status LED above the button will blink.
Step 2
Press the WPS button on your router within 60 seconds. The WPS button is usually on the front or side of your router. On some routers, you may need to log in to the web interface and click on an on-screen button to activate the WPS feature. If you are not sure where the WPS button is on your router, please refer to your router’s User Manual.
WPS Button
The DCS-932L will automatically create a secure wireless connection to your router. While connecting, the green LED will lash and your camera will reboot.
D-Link DCS-932L User Manual |
12 |

Section 3 - mydlink Portal
mydlink Portal
fter registering your DCS-932L camera with a mydlink account in the Camera Installation Wizard. You will be able to remotely
access your camera from the www.mydlink.com website. After signing in to your mydlink account, you will see a screen similar to the following:
D-Link DCS-932L User Manual |
13 |

Section 3 - mydlink Portal
Camera Status
Here, you can see the online status of each of your cameras. Your online status may be one of the following:
A green checkmark indicates that your camera is online and ready to use.
A yellow exclamation point indicates that your camera is online, but the camera password has changed. You will need to enter your new camera password to access your camera again.
A red x indicates that your camera is oline and currently cannot be accessed remotely.
f your camera is oline, try the following:
• Check to make sure that the Internet connection to your camera is working properly.
•Try restarting your Internet router.
•Check your camera’s cable connections and make sure they are secure.
•Check to make sure that the LED on your camera is lit solid green.
If you still cannot access your camera, reset your camera and run the Camera Installation Wizard again from the CD-ROM included in your package.
D-Link DCS-932L User Manual |
14 |

Section 3 - mydlink Portal
Live Video
n the main part of the screen, the Live Video tab will be selected by default. If the camera is available, a Live Video feed will be displayed. Video will be shown at VGA resolution (640x480) if viewing your camera from a PC on the same local network, or at
QVGA resolution (320x240) if viewing your camera from a PC on a remote network.
D-Link DCS-932L User Manual |
15 |
Section 3 - mydlink Portal
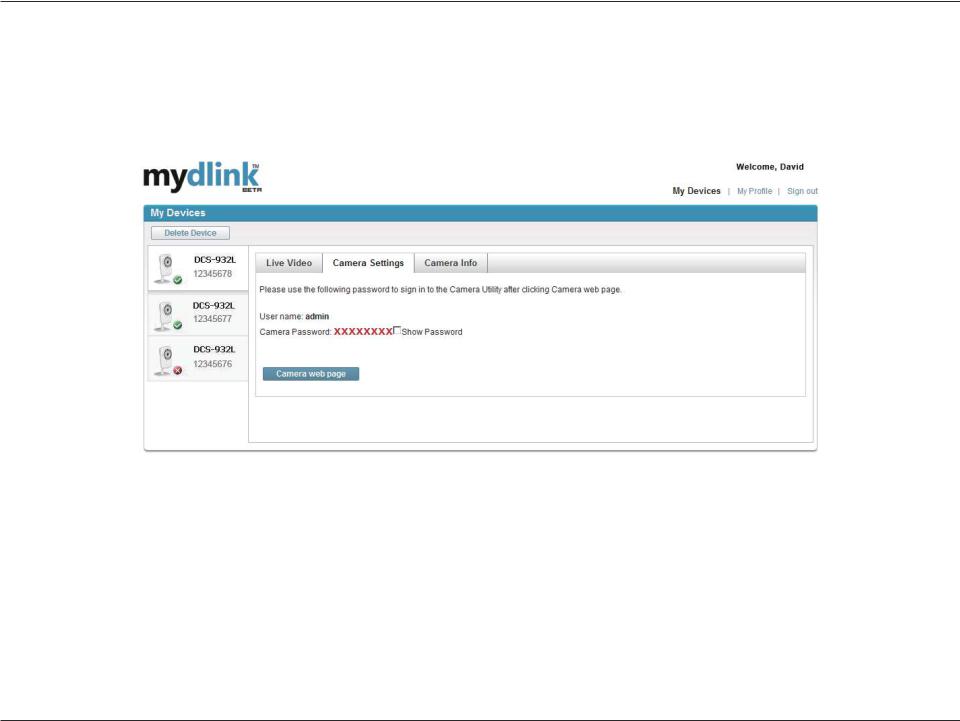
Camera Settings
he Camera Settings tab allows you to access your camera’s coniguration interface. To open your camera’s coniguration
interface, click Camera web page and enter the password exactly as listed on the Camera Settings page.
D-Link DCS-932L User Manual |
16 |
Section 3 - mydlink Portal
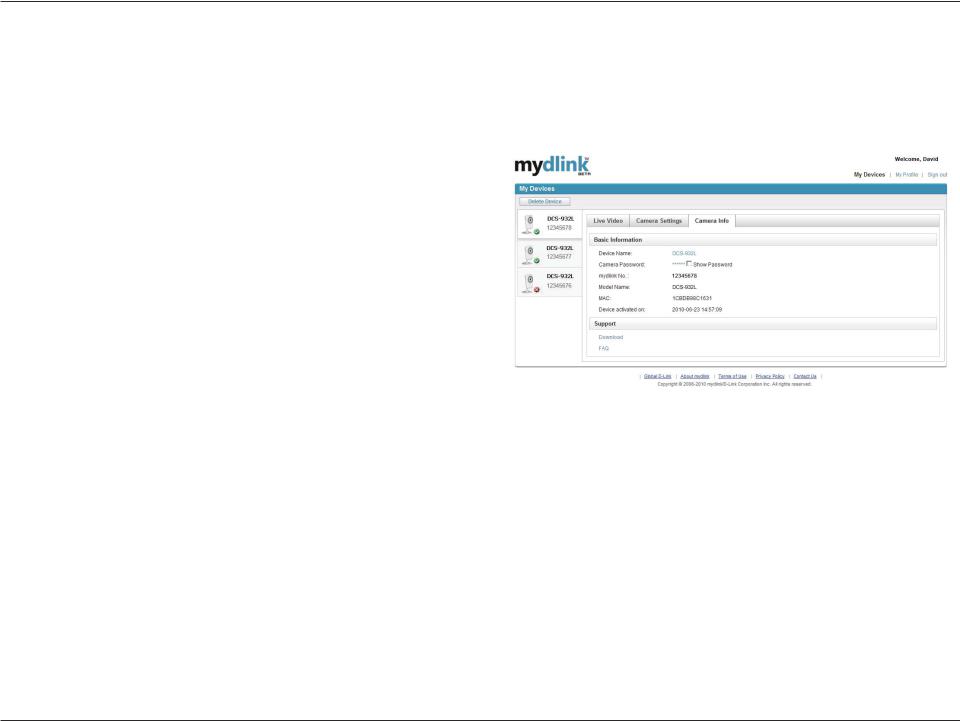
Camera Info
he Camera Info tab shows you various information about your camera.
vice Name: The Device Name is a unique name that you can give to
D
your device to help you identify it. Clicking on the Device Name will open a window for you to log in to your camera’s coniguration interface. Then,
it will open the Maintenance > Admin page where you can change your Device Name.
Camera Password: Displays the current password for your camera’s coniguration interface. Clicking on the Show Password checkbox will
either show or hide the password. Clicking on the Password will open a window for you to log in to your camera’s coniguration interface. Then,
it will open the Maintenance > Admin page where you can change your Password.
mydlink No.: Displays the mydlink number of your device.
Model Name: Displays the model name of your device.
MAC Address: Displays the MAC address of your device.
Device activated On: Displays the time and date that your device was added to mydlink.
Support: This section provides you with links to various support websites and downloads related to your product.
D-Link DCS-932L User Manual |
17 |
Section 4 - Web Coniguration
WEB Coniguration
Using the WEB Coniguration Menu
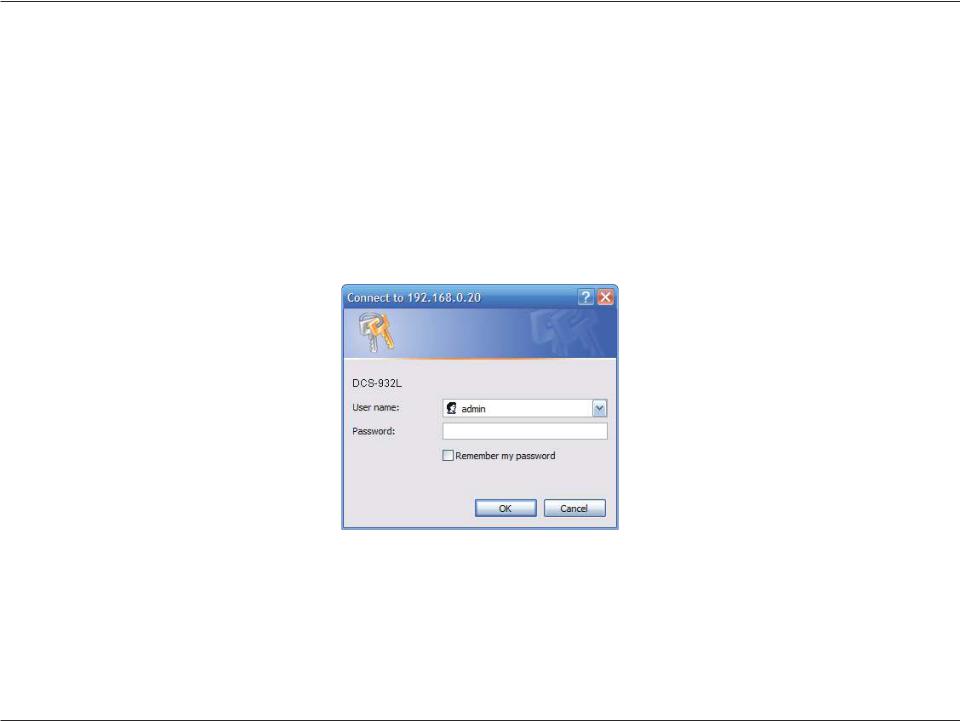
fter completing the Camera Installation Wizard, you are ready to use your camera. The camera’s built-in Web coniguration utility is designed to
allow you to easily access and conigure your DCS-932L. At the end of the wizard, click Go To Camera, or enter the IP address of your camera into a web browser, such as Internet Explorer®. To log in, use the User name admin and the password you created in the Installation Wizard. If you did not create a password, the default password is blank. After entering your password, click OK.
Note: If you are directly connecting your PC to the camera, or if you are using the camera on a closed network, the default IP is 192.168.0.20.
D-Link DCS-932L User Manual |
18 |
 Loading...