


HD Outdoor Cloud Camera
DCS-7010L
QUICK
INSTALLATION
GUIDE
Краткое руководство по установке
Guía de Instalación Rápida
Guia de Instalação Rápida
Petunjuk Pemasangan Cepat
ENGLISH
Package Contents

 DCS-7010L HD Outdoor Cloud Camera
 CD-ROM with User Manual and Software
CAT5 Ethernet Cable
Power Adapter
If any of the above items are missing, please contact your reseller.
Minimum Requirements
Computer with:
•PC with 1.3 GHz or above and at least 128 MB RAM
•Windows® 8, Windows® 7, Vista® or XP (32-bit or 64-bit)
•Mac OS® X 10.6 or higher
Web Browser:
•Internet Explorer® 7, Firefox 12, Safari 4, or Chrome 20 and above
•Installed and enabled Java and ActiveX® controls
Network Device and Service:
•A router (A D-Link Cloud Router is recommended)
•An Internet connection
•An e-mail account (Required to register mydlink service)
2
Setting up your Camera
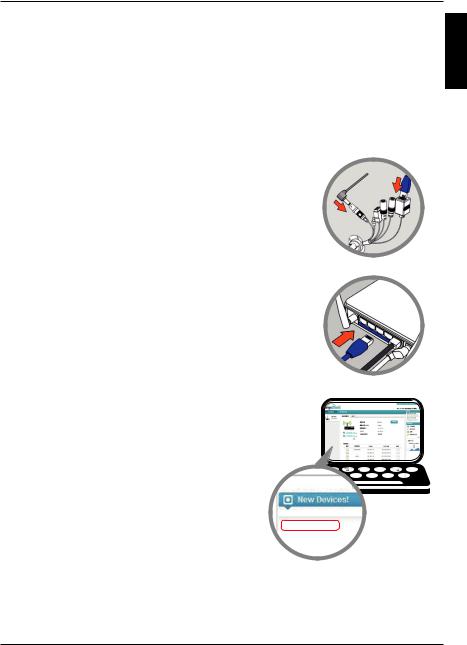
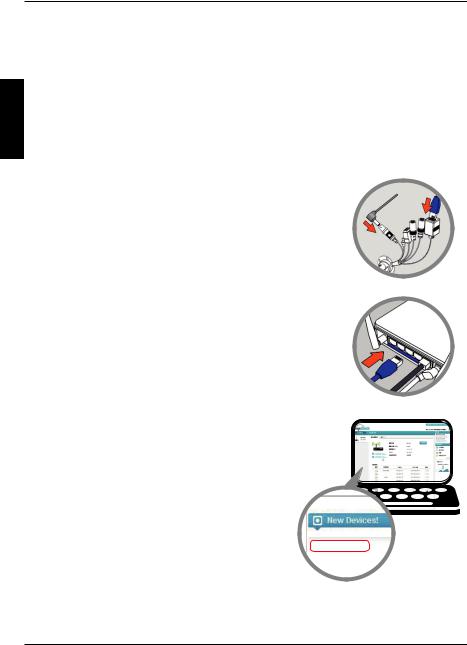
Using a D-Link Cloud Router (Zero Configuration)
If you have a D-Link Cloud Router, you can take advantage of Zero Configuration Setup. This feature automatically configures your camera’s settings for you and adds it to your mydlink account automatically. If you do not have a D-Link Cloud router, refer to the next page to install and configure your camera.
Connect the power cable and Ethernet cable to your cloud camera.
Connect the other end of the Ethernet cable to your D-Link Cloud Router and connect the camera’s power adapter to a power outlet.
From any computer, open a web browser, go to
http://www.mydlink.com and log in to your account.
Click on the device name when the new device notification appears to add the camera to your account.
DCS-7010L
ENGLISH
3
ENGLISH
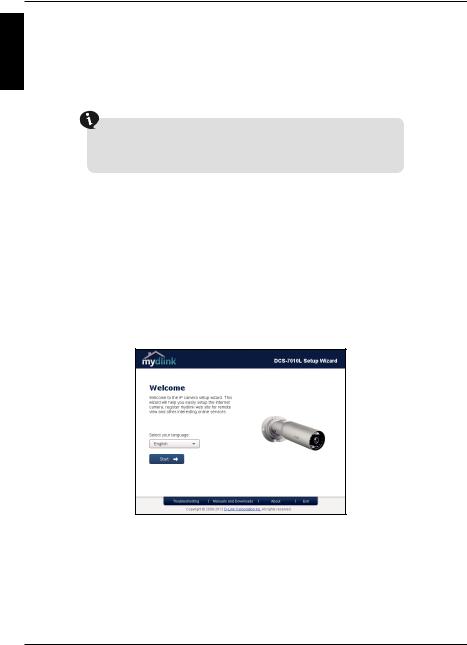
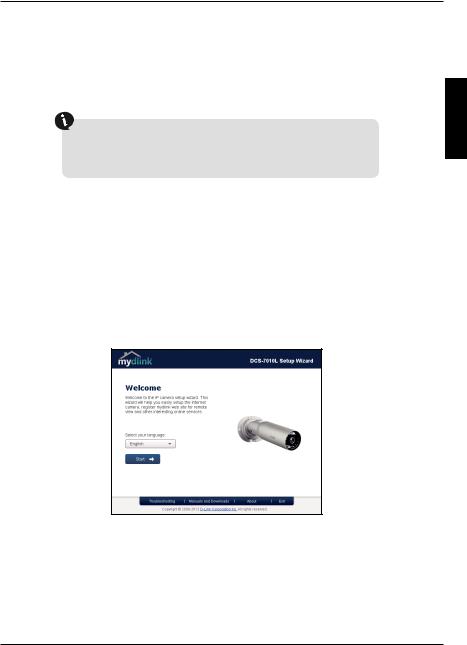
Using the Installation Wizard
If you do not have a D-Link Cloud Router, you can simply use any Windows or Mac computer to go through the Installation Wizard from the CD, which will guide you through the installation process from connecting your hardware to configuring your camera.
If you do not have a CD-ROM drive, or the CD is missing, please download the Setup Wizard from http://www.mydlink.com/support
•Windows Users - Insert the CD. Simply click Set up your Cloud Camera to go through the Setup Wizard. If the Setup Wizard program does not automatically start on your computer, go to Start > Run. In the run box type D:\autorun.exe (where D: represents the drive letter of your CD-ROM drive) and click OK.
•Mac Users - Insert the CD. On the desktop, open your CD drive, double-click on the SetupWizard file, wait about 20-30 seconds, and follow the instructions.
4
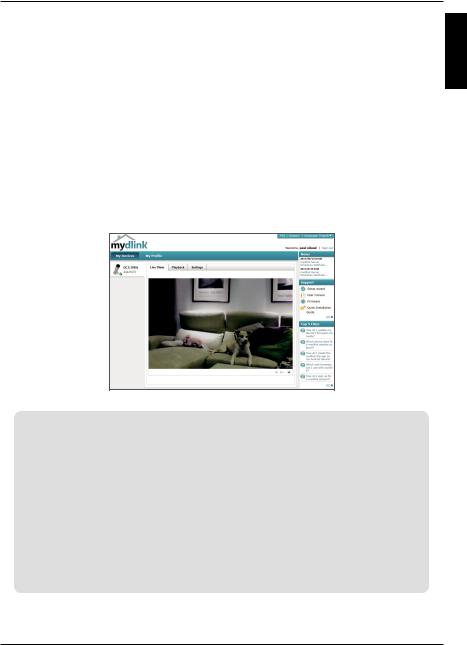
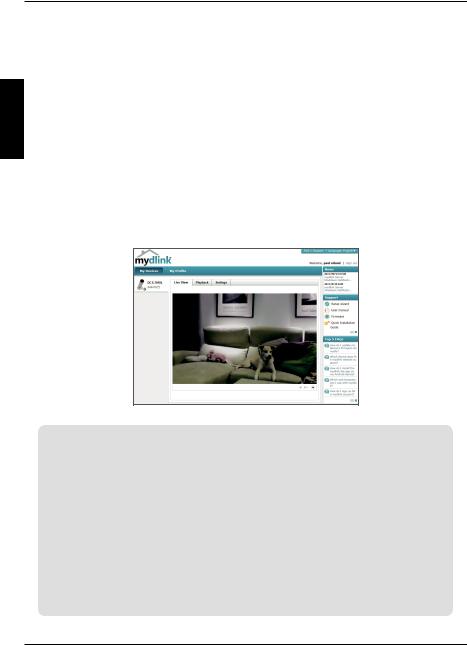
Getting Started with mydlink
mydlink is a web-based service which allows you to view and control your mydlink-enabled devices through any computer connected to the Internet. If you have cameras linked to your mydlink account, you will be able to see their live views using the mydlink website. Follow the instructions below to access your mydlink account.
•Open a web browser on any computer connected to the Internet.
•Type http://www.mydlink.com in the address bar and press Enter.
•Sign in using your mydlink account.
•From the home screen, you will be able to view all devices which have been linked to your mydlink account.
ENGLISH
•Ensure that your browser supports both Java and ActiveX, and that these features have been installed and enabled.
•Windows does not have Java installed by default. You can download the latest version from http://www.java.com.
•In Mac OS X 10.7.x, Java applets are disabled by default. To enable Java applets, click the Finder > Applications > Utilities > Java Preferences and check the Enable applet plug-in and Web Start applications option.
•The ActiveX® controls in IE will install automatically if needed. We suggest that you make sure that you have enabled the related options in Tools > Internet Options > Security > Custom Level.
5
ENGLISH
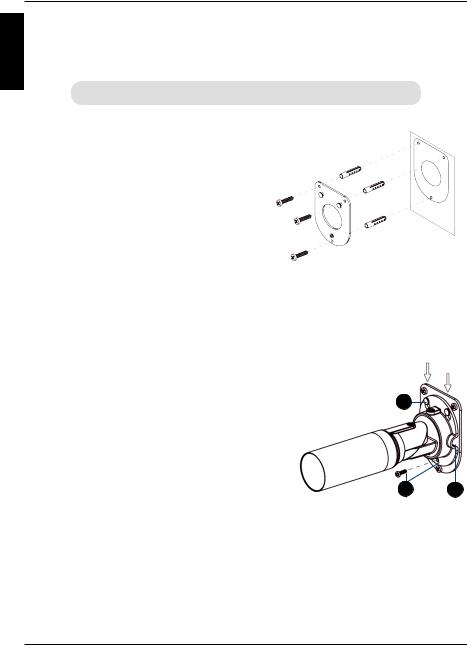
Mount the Camera
Please refer to the steps below to assist you with mounting the camera.  We suggest that you configure the camera before mounting.
Step 1
Position the mounting bracket in the desired location.
Step 2
Mark the surface behind the mounting bracket with a pencil.
Step 3
Use a 6mm drill bit to make required holes approximately 25mm deep.
Step 4
Insert wall anchors and affix the bracket using the screws provided.
6
Step 5
Ensure the cable is seated in the cable channel.
Step 6
Suspend the camera from the two protruding 7 5 studs near the top of the mounting bracket.
Step 7
Insert and tighten the remaining screw into the hole on the camera base.
6
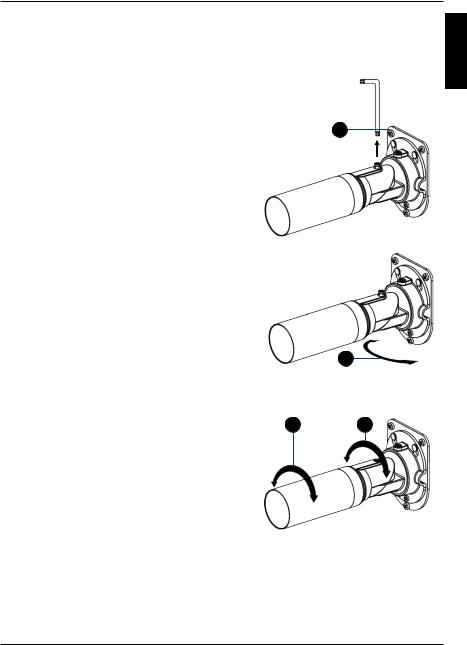
Positioning the Camera
The DCS-7010L can be adjusted to ensure optimal viewing when mounted by following the steps outlined.
Step 1
Using a Torx Security screwdriver, loosen the 1 screw on the top of the camera housing.
Step 2
Swivel the camera along it's horizontal axis until you achieve the desired angle.
Step 3
Using a Torx Security screwdriver, tighten the screw on the top of the camera housing firmly.
2
Step 4
Rotate the camera around its vertical 5 4 axis by adjusting the base.
Step 5
Rotate the camera to adjust for positioning by rotating the barrel.
ENGLISH
7

ENGLISH
Using the mydlink Lite Mobile App
The mydlink Lite app lets you conveniently manage all your mydlink-enabled devices right from your mobile device.
You can download the free mydlink Lite app from the App Store or Google Play. If you have a QR code scanning app, you can scan the corresponding code below to go straight to the mydlink Lite app page.
8

TECHNICAL SUPPORT
You can find software updates and user documentation on the D-Link website.
Tech Support for customers in
Australia:
Tel: 1300-766-868 24/7 Technical Support
Web: http://www.dlink.com.au E-mail: support@dlink.com.au
India:
Tel: +91-22-27626600
Toll Free 1800-22-8998 Web: www.dlink.co.in E-Mail: helpdesk@dlink.co.in
Singapore, Thailand, Indonesia, Malaysia, Philippines, Vietnam:
Singapore - www.dlink.com.sg Thailand - www.dlink.co.th Indonesia - www.dlink.co.id Malaysia - www.dlink.com.my Philippines - www.dlink.com.ph Vietnam - www.dlink.com.vn
Korea:
Tel : +82-2-2028-1810
Monday to Friday 9:00am to 6:00pm Web : http://d-link.co.kr
E-mail : g2b@d-link.co.kr
New Zealand:
Tel: 0800-900-900 24/7 Technical Support
Web: http://www.dlink.co.nz E-mail: support@dlink.co.nz
South Africa and Sub Sahara Region:
Tel: +27 12 661 2025
08600 DLINK (for South Africa only) Monday to Friday 8:30am to 9:00pm South Africa Time
Web: http://www.d-link.co.za E-mail: support@d-link.co.za
Saudi Arabia (KSA):
Tel: +966 01 217 0008
Fax: +966 01 217 0009
Saturday to Wednesday 9.30AM to 6.30PM Thursdays 9.30AM to 2.00 PM
E-mail: Support.sa@dlink-me.com
D-Link Middle East - Dubai, U.A.E.
Plot No. S31102,
Jebel Ali Free Zone South,
P.O.Box 18224, Dubai, U.A.E. Tel: +971-4-8809022
Fax: +971-4-8809066 / 8809069
Technical Support: +971-4-8809033 General Inquiries: info.me@dlink-me.com Tech Support: support.me@dlink-me.com
Egypt
1, Makram Ebeid Street - City Lights Building Nasrcity - Cairo, Egypt
Floor 6, office C2
Tel.: +2 02 26718375 - +2 02 26717280 Technical Support: +2 02 26738470 General Inquiries: info.eg@dlink-me.com Tech Support: support.eg@dlink-me.com
Kingdom of Saudi Arabia
Office # 84 ,
Al Khaleej Building ( Mujamathu Al-Khaleej) Opp. King Fahd Road, Olaya
Riyadh - Saudi Arabia
Tel: +966 1 217 0008
Technical Support:
+966 1 2170009 / +966 2 6522951 General Inquiries: info.sa@dlink-me.com Tech Support: support.sa@dlink-me.com
Pakistan
Islamabad Office:
61-A, Jinnah Avenue, Blue Area,
Suite # 11, EBC, Saudi Pak Tower,
Islamabad - Pakistan
Tel.: +92-51-2800397, 2800398
Fax: +92-51-2800399
Karachi Office:
D-147/1, KDA Scheme # 1,
Opposite Mudassir Park, Karsaz Road, Karachi – Pakistan
Phone: +92-21-34548158, 34326649 Fax: +92-21-4375727
Technical Support: +92-21-34548310, 34305069 General Inquiries: info.pk@dlink-me.com
Tech Support: support.pk@dlink-me.com
ENGLISH
9
ENGLISH
TECHNICAL SUPPORT
Iran
Unit 5, 5th Floor, No. 20, 17th Alley , Bokharest
St. , Argentine Sq. , |
|
Tehran IRAN |
|
Postal Code : 1513833817 |
|
Tel: +98-21-88880918,19 |
|
+98-21-88706653,54 |
073-796-2797 |
General Inquiries: info.ir@dlink-me.com |
Tech Support: support.ir@dlink-me.com
Morocco
M.I.T.C
Route de Nouaceur angle RS et CT 1029
Bureau N° 312 ET 337
Casablanca , Maroc
Phone : +212 663 72 73 24
Email: support.na@dlink-me.com
Lebanon RMA center
Dbayeh/Lebanon
PO Box:901589
Tel: +961 4 54 49 71 Ext:14
Fax: +961 4 54 49 71 Ext:12
Email: taoun@dlink-me.com
Bahrain
Technical Support: +973 1 3332904
Kuwait:
Technical Support: + 965 22453939 / +965 22453949
Türkiye Merkez İrtibat Ofisi
Ayazağa Maslak yolu
Erdebil Cevahir İş Merkezi No: 5/A Ayazağa / Maslak İstanbul
Tel: +90 212 2895659
Ücretsiz Müşteri Destek Hattı: 0 800 211 00 65 Web:www.dlink.com.tr
Teknik Destek: support.tr@dlink.com.tr
10
Комплект поставки
DCS-7010L HD видеокамера для наружного использования  с поддержкой сервиса mydlink
CD-диск с руководством пользователя и программным обеспечением
Ethernet-кабель 5 категории
Адаптер питания
Если что-либо из перечисленного отсутствует, пожалуйста, обратитесь к поставщику.
Минимальные требования
Компьютер:
•ПК с частотой процессора 1.3 ГГц или выше, 128 МБ оперативной памяти и более
•Windows® 8, Windows® 7, Vista® или XP (32или 64-битная)
•Mac OS® X 10.6 или выше
Web-браузер:
•Internet Explorer® 7, Firefox 12, Safari 4 или Chrome 20 и выше
•Установленные и включенные элементы управления ActiveX® и Java
Сетевое оборудование и сервисы:
•Маршрутизатор (рекомендуется маршрутизатор Cloud компании D-Link)
•Подключение к Интернет
•Учетная запись e-mail (требуется для регистрации на портале mydlink)
КИЙPYCC
11
PYCCКИЙ
Установка
Установка с использованием маршрутизатора Cloud (Механизм Zero Configuration)
При наличии маршрутизатора Cloud с поддержкой сервиса mydlink можно воспользоваться функцией Zero Configuration, благодаря которой настройка IP-камеры и ее добавление в учетную запись mydlink осуществляются автоматически. C особенностями установки и настройки IP-камеры без использования маршрутизатора Cloud можно ознакомиться на следующей странице.
Подключите кабель питания и Ethernet-кабель к IP-камере.
Подсоедините уже подключенный к IP-камере Ethernet-кабель к маршрутизатору. Подключите адаптер питания к розетке.
На любом компьютере откройте web-браузер, перейдите на портал http://www.mydlink.com и
авторизуйтесь под своей учетной записью mydlink.
Для добавления IP-камеры в учетную запись необходимо выбрать ее из списка новых
устройств после получения уведомления
об обнаружении нового оборудования.
DCS-7010L
12
Установка с помощью Мастера
Если маршрутизатора Cloud в наличии нет, можно использовать любой компьютер с ОС Windows или Mac, чтобы с помощью Мастера (на CD-диске) выполнить пошаговую установку IP-камеры, начиная с аппаратного подключения и заканчивая настройкой устройства.
Если компьютер не оснащен дисководом CD-ROM или отсутствует CD-диск, загрузите Мастер установки с http://www.mydlink.com/support.
•Для пользователей Windows - Вставьте CD-диск в дисковод. Если автоматический запуск Мастера установки не произошел, нажмите Start > Run (Пуск > Выполнить). В поле ввода команды введите D:\autorun.exe (где D – имя дисковода) и нажмите OK.
•Для пользователей Mac – Вставьте CD-диск. На рабочем столе откройте CD-дисковод, дважды щелкните мышкой по файлу SetupWizard и следуйте инструкциям.
КИЙPYCC
13
PYCCКИЙ
Начало работы с сервисом mydlink
Сервис mydlink предоставляет пользователю возможность удаленного просмотра изображения и управления устройствами с поддержкой mydlink с любого подключенного к Интернету компьютера. После добавления IP-камер в учетную запись mydlink можно просматривать изображение с этих камер в режиме реального времени на портале mydlink. Для получения доступа к учетной записи mydlink выполните
следующее:
•Откройте браузер на любом подключенном к Интернету компьютере.
•В адресной строке введите http://www.mydlink.com и нажмите Enter.
•Авторизуйтесь под своей учетной записью mydlink.
•В главном окне отобразится список устройств, добавленных в учетную запись mydlink.
•Убедитесь, что браузер поддерживает Java и ActiveX и данные опции установлены и включены.
•По умолчанию в ОС Windows плагин Java не установлен. Загрузить его последнюю версию можно на сайте http://www.java.com.
•В Mac ОS X 10.7.x Java-апплеты выключены по умолчанию. Чтобы включить данную опцию, нажмите Finder > Applications > Utilities > Java Preferences (Finder > Приложения > Утилиты > Характеристики Java) и отметьте флажком опцию Enable applet plug-in and Web Start applications (Активировать апплет и приложения Web Start).
•Элементы управления ActiveX® в IE при необходимости будут установлены автоматически. По возможности убедитесь, что действительно включили соответствующие опции в Tools > Internet Options > Security > Custom Level (Сервис > Свойства обозревателя > Безопасность > Другой…).
14

Монтаж камеры
Для монтажа камеры на стену или потолок выполните следующие шаги.
 Рекомендуется выполнить настройку камеры до ее монтажа.
Шаг 1
Поместите монтажный кронштейн в выбранное Вами место.
Шаг 2
Отметьте карандашом отверстия.
Шаг 3
Используя сверло диаметром 6 мм, просверлите отверстия глубиной около 25 мм.
Шаг 4
Вставьте анкеры в отверстия и зафиксируйте кронштейн
с помощью винтов, входящих в комплект поставки.
КИЙPYCC
6
Шаг 5
Убедитесь, что кабель проходит в предназначенном для него канале.
Шаг 6 |
7 |
5 |
Подвесьте камеру на выступающие шляпки в верхней части монтажного кронштейна.
Шаг 7
Вставьте оставшийся винт в отверстие у основания камеры и закрутите его.
15
 Loading...