


Building Networks for People
Quick Installation Guide Outdoor Enclosure
This document will guide you through the basic installation process for your new D-Link Outdoor Enclosure.
DCS-56
DCS-56P
DCS-56W
Quick Installation Guide
Краткое руководство по установке
Guía de Instalación Rápida Guia de Instalação Rápida
Petunjuk Pemasangan Cepat
ENGLISH
Quick Install Guide
This installation guide provides basic instructions for installing the DCS-56 Series Outdoor Enclosure. The DCS-56 series are outdoor enclosures designed for use with D-Link’s box cameras. This IP66-certified enclosure protects your camera against dust and heavy jets of water. These models include a heater and a blower for a wider range of temperaturesensitive environments. The DCS-56 series consists of the DCS-56, the DCS-56P, and the
DCS-56W.
Package Contents
-- Camera Enclosure -- Mount Bracket
-- Wireless Antenna & holder (DCS-56W only)
-- Assembly Kit (Anchors, Screws, Allen key) -- Quick Installation Guide
If any of the above items are missing, please contact your reseller.
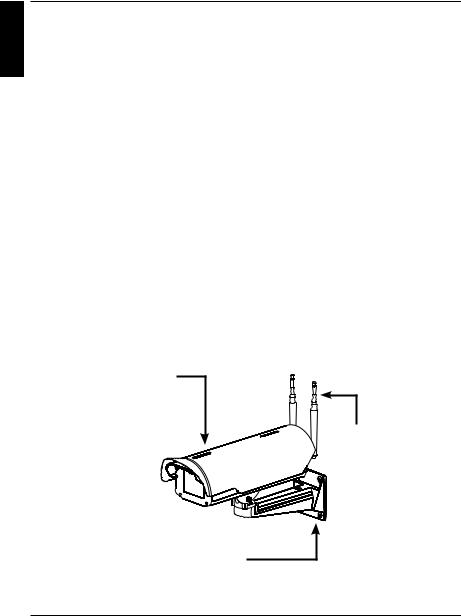
Hardware Overview
Camera Enclosure
Wireless Antenna
(DCS-56W only)
Mount Bracket
(Connects metal housing to wall)
2 |
D-Link DCS-56 Series Quick Install Guide |
|
|
Physical Installation
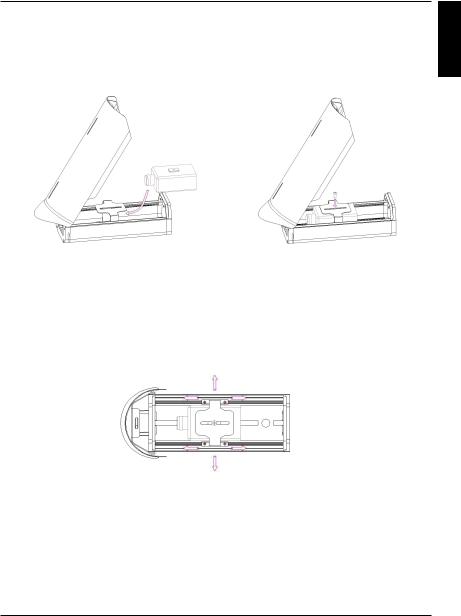
STEP 1: Open the camera enclosure and slide the camera into the holder. Tighten the camera in the holder.
STEP 2: Adjust the holder by loosing the retaining screws and tighten the screws to lock the desired position.
ENGLISH
D-Link DCS-56 Series Quick Install Guide |
3 |
|
|

ENGLISH
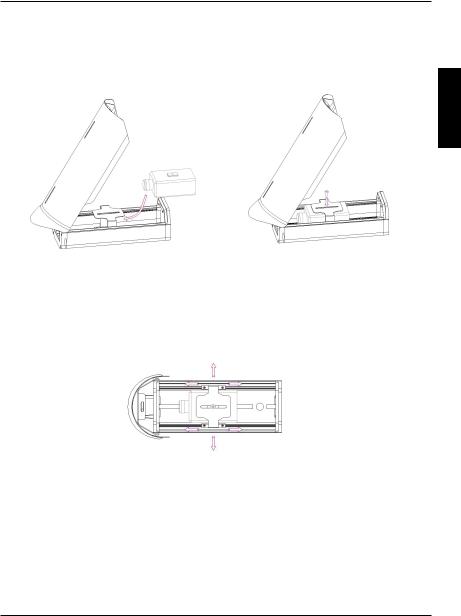
STEP 3: For the DCS-56 and DCS-56P models, Connect the Ethernet cable to the LAN port of the camera.
Note: Do not use the 12 V DC to power the camera via PoE.
12 V DC to main board of enclosure
Ethernet
PoE to camera
|
|
|
|
|
|
|
|
|
|
|
|
|
|
|
|
|
|
|
|
|
|
|
|
|
|
|
|
|
|
|
|
|
|
|
|
|
|
|
|
|
|
|
|
|
|
|
|
|
|
|
|
|
|
|
|
|
|
|
|
|
|
|
|
|
|
|
|
|
|
|
|
|
|
|
|
|
|
|
|
|
|
|
|
|
|
|
|
|
|
|
|
|
|
|
|
|
|
|
|
|
|
|
|
|
|
|
|
|
|
|
|
|
|
|
|
|
|
|
|
|
|
|
|
|
|
|
|
PoE to main board |
|
||||||||||
12 V DC to camera |
|
||||||||||||||||||
|
of enclosure |
|
|
|
|
||||||||||||||
|
|
|
|
|
|
|
|
|
|||||||||||
|
|
|
|
|
|
|
|
|
|
|
|
||||||||
|
|
|
|
|
|
|
|
|
|
12 V DC to camera |
|||||||||
|
|
|
|
|
|
|
|
|
|
(optional) |
|||||||||
For the DCS-56W model, connect the wireless antenna extender to the camera.
Cable for extended wireless antenna
12 V DC to camera (optional)
STEP 4: Mount the mount bracket to the location where you want to set up your camera.
To prevent damage to the Ethernet cable, pre-install the cable to the location.
4 |
D-Link DCS-56 Series Quick Install Guide |
|
|

STEP 5: Install the camera enclosure onto the mount bracket and secure the joint with the screws provided.
STEP 6: Adjust the screws accordingly below the camera enclosure to control the camera position.
This screw controls the vertical position adjustment (<180°).
This screw controls the level position adjustment
(<360°).
STEP 7: To install the wireless antennas (DCS-56W only), connect the wireless antennas to the camera enclosure, then attach the antenna holders to the enclosure, and tighten them in place.
ENGLISH
D-Link DCS-56 Series Quick Install Guide |
5 |
|
|

ENGLISH
TECHNICAL SUPPORT
You can find software updates and user documentation on the D-Link website.
Tech Support for customers in
Australia:
Tel: 1300-766-868 24/7 Technical Support
Web: http://www.dlink.com.au E-mail: support@dlink.com.au
India:
Tel: +91-22-27626600
Toll Free 1800-22-8998
Web: www.dlink.co.in
E-Mail: helpdesk@dlink.co.in
Singapore, Thailand, Indonesia,
Malaysia, Philippines, Vietnam:
Singapore - www.dlink.com.sg Thailand - www.dlink.co.th Indonesia - www.dlink.co.id Malaysia - www.dlink.com.my Philippines - www.dlink.com.ph Vietnam - www.dlink.com.vn
Korea:
Tel : +82-2-2028-1810
Monday to Friday 9:00am to 6:00pm Web : http://d-link.co.kr
E-mail : g2b@d-link.co.kr
New Zealand:
Tel: 0800-900-900 24/7 Technical Support
Web: http://www.dlink.co.nz E-mail: support@dlink.co.nz
South Africa and Sub Sahara
Region:
Tel: +27 12 661 2025
08600 DLINK (for South Africa only) Monday to Friday 8:30am to 9:00pm South Africa Time
Web: http://www.d-link.co.za E-mail: support@d-link.co.za
Saudi Arabia (KSA):
Tel: +966 01 217 0008
Fax: +966 01 217 0009
Saturday to Wednesday 9.30AM to 6.30PM Thursdays 9.30AM to 2.00 PM
E-mail: Support.sa@dlink-me.com
D-Link Middle East - Dubai, U.A.E.
Plot No. S31102,
Jebel Ali Free Zone South,
P.O.Box 18224, Dubai, U.A.E. Tel: +971-4-8809022
Fax: +971-4-8809066 / 8809069
Technical Support: +971-4-8809033 General Inquiries: info.me@dlink-me.com Tech Support: support.me@dlink-me.com
Egypt
1, Makram Ebeid Street - City Lights Building Nasrcity - Cairo, Egypt
Floor 6, office C2
Tel.: +2 02 26718375 - +2 02 26717280 Technical Support: +2 02 26738470 General Inquiries: info.eg@dlink-me.com Tech Support: support.eg@dlink-me.com
Kingdom of Saudi Arabia
Office # 84 ,
Al Khaleej Building ( Mujamathu Al-Khaleej) Opp. King Fahd Road, Olaya
Riyadh - Saudi Arabia
Tel: +966 1 217 0008
Technical Support:
+966 1 2170009 / +966 2 6522951 General Inquiries: info.sa@dlink-me.com Tech Support: support.sa@dlink-me.com
Pakistan
Islamabad Office:
61-A, Jinnah Avenue, Blue Area,
Suite # 11, EBC, Saudi Pak Tower,
Islamabad - Pakistan
Tel.: +92-51-2800397, 2800398
Fax: +92-51-2800399
Karachi Office:
D-147/1, KDA Scheme # 1,
Opposite Mudassir Park, Karsaz Road, Karachi – Pakistan
Phone: +92-21-34548158, 34326649 Fax: +92-21-4375727
Technical Support: +92-21-34548310, 34305069 General Inquiries: info.pk@dlink-me.com
Tech Support: support.pk@dlink-me.com
6 |
D-Link DCS-56 Series Quick Install Guide |
|
|

TECHNICAL SUPPORT
Iran
Unit 5, 5th Floor, No. 20, 17th Alley , Bokharest St. , Argentine Sq. ,
Tehran IRAN
Postal Code : 1513833817
Tel: +98-21-88880918,19 +98-21-88706653,54
General Inquiries: info.ir@dlink-me.com Tech Support: support.ir@dlink-me.com
Morocco
M.I.T.C
Route de Nouaceur angle RS et CT 1029 Bureau N° 312 ET 337
Casablanca , Maroc Phone : +212 663 72 73 24
Email: support.na@dlink-me.com
Lebanon RMA center
Dbayeh/Lebanon
PO Box:901589
Tel: +961 4 54 49 71 Ext:14
Fax: +961 4 54 49 71 Ext:12
Email: taoun@dlink-me.com
Bahrain
Technical Support: +973 1 3332904
Kuwait:
Technical Support: + 965 22453939 / +965 22453949
Türkiye Merkez İrtibat Ofisi
Ayazağa Maslak yolu
Erdebil Cevahir İş Merkezi No: 5/A Ayazağa / Maslak İstanbul
Tel: +90 212 2895659
Ücretsiz Müşteri Destek Hattı: 0 800 211 00 65 Web:www.dlink.com.tr
Teknik Destek: support.tr@dlink.com.tr
ENGLISH
073-796-2797


D-Link DCS-56 Series Quick Install Guide |
7 |
|
|

PYCCКИЙ
Краткое руководство по установке
Данное руководство по установке содержит основные инструкции по установке кожухов для наружного использования серии DCS-56. Серия кожухов DCS-56 разработана для
использования совместно с камерами D-Link. Данные кожухи, имеющие сертификат IP66,
защищают камеру от пыли и потоков воды. Модели этой серии оснащены обогревателем и вентилятором для обеспечения работы камеры в широком диапазоне температур. Серия кожухов DCS-56 включает модели DCS-56, DCS-56Pи DCS-56W.
Комплект поставки
-- Кожух для камеры -- Монтажный кронштейн
-- Беспроводные антенны и держатели (только для DCS-56W)
-- Монтажный комплект (анкеры, винты, шестигранный ключ)
-- Краткое руководство по установке Если что-либо из перечисленного отсутствует, пожалуйста, обратитесь к поставщику.
Обзораппаратнойчасти
Кожух для камеры
Беспроводные
антенны
(только для DCS-71W)
Монтажный кронштейн 
(для крепления металлического корпуса к стене)
8 |
D-Link DCS-56 Series Quick Install Guide |
|
|
Установка
ШАГ 1: Откройте кожух для камеры, вставьте камеру в держатель и закрепите ее в
держателе с помощью винта.
КИЙPYCC
ШАГ 2: Отрегулируйте положение держателя, ослабив фиксирующие винты, и затяните
винты, когда держатель будет установлен в требуемое положение.
D-Link DCS-56 Series Quick Install Guide |
9 |
|
|

PYCCКИЙ
ШАГ 3: Для моделей DCS-56 и DCS-56P подключите Ethernet-кабель к LAN-порту камеры.
Примечание: Не используйте 12 В постоянного тока, если питание камеры будет
осуществляться через PoE.
12 В постоянного тока к главной плате кожуха
Ethernet
PoE к камере
PoE к главной 12 В постоянного тока плате кожуха к камере
12 В постоянного тока к камере (опционально)
Для модели DCS-56W подключите удлинитель беспроводной антенны к камере.
Кабель для беспроводной антенны
12 В постоянного тока к камере (опционально)
ШАГ 4: Установите монтажный кронштейн в том месте, где необходимо установить
камеру. Чтобы предотвратить повреждение Ethernet-кабеля, предварительно
проведите кабель к требуемому месту.
10 |
D-Link DCS-56 Series Quick Install Guide |
|
|
 Loading...