


DCS-3220
Table of contents
 Loading...
2-Way Audio Internet Camera
with Digital Zoom
Manual
Building Networks for People
Version 1.10
DCS-3220
(10/04/04)

2
Contents of Package.......................................................................................3
Introduction......................................................................................................4
Features and Benefits .....................................................................................4
Connections ....................................................................................................6
Hardware Installation .......................................................................................8
Installation Wizard...........................................................................................9
Installation Wizard Screen ............................................................................14
Enabling UPnP for Windows XP/Me..............................................................1 7
Installing IP surveillance Software .................................................................21
Testing the DCS-3220 ...................................................................................25
Security .........................................................................................................26
Using and Configuring the DCS-3220 with a NAT Router .............................27
Using the DCS-3220 with an Internet Browser..............................................33
Record Snapshots to your FTP server with Motion Detection.......................59
Using IP surveillance Software......................................................................63
Installing IP surveillance Software .....................................................63
Launcher ..........................................................................................68
Monitor Program................................................................................71
Scheduling.........................................................................................96
Playback Program............................................................................104
Schedule Video Recording with Motion Detection .......................................119
Appendix......................................................................................................122
Frequently Asked Questions............................................................122
How to PING Your IP Address..........................................................125
Reset and Restore ..........................................................................126
I/O Connector ..................................................................................127
Adjusting the Camera’s Focus ........................................................131
Replacing the Lens..........................................................................132
Technical Specifications ..................................................................133
Contacting Technical Support .....................................................................135
Time Zone Table ..........................................................................................136
Warranty......................................................................................................138
Registration .................................................................................................141
Contents
3
D-Link DCS-3220 Internet Camera
Power Adapter
Installation software and manual on CD
Quick Installation Guide
Camera Stand
Category 5 Ethernet Cable
Note: Using a power supply with a different voltage than the one included with the
DCS-3220 will cause damage and void the warranty for this product.
Minimum System Requirements:
Internet Explorer 6.x Internet Web Browser
CPU: Pentium 4, 1.7GHz or above
(Pentium 4, 2.8GHz plus processor with 512MB memory and a
32MB video card is required for multiple camera viewing and
recording in IP Surveillance)
Memory Size: 128MB
VGA card resolution: 800 x 600 or above
Package Contents
If any of the above items are missing, please contact your reseller.

4
Introduction
Broad Range of Applications
With today’s high-speed Internet services, the Internet Camera can provide the
ideal solution for live video images and audio over the Intranet and Internet for
remote monitoring. The DCS-3220 allows remote access from your Internet
Explorer Web browser for live image viewing with audio and allows the
administrator to manage and control the Internet Camera anywhere and any
time in the world. Apply the Internet Camera to monitor various objects and
places such as homes, offices, banks, hospitals, child-care centers, amusement
parks and other varieties of industrial and public monitoring. The Internet Camera
can also be used for intruder detection with its motion-detection mode, capture
still images and video images for archiving and many more applications such
as sending images to an FTP server or configuring for E-mail alerts. The DCS-
3220 features 2-way audio with a built-in microphone that lets you remotely
monitor and record audio. With the addition of optional speakers (not included),
you can have 2-way audio communication with the people you are viewing. The
DCS-3220 also features 4x digital zoom for closer viewing.
The D-Link SECURICAM Network
TM
DCS-3220 Internet Camera is a full featured
surveillance system that connects to an Ethernet, Fast Ethernet or broadband
Internet connection to provide remote high-quality video, 2-way audio
surveillance, and 4x digital zoom
1
. The DCS-3220 Internet Camera differs from
a conventional PC Camera because it is a stand-alone system with a built-in
CPU and Web server providing a low-cost solution capable of solving demanding
security and home/office monitoring needs. The DCS-3220 can be accessed
remotely, and controlled, from any PC or notebook computer over the Internet
from anywhere in the world. Simple installation procedures, along with the built-
in Web-based interface offers easy integration to your network environments.
CCD Sensor
The DCS-3220 comes standard with a high quality CCD sensor that is superior
to a CMOS type sensor. The fixed focus glass lens will facilit ate the use of the
DCS-3220 providing crystal clear and sharp images. You can view up to
30 frames
2
per second of live motion video with 380 TV lines of resolution.
2
Actual frame rate will vary due to network traffic, compression rate, frame rate, and lighting.
Features and Benefits
The SECURICAM Network
TM
DCS-3220 Internet Camera is a stand-alone
system requiring no special hardware or software such as PC frame grabber
cards. All that is required is a computer with Internet Explorer Web browser
(version 5.x or above). Just plug in the camera and view the picture from your
Internet Camera with a valid IP Address.
1
4x digital zoom enlarges an image by magnifying the pixels in a selected portion of the image by 4 times.

5
Powerful Surveillance and Remote Monitoring Utility
The powerful IP surveillance software application assigns an administrator
with a pre-defined user ID and password who can modify the Internet Camera
settings from the remote site via an Intranet or the Internet. Administrators are
allowed to monitor the image, record the image to a hard drive, and take
snapshots.
Connection to External Devices
Supporting auxiliary Input/Output connectors, you can connect the Internet
Camera to a variety of external devices such as IR-sensors, switches and alarm
relays. Combined with programmable alarming facilities, you can develop a variety
of security applications that are triggered on alarm-based events. The Internet
Camera provides an industry standard in/out external connector for connectivity .
Note: Use of audio or video equipment for recording the image or voice of a
person without their knowledge and consent is prohibited in certain states or
jurisdictions. Nothing herein represents a warranty or representation that the
D-Link product provided herein is suitable for the end-user’s intended use under
the applicable laws of his or her state. D-Link disclaims any liability whatsoever
for any end-user use of the D-Link product, which fails to comply with applicable
state, local, or federal laws.
Web Configuration
Using the Internet Explorer Web browser, administrators can configure and
manage the Internet Camera directly from its own Web page via the Intranet or
the Internet. Up to 20 user names and passwords are permitted, with privilege
settings controlled by the administrator .
Features & Benefits (continued)
Supports a Variety of Protocols
Supporting TCP/IP networking, SMTP e-mail, HTTP and other Internet related
protocols, the DCS-3220 can be integrated easily into other Internet/Intranet
applications because of its standards-based features. The camera also supports
UPnP
TM
and DDNS. DDNS allows the camera to use an easier to remember
naming format rather than an IP address. UPnP
TM
will allow users of Windows
XP and Me to install the camera using Plug-and-Play technology.
6
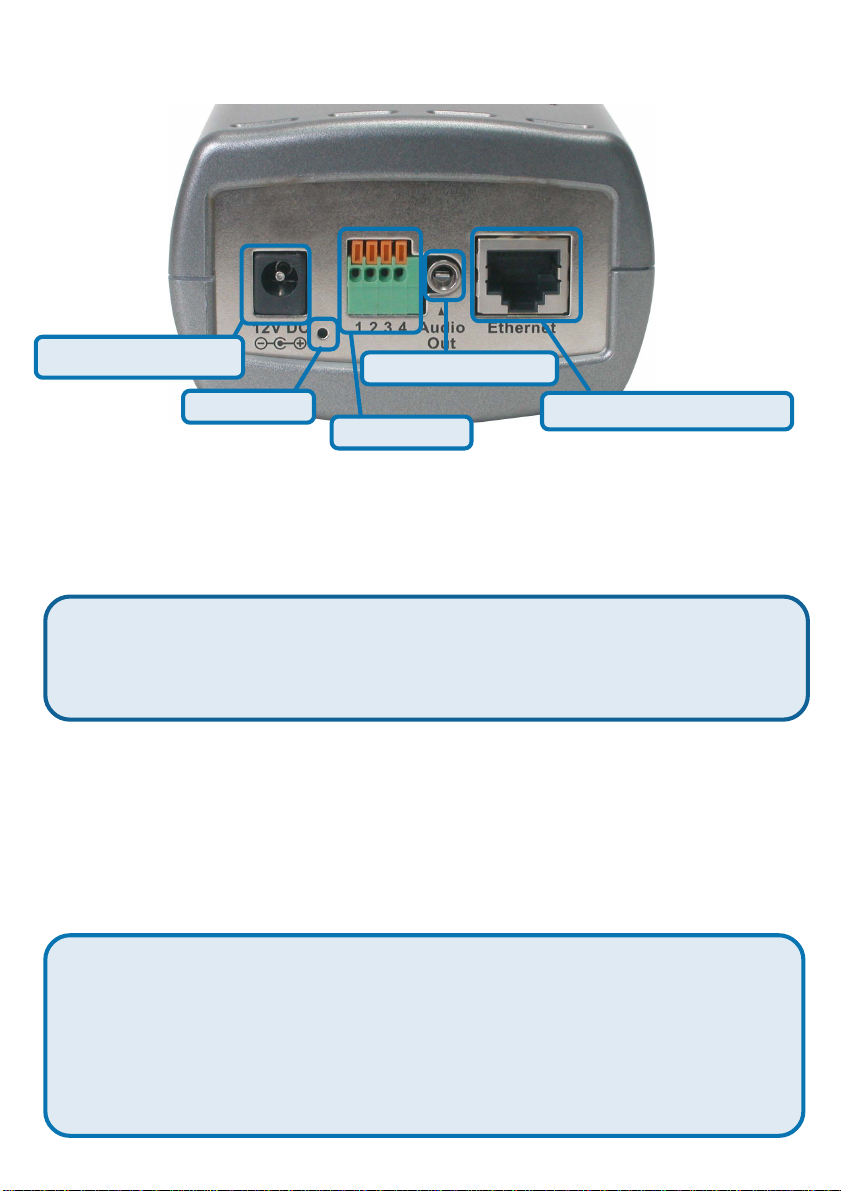
Connections
Ethernet Cable Connector
The DCS-3220 back panel features an RJ-45 connector for connections to
10Base-T Ethernet cabling or 100Base-TX Fast Ethernet cabling. This network
port supports the NWay protocol, allowing the Internet Camera to automatically
detect or negotiate the transmission speed of the network.
.
DC Power Connector
The DC power input connector is located on the DCS-3220 Internet Camera’s
back panel and is labeled DC 12V with a single socket to supply power to the
Internet Camera.
A reset to factory defaults will be initiated when the reset button is pressed
continuously for 5 seconds or when the Power LED changes from green to
red for 2 cycles. (For example you will see the LED turn to red twice, release
the reset button when the LED turns red the second time). The Power LED
will begin to flash indicating that the Internet Camera’s settings are reverting
back to the factory settings, then turn back to green. To reset the camera,
press the reset button once, and the LED will flash to orange.
The Ethernet cable included with the DCS-3220 Internet Camera is a
Category 5 “straight through” cable. This is the recommended cable type
when the camera is connected to a 100 Mbps Fast Ethernet network hub or
switch.
Ethernet Cable Connector
DC Power Connector
I/O Connector
Reset Button
Audio Out Connector
Reset Button
Reset will be initiated when the reset button is pressed once and held until the
Power LED flashes through its cycle twice

7
The DCS-3220 provides a terminal block with two pairs of connectors situated
on the back panel. One pair is for input and the other is for output. The I/O
connectors provide the physical interface to send and receive digital signals to
a variety of external alarm devices. Please refer to the appendix in this
manual for detailed information.
Connections (continued)
Located on the bottom panel of the DCS-3220, the socket is used to connect
the camera stand to the Internet Camera by attaching the screw head on the
camera stand to the Internet Camera.
Bottom Panel
Socket for stand
Power LED
LED stands for Light-Emitting Diode.
The Power LED is positioned on the right side of the Internet Camera lens. As
soon as the power adapter is connected to the Internet camera the power LED
will flash red and green several times, the DCS-3220 is conducting a
self-test. Upon passing the self-test the LED will turn green to indicate a good
connection to an Ethernet port or red to indicate no connection has been made.
I/O Connector
Attachment socket for the Camera Stand
Audio Out Connector
The DCS-3220 provides an Audio Out connector to be used for 2-way audio.
Speakers (not included) may be connected to the camera to provide audio for
2-way conversations with those you are viewing.
8
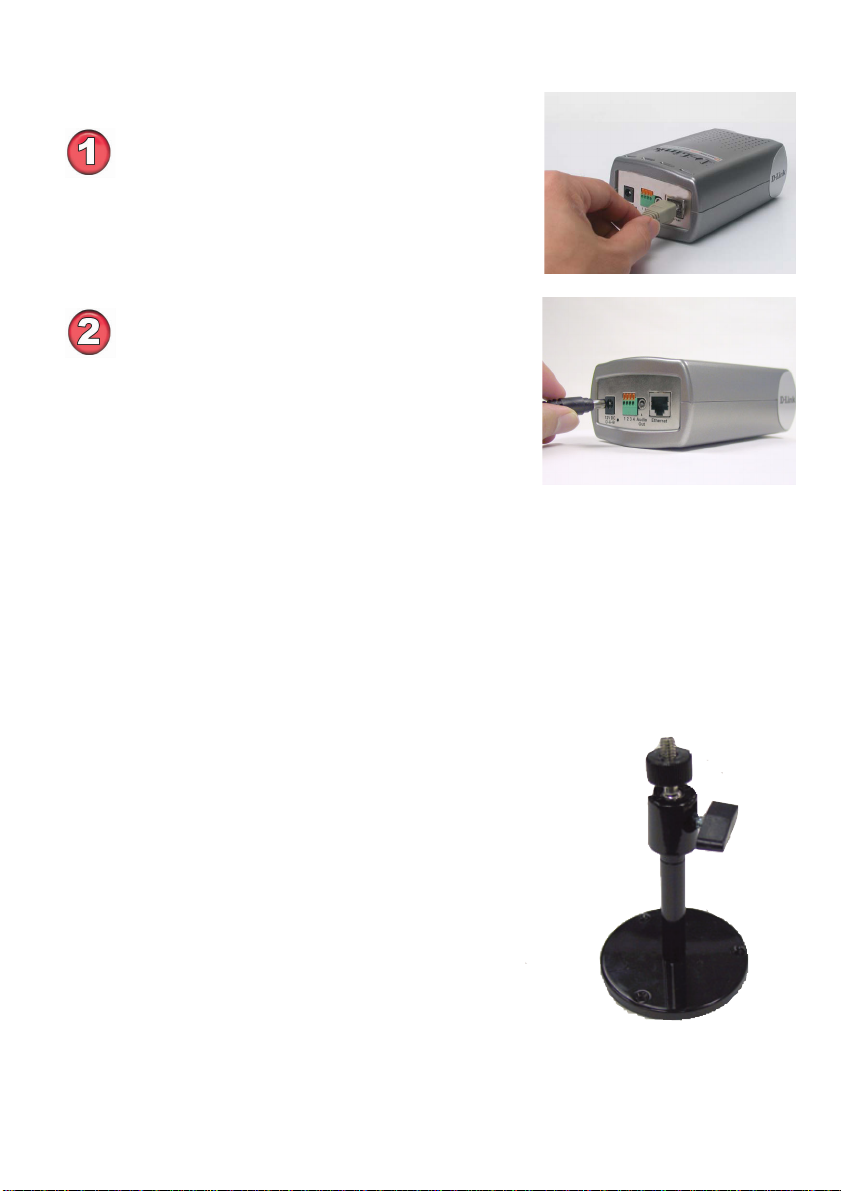
Hardware Installation
Connect an Ethernet cable
Connect an Ethernet cable to the network
cable connector located on the DCS-3220’s
back panel and attach it to the network.
Attach the external power supply
Attach the external power supply to the DC
power input connector located on the
DCS-3220’s back panel labeled 12VDC
and connect the other end to your wall outlet.
The Internet Camera comes with a camera
stand with a swivel ball screw head that
can be attached to the Internet Camera
bottom socket cavity. Attach the camera
stand to the Internet Camera and station it
for your application. There are holes
located in the base of the camera stand
allowing the Internet Camera to be mounted
to the ceiling, or any wall securely .
Attaching the Internet Camera to the Camera Stand
When you have a proper connection, the LED will turn from red to green. The
light may cycle on and off and your computer may show an intermittent loss of
connectivity , this is normal until you have configured your Internet Camera.
9
Installation Wizard
After you have successfully completed the hardware installation of the DCS-
3220 Internet Camera, it is necessary to install software to configure and operate
the camera. The first step is to install the Installation Wizard from the CD.
Installation Wizard will allow you to configure the Internet Camera to your
network
After the Installation Wizard software program is completed, you will have an
operating and controllable Internet Camera. From your Internet Explorer Web
browser you will be able to access the video and sound from the Internet camera.
The camera has a built-in Web server . This Web server will allow the camera to
access the Internet without being attached to a computer and permits users to
view the video and audio remotely .
After running the Installation Wizard, you will be able to operate the DCS-3220
and view the camera remotely through Internet Explorer 6.x or above.
However it is necessary to install the IP surveillance software from the enclosed
CD to create a truly powerful monitoring and surveillance system. The following
section will show in detail the installation of the Installation Wizard and the IP
surveillance software.
Installing the Installation Wizard program
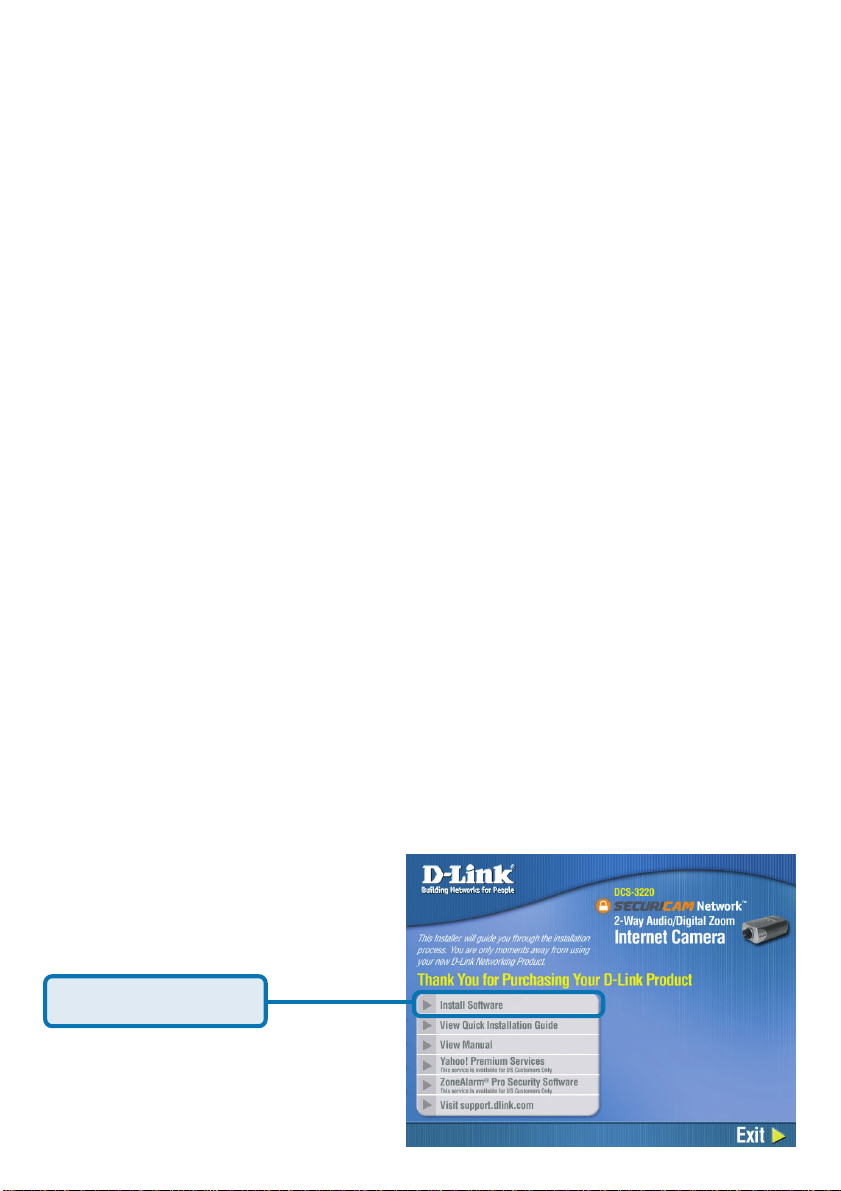
Insert the CD that is included with the DCS-3220 Internet Camera. The
DCS-3220 installation menu will start up automatically from the CD. If the CD
does not start up automatically (the Windows operating system can turn this
function off, for example), go to Start > Run > Type D:\Autorun (if D:\ is your
cd-rom drive) to access the installation menu shown below:
Click Install Software.
10
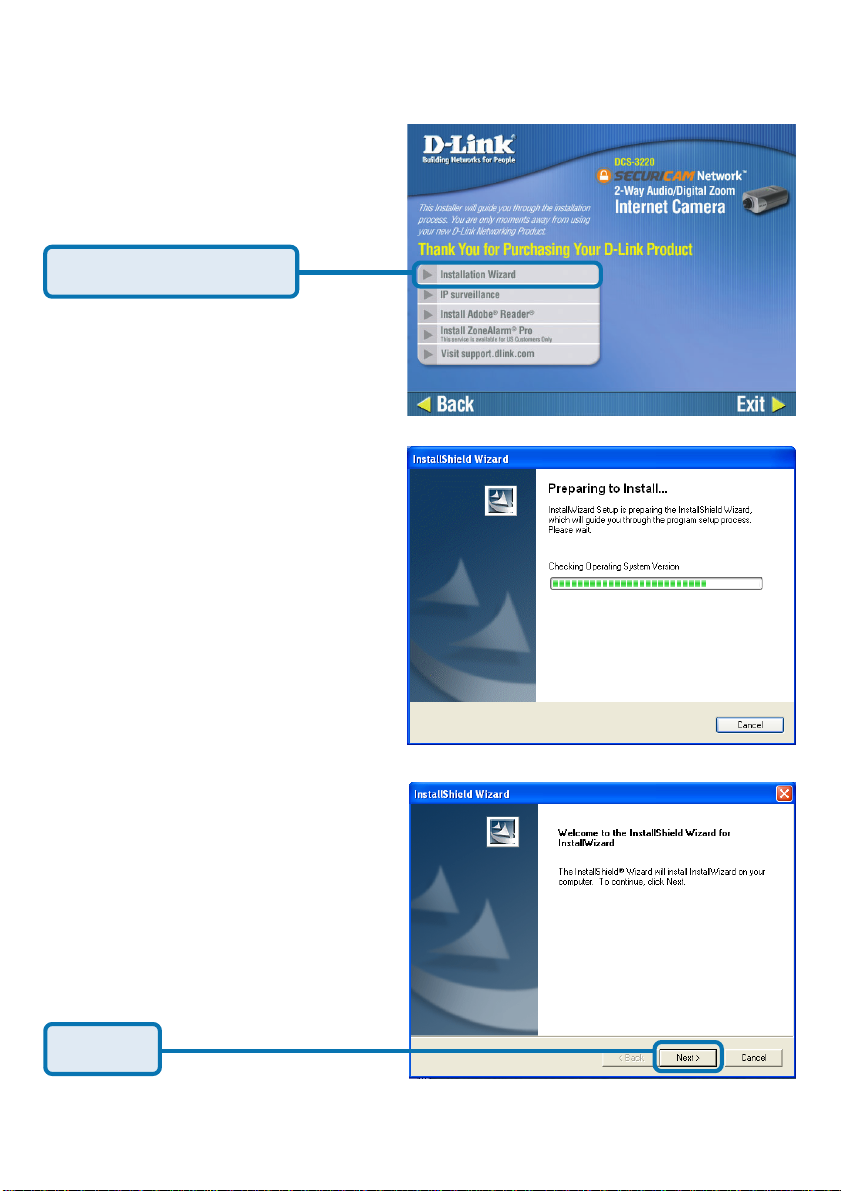
Installation Wizard (continued)
Click Installation Wizard.
Please wait while the
InstallShield Wizard
prepares to install.
Click Next.

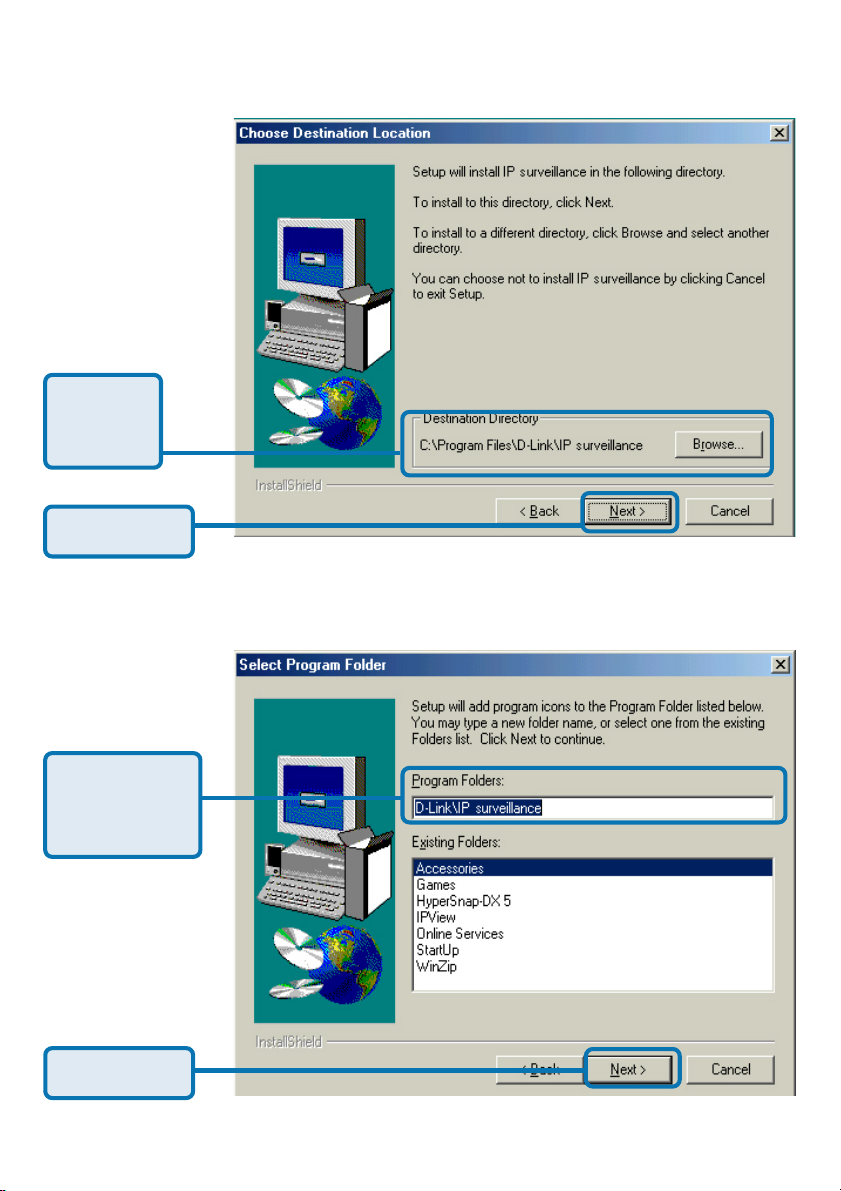
11
The InstallShield will install in
the following folder. T o install
into a different folder, click
Browse and select another
folder.
Click Next.
Select the Program folder
that Setup will add program
icons to. Y ou may type a new
folder name, or select one
from the existing folders list.
Click Next.
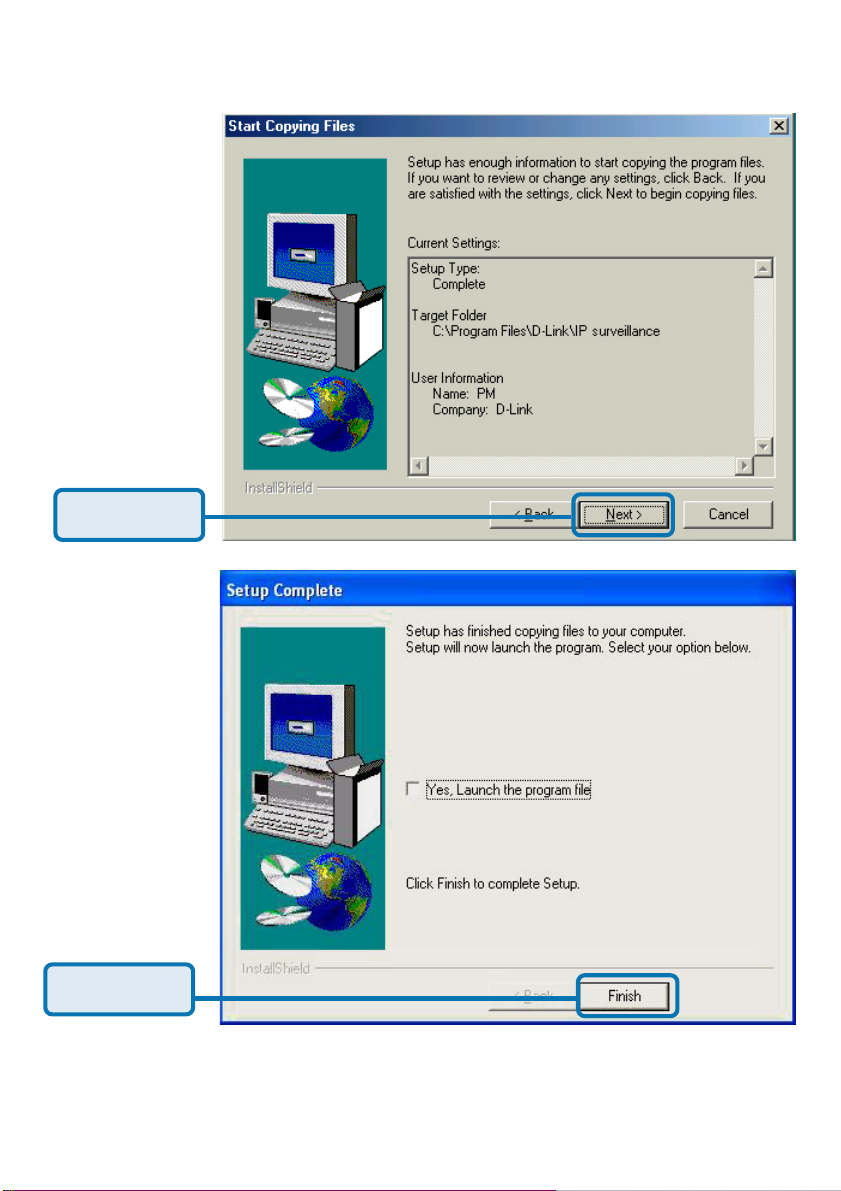
Please wait while the
Installation Wizard is
installed.
Installation Wizard (continued)
12
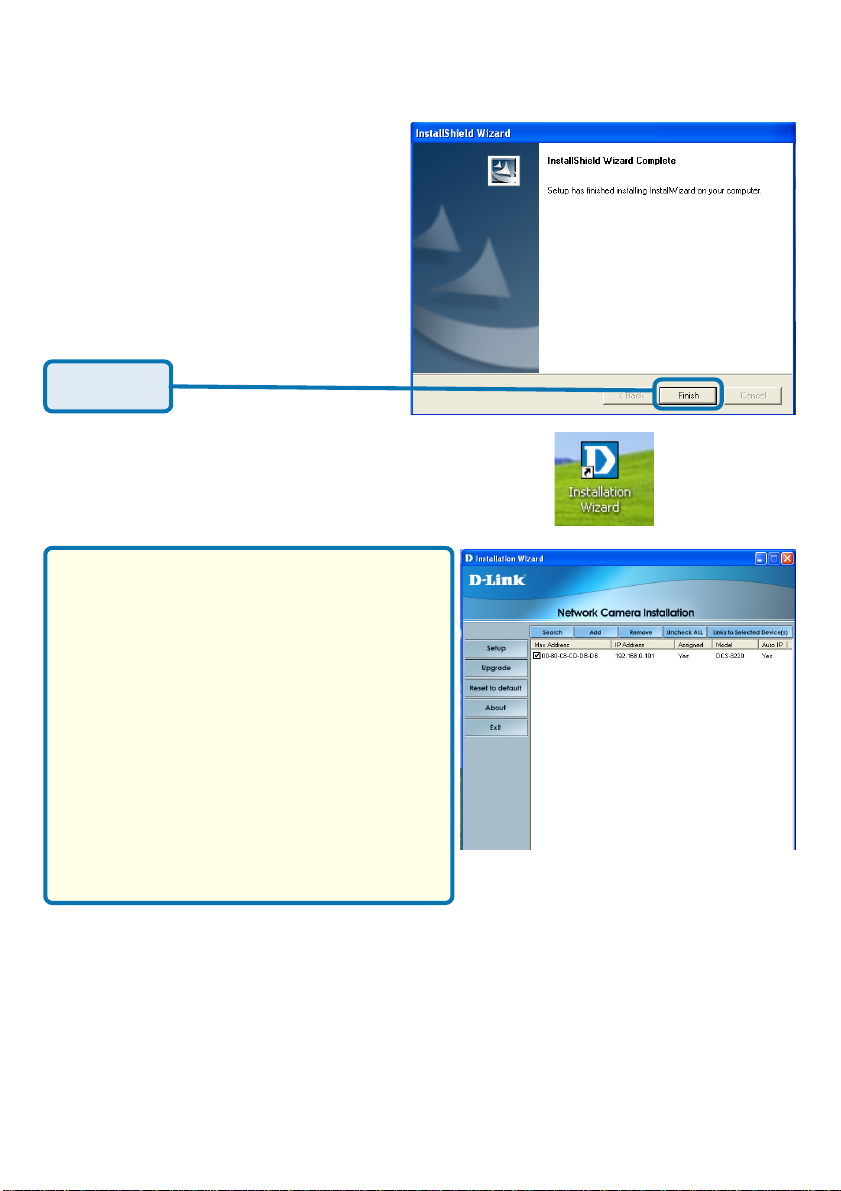
Installation is now complete.
Installation Wizard (continued)
IMPORTANT:
A hardware reset of the Internet Camera may be required if the Installation
Wizard cannot find the camera. To accomplish this reset, lightly insert a paper
clip (or a similar sized tool) into the reset hole on the back of the camera (see
page 6 for the location of the reset hole). The LED on the front of the camera
will begin blinking orange. When it stops the blinking cycle continue to hold in
the reset button until a second cycle of blinking red and green lights indicates a
second reset cycle has completed. This will take approximately 5-7 seconds.
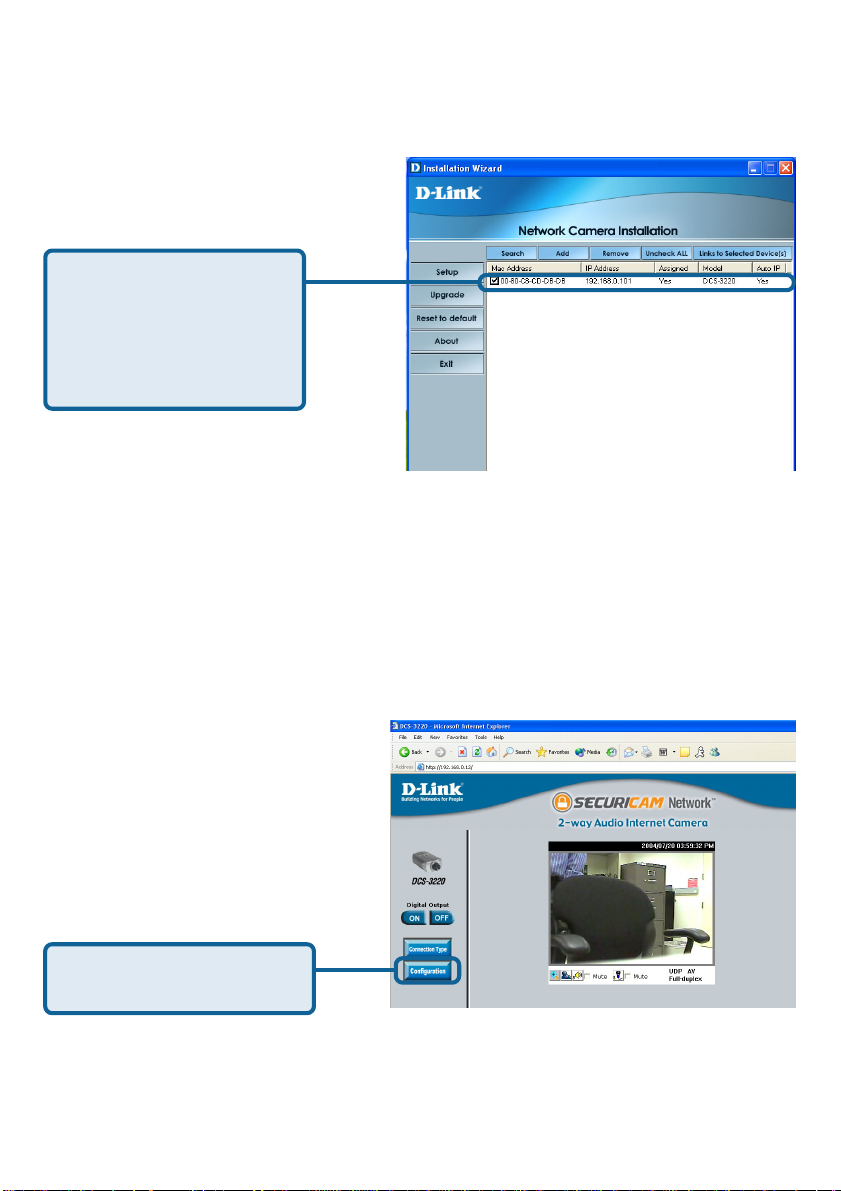
The opening Installation Wizard screen
will appear and show a MAC address of
the DCS-3220 and an IP Address (which
may or may not be correct depending on
what you have your DCS-3220 connected
to). If you have a DHCP* server on your
network, there will be a valid IP Address
displayed here, indicated by a “Yes”
under the assigned column.
*A DHCP server is a device that supplies
IP Addresses to its clients that are on the
same network.
Click Finish.
To access the Installation Wizard
screen, click on the Installation
Wizard Icon on your desktop.
13
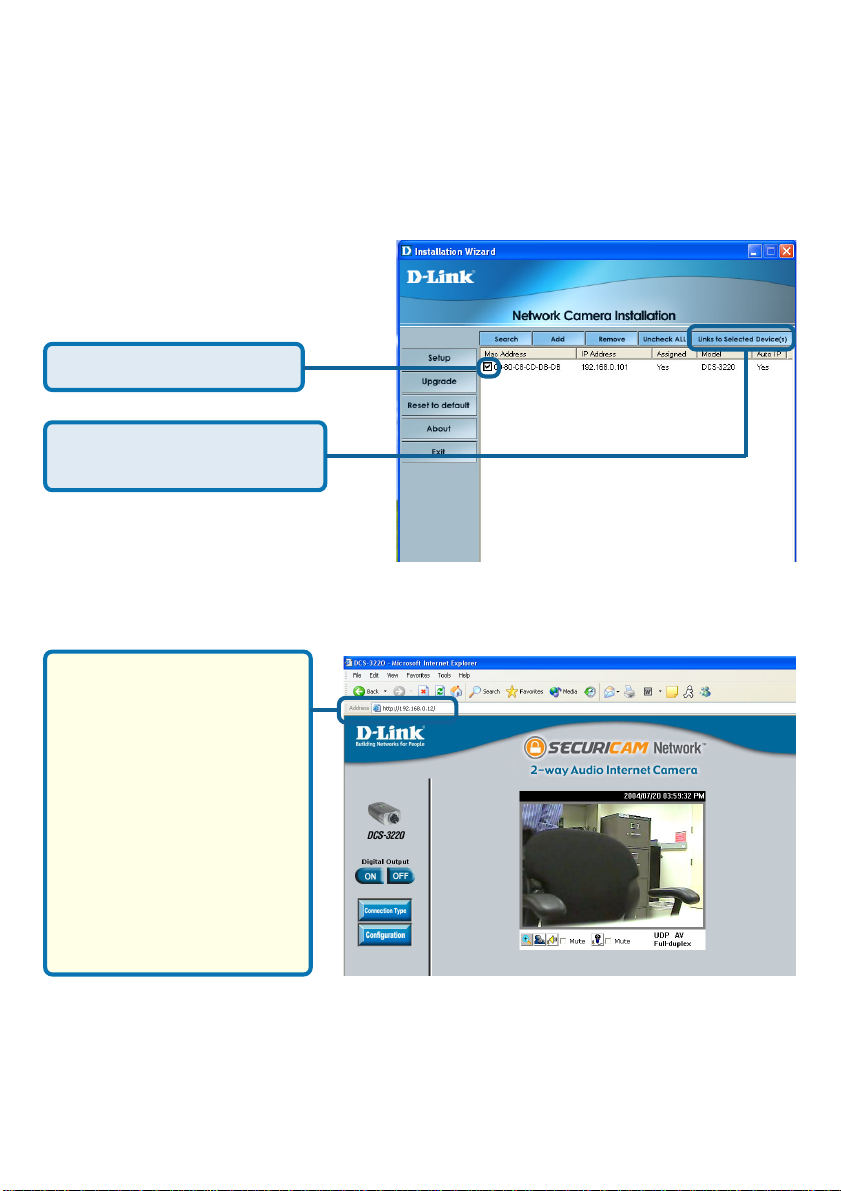
The Installation Wizard will now show a MAC address for the DCS-3220 and
an IP address. This IP address may not be correct at this step in the installation
until you see “Y es” under the assigned column. The camera is now automatically
configured with an IP address consistent to the device it is connected to.
Click on the Link to Selected
Devices button.
Select the MAC address.
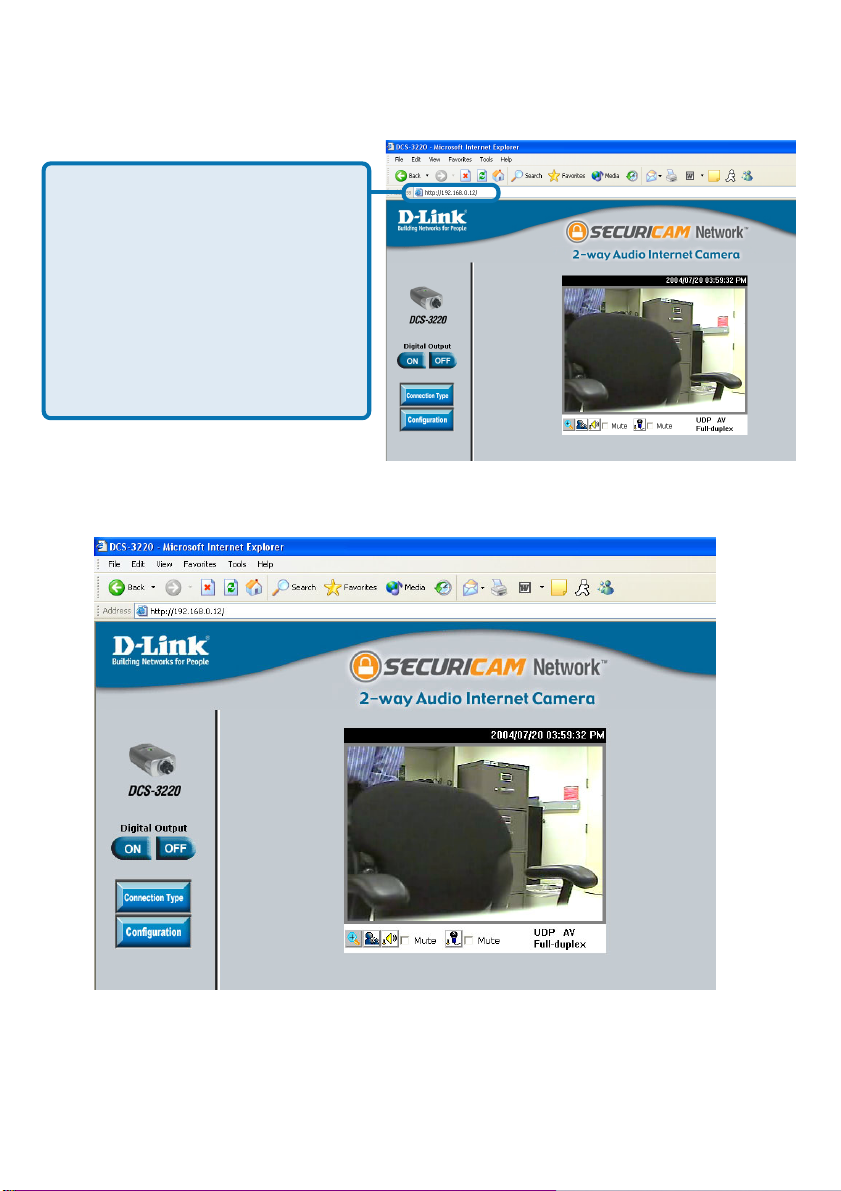
After you click on the Link
to Selected Devices
button, Installation
Wizard will automatically
open your Internet
browser to the IP
Address of the DCS-
3220, in this example it is:
http://192.168.0.12. Y our
DCS-3220 may have a
different IP Address.
You have now completed the Setup Wizard and are ready to use your
camera! You can also continue to the section titled “Installing IP
surveillance Software” (P. 21) to install the IP surveillance software be-
fore you begin to use the DCS-3220.
For more information regarding the functions of this screen, see the following
section titled “Installation Wizard Screen.”
Installation Wizard (continued)

14
Installation Wizard Screen
The following options are available on the Installation Wizard screen by clicking
on the corresponding tab:
Search -
Click to search for any available
cameras to connect to the network.
Add -
Click to manually add a camera to
the network. A window will appear,
prompting you to enter the camera’s
IP address or domain name. A
second window will appear,
prompting you to enter the port
number.
Remove -
Click to remove the selected camera(s) from the network.
Uncheck All -
Click to uncheck all selected cameras.
Links to Selected Devices -
Click to link all selected devices to the network.
Setup -
On the initial Setup Screen you can
configure System and Date/Time
settings for each camera. Click
Next to configure Network settings
for the camera.
System Settings -
Enter a Camera Name and create
a Root password for the camera.
Date/Time Settings -
Enter the Date and Time for each
camera. These settings can also be
configured on the Tools > System
screen (page 51) when configuring
the camera via a Web browser.
15
Installation Wizard Screen (continued)
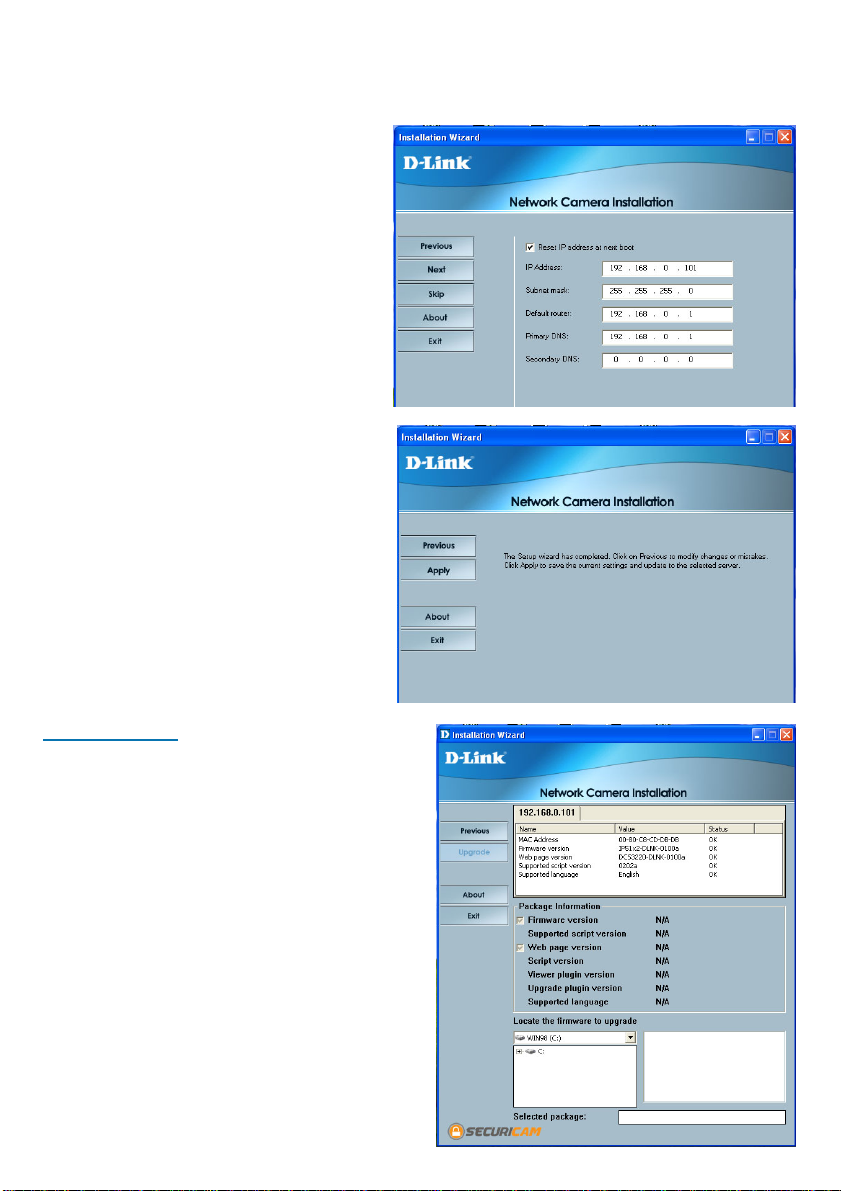
Upgrade -
Network Settings -
Here users can configure the
Network Settings for the camera.
Enter the IP address, Subnet mask,
Default router IP , Primary DNS, and
Secondary DNS. Automatically , the
option to reset IP address at boot is
selected. If you would like to save
your IP address settings, make sure
to uncheck this box. These settings
can also be configured on the
Advanced > Network screen
(page 37) when configuring the
camera via a Web Browser.
Click Next and then Apply to save
the configured settings. Users can
click Previous to modify changes
or mistakes.
The upgrade window allows users
to upload a saved firmware file. If
the firmware is older than that
currently on the camera, a screen
will appear indicating so and
prompting the user to confirm the
upload.
Package Information -
This displays information about the
firmware and plugin currently
installed on the camera.

16
Installation Wizard Screen (continued)
Reset to Default -
About -
Exit -
Click the Exit tab to exit the Installation Wizard screen.
Click About to display the current
version and date.
Click the Reset to Default tab to reset the camera’s settings to factory defaults.
Locate the Firmware to Upgrade -
Indicate the location of the firmware to be uploaded to the camera.
Selected Package -
This displays the file name of the firmware selected for upload.
17
Enabling UPnP for Windows XP/Me
UPnP is short for Universal Plug and Play, which is a networking architecture
that provides compatibility among networking equipment, software, and
peripherals. The DCS-3220 is a UPnP enabled Internet camera. If your operating
system is UPnP enabled, the device will be easier to configure. If you do not
want to use the UPnP functionality , it can be disabled by unchecking the Enabled
DDNS check box on the DDNS/UPnP settings page under “Advanced” in the
configuration menu. Use the following steps to enable UPnP (Universal Plug
and Play) settings only if you are running Windows XP/Me. If you are running
Windows 98/2000, UPnP is not available.
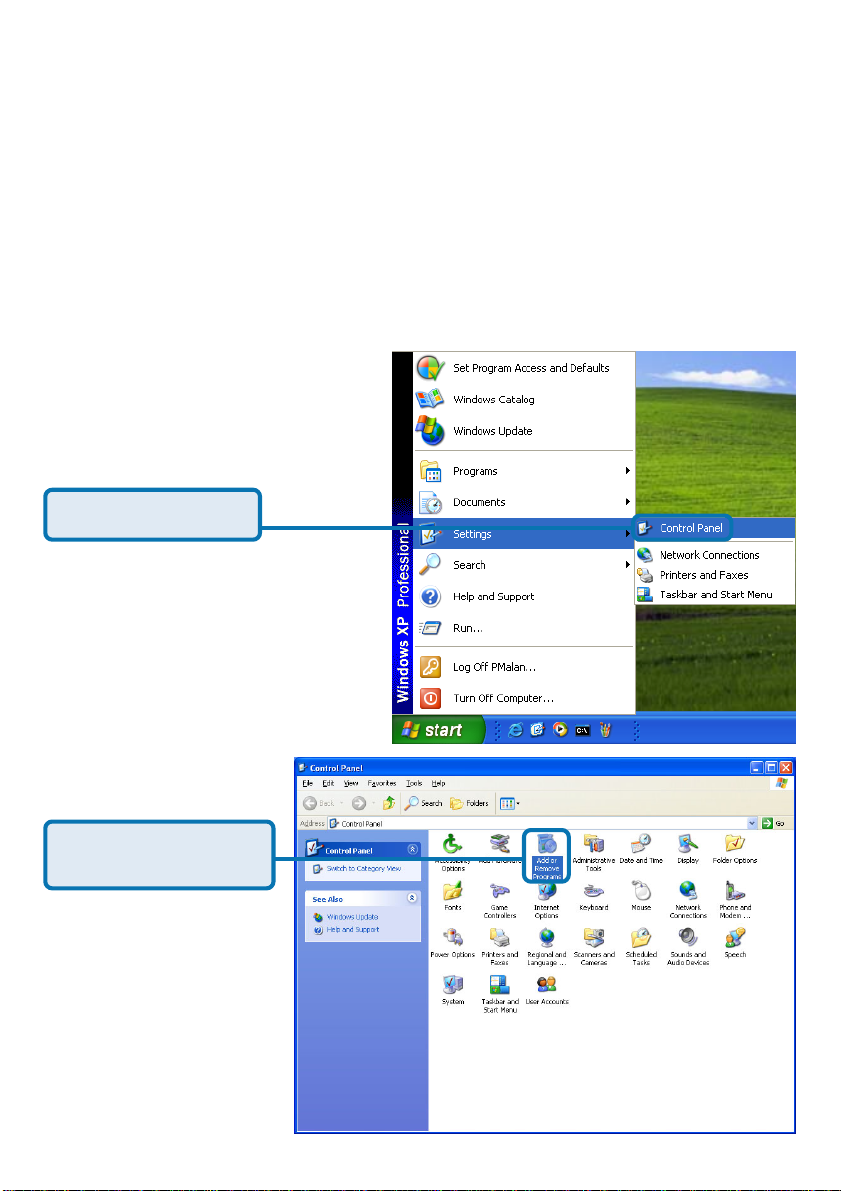
Click Control Panel.
Go to Start >Settings.
Click Add or Remove
Programs.
18
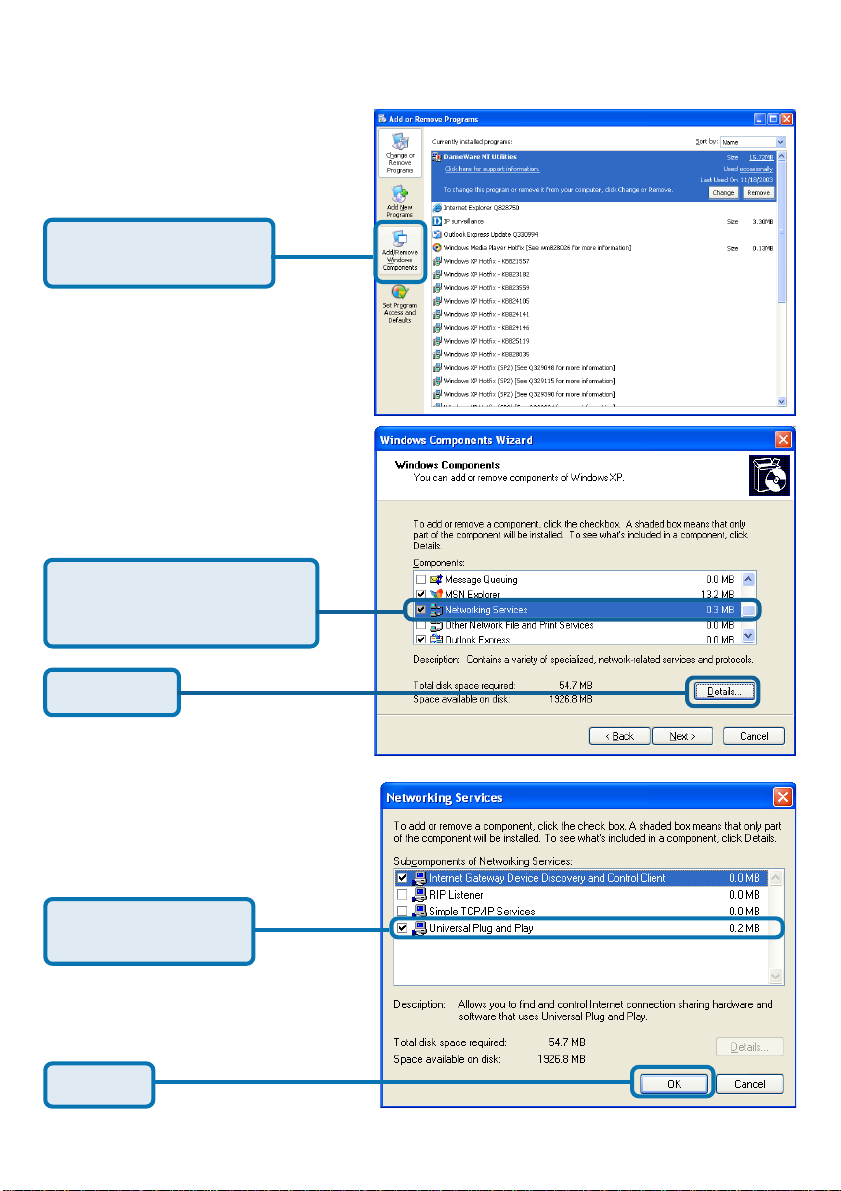
Click Add/Remove
Windows Components.
The following screen will
appear:
Select Networking Services
(Communications in Windows
Me).
Click Details.
Select Universal
Plug and Play.
Click Ok.
Enabling UPnP for Windows XP/Me
(continued)

19
Please wait while Setup
configures the components.
Click Next.
Click Finish.
Enabling UPnP for Windows XP/Me
(continued)
20
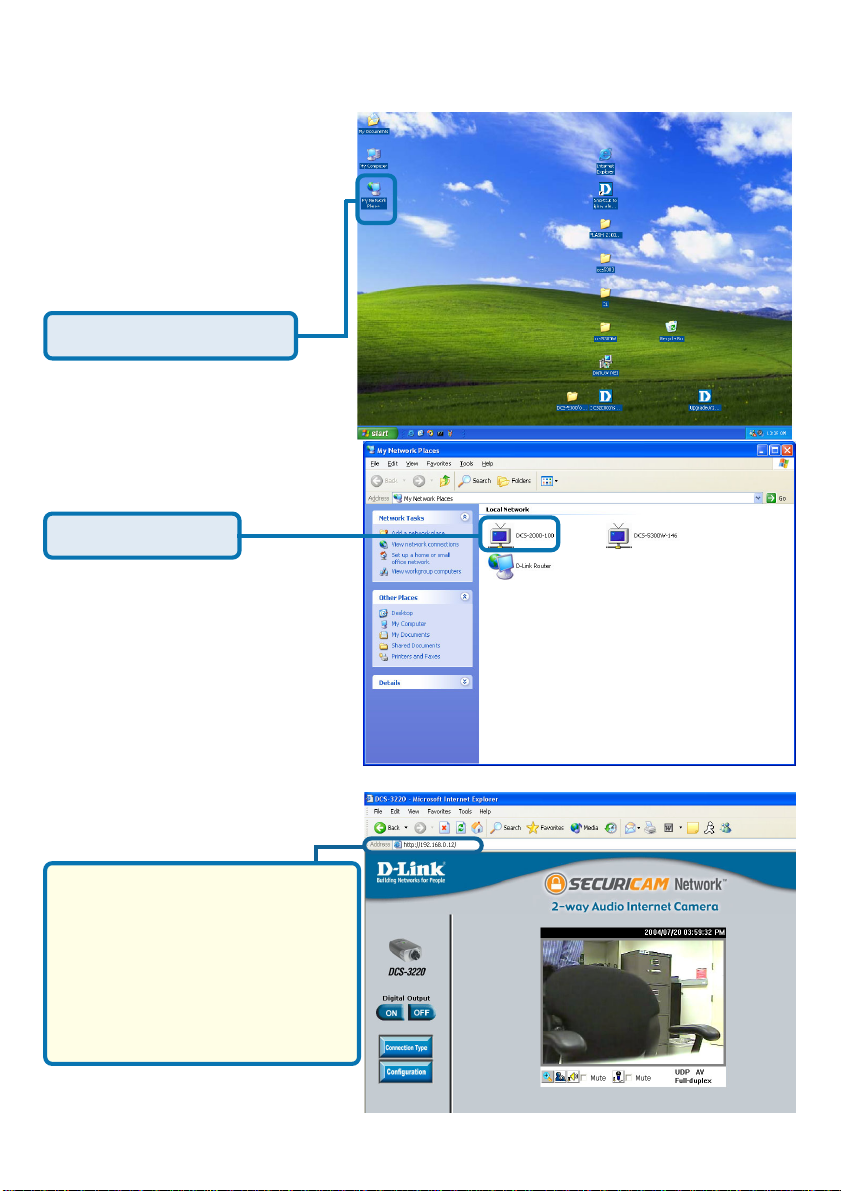
Click My Network Places.
To view your DCS-3220
Internet Camera in an Internet
browser, go to your Desktop
and click My Network
Places.
Click DCS-3220-100.
The last three digits (100),
represent the fourth octet of your
Internet Camera’s IP address
(in this example, 198.168.0.100).
After you click on the DCS-3220-
100 icon, your Internet browser
will automatically be opened to
the IP Address of the DCS-3220,
in this example it is: http://
192.168.0.12. Your DCS-3220
may have a different IP Address.
(Note: Screen shots are taken in Windows XP, similar screens will appear in Windows Me.)
Enabling UPnP for Windows XP/Me
(continued)

21
Click Next.
Real-time Monitoring
Video Recording to hard disk
High quality video
High compression ratio
Maximum of 16 cameras with different monitor layouts
Smart playback
Triggered event browsing
Fast database searching
Configurable automated alarms
Account password protection
Scheduled recording for each camera
Email / FTP snapshot
A VI file export
Motion detection for each camera
The IP surveillance software on the CD included with the DCS-3220 Internet
Camera converts the DCS-3220 into a powerful, yet flexible, surveillance system
for home or business, with these features:
Installing IP surveillance Software
T o install the IP surveillance software, click on Install IP surveillance Sof tware
on the CD included with the Internet Camera. The Welcome screen appears:

22
Please read the Software Licensing Agreement and click yes if you wish to
accept the agreement. Click “No” to exit the installation.
Installing IP surveillance Software (continued)
Enter your name and company information and click “Next.”
Click Next.
Click Yes.
23
Installing IP surveillance Software (continued)
Click Next.
Select the
destination
directory.
Click Next.
Select the
program folder
the software will
be installed into.
24
The installation is complete.
Click Finish.
Installing IP surveillance Software (continued)
Click Next.
25
Testing the DCS-3220 Internet
Camera
Open your Internet browser and
type in the IP address of the
DCS-3220. In this example the
address is:
http://192.168.0.12
(your DCS-3220 may have a
different IP address based on
what you used in the
Installation Wizard program).
The window in the center of your browser is the camera image window. You
should now see a video image and hear the audio over your computer speakers
from the DCS-3220. If you are having problems please consult the FAQ section
of this manual (page 122).
26
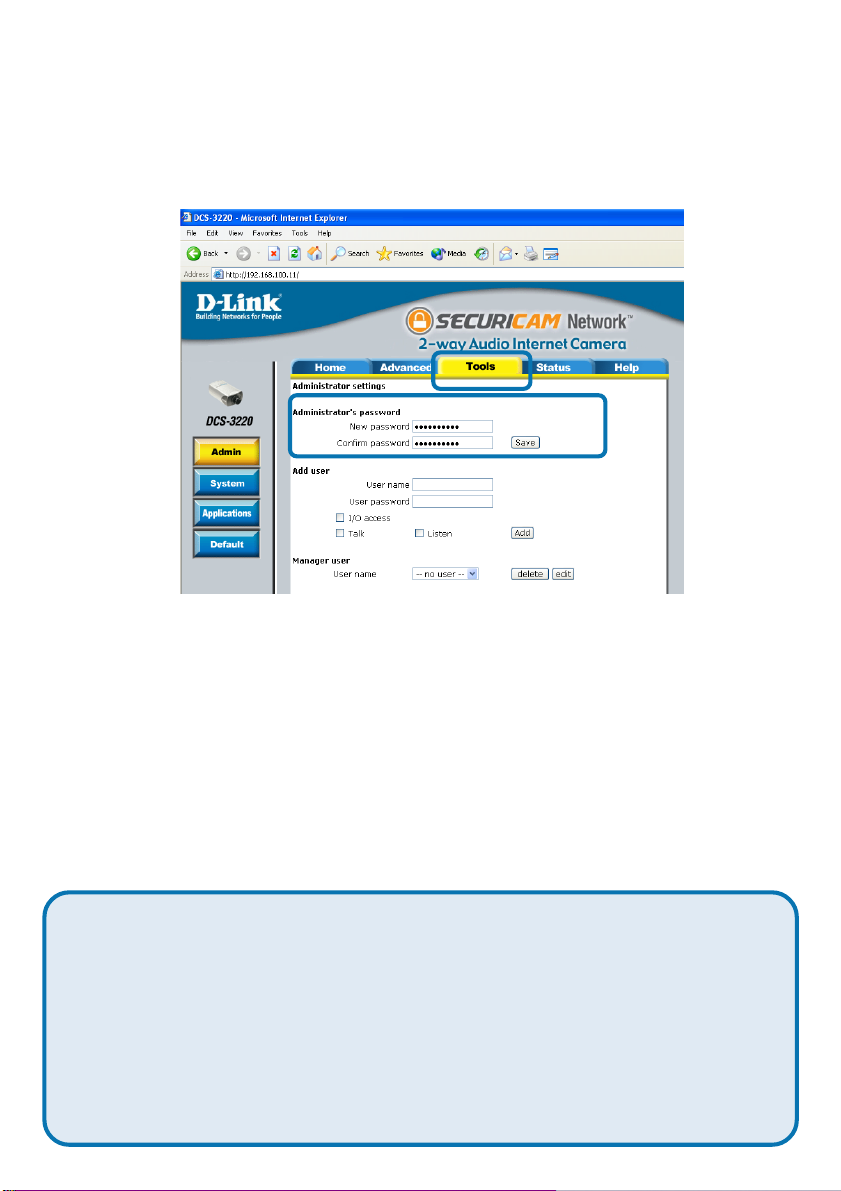
When the Internet Camera is used for the first time, it is highly
recommended that the Administrator set the Administrator’s Password
to constrain user access to the Internet Camera since the Default
settings are Null String (no password). Once the Password is defined,
only the Administrator has access to the management of the Internet
Camera. This procedure should be done as soon as possible since the
security features of the Internet Camera will not be enabled until the
Administrator Password is defined.
To ensure the highest security and prevent unauthorized use of the Internet
Camera, the Administrator has the exclusive privilege to access the System
Administration settings to allow users entry and authorize privileges for all
users. The Internet Camera supports multi-level password protection/access
to the Internet Camera that can be restricted to defined users who have a User
Name and User Password, which is assigned by the Administrator.
The Administrator can release a public user name and p assword so that when
remote users access the Internet Camera they will have the right to view the
image transmitted by the Internet Camera.
At this point it is highly recommended that you click on the Configuration button
on the Home screen, and then the T ools tab to bring you to the Admin screen.
Enter a password for security purposes.
Security

27
Using & Configuring the DCS-3220
with a NAT Router
D-Link’s DCS-3220 is a versatile and cost effective Internet Camera offering
both video and audio monitoring. It can also serve as a powerful surveillance
system in security applications. The DCS-3220 can be used with any wired or
wireless router. This section explains how to view the camera from either the
Internet or from inside your internal network.
Materials Needed:
• 1 DCS-3220 Internet Camera
• 1 Ethernet Cable
• A Wired or Wireless router such as the D-Link DI-624 Wireless Router
• Ethernet based PC for system configuration
SETTING UP THE DCS-3220 FOR USE BEHIND A ROUTER
Installing a DCS-3220 Internet Camera on your network is an easy 4–step
procedure:
Assign a local IP Address to your Internet Camera
View the Internet Camera Using Y our Internet Explorer W eb browser
Access the Router with Your Web browser
Open Virtual Server Ports for Your Router (Enable Remote Viewing)
This section is designed to walk you through the setup process for installing
your camera behind a router and enable remote video viewing. For the basic
setup of the DCS-3220, follow the steps outlined in the Quick Installation
Guide.
After you have completed the setup of the DCS-3220 outlined in the Quick
Installation Guide you will have an operating camera that has an assigned IP
Address. Because you are using a router to share the Internet with one or more
PCs, the IP Address assigned to the Internet Camera will be a local IP Address.
This allows viewing within your Local Area Network (LAN) until the router is
configured to allow remote viewing of the camera over the Internet.
Run the Installation Wizard program from the CD included with the DCS-3220.
Follow the steps in the Quick Installation Guide to configure the DCS-3220.
The camera will be assigned a local IP Address that allows it to be recognized
by the router. Write down this IP Address for future reference.
Assign a Local IP Address for Your Camera
28
Using & Configuring the DCS-3220 with a
NAT Router (continued)
Assign a Local IP Address
View the Internet Camera using your Internet Explorer Web
browser
Viewing the Video on the browser to test the connection
Click on the Configuration button on the left side of the display . The Network
Configuration page displays the ports used by HTTP and Streaming audio
and video.
This is the IP Address
assigned to your camera.
Write it down for later use.
192.168.0.146 is only an
example. Y ou will probably
have a different IP Address.
Run your Internet Explorer Web browser. In the address bar, type in the IP
Address that was assigned to the Internet Camera by the Installation Wizard
program. The DCS-3220 Home Page appears with a window displaying live
video from the camera. You are able to view this screen from any PC running
Internet Explorer on your LAN.
Click on the Configuration
button.

29
Using & Configuring the DCS-3220 with a
NAT Router (continued)
Router Set-Up and Installation
The following steps generally apply to any router that you have on your network.
The D-Link DI-624 is used as an example to clarify the configuration process.
Configure the initial settings of the DI-624 by following the steps outlined in the
DI-624 Quick Installation Guide.
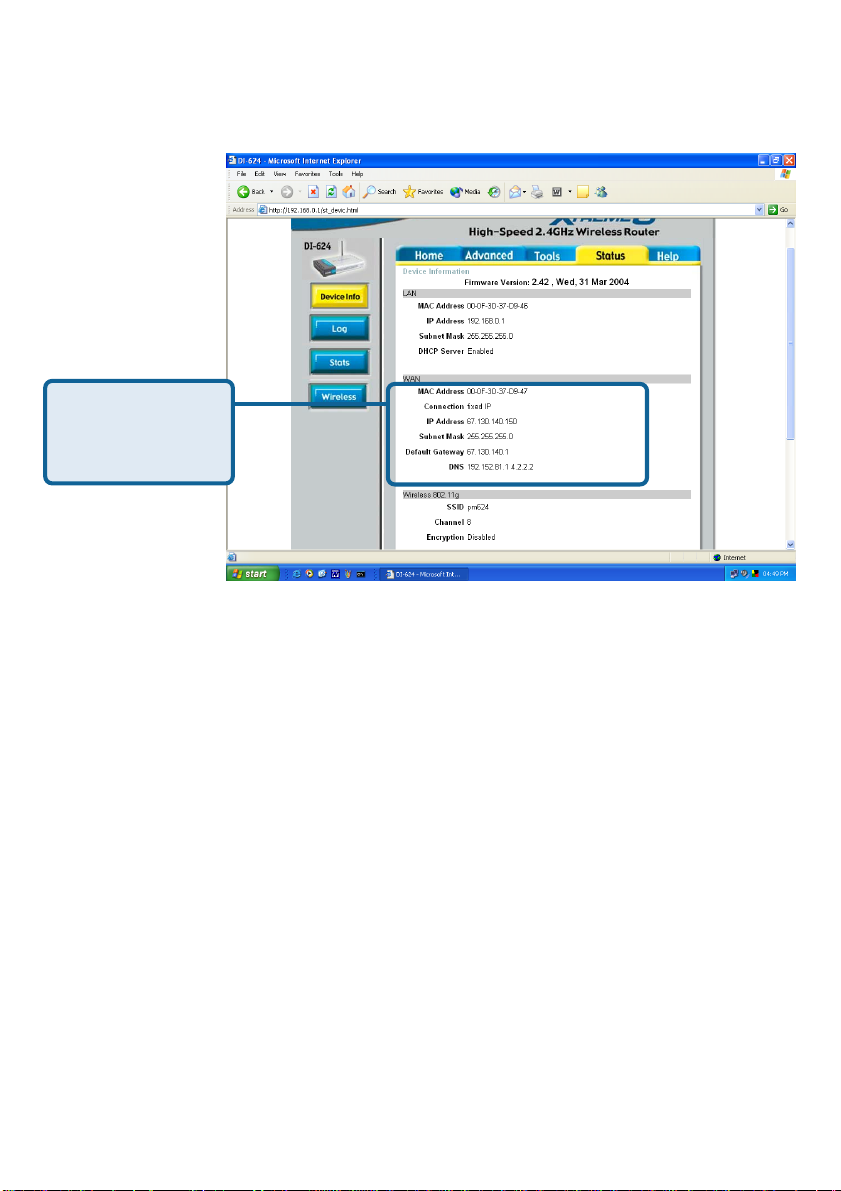
Access Your Router on Your Web Browser
If you have cable or DSL service, you will most likely have a dynamically
assigned WAN IP Address. ‘Dynamic’ means that your router’s W AN IP address
can change from time to time depending on your ISP . A dynamic W AN IP Address
identifies your router on the public network and allows it to access the Internet.
To find out what your router ’s WAN IP Address is, go to the Status menu on
your router and locate the WAN information for your router. As shown on the
next page the WAN IP Address will be listed. This will be the address that you
will need to type in your Web browser to view your camera over the Internet.
Ports that are used by the DCS-3220
These are the port settings for
your camera. If necessary , these
ports can be changed if they are
already in use by other devices
(e.g. in a multiple camera environ-
ment).
30
Note: Because a dynamic WAN IP can change from time to time depending on
your ISP, you may want to obtain a Static IP address from your ISP. A St atic IP
address is a fixed IP address that will not change over time and will be more
convenient for you to use to access your camera from a remote location. The
Static IP Address will also allow you to access your camera attached to your
router over the Internet
Open Virtual Server Ports to Enable Remote Image Viewing
Using & Configuring the DCS-3220 with a
NAT Router (continued)
The firewall security features built into the DI-624 router prevent users from
accessing the video from the DCS-3220 over the Internet. The router connects
to the Internet over a series of numbered ports. The ports normally used by the
DCS-3220 are blocked from access over the Internet. Therefore, these ports
need to be made accessible over the Internet. This is accomplished using the
Virtual Server function on the DI-624 router . The Virtual Server port s used by
the camera must be opened through the router for remote access to your
camera. Virtual Server is accessed by clicking on the Advanced tab of the
router screen.
Determine Your Router’s IP Address (WAN)
Your WAN IP
Address will be
listed here.
Loading...