


Quick Installation Guide Fixed Dome Network Camera
This document will guide you through the basic installation process for your new D-Link Network Camera.
DCS-6112/DCS-6113
Quick Installation Guide
Руководство по быстрой установке
Guía de Instalación Rápida Guia de Instalação Rápida
Petunjuk Pemasangan Cepat
Documentation also available on CD and via the D-Link Website

ENGLISH
DCS-6112/DCS-6113
Quick Install Guide
This installation guide provides basic instructions for installing the DCS-6112/DCS-6113 Network Camera on your network. For additional information about how to use the camera, please see the User’s Manual which is available on the CD include in this package or from the D-Link support website.
Installation Steps
1.Verify the package contents against the list below.
2.Hardware Overview
3.Hardware Installation
4.Configuration with Wizard
5.Adjust the Viewing Angle
6.Attaching the Enclosure
1.Package Contents
DCS-6112/DCS-6113 Network Camera
Manual and Software on CD-ROM
CAT5 Ethernet Cable
AV / Power cable
Power Adapter
Screwdriver
Screw
Alignment Sticker
Quick Install Guide
Cable Tie
If any of the above items are missing, please contact your reseller.
2 |
D-Link DCS-6112/DCS-6113 Quick Install Guide |
|
|

2. Hardware Overview
Dome Cover
 Plastic housing
ENGLISH
D-Link DCS-6112/DCS-6113 Quick Install Guide |
3 |
|
|

ENGLISH
Light sensor
Judges lighting conditions and switches from day mode to night mode accordingly (Control IR-LED and ICR on/off) (DCS-6113 only)
3-Axis Mechanism
Adjust the camera’s image to achieve the desired orientation
MicroSD Card Slot
Local MicroSD card for storing recorded images and video
Reset
Press and hold this button for 10 seconds to reset the camera
LED
Power and network indicator
NTSC/PAL Switch
Switch for NTSC/PAL video format
Infrared LEDs
Used to illuminate the camera's field of view at night (DCS-6113 only)
Lens
Fixed focus lens
Ethernet (PoE)
RJ-45 connector for Ethernet which can also be used to power the camera using PoE
Audio Input / Output
Audio input/output connector for external speaker.
Digital Input (DI) /Output (DO)
DI/DO connectors provide a physical interface to send and receive digital signals to
and from a variety of external devices
DC Input
Connects to the 12V DC power adapter to power the camera
Video Output
Video output connector for TV/Monitor
Audio I/O and DI/DO
1: Power + 12V
2: Digital output
3: Digital input
4: Ground
5: Audio input
6: Ground of audio input
7: Audio output
8: Ground of audio output
DC input / Video Output
1: Ground of Video out
2: Video output
3: Ground of DC input
4: DC 12V
4 |
D-Link DCS-6112/DCS-6113 Quick Install Guide |
|
|
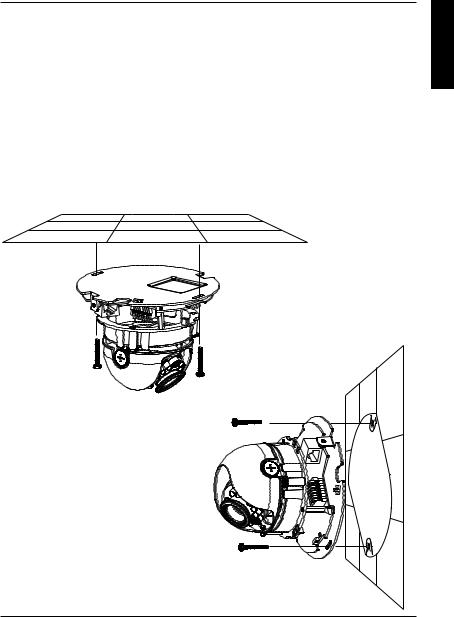
3. Hardware Installation
Mounting to a Ceiling or a Wall
1.Locate an area on the ceiling or wall which is capable of supporting the weight of the camera.
2.Attach the alignment sticker to the ceiling or wall.
3.Drill two pilot holes where the holes of the alignment sticker are located.
4.Insert the supplied plastic anchors into the drilled holes, and align the holes at the base of the camera with the plastic anchors.
5.The camera can be mounted with the cable routed through the ceiling, wall or from the side.
6.Insert the provided screws through the holes. Use a screwdriver to tighten and secure.
ENGLISH
D-Link DCS-6112/DCS-6113 Quick Install Guide |
5 |
|
|
ENGLISH
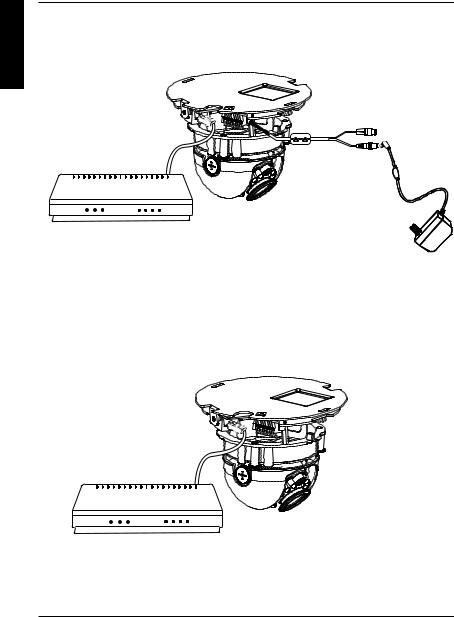
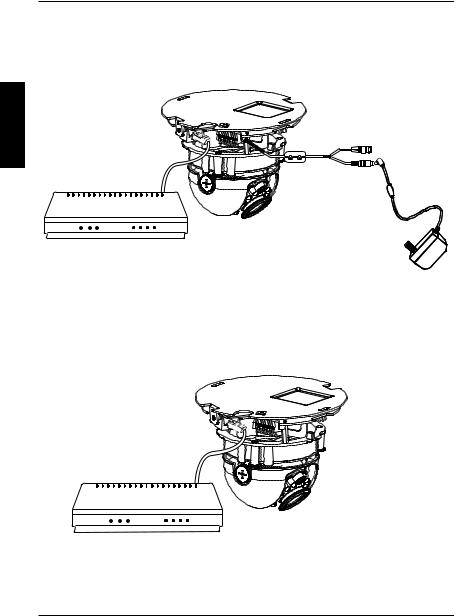
General Connection (without PoE)
Connect the network camera to a switch or router via an Ethernet cable.
Connect the supplied power cable from the camera to a power outlet.
Connection with a PoE Switch
If using a PoE switch, connect the network camera to the switch via an Ethernet cable, which will provide both power and data transmission over a single cable.
6 |
D-Link DCS-6112/DCS-6113 Quick Install Guide |
|
|

4. Configuration with Wizard
Insert the DCS-6112/DCS-6113 CD into your computer's CD-ROM drive to begin the installation. If the Autorun function on your computer is disabled, or if the D-Link
Launcher fails to start automatically, click Start > Run. Type D:\autorun.exe, where D: represents the drive letter of your CD-ROM drive.
Click Setup Wizard to begin the installation. 
After clicking Setup Wizard, the following window will open.
Click Next to continue.
Click Yes to accept the License Agreement. 
To start the installation process, click Next.
Note: The installation may take several minutes to finish.
Click Finish to complete the installation.
D-Link DCS-6112/DCS-6113 Quick Install Guide
ENGLISH
7
ENGLISH
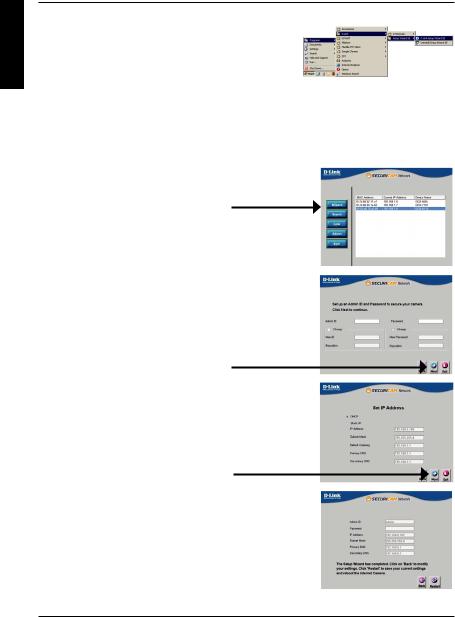
Click on the D-Link Setup Wizard SE icon that was created in your Windows Start menu.
Start > D-Link > Setup Wizard SE
The Setup Wizard will appear and display the MAC address and IP address of your camera(s). If you have a DHCP server on your network, a valid IP Address will be displayed. If your network does not use a DHCP server, the network camera's default static IP
192.168.0.20 will be displayed.
Click the Wizard button to continue.
Enter the Admin ID and password. When logging in for the first time, the default Admin ID is admin with the password left blank.
Click Next, to proceed to the next page.
Select DHCP if your camera obtains an IP address automatically when it boots up. Select static IP if the camera will use the same IP address each time it is started.
Click Next, to proceed to the next page.
Take a moment to confirm your settings and click Restart. 
8 |
D-Link DCS-6112/DCS-6113 Quick Install Guide |
|
|

Viewing Camera via Web Browser
Click on the D-Link Setup Wizard SE icon that was created in your Windows Start menu.
Start > D-Link > Setup Wizard SE
Select the camera and click the button labeled "Link" to access the web configuration.
The Setup Wizard will automatically open your web browser to the IP address of the camera.
Enter admin as the default username and leave the password blank. Click OK to continue.
This section shows your camera’s live video. You can select your video profile and view or operate the camera. For additional information about web
configuration, please refer to the user manual included on the CD-ROM or the D-Link website.
ENGLISH
D-Link DCS-6112/DCS-6113 Quick Install Guide |
9 |
|
|

ENGLISH
5. Adjust the viewing angle
Loosen the pan screw and turn the lens module left and right until the desired position is achieved; tighten the pan screw once completed. Loosen the tilt screws on both sides of the camera, and turn the lens module up and down until the desired position is achieved; tighten the tilt screws once completed.
Loosen the image adjustment screw and turn the lens to adjust the network camera’s image until the desired orientation is achieved, tighten the image adjustment screw once completed.
Loosen |
Tighten |
Pan 350° |
Rotate 350° |
|
|
Tilt 85° |
|
|
6. Attaching the Enclosure
1.Align the inner side of the black cover with the notch on both sides of the lens, fix the black Cover.
2.If you choose to the feed the cable through the ceiling or wall, arrange the cable neatly through the cable hole. If you choose to feed the cable from the side, remove plate A.
3.Attach the dome cover to the camera as the direction shown below. With idiot-proof mechanism design, the dome cover cannot be attached if the angle does not fit.
4.Finally, make sure all parts of the camera are securely installed.
A
10 |
D-Link DCS-6112/DCS-6113 Quick Install Guide |
|
|
Technical Support
You can find software updates and user documentation on the D-Link website.
Tech Support for customers in
Australia:
Tel: 1300-766-868 24/7 Technical Support
Web: http://www.dlink.com.au E-mail: support@dlink.com.au
India:
Tel: +91-22-27626600
Toll Free 1800-22-8998
Web: www.dlink.co.in
E-Mail: helpdesk@dlink.co.in
Singapore, Thailand, Indonesia,
Malaysia, Philippines, Vietnam:
Singapore - www.dlink.com.sg Thailand - www.dlink.co.th Indonesia - www.dlink.co.id Malaysia - www.dlink.com.my Philippines - www.dlink.com.ph Vietnam - www.dlink.com.vn
Korea:
Tel : +82-2-2028-1810
Monday to Friday 9:00am to 6:00pm Web : http://d-link.co.kr
E-mail : g2b@d-link.co.kr
New Zealand:
Tel: 0800-900-900 24/7 Technical Support
Web: http://www.dlink.co.nz E-mail: support@dlink.co.nz
South Africa and Sub Sahara
Region:
Tel: +27 12 661 2025
08600 DLINK (for South Africa only) Monday to Friday 8:30am to 9:00pm South Africa Time
Web: http://www.d-link.co.za E-mail: support@d-link.co.za
Saudi Arabia (KSA):
Tel: +966 01 217 0008
Fax: +966 01 217 0009
Saturday to Wednesday 9.30AM to 6.30PM Thursdays 9.30AM to 2.00 PM
E-mail: Support.sa@dlink-me.com
D-Link Middle East - Dubai, U.A.E.
Plot No. S31102,
Jebel Ali Free Zone South,
P.O.Box 18224, Dubai, U.A.E. Tel: +971-4-8809022
Fax: +971-4-8809066 / 8809069
Technical Support: +971-4-8809033 General Inquiries: info.me@dlink-me.com Tech Support: support.me@dlink-me.com
Egypt
1, Makram Ebeid Street - City Lights Building Nasrcity - Cairo, Egypt
Floor 6, office C2
Tel.: +2 02 26718375 - +2 02 26717280 Technical Support: +2 02 26738470 General Inquiries: info.eg@dlink-me.com Tech Support: support.eg@dlink-me.com
Kingdom of Saudi Arabia
Office # 84 ,
Al Khaleej Building ( Mujamathu Al-Khaleej) Opp. King Fahd Road, Olaya
Riyadh - Saudi Arabia
Tel: +966 1 217 0008
Technical Support:
+966 1 2170009 / +966 2 6522951 General Inquiries: info.sa@dlink-me.com Tech Support: support.sa@dlink-me.com
Pakistan
Islamabad Office:
61-A, Jinnah Avenue, Blue Area,
Suite # 11, EBC, Saudi Pak Tower,
Islamabad - Pakistan
Tel.: +92-51-2800397, 2800398
Fax: +92-51-2800399
Karachi Office:
D-147/1, KDA Scheme # 1,
Opposite Mudassir Park, Karsaz Road, Karachi – Pakistan
Phone: +92-21-34548158, 34326649 Fax: +92-21-4375727
Technical Support: +92-21-34548310, 34305069 General Inquiries: info.pk@dlink-me.com
Tech Support: support.pk@dlink-me.com
ENGLISH
D-Link DCS-6112/DCS-6113 Quick Install Guide |
11 |
|
|

ENGLISH
Technical Support
Iran
Unit 5, 5th Floor, No. 20, 17th Alley , Bokharest St. , Argentine Sq. ,
Tehran IRAN
Postal Code : 1513833817
Tel: +98-21-88880918,19 +98-21-88706653,54
General Inquiries: info.ir@dlink-me.com Tech Support: support.ir@dlink-me.com
Morocco
M.I.T.C
Route de Nouaceur angle RS et CT 1029
Bureau N° 312 ET 337
Casablanca , Maroc
Phone : +212 663 72 73 24
Email: support.na@dlink-me.com
Lebanon RMA center
Dbayeh/Lebanon
PO Box:901589
Tel: +961 4 54 49 71 Ext:14
Fax: +961 4 54 49 71 Ext:12
Email: taoun@dlink-me.com
Bahrain
Technical Support: +973 1 3332904
Kuwait:
Technical Support: + 965 22453939 / +965 22453949
Türkiye Merkez İrtibat Ofisi
Ayazağa Maslak yolu
Erdebil Cevahir İş Merkezi No: 5/A Ayazağa / Maslak İstanbul
Tel: +90 212 2895659
Ücretsiz Müşteri Destek Hattı: 0 800 211 00 65 W e b : w w w . d l i n k . c o m . t r Teknik Destek: support.tr@dlink.com.tr
12 |
D-Link DCS-6112/DCS-6113 Quick Install Guide |
|
|

NOTES
13

PYCCКИЙ
Руководство по быстрой установке DCS-6112/DCS-6113
Данное руководство содержит основные инструкции по установке камеры
DCS-6112/DCS-6113 в сети. За дополнительной информацией об установке
камеры, пожалуйста, обращайтесь к руководству пользователя на CD диске из комплекта поставки или через web-сайт D-Link.
Шаги установки
1.Убедитесь в наличии всех компонентов по списку ниже.
2.Обзор устройства
3.Установка устройства
4.Настройка с помощью мастера по установке
5.Регулировка угла обзора
6.Установка корпуса
1.Комплект поставки
Сетевая камера DCS-6112/DCS-6113
CD-диск с руководством пользователя и программным обеспечением
Кабель Ethernet 5 категории
Кабель питания AV
Адаптер питания
Отвертка
Винты
Стикер
Руководство по быстрой установке
Стяжка для кабеля
Если что-либо из перечисленного отсутствует, пожалуйста, обратитесь к
поставщику.
14 |
D-Link DCS-6112/DCS-6113 Quick Install Guide |
|
|

2. Обзор устройства
Крышка корпуса
КИЙPYCC
 Пластиковый кожух
D-Link DCS-6112/DCS-6113 Quick Install Guide |
15 |
|
|

PYCCКИЙ
Светочувствительный датчик
В зависимости от условий освещения переключается в ночной или дневной режим
(управление ИК-датчиком и включение/отключение ICR) (только DCS-6113)
3-х осевой механизм
Позволяет регулировать положение камеры 

Инфракрасные диоды
Используется для освещения области камеры для ночного обзора (только
DCS-6113)
Объектив
Объектив с фиксированным фокусным расстоянием
Ethernet (PoE)
Разъем RJ-45 для Ethernet-
соединения, который может также использоваться для питания камеры с помощью
Power over Ethernet (PoE)
Слот для карты MicroSD
Карта MicroSD для записи изображений и видео
Кнопка Reset
Нажмите и удерживайте кнопку в течение 10 секунд для сброса настроек камеры
Индикатор |
Индикатор питания и сети |
Переключатель NTSC/PAL
Пореключатель форматов
NTSC/PAL
Входной разъем для постоянного тока
Для подключения к адаптеру питания 12 В постоянного тока для питания камеры
Выходной
видеоразъем
Выходной видеоразъем для ТВ/монитора
Аудиоразъем I/O
Аудиоразъем input/output для внешних динамиков
Цифровой разъем DI/DO
Цифровые разъемы DI/DO обеспечивают физический интерфейс для отправки и приема цифровых сигналов из различных внешних устройств.
Аудиоразъемы I/O и DI/DO
1:Питание + 12В
2:Цифровой выход
3:Цифровой вход
4:Земля
5:Аудиовход
6:Земля аудиовхода
7:Аудиовыход
8:Земля аудиовыхода
Входной разъем для постоянного тока / Выдеовыход
1:Земля видеовыхода
2:Видеовыход
3:Земля входного разъема для постоянного тока
4:Постоянный ток 12В
16 |
D-Link DCS-6112/DCS-6113 Quick Install Guide |
|
|

3. Установка устройства
Установка на потолок или стену
1.Определите местонахождение установки камеры на потолке или на стене, способной выдержать вес устройства.
2.Наклейте выравнивающий стикер на потолок или стену. 3.Просверлите два отверстия в точках, отмеченных на стикере.
4.Разместите пластиковые дюбели в просверленные отверстия, и выровняйте
отверстия на основании камеры с дюбелями.
5.Камера может быть установлена с кабелем, протянутом по потолку или стене. 6.Вставьте винты в отверстия. Используйте отвертку для затяжки двух винтов, чтобы обеспечить надежное крепление камеры.
КИЙPYCC
D-Link DCS-6112/DCS-6113 Quick Install Guide |
17 |
|
|
Основное соединение (без PoE)
Подключите сетевую камеру к коммутатору или маршрутизатору через Ethernet
кабель.
Подключите кабель питания из комплекта поставки от камеры к настенной розетке.
PYCCКИЙ
Подключение к коммутатору PoE
Если используется коммутатор PoE, то подключите камеру к коммутатору с
помощью кабеля Ethernet, который обеспечивает питание и передачу данных по
одному кабелю.
18 |
D-Link DCS-6112/DCS-6113 Quick Install Guide |
|
|

4. Настройка с помощью мастера
Разместите CD-диск DCS-6112/DCS-6113 в привод CD-ROM компьютера для
начала установки. Если функция автозагрузки на компьютере отключена или не запустилась автоматически, то нажмите Пуск > Выполнить. Введите D:\autorun. exe, где D: буква CD-ROM привода.
Нажмите Setup Wizard, чтобы начать установку.
После нажатия на Setup Wizard откроется следующее окно.
Нажмите Далее для продолжения.
Нажмите Да, чтобы принять лицензионный договор.
Чтобы начать процесс установки, нажмите Далее. 
Примечание: Установка может занять несколько минут.
Нажмите Финиш, чтобы завершить установку. 
D-Link DCS-6112/DCS-6113 Quick Install Guide
КИЙPYCC
19

PYCCКИЙ
Нажмите иконку утилиты установки D-Link Setup Wizard SE в стартовом меню Windows.
Пуск > D-Link > Setup Wizard SE
Мастер установки отображает МАС-адрес и IP-адрес
камер(-ы). Если в сети присутствует DHCP-сервер,
отобразится корректный IP-адрес. Если в сети не используется DHCP-сервер, отобразится статический IP-адрес камеры по умолчанию
192.168.0.20.
Нажмите кнопку Wizard, чтобы продолжить. 
Введите ID администратора и пароль. Если регистрация выполняется впервые, ID
администратора по умолчанию admin, поле пароля
остается незаполненным.
Нажмите Далее для перехода на следующую
страницу.
Выберите DHCP, если при загрузке камеры IP-адрес
назначается автоматически. Выберите статический
IP-адрес, если камера при каждом запуске использует
один и тот же IP-адрес.
Нажмите Далее для перехода на следующую страницу.
Подождите некоторое время для подтверждения
настроек и нажмите Restart.
20 |
D-Link DCS-6112/DCS-6113 Quick Install Guide |
|
|
 Loading...