


 Loading...
Version 1.0 | 10/23/2012
User Manual
HD Wireless Outdoor Cloud Camera
DCS-2332L

Preface
D-Link reserves the right to revise this publication and to make changes in the content hereof without obligation to notify any person or organization of such revisions or changes. Information in this document may become obsolete as our services and websites develop and change. Please refer to the www.mydlink.com website for the most current information.
Manual Revisions
Revision |
Date |
Description |
1.0October 23, 2012 DCS-2332L Revision A1 with firmware version 1.00
Trademarks
D-Link and the D-Link logo are trademarks or registered trademarks of D-Link Corporation or its subsidiaries in the United States or other countries. All other company or product names mentioned herein are trademarks or registered trademarks of their respective companies.
Copyright © 2012 D-Link Corporation.
All rights reserved. This publication may not be reproduced, in whole or in part, without prior expressed written permission from D-Link Corporation.
D-Link DCS-2332L User Manual |
2 |

Table of Contents
Product Overview......................................................................... |
4 |
Package Contents.................................................................. |
4 |
Introduction............................................................................ |
5 |
System Requirements.......................................................... |
5 |
Features.................................................................................... |
6 |
Hardware Overview.............................................................. |
7 |
Front....................................................................................... |
7 |
Rear: External...................................................................... |
8 |
Rear: Internal....................................................................... |
9 |
Removing the Top Panel................................................... |
10 |
Replacing the Ethernet Cable..................................... |
11 |
Reattaching the Top Panel........................................... |
12 |
Removing the Bottom Panel........................................... |
13 |
Using the Reset Button.................................................. |
13 |
Installing an SD Memory Card.................................... |
14 |
Reattaching the Bottom Panel................................... |
14 |
Installation..................................................................................... |
16 |
Zero Configuration Setup................................................ |
16 |
Camera Installation Wizard.............................................. |
19 |
Windows Users..................................................................... |
19 |
Mac Users............................................................................... |
20 |
Manual Hardware Installation........................................ |
21 |
SD Memory Card Installation.......................................... |
22 |
mydlink........................................................................................... |
23 |
Configuration............................................................................... |
24 |
Using the Configuration Interface................................ |
24 |
Live Video............................................................................... |
25 |
Setup........................................................................................ |
27 |
Setup Wizard..................................................................... |
27 |
Network Setup................................................................. |
33 |
Wireless Setup.................................................................. |
36 |
Dynamic DNS.................................................................... |
37 |
Image Setup...................................................................... |
38 |
Audio and Video.............................................................. |
40 |
Preset................................................................................... |
42 |
Motion Detection............................................................ |
44 |
Time and Date.................................................................. |
45 |
Event Setup....................................................................... |
46 |
SD Card................................................................................ |
55 |
Advanced............................................................................... |
56 |
ICR and IR........................................................................... |
56 |
HTTPS.................................................................................. |
57 |
Access List.......................................................................... |
58 |
System................................................................................. |
59 |
Maintenance......................................................................... |
60 |
Device Management...................................................... |
60 |
Firmware Upgrade.......................................................... |
61 |
Status....................................................................................... |
62 |
Device Info............................................................................. |
62 |
Logs...................................................................................... |
63 |
Help...................................................................................... |
64 |
Technical Specifications............................................................ |
65 |
D-Link DCS-2332L User Manual |
3 |

Section 1: Product Overview
Product Overview
Package Contents
DCS-2332L HD Wireless Outdoor Cloud Camera
CAT5 Ethernet cable (Pre-Attached)
Power adapter (Pre-Attached)
CD-ROM with User Manual and software
Quick Installation Guide
Antenna
If any of the above items are missing, please contact your reseller.
Note: Using a power supply with a different voltage than the one included with your product will cause damage and void the warranty for this product.
D-Link DCS-2332L User Manual |
4 |

Section 1: Product Overview
Introduction
Congratulations on your purchase of the DCS-2332L HD Wireless Outdoor Cloud Camera. The DCS-2332L is a versatile and unique solution for your small office or home. Unlike a standard webcam, the DCS-2332L is a complete system with a built-in CPU and web server that transmits high quality video images for security and outdoor surveillance. The DCS-2332L can be accessed remotely, and controlled from any PC/Notebook over your local network or through the Internet via a web browser. The simple installation and intuitive web-based interface offer easy integration with your Ethernet/Fast Ethernet or 802.11n/g wireless network. The DCS-2332L also comes with remote monitoring and motion detection features for a complete and costeffective home security solution.
System Requirements
•Computer with Microsoft Windows ® 8/7/Vista/XP, or Mac with OS X 10.6 or higher
•PC with 1.3GHz or above and at least 128MB RAM
•Internet Explorer 7, Firefox 12, Safari 4, or Chrome 20 or higher version with Java installed and enabled
•Existing 10/100 Ethernet-based network or 802.11g/n wireless network
D-Link DCS-2332L User Manual |
5 |

Section 1: Product Overview
Features
Simple to Use
The DCS-2332L is a stand-alone system with a built-in CPU, requiring no special hardware or software. The DCS-2332L supports both ActiveX mode for Internet Explorer and Java mode for other browsers such as Firefox® and Safari®.
Supports a Variety of Platforms
Supporting TCP/IP networking, HTTP, and other Internet related protocols. The DCS-2332L can also be integrated easily into other Internet/Intranet applications because of its standards-based features.
Web Configuration
Using a standard Web browser, administrators can configure and manage the Network Camera directly from its own Web page via Intranet or Internet. This means you can access your DCS-2332L anytime, anywhere in the world.
Broad Range of Applications
With today’s high-speed Internet services, the Network Camera can provide the ideal solution for delivering live video images over the Intranet and Internet for remote monitoring. The Network Camera allows remote access using a Web browser for live image viewing, and allows the administrator to manage and control the Network Camera anytime, anywhere in the world. Many applications exist, including industrial and public monitoring of homes, offices, banks, hospitals, child-care centers, and amusement parks.
Remote Monitoring Utility
The D-ViewCam application adds enhanced features and functionality for the Network Camera and allows administrators to configure and access the Network Camera from a remote site via Intranet or Internet. Other features include image monitoring, recording images to a hard drive, viewing up to 32 cameras on one screen, and taking snapshots.
IR LED for Day and Night Functionality
The built-in infrared LEDs enables night time viewing of up to 16 feet (5 meters).
IP65 Weatherproof Housing
The DCS-2332L uses an IP65 weatherproof housing, allowing you to rest assured that in the toughest of conditions, it will continue to provide round-the-clock surveillance.
802.11n Wireless or Ethernet/Fast Ethernet Support
The DCS-2332L offers wireless 802.11n and Ethernet/Fast Ethernet connectivity, making the DCS-2332L easy to integrate into your existing network environment. The DCS-2332L works with a 10Mbps Ethernet based network or 100Mbps Fast Ethernet based network for traditional wired environments, and works with 802.11n routers or access points for added flexibility. The Site Survey feature also allows you to view and connect to any available wireless networks.
D-Link DCS-2332L User Manual |
6 |
Section 1: Product Overview
Hardware Overview
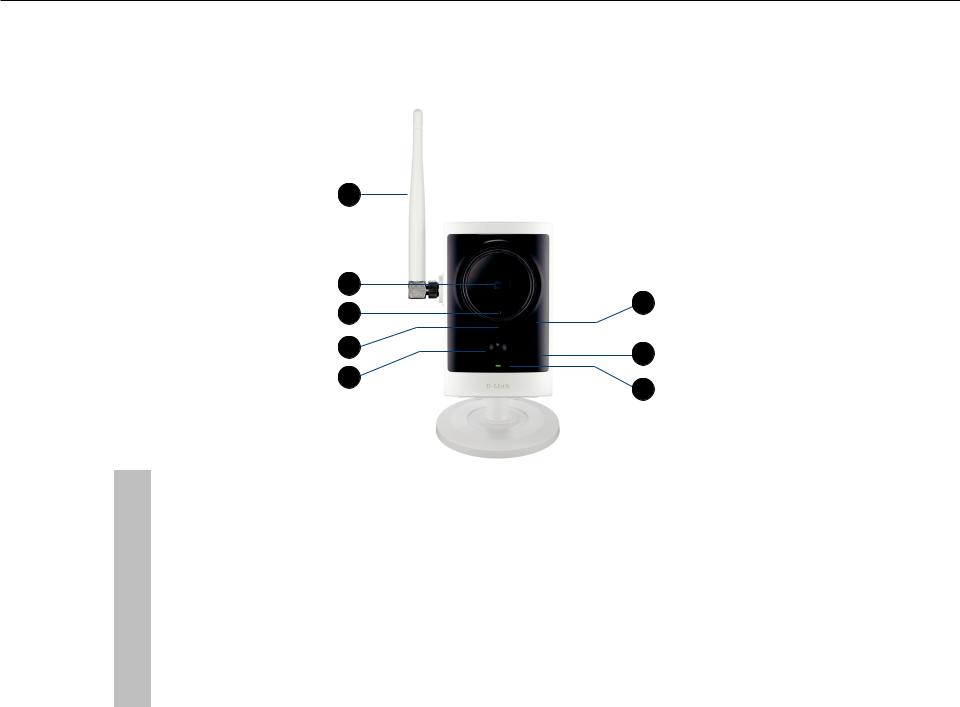
Front
8
1
2 |
5 |
|
|
3 |
6 |
|
|
4 |
7 |
|
|
1 |
Camera Lens |
Records video of the surrounding area |
|
|
|
|
|
|
|
2 |
ICR Sensor |
The IR-Cut Removable sensor measures the lighting conditions and switches |
|
|
between color and infrared accordingly |
|
||
|
|
|
|
|
|
|
|
|
|
|
3 |
Microphone |
Records audio from the surrounding area |
|
|
|
|
|
|
|
4 |
PIR |
Passive Infrared sensor for motion detection |
|
|
|
|
|
|
|
5 |
IR LED |
Infrared LED illuminates the camera's field of view at night |
|
|
|
|
|
|
|
6 |
WPS Status LED |
Indicates the WPS connection status of the camera |
|
|
|
|
|
|
|
7 |
Power/Status LED |
Indicates the camera's current status |
|
|
|
|
|
|
|
8 |
Antenna |
Outdoor wireless antenna |
|
|
|
|
|
|
|
|
|
|
|
D-Link DCS-2332L User Manual |
7 |
|||

Section 1: Product Overview
Rear: External
|
1 |
|
6 |
||||||
|
|
|
|
|
|
|
|
||
|
2 |
|
|
|
|
|
|
|
|
|
|
7 |
|||||||
|
3 |
|
|||||||
|
|
|
|
|
|
|
8 |
||
|
|
|
|
|
|
|
|||
|
4 |
|
|
|
|
|
|||
|
|
|
|||||||
|
|
|
|
|
|
|
|
||
|
5 |
|
9 |
||||||
|
|
|
|
|
|
|
|
||
|
|
|
6 |
||||||
|
|
|
|
|
|
|
|
|
|
1 |
Weatherproof Cover |
Weatherproof protective panel |
|||||||
|
|
|
|
|
|
|
|
|
|
2 |
Protective Cable Cover |
Weatherproof cable connection cover |
|||||||
|
|
|
|
|
|
|
|
|
|
3 |
Ethernet Cable |
RJ45 Ethernet cable to connect to your network |
|||||||
|
|
|
|
|
|
|
|
|
|
4 |
Speaker |
Audio output |
|||||||
|
|
|
|
|
|
|
|
|
|
5 |
Weatherproof Cover |
Weatherproof cover for the MicroSD Card slot and reset button |
|||||||
|
|
|
|
|
|
|
|
|
|
6 |
Weatherproof Screw Covering |
Weatherproof protective covering for enclosure screws |
|||||||
|
|
|
|
|
|
|
|
|
|
7 |
Power Cable |
Connected to the included DC 5 V power adapter |
|||||||
|
|
|
|
|
|
|
|
|
|
8 |
WPS Button |
Press this button, then press the WPS button for 5 seconds on your |
|||||||
router to set up a wireless connection automatically |
|||||||||
|
|
|
|||||||
|
|
|
|
|
|
|
|
|
|
9 |
Adjustment Ring |
Tighten or loosen the adjustment ring to adjust the camera's position |
|||||||
|
|
|
|
|
|
|
|
|
|
D-Link DCS-2332L User Manual |
8 |

Section 1: Product Overview
Rear: Internal
1
2
3 4
1 |
DC Power Connector |
Connected to the included DC 5 V power adapter |
|
|
|
|
|
2 |
RJ45 Ethernet Port |
RJ45 connector for Ethernet |
|
|
|
|
|
3 |
Reset Button |
Use a paperclip or similar tool to press and hold the recessed button for |
|
10 seconds to reset the camera |
|||
|
|
||
|
|
|
|
4 |
SD Memory Card Slot |
Insert a MicroSD card for for storing recorded images and video |
|
|
|
|
D-Link DCS-2332L User Manual |
9 |
Section 1: Product Overview
Removing the Top Panel
2 3 4
Step 1:
Place the camera face down on a non-slip flat surface.
Step 2:
Carefully pry out the two protective rubber screw coverings using a thin flat blade.
Step 3:
Undo the two screws using a Philips #00 Screwdriver.
Step 4:
Lift off the protective panel.
Note: To ensure that the camera stays weatherproof, users are advised to ensure that all the rubber seals are secured firmly in place.
D-Link DCS-2332L User Manual |
10 |
Section 1: Product Overview
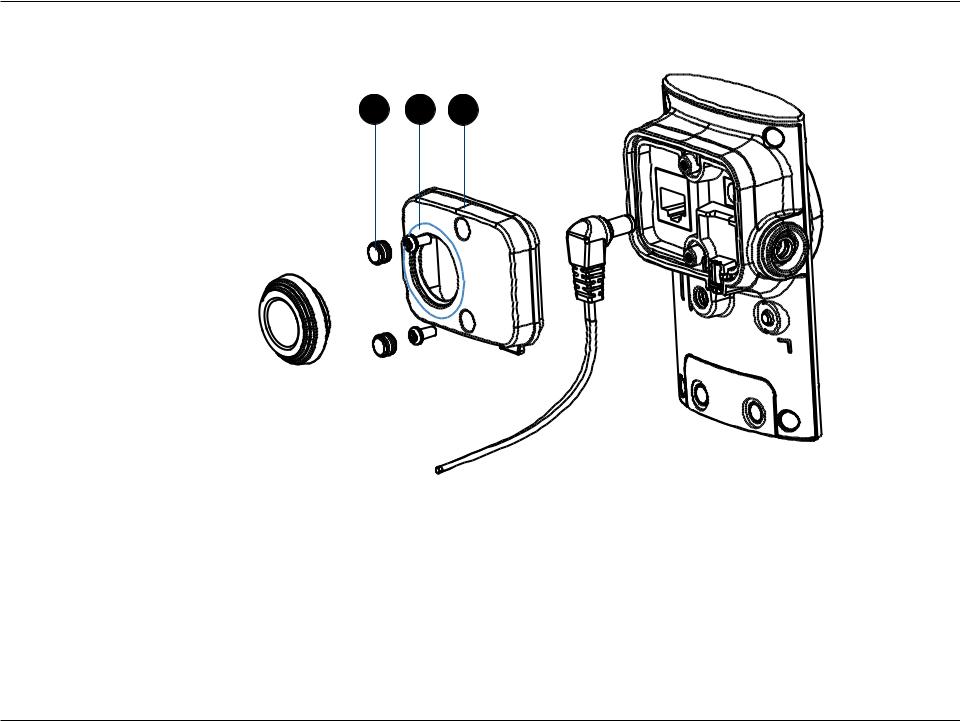
Replacing the Ethernet Cable
3 2
Step 1:
Follow the steps outlined in "Removing the Top Panel" on page 10.
Step 2:
Unplug the Ethernet cable from the RJ45 connector.
Step 3:
Carefully remove the weatherproof cable connection cover.
Step 4:
Attach the weatherproof cable connection cover to the new Ethernet cable.
Step 5:
Plug the new Ethernet cable into the RJ45 connector.
Step 6:
Follow the steps outlined in "Reattaching the Top Panel" on page 12.
Note: To avoid damage to the weatherproof aspects of the camera, users are advised not to remove the rear cable connection covering. To use a longer Ethernet cable install a coupling adaptor.
D-Link DCS-2332L User Manual |
11 |

Section 1: Product Overview
Reattaching the Top Panel
3 2 1
Step 1:
Seat the protective panel, ensuring a tight fit with the inlaid rubber seal.
Step 2:
Replace the two screws. Ensure that the screws are tightened firmly.
Step 3:
Firmly replace the protective rubber screw coverings.
Note: To ensure that the camera stays weatherproof, users are advised to ensure that all the rubber seals are secured firmly in place.
D-Link DCS-2332L User Manual |
12 |
Section 1: Product Overview
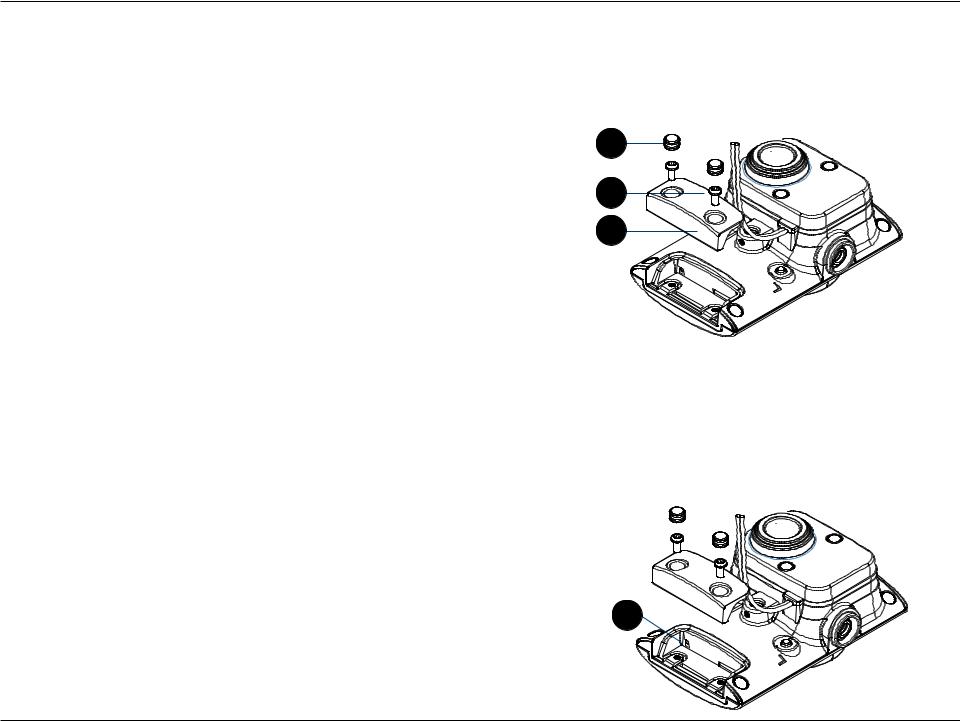
Removing the Bottom Panel
Step 1:
Place the camera face down on a non-slip flat surface.
Step 2:
Carefully pry out the two protective rubber screw coverings using a thin flat blade.
Step 3:
Undo the two screws using a Philips #00 Screwdriver.
2
3
4
Step 4:
Lift off the protective panel.
If you need to install an SD Memory Card please skip to "Installing an SD Memory Card" on page 14.
Using the Reset Button
If you need to use the Reset Button follow these steps.
Step 1:
Follow the steps outlined in "Removing the Bottom Panel" on page 13.
Step 2:
Using a paperclip or similar tool, press and hold the Reset Button for 10 seconds. This will reset the device to it's factory settings.
Step 3:
Follow the steps outlined in "Reattaching the Bottom Panel" on page 14.
2 
D-Link DCS-2332L User Manual |
13 |
Section 1: Product Overview
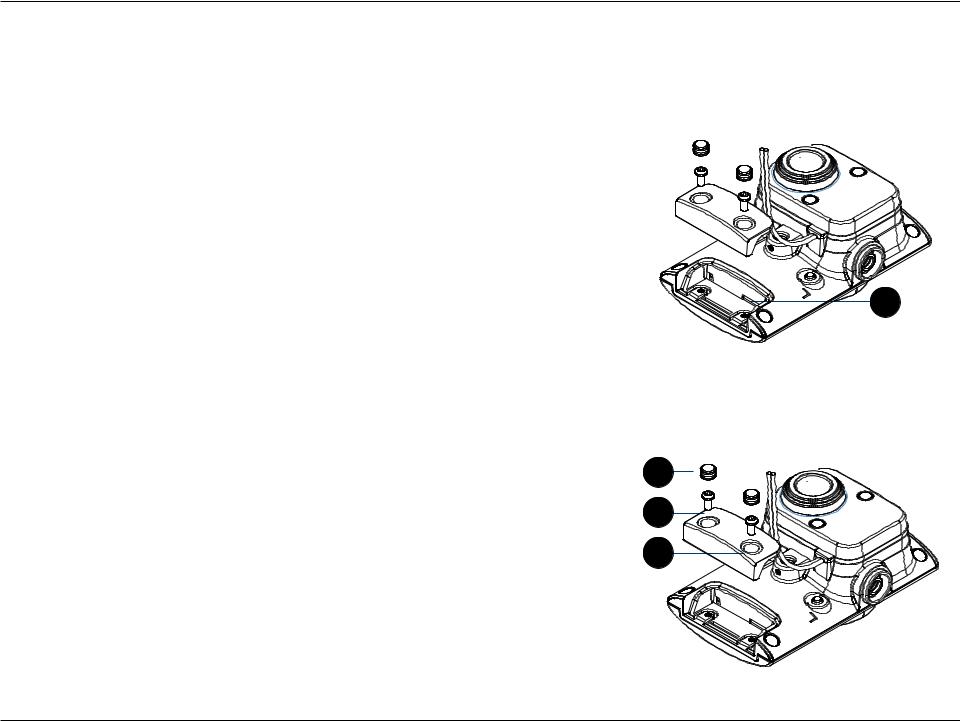
Installing an SD Memory Card
Step 1:
Follow the steps outlined in "Removing the Bottom Panel" on page 13.
Step 2:
Insert a MicroSD Memory card into the slot, with the notch facing right.
Step 3:
Follow the steps outlined in "Reattaching the Bottom Panel" on page 14.
2
Reattaching the Bottom Panel
Step 1:
Seat the protective panel, ensuring a tight fit with the inlaid rubber seal.
Step 2:
Replace the two screws. Ensure that the screws are tightened firmly.
Step 3:
Firmly replace the protective rubber screw coverings.
Note: To ensure that the camera stays weatherproof, users are advised to ensure that all the rubber seals are secured firmly in place.
2
3
4
D-Link DCS-2332L User Manual |
14 |

Section 1: Product Overview
Optional: WPS Wireless Connection
Alternatively, if your router supports WPS, you can use the WPS button on the camera to easily create a secure wireless connection to your network.
To create a WPS connection:
Step 1
Attach the Antenna
Locate the antenna included with your DCS-2332L, and attach it to the antenna connector located on the side of the DCS-2332L.
Step 2
Press and hold the WPS button for approximately 5-6 seconds. The blue WPS status LED on the front panel will blink.
Step 3
Within 60 seconds press the WPS button on your router. On some routers, you may need to log in to the web interface and click on an on-screen button to activate the WPS feature. If you are not sure where the WPS button is on your router, please refer to your router’s User Manual.
The DCS-2332L will automatically create a wireless connection to your router. While connecting, the status LED will flash. When the connection process is complete, the status LED will turn solid.
Note: If your router does not support WPS, you can still use the wired connection method on the previous page. After Zero Configuration setup is complete, your router's wireless settings will be automatically transferred to the camera.
1


 WPS Button
2
D-Link DCS-2332L User Manual |
15 |

Section 2: Installation
Installation
Zero Configuration Setup
If you have a mydlink-enabled Cloud Router, you can take advantage of Zero Configuration. Zero Configuration automatically configures your camera's settings for you, and adds it to your mydlink account automatically. This type of setup allows you to set up your camera by simply plugging it in and connecting it to your router.
Connect your camera to your mydlink-enabled Cloud Router and Zero Configuration will automatically configure your DCS 2332L and automatically add the camera to your mydlink account. After the short time it takes to do this you can remotely access your camera from the www.mydlink.com website to manage and monitor your DCS-2332L.
Connect the Ethernet Cable
Using the pre-attached Ethernet cable connect the free end to your network.
Attach the External Power Supply
Attach the external power supply to your wall outlet or power strip.
D-Link DCS-2332L User Manual |
16 |

Section 2: Installation
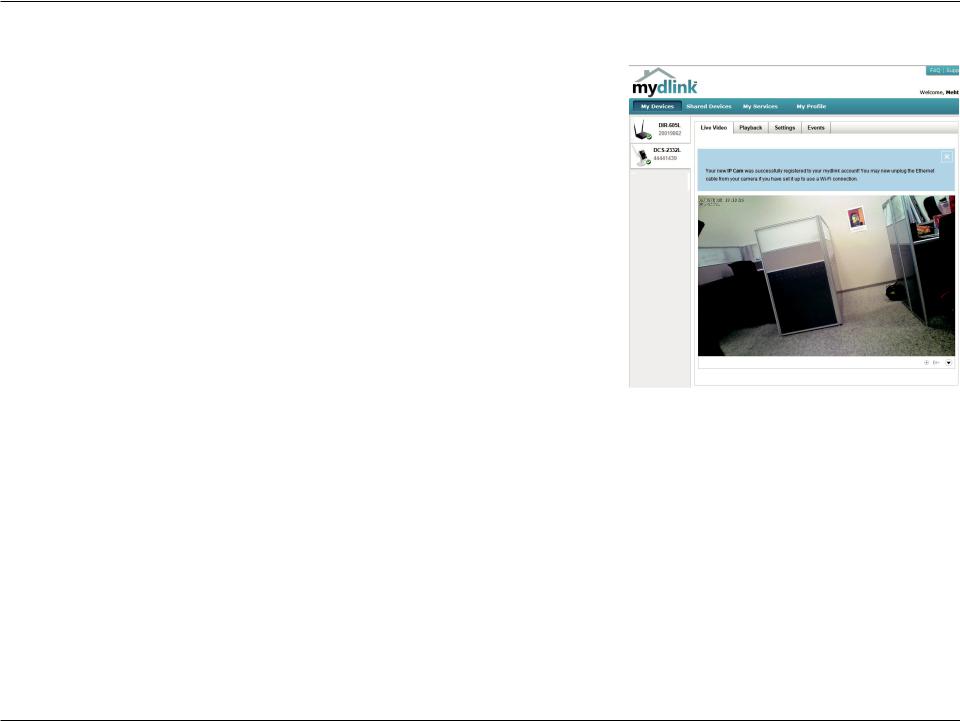
Check Your mydlink Account
Open a web browser and login to your mydlink account. The mydlink page will check for new devices and display a New device Found! pop-up notification in the bottom-left corner. Click the notification to continue.
A summary and confirmation notification will appear with the automatically configured details. Make a note of the details and click Yes to add the camera to your account.
DCS-2332L
D-Link DCS-2332L User Manual |
17 |
Section 2: Installation
Zero Configuration will navigate to the mydlink Live View tab for your camera where you will see a screen similar to the following.
If you wish to connect your camera to your router wirelessly, you can simply disconnect the Ethernet cable and move the camera to its intended location; your router's wireless settings have been automatically transferred to the camera, and no further configuration is required.
Your camera is now set up, and you can skip to "mydlink" on page 23 to learn more about the mydlink features of this camera, or to "Configuration" on page 24 for advanced configuration of your camera.
D-Link DCS-2332L User Manual |
18 |

Section 2: Installation
Camera Installation Wizard
Windows Users
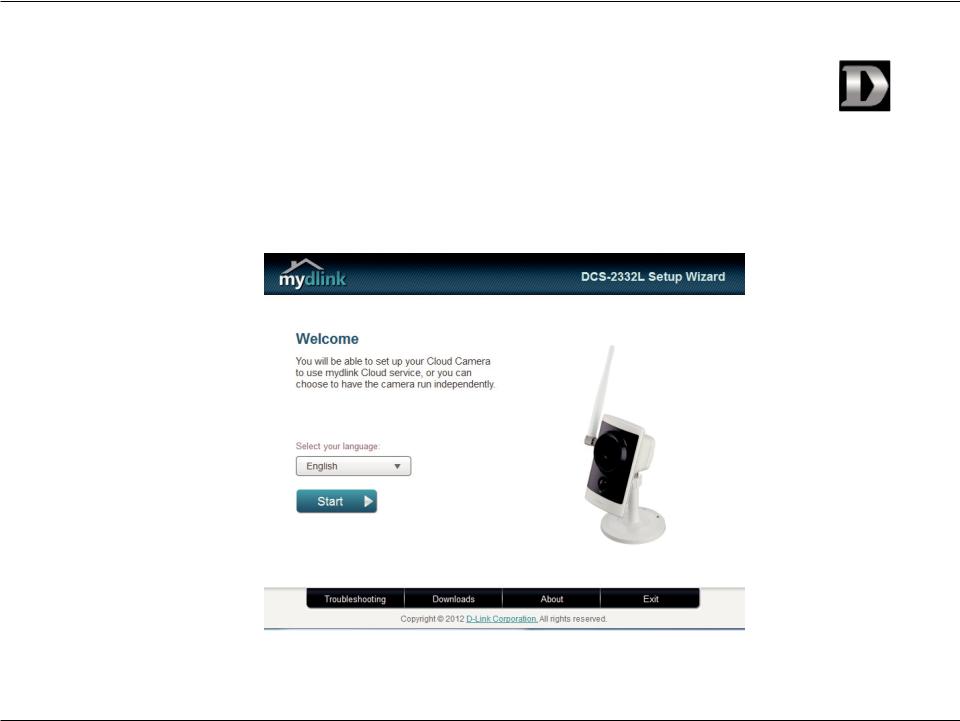
Insert the Installation CD-ROM into your computer’s optical drive to start the autorun program.
Simply click Set up your Cloud Camera to go through the SetupWizard, which will guide you step-by-step through the installation process from connecting your hardware to configuring your camera and registering it with your mydlink account.
Note: If the autorun program does not open, go to My Computer, browse to your CD drive, and double-click on the setup.exe file.
D-Link DCS-2332L User Manual |
19 |
Section 2: Installation
Mac Users
Insert the Installation CD-ROM into your computer’s CD drive. On the desktop, open your CD drive and double-click on the SetupWizard file.
SetupWizard
Within 20-30 seconds, the Setup Wizard will open, which will guide you step-by-step through the installation process from connecting your hardware to configuring your camera and registering it with your mydlink account.
Note: mydlink portal requires JavaTM to function correctly.
For more guidelines, please refer to mydlink FAQ pages at https://eu.mydlink.com/faq/mydlink
D-Link DCS-2332L User Manual |
20 |
Section 2: Installation
Manual Hardware Installation
If you wish to set up your camera without using the Camera Setup Wizard, please follow these steps.
Note: In order to use the mydlink features of this product, you will need to go through the Camera Setup Wizard.
Connect the Ethernet Cable
Using the pre-attached Ethernet cable connect the free end to your network.
Attach the External Power Supply
Attach the external power supply to your wall outlet or power strip.
D-Link DCS-2332L User Manual |
21 |
Loading...