


D-Link DAP-2660 User Manual
Table of Contents
Product Overview...................................................................... |
4 |
Introduction.................................................................................... |
4 |
Features............................................................................................ |
5 |
Package Contents......................................................................... |
6 |
System Requirements.................................................................. |
6 |
Hardware Overview................................................................... |
7 |
LEDs.................................................................................................... |
7 |
Connections.................................................................................... |
7 |
Basic Installation........................................................................ |
8 |
Hardware Setup............................................................................. |
8 |
Method 1 - PoE with PoE Switch or Router.................. |
8 |
Method 2 - PoE without PoE Switch or Router................ |
9 |
Method 3 - No PoE.............................................................. |
10 |
Web User Interface.................................................................. |
11 |
Wireless........................................................................................... |
12 |
Access Point Mode.............................................................. |
12 |
WDS with AP Mode............................................................. |
14 |
WDS Mode............................................................................. |
16 |
Wireless Client Mode......................................................... |
18 |
Wireless Security.................................................................. |
19 |
Wired Equivalent Privacy (WEP)............................... |
19 |
Wi-Fi Protected Access (WPA / WPA2).................... |
20 |
LAN........................................................................................... |
22 |
IPv6........................................................................................... |
23 |
Advanced Settings...................................................................... |
24 |
Performance.......................................................................... |
25 |
Wireless Resource Control....................................................... |
27 |
Multi-SSID.............................................................................. |
29 |
VLAN........................................................................................ |
31 |
VLAN List........................................................................... |
31 |
Port List............................................................................. |
32 |
Add/Edit VLAN................................................................ |
33 |
PVID Settings................................................................... |
34 |
Intrusion................................................................................. |
35 |
Schedule................................................................................. |
36 |
Internal RADIUS Server...................................................... |
37 |
ARP Spoofing Prevention................................................. |
38 |
Bandwidth Optimization.................................................. |
39 |
AP Array.................................................................................. |
41 |
AP Array Scan.................................................................. |
41 |
Configuration Settings................................................ |
42 |
Auto-RF............................................................................. |
46 |
Load Balance................................................................... |
47 |
Captive Portal....................................................................... |
48 |
Authentication Settings - Passcode........................ |
48 |
Authentication Settings - Username/Password.49 |
|
Authentication Settings - Remote RADIUS.......... |
50 |
Authentication Settings - LDAP............................... |
51 |
Authentication Settings - POP3............................... |
52 |
Login Page Upload........................................................ |
53 |
2

D-Link DAP-2660 User Manual
Web Redirection............................................................ |
54 |
DHCP Server.......................................................................... |
55 |
Dynamic Pool Settings................................................ |
55 |
Static Pool Setting......................................................... |
56 |
Current IP Mapping List.............................................. |
57 |
Filters........................................................................................ |
58 |
Wireless MAC ACL.......................................................... |
58 |
WLAN Partition............................................................... |
59 |
Traffic Control............................................................................... |
60 |
Uplink/Downlink Setting.................................................. |
60 |
QoS........................................................................................... |
61 |
Traffic Manager.................................................................... |
62 |
Status............................................................................................... |
63 |
Device Information............................................................. |
64 |
Client Information............................................................... |
65 |
WDS Information Page...................................................... |
66 |
Channel Analyze.................................................................. |
67 |
Stats Page....................................................................................... |
68 |
Ethernet Traffic Statistics.................................................. |
68 |
WLAN Traffic Statistics....................................................... |
69 |
Log.................................................................................................... |
70 |
View Log................................................................................. |
70 |
Log Settings.......................................................................... |
71 |
Maintenance Section................................................................. |
72 |
Administration............................................................................. |
73 |
Limit Administrator............................................................. |
73 |
System Name Settings....................................................... |
74 |
Login Settings....................................................................... |
74 |
Console Settings.................................................................. |
74 |
SNMP Settings...................................................................... |
75 |
Administration............................................................................. |
76 |
Central WiFiManager Settings........................................ |
76 |
Firmware and SSL Upload................................................ |
77 |
Configuration File Upload................................................ |
78 |
Time and Date Settings..................................................... |
79 |
Configuration and System....................................................... |
80 |
System Settings........................................................................... |
81 |
Help.................................................................................................. |
82 |
Knowledge Base...................................................................... |
83 |
Wireless Basics.............................................................................. |
83 |
Wireless Installation Considerations.................................... |
84 |
Troubleshooting...................................................................... |
85 |
Why can’t I access the web-based configuration |
|
utility?...................................................................................... |
85 |
What can I do if I forgot my password?....................... |
85 |
How to check your IP address?....................................... |
86 |
How to statically assign an IP address?....................... |
87 |
Technical Specifications......................................................... |
88 |
Antenna Pattern ..................................................................... |
89 |
3

D-Link DAP-2660 User Manual
Product Overview
Introduction
D-Link, an industry pioneer in wireless networking, introduces a solution for businesses seeking to deploy next generation 802.11ac LANs. D-Link unveils its new DAP-2660, designed specifically for environments with high traffic areas such as airports, coffee shops, shopping centers, sporting venues, and school campuses to provide secure and manageable dual band wireless network options for network administrators.
Versatile Access Point
The DAP-2660 Access Point allows network administrators to deploy a highly manageable and extremely robust dual band wireless network. For advanced installations, this new high-speed Access Point has integrated 802.3af Power over Ethernet (PoE) support, allowing installation of this device in areas where power outlets are not readily available. In addition to bridging 802.11ac and 802.11b/g/n wireless networks, the DAP-2660 can bridge to wired networks with its integrated Gigabit (10/100/1000Mbps) Ethernet port.
Enhanced Performance
The DAP-2660 delivers reliable wireless performance with maximum wireless signal rates of up to 1200Mbps. This, coupled with support for Wi-Fi Multimedia™ (WMM) Quality of Service features, makes it an ideal access point for audio, video, and voice applications.
Security
To help maintain a secure wireless network, the DAP-2660 provides the latest in wireless security technologies by supporting both Personal and Enterprise versions of WPA and WPA2 (802.11i) with support for RADIUS server back end. To further protect your wireless network, MAC Address Filtering, Wireless LAN segmentation, Disable SSID Broadcast, Rogue AP Detection, and Wireless Broadcast Scheduling are also included.
Power Usage
This device is an Energy Related Product (ErP) with High Network Availability (HiNA), and automatically switches to a power-saving Network Standby mode within 1 minute of no packets being transmitted. It can also be turned off through a power switch to save energy when it is not needed.
Network Standby: 3.46 watts Switched Off: 0.14 watts
*In Hong Kong, for operation within 5.15 ~ 5.35GHz frequency range, it is restricted to indoor environment.
*Maximum wireless signal rate derived from IEEE Standard 802.11ac, 802.11g, 802.11a, and 802.11n specifications. Actual data throughput will vary. Network conditions and environmental factors, including volume of network traffic, building materials and construction, and network overhead, lower actual data throughput rate. Environmental conditions will adversely affect wireless signal range.
4

D-Link DAP-2660 User Manual
Features
yy Provide Ethernet to Wireless LAN bridge fully IEEE 802.3/u/ab compatible on the Ethernet side and fully interoperable with IEEE 802.11ac and b/g/n compliant equipment
yy Compatible with IEEE 802.11b high rate standard to provide wireless 11Mbps data rate*
yy Compatible with IEEE 802.11g higher speed standard to provide wireless 54Mbps data rate* yy Compatible with IEEE 802.11a higher speed standard to provide wireless 54Mbps data rate* yy Compatible with IEEE 802.11n higher speed standard to provide wireless 300Mbps data rate* yy Compatible with IEEE 802.11ac higher speed standard to provide wireless 900Mbps data rate* yy Operation at 2.4~2.5GHz and 5.15~5.85GHz** frequency band to meet worldwide regulations yy Supports IEEE 802.11ac and b/g/n wireless data encryption with 64/128-bit WEP for security yy Supports enhanced security – WPA-PSK and WPA2-PSK, RADIUS client, and Cipher negotiation yy Allows auto fallback data rate for reliability, optimized throughput and transmission range
yy Web-based configuration and management yy Supports 802.3af PoE
yy Supports 802.3az
yy Supports one Gigabit Ethernet port
yy AP Mode, WDS Mode, WDS with AP, and Wireless Client Mode yy Supports SNMP v1,v2,v3
yy Support Trap server (SNMP v1, v2c) yy Support Central WiFiManager
yy Support AP Array and AP Array Setup Tool
* Maximum wireless signal rate derived from IEEE Standard 802.11ac, 802.11g, 802.11a, and 802.11n specifications. Actual data throughput will vary. Network conditions and environmental factors, including volume of network traffic, building materials and construction, and network overhead, lower actual data throughput rate. Environmental conditions will adversely affect wireless signal range.
**Please note that operating frequency ranges vary depending on the regulations of individual countries and jurisdictions. The DAP-2660 isn’t supported in the 5.25~5.35GHz and 5.47 ~ 5.725GHz frequency ranges in some regions.
5

D-Link DAP-2660 User Manual
Package Contents
•DAP-2660 Access Point
•Power Adapter
•Mounting Plate and Hardware
•Ethernet Cable
•CD (with software and user manual)
Note: Using a power supply with a different voltage rating than the one included with the DAP-2660 will cause damage and void the warranty for this product.
System Requirements
yy Computers with Windows®, Macintosh®, or Linux-based operating systems with an installed Ethernet Adapter yy Internet Explorer Version 7.0, Chrome 12, Safari 4, or Firefox 12 and above (for web-based configuration)
6
D-Link DAP-2660 User Manual
|
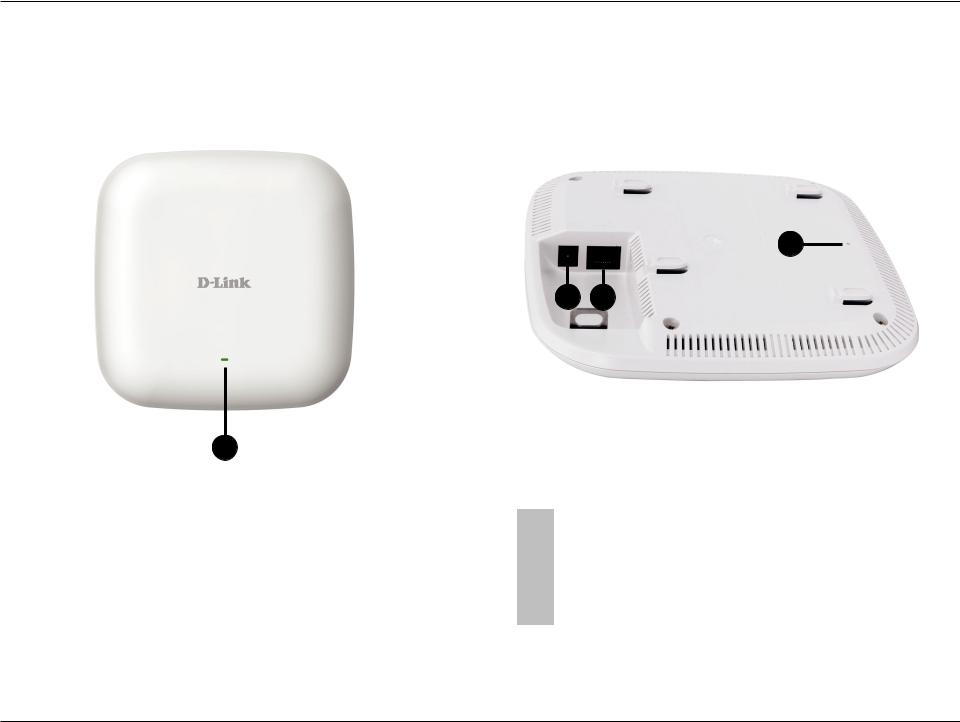
Hardware Overview |
LEDs |
Connections |
4
2 3
1
|
|
|
|
|
|
|
|
2 |
Power Receptor |
Connect the supplied power adapter. |
|
|
Solid Red |
Indicates the access point has malfunctioned. |
|
||||||
|
|
|
|
|
|
|||||
|
3 |
LAN (PoE) Port |
Connect to a Power over Ethernet (PoE) switch or router via |
|||||||
|
|
|
|
|
|
|
|
|||
|
|
Blinking Red |
This LED will blink during boot-up. |
|
an Ethernet cable. |
|||||
|
|
|
|
|
||||||
|
|
|
|
|
|
|||||
1 |
Power/Status |
|
|
|
|
|
|
|
|
Press and hold for five seconds to reset the access point to |
|
Indicates |
that |
the DAP-2660 |
is working |
|
4 |
|
|||
|
|
Solid Green |
|
Reset Button |
the factory default settings. Press and hold for one second |
|||||
|
|
properly. |
|
|
|
|
||||
|
|
|
|
|
|
|
|
|
to reboot the access point. |
|
|
|
Blinking Green |
This light |
will |
blink green |
during data |
|
|
|
|
|
|
|
|
|
|
|||||
|
|
|
|
|
||||||
|
|
transmission. |
|
|
|
|
|
|
||
|
|
|
|
|
|
|
|
|
||
|
|
|
|
|
|
|
|
|
|
|
7
D-Link DAP-2660 User Manual
Basic Installation
Hardware Setup
To power the access point, you can use one of the following 3 methods: Method 1 - Use if you have a PoE switch or router.
Method 2 - Use if you do not have a PoE switch or router and do not have a power outlet near the location of the access point. Method 3 - Use if you do not have a PoE switch or router and have a power outlet near the location of the access point.
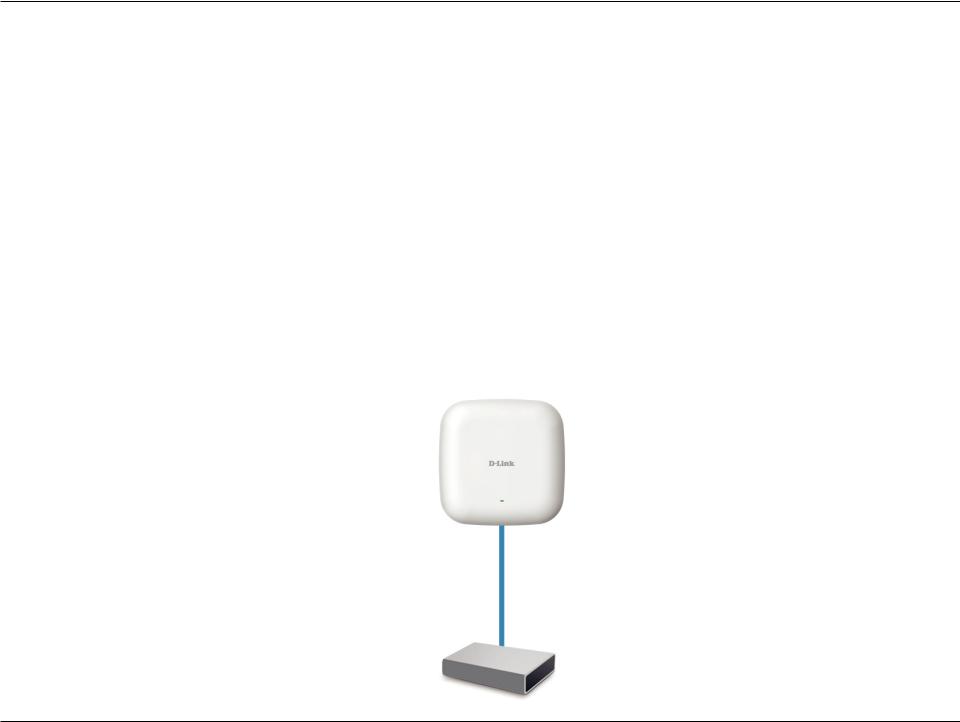
Method 1 - PoE with PoE Switch or Router
1.Connect one end of your Ethernet cable to the LAN (PoE) port on the access point.
2.Connect the other end into one port on a PoE switch or router.
DAP-2660
PoE Switch or Router
8
D-Link DAP-2660 User Manual
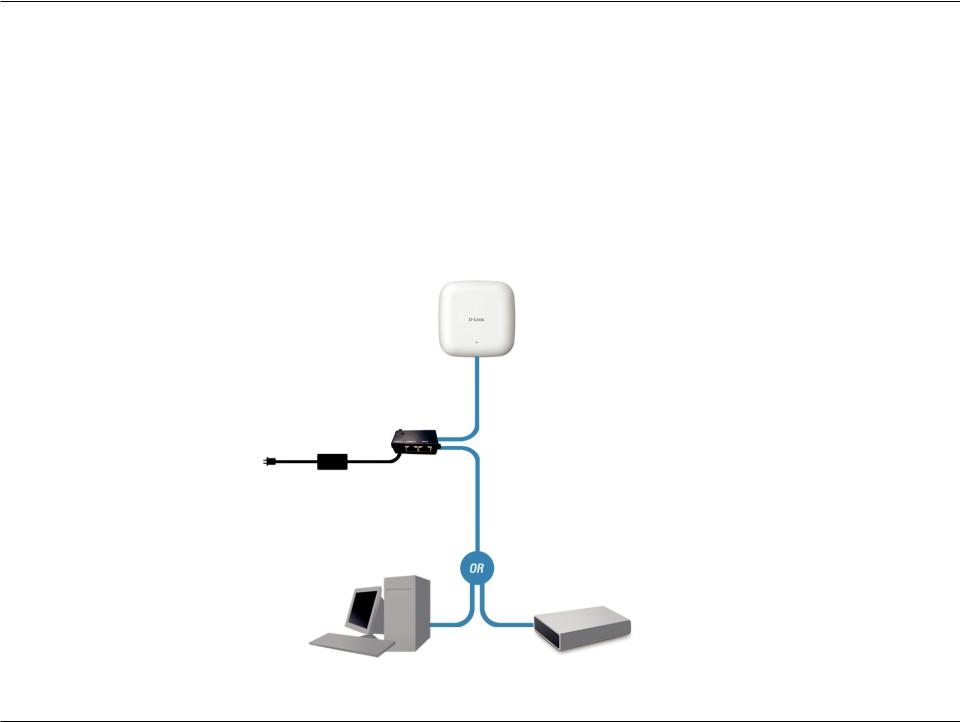
Method 2 - PoE without PoE Switch or Router
1.Connect one end of an Ethernet cable into the Data In port on the PoE base unit and the other end into one port on your switch, router, or computer.
2.Connect one end of an Ethernet cable into the P+Data Out port on the PoE base unit and the other end into the LAN (PoE) port on the Access Point.
3.Use the supplied power adapter. Connect the power adapter to the Power In receptor on the PoE adapter.
4.Connect the power cable to the power adapter and then connect the other end into a power outlet.
DAP-2660
PoE Base Unit
Power Adapter
PC |
Switch or Router |
9
D-Link DAP-2660 User Manual
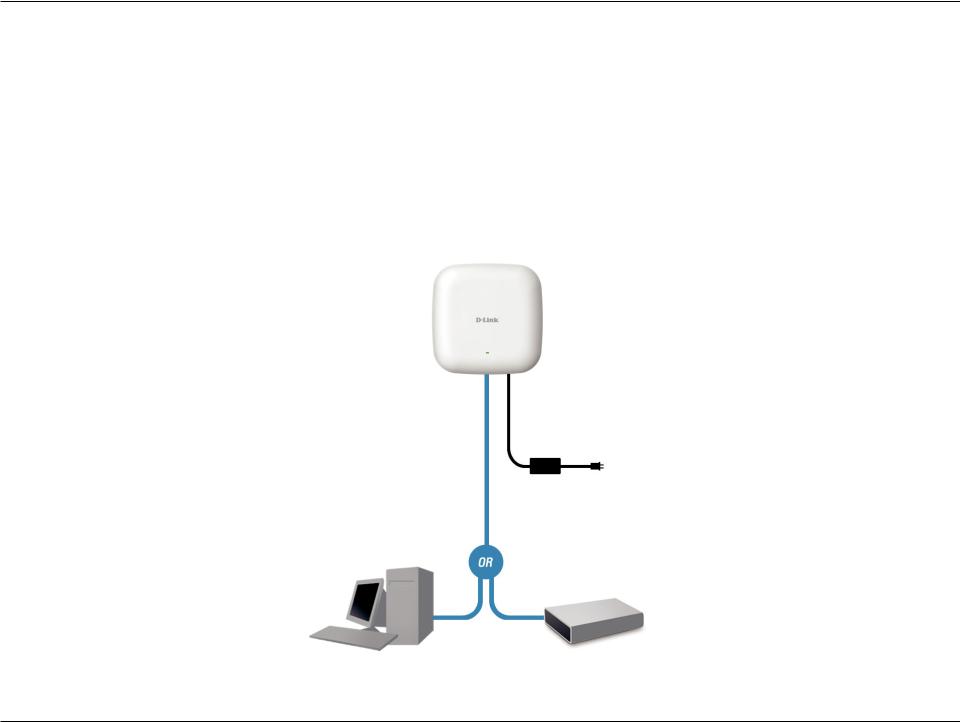
Method 3 - No PoE
1.Connect one end of your Ethernet cable into the LAN (PoE) port and then connect the other end to a switch, router, or computer.
2.Use the supplied power adapter. Connect the power adapter to the Power receptor on the Access Point.
3.Connect the power cable to the power adapter and then connect the other end into a power outlet.
DAP-2660
Power Adapter
PC |
Switch or Router |
10
D-Link DAP-2660 User Manual
Web User Interface
The DAP-2660 supports an elaborate web user interface where the user can configure and monitor the device. Most of the configurable settings are located in the left menu of the web GUI which contains section called Basic Settings, Advanced Settings and Status.
11
D-Link DAP-2660 User Manual
Wireless
On the wireless settings page, you can setup the basic wireless configuration for the access point. The user can choose from 4 different wireless modes:
Access Point - Used to create a wireless LAN
WDS with AP - Used to connect multiple wireless networks while still functioning as a wireless access point WDS - Used to connect multiple wireless networks
Wireless Client - Used when the access point needs to act as a wireless network adapter for an Ethernet enabled device
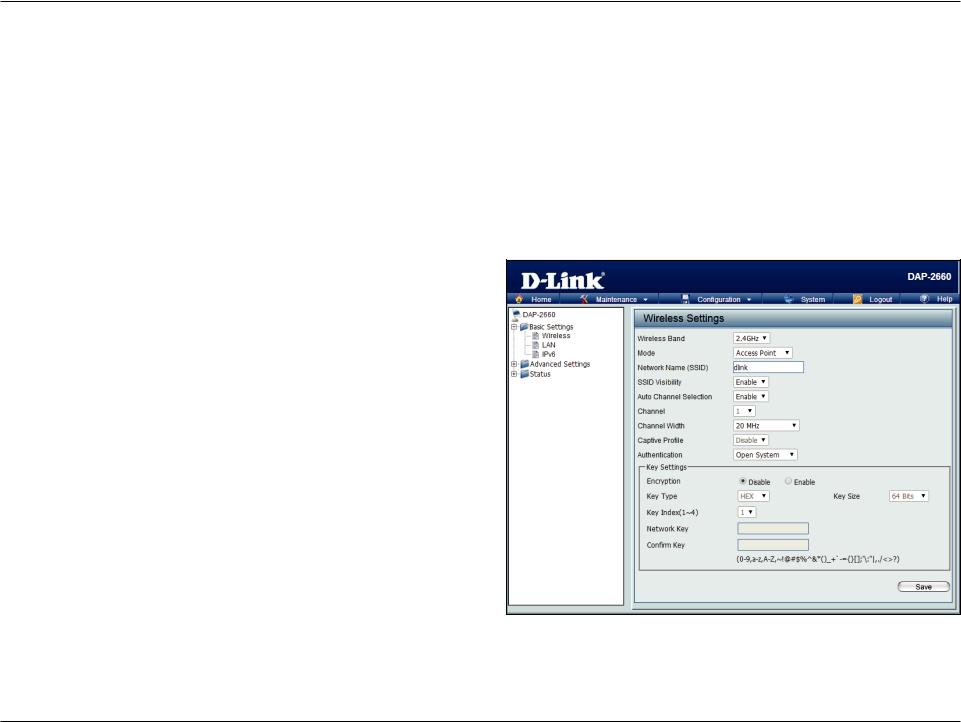
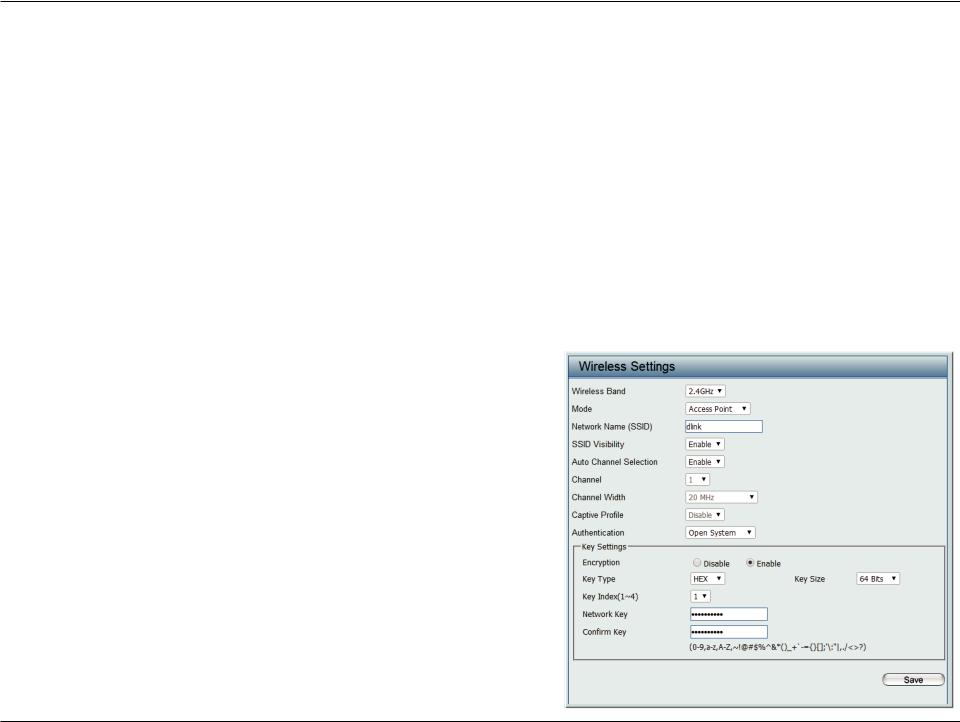
Access Point Mode
Wireless Band: Selecteither2.4GHzor5GHzfromthedrop-down
menu.
Mode: Select Access Point from the drop-down menu.
Network Name (SSID): Service Set Identifier (SSID) is the name designated for a specific wireless local area network (WLAN). The SSID’s factory default setting is dlink.The SSID can be easily changed to connect to an existing wireless network or to establish a new wireless network. The SSID can be up to 32 characters and is case-sensitive.
SSID Visibility: Select Enable to broadcast the SSID across the network, thus making it visible to all network users. Select Disable to hide the SSID from the network.
Auto Channel Selection: This feature when enabled automatically selects the channel that provides the best wireless performance. The channel selection process only occurs when the AP is booting up. To manually select a channel, set this option to Disable and select a channel from the drop-down menu.
12

D-Link DAP-2660 User Manual
Channel: To change the channel, first toggle the Auto Channel Selection setting to Disable, and then use the drop-down menu to make the desired selection.
Note: The wireless adapters will automatically scan and match the wireless settings.
Channel Width: Allows you to select the channel width you would like to operate in. Select 20 MHz if you are not using any 802.11n wireless clients. Auto 20/40 MHz allows you to connect to both 802.11n and 802.11b/g or 802.11a wireless devices on your network.
Captive Profile: Enable or disable captive port profile for user authentication.
Authentication: Use the drop-down menu to choose Open System, Shared Key, WPA-Personal, WPA-Enterprise, or 802.1x.
•Select Open System to communicate the key across the network (WEP).
•Select Shared Key to limit communication to only those devices that share the same WEP settings. If multi-SSID is enabled, this option is not available.
•Select WPA-Personal to secure your network using a password and dynamic key changes. No RADIUS server is required.
•Select WPA-Enterprise to secure your network with the inclusion of a RADIUS server.
•Select 802.1X if your network is using port-based Network Access Control.
13
D-Link DAP-2660 User Manual
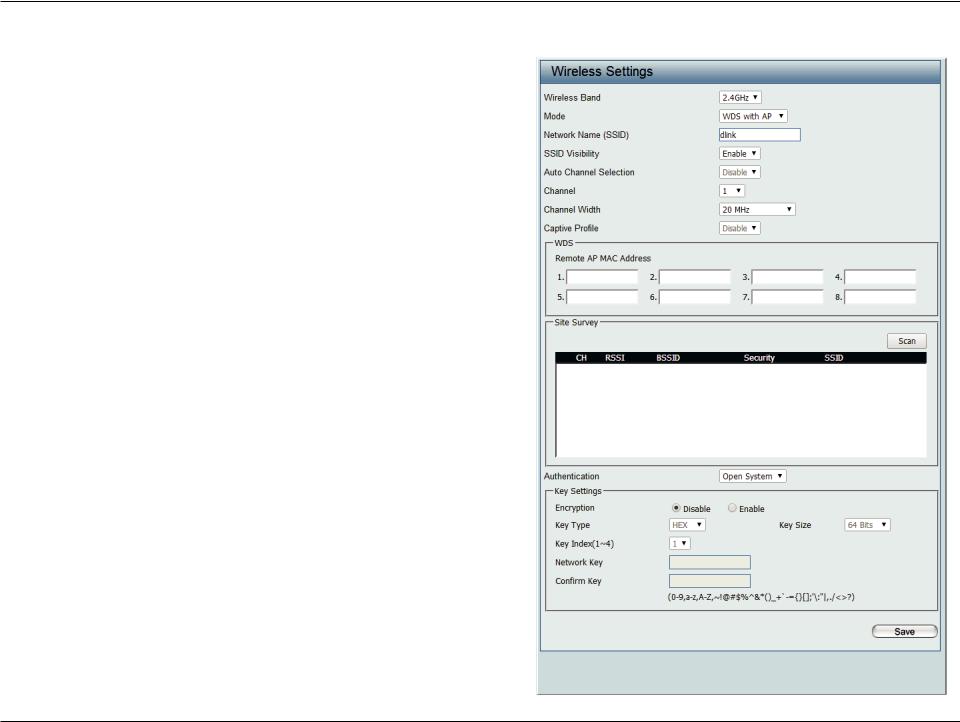
WDS with AP Mode
Wireless Band: Select either 2.4GHz or 5GHz from the drop-down menu.
Mode: WDS with AP mode isselected from the drop-down
menu.
Network Name (SSID): Service Set Identifier (SSID) is the name designated for a specific wireless local area network (WLAN). The SSID’s factory default setting is dlink. The SSID can be easily changed to connect to an existing wireless network or to establish a new wireless network.
SSID Visibility: Enable or Disable SSID visibility. Enabling this feature broadcasts the SSID across the network, thus making it visible to all network users.
Auto Channel Selection: Enabling this feature automatically selects the channel that will provide the best wireless performance. This feature is not supported in WDS with AP mode. The channel selection process only occurs when the AP is booting up.
Channel: All devices on the network must share the same channel.Tochangethechannel,usethedrop-down menu to make the desired selection. (Note: The wirelessadapterswillautomaticallyscanandmatch the wireless settings.)
Channel Width: Allows you to select the channel width you would like to operate in. Select 20 MHz if you are not using any802.11nwirelessclients.Auto20/40MHzallows you to connect to both 802.11n and 802.11b/g or 802.11a wireless devices on your network.
14

D-Link DAP-2660 User Manual
Captive Profile: Enable or disable captive port profile for user authentication.
Remote AP MAC Address: Enter the MAC addresses of the APs on your network that will serve as bridges to wirelessly connect multiple networks.
Site Survey: Click on the Scan button to search for available wireless networks, then click on the available network that you want to connect with.
Authentication: Use the drop-down menu to choose Open System, Shared Key, or WPA-Personal.
•Select Open System to communicate the key across the network.
•Select Shared Key to limit communication to only those devices that share the sameWEP settings. If multi-SSID is enabled, this option is not available.
•Select WPA-Personal to secure your network using a password and dynamic key changes. No RADIUS server is required.
15
D-Link DAP-2660 User Manual
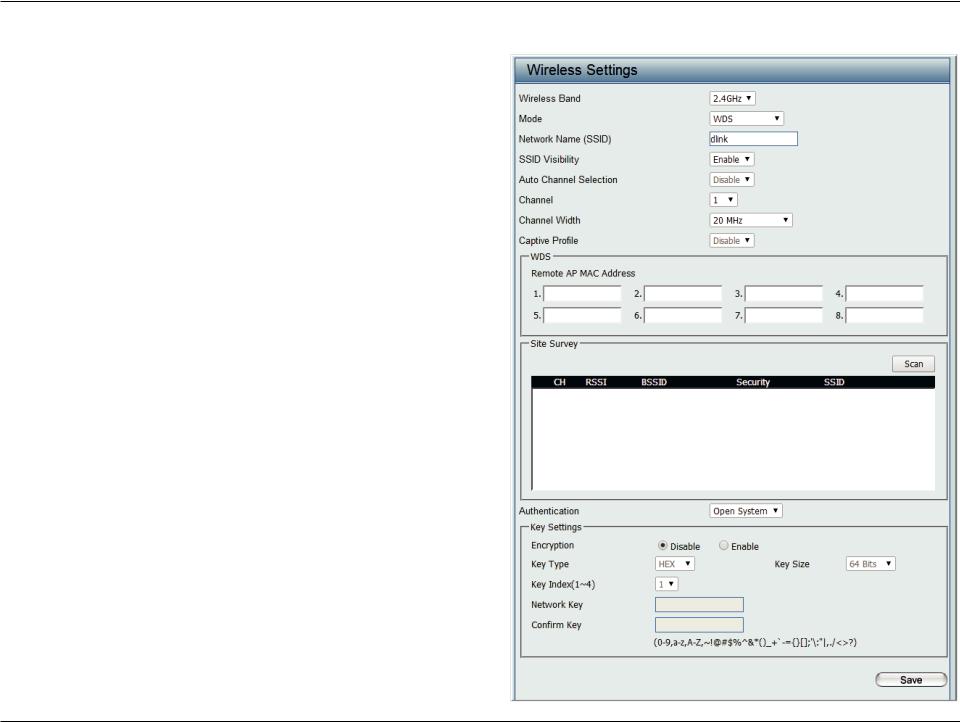
WDS Mode
Wireless Band: Select either 2.4GHz or 5GHz from the drop-down menu.
Mode: WDS is selected from the drop-down menu.
Network Name (SSID): Service Set Identifier (SSID) is the name designated foraspecificwirelesslocalareanetwork(WLAN).The SSID’s factory default setting is dlink. The SSID can be easily changed to connect to an existing wireless network or to establish a new wireless network.
SSID Visibility: Enable or Disable SSID visibility. Enabling this featurebroadcaststheSSIDacrossthenetwork,thus making it visible to all network users.
Auto Channel Selection: Enabling this feature automatically selects the channel that will provide the best wireless performance. This feature is not supported in WDS mode.
Channel: All devices on the network must share the same channel.Tochangethechannel,usethedrop-down menu to make the desired selection.
Channel Width: Use the drop-down menu to choose 20 MHz or Auto 20/40 MHz.
Captive Profile: Enable or disable captive port profile for user authentication.
Remote AP MAC Address: EntertheMACaddressesoftheAPsonyournetwork that will serve as bridges to wirelessly connect multiple networks.
16

D-Link DAP-2660 User Manual
Site Survey: Click on the Scan button to search for available wireless networks, then click on the available network that you want to connect with.
Authentication: Use the drop-down menu to choose Open System, Shared Key, or WPA-Personal.
•Select Open System to communicate the key across the network.
•Select Shared Key to limit communication to only those devices that share the same WEP settings.
•Select WPA-Personal to secure your network using a password and dynamic key changes. No RADIUS server is required.
17
D-Link DAP-2660 User Manual
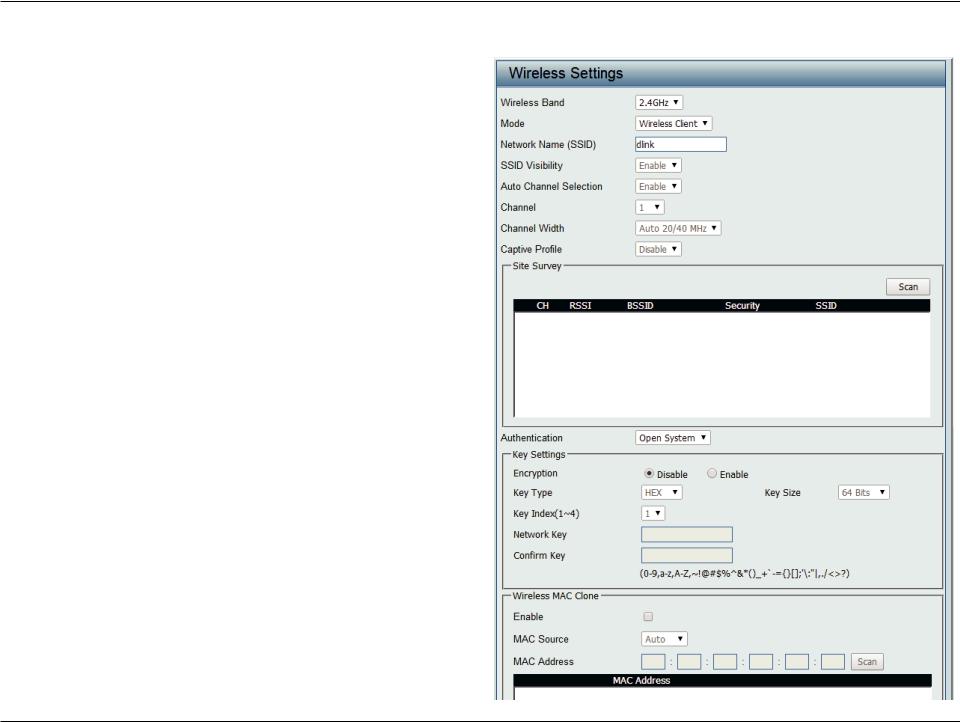
Wireless Client Mode
Wireless Band: Select either 2.4 GHz or 5 GHz from the drop-down menu.
Mode: WirelessClientisselectedfromthedrop-downmenu.
Network Name (SSID): Service Set Identifier (SSID) is the name designated for a specific wireless local area network (WLAN).The SSID’s factory default setting is dlink. The SSID can be easily changed to connect to an existing wireless network.
SSID Visibility: This option is unavailable in Wireless Client mode.
Auto Channel Selection: Enablingthisfeatureautomaticallyselectsthechannel that will provide the best wireless performance. This feature is not supported in Wireless Client mode.
Channel: The channel used will be displayed, and matches the
AP that the DAP-2660 is connected to when set to
Wireless Client mode.
Channel Width: Use the drop-down menu to choose 20 MHz or Auto 20/40 MHz.
Site Survey: Click on the Scan button to search for available wirelessnetworks,thenclickontheavailablenetwork that you want to connect with.
Captive Profile: Enable or disable captive port profile for user authentication.
Authentication: Will be explained in the next topic.
18
D-Link DAP-2660 User Manual
Wireless Security
Wireless security is a key concern for any wireless network installed. Unlike any other networking method wireless networks will broadcast it’s presence for anyone to connect to it. Today, wireless security has advanced to a level where it is virtually impenetrable.
There are mainly two forms of wireless encryption and they are called Wired Equivalent Privacy (WEP) and Wi-Fi Protected Access (WPA). WEP was the first security method developed. It is a low level encryption but better than now encryption.WPA is the newest encryption standard and with the advancedWPA2 standard wireless networks have finally reach a point where the security is strong enough to give users the peace of mind when installing wireless networks.
Wired Equivalent Privacy (WEP)
WEP provides two variations called Open System and Shared Key.
Open System will send a request to the access point and if the key used matches the one configured on the access point, the access point will return a success message back to the wireless client. If the key does not match the one configured on the access point, the access point will deny the connection request from the wireless client.
Shared Key will send a request to the access point and if the key used matches the one configured on the access point, the access point will send a challenge to the client.The client will then again send a confirmation of the same key back to the access point where the access point will either return a successful or a denial packet back to the wireless client.
Encryption: |
Use the radio button to disable or enable |
|
encryption. |
Key Type*: |
Select HEX or ASCII. |
Key Size: |
Select 64 Bits or 128 Bits. |
Key Index (1-4): |
Select the 1st through the 4th key to be the active |
|
key. |
Key: |
Input up to four keys for encryption. You will select |
|
one of these keys in the Key Index drop-down |
|
menu. |
**Hexadecimal (HEX) digits consist of the numbers 0-9 and the letters A-F.
*ASCII (American Standard Code for Information Interchange) is a code that represents English letters using numbers ranging from 0-127.
19
D-Link DAP-2660 User Manual
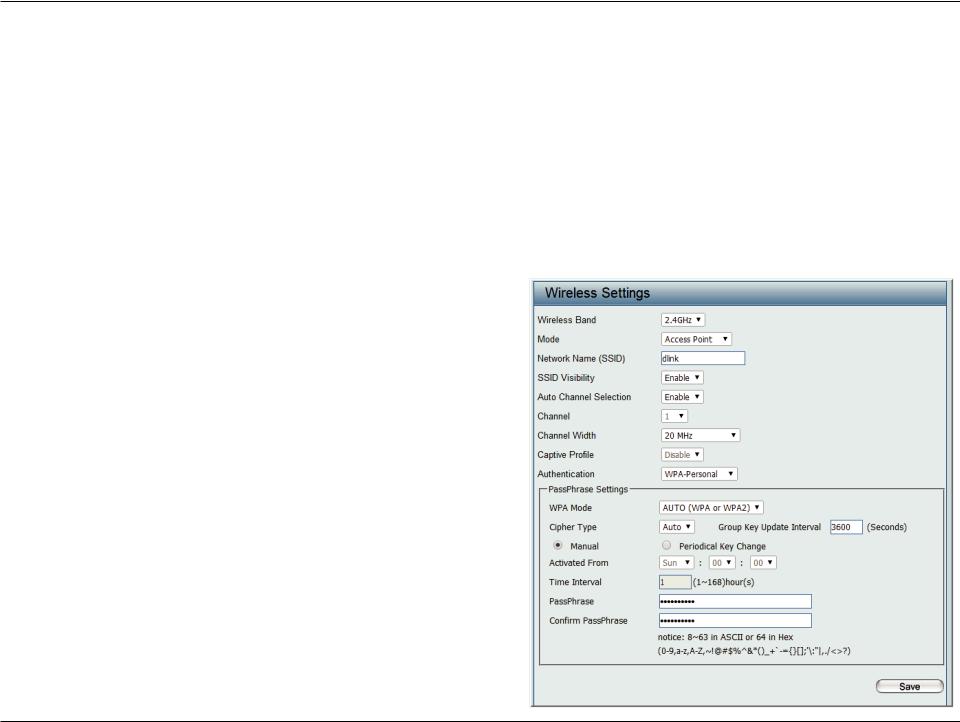
Wi-Fi Protected Access (WPA / WPA2)
WPA was created by the Wi-Fi Alliance to address the limitations and weaknesses found in WEP. This protocol is mainly based on the 802.11i standard. There are also two variations found in WPA called WPA-Personal (PSK) and WPA-Enterprise (EAP).
WPA-EAP requires the user to install a Radius Server on the network for authentication.
WPA-Personal does not require the user to install a Radius Server on the network.
Comparing WPA-PSK with WPA-EAP, WPA-PSK is seen as a weaker authentication but comparing WPA-PSK to WEP, WPA-PSK is far more secure than WEP. WPA-EAP is the highest level of wireless security a user can use for wireless today.
WPA2 is an upgrade of WPA. WPA2 yet again solves some possible security issues found in WPA. WPA2 has two variations called WPA2-Personal (PSK) and WPA2-Enterprise (EAP) which is the same as found with WPA.
WPA Mode: When WPA-Personal is selected for Authentication type, you must also select a WPA mode from the drop-down menu: AUTO (WPA or WPA2), WPA2 Only, or WPA Only. WPA and WPA2 use different algorithms. AUTO (WPA or WPA2) allows you to use both WPA and WPA2.
Cipher Type: WhenyouselectWPA-Personal,youmustalsoselectAUTO,
AES, or TKIP from the pull down menu.
Group Key Update: Selecttheintervalduringwhichthegroupkeywillbevalid.
The default value of 1800 is recommended.
Pass Phrase: When you selectWPA-Personal, please enter a Pass Phrase
in the corresponding field.
20
D-Link DAP-2660 User Manual
WPA Mode: When WPA-Enterprise is selected, you must also select a WPA mode from the drop-down menu:
AUTO (WPA or WPA2), WPA2 Only, or WPA Only. WPA and WPA2 use different algorithms. AUTO (WPA or WPA2) allows you to use both WPA and WPA2.
Cipher Type: When WPA-Enterprise is selected, you must also select a cipher type from the drop-down menu: Auto, AES, or TKIP.
Group Key Update Interval: Select the interval during which the group key will be valid. 1800 is the recommended value as a lower interval may reduce data transfer rates.
Network Access Protection: Enable or disable Microsoft Network Access Protection.
RADIUS Server: Enter the IP address of the RADIUS server.
RADIUS Port: Enter the RADIUS port.
RADIUS Secret: Enter the RADIUS secret.
Account Server: Enter the IP address of the Account Server
Account Port: Enter the Account port
Account Secret: Enter the Account secret
21
D-Link DAP-2660 User Manual
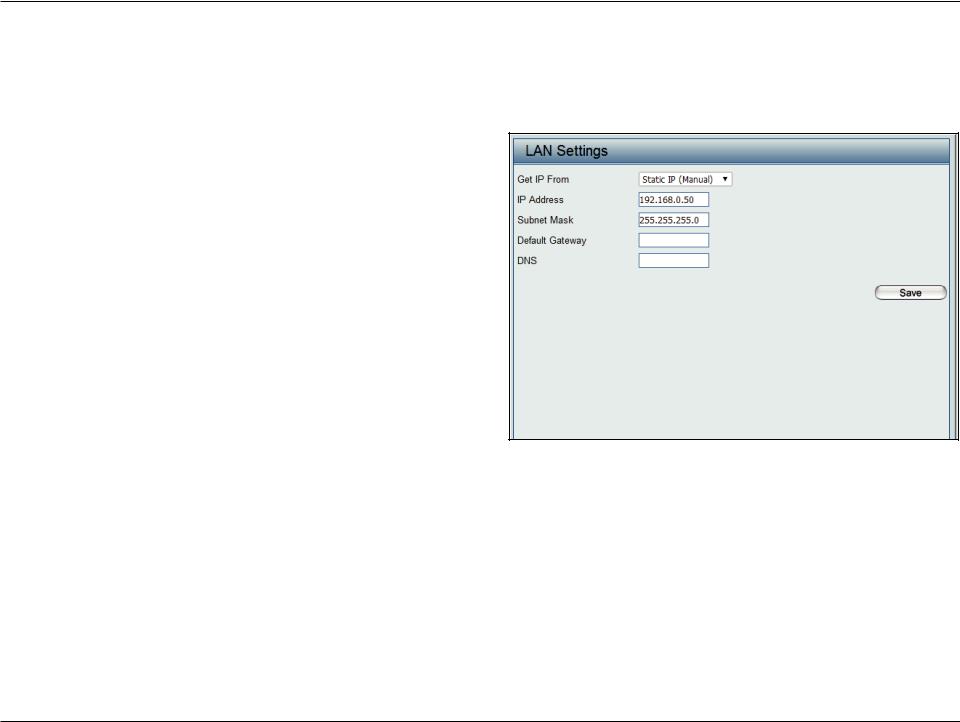
LAN
LAN is short for Local Area Network. This is considered your internal network. These are the IP settings of the LAN interface for the DAP-2660. These settings may be referred to as private settings. You may change the LAN IP address if needed. The LAN IP address is private to your internal network and cannot be seen on the Internet.
Get IP From: Static IP (Manual) is chosen here. Choose this option if you do not have a DHCP server in your network, or if you wish to assign a static IP address to the DAP-2660.When Dynamic IP (DHCP) is selected, the other fields here will begrayedout.Pleaseallowabout2minutesfortheDHCP client to be functional once this selection is made.
IP Address: The default IP address is 192.168.0.50. Assign a static IP address that is within the IP address range of your network.
Subnet Mask: Enter the subnet mask. All devices in the network must share the same subnet mask.
Default Gateway: Enter the IP address of the gateway/router in your network.
DNS: Enter a DNS server IP address. This is usually the local IP address of your gateway/router.
22
D-Link DAP-2660 User Manual
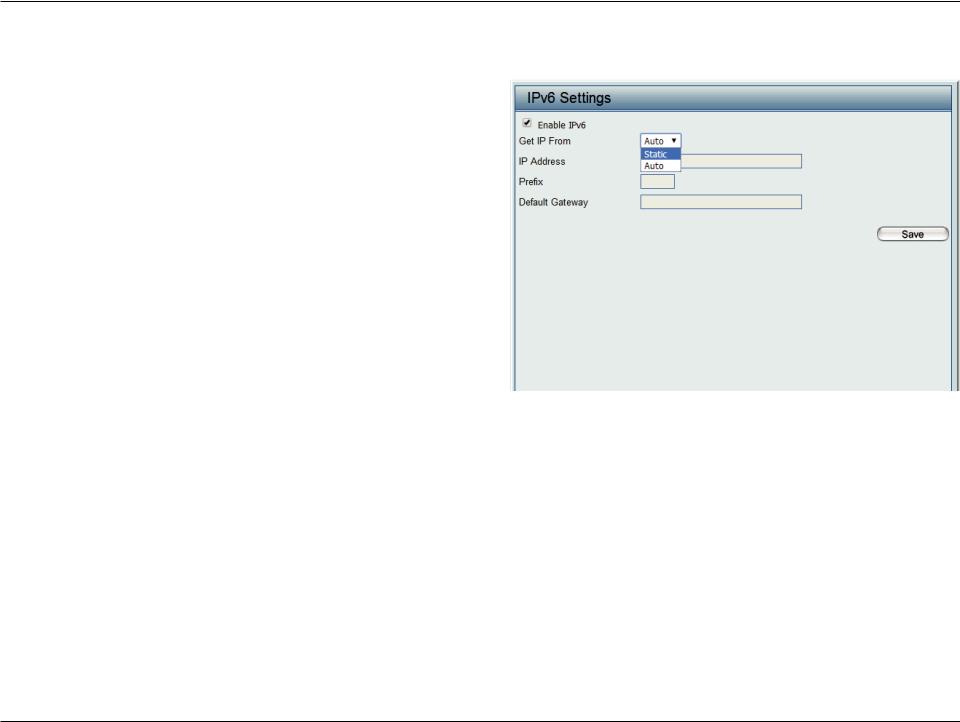
IPv6
Enable IPv6: Check to enable the IPv6
Get IP From: Auto is chosen here. Choose this option the DAP-2660 can get IPv6 address automatically or use Static to set IPv6 address manually.
WhenAutoisselected,theotherfieldsherewillbegrayed out.
IP Address: Enter the LAN IPv6 address used here.
Prefix: Enter the LAN subnet prefix length value used here.
Default Gateway: Enter the LAN default gateway IPv6 address used here.
23
D-Link DAP-2660 User Manual
Advanced Settings
In the Advanced Settings Section the user can configure advanced settings concerning Performance, Multiple SSID, VLAN, Security, Quality of Service, AP
Array,Web Redirection, DHCP Server, Filters and Scheduling.The following pages will explain settings found in the Advanced Settings section in more detail.
24
D-Link DAP-2660 User Manual
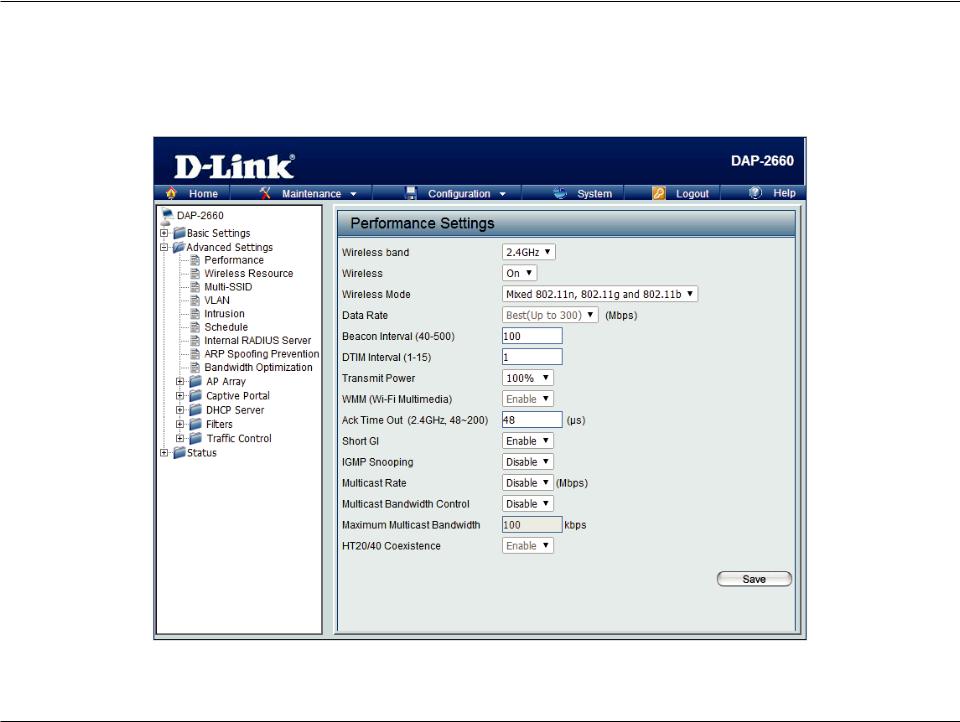
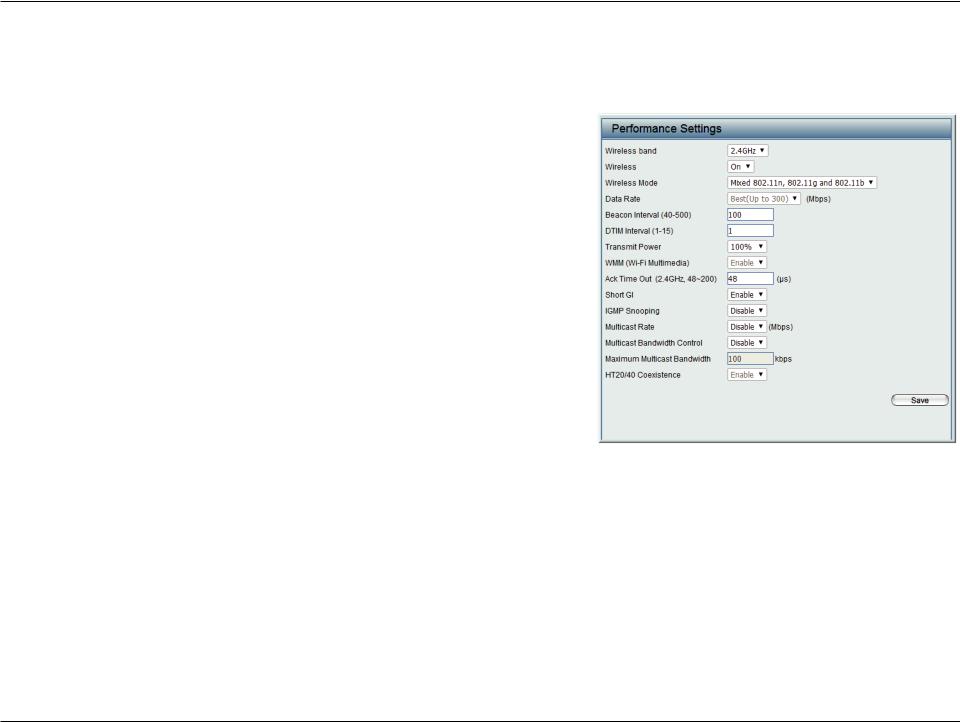
Performance
On the Performance Settings page the users can configure more advanced settings concerning the wireless signal and hosting.
Wireless Band: Select either 2.4GHz or 5GHz.
Wireless: Use the drop-down menu to turn the wireless function On or Off.
Wireless Mode: The different combination of clients that can be supported include Mixed 802.11n, 802.11g and 802.11b, Mixed 802.11g and 802.11b and 802.11n Only in the 2.4 GHz band and Mixed 802.11n, 802.11a, 802.11a only, and 802.11n Only in the 5 GHz band. Please note that when backwards compatibility is enabled for legacy (802.11a/g/b) clients, degradation of 802.11n (draft) wireless performance is expected.
Data Rate*: Indicate the base transfer rate of wireless adapters on the wireless LAN.The AP will adjust the base transfer rate depending on the base rateoftheconnecteddevice.Ifthereareobstaclesorinterference,the AP will step down the rate. This option is enabled in Mixed 802.11g and 802.11b mode (for 2.4 GHz) and 802.11a only mode (for 5 GHz). The choices available are Best (Up to 54), 54, 48, 36, 24, 18, 12, 9, 6 for 5 GHz and Best (Up to 54), 54, 48, 36, 24, 18, 12, 9, 6, 11, 5.5, 2 or 1 for 2.4 GHz.
Beacon Interval (25-500): Beacons are packets sent by an access point to synchronize a wireless network. Specify a value in milliseconds. The default (100) is recommended. Setting a higher beacon interval can help to save the power of wireless clients, while setting a lower one can help a wireless client connect to an access point faster.
DTM Interval (1-15): Select a Delivery Traffic Indication Message setting between 1 and 15. 1 is the default setting. DTIM is a countdown informing clients of the next window for listening to broadcast and multicast messages.
25

D-Link DAP-2660 User Manual
Transmit Power: This setting determines the power level of the wireless transmission.Transmitting power can be adjusted to eliminate overlapping of wireless area coverage between two access points where interference is a major concern. For example, if wireless coverage is intended for half of the area, then select 50% as the option. Use the drop-down menu to select 100%, 50%, 25%, or 12.5%.
WMM (Wi-Fi Multimedia): WMM stands for Wi-Fi Multimedia. Enabling this feature will improve the user experience for audio and video applications over a Wi-Fi network.
Ack Time Out To effectively optimize throughput over long distance links enter a value for Acknowledgement Time Out between 25 and 200 (2.4 GHZ, 64~200): microseconds for 5 GHz or from 64 to 200 microseconds in the 2.4 GHz in the field provided.
Short GI: Select Enable or Disable. Enabling a short guard interval can increase throughput. However, be aware that it can also increase the error rate in some installations due to increased sensitivity to radio-frequency installations.
IGMP Snooping: Select Enable or Disable. Internet Group Management Protocol allows the AP to recognize IGMP queries and reports sent between routers and an IGMP host (wireless STA). When IGMP snooping is enabled, the AP will forward multicast packets to an IGMP host based on IGMP messages passing through the AP.
Multicast Bandwidth Adjust the multicast packet data rate here. The multicast rate is supported in AP mode, (2.4 GHZ and 5 GHZ) and WDS Control : with AP mode, including Multi-SSIDs
HT20/40 Coexistence : Enable this option to reduce interference from other wireless networks in your area. If the channel width is operating at 40MHz and there is another wireless network’s channel over-lapping and causing interference, the Access Point will automatically change to 20MHz
Transfer DHCP Offer to Enable to transferthe DHCPOffertoUnicast fromLAN toWLAN, suggest to enable this functionifstations number is larger than 30.
Unicast :
26
D-Link DAP-2660 User Manual
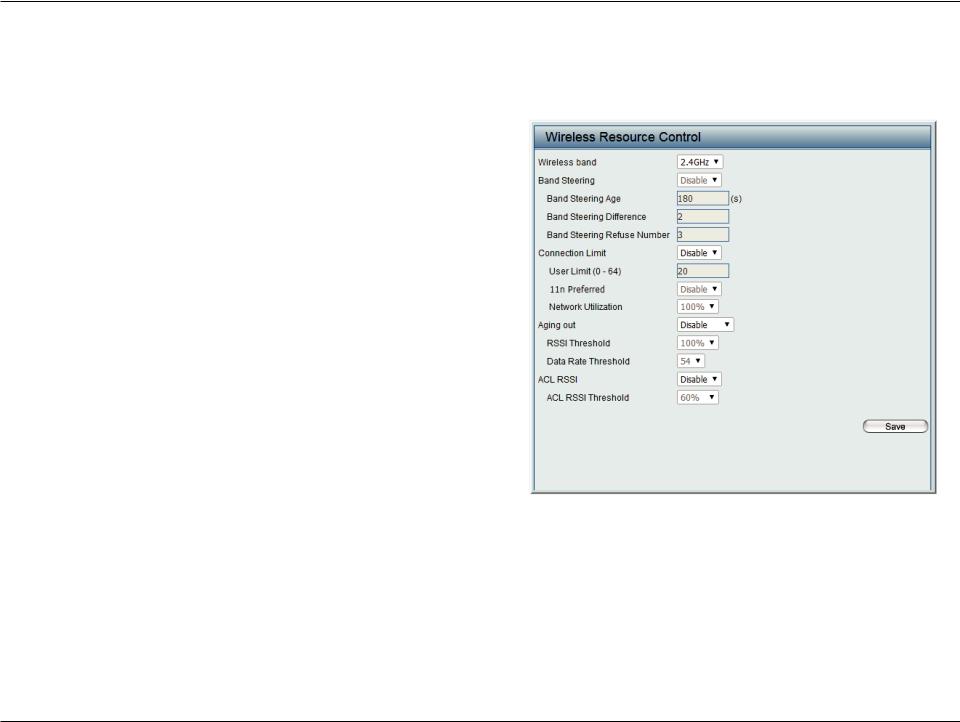
Wireless Resource Control
The Wireless Resource Control window is used to configure the wireless connection settings so that the device can detect the better wireless connection in your environment.
Wireless band: Select 2.4GHz or 5GHz.
Band Steering: Use the drop-down menu to Enable the 5G Preferred function. When the wireless clients support both 2.4GHz and 5GHz and the 2.4GHz signal is not strong enough, the device will use 5G as higher priority.
Band Steering Age: Enter the time in seconds to specify the interval of updating information.
Band Steering The 5G preferred difference value is equal to the Difference: number of 5GHz wireless client connections minus
the number of 2.4GHz wireless client connections. If the number of 5GHz wireless client connections minus the number of 2.4GHz wireless client connec-
tions exceed this value, the extra 5GHz wireless client connections will be forced to connect to the 2.4GHz band and not the 5GHz band.
Band Steering Enter the maximum 5G connection attempts allowed Refuse Number: before the 5G preferred function will be disabled for
the wireless station connection.
Connection Limit: Select Enable or Disable. This is an option for load balancing. This determines whether to limit the number of users accessing this device. The exact number is entered in the User Limit field below. This feature allows the user to share the wireless network traffic and the client using multiple APs. If this function is enabled and when the number of users exceeds this value, or the network utilization of this AP exceeds the percentage that has been specified, the DAP-2660 will not allow clients to associate with the AP.
User Limit: Set the maximum amount of users that are allowed access (zero to 64 users) to the device using the specified wireless band. The default setting is 20.
27
 Loading...