


 Loading...
2020 | Business Class Networking
NUCLIAS CONNECT
DAP-2620 User Guide
V 1.00

Table of Contents
Table of Contents
Table of Contents............................................................... |
2 |
Nuclias Connect.................................................................. |
4 |
Introduction..................................................................................... |
4 |
Nuclias Connect Key Features................................................... |
5 |
Package Contents.......................................................................... |
6 |
System Requirements................................................................... |
6 |
Hardware Overview........................................................... |
7 |
LEDs..................................................................................................... |
7 |
Connections..................................................................................... |
7 |
Basic Installation................................................................ |
8 |
Hardware Setup.............................................................................. |
8 |
Configure the Access Point.................................................. |
8 |
Setup Wizard..................................................................... |
10 |
Web User Interface........................................................... |
11 |
Basic Settings................................................................................. |
12 |
Wireless Settings................................................................... |
12 |
Access Point Mode......................................................... |
12 |
WDS with AP Mode........................................................ |
14 |
WDS Mode........................................................................ |
16 |
Wireless Client Mode..................................................... |
18 |
Wireless Security.................................................................... |
20 |
Wired Equivalent Privacy (WEP)................................ |
20 |
Wi-Fi Protected Access (WPA / WPA2)..................... |
21 |
LAN............................................................................................. |
23 |
IPv6............................................................................................. |
24 |
Advanced Settings....................................................................... |
25 |
Performance............................................................................ |
26 |
Wireless Resource Control.................................................. |
28 |
Multi-SSID................................................................................ |
30 |
VLAN.......................................................................................... |
33 |
VLAN List............................................................................ |
33 |
Port List.............................................................................. |
34 |
Add / Edit VLAN............................................................... |
35 |
PVID Settings................................................................... |
36 |
Intrusion................................................................................... |
37 |
Schedule................................................................................... |
38 |
Internal RADIUS Server........................................................ |
39 |
ARP Spoofing Prevention................................................... |
40 |
Bandwidth Optimization.................................................... |
41 |
Captive Portal......................................................................... |
43 |
Authentication Settings - Web Redirection Only43 |
|
Authentication Settings - Username/Password..45 |
|
Authentication Settings - Passcode......................... |
47 |
Authentication Settings - Remote RADIUS........... |
49 |
Authentication Settings - LDAP................................ |
51 |
Authentication Settings - POP3................................ |
53 |
Login Page Upload......................................................... |
55 |
MAC Bypass...................................................................... |
56 |
DHCP Server............................................................................ |
57 |
D-Link DAP-2620 User Manual |
2 |

Table of Contents
Dynamic Pool Settings................................................. |
57 |
Static Pool Settings........................................................ |
59 |
Current IP Mapping List............................................... |
60 |
Filters......................................................................................... |
61 |
Wireless MAC ACL........................................................... |
61 |
WLAN Partition................................................................ |
62 |
IP Filter Settings.............................................................. |
63 |
Traffic Control......................................................................... |
64 |
Uplink/Downlink Settings........................................... |
64 |
QoS...................................................................................... |
65 |
Traffic Manager............................................................... |
66 |
Status................................................................................................ |
67 |
Device Information............................................................... |
68 |
Client Information................................................................. |
69 |
WDS Information................................................................... |
70 |
Statistics.................................................................................... |
71 |
Ethernet............................................................................. |
71 |
WLAN Traffic Statistics.................................................. |
72 |
Log.............................................................................................. |
73 |
View Log............................................................................ |
73 |
Log Settings...................................................................... |
74 |
Maintenance.................................................................................. |
76 |
Administration Settings...................................................... |
77 |
Limit Administrator........................................................ |
78 |
System Name Settings.................................................. |
78 |
Login Settings.................................................................. |
79 |
Console Settings............................................................. |
79 |
Ping Control Settings.................................................... |
79 |
LED Settings..................................................................... |
80 |
Country Settings............................................................. |
80 |
DDP Control Settings.................................................... |
80 |
Nuclias Connect Settings............................................. |
80 |
Firmware and SSL Certification Upload........................ |
81 |
Configuration File.................................................................. |
82 |
Time and Date Settings....................................................... |
83 |
Configuration................................................................................ |
84 |
System.............................................................................................. |
85 |
Logout.............................................................................................. |
86 |
Help................................................................................................... |
87 |
Knowledge Base............................................................... |
88 |
Wireless Basics............................................................................... |
88 |
Wireless Installation Considerations..................................... |
89 |
Troubleshooting............................................................... |
90 |
Why can’t I access the web-based configuration utility?90 |
|
What can I do if I forgot my password?................................ |
91 |
How to check your IP address?................................................ |
91 |
How do I assign a static IP address?...................................... |
92 |
Technical Specifications................................................... |
93 |
Antenna Pattern............................................................... |
94 |
D-Link DAP-2620 User Manual |
3 |

Nuclias Connect
Nuclias Connect
Introduction
Nuclias Connect is D-Link’s centralized management solution for Small-to-Medium-Sized Business (SMB) networks. Nuclias Connect makes it easier to analyze, automate, configure, optimize, scale, and secure your network — delivering the convenience of an Enterprise-wide management solution, at an SMB price. Nuclias Connect gives you the financial and technical flexibility to expand from a small network to a larger one of up to 1,000 Access Points APs, while retaining a robust and centralized management system. With its intuitive Graphical User Interface (GUI), a wealth of enhanced AP features, and a setup wizard that supports 11 languages, Nuclias Connect minimizes the hassle of deployment, configuration, and administration tasks.
Deployable on a Windows server (or Linux via Docker), PC, or Smartphone (via lite management app) the Nuclias Connect free-to-download software is capable of managing up to 1,000 APs without licensing charges, coupled with an inexpensive optional
hardware controller (DNH-100 Nuclias Connect Hub) suitable for remote locations. Through software-based monitoring and remote management of all wireless Access Points (APs) on your network, Nuclias Connect offers tremendous flexibility compared to traditional hardware-based unified
management systems. Configuration can be done remotely. Network traffic analytics are available at a glance (in whole or in part). Load Balancing, Airtime Fairness, and Localized Throttling are enabled.
Nuclias Connect supports multi-tenancy, so network administrators can grant localized management authority for local networks. In addition, because APs can support 8 SSIDs per radio (16 SSIDs per dual band APs), administrators have the option of using one SSID to create a guest network for visitors.
Nuclias Connect provides direct AP discovery and provisioning when it shares the same Layer-2/Layer-3 network with a given AP, allowing users to find APs and import profiles with minimum effort, which can be applied as needed to groups or individual APs for even more effective configuration.
Since Nuclias Connect’s software operates transparently on the network, an AP can be deployed anywhere in an NAT environment. Admins can provide and manage a variety of distributed deployments, including setting and admin account configuration for each deployment.
Nuclias Connect allows for multiple user authentications while enabling specific access control configurations for each SSID, giving admins the option of configuring separate internal networks for different subnets, while enabling more advanced Value-Added Services, such as Captive Portal or Wi-Fi Hotspot.
D-Link DAP-2620 User Manual |
4 |

Nuclias Connect
Nuclias Connect Key Features
•Free-to-Download Management Software
•Searchable Event Log and Change Log
•License-Free Access Points
•Traffic Reporting & Analytics
•Authentication via Customizable Captive Portal, 802.1x and RADIUS Server, POP3, LDAP
•Backwards-Compatibility
•Remote Config. & Batch Config.
•Multilingual Support
•Intuitive Interface
•Multi-Tenant & Role-Based Administration
•Payment Gateway (Paypal) Integration and Front-Desk Ticket Management
For more information on how to use Nuclias Connect with DAP-2620, please refer to the Nuclias Connect User Guide.
D-Link DAP-2620 User Manual |
5 |

Nuclias Connect
Package Contents
yDAP-2620 802.11ac Power over Ethernet (PoE) Access Point
yMounting Brackets
yQuick Setup Guide
System Requirements
yComputers with Windows®, Macintosh®, or Linux-based operating systems with an installed Ethernet Adapter
yInternet Explorer 11, Safari 7, Firefox 28, or Google Chrome 33 and above (for configuration)
D-Link DAP-2620 User Manual |
6 |

Hardware Overview
|
Hardware Overview |
LEDs |
Connections |
|
|
|
|
|
|
|
|
|
|
|
|
|
|
No. |
Item |
LED Color |
Description |
|||
|
|
Red (Flashing) |
Indicates device booting up/device |
|||
|
|
malfunctioned. |
||||
|
|
|
|
|||
1 |
Power/Status |
Red (Solid) |
Indicates the access point has |
|||
LED |
malfunctioned. |
|||||
|
|
|
||||
|
|
Green (Solid) |
Indicates that the DAP-2620 is |
|||
|
|
working properly. |
||||
|
|
|
|
|||
|
|
|
|
|
|
|
|
|
|
|
|
|
|
|
|
|
|
|
|
|
|
|
|
|
|
|
|
|
|
|
|
|
|
|
|
|
|
|
|
|
|
|
|
|
|
|
|
|
|
|
|
|
|
|
|
|
|
|
|
|
|
|
|
|
|
|
|
|
|
|
|
|
|
|
|
|
|
|
|
|
|
|
|
|
|
|
|
|
|
|
|
|
|
|
|
|
|
|
|
|
|
|
|
|
|
|
|
|
|
|
|
|
|
|
|
|
|
|
No. |
Item |
Description |
||||||||||||||
2 |
RJ11 Uplink Port |
Connect to a Private Automatic Branch Exchange (PABX) |
||||||||||||||
|
|
|
|
|
|
or telephone line. |
||||||||||
3 |
LAN (PoE) Port |
Connect to a Power over Ethernet (PoE) switch via an |
||||||||||||||
Ethernet cable. |
||||||||||||||||
|
|
|
|
|
|
|||||||||||
4 |
LAN Port |
Connect to computer, IP cam or Set-Top Box |
||||||||||||||
|
|
|
|
|
|
|
|
|
|
|
|
|
|
|
|
|
5 |
RJ11 Downlink |
Connect to a phone via a phone cable. |
||||||||||||||
Port |
||||||||||||||||
|
|
|
|
|
|
|
|
|
|
|
||||||
6 |
Reset Button |
Press and hold for 10 seconds to factory reset the device. |
||||||||||||||
|
|
|
|
|
|
|
|
|
|
|
|
|
|
|
|
|
D-Link DAP-2620 User Manual |
7 |

Basic Installation
Basic Installation
Hardware Setup
To power on the DAP-2620, you can use the following method:
Plug in one end of your Ethernet cable into the LAN port of the DAP-2620’s back panel, and the other end into the port on a switch.
Configure the Access Point
D-Link DAP-2620 User Manual |
8 |

Basic Installation
To set up and manage the DAP-2620, use one of the following methods:
1.Connect the access point and your computer to the same PoE switch. Manage the access point from the computer. Enter dap2620.local in the address field of your browser.
Log in to the Administration Web pages. The default login information is: Username: admin
Password: admin
2.On your smart device, search for the Nuclias Connect app, or scan the QR codes below.
3.Download the Nuclias Connect app.
4.Open the Nuclias Connect app and follow the onscreen instructions to discover and setup your device.
D-Link DAP-2620 User Manual |
9 |

Setup Wizard
Setup Wizard
The first login instance displays the System Settings window which requires a change in password. Additional settings include the System Time and System Country functions.
After logging in to the user interface, fill in the New Password and Confirm New Password fields.
In the System Time function, select Using Network Time Protocol (NTP) or Manually to define the system time. If required, click the Daylight Saving Offset drop-down menu and select the value (minutes).
ySetting NTP System Time: Before trying to configure NTP check perform a ping test with the NTP server. In the NTP Server field, enter the NTP server to use. Then click the Time Zone drop-down menu and select the appropriate time zone.
ySetting System Time Manually: From the System Date drop-down menu, select the Year, Month, and Day along with the Hour and Minutes appropriate for the AP.
yEnable Daylight Saving: Click the radio button to enable the daylight savings time (DST) function. Set the DST start (24 hours) and end (24 hours) time by clicking on the drop-down menus and setting the Month, Week, Day, Hour, and Minute of the DST starting days.
ySystem Country: Click the drop-down menu to select the country.
Once the settings are configured, click the Update button to accept the configuration and proceed to the main interface menu page.
D-Link DAP-2620 User Manual |
10 |
Web User Interface
Web User Interface
The DAP-2620 supports an elaborate web user interface where the user can configure and monitor the device. Launch a web browser, type dap2620.local in the address field and then press Enter to login. Most of the configurable settings are located in the left menu of the web GUI which contains section called Basic Settings, Advanced Settings and Status.
D-Link DAP-2620 User Manual |
11 |

Web User Interface
Basic Settings
Wireless Settings
On the wireless settings page, you can setup the basic wireless configuration for the access point. The user can choose from 4 different wireless modes:
yAccess Point - Used to create a wireless LAN
yWDS with AP - Used to connect multiple wireless networks while still functioning as a wireless access point
yWDS - Used to connect multiple wireless networks
yWireless Client - Used when the access point needs to act as a wireless network adapter for an Ethernet enabled device
Access Point Mode
Wireless Band Click the drop-down menu to select the wireless band, 2.4GHz or 5GHz.
Operation Mode Click the drop-down menu to select Access Point.
Network Name (SSID) Enter the name of Service Set Identifier (SSID) up to 32 characters and is case-sensitive.
SSID Visibility Click the drop-down menu to enable or disable broadcast the SSID across the network.
Auto Channel Selection Click the drop-down menu to enable automatically selects the channel that provides the best wireless performance. The channel selection process only occurs when the AP is booting up.
Channel Click the drop-down menu to select the desired channel. The function is only available when
Auto Channel Selection is Disable.
Note: The wireless adapters will automatically scan and match the wireless settings.
D-Link DAP-2620 User Manual |
12 |

Web User Interface
Channel Width Click the drop-down menu to select 20 MHz, Auto 20/40 MHz or Auto 20/40/80 MHz. Select 20 MHz if you are not using any 802.11n wireless clients. Auto 20/40 MHz allows you to connect to both 802.11n and 802.11b/g or 802.11a wireless devices on your network.
Authentication Click the drop-down menu to select Open System, Shared Key, WPA-Personal, WPA-EAP, or 802.1X.
ySelect Open System to communicate the key across the network (WEP).
ySelect Shared Key to limit communication to only those devices that share the same WEP settings. If multi-SSID is enabled, this option is not available.
ySelect WPA-Personal to secure your network using a password and dynamic key changes. No RADIUS server is required.
ySelect WPA-Enterprise to secure your network with the inclusion of a RADIUS server.
ySelect 802.1X if your network is using port-based Network Access Control.
Save Click to save the updated configuration. To make the updates permanent, click Configuration > Save and Activate.
D-Link DAP-2620 User Manual |
13 |

Web User Interface
WDS with AP Mode
Wireless Band Click the drop-down menu to select the wireless band, 2.4GHz or 5GHz.
Operation Mode Click the drop-down menu to select WDS with AP.
Network Name (SSID) Enter the name of Service Set Identifier (SSID) up to 32 characters and is case-sensitive.
Auto Channel Selection This option is unavailable in WDS with AP mode.
Channel Click the drop-down menu to select the desired channel. The function is only available when
Auto Channel Selection is Disable.
Note: The wireless adapters will automatically scan and match the wireless settings.
Channel Width Click the drop-down menu to select 20 MHz,
Auto 20/40 MHz or Auto 20/40/80 MHz. Select 20 MHz if you are not using any 802.11n wireless clients. Auto 20/40 MHz allows you to connect to both 802.11n and 802.11b/g or 802.11a wireless devices on your network.
AP MAC Address Enter the MAC addresses of the APs on your network that will serve as bridges to wirelessly connect multiple networks.
Site Survey Click Scan to search for available wireless networks, then click on the available network that you want to connect with.
D-Link DAP-2620 User Manual |
14 |

Web User Interface
Authentication Click the drop-down menu to select Open System, or WPA-Personal.
ySelect Open System to communicate the key across the network.
ySelect WPA-Personal to secure your network using a password and dynamic key changes. No RADIUS server is required.
Save Click to save the updated configuration. To make the updates permanent, click Configuration > Save and Activate.
D-Link DAP-2620 User Manual |
15 |

Web User Interface
WDS Mode
Wireless Band Click the drop-down menu to select the wireless band, 2.4GHz or 5GHz.
Operation Mode Click the drop-down menu to select WDS.
Network Name (SSID) Enter the name of Service Set Identifier (SSID) up to 32 characters and is case-sensitive.
Auto Channel Selection This option is unavailable in WDS mode.
Channel Click the drop-down menu to select the desired channel. The function is only available when
Auto Channel Selection is Disable.
Note: The wireless adapters will automatically scan and match the wireless settings.
Channel Width Click the drop-down menu to select 20 MHz,
Auto 20/40 MHz or Auto 20/40/80 MHz. Select 20 MHz if you are not using any 802.11n wireless clients. Auto 20/40 MHz allows you to connect to both 802.11n and 802.11b/g or 802.11a wireless devices on your network.
AP MAC Address Enter the MAC addresses of the APs on your network that will serve as bridges to wirelessly connect multiple networks.
Site Survey Click Scan to search for available wireless networks, then click on the available network that you want to connect with.
D-Link DAP-2620 User Manual |
16 |

Web User Interface
Authentication Use the drop-down menu to choose Open System, or WPA-Personal.
ySelect Open System to communicate the key across the network.
ySelect WPA-Personal to secure your network using a password and dynamic key changes. No RADIUS server is required.
Save Click to save the updated configuration. To make the updates permanent, click Configuration > Save and Activate.
D-Link DAP-2620 User Manual |
17 |
Web User Interface
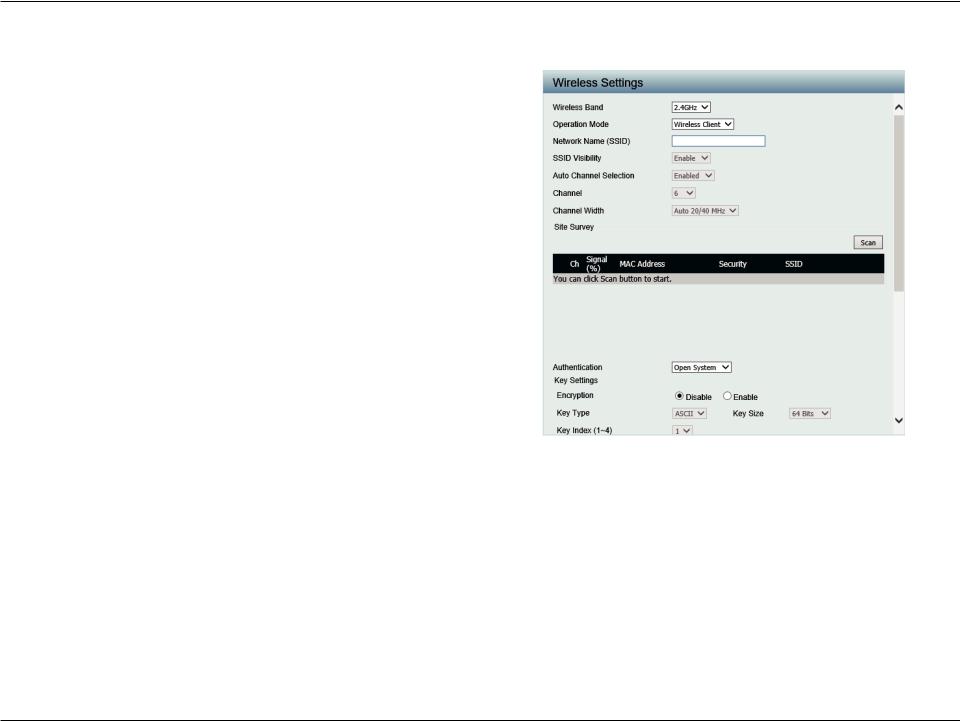
Wireless Client Mode
Wireless Band Click the drop-down menu to select the wireless band, 2.4GHz or 5GHz.
Operation Mode Click the drop-down menu to select Wireless Client.
Network Name (SSID) Enter the name of Service Set Identifier (SSID) up to 32 characters and is case-sensitive.
SSID Visibility This option is unavailable in Wireless Client mode.
Auto Channel Selection Click the drop-down menu to select the desired channel. The function is only available when
Auto Channel Selection is Disable.
Note: The wireless adapters will automatically scan and match the wireless settings.
Channel The channel used will be displayed, and matches the AP that the DAP-2620 is connected to when set to Wireless Client mode.
Channel Width Click the drop-down menu to select 20 MHz,
Auto 20/40 MHz or Auto 20/40/80 MHz. Select 20 MHz if you are not using any 802.11n wireless clients. Auto 20/40 MHz allows you to connect to both 802.11n and 802.11b/g or 802.11a wireless devices on your network.
Site Survey Click Scan to search for available wireless networks, then click on the available network that you want to connect with.
Authentication Will be explained in the next topic.
Enable Check the box to enable the Wireless MAC Clone function.
MAC Source Click the drop-down menu to select Auto or
Manual.
D-Link DAP-2620 User Manual |
18 |

Web User Interface
MAC Address When MAC Source is set to Manual, click Scan to find the MAC address to clone.
Save Click to save the updated configuration. To make the updates permanent, click Configuration > Save and Activate.
D-Link DAP-2620 User Manual |
19 |

Web User Interface
Wireless Security
Wireless security is a key concern for any wireless network installed. Unlike any other networking method wireless networks will broadcast it’s presence for anyone to connect to it. Today, wireless security has advanced to a level where it is virtually impenetrable.
There are mainly two forms of wireless encryption and they are called Wired Equivalent Privacy (WEP) and Wi-Fi Protected Access (WPA). WEP was the first security method developed. It is a low level encryption but better than now encryption. WPA is the newest encryption standard and with the advanced WPA2 standard wireless networks have finally reach a point where the security is strong enough to give users the peace of mind when installing wireless networks.
Wired Equivalent Privacy (WEP)
WEP provides two variations called Open System and Shared Key.
yOpen System will send a request to the access point and if the key used matches the one configured on the access point, the access point will return a success message back to the wireless client. If the key does not match the one configured on the access point, the access point will deny the connection request from the wireless client.
yShared Key will send a request to the access point and if the key used matches the one configured on the access point, the access point will send a challenge to the client. The client will then again send a confirmation of the same key back to the access point where the access point will either return a successful or a denial packet back to the wireless client.
Encryption Click the radio button to disable or enable encryption.
Key Type Click the drop-down menu to select HEX* or
ASCII**.
Key Size Click the drop-down menu to select 64 Bits or
128 Bits.
Key Index (1~4) Click the drop-down menu to select the 1st through the 4th key to be the active key.
Network Key Input the characters which will define the network key.
Confirm Key Re-enter the value as entered in the Network Key to confirm the setting.
Save Click to save the updated configuration. To make the updates permanent, click
Configuration > Save and Activate.
*Hexadecimal (HEX) digits consist of the numbers 0-9 and the letters A-F.
**ASCII (American Standard Code for Information Interchange) is a code that represents English letters using numbers ranging from 0-127.
D-Link DAP-2620 User Manual |
20 |
Web User Interface
Wi-Fi Protected Access (WPA / WPA2)
The WPA protocol is based on the 802.11i standard. WPA offers two variations called WPA-Personal (PSK) and WPA-Enterprise (EAP). WPA-EAP requires the user to install a Radius Server on the network for authentication, while WPA-Personal does not. In comparison, WPA-PSK is seen as a weaker authentication variation than WPA-EAP. WPA-EAP is the highest level of wireless security a user can use for wireless today.
WPA2 is an upgrade of WPA and solves security issues found in WPA. WPA2 also offers two variations called WPA2-Personal (PSK) and WPA2Enterprise (EAP) similar to WPA.
WPA Mode When Authentication setting is set to WPAPersonal, click the drop-down menu to select one of the following: Auto (WPA or WPA2),
WPA2 Only, or WPA Only.
Auto (WPA or WPA2) allows the device to select either setting to match the client configuration.
Cipher Type Click the drop-down menu to select the cipher type for the WPA setting, type: Auto, AES, or
TKIP.
Group Key Update Enter the interval period in seconds in which the Interval interval period is valid.
Encryption key Select the method to define the cipher type encryption key: Manual or Periodical Key Change.
yManual: Enter the PassPhrase encryption key. The minimum and maximum number of characters is 8 to 63 ASCII characters and 64 characters in HEX. In the Confirm PassPhrase field enter the same key to confirm.
yPeriodical Key Change: Select the option to have each client negotiate an unique encryption key between the client and the access point.
Save Click to save the updated configuration.
To make the updates permanent, click
Configuration > Save and Activate.
D-Link DAP-2620 User Manual |
21 |
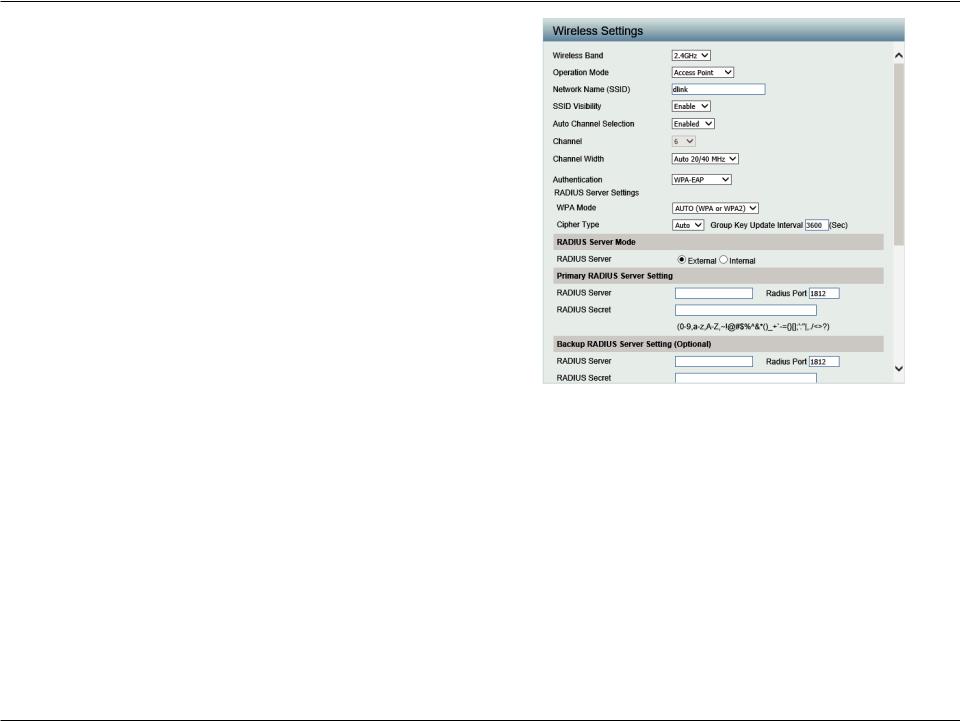
Web User Interface
WPA Mode When Authentication setting is set to WPAEAP, click the drop-down menu to select one of the following: Auto (WPA or WPA2), WPA2 Only, or WPA Only.
Auto (WPA or WPA2) allows the device to select either setting to match the client configuration.
Cipher Type Click the drop-down menu to select the cipher type for the WPA setting, type: Auto, AES, or
TKIP.
Group Key Update Enter the interval period in seconds in which the Interval interval period is valid.
RADIUS Server Enter the IP address of the RADIUS server to be used to authenticate.
Radius Port Enter the RADIUS port.
RADIUS Secret Enter the shared secret to be used between the radius server and the DAP to authenticate.
Accounting Mode Click the drop-down menu to enable or disable the accounting mode.
Accounting Server Enter the IP address of the accounting server. Accounting Port Enter the accounting port.
Accounting Secret Enter the accounting secret.
Save Click to save the updated configuration. To make the updates permanent, click
Configuration > Save and Activate.
D-Link DAP-2620 User Manual |
22 |

Web User Interface
LAN
LAN is short for Local Area Network. This is considered your internal network. These are the IP settings of the LAN interface for the DAP-2620. These settings may be referred to as private settings. You may change the LAN IP address if needed. The LAN IP address is private to your internal network and cannot be seen on the Internet.
Get IP From Click the drop-down menu to select IP address setting mode.
yStatic IP (Manual): Select this setting to assign a static IP address to the device.
yDynamic IP (DHCP): Select this setting to obtain an IP address from a DHCP server on the network.
IP Address Enter the IP address to assign a static IP address
Subnet Mask Enter the subnet mask. All devices in the network must share the same subnet mask.
Default Gateway Enter the IP address of the gateway/router in your network.
DNS Enter a DNS server IP address. This is usually the local IP address of your gateway/router.
Save Click to save the updated configuration. To make the updates permanent, click
Configuration > Save and Activate.
D-Link DAP-2620 User Manual |
23 |

Web User Interface
IPv6
Enable IPv6 Check to enable the IPv6.
Get IP From Click the drop-down menu to select IPv6 address setting mode.
yAuto: Choose this option the DAP-2620 can get IPv6 address automatically. The other fields will be grayed out.
yStatic: to set IPv6 address manually.
IP Address Enter the LAN IPv6 address used.
Prefix Enter the LAN subnet prefix length value used.
Default Gateway Enter the LAN default gateway IPv6 address used.
Save Click to save the updated configuration. To make the updates permanent, click
Configuration > Save and Activate.
D-Link DAP-2620 User Manual |
24 |

Web User Interface
Advanced Settings
In the Advanced Settings Section the user can configure advanced settings concerning Performance, Wireless Resource, Multi-SSID, VLAN, Intrusion, Schedule, Internal RADIUS Server, ARP Spoofing Prevention, Bandwidth Optimization, Captive Portal, DHCP Server, Filters and Traffic Control. The following pages will explain settings found in the Advanced Settings section in more detail.
D-Link DAP-2620 User Manual |
25 |

Web User Interface
Performance
On the Performance Settings page the users can configure more advanced settings concerning the wireless signal and hosting.
Wireless Band Click the drop-down menu to select the wireless band, 2.4GHz or 5GHz.
Wireless Click the drop-down menu to enable or disable the wireless function.
Wireless Mode Click the drop-down menu to select the wireless mode.
y2.4GHz band supports: Mixed 802.11b, 802.11g, 802.11n; Mixed 802.11b, 802.11g; and 802.11n Only.
y5GHz band supports: Mixed 802.11n, 802.11a; 802.11a Only; 802.11n Only; and Mixed 802.11ac.
Please note that when backwards compatibility is enabled for legacy (802.11a/g/b) clients, degradation of 802.11n wireless performance is expected.
Data Rate* When Wireless Mode is set to Mixed 802.11b, 802.11g (for 2.4GHz) and 802.11a Only (for 5GHz), click the drop-down menu to indicate the base transfer rate of wireless adapters on the wireless LAN. The AP will adjust the base transfer rate depending on the base rate of the connected device. If there are obstacles or
interference, the AP will derate the transfer rate.
Beacon Interval (40-500) Beacons are packets sent by an access point to synchronize a wireless network. Specify a value in milliseconds. The default (100) is
recommended. Setting a higher beacon interval can help to save the power of wireless clients, while setting a lower one can help a wireless client connect to an access point faster.
D-Link DAP-2620 User Manual |
26 |

Web User Interface
DTM Interval (1-15) Select a Delivery Traffic Indication Message setting between 1 and 15. 1 is the default setting. DTIM is a countdown informing clients of the next window for listening to broadcast and multicast messages.
Transmit Power Use the drop-down menu to determines the power level of the wireless transmission. Transmitting power can be adjusted to eliminate overlapping of wireless area coverage between two access points where interference is a major concern. For example, if wireless coverage is intended for half of the area, then select 50% as the option.
WMM (Wi-Fi Multimedia) This function is available for Mixed 802.11g and 802.11b in 2.4GHz and 802.11a Only in 5GHz wireless bands. Click the drop-
|
down menu to enable or disable the WMM function. WMM stands for Wi-Fi Multimedia. Enabling this feature will improve the |
|
user experience for audio and video applications over a Wi-Fi network. |
Ack Time Out To effectively optimize throughput over long distance links enter a value for Acknowledgement Time Out between 25 and 200 |
|
|
microseconds for 5GHz or between 48 and 200 microseconds in the 2.4GHz in the field provided. |
Short GI |
Click the drop-down menu to enable or disable the short GI function. Enabling a short guard interval can increase throughput. |
|
However, be aware that it can also increase the error rate in some installations due to increased sensitivity to radio-frequency |
|
installations. |
IGMP Snooping Click the drop-down menu to enable or disable the IGMP Snooping function. Internet Group Management Protocol allows |
|
|
the AP to recognize IGMP queries and reports sent between routers and an IGMP host (wireless STA). When IGMP snooping is |
|
enabled, the AP will forward multicast packets to an IGMP host based on IGMP messages passing through the AP. |
Multicast Rate |
Click the drop-down menu to select the multicast rate to adjust multicast packet data rates. |
Multicast Bandwidth |
Adjust the multicast packet data rate. The multicast rate is supported in AP mode, (2.4GHz and 5GHz) and WDS with AP mode, |
Control |
including Multi-SSIDs. |
Maximum Multicast |
Set the multicast packets maximum bandwidth pass through rate from the Ethernet interface to the Access Point. The function is |
Bandwidth |
only available when Multicast Bandwidth Control is Enable. |
HT20/40 Coexistence |
Click the drop-down menu to enable the function to reduce interference from other wireless networks in your area. If the |
|
channel width is operating at 40 MHz and there is another wireless network’s channel over-lapping and causing interference, the |
|
Access Point will automatically change to 20 MHz. |
Transfer DHCP Offer to |
Click the drop-down menu to enable the function to transfer the DHCP Offer to Unicast from LAN to WLAN, suggest to enable |
Unicast |
this function if stations number is larger than 30. |
STP (Spanning tree) |
Click the drop-down menu to enable the spanning tree function. |
Save |
Click to save the updated configuration. To make the updates permanent, click Configuration > Save and Activate. |
D-Link DAP-2620 User Manual |
27 |

Web User Interface
Wireless Resource Control
The Wireless Resource Control window is used to configure the wireless connection settings so that the device can detect the better wireless connection in your environment.
Airtime Fairness Click the drop-down menu to enable or disable the airtime fairness function.
Band Steering Click the drop-down menu to enable the Band Steering function. When the wireless clients support both 2.4GHz and 5GHz and the 2.4GHz signal is not strong enough, the device will use 5GHz as higher priority.
Wireless Band Click the drop-down menu to select the wireless band, 2.4GHz or 5GHz.
Connection Limit Click the drop-down menu to enable or disable the connection limit function. The option is for load balancing. This determines whether to limit the number of users accessing this device. The exact number is entered in the User Limit field below. This feature allows the user to share the wireless network traffic and the client using multiple APs. If this function is enabled and when the number of users exceeds this value, or the network utilization of this AP exceeds the percentage that has been specified, the DAP-2620 will not allow clients to associate with the AP.
User Limit (1 - 64) This function is only available when Connection Limit is enabled. Set the maximum amount of users that are allowed access (1 - 64 users) to the device using the specified wireless band.
11n Preferred This function is only available when Connection Limit is enabled. Use the drop-down menu to enable the 11n Preferred function. The wireless clients with 802.11n protocol will have higher priority to connect to the device.
D-Link DAP-2620 User Manual |
28 |

Web User Interface
Network Utilization Click the drop-down menu to set the maximum utilization of this access point for service. The DAP-2620 will not allow any new clients to associate with the AP if the utilization exceeds the value the user specifies. When this network utilization threshold is reached, the device will pause one minute to allow network congestion to dissipate.
Aging out Use the drop-down menu to select the criteria of disconnecting the wireless clients.
RSSI Threshold When Aging out is RSSI, click the drop-down menu to select the percentage of RSSI. When the RSSI of wireless clients is lower than the specified percentage, the device disconnects the wireless clients. The function is only available when Aging out is RSSI.
Data Rate Threshold When Aging out is Data Rate, click the drop-down menu to select the threshold of data rate. When the data rate of wireless clients is lower than the specified number, the device disconnects the wireless clients. The function is only available when Aging out is Data Rate.
ACL RSSI Click the drop-down menu to enable the ACL RSSI function. When enabled, the device denies the connection request from the wireless clients with the RSSI lower than the specified threshold below.
ACL RSSI Threshold Click the drop-down menu to set the ACL RSSI Threshold.
Save Click to save the updated configuration. To make the updates permanent, click Configuration > Save and Activate.
D-Link DAP-2620 User Manual |
29 |
Loading...