


 Loading...
Automatic Breadmaker
OPERATING INSTRUCTIONS AND RECIPES (Household Use)
Model No. SD-257/SD-256
Thank you for purchasing this Panasonic product.
Please read these instructions carefully before using this product and save this manual for future use.
These operating instructions are intended to be used for two different models. The explanations inside mainly focus on the SD-257 model.
(See page 2 for the differences in functions between the two)
This product is intended for household use only.
Use Before
SD-257 pictured
Use to How
Recipes
Troubleshooting Clean to How

Contents
Before Use
¶Safety Instructions·················································· 3
¶Accessories/Parts Identification····························· 4
¶Bread-making Ingredients ····································· 6
How to Use
¶Baking Bread [BAKE]············································· 8
¶Making Dough [DOUGH]····································· 10
¶When adding extra ingredients… ························ 11
¶Baking Brioche····················································· 12
¶Baking Cakes······················································· 14
¶List of Bread Types and Baking Options·············· 15
Recipes
¶ Bread Recipes
basic···········································16 whole wheat································17
rye ··············································19
french ·········································20
italian ··········································21
brioche ·······································21
sandwich ····································21
¶Gluten Free Recipes ··············22
¶Dough Recipes ······················24
basic whole wheat rye
french pizza
¶Cake Recipes·························30
cakes teabreads
How to Clean
¶ Care & Cleaning··················································· 34
To Protect the Non-stick Finish
¶ To protect the non-stick finish ······························ 35
Troubleshooting
¶ Troubleshooting···················································· 36
These instructions are for two different breadmaker models
SD-257
Rye bread mode is available
SD-256
SD-257
Raisin nut dispenser
If using dried fruit such as raisins, nuts, or seeds, these are added automatically. (P.11)
SD-256
Additional ingredients should be added manually when the beep sounds. (P.11)
Measuring spoon storage
•The photographs and illustrations in this manual are of the SD-257 model.
2
Safety Instructions
Important Safety Precautions
Location
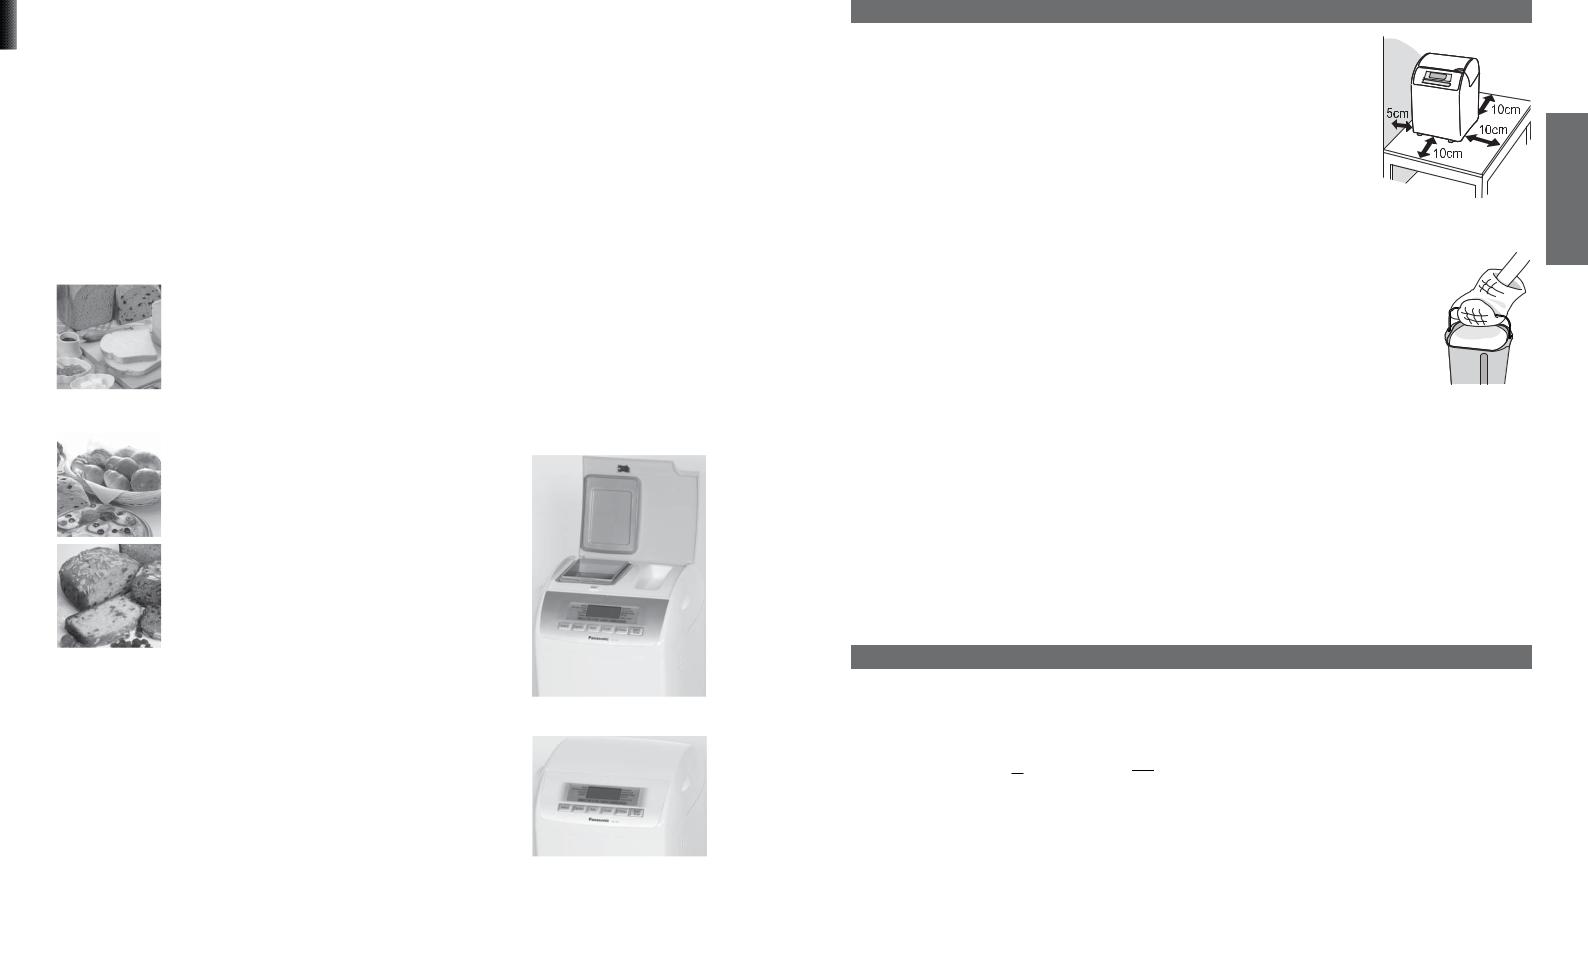
• Do not use the appliance outdoors or in the immediate vicinity of heat sources or in rooms where humidity is high.
• Position the breadmaker on a firm, dry, clean, flat heatproof worktop at least
10 cm (4 inches) from the edge of the worktop.
• Do not place on unstable surfaces, or on electrical items such as fridges or on materials such as tablecloths.
• During baking the casing heats up, the breadmaker should be placed at least 5 cm (2 inches) from walls and other objects.
Caution
1.If the supply cord is damaged, it must be replaced by the manufacturer, its service agent or a similarly qualified person in order to avoid a hazard.
2.Do not attempt to repair the breadmaker. Consult a Panasonic dealer and have it serviced by an authorised technician.
3. Do not immerse the unit, power cord, or plug in water or any kind of liquid.
4. Do not allow the power cord to hang over the edge of the worktop or touch a hot surface. 5. Do not remove the bread pan or unplug the breadmaker during its operation.
(If the electricity supply is switched off the program sequence stops. However the appliance has a 10 minute memory so if the power is restored within 10 minutes, the program will resume.)
6.Do not touch, block or cover steam vent during use.
7.The surfaces are liable to get hot during use.
8.To avoid burns, always use oven gloves when removing the bread pan and the finished bread. Also take care when removing the kneading blade.
9.Always keep the inside of the unit and the bread pan clean to ensure programs work successfully. (See page 34 for care and cleaning.)
10.This appliance is not intended for use by persons (including children) with reduced physical, sensory or mental capabilities, or lack of experience and knowledge, unless they have been given supervision or instruction concerning use of the appliance by a person responsible for their safety.
Children should be supervised to ensure that they do not play with the appliance.
11.This appliance is only intended to be used to make bread, dough and cakes as detailed in the following instructions.
12.This appliance is not intended to be operated by means of an external timer or separate remote-control system.
Electrical Requirement
FOR YOUR SAFETY PLEASE READ THE FOLLOWING TEXT CAREFULLY.
This appliance is supplied with a moulded three pin mains plug for your safety and convenience. A 13-amp fuse is fitted in this plug.
Should the fuse need to be replaced please ensure that the replacement fuse has a rating of 13 amps and that it is approved by ASTA or BSI to BS1362.
Check for the ASTA mark  or the BSI mark
  on the body of the fuse.
If the plug contains a removable fuse cover you must ensure that it is refitted when the fuse is replaced. If you lose the fuse cover the plug must not be used until a replacement cover is obtained.
A replacement fuse cover can be purchased from your local Panasonic Dealer.
IF THE FITTED MOULDED PLUG IS UNSUITABLE FOR THE SOCKET OUTLET IN YOUR HOME, THEN THE FUSE SHOULD BE REMOVED AND THE PLUG CUT OFF AND DISPOSED OF SAFELY.
THERE IS A DANGER OF SEVERE ELECTRICAL SHOCK IF THE CUT OFF PLUG IS INSERTED INTO ANY 13-AMP SOCKET.
Use Before
3

Main Unit
Raisin nut dispenser (SD-257 only)
The ingredients placed in the raisin nut dispenser will |
|
|
|
|
||||||||
drop into the bread pan automatically upon selecting |
|
|
|
|
||||||||
the ‘BAKE RAISIN’ or ‘RAISIN |
|
|
|
|
||||||||
DOUGH’ mode. |
|
|
|
|
||||||||
Turn to P.11 for ingredients which |
|
Raisin nut |
Lid |
|||||||||
may be placed in the raisin nut |
|
|||||||||||
dispenser. |
|
dispenser flap |
|
|||||||||
Never operate the breadmaker without the |
|
(SD-257 only) |
|
|||||||||
dispenser |
|
|
|
|
||||||||
being in |
|
|
|
|
||||||||
|
|
|
Dispenser lid |
|
|
|
|
|||||
|
|
|
|
|
|
|
||||||
|
|
|
Kneading blade |
|
|
|
|
|
||||
|
|
|
|
|
|
|
|
|||||
|
|
|
(rye bread |
|
|
|
|
|||||
|
|
|
SD-257 only) |
|
|
|
|
|||||
|
|
|
Kneading blade |
|
|
|
|
|
||||
|
|
|
|
|
|
|
|
|||||
|
|
|
(wheat bread and |
|
|
|
|
|||||
|
|
|
gluten and wheat |
|
|
|
|
|||||
|
|
|
free bread) |
|
|
|
|
|||||
|
|
|
Handle |
|
|
|
|
|
|
|
|
|
|
|
|
|
|
|
|
|
|
|
|
||
|
|
|
Bread pan |
|
|
|
|
|
|
|
||
|
|
|
|
|
|
|
|
|
|
|||
|
|
|
|
|
|
|
|
|
|
|
|
|
Measuring cup |
Measuring spoon |
|
To measure out liquids |
To measure out sugar, salt, |
|
|
yeast, etc. |
|
|
(15 ml) |
(5 ml) |
(max. 310 ml) |
|
|
|
Tablespoon |
Teaspoon |
•10 ml increments |
•1⁄2 marking |
•1⁄4, 1⁄2, 3⁄4 |
|
|
markings |
Plug
4

Control Panel
Operation status
•REST: Displayed during the initial stage or with timer operation when the temperature of the bread pan and ingredients is being regulated before kneading
•POWER ALERT: displayed when there has been an interruption in the power supply
•TEMP: Displayed when the unit is hot – allow to cool before use
Options |
Time remaining until program |
||||||||||||
As the option pad is pressed |
|
|
finished |
||||||||||
the option chosen will flash. |
|
|
|
|
|
|
|
||||||
|
|
|
|
|
|
|
|
|
|
|
|
|
|
|
|
|
|
|
|
|
|
|
|
|
|
|
|
|
|
|
|
|
|
|
|
|
|
|
|
|
|
|
|
|
|
|
|
|
|
|
|
|
|
|
|
|
|
|
|
|
|
|
|
|
|
|
|
|
|
|
|
|
|
|
|
|
|
|
|
|
|
|
|
|
|
|
|
|
|
|
|
|
|
|
|
|
|
|
|
|
|
|
|
|
|
|
|
|
|
|
|
|
|
|
|
|
|
|
|
|
|
|
|
|
|
|
|
|
|
|
|
|
|
|
|
|
|
|
|
|
|
|
|
|
|
|
|
|
|
|
|
|
|
|
|
|
|
|
|
|
|
|
|
|
|
|
|
|
|
|
|
|
|
|
|
|
|
|
|
|
|
Use Before
Select:
Choose type of bread or dough. Each time this pad is pressed, the arrow on the right of the
display will move down to the next choice.
•basic 
•whole wheat
•rye (SD-257 only)
•french
•italian
•brioche
•sandwich
•gluten free
•pizza
•bake only
Option: |
|
|
|
|
|
|
|
|
|
|
|
|
|
|
|
|
|
|
|
|
|
|
|
|
|
|
|
|
|
|
|
|
|||||||||||
|
Size: |
|
|
|
|
Timer: |
|
||||||||||||||
For Standard |
|
Available on basic |
|
Set delay timer |
|
||||||||||||||||
Bake or Pizza |
|
and whole wheat |
|
(time until bread |
|
||||||||||||||||
Dough it is not |
|
• M |
|
|
|
|
|
|
|
is ready) or set |
|
||||||||||
necessary to |
|
|
|
|
|
|
|
|
the baking time |
|
|||||||||||
|
|
|
|
|
|
|
|
|
|
|
|
|
|||||||||
|
|
|
|
|
|
|
|
|
|
|
|
||||||||||
press this pad. |
|
• L |
|
|
|
|
|
|
for ‘bake only’ |
|
|||||||||||
Press the option pad |
|
|
|
|
|
|
mode |
|
|
||||||||||||
|
|
|
|
|
|
|
|
|
|
|
|
|
|||||||||
to choose Bake |
|
• XL |
|
|
|
|
|
|
|
|
|
|
|
|
|
||||||
|
|
|
|
Crust: |
|
|
|
Start/Stop: |
|||||||||||||
Rapid, Bake Raisin, |
|
|
|
|
|
|
|||||||||||||||
|
|
|
|
|
|
Crust Colour |
|
|
|
The start/stop light will flash |
|||||||||||
Dough, Raisin Dough, |
|
|
|
||||||||||||||||||
Bake Butter. |
|
|
|
|
|
|
|
available on Basic |
during program selection. |
||||||||||||
e.g. (basic) |
|
|
|
|
|
|
|
and Gluten Free |
Press the start pad when |
||||||||||||
|
|
|
|
|
|
|
only |
|
|
|
programming is completed. |
||||||||||
• BAKE |
|
|
|
|
|
|
|
|
|
|
|
||||||||||
|
|
|
|
|
|
|
|
• LIGHT |
|
|
|
|
When the start pad is |
||||||||
|
|
|
|
|
|
|
|
|
|
|
|
||||||||||
Bake bread (knead, rise, bake) |
|
|
|
|
pressed, the start/stop |
||||||||||||||||
|
|
|
|
||||||||||||||||||
|
|
|
|
|
|
|
|
|
|
|
|
|
|
|
|
|
|
|
|
light will stop flashing and |
|
• BAKE RAPID |
|
|
|
|
|
|
|
• MEDIUM* |
|
|
|
||||||||||
|
|
|
|
|
|
|
|
|
|
become constant. If you |
|||||||||||
Faster baking process |
|
|
|
|
|
|
|
|
wish to change the program, |
||||||||||||
• DARK |
|
|
|
|
|
||||||||||||||||
|
|
|
|
|
|
|
|
|
|
|
|
|
|
|
|
|
you must stop the operation |
||||
• BAKE RAISIN |
|
|
|
|
|
|
|
|
|
|
|
|
|||||||||
|
|
|
|
|
|
|
* Medium crust is |
by holding down the stop |
|||||||||||||
Bake bread with added |
indicated by the |
pad for 1–2 seconds. The |
|||||||||||||||||||
ingredients |
|
|
|
|
|
|
|
black dot between |
display will go blank and |
||||||||||||
|
|
|
|
|
|
|
|
|
|
|
|
light and dark. |
|
|
|
the start/stop light will go |
|||||
• DOUGH |
|
|
|
|
|
|
|
|
|
|
|||||||||||
|
|
|
|
|
|
|
|
|
|
|
|
|
|
|
off. Press the select pad to |
||||||
Make dough (knead, rise) |
|
|
|
|
|
|
|
|
reactivate the screen and |
||||||||||||
|
|
|
|
|
|
|
|
|
|
|
|
|
|
|
|
|
|
|
|
then re-program accordingly. |
|
• DOUGH RAISIN |
|
|
|
|
|
|
|
|
|
|
|
|
|
|
|
||||||
|
|
|
|
|
|
|
|
|
|
|
|
|
|
|
If you press this pad without |
||||||
Make dough with added |
|
|
|
|
|
|
|
|
selecting any programs, |
||||||||||||
ingredients |
|
|
|
|
|
|
|
|
|
|
|
|
|
|
|
basic/BAKE XL size program |
|||||
|
|
|
|
|
|
|
|
|
|
|
|
|
|
|
|
|
|
|
|
will start. |
|
• BAKE BUTTER |
|
|
|
|
|
|
|
|
|
|
|
|
|
|
|
||||||
|
|
|
|
|
|
|
|
|
|
|
|
|
|
|
|
|
|||||
|
|
|
|
|
|
|
|
|
|
|
|
|
|
|
|
|
|||||
• SD-257 display shown. This picture shows all words and symbols, but during operation only those relevant will be displayed.
5
Bread-making Ingredients
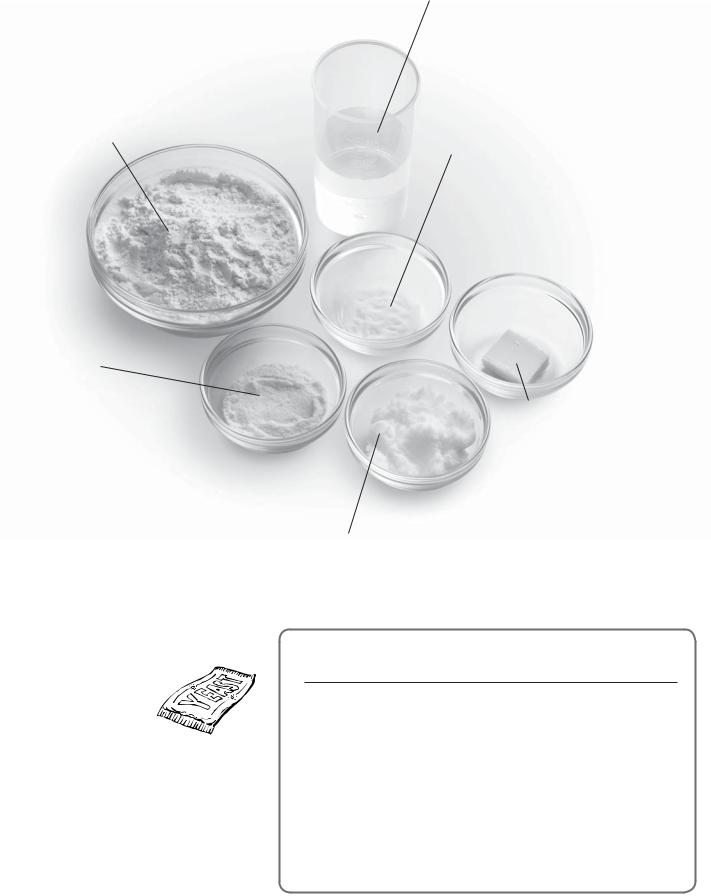
Flour
Main ingredient of bread. The protein in flour forms gluten during kneading.
Gluten provides structure and texture and helps the bread to rise.
Use strong bread flour only.
Flour must be weighed on scales.
Water
Use normal tap water.
Use tepid water if using ‘RAPID’, ‘rye’ or ‘gluten free’ settings in a cold room.
Use chilled water if using ‘rye’, ‘french’ or ‘brioche’ settings in a hot room.
Always measure out liquids using the measuring cup provided.
Salt
Improves the flavour and strengthens gluten to help the bread rise.
The bread may lose size/flavour if measuring is inaccurate.
Dairy Products
Add flavour and nutritional value.
If you use milk instead of water, the nutritional value of the bread will be higher, but do not use in timer setting as it may not keep fresh overnight.
Reduce the amount of water proportionally to the amount of milk.
Yeast
Enables the bread to rise.
Yeast which has ‘Easy Blend’, ‘Fast Action’ or ‘Easy Bake’ written on the packet is recommended.
Do not use dried yeast that requires preliminary fermentation.
When using yeast from sachets, seal the sachet again immediately after use. To store follow manufacturers instructions but use opened individual sachets within 48 hours.
Fat
Adds flavour and softness to the bread.
Use butter, margarine or oil. 2 tbsps oil are equivalent to 25 g butter.
Sugar (granulated sugar, brown sugar, honey, treacle etc)
Adds softness and gives crust colour.
You can make your bread taste better by adding other ingredients:
Eggs |
Improve the nutritional value and colouring |
|
of the bread. (Water amount must be |
|
reduced proportionally) |
|
Beat eggs when adding eggs. |
|
|
Bran |
Increases the bread’s fibre content. |
|
• Use max. 50 g (2 oz). |
|
|
Wheat germ |
Gives the bread a nuttier flavour. |
|
• Use max. 50 g (2 oz). |
|
|
Spices, |
Enhance the flavour of the bread. |
herbs |
• Only use a small amount (1-2 tsp). |
|
|
6

Main Flours Used in Bread
Strong flour is milled from hard wheat and has a high content of protein which is necessary for the development of gluten. Carbon dioxide produced during fermentation is trapped within the elastic network of gluten, thus making the dough rise.
White flour:
Made by grinding wheat kernel, excluding bran and germ. Used in e.g. ‘basic’, ‘french’ modes.
•Always use strong flour when using the recipes in this book.
•Do NOT use plain or self-raising flour as a substitute for bread flour.
Wholemeal flour:
Made by grinding entire wheat kernel, including bran and germ.
Makes bread rich in minerals, but lower in height and denser than bread baked with white flour because the gluten strands are cut by the edges of bran flakes and germ.
Rye flour:
Contains some proteins, but these do not produce as much gluten as wheat flour. Makes dense, heavy bread with a flat or slightly sunken top crust (use in rye mode).
• Do not use more than stated quantity ,100 g maximum rye out of 500 g flour in SD-256.
Spelt flour:
In the wheat family but is a completely different species genetically. Although it contains gluten some gluten-intolerant people can digest it. Makes loaves with a flat/slightly sunken crust.
Brown flour: 10-15% of wheat grain removed during milling.
Softgrain flour:
Strong white flour with wheat and rye grains added. Provides extra fibre, texture, and flavour.
• Do not use with ‘Timer’ option (grains can absorb water and swell up, spoiling texture of loaf).
GranaryR or Malted Grain flour:
Has crushed wheat or rye grains added together with malted whole wheat. Makes brown bread coarser and moister with nuttier flavour.
• Do not use more than stated quantity (could damage bread pan’s non-stick finish).
Stoneground flour:
Grains are crushed between two large millstones rather than with steel rollers.
• Do not use more than stated quantity (could damage bread pan’s non-stick finish, or overload motor).
Other flour:
Products milled from other grains (i.e. corn meal, rice, millet, soy, oat, buckwheat, barley flours).
•Do not use more than stated quantity (hinders rising and texture).
•Should not be used as substitute for bread flour.
•Gluten Free - see page 22.
Coarse ingredients such as flours with whole grains or the addition of nuts and seeds may damage the non-stick finish of the bread pan.
If using a bread mix...
Bread mixes including yeast
1 Place a 500 g mix in the bread pan, then add water. (Follow instructions on the packet for the quantity of water)
2Select the ‘basic’ – ‘BAKE RAPID’ – ‘Large’ size setting.
With some mixes, it is not clear how much yeast is included, so results may vary.
Baking brioche with brioche mix
Select the ‘brioche’ or ‘basic’ – ‘BAKE RAPID’
– ‘Medium’ size – ‘LIGHT’.
Bread mix with separate yeast sachet
1 First place the measured yeast in the bread pan, then the bread mix, then the water.
• Bread Bakery Capacity
400-550 g mix (for a loaf), 250-600 g mix (for a dough)
2Set the machine according to the type of flour included in the mix, and start the baking.
•White flour, brown flour basic
•Whole wheat, multi grain flour whole wheat
•rye flour rye (SD-257 only)
Use Before
7

Baking Bread
Turn to P.16-21 for bread recipes
Place the ingredients in the bread pan
Kneading blade
1Remove the bread pan and set the kneading blade
1 Twist the bread pan anticlockwise and lift up to remove
2 Ensure the kneading blade is firmly on the kneader mounting shaft
Ensure that the shaft and kneading blade are clean, see page 34 for cleaning.
• Use the specified kneading blade when baking rye bread. (SD-257 only)
•The kneading blade is designed to fit loosely on the shaft.
Baking bread
with added ingredients
(P.11)
(SD-257 only)
Clean and dry beforehand
8
2Place the measured ingredients in the bread pan
1 Place the dry yeast at the bottom (so that it does not mix with the liquid until later)
2 Cover the yeast with all the dry ingredients (flour, sugar, salt, etc.)
• Flour must be weighed on scales.
 3 Pour in the water and
any other liquids
• Wipe the outside of the pan to remove any flour or liquid
4 Put the bread pan into the breadmaker and turn slightly clockwise
5 Close the lid
For optimum results, don’t open the lid until bread is complete as it affects bread quality.
3Plug the breadmaker into a
230-240V socket
Make sure the start/stop light is off before selecting a program.
Set the program and start |
Remove the bread |
4 |
|
* SD-257 display shown. |
Select a bread type |
Press Stop pad |
|
|
and remove bread |
|
|
7when machine beeps 8 times |
5Press Option pad to choose a baking option
The flashing start/stop light will go off.
8Remove the bread immediately,
See page15 for availability of size and crust. |
Oven |
|
glove |
||
|
To change the size |
|
|
Bread |
||
|
|
|
|
|
|
To change the crust colour |
|
|
pan |
||
|
|
|
|||
|
|
|
|
|
|
|
To set the timer |
|
|
|
|
|
e.g. It is 9:00 PM now, and you want the bread to be ready at |
|
|||
|
6.30 the next morning. |
|
|
allow to cool, for example, on a wire rack |
|
|
Set the timer to ‘9:30’ (9 hours 30 minutes from now). |
||||
|
Unplug after use |
||||
|
12 |
|
|
12 |
|
|
|
|
|
||
|
9 |
3 |
9 |
3 |
The breadmaker has a keep warm |
|
|
9hr 30min |
|
facility to reduce condensation of |
|
|
6 |
from now |
|
6 |
9 steam within the loaf which operates |
|
Current time |
Ready time |
if the stop pad is not pressed on |
||
|
• Pressing the button once will advance the timer by 10 minutes |
||||
|
completion of the program. |
||||
|
(hold to advance more quickly) |
|
|
||
6 |
|
|
However, this will accelerate the |
||
|
|
|
|
||
Press Start pad to start the machine |
browning of the crust, therefore, |
||||
upon completion of baking, switch |
|||||
|
|
|
|
off the unit, remove the bread |
|
|
|
|
|
immediately from the unit to cool it. |
|
|
|
|
|
If you leave the bread to cool |
|
|
|
|
|
|
down in the bread pan, moisture |
|
|
|
|
|
will be retained within the loaf |
|
Time until the selected program is complete |
which will affect the finished |
|||
|
quality of the loaf. Therefore, cool |
||||
|
The start/stop light will come on. |
|
on a wire rack to ensure optimum |
||
|
|
quality of the loaf. |
|||
|
|
|
|
|
|
Use to How
9

Making Dough
Turn to P.24-29 for dough recipes
|
|
To cancel/stop |
|
|
once started |
|
|
(hold for more |
|
|
than 1 second) |
1 |
2 |
3,4 |
Preparation 1 Put the kneading blade into the bread pan.
(P.8) 2 Place the ingredients in the bread pan in the order listed in the recipe.
3 Set the bread pan into the main unit, and plug the machine into the socket. (Make sure the start/stop light is off.)
1Select a dough type
Timer is not available on Dough
Options. (except pizza)
You can select between ‘basic’, ‘whole wheat’, ‘rye’ (SD-257 only), ‘french’, and ‘pizza’ dough types.
2Press Option pad to choose
‘DOUGH’
Options available include ‘DOUGH RAISIN’ on ‘basic’ or ‘whole wheat’.
Select ‘DOUGH RAISIN 
 ’ if you would like to add extra ingredients to your dough by pressing the option pad. (P.11)
3Press Start pad to start the machine
For modes other than ‘pizza’, a ‘resting’ process will begin immediately after starting, followed by ‘kneading’ and ‘rising’.
Time until the selected program is complete
Press Stop pad and remove |
Shape the finished dough and allow it |
|
4whendoughmachine beeps 8 times |
||
to prove until doubled in size. |
||
Then bake in the oven according to |
||
recipe. |
10
When adding extra ingredients...
(Select when baking bread)
‘BAKE RAISIN  ’ will be displayed
(Select when making dough)
|
|
|
|
|
|
‘DOUGH RAISIN |
’ will be displayed |
|
|
|
|||||
|
|
|
|
|
|
Press this pad after you’ve pressed start |
|
|
|
|
|
|
|
||
|
|
|
|
|
|
and the light is on, to see how long to wait |
|
|
|
|
|
|
|
||
|
|
|
|
|
|
until the selection of program is complete. |
|
|
|
|
|
|
|
(SD-256 only) |
|
|
|
||||||
|
|
||||||
|
|
|
|
|
|
|
|
|
1 |
2 |
3,4 |
Preparation |
1 Put the kneading blade into the bread pan. |
||
(P.8) |
2 Place the ingredients in the bread pan in the order listed in the recipe. |
||
3Set the bread pan into the main unit, and plug the machine into the socket. (Make sure the start/stop light is off.)
1Select ‘basic’ or ‘whole wheat’
Press once for ‘basic’, twice for ‘whole wheat’.
2Press Option pad to choose
‘BAKE RAISIN’ or ‘DOUGH RAISIN’
Press twice for ‘BAKE RAISIN’, 4 times for ‘DOUGH RAISIN’.
3Press Start pad to start the machine
Time until the selected program is complete
(SD-256)
after the raisin beep sounds or when timer pad pressed
Time until additional |
Time until the selected |
ingredients are added |
program is complete |
The start/stop light will come on. |
|
4Press Stop pad and remove bread or dough
when machine beeps 8 times
The flashing start/stop light will go off.
Adding extra ingredients
(SD-257) Moist Ingredients
e.g. chocolate, cheese,
fresh fruits,
fruits packed in alcohol.
Moist Ingredients should be added directly into the bread pan with the other ingredients at the beginning of the cycle.
Dry Ingredients
e.g. dried fruits, nuts
Dry ingredients can be added into the dispenser at the beginning of the cycle.
(SD-256)
Moist/Dry Ingredients
Extra ingredients can be added 
 directly into the


 bread pan when

the raisin beep sounds.
Use to How
11

Baking Brioche
|
|
|
|
|
|
|
|
|
|
|
|
|
|
|
Yeast |
11⁄4 tsp |
|
|
|
|
|
|
|
|
|
|
|
|
|
|
|
Strong White Flour |
400 g (14 oz) |
|
|
|
|
|
|
|
|
|
|
|
|
|
|
|||
|
|
|
|
|
|
|
|
|
|
|
|
|
|
|
Sugar |
2 tbsp |
|
|
|
|
|
|
|
|
|
|
|
|
|
|
|||
|
|
|
|
|
|
|
|
|
|
|
|
|
|
|
Salt |
1 tsp |
|
|
|
|
|
|
|
|
|
|
|
|
|
|
|||
|
|
|
|
|
|
|
|
|
|
|
|
|
|
|
Skimmed milk |
2 tbsp |
|
|
|
|
|
|
|
|
|
|
|
|
|
|
|||
|
|
|
|
|
|
|
|
|
|
|
|
|
|
|||
|
|
|
|
|
|
|
|
|
|
|
|
|
|
|
Butter (Cut into 2 cm cubes and |
100 g (4 oz) |
|
|
|
|
|
|
|
|
|
|
|
|
|
|
|
keep in fridge) |
|
|
|
|
|
|
|
|
|
|
|
|
|
|
|
|
||
|
|
|
|
|
|
|
|
|
|
|
|
|
|
|
|
|
|
|
|
|
|
|
|
|
|
|
|
|
|
|
|
Water |
220 ml |
|
|
|
|
|
|
|
|
|
|
|
|
|
|
|
Egg, medium |
1 (50 g) |
|
|
|
|
|
|
|
|
|
|
|
|
|
|
|||
|
|
|
|
|
|
|
|
|
|
|
|
|
|
|
|
|
|
|
|
|
|
|
|
|
|
|
|
|
|
|
|
|
|
|
|
|
|
|
|
|
|
|
|
|
|
|
|
|
|
|
1 2,3
Preparation |
1 Put the kneading blade into the bread pan. |
(P.8) |
2 Place the ingredients in the bread pan in the order listed in the recipe. |
|
3 Set the bread pan into the main unit, and plug the machine into the socket. |
|
(Make sure the start/stop light is off.) |
1Select ‘brioche’
2Press Start pad to start the machine
Time until the selected program is complete
12
Loading...