


 Loading...
magicolor ® 2200
DeskLaser Installation Guide
English
1800621-001E
i

English
Thank You
Thank you for purchasing a magicolor 2200 DeskLaser. You have made an excellent choice. Your magicolor 2200 DeskLaser is specially designed for optimal performance in Windows and TCP/IP networking environments.
Trademarks
The following are registered trademarks of MINOLTA-QMS, Inc.: QMS, the MINOLTA-QMS logo, and magicolor.
Minolta is a trademark of Minolta Co., Ltd. Other product names mentioned in this guide may also be trademarks or registered trademarks of their respective owners.
Proprietary Statement
The digitally encoded software included with your printer is Copyrighted © 2002 by MINOLTA-QMS, Inc. All Rights Reserved. This software may not be reproduced, modified, displayed, transferred, or copied in any form or in any manner or on any media, in whole or in part, without the express written permission of MINOLTA-QMS, Inc.
Copyright Notice
This manual is Copyrighted © 2002 by MINOLTA-QMS, Inc., One Magnum Pass, Mobile, AL 36618. All Rights Reserved. This document may not be copied, in whole or part, nor transferred to any other media or language, without written permission of MINOLTA-QMS, Inc.
Manual Notice
MINOLTA-QMS, Inc. reserves the right to make changes to this manual and to the equipment described herein without notice. Considerable effort has been made to ensure that this manual is free of inaccuracies and omissions. However, MINOLTA-QMS, Inc. makes no warranty of any kind including, but not limited to, any implied warranties of merchantability and fitness for a particular purpose with regard to this manual. MINOLTA-QMS, Inc. assumes no responsibility for, or liability for, errors contained in this manual or for incidental, special, or consequential damages arising out of the furnishing of this manual, or the use of this manual in operating the equipment, or in connection with the performance of the equipment when so operated.
Registering the Printer
Mail—Fill out and send in the registration card enclosed in your shipment.
Internet—Go to www.onlineregister.com/minolta-qms/ and follow the instructions given there.
CD-ROM—Follow the instructions on the CD-ROM.
ii

Contents
English
Getting Acquainted with Your Printer ....................................................................................... |
1 |
Features 1 |
|
Front/Right Side View 1 |
|
Front Internal View 1 |
|
Left Side/Rear Side View 2 |
|
Documentation Set ........................................................................................................................ |
2 |
Setting up Your Printer ................................................................................................................ |
3 |
Shipment Contents 3 |
|
Unpacking the Printer 3 |
|
Installing the Waste Toner Pack 5 |
|
Installing the Fuser Oil Roller 6 |
|
Removing the Tape from the Transfer Roller 7 |
|
Loading Media 8 |
|
Loading the Multipurpose Tray 10 |
|
Installing Accessories 11 |
|
Plugging in/Turning on the Printer ........................................................................................... |
12 |
About the Control Panel ............................................................................................................. |
12 |
Control Panel Indicators 13 |
|
Control Panel Keys 13 |
|
Configuration Menu Overview ................................................................................................. |
14 |
Language 14 |
|
Sample Page 15 |
|
Engine 15 |
|
Network 16 |
|
Service 19 |
|
Connecting the Printer ............................................................................................................... |
19 |
Installing Printer Drivers and Software ................................................................................... |
20 |
Plug and Play Printer Driver Installation 20 |
|
Manually Installing the Printer Driver/Monitor 20 |
|
Selecting the Crown Port 21 |
|
Troubleshooting .......................................................................................................................... |
21 |
Accessories and Consumables .................................................................................................... |
23 |
Accessories 23 |
|
Consumables 23 |
|
i

English
Regulatory Compliance .............................................................................................................. |
24 |
FCC Compliance Statement 25 |
|
Canadian Users Notice 25 |
|
Laser Safety 25 |
|
International Notices 26 |
|
Warranty Considerations ........................................................................................................... |
26 |
Consumables and Your Warranty 26 |
|
Manufacturer’s Declaration of Conformity—Europe 220 Volt .............................................. |
27 |
Manufacturer’s Declaration of Conformity—Latin America 110 Volt ................................. |
28 |
Manufacturer’s Declaration of Conformity—Latin America 220 Volt ................................. |
29 |
|
|
ii |
Contents |
Getting Acquainted with Your Printer
Features
Print Speed |
5/20* pages per minute |
|
|
SDRAM |
32 MB |
|
|
Resolution |
1200 x 600 dpi |
|
|
500-sheet Letter/A4/Legal (Upper Media Tray) |
Standard |
|
|
Multipurpose Tray |
Standard |
|
|
Lower Feeder Unit |
Optional |
|
|
Duplex Unit |
Optional |
|
|
5-bin Mailbox |
Optional |
|
|
64 MB Memory Expansion |
Optional |
|
|
*5 = color; 20 = monochrome black |
|
The following drawings illustrate the parts of your printer referred to throughout this guide, so please take some time to become familiar with them.
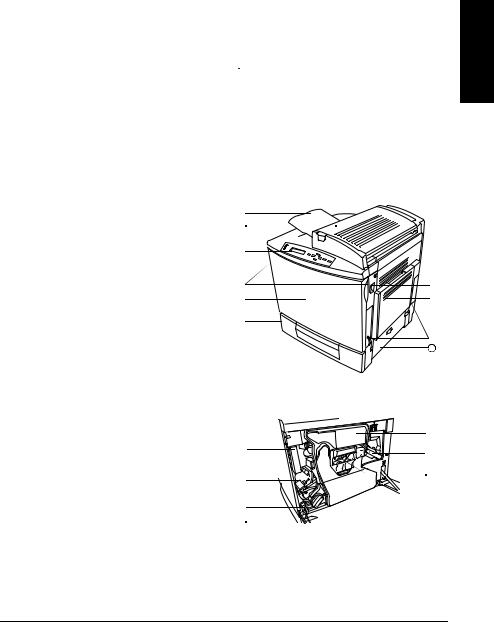
Front/Right Side View
1—Output tray 2—Top cover 3—Top cover latch
4—Control panel and message window 5—Front cover latch (one on each side) 6—Front cover
7—Upper media tray (tray also known as a cassette)
8—Right-side cover latch 9—Multipurpose tray (closed)
10—Pull-out carrying bars (one on each side) 11—Upper feed path cover
Front Internal View
1—Toner ejection lever 2—Toner slot
3—Toner carousel release button 4—Toner rotation knob
5—Waste toner pack
6—Transfer belt unit right release lever 7—OPC drum cartridge


|
|
|
|
|
|
|
|
|
|
|
11 |
|
|
|
|
|
|
|
|
|
|
|
|
|
|
English
Getting Acquainted with Your Printer |
1 |

English
Left Side/Rear Side View
1—Ventilation grille 2—Interface
3—AC power connector 4—Top cover
5—Output tray 6—Main power switch
7—Hand grips for moving printer 8—Media tray (left side)


|
|
|
|
|
Documentation Set
Your magicolor 2200 comes with one CD-ROM. All the documentation is on this CD-ROM unless otherwise noted below. It is provided in Adobe Acrobat PDF format.
You may discover movie camera icons in the manuals. If you’re using the Acrobat PDF version of this guide, click the icon to play a QuickTime video clip of the procedure described in the text.
Quick Setup Guide |
Use this sheet when unpacking the printer. |
|
|
Service & Support |
This lists global sources of service and support for your printer. Further information |
Guide |
about MINOLTA-QMS printers is available through the Internet. |
|
|
Installation Guide |
You’re looking at this document right now. This assists in setting up the printer, install- |
|
ing a printer driver, and connecting to a network. It also briefly describes the control |
|
panel and configuration menu. |
|
|
User’s Guide |
The User’s Guide guides you through the day-to-day operation of your printer, includ- |
|
ing information on printing files, refilling print media, and replacing toner. It also |
|
includes information on handling, cleaning, and maintaining your printer; improving |
|
print quality; and troubleshooting printer problems. |
|
|
Maintenance Guide |
This guide is a handy item to keep at the printer for quick reference information |
|
regarding operation and care of the printer. |
|
|
Registration Card |
Registration and warranty information is included. |
|
|
2 |
Documentation Set |

Setting up Your Printer
WARNING!
The printer weighs 87.1 lbs (39.5 kg) without consumables. To avoid injury, at least two people must lift and move the printer.
 Attention
Do not plug in the printer’s power cord before completing all installation steps.
Shipment Contents
Printer with a 500-sheet letter/A4/legal media tray
Consumables kit
Fuser oil roller |
Waste toner pack |
Power cord
Documentation (see “Documentation Set” on page 2)
Utilities and Documentation CD-ROM
Interface cables aren’t included in the shipment. If you need cables, contact your local vendor or computer store.
Unpacking the Printer
Save the packing materials in case you ever have to relocate your printer or for future storage.
1 Remove the protective plastic cover.
2 Remove the tape from the outside of the printer.
3 Take the tape off of the pull-out carrying bars and slide them outward from the printer.


English
Setting up Your Printer |
3 |

English
4 With another person’s help, lift the printer from the carton, and place it in its intended location. A third person’s assistance may be required if the printer is lifted above waist level.
When lifting and carrying the printer, use the hand gripsand the pull-out carrying bars .


5 Open the front cover.
Use both hands to avoid putting uneven strain on the front cover hinges.
6 Remove the cardboard/foam spacers and the tape from the laser lens cover.
The transfer belt left release lever will move to the 4 |
|
|
|
o’clock position when you remove the spacers. |
|

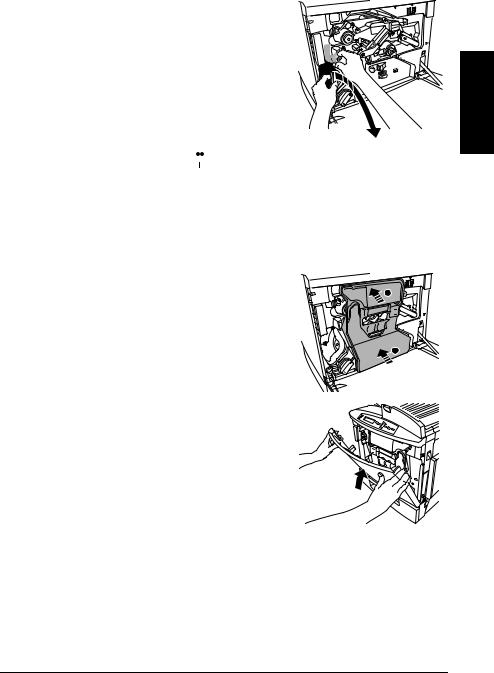
7 Pressing on the transfer belt unit front handle with one hand, take the yellow tag attached to the transfer belt unit fixture with your other hand, and pull the fixture straight toward you.
This fixture protects the transfer belt during initial transportation.
Dispose of the fixture according to your local regulations.
4 |
Setting up Your Printer |
8 Remove the tape holding the toner cartridge carousel in place.
9 Remove the piece of foam attached to the front of the toner cartridge carousel.
English
Installing the Waste Toner Pack 


The waste toner pack collects the excess toner remaining on the OPC drum cartridge.
1
2
Remove the waste toner pack from its plastic shipping bag.
Make sure the transfer belt unit left release lever is still set to its correct (2 o’clock) position.
If the transfer belt unit left release lever is at its top (12 o’clock) position or the laser lens cover is not firmly seated, the waste toner pack cannot be installed.
3 Press the bottom of the waste toner pack into the printer
first, then the top, until it is firmly seated.
 2
2

4 Close the front cover.
Use both hands to avoid putting uneven strain on the cover hinges.
Setting up Your Printer |
5 |

Installing the Fuser Oil Roller
1 |
Push the top cover latch and open the top of the |
|
|
printer . |
|
2 |
Remove the fuser oil roller from its box. |
|
|
|
|
English
 Attention
Lift and hold the fuser oil roller only by the handle. Do not allow the roller surface to contact the table or get dirty. This could lower image quality.
3 Rotate the two small levers to the unlocked position.
4 Remove the tape from the media exit area.
5 Insert the fuser oil roller guides into the guide rails, then carefully lower the roller.
6 |
Setting up Your Printer |
6 With the top of the printer open, rotate the two fuser oil roller levers to the locked position.
If the fuser oil roller release levers are not correctly set, the top cover cannot be closed.
English
7 Close the top cover gently to avoid jarring the fuser oil roller.
Removing the Tape from the Transfer Roller
1 Press the right cover release button and open the right cover .


2 Remove the tape from the transfer roller unit.
Setting up Your Printer |
7 |
Loading...