


2463_English |
2/14/00 1:21 PM Page 62 |
Minolta Co., Ltd. |
3-13, 2-Chome, Azuchi-Machi, Chuo-Ku, Osaka 541-8556, Japan |
|
Minolta Europe GmbH |
Kurt-Fischer-Strasse 50, D-22923 Ahrensburg, Germany |
|
Minolta France S.A. |
365 Route de Saint-Germain, F-78420 Carrieres-Sur-Seine, France |
|
Minolta (UK) Limited |
7 Tanners Drive, Blakelands, Milton Keynes, MK14 5BU, England |
|
Minolta Austria Ges. m.b.H. |
Amalienstrasse 59-61, A-1131 Wien, Austria |
|
Minolta Camera Benelux B.V. |
Zonnebaan 39, P.O. Box 6000, NL-3600 HA Maarssen, The Netherlands |
|
Belgium Branch |
Prins Boudewijnlaan 1, B-2550 Kontich, Belgium |
|
Minolta (Schweiz) AG |
Riedstrasse 6, CH-8953 Dietikon, Switzerland |
|
Minolta Svenska AB |
Albygatan 114, S-171 54 Solna, Sweden |
|
Finland Branch |
Niittykatu 6 PL 37, SF-02201 Espoo, Finland |
|
Minolta Portugal Limitada |
Av. do Brasil 33-A, P-1700 Lisboa, Portugal |
|
Minolta Corporation |
|
|
Head Office |
101 Williams Drive, Ramsey, New Jersey 07446, U.S.A. |
|
Los Angeles Branch |
11150 Hope Street Cypress, CA 90630, U.S.A. |
|
Minolta Canada Inc. |
|
|
Head Office |
369 Britannia Road East, Mississauga, Ontario L4Z 2H5, Canada |
|
Vancouver Branch |
230-3771 Jacombs Road, Richmond, B.C. V6V 2L9, Canada |
|
Minolta Hong Kong Limited |
Room 208, 2/F, Eastern Center, 1065 King’s Road, Quarry Bay, Hong Kong |
|
Minolta Singapore (Pte) Ltd. |
10, Teban Gardens Crescent, Singapore 608923 |
|
Shanghai Minolta Optical |
|
|
Products Co., Ltd. |
368 Minolta Road, Songjiang, Shanghai, China |
|
9222-2463-11 P-A002 |
©2000 Minolta Co., Ltd. under the Berne Convention and |
Printed in Japan |
|
Universal Copyright Convention |
|
E INSTRUCTION MANUAL

2463_English |
2/14/00 1:21 PM Page 2 |
FOR PROPER AND SAFE USE
Read and understand all warnings and cautions before using this product.
 WARNING
Batteries may become hot or explode due to improper use.
•Use only the batteries specified in this instruction manual.
•Do not install the batteries with the polarity (+/–) reversed.
•Do not subject batteries to fire or high temperatures.
•Do not attempt to recharge, short, or disassemble.
•Tape over lithium battery contacts to avoid short-circuit when disposing of batteries, and follow local regulations for battery disposal.
Keep batteries or things that could be swallowed away from young children. Contact a doctor immediately if an object is swallowed.
Immediately remove the batteries and discontinue use if...
•the camera is dropped or subjected to an impact in which the interior is exposed.
•the product emits a strange smell, heat, or smoke.
Do not disassemble. Electric shock may occur if a high voltage circuit inside the camera is touched. Take your camera to a Minolta Service Facility when repairs are required.
 CAUTION
The lens retracts when the camera is turned off or Auto Power Off is activated. Touching the lens barrel while it is retracting may cause injury.
1

2463_English |
2/14/00 1:21 PM Page 2 |
TABLE OF CONTENTS
Thank you for purchasing this Minolta camera. Your new camera is equipped with functions which will suit your every photographic need. Before using your new camera, please take the time to read through this instruction manual for it contains important information on the use and care of your camera.
2
For Proper and Safe Use ........... |
2 |
Name of Parts ............................ |
4 |
Inserting the Battery ................... |
8 |
Battery Condition Indicator ......... |
9 |
Loading the Film......................... |
10 |
Full-Auto Operation .................... |
12 |
For Closer Subjects.................... |
16 |
Special Focusing Situations ....... |
18 |
Focus Hold ................................. |
20 |
Rewinding the Film..................... |
22 |
Selecting the Flash Mode........... |
24 |
Using the Built-in Flash .............. |
25 |
Flash Lamp ........................... |
25 |
Flash Range.......................... |
26 |
Autoflash with Red-eye |
|
Reduction ................... |
27 |
Fill Flash ..................................... |
28 |
Flash Cancel............................... |
29 |
Night Portrait Mode .................... |
30 |
Exposure Compensation Mode .. |
32 |
Selecting Additional Features..... |
34 |
Self-timer .................................... |
35 |
Continuous Drive ........................ |
37 |
IR Remote Control RC-3 ............ |
39 |
For Owners of the |
|
Quartz Date Model................ |
46 |
Imprinting the Date or Time .. |
47 |
Setting the Date and Time .... |
48 |
Changing the Format ............ |
50 |
Camera Strap ............................. |
52 |
Care and Storage ....................... |
54 |
Technical Details......................... |
58 |
3

2463_English |
2/14/00 1:21 PM Page 4 |
NAME OF PARTS
BODY
Meter window*
AF window*
Remote-control
receiver*
Self-timer/
Remote-control lamp*
4
Viewfinder window*
Flash*
Lens*
 Back-cover release (10)
Panorama switch
(Panorma model only)
Tripod socket Manual-rewind button (23)
* Do not touch
Data panel
Date button
(Quartz Date model only)
Drive-mode/Adjust button
Flash-mode/Select button 
Viewfinder*
Back cover
Shutter-release button
 Main switch

 Strap eyelet
Battery-chamber door (8)
|
|
|
Film window |
|
|
|
|
|
|
|
|
|
Zoom lever (13) |
|
|
|
|
|
|
For information on specific parts, refer to the page numbers shown in parenthesis. |
|
|||
|
|
Continued on next page. |
5 |
|
2463_English 2/14/00 1:21 PM Page 6
NAME OF PARTS
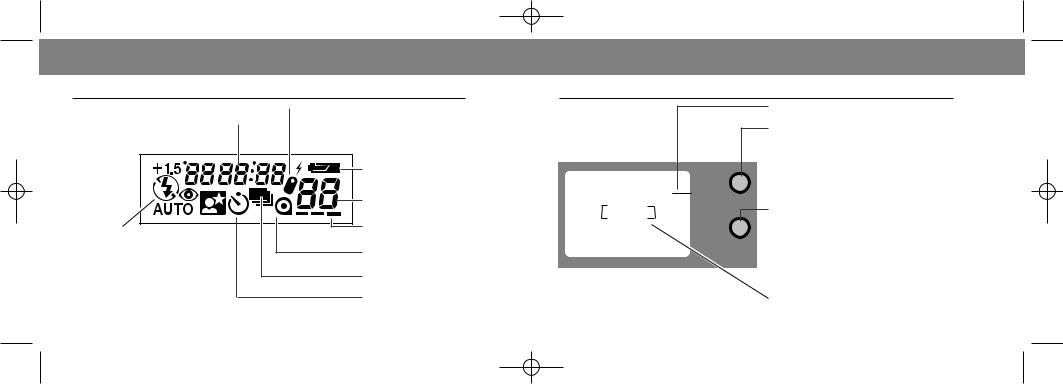
DATA PANEL VIEWFINDER
Date/Time display (Quartz Date model only) |
|
Remote-control indicator♦ |
|
|
|||
|
♦The remote control (RC-3) is sold separately. |
||
|
|
||
|
Battery-condition indicator |
|
Frame counter |
Flash mode indicators |
Film-transport signals |
|
|
Autoflash |
Cartridge mark |
Autoflash with red-eye reduction |
|
Fill-flash |
Continuous-drive indicator |
Flash cancel |
|
Night Portrait (with red-eye reduction) |
Self-timer indicator |
Exposure Compensation |
Close-framing guide (16)
Focus lamp (green)
With the shutter-release button pressed partway down - Glows: Focus confirmed
Blinks quickly: Subject is too close Blinks slowly: Contrast too low
Flash lamp (orange)
With the shutter-release button pressed partway down - Glows: Flash will fire
Blinks quickly: Flash charging
Blinks slowly: Camera-shake warning
Focus frame
6 |
7 |
2463_English |
2/14/00 1:21 PM Page 8 |
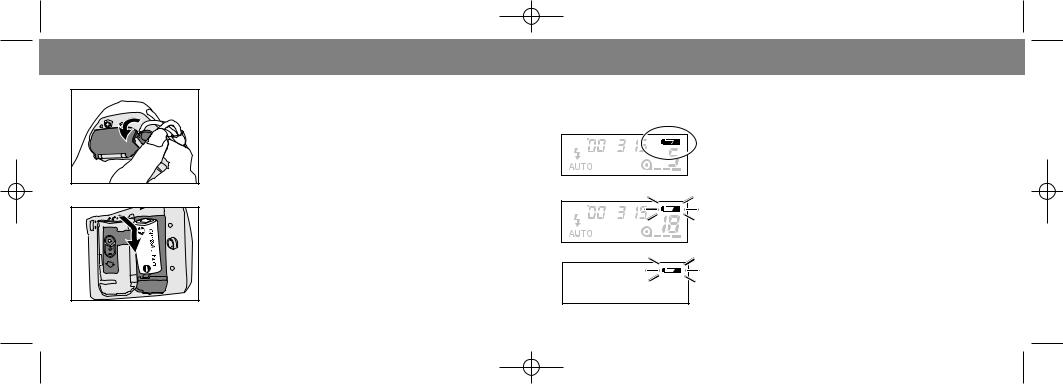
INSERTING THE BATTERY
Your camera uses one 3-volt CR123A or DL123A lithium battery to supply power for all camera operations.
1. Open the battery-chamber door using the bigger key included on the strap.
2. Insert the battery according the + and – marks inside the battery chamber, then snap the door closed.
• Quartz Date model: The date and time must be reset (p. 48).
8
BATTERY CONDITION INDICATOR
Each time the camera is turned on, a symbol will appear in the data panel to indicate the power status of the battery.
Briefly appears. Power is sufficient for all camera operations.
Power is sufficient, but the battery must be replaced soon.
Replace the battery. The shutter will lock until the battery is replaced.
9

2463_English |
2/14/00 1:21 PM Page 10 |
LOADING THE FILM
Use only 35mm, DX-coded film rated ISO 25 to 3200.
• ISO 400 film is recommended for best results.
• Always load and unload film in subdued light.
• Do not use Polaroid instant 35mm film. Winding problems may occur.
10 |
1.Slide the back-cover release down to open the back cover, then place the film cartridge
into the film chamber.
•Once the film is loaded, the back cover will lock until the film rewinding is complete, preventing accidental opening. If the release lever is slid to the open position, “CLOSEd” will appear in the data panel.
2.Extend the film tip to the "FILM TIP" mark, making sure it lays flat.
OK
3. Close the back cover.
•The film automatically advances to the first frame and 
 appears in the data panel.
•If the film has been loaded improperly, 
 will blink in the data panel and the shutter will remain locked. Open the back cover and repeat the loading procedure.
11

2463_English |
2/14/00 1:21 PM Page 12 |
FULL-AUTO OPERATION
1. Press the main switch to turn the camera on.
• Auto Power Off: To conserve power, the camera automatically turns off if it is not operated for more than 8 minutes.
2.Hold the camera steady, making sure your fingers do not cover the flash, lens, or AF
window.
• For vertically framed pictures, hold the camera so the flash is on top.
•Dots under the flash function as a guide to prevent accidental shielding of the flash with a finger.
•Do not obstruct or hold the camera using the lens barrel.
12
3.Look through the viewfinder and push the zoom lever T (telephoto) to zoom in or W (wide angle) to zoom out.
4.Place the focus frame on a detailed part of the subject and press the shutter-release button partway down.
Continued on next page. |
13 |

2463_English |
2/14/00 1:21 PM Page 14 |
FULL-AUTO OPERATION
(4. continued from page 13).
• The AF illuminator (flash) will fire in low light to determine focus distance.
•The flash will fire automatically in low-light and back-lit situations.
•When the orange lamp blinks rapidly, the flash is charging. Wait until it glows steadily, then take the picture.
•When the green lamp blinks rapidly, you are too close to the subject. (See page 16-17).
14
5.When the green focus lamp glows, press the shutter-release button all the way down
to take the picture.
• The film automatically advances to the next frame.
15
2463_English |
2/14/00 1:21 PM Page 16 |
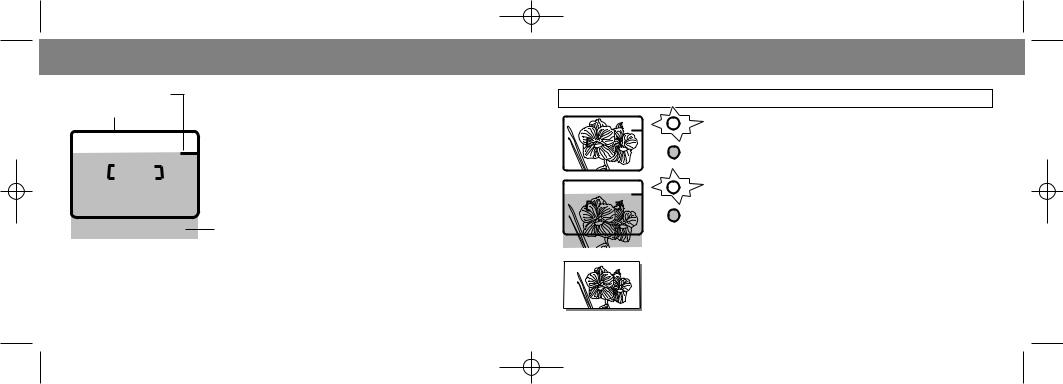
FOR CLOSER SUBJECTS
Close-framing guide
Viewfinder image
When taking a picture with the subject closer than 1.7m (5.6 ft.), the viewfinder image and the actual film image is going to be different. The difference increases as the subject becomes closer, or when taking telephoto pictures. At the closest range, the top of the actual film image is located below the close framing guide.
Actual image (shaded area)
•When taking pictures at extremely close distances, the green focus lamp may blink slowly, but the focus may not be accurate.
•If the green focus lamp blinks rapidly and the shutter locks, the subject is too close. Be sure your camera-to-subject distance is at least 60 cm (W), 85 cm (T).
16
If the subject is closer than 1.7m (5.6 ft.), take the following steps.
1. Place the focus frame on the subject and press the shutter release button partway down.
2. While pressing the shutter-release button partway down, aim the camera upward. Recompose the subject under the close-framing guide and take the picture.
Actual print
17
 Loading...