


 Loading...
PS3000
PR version
Operator´s Manual

i
Using the Machine Properly
To ensure the optimum performance of the machine, follow the precautions listed below.
‹Never place a heavy object on the machine.
‹Never subject the machine to shocks.
‹Never open any doors or turn the machine off while the machine is making prints.
‹Never bring any magnetized object near the machine.
‹Never use flammable sprays, liquids or gases near the machine.
‹Never modify the machine, as a fire or electrical shock could result.
‹Never remove any panel or cover which is secured. The machine contains high voltage components which can cause electrical shock.
‹Never tamper with the laser mechanism in laser-equipped models, as blindness or other injury may result.
‹Never drop paper clips, staples or other small pieces of metal through the vents or other openings in the machine, as a fire or electrical shock can result.
‹Never place containers of liquid on the machine. If liquids get inside the machine, they can cause fire or electrical shock. If a piece of metal or any liquid gets inside the machine, immediately turn the machine off, unplug the power cord and call your Minolta authorized dealer. A fire or electrical shock can result if the machine remains plugged in or is operated after metal or liquid gets inside.
‹Never leave the machine running if it becomes unusually hot, or if smoke or an unusual odor or noise is detected. Should any of these conditions occur, immediately turn the machine off, unplug the power cord and call your Minolta authorized diealer. A fire or electrical shock can result if the machine remains plugged in under any of these conditions.
‹Always insert the power plug all the way into the outlet.
‹Always make sure that the outlet is visible, clear of the machine or machine cabinet.
‹Always provide good ventilation when making a large number of continuous prints.
‹Never pull on the power cord, and always hold the plug when unplugging the power cord. A damaged cord could result in a fire or cause an electrical shock.
‹Never unplug the power cord with a wet hand, as it could cause an electrical shock.
‹Always unplug the power cord before moving the machine. Moving the machine with the power cord plugged in can damage the cord resulting in a fire or causing an electrical shock.
‹Always unplug the power cord when the machine is not going to be used for a long time.

ii
‹Never place a heavy object on the power cord, or pull or bend it, as a fire or electrical shock can result.
‹Always ensure that the machine does not sit on or move onto the power cord or communications cable of other electrical equipment, as malfunctioning equipment or a fire could result.
‹Always ensure that the power cord or communications cable of other electrical equipment does not become wedged into the machine mechanism, as malfunctioning equipment or a fire could result.
‹Always use the correct power voltage, as improper voltage can cause a fire or electrical shock.
‹Never use a multiple outlet adapter, as a fire or electrical shock can result.
‹Should the power cord become damaged, immediately turn the machine off, unplug the power cord and call your Minolta authorized dealer. A damaged cord can result in a fire or cause an electric shock.
‹If an extension cord is needed, use one with a greater rated capacity than the maximum power requirements of the machine. The use of an extension cord that falls short of supporting the maximum power requirements can result in overheating or a fire.
‹Always unplug the machine whenever anything unusual is observed during operation. Make sure that the outlet is nearby and clear of the machine and furniture.
Note: =Locate the Machine in a Well Ventilated Room=
A negligible amount of ozone is generated during normal operation of this machine. An unpleasant odor may, however, be created in poorly ventilated rooms during extensive machine operations. For a comfortable, healthy and safe operating environment, it is recommended that the room be well ventilated.
Remarque:= Placer le líappareil dans une pièce largement ventilée=
Une quantité díozone négligeble est dégagée pendant le fonctionnement du líappaeil quand celui-ci est utilisé normalement. Cependant, une odeur désagréable peut être ressentie dans les pièces dont líaération est insuffisante et lorsquíune utilisation prolongée du líappareil est effectuée. Pour avoir la certitude de travailler dans un environnement réunissant des conditions de confort, santé et de sécurité, il est préférable de bien aérer la pièce ou se trouve le líappareil.

iii
Welcome
Thank you for choosing Minolta quality. For over 30 years Minolta has been a leader on the forefront of office equipment technology and service. Our desire has always been to bring you highly reliable products. We pledge to continue to provide you, our customer, with our state of the art equipment, as well as full customer service for all our products. We look forward to a long healthy relationship with you and our company. If you have any questions or comments about Minolta, our product or service, please let us know. Our fax number is 800-237-8087 (for U.S.A. and Canada). Thank you again.
This operator's manual explains how to operate the unit and replenish its supplies. It also gives some troubleshooting tips as well as general precautions to be observed when operating the unit.
To ensure the best performance and effective use of your unit, read this manual carefully until you familiarize yourself thoroughly with the unit's operation and features. Please keep this manual and use it as a quick and handy reference tool for immediately clarifying any questions that may arise.
Please follow the instructions given in this manual when handling the system and do not touch any part of the system the manual does not cover.
NEVER attempt to disassemble or remodel the system.
The contents of this manual are subject to change without notice.
No part of this manual may be quoted, reproduced, or translated into any other language.

iv
Safety Information (PS3000 Scanner)
All areas
-Use the shielded cable furnished with the this system. Use of an unshielded cable invites radio frequency interference.
-Always refer to this manual when operating the scanner and do not attempt to touch the scanner parts for which no explanations are given in the text.
-NEVER attempt to disassemble or remodel the scanner, as it is very dangerous.
-Call your Minolta authorized dealer when you want to move a scanner which has been installed.
U.S.A. only
NOTE
This equipment has been tested and found to comply with the limits for a Class A digital device, pursuant to Part 15 of the FCC Rules. These limits are designed to provide reasonable protection against harmful interference when the equipment is operated in a commercial environment. This equipment generates, uses, and can radiate radio frequency energy and, if not installed and used in accordance with the instruction manual, may cause harmful interference to radio communications. Operation of this equipment in a residential area is likely to cause harmful interference in which case the user will be required to correct the interference at his own expense.
WARNING
The design and production of this unit conform to FCC regulations, and any changes or modifications must be registered with the FCC and are subject to FCC control. Any changes made by the purchaser or user without first contacting the manufacturer will be subject to penalty under FCC regulations.
Copyright
Books, magazines, journals and other materials may be copyrighted. Unauthorized scanning into a computer and subsequent printing of such copyrighted materials may be contrary to the provisions of the United States copyright laws, title 17 of the United States Code.
You are encouraged to obtain a license from an organization such as the Copyright Clearance Center in those circumstances where it is appropriate.
Post a copy of the above notice where it will be clearly visible to
users of the scanner.

v
Scanning into a computer and subsequent printing of the following is also prohibited by law under some circumstances.
1.Paper Money of the United States or any Foreign Government
2.Obligations or Securities of the United States
3.Postage stamps, Postal Money Orders or Internal Revenue Stamps
4.Passports
5.Badges, Identification Card, Passes or Insignia carried by Federal Departments
6.Obligations or Securities of any Foreign Government, Bank or Corporation
The above list is not all inclusive, and no liability is assumed for its completeness. In case you have doubt, consult your lawyer.
Canada only
This Class A digital apparatus complies with Canadian ICES-003.
Cet appareil numérique de la classe A est conforme à la norme NMB-003 du Canada.
Minolta Co., Ltd. reserves the right to modify this documentation for improvements at any time without prior notice.
The information disclosed in this documentation, including all designs and related materials, is the property of Minolta Co., Ltd.
No part of this documentation may be reproduced, transmitted, transcribed, stored in a retrieval scanner, or translated into other languages without prior written consent from Minolta Co., Ltd.

vi
Safety Information (MSP3000 Printer)
Laser Safety
This printer is a page printer which operates by means of a laser. There is no possibility of danger from the laser, provided the printer is operated according to the instructions provided in this manual.
Since radiation emitted by the laser is completely confined within protective housing, the laser beam cannot escape from the machine during any phase of user operation.
Internal Laser Radiation
Maximum Radiation Power: 8.8 ×10⁻⁴(W) Wave Length: 770-810 (nm)
This is a Class IIIb Laser Diode Assy. that has an invisible laser beam. The print head unit is NOT A FIELD SERVICE ITEM. Therefore, the print head unit should not be opened under any circumstances.
For United States
Laser Safety
This printer is certified as a Class 1 Laser product under the U.S. Department of Health and Human Service (DHHS) Radiation Performance Standard according to the Radiation Control for Health and Safety Act of 1968. This means that the printer does not produce hazardous laser radiation.
CDRH Regulations
The Center for Devices and Radiological Health (CDRH) of the U.S. Food and Drug Administration implemented regulations for laser products on August 2, 1976. These regulations apply to laser products manufactured from August 1. Compliance is mandatory for products marketed in the United States. The label shown below indicates compliance with the CDRH regulations and must be attached to laser products marketed in the United States.
WARNING: Use of controls, adjustments or performance of procedures other than those specified in this manual may result in hazardous radiation exposure.
All other users
WARNING: Use of controls, adjustments of performance or procedures other than those specified in this manual may result in hazardous radiation exposure.
This is a semiconductor laser. The maximum power of the laser diode is 8.8 × 10⁻⁴W and the wavelength is 770-810 nm.

vii
WARNING LABEL

viii
OZONE RELEASE (For all Users)
During printer operation, a small quantity of ozone is released. This amount is not large enough to cause any adverse affects or harm. However, be sure the room where the machine is being used has adequate ventilation, especially if you are printing a high volume of materials, or if the machine is being used continuously over a long period.
WARNING LABEL

ix
Organization
This manual consists of the following seven chapters. Chapters 1 and 2 contain basic information about the Scanner, including safety precautions for installation/operation, system configuration, and features. Be sure to read these chapters before using the Scanner.
Chapter 1 Precautions for Installation & Operation
Provides safety precautions required to ensure correct installation and operation of the Scanner.
Chapter 2 Overview
An overview of the features, system configuration, functions and part names for each section and control panel.
Chapter 3 Operation
Describes operation precautions and procedures (including control panel descriptions), menu flow charts, and settings for each function.
Chapter 4 Printer
Describes functions, operation procedures and part names for the printer.
Chapter 5 Troubleshooting
Describes error and warning messages that appear on the control panel, and procedures for eliminating these problems.
Chapter 6 Maintenance
Describes daily maintenance required for satisfactory operation of the Scanner.
Chapter 7 Specifications
Complete specifications of the Scanner.
NOTE
In this manual, important points requiring special attention are described in sections marked with “NOTE”. The key name that appears on the display is shown in brackets [ ].
Referenced chapters or their titles are enclosed by double quotation marks “ ”.
x
Contents
Chapter 1. Precautions for Installation & Operation
|
Installation ..................................................................................... |
1-1 |
|
Installation Environment ............................................................ |
1-1 |
|
Power Source ............................................................................. |
1-1 |
|
Grounding .................................................................................. |
1-1 |
|
Moving the Scanner ................................................................... |
1-2 |
|
Space Requirements ................................................................... |
1-2 |
|
Operation ....................................................................................... |
1-3 |
|
Operating Environment .............................................................. |
1-3 |
|
Precautions When Operating the Scanner ................................. |
1-3 |
|
Moving the Scanner ................................................................... |
1-4 |
|
Precautions When Operating the Printer ................................... |
1-5 |
|
Moving the Printer ..................................................................... |
1-5 |
Chapter 2. |
Overview |
|
|
Features .......................................................................................... |
2-1 |
|
System Configuration ................................................................ |
2-1 |
|
Types of Copy ............................................................................... |
2-2 |
|
Page-by-Page Copy .................................................................... |
2-2 |
|
Spread Copy ............................................................................... |
2-2 |
|
Book Split Copy ......................................................................... |
2-2 |
|
Part Identification and Functions ................................................... |
2-3 |
|
Control Panel Keys ........................................................................ |
2-5 |
|
How to Read the Display ........................................................... |
2-6 |
|
Basic screen ........................................................................ |
2-6 |
|
Panel Reset Key ......................................................................... |
2-7 |
|
Functions .................................................................................... |
2-8 |
Chapter 3. |
Operation |
|
|
Precautions for Operation .............................................................. |
3-1 |
|
Lamp Status ................................................................................... |
3-2 |
|
Half Intensity ............................................................................. |
3-2 |
|
Full Intensity .............................................................................. |
3-2 |
|
Turning ON and OFF the System .................................................. |
3-3 |
|
Turning ON ................................................................................ |
3-3 |
|
Turning OFF .............................................................................. |
3-5 |
|
Placing the Original ....................................................................... |
3-6 |
|
How to Make Copies ..................................................................... |
3-7 |
|
Book/Sheet Original .................................................................... |
3-11 |
|
Book Original mode ................................................................. |
3-11 |
|
Functions automatically activated .................................... |
3-11 |
|
Other available functions ................................................. |
3-11 |
|
xi |
|
Contents |
|
|
Sheet Original mode ................................................................ |
3-12 |
Note on Originals ........................................................................ |
3-13 |
1. High-gloss Originals ............................................................ |
3-13 |
2. Originals having high background density .......................... |
3-13 |
3. Originals with a tag attached or bookmark .......................... |
3-14 |
4. Originals with both text and photographs ............................ |
3-14 |
5. Originals larger than the book table ..................................... |
3-14 |
6. Originals with foldings, wrinkles or warps .......................... |
3-14 |
7. Originals having texts or figures in red ............................... |
3-14 |
Menu Flow Chart ......................................................................... |
3-15 |
Adjusting Exposure ..................................................................... |
3-16 |
Auto ......................................................................................... |
3-16 |
Manual Adjustment .................................................................. |
3-17 |
Setting Image Type ...................................................................... |
3-18 |
Text mode ................................................................................ |
3-18 |
Photo mode .............................................................................. |
3-18 |
Setting Magnification .................................................................. |
3-19 |
Auto ......................................................................................... |
3-19 |
Reduction ................................................................................. |
3-20 |
Full (x 1.00) ............................................................................. |
3-21 |
Enlargement ............................................................................. |
3-22 |
Setting the Number of Copies ..................................................... |
3-23 |
Confirming the Number of Scans ................................................ |
3-24 |
Total Counter ........................................................................... |
3-24 |
User Counter ............................................................................ |
3-24 |
Selecting the Copy Size ............................................................... |
3-25 |
Page-by-Page Copy ................................................................. |
3-26 |
Spread Copy ............................................................................ |
3-26 |
Book Split Copy ...................................................................... |
3-26 |
How to Use the Functions ........................................................... |
3-28 |
Function menu ......................................................................... |
3-28 |
Selecting the Type of Original .................................................... |
3-29 |
Center Erase ................................................................................. |
3-30 |
User Choice ................................................................................. |
3-31 |
Expo ......................................................................................... |
3-32 |
Center Erase ............................................................................. |
3-32 |
Print to Fit ................................................................................ |
3-32 |
Using the Edit Function ............................................................... |
3-33 |
Using the Edit menu ................................................................ |
3-33 |
Frame Masking ........................................................................ |
3-34 |
Centering .................................................................................. |
3-35 |
Finger Erase ............................................................................. |
3-36 |
Warning ....................................................................................... |
3-37 |
Confirming the Current User Setting .......................................... |
3-38 |

xii
Contents
Chapter 4. Printer |
|
Using the Printer ............................................................................ |
4-1 |
Parts of the Printer ..................................................................... |
4-1 |
Troubleshooting and Maintenance ................................................ |
4-3 |
Replenishing the Paper Supply .................................................. |
4-3 |
Replacing the Toner Cartridge ................................................... |
4-7 |
Clearing Misfeeds .................................................................... |
4-10 |
Solving Irregular Printing Problems ........................................ |
4-13 |
Chapter 5. Troubleshooting |
|
Potential Problems ......................................................................... |
5-1 |
Warning Message ...................................................................... |
5-1 |
Error Message ............................................................................ |
5-1 |
Troubleshooting Warning Messages ............................................. |
5-2 |
Chapter 6. Maintenance |
|
Maintenance .................................................................................. |
6-1 |
Daily Checks .............................................................................. |
6-1 |
Cleaning ..................................................................................... |
6-1 |
Scanner glass and illumination glass .................................. |
6-1 |
Steel mirror and shading plate ............................................ |
6-1 |
Cleaning the Printer ............................................................ |
6-2 |
Chapter 7. Specifications
Product Specifications ................................................................... |
7-1 |
For Key Operator’s Use ................................................................. |
7-3 |

Chapter 1
Precautions for Installation & Operation
Precautions for Installation & Operation Chapter 1

Precautions for Installation & Operation Chapter 1
1-1
Installation
Installation Environment
Install the Scanner in a location which meets the following requirements to ensure safe operation and utmost performance.
‹A place where the illumination onto the book table is less than 1000 lx (e.g. 4.5 m x 6.5 m area with ceiling height of 8.5ft (2.6 m), and 12 or less 40 W fluorescent lamps).
‹A place the room lighting or the light from a window does not directly strike the scanner unit or reflect from the steel mirror.
‹A place away from curtains or other objects that catch fire and burn easily.
‹A place where there is no possibility of being splashed with water or other liquid.
‹An area free from direct sunlight.
‹A place not in the direct air stream from an air conditioner, heater, and/or ventilator, ensuring fairly constant temperature.
‹A well-ventilated place.
‹A dry place.
‹A dust-free location.
‹An area not subject to undue vibration.
‹A stable and level surface.
Power Source
The power source voltage requirements are as follows.
‹ Use a power source with little voltage/frequency fluctuations.
Voltage fluctuation: |
120 VAC |
±10% |
Frequency fluctuation: |
60 Hz |
±3 Hz |
‹When a 15A or less power source is to be used, connect the Scanner and printer to separate outlets. When a 20A or more power source is to be used, these two machines can be connected to the same outlet.
‹If any other electrical equipment uses the same power outlet, make sure that the capacity of the outlet is not exceeded.
‹The outlet should be located near the Scanner and easily accessible so that the power cord can be disconnected whenever necessary.
‹NEVER use a multiple adapter to connect other equipment or machines to the outlet used by the Scanner.
‹If an extension cord is required, use one with a capacity higher than the power consumption of the Scanner.
‹Make sure that no unusual, excessive force is applied to the power cord or extension cord.
Grounding
Connect the Scanner’s ground wire to any of the following to prevent electrical shocks due to electrical leakage.
‹Ground terminal of the outlet.
‹Ground contact that complies with local electrical standards.
Never connect the ground cable to a gas pipe, ground wire for a telephone line, or a water pipe.

1-2
Installation
Moving the Scanner
Please contact your Minolta authorized dealer before moving the Scanner to a new location.
Space Requirements
‹Secure the recommended space shown in the figure below to ensure easy operation and maintenance of the Scanner.
5 7/8" |
(150mm) |
30 2/3" |
(763mm) |
23 1/2" (598mm) |
|
5 7/8" |
|
5 7/8" |
|
|
||
|
(150mm) |
|
|
|
(150mm) |
|
|
|
|
|
|
|
|
|
|
|
|
|
|
|
|
|
|
|
|
|
|
|
|
|
|
25 5/8" (651mm)
‹Also, secure the recommended space shown in the figure below to ensure easy operation, replacement of consumables and maintenance of the printer.
Precautions for Installation & Operation Chapter 1
29 1/4" (743mm)
5 7/8" |
23 7/8" |
|
5 7/8" |
22" |
5 7/8" |
|
|
(150mm) |
(606mm) |
|
(150mm) |
(545mm) |
|
(150mm) |
|
|
|
||||||
|
|
|
|
|
|
|
|
‹The Scanner is connected to the printer via an interface cable which is 9.3 ft. (2.8m) long or more. However, keep a distance of less than 6.7 ft. (2m) between the two machines to prevent a load from being applied to the cable and connectors.

Precautions for Installation & Operation Chapter 1
1-3
Operation
Operating Environment
The following environment is required for consistent performance of the Scanner. Temperature: 50 to 95°F (10 to 35°C) with temperature variation not exceeding 50°F
|
(10°C) per hour |
Humidity: |
15 to 85% RH with humidity variation not exceeding 20% RH per hour |
Precautions When Operating the Scanner
Observe the following precautions to ensure the optimum performance of the Scanner.
‹NEVER place any object other than the original on the book table or apply excessive pressure to the book table.
‹NEVER turn the main switch off during operation.
‹NEVER bring any magnetized object or use flammable sprays/liquids near the Scanner.
‹NEVER place a vase or vessel containing water on the Scanner.
‹NEVER drop paper clips, staples, or other small pieces of metal into the Scanner. If this occurs, contact your Minolta authorized dealer.
‹NEVER remove the shading plate (refer to page 2-2), outer cover, mirror, or control panel. Always keep the shading plate clean (refer to page 6-1 for cleaning).
‹NEVER place the Scanner or the cabinet on the power cord or interface cables of other electrical equipment.
‹NEVER leave a damaged or cracked power cord or interface cable unrepaired. If any of these conditions are found, immediately shut down the Scanner, unplug the power cord, and call your Minolta authorized dealer for appropriate action.
‹NEVER place an object on the lamp unit.
‹ALWAYS completely insert the power cord plug into the power outlet.
‹ALWAYS make sure that the outlet into which the power cord is plugged is visible.
‹ALWAYS be sure to turn the power switch off, unplug the power cord, and call your Minolta authorized dealer for appropriate action when the Scanner becomes excessively hot or produces abnormal noise.
NOTE
We recommend that you take a 5 minute break every hour to rest your eyes when operating the Scanner.
NOTE
A negligible amount of ozone is generated during normal operation of this machine. An unpleasant odor may, however, be created in poorly ventilated rooms during extensive machine operation. For a comfortable, healthy and safe operating environment, it is recommended that the room be well ventilated.
1-4
Operation
Moving the Scanner
When moving the Scanner, observe the following.
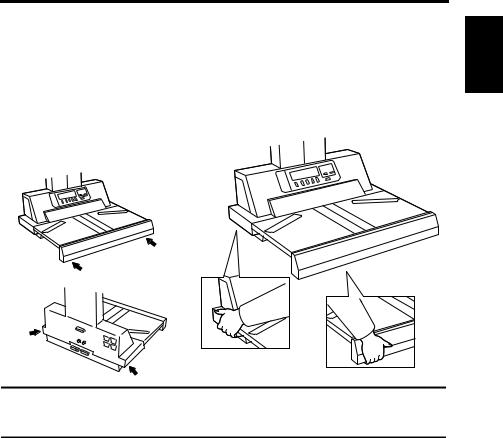
‹The Scanner body weighs 43kg (95lbs). When carrying the Scanner, hold the parts identified with arrows in the figure below. Be careful not to hurt your back. Do not carry the Scanner alone but with the assistance of at least one other person.
‹When moving the Scanner, be sure to disconnect the power cord and the interface cable.
‹When transporting the Scanner, contact your Minolta authorized dealer.
Precautions for Installation & Operation Chapter 1
NOTE
Never hold any parts other than the parts indentified with arrows in the figure (e.g.,lamp cover, book table) or the Scanner may be damaged.

Precautions for Installation & Operation Chapter 1
1-5
Operation
Precautions When Operating the Printer
Observe the following precautions to ensure the optimum performance of the printer.
‹NEVER place a heavy object on the printer or apply excessive pressure to the printer.
‹NEVER turn the power switch off during operation.
‹NEVER use any flammable sprays/liquids near the printer.
‹NEVER place a vase or vessel containing water on the printer.
‹NEVER drop paper clips, staples, or other small pieces of metal into the printer. If this occurs, contact your Minolta authorized dealer.
‹NEVER place the printer or the cabinet on the power cord or interface cables of other electrical equipment.
‹NEVER leave a damaged or cracked power cord or interface cable unrepaired. If any of these conditions are found, immediately shut down the printer, unplug the power cord, and call your Minolta authorized dealer for appropriate action.
‹ALWAYS completely insert the power cord plug into the power outlet.
‹ALWAYS make sure that the outlet into which the power cord is plugged is visible.
‹ALWAYS be sure to turn the power switch off, unplug the power cord, and call your Minolta authorized dealer for appropriate action when the printer becomes excessively hot or produces abnormal noise.
Moving the Printer
When moving the printer, observe the following.
‹The printer body weighs about 28kg (61 3/4lbs). Be careful not to hurt your back. Do not carry the Scanner alone but with the assistance of at least one other person.
‹When moving or transporting the printer, be sure to remove the imaging cartridge beforehand.

Overview Chapter 2
Chapter 2
Overview
Overview Chapter 2
2-1
Features
This system is designed for making quality copies of books and other bound originals. The Scanner reads the images of an open book placed on the Book Table and the Printer copies them. The Scanner is designed to scan books set face up on the book table. This makes placement of the book very easy and reduces concerns that the book may be creased or damaged. In addition, warped text lines and text compression are corrected, ensuring clearer images. Various options such as a foot switch, etc. are also provided.
System Configuration
The system is configured as follows:
Printer
Book Scanner

2-2
Types of Copy
The system allows you to make three different types of copy: Page-by-Page Copy, Spread Copy, and Book Split Copy.
Page-by-Page Copy
The system copies the right or left page of the original, determined with reference to the center of the book table, onto a single separate sheet of copy paper.
1 2
Spread Copy
The system copies the right and left pages of the original, determined with reference to the center of the book table, onto a single sheet of copy paper.
1 |
2 |
1 |
2 |
Overview Chapter 2
Book Split Copy
The system copies the right and left pages |
|
|
|
of the original, determined with reference |
|
|
|
to the center of the book table, onto sepa- |
1 |
2 |
|
rate sheets of copy paper. |
|||
|
|
1
2
Overview Chapter 2
2-3
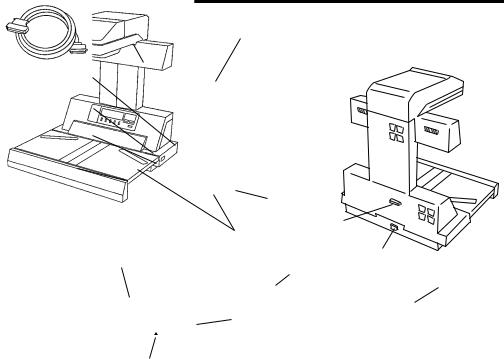
Part Identification and Functions
|
2 |
1 |
|
|
|
|
3 |
|
|
4 |
|
|
5 |
|
6 |
|
|
|
|
8 |
|
|
9 |
|
|
7 |
|
13 |
10 |
|
11 |
|
|
|
|
|
|
12 |
|
|
15 |
|
14 |
|
1. |
Lamp unit: |
Illuminates the original when the scanner unit reads the |
|
|
image. |
2. |
Scanner unit: |
The image scanner in this unit scans the original. |
3. |
Control panel: |
Used to set the operating mode and displays operating |
|
|
status and error/warning messages. Refer to “Control |
|
|
panel keys” on page 2-5 for details. |
4. |
Shading plate: |
Used to adjust the exposure. |
5. |
Steel mirror: |
Detects the position (height) of the original. |
6. |
Book table: |
Place the original (book) face up on this table. |
7. |
Start key: |
Press this key to start scanning the original. |
8. |
Main switch: |
Turns the Scanner on and off. |
9.Printer connector: Connect the printer cable to this connector.
10.Power cord socket: Plug the power cord into this socket.
11. Power cord: |
Connects the Scanner to the power outlet. |
12. Interface cable: Connects the Scanner to the printer.

|
|
2-4 |
|
|
Part Identification and Functions |
|
|
|
13. |
Stopper: |
Used as the reference position for the original. When |
|
|
placing the original, align its top edge with this position. |
14. |
Center mark: |
Adjust the center of the original to this mark. |
15. |
Size guide: |
Indicates the scannable range of the original. |
|
|
The 5-1/2" x 8-1/2" (A5) Size Guide is used for 5-1/2" x |
|
|
8-1/2" (A5) originals to be enlarged to other sizes. |
|
|
However, this system cannot make copies onto the |
|
|
5-1/2" x 8-1/2" (A5) paper. |
Overview Chapter 2

Overview Chapter 2
2-5
Control Panel Keys
6
10
1 |
Exposure |
Spread Page by Page |
|
|
|
|
|
2 |
Zoom |
|
|
|
|
|
|
|
Multi-Copy |
|
|
3 |
Paper |
|
|
4 |
Function |
Panel Reset |
9 |
|
|
||
|
|
|
|
5 |
|
|
|
|
7 |
8 |
|
1. |
Exposure key: |
Press to select the exposure and image type settings |
|
|
(Text or Photo). |
2. |
Zoom key: |
Press to set the enlarge or reduction settings. |
3. |
Multi-Copy key: |
Press to set the number of copies to be made. |
4. |
Paper key: |
Press to set the copy size. |
5. |
Function key: |
Press to access the function menu including the |
|
|
following settings: |
|
|
-Book Original |
|
|
-Center Erase |
|
|
-User Choice |
|
|
-Warn Setting |
|
|
-Edit (Mask, Centering, Finger Erase) |
|
|
-Check (Current user setting) |
6. |
Display: |
Displays current status, operation instructions, warning |
|
|
messages, and functions available for selection. For the |
|
|
information on how to read the display, refer to “How to |
|
|
Read the Display” on page 2-6. |
7. |
Selection keys: |
Press to select functions shown on the display. |
8. |
Page Selection keys: |
These keys do not function. |
9. |
Panel Reset key: |
Resets the settings to defaults. For details of the default |
|
|
settings, refer to “Panel Reset Key” on page 2-7. |
10. |
Copy Type Indicators: |
Displays the type of copy. In the Spread Copy mode, the |
|
|
“Spread” is lighting, and in the Page-by-Page Copy or |
|
|
Book Split Copy mode, “Page-by-Page” is lighting. |

2-6
Control Panel Keys
How to Read the Display
When the power switch is turned on, the basic screen (size selection menu) is displayed on the Display
Basic screen
1 |
|
2 |
|
Press Start Key |
x1.00 |
Spread Page by Page |
|
Copy Single Page |
LTR |
1 |
|
|
Size |
|
|
LTR |
11x17 |
2LTR |
|
Panel Reset
34
1.Message area: Displays the current status, operation instructions, and
warning and caution messages.
2. |
Zoom and Size area: |
Displays the current copy size, direction, magnification |
|
|
and number of copies. |
3. |
Menu: |
Displays the name of the current menu screen. |
4. |
Choice: |
Displays the currently available choices. |
|
|
Use the selection keys below the display to select or set |
|
|
functions. The specified functions are highlighted. |
Overview Chapter 2

2-7
Control Panel Keys
Panel Reset Key
Pressing this key returns all settings to their default settings and displays the basic screen. All settings revert to default settings when the main switch is turned on.
Default settings are as follows:
|
|
|
|
2 |
|
Function |
Default Setting |
Chapter |
|
|
|
|
|
|
|
|
Exposure* |
Auto: ON |
|
|
|
||
|
|
Center of auto/manual exposure adjustment setting |
|
|
|
|
|
|
|
|
|
|
|
Image Type |
Text |
Overview |
|
|
|
|
Book Original |
ON |
|
|
|
Zoom* |
Full (x1.00) |
|
|
Copy Size |
Current Copy Size |
|
|
|
|
|
|
Book Split |
OFF |
|
|
|
|
|
|
Center Erase* |
OFF (0.0") |
|
|
|
|
|
|
|
Mask (Frame Masking): ON |
|
|
|
|
|
|
Edit |
Center: ON |
|
|
|
|
|
|
|
Finger Erase: ON |
|
|
|
|
|
|
Warning |
ON for all functions |
|
|
|
|
|
|
Number of Copies |
1 |
|
|
|
|
*The settings of Exposure, Zoom and Center Erase can be changed by using “User Choice.” Refer to “User Choice” on page 3-31 for details.
NOTE
To change the default settings of Image Type, Book Split, Edit and Warning, contact your Minolta authorized dealer.

2-8
Control Panel Keys
Functions
Function |
Default Setting/Explanation |
ON
Auto clear
Auto Clear resets the unit to the initial paper selection menu at the time when the lamp turns off and returns all setting to default settings.
OFF
Power Save is a power-saving function that switches the system Power Save into the standby state without turning off the power. In one minute
after the Scanner lamp goes off, the Printer fusing unit is turned off, and the system enters the standby state.
Buzzer
ON
A buzzer sounds with Control Panel key operation.
NOTE
To change the settings of Auto Clear, Power Save and Buzzer, contact your Minolta authorized dealer.
Overview Chapter 2

2-9
Control Panel Keys
Overview Chapter 2

Chapter 3
Operation
Operation Chapter 3
Loading...