


 Loading...
PageScope
Account Manager Ver. 3.0
User’s Guide
Account Manager

Contents
1 General |
|
|
1.1 |
Account Manager............................................................................... |
1-1 |
|
Counter information........................................................................ |
1-1 |
|
Accounting ..................................................................................... |
1-1 |
|
Analysis .......................................................................................... |
1-1 |
|
Upper Limit Settings....................................................................... |
1-1 |
1.2 |
General setup operation.................................................................... |
1-2 |
2 Logging on |
|
|
2.1 |
Logging on to Enterprise Suite ......................................................... |
2-1 |
2.2 |
Basic operations ................................................................................ |
2-2 |
2.2.1 |
Top Menu ....................................................................................... |
2-2 |
2.2.2 |
Pages for the functions .................................................................. |
2-3 |
3 |
Account Manager |
|
|
|
3.1 |
Counter information........................................................................... |
3-1 |
|
3.1.1 |
Selecting the device ....................................................................... |
3-1 |
|
3.1.2 |
Selecting a time period ................................................................... |
3-2 |
|
3.1.3 |
Displaying the result ....................................................................... |
3-3 |
|
|
Export ............................................................................................. |
3-5 |
|
|
Editing the exported file.................................................................. |
3-6 |
|
|
Editing a text or CSV file................................................................. |
3-6 |
|
3.2 |
Accounting by user ............................................................................ |
3-8 |
|
3.2.1 |
Selecting the main item .................................................................. |
3-8 |
|
3.2.2 |
Selecting the sub item .................................................................... |
3-9 |
|
3.2.3 |
Selecting a time period ................................................................. |
3-12 |
|
|
Relationship between settings of start and end days and |
|
|
|
counter collection time ................................................................. |
3-13 |
|
|
If "By Term" in "Counter Based" was selected ............................ |
3-13 |
|
|
Accounting period and counter collection ................................... |
3-14 |
|
3.2.4 |
Selecting detail items ................................................................... |
3-14 |
|
3.2.5 |
Displaying the result ..................................................................... |
3-17 |
|
|
Registering an accounting report template .................................. |
3-20 |
|
|
Export ........................................................................................... |
3-22 |
Account Manager |
i |

|
|
|
|
|
|
|
........................................................................Displaying a graph |
3-24 |
3.3 |
Accounting by device ...................................................................... |
3-26 |
3.3.1 |
Selecting the main item ................................................................ |
3-26 |
3.3.2 |
Selecting the sub item .................................................................. |
3-27 |
3.3.3 |
Selecting a time period ................................................................. |
3-29 |
|
If "By Term" was selected ............................................................ |
3-29 |
|
Accounting period and counter collection ................................... |
3-30 |
3.3.4 |
Selecting detail items ................................................................... |
3-30 |
3.3.5 |
Displaying the result ..................................................................... |
3-33 |
|
Registering an accounting report template .................................. |
3-35 |
|
Export ........................................................................................... |
3-36 |
|
Show Graph.................................................................................. |
3-36 |
3.4 |
Accounting by account track.......................................................... |
3-37 |
3.4.1 |
Selecting the main item ................................................................ |
3-37 |
3.4.2 |
Selecting the sub item .................................................................. |
3-38 |
3.4.3 |
Selecting a time period ................................................................. |
3-41 |
|
If "By Term" in "Counter Based" was selected ............................ |
3-42 |
|
Accounting period and counter collection ................................... |
3-42 |
3.4.4 |
Selecting detail items ................................................................... |
3-43 |
3.4.5 |
Displaying the result ..................................................................... |
3-45 |
|
Registering an accounting report template .................................. |
3-47 |
|
Export ........................................................................................... |
3-48 |
|
Show Graph.................................................................................. |
3-48 |
3.5 |
Selecting an accounting report template ...................................... |
3-49 |
3.5.1 |
Accounting ................................................................................... |
3-49 |
3.5.2 |
Adding a new accounting report template ................................... |
3-49 |
3.5.3 |
Editing or copying an accounting report template ....................... |
3-51 |
3.5.4 |
Deleting the selected report template .......................................... |
3-52 |
3.6 |
Analyzing by user ............................................................................. |
3-53 |
3.6.1 |
Selecting the analysis item ........................................................... |
3-53 |
3.6.2 |
Selecting the analysis range ......................................................... |
3-56 |
3.6.3 |
Selecting a time period ................................................................. |
3-57 |
3.6.4 |
Displaying the result ..................................................................... |
3-59 |
|
Registering an analysis report template ....................................... |
3-61 |
|
Export ........................................................................................... |
3-62 |
|
Displaying a graph........................................................................ |
3-63 |
Account Manager |
ii |

|
|
|
|
|
|
3.7 |
.........................................................................Analyzing by device |
3-65 |
3.7.1 |
Selecting the analysis item ........................................................... |
3-65 |
3.7.2 |
Selecting the analysis range ......................................................... |
3-67 |
3.7.3 |
Selecting a time period ................................................................. |
3-68 |
3.7.4 |
Displaying the result ..................................................................... |
3-70 |
|
Registering an analysis report template ....................................... |
3-72 |
|
Export ........................................................................................... |
3-72 |
|
Show Graph.................................................................................. |
3-72 |
3.8 |
Analyzing by account track............................................................. |
3-73 |
3.8.1 |
Selecting the analysis item ........................................................... |
3-73 |
3.8.2 |
Selecting the analysis range ......................................................... |
3-75 |
3.8.3 |
Selecting a time period ................................................................. |
3-76 |
3.8.4 |
Displaying the result ..................................................................... |
3-78 |
|
Registering an analysis report template ....................................... |
3-80 |
|
Export ........................................................................................... |
3-80 |
|
Show Graph.................................................................................. |
3-80 |
3.9 |
Selecting an analysis report template............................................ |
3-81 |
3.9.1 |
Analyzing ...................................................................................... |
3-81 |
3.9.2 |
Adding a new analysis report template ........................................ |
3-81 |
3.9.3 |
Editing or copying an analysis report template ............................ |
3-82 |
3.9.4 |
Deleting the selected report template .......................................... |
3-84 |
3.10 |
Output Report................................................................................... |
3-85 |
3.10.1 |
Creating a report .......................................................................... |
3-85 |
|
Selecting a user to be reported .................................................... |
3-88 |
|
Selecting a device to be reported ................................................ |
3-89 |
|
Selecting an account track to be reported................................... |
3-90 |
3.10.2 |
Report file ..................................................................................... |
3-91 |
3.10.3 |
Template list ................................................................................. |
3-92 |
|
Editing a template......................................................................... |
3-92 |
|
Deleting a template....................................................................... |
3-92 |
3.11 Upper Limit Settings ........................................................................ |
3-93 |
3.11.1 Specifying the basic settings ........................................................ |
3-93 |
Editing e-mail content at the time of limit warning ....................... |
3-94 |
Editing e-mail content when the value of upper limit was |
|
reached......................................................................................... |
3-95 |
Operation when upper limit setting is enabled............................. |
3-97 |
Operation when upper limit setting is disabled ............................ |
3-97 |
When changed from "Disable" to "Enable".................................. |
3-97 |
Account Manager |
iii |

|
|
|
|
|
|
|
|
3.11.2 |
.............................................................................Setting by user |
3-98 |
|
|
"Setting by User" page................................................................. |
3-98 |
|
|
Displaying the users ..................................................................... |
3-99 |
|
3.11.3 |
Changing settings ....................................................................... |
3-101 |
|
3.11.4 |
Importing/exporting .................................................................... |
3-102 |
|
|
Exporting .................................................................................... |
3-102 |
|
|
Data configuration of a file ......................................................... |
3-104 |
|
|
Importing .................................................................................... |
3-106 |
|
|
Checking the import result ......................................................... |
3-108 |
|
3.12 |
Pricing Setup .................................................................................. |
3-109 |
|
3.12.1 Specifying the basic settings ...................................................... |
3-109 |
||
|
Adding and editing unit price templates..................................... |
3-110 |
|
|
Deleting a unit price template..................................................... |
3-113 |
|
|
Adding and editing degression templates.................................. |
3-114 |
|
|
Deleting a degression template.................................................. |
3-115 |
|
3.12.2 |
Setting by user ........................................................................... |
3-115 |
|
3.12.3 |
Importing/exporting .................................................................... |
3-116 |
|
|
Exporting .................................................................................... |
3-116 |
|
|
Data configuration of a file ......................................................... |
3-118 |
|
|
Importing .................................................................................... |
3-120 |
|
|
Checking the import result ......................................................... |
3-121 |
|
3.12.4 |
Setting by device ........................................................................ |
3-122 |
|
3.12.5 |
Importing/exporting .................................................................... |
3-124 |
|
|
Exporting .................................................................................... |
3-124 |
|
|
Data configuration of a file ......................................................... |
3-126 |
|
|
Importing .................................................................................... |
3-128 |
|
|
Checking the import result ......................................................... |
3-129 |
|
3.12.6 Setting by account track ............................................................ |
3-130 |
||
3.12.7 |
Importing/exporting .................................................................... |
3-131 |
|
|
Exporting .................................................................................... |
3-131 |
|
|
Data configuration of a file ......................................................... |
3-133 |
|
|
Importing .................................................................................... |
3-135 |
|
|
Checking the import result ......................................................... |
3-136 |
|
3.13 |
Initial settings ................................................................................. |
3-137 |
|
3.13.1 Counter Reader: Device Management ....................................... |
3-137 |
||
3.13.2 Account Manager: Device Management .................................... |
3-140 |
||
|
Select Target Device .................................................................. |
3-140 |
|
3.13.3 Specifying the counter collection ............................................... |
3-146 |
||
Account Manager |
iv |

|
|
|
|
|
|
|
|
..........................................................3.13.4 Job log collection settings |
3-148 |
||
|
Register/Edit file save setting ..................................................... |
3-149 |
|
|
CSV setting................................................................................. |
3-150 |
|
3.13.5 Specifying the paper size and color ........................................... |
3-151 |
||
3.13.6 Specifying settings for Print Log Tool ........................................ |
3-153 |
||
|
Specifying the print port name ................................................... |
3-154 |
|
3.14 |
Option.............................................................................................. |
3-156 |
|
3.14.1 |
Report Processor Settings ......................................................... |
3-156 |
|
|
Size of saved files....................................................................... |
3-157 |
|
|
Adding and editing the settings for periodic processing............ |
3-158 |
|
|
Deleting a periodic process........................................................ |
3-159 |
|
3.14.2 Specifying the administrator settings ......................................... |
3-160 |
||
|
Adding an administrator ............................................................. |
3-160 |
|
|
Deleting an administrator ........................................................... |
3-161 |
|
3.14.3 |
Counter collection results ........................................................... |
3-162 |
|
3.14.4 Job Log Collection Result .......................................................... |
3-164 |
||
3.14.5 |
Client software ............................................................................ |
3-166 |
|
3.14.6 |
Version ........................................................................................ |
3-167 |
|
3.15 |
Print Log Tool ................................................................................. |
3-168 |
|
3.15.1 |
Installation .................................................................................. |
3-168 |
|
3.15.2 |
Uninstallation .............................................................................. |
3-172 |
|
3.15.3 Using Print Log Tool ................................................................... |
3-173 |
||
3.16 Print Log Tool for Print Server ...................................................... |
3-175 |
||
3.16.1 Using Print Log Tool for Print Server .......................................... |
3-176 |
||
4 Setting for each purpose
4.1To find out usage status (for example, the number of
sheets printed) for each user or account track:.............................. |
4-1 |
4.2To analyze the usage status (for example, the percentage of
|
color printing frequency or percentage of paper savings) for |
|
|
each user or device............................................................................ |
4-2 |
4.3 |
To restrict the number of pages printed for each user: ................. |
4-3 |
4.4 |
To display the accounting result in terms of cost:.......................... |
4-4 |
4.5To total the costs under the same conditions every time and to
receive the accounting results by e-mail every month: ................. |
4-5 |
Account Manager |
v |

|
|
|
|
|
|
|
|
5 |
Troubleshooting |
|
|
|
5.1 |
Problems related to Upper Limit Settings ....................................... |
5-1 |
|
5.2 |
Problems related to accounting (result display) ............................. |
5-2 |
|
5.3 |
Problems related to Report Processing .......................................... |
5-3 |
|
5.4 |
Problems related to accounting report (result display).................. |
5-4 |
|
5.5 |
Problems related to Print Log Tool settings.................................... |
5-5 |
Account Manager |
vi |

About this product
Account Manager is a utility used to centrally manage devices, such as multifunctional peripherals, on the network. By using Account Manager in a Web browser, the usage and costs for each account or each user of network devices can be totaled and analyzed.
Account Manager is an application that runs on Device Manager. Device Manager must be installed in order to install Account Manager.
Abbreviation of product names
This manual describes product names with the following abbreviations.
Product name |
Abbrev. |
KONICA MINOLTA PageScope Enterprise Suite |
Enterprise Suite |
|
|
KONICA MINOLTA PageScope Web Connection |
Web Connection |
|
|
KONICA MINOLTA PageScope Net Care Device |
Device Manager |
Manager |
|
|
|
KONICA MINOLTA PageScope Account Manager |
Account Manager |
|
|
KONICA MINOLTA PageScope Enterprise Suite |
Enterprise Suite Terminal |
Terminal |
|
|
|
KONICA MINOLTA Print Log Tool |
Print Log Tool |
|
|
KONICA MINOLTA Print Log Tool for Print Server |
Print Log Tool for Print Server |
|
|
Account Manager |
vii |

Trademarks and registered trademarks
Trademark acknowledgements
KONICA MINOLTA and KONICA MINOLTA logo are registered trademarks or trademarks of KONICA MINOLTA HOLDINGS, INC.
PageScope is a registered trademark or trademark of KONICA MINOLTA BUSINESS TECHNOLOGIES, INC.
Microsoft, Excel and Windows are either registered trademarks or trademarks of Microsoft Corporation in the United States and/or other countries.
All other company and product names are either trademarks or registered trademarks of their respective companies.
NetAdvantage 2005
Copyright © 2002-2006 Infaragistics, inc.
Dialog boxes
The dialog boxes shown in this manual are those that appear in Windows XP.
!
Detail
The dialog boxes that appear in this document may differ from those that appear on your computer, depending on the installed devices and specified settings.
Note
Unauthorized reproduction, translation or duplication of this document, whether in its entirety or in part, is strictly prohibited.
The contents of this document are subject to change without notice.
Copyright © 2007 KONICA MINOLTA BUSINESS TECHNOLOGIES, INC. All rights reserved.
Account Manager |
viii |

General |
1 |
|
1General
1.1Account Manager
Account Manager provides the following functions.
Counter information
Counters of the selected device can be totaled easily.
For details, refer to "Counter information" on page 3-1.
Accounting
Accounting can be performed by detail items such as user, device, account track, color, and paper size. By specifying unit prices, expenses for copies and printouts can be calculated.
The specified accounting settings can be saved so that they can later be recalled for quick calculations.
Analysis
Usage can be analyzed under the conditions specified by user, device, or account track. Creating an activities summary of analyses results or calculations of the top 10 in terms of the percentage of color printing frequency or of paper savings can be performed.
The specified analysis settings can be saved so that they can later be recalled for quick analyses.
Upper Limit Settings
When the upper limit of the number of copies or printouts per user has nearly been reached, a warning message can be sent. When the upper limit is exceeded, printing can be prohibited.
Account Manager |
1-1 |
General |
1 |
|
1.2General setup operation
In order to use Device or Account Manager, configure settings in the following order.
Device Manager settings
Log on to Device Manager as a system administrator, and then specify settings for the following. These settings are required in order to specify accounting settings.
Function |
Description |
Device List |
Refer to the Device Manager User's Guide. |
|
|
User List |
Refer to the Device Manager User's Guide. |
|
|
Account Manager |
• Device Management: Select the devices for which data is to be |
|
totaled and analyzed. (page 3-140) |
|
• Counter Collection Settings: Specify a collection interval and |
|
save period for saving counters collected from each device. |
|
(page 3-146) |
|
• Print Log Tool Settings: Specify the print port name and a com- |
|
puter name when using Print Log Tool. Also specify the device |
|
to be managed. (page 3-153) |
|
|
Server Settings |
Refer to the Device Manager User's Guide. |
|
|
Account Manager |
1-2 |

Logging on |
2 |
|
2 Logging on
This chapter provides details on logging on to Account Manager.
2.1Logging on to Enterprise Suite
For details on logging on to Enterprise Suite, refer to the "Device Manager User's Guide".
Account Manager |
2-1 |
Logging on |
2 |
|
2.2Basic operations
The basic operation of Account Manager is described below.
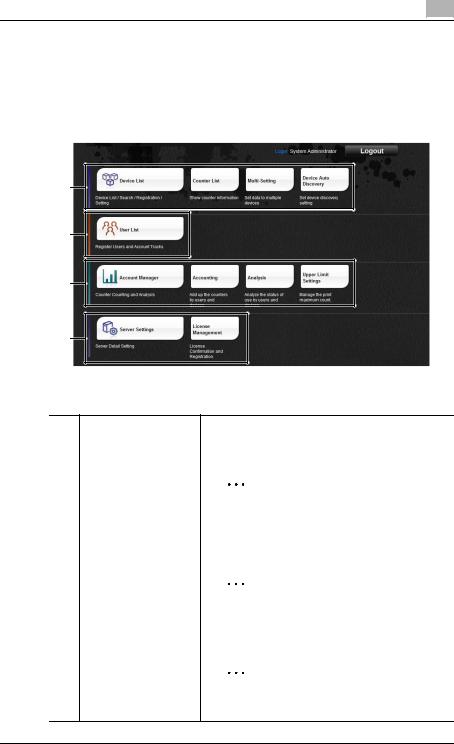
2.2.1Top Menu
1
2
3
4
No. |
Function |
Description |
1 |
Device List |
Registers and manages devices. For details, refer to the |
|
|
Device Manager User's Guide. |
|
|
2 |
|
|
Reminder |
|
|
This function can be used by the system admin- |
|
|
istrator or the device list administrator. |
|
|
|
2 |
User List |
Registers and manages users. For details, refer to the De- |
|
|
vice Manager User's Guide. |
|
|
2 |
|
|
Reminder |
|
|
This function can be used by the system admin- |
|
|
istrator or the user list administrator. |
|
|
|
3 |
Account Manager |
Totals counters. For details, refer to "3 Account Manager". |
|
|
2 |
Reminder
When a general user is logged on, the totals for that user's counter are available.
Account Manager |
2-2 |
Logging on |
2 |
|
No. |
Function |
Description |
4 |
Server Settings |
Allows you to set up the Enterprise Suite server. For details, |
|
|
refer to the Device Manager User's Guide. |
|
|
2 |
|
|
Reminder |
|
|
This function can only be used by the system |
|
|
administrator. |
|
|
|
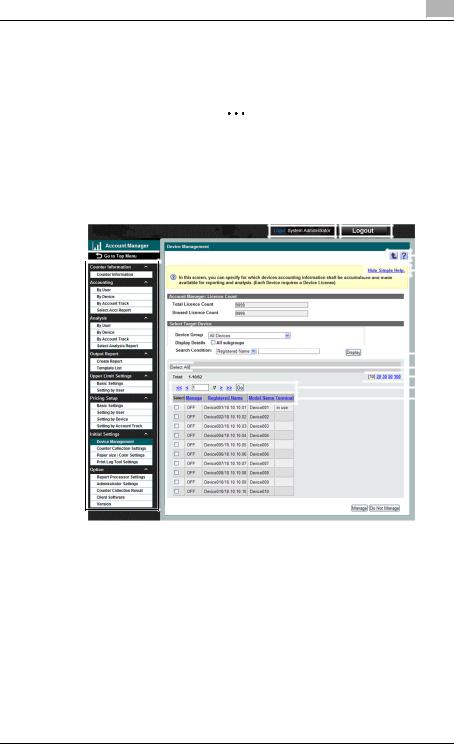
2.2.2 Pages for the functions
1 |
2 |
|
|
|
|
|
|
||||||||||
3 |
|
|
|
|
|
|
|
|
|
|
|
|
|
|
|
|
5 |
|
|
|
|
|
|
|
|
|
|
|
|
|
|
|
|
||
|
|
|
|
|
|
|
|
|
|
|
|
|
|
|
|
||
|
|
|
|
|
|
|
|
|
|
|
|
|
|
|
|
||
|
|
|
|
|
|
|
|
|
|
|
|
|
|
6 |
|||
|
|
|
|
|
|
|
|
7 |
|||
|
|
|
|
|
|
|
|
|
|
||
|
|
|
|
|
|
|
8 |
||||
|
|
|
|
|
|||||||
|
|
|
|
|
|
|
|||||
4 |
|
|
|
|
|
|
|
|
|
|
9 |
|
|
|
|
|
|
|
|
|
|
||
|
|
|
|
|
|
|
|
|
|
10 |
|
|
|||||||||||
|
|
|
|
|
|
|
|
|
|||
|
|||||||||||
|
|
|
|
11 |
|||||||
|
|
|
|
|
|
|
|||||
No. |
Function |
Description |
1 |
Login user name |
Displays the name of the user who is logged on. |
|
|
|
2 |
[Logout] button |
Click this button to log off of Account Manager and display |
|
|
the Login page. |
|
|
|
3 |
[Go to Top Menu] button |
Click this button to move to the Top Menu page. |
|
|
|
Account Manager |
2-3 |
Logging on |
2 |
|
No. |
Function |
Description |
|
|
|
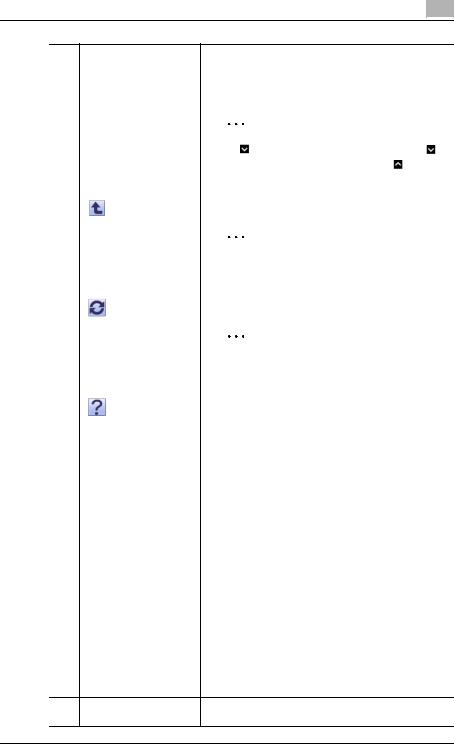
4 |
Menu |
Displays the menu. |
|
|
|
|
|
Click a menu item to display details on the right side of the |
|||
|
|
page. |
|
|
|
|
|
2 |
|
|
|
|
|
Reminder |
|
|
|
|
|
If |
appears beside the menu title, click |
to |
|
|
|
display the collapsed menu. Click |
to close |
||
|
|
the menu. |
|
|
|
|
|
|
|||
5 |
|
Click this button to display the page for the item one level |
|||
|
|
higher in the menu. |
|
|
|
|
|
2 |
|
|
|
|
|
Note |
|
|
|
|
|
Do not use the [Back] button of the Web brows- |
|||
|
|
er. |
|
|
|
|
|
|
|||
|
|
Click this button to update the information on the current |
|||
|
|
page. |
|
|
|
|
|
2 |
|
|
|
|
|
Note |
|
|
|
|
|
Do not use the [Update] button of the Web |
|
||
|
|
browser. |
|
|
|
|
|
|
|||
|
|
Click this button to display the Help information for the cur- |
|||
|
|
rent page. |
|
|
|
|
|
|
|||
6 |
Simple Help |
Depending on the page, the basic help information is dis- |
|||
|
|
played for the current page. Click [Hide Simple |
|
|
|
|
|
Help.]/[Show Simple Help.] to switch the display. |
|
||
|
|
|
|||
7 |
Search Condition |
When a list is displayed in the page, the listed items can be |
|||
|
|
narrowed. |
|
|
|
|
|
Select a column to be searched from the drop-down list, |
|||
|
|
and then type in a character string to be searched for in the |
|||
|
|
text box. |
|
|
|
|
|
|
|||
8 |
Select All/Uncheck All |
When a list is displayed in the page, all items can be select- |
|||
|
|
ed or cleared. |
|
|
|
|
|
|
|||
9 |
Maximum number of dis- |
When a list is displayed on the page, select the number of |
|||
|
played lines |
data items displayed in the list. |
|
|
|
|
|
For example, if "10" is clicked, ten data items are displayed |
|||
|
|
on the current page. |
|
|
|
|
|
|
|||
10 |
Page selection |
These buttons appear when the list displayed on the page |
|||
|
|
extends over multiple pages. |
|
|
|
•Click the [<] button to move to the previous page.
•Click the [>] button to move to the next page.
•Click the [<<] button to move to the first page.
•Click the [>>] button to move to the last page.
•Type the desired page number in the text box, and then click the [Go] button to move to the specified page.
11 |
Sort |
When a list is displayed in the page, click an item name in |
|
|
the list to sort the entire list using the item as a sort key. |
Account Manager |
2-4 |

Account Manager |
3 |
|
3Account Manager
3.1Counter information
3.1.1Selecting the device
Select the device of which you want to view the counter information.
Counter history information obtained for each device can be viewed. It can also be viewed how many times printing has been performed on the selected device.
2
Reminder
To total or display the counters of multiple devices at a time or display the device counter by item (By Function, By User, By Account Track, By Term, By Paper Size, By Color, No. of Originals/No. of Sheets/No. of Duplexed Sheets), refer to "Accounting by device" on page 3-26.
1 From the [Device Group] drop-down list, select the device group to be displayed.
–To display all devices, select "All Devices".
–If master and subordinate relationships are specified in the group, select the "All subgroup devices are included" check box to display all devices, including those in subordinate groups.
–Select a column to search from the drop-down list, type in the text to be searched for in the text box, and then click the [Display] button to narrow down data to be displayed.
Account Manager |
3-1 |

Account Manager |
3 |
|
2 Click the [Display] button.
A list of devices registered in the selected group appears.
3 Select the device of which you want to view the counter information, and click the [Next] button.
3.1.2Selecting a time period
Select a time period during which you want to view the counter information.
Account Manager |
3-2 |
Account Manager |
3 |
|
%Select the pattern for the time period and the basic day.
–Select "Every 3 Months", "Every Month", "Every Week" or "Every Day" as the accounting period, and then select the details for the time period.
–Select a date in the "Basic Day" list, and then select whether the data is totaled as "Account up to the Setting Date" or "Account from the Setting Date".
–Click  to open the calendar control. Select a day in the "Basic Day" list by clicking the appropriate day in the calendar.
2
Reminder
The "Basic Day" list shows the date when the counters were collected. If the counter information was not collected from the devices, the dates are not displayed.
The indicated date may differ from the date displayed based on the selection for an accounting and analysis period.
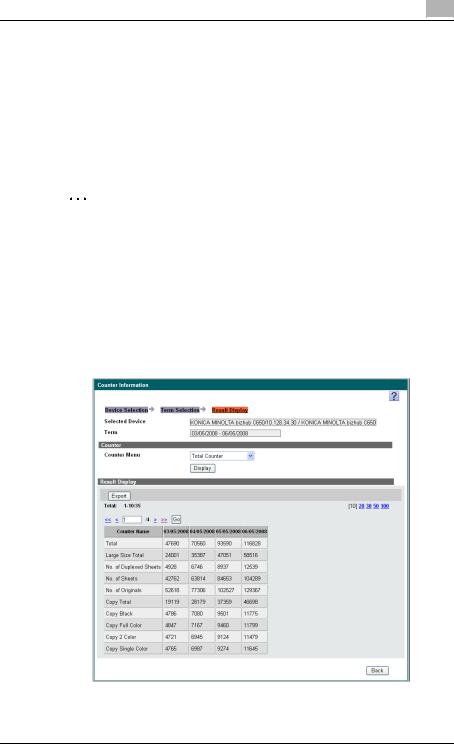
3.1.3Displaying the result
The counter information can be viewed.
Account Manager |
3-3 |

Account Manager |
3 |
|
|
Function |
Details |
|
Selected Device |
Displays the registered name of the selected device. |
|
|
|
|
Term |
Displays the selected time period. |
|
|
|
|
Date |
Displays the selected date. |
|
|
|
|
User |
Displays the selected user. |
|
|
|
|
Account Track |
Displays the selected account track. |
|
|
|
2 |
|
|
Note
Depending on the counter type selected in [Counter Menu], some items may not be displayed.
<Counter>
By selecting the counter type, the displayed results can be changed. Select the counter type, and then click the [Display] button.
Function |
Details |
|
|
|
Counter menu |
Select the counter type to be displayed. |
|||
|
|
|
|
|
|
Total Counter |
Displays the total counter. |
|
|
|
|
|
||
|
Size Counter |
Displays the counter by each paper size. |
||
|
|
|
||
|
User Counter |
Displays the counter by each user. |
||
|
|
Clicking the icon |
next to the user name displays the |
|
|
|
counter information of the user in detail. |
||
|
|
Also, clicking the icon |
next to the time period displays |
|
|
|
the counter information of the period in detail. |
||
|
|
|
||
|
Account Track Counter |
Displays the counter by each account track. |
||
|
|
Clicking the icon |
next to the account name displays the |
|
|
|
counter information of the account track in detail. |
||
|
|
Also, clicking the icon |
next to the time period displays |
|
|
|
the counter information of the period in detail. |
||
|
|
|
|
|
<Result Display>
The counter information is displayed according to the specified settings.
Function |
Details |
[Export] button |
Click this button to export the counter information data. |
|
|
Search Condition |
Specify the condition to narrow down users or account tracks to |
|
be displayed in the list. |
|
|
Account Manager |
3-4 |

Account Manager |
3 |
|
Export
The counter information data can be exported to and saved in a file of the specified format.
The following file formats can be exported.
-Excel 97-2003 Workbook format (.xls)
-Excel Workbook format (Office Excel 2007 or later)(.xlsx)
-XML spreadsheet format (XML format that can be read by Excel) (.xml)
-Text format (tab delimited) (.txt)
-CSV format (comma delimited) (.csv)
1 Select the format of the file you want to export from the [File Format] drop-down list.
2
3
4
5
–To set a read password for a file you want to export, select the "Set password and export." check box and set a password.
–A password of 1-15 characters can be set for files in the Excel 972003 Workbook format (.xls).
–A password of 1-255 characters can be set for files in the Excel Workbook format (Office Excel 2007 or later) (.xlsx).
–To clear the entered information, click the [Clear] button.
Click the [Start Export] button.
In the File Download dialog box, click the [Save] button.
Specify the location where the file is to be saved, and then click the [Save] button.
In the Download complete dialog box, click the [Close] button.
The exported data is saved in the specified location.
2
Note
When the XLS or XLSX file format is selected, the data cannot be exported if the number of lines of data exceeds the following limits.
-XLS:65,536 lines
-XLSX:1,048,576 lines
Account Manager |
3-5 |
Account Manager |
3 |
|
2
Note
The exported data can be viewed and edited in a spreadsheet application. For details, refer to "Editing the exported file" on page 3-6.
2
Note
To open a file for which a password has been set with XLS or XLSX selected in "File Format", a read password must be entered to open the file.
Editing the exported file
The exported file can be edited and saved in a spreadsheet application.
2
Reminder
To edit and save an XML file in a spreadsheet application, change the file format to "XML Spreadsheet", and then save it.
For the procedure to edit a tab-delimited text file (.txt) or a commadelimited CSV file (.csv) in a spreadsheet application, see "Editing a text or CSV file".
Editing a text or CSV file
The following procedure describes how to edit an exported tab-delimited text or comma-delimited CSV file in Microsoft Excel.
1
2
Open Microsoft Excel.
Open the exported file.
–To open a CSV file using Microsoft Excel 2003, select "Import External Data" - "Import Data" from the Data menu. In the Select Data Source dialog box, select "All Files" as the file type.
–To open a CSV file using Microsoft Excel 2007, click "From Text" on the Data tab.
The Text Import Wizard appears.
Account Manager |
3-6 |

Account Manager |
3 |
|
3 Specify the data type that best describes your data, and then click the [Next] button.
–For "Original data type", select "Delimited - Characters such as commas or tabs separate each field".
–Select "1" for "Start import at row".
–Select "UTF-8" as the character code.
4 Specify the field delimiter, and then click the [Next] button.
–To edit a text file, select the "Tab" check box in the "Delimiters" section.
–To edit a CSV file, select the "Comma" check box in the "Delimiters" section.
–Clear the "Treat consecutive delimiters as one" check box.
–Select [" (double quotation mark)] for "Text Qualifier".
5
6
7
Specify the column data format, and then click the [Finish] button.
–Highlight the desired column in the data preview and change the "Column data format" to "Text".
–Change data formats in all columns to "Character String".
The exported file opens.
Edit the file.
Save the file.
–To save the file as a text file, change the file format to "Text (Tab delimited)", and then save it.
–To save the file as a CSV file, change the file format to "CSV (comma delimited)", and then save it.
8 Change the file character code to UTF-8.
–Open the file saved in step 8 by selecting "Accessories" - "Notepad", and then save it as a new file. Select "UTF-8" as the character code.
Account Manager |
3-7 |
Account Manager |
3 |
|
3.2Accounting by user
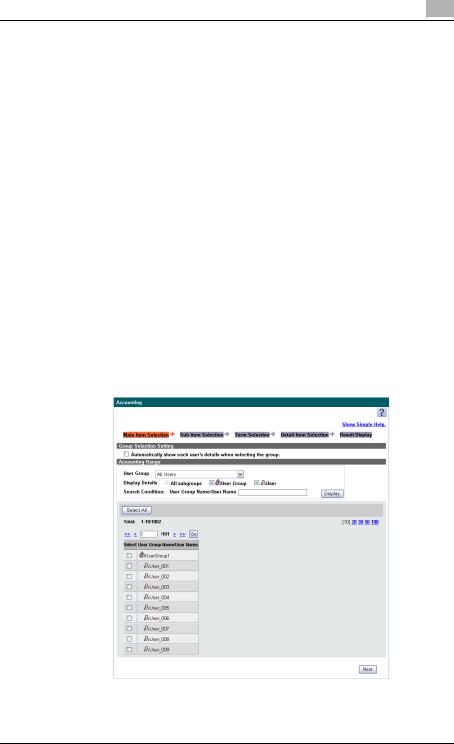
3.2.1Selecting the main item
Select the users whose data is to be totaled.
1 From the [User Group] drop-down list, select the user group to be displayed.
–To select all user groups and users who belong to a selected user group as the target whose data is to be totaled, select the "Automatically show each user's details when selecting the group." check box.
–Type in the text to be searched for in the text box, and then click the [Display] button to narrow down data to be displayed.
–To display all users, select "All Users".
–If master and subordinate relationships are specified in the group, select the "All subgroups" check box to display all users, including those in subordinate groups.
–To hide the user or user group in the list, clear the appropriate check boxes.
2 Click the [Display] button.
A list of users/user groups registered in the selected group appears.
Account Manager |
3-8 |

Account Manager |
3 |
|
3 Select the check box beside the user/user group whose data is to be totaled, and then click the [Next] button.
–To select all users/user groups, click the [Select All] button.
–To select all user groups and users who belong to a specific user group as the target whose data is to be totaled, select the "Automatically show each user's details when selecting the group." check box and select the user group in the list.
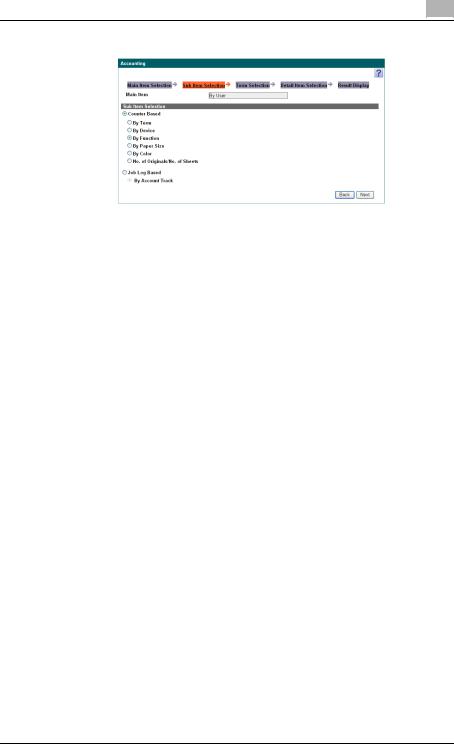
3.2.2Selecting the sub item
Select which data for the selected user/user group is to be totaled. The following settings can be selected.
|
Function |
Details |
|
|
Counter Based |
|
|
|
|
|
|
|
|
By Term |
Select this setting to total the data according to the usage |
|
|
|
period. |
|
|
|
|
|
|
By Device |
Select this setting to total the data according to the device |
|
|
|
that was used. |
|
|
|
2 |
|
|
|
Note |
|
|
|
When a general user is logged on, this function |
|
|
|
does not appear. |
|
|
|
|
|
|
By Function |
Select this setting to total the data according to the func- |
|
|
|
tions that were used. |
|
|
|
|
|
|
By Paper Size |
Select this setting to total all data and total data by "Large |
|
|
|
Size" and "Normal Size". |
|
|
|
|
|
|
By Color |
Select this setting to total all data, and total data by "Full |
|
|
|
Color", "2-Color", "Single Color", or "Black". |
|
|
|
|
|
|
No. of Originals/No. of |
Displays the No. of Originals/No. of Sheets. |
|
|
Sheets |
|
|
|
|
|
|
Job Log Based |
|
|
|
|
|
|
|
|
By Account Track |
Select this setting to total the data according to the ac- |
|
|
|
count track that was used. |
|
|
|
|
2 |
|
|
|
|
Note |
|
|
If [Enable] is not selected for "Job Log Function" in Admin Console, "Job Log Based" and subsequent items are not displayed.
Account Manager |
3-9 |
Account Manager |
3 |
|
1 Select the sub item, and then click the [Next] button.
2 If "By Device" is selected in "Counter Based", also select a device that is targeted for summarization. If "By Account Track" is selected in "Job Log Based", also select an account track that is targeted for summarization.
–Select a column to search from the drop-down list, type in the text to be searched for in the text box, and then click the [Display] button to narrow down data to be displayed.
Account Manager |
3-10 |

Account Manager |
3 |
|
–If "By Device" in "Counter Based" was selected
–If "By Account Track" in "Job Log Based" was selected
Account Manager |
3-11 |
Account Manager |
3 |
|
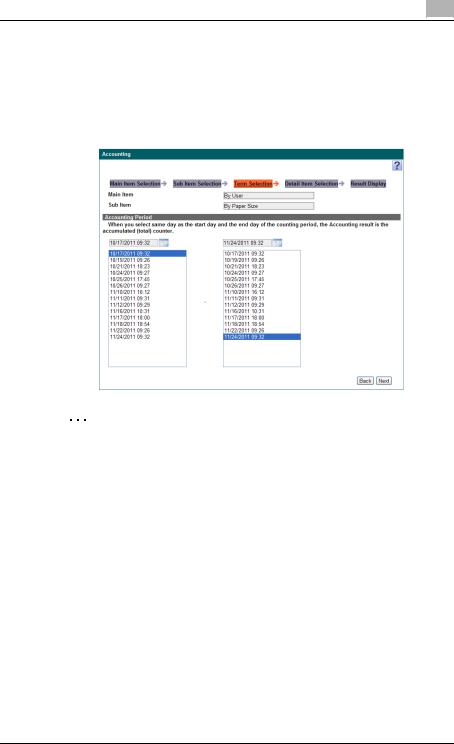
3.2.3Selecting a time period
Select the time period of the data that is to be totaled.
%Select the starting date in the list on the left side and the ending date in the list on the right side, and then click the [Next] button.
–Click  to open the calendar control. Select start and end days by clicking the appropriate days in the calendar.
2
Note
The dates when totaled counters cannot be collected do not appear in the list.
Account Manager |
3-12 |
Account Manager |
3 |
|
Relationship between settings of start and end days and counter collection time
Counter values are collected between the time the counter collection was performed on the start day and the time it was performed on the end day.
Example 1) When the counter collection start time is set to 23:00 in the "Specifying the counter collection" on page 3-146 for the month of June:
%If the start day is set to "5/31" and the end day is set to "6/30", collection is performed between 23:00 May 31 and 23:00 June 30.
Example 2) When the counter collection start time is set to 6:00 in the "Specifying the counter collection" on page 3-146 for the month of June:
%If the start day is set to "6/1" and the end day is set to "7/1", collection is performed between 06:00 June 1 and 06:00 July 1.
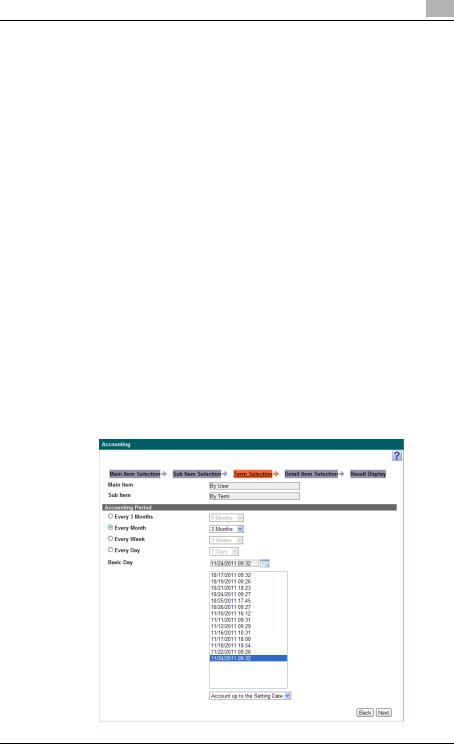
If "By Term" in "Counter Based" was selected
%If "By Term" in "Counter Based" was selected, select the pattern for the accounting period and the basic day.
–Select "Every 3 Months", "Every Month", "Every Week" or "Every Day" as the accounting period, and then select the details for the accounting period.
–Select a date in the "Basic Day" list, and then select whether the data is totaled as "Account up to the Setting Date" or "Account from the Setting Date".
–Click  to open the calendar control. Select a day in the "Basic Day" list by clicking the appropriate day in the calendar.
Account Manager |
3-13 |

Account Manager |
3 |
|
Accounting period and counter collection
If "9 Months" is selected in the "Every 3 months" box for the accounting period, and "01/01/2008" is selected for "Basic Day", the data is totaled over the following time periods.
2008/1/1-4/1
2008/4/1-7/1
2008/7/1-10/1
The count for the difference (increment) is calculated for each time period and shown as the result. If counters were not totaled on 4/1, the counter for the nearest day is used.
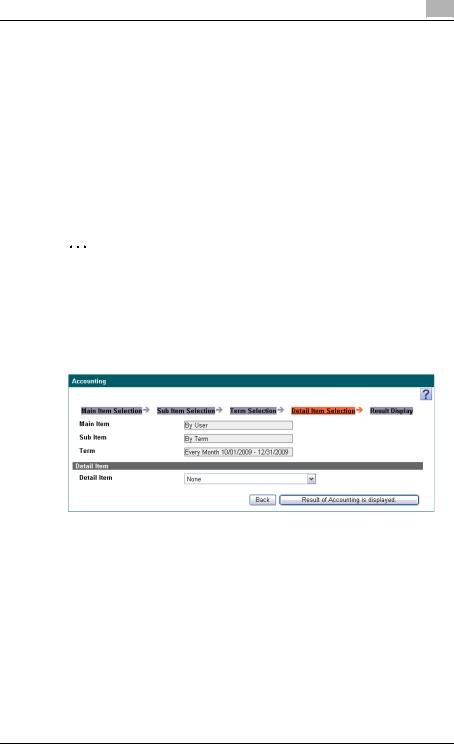
3.2.4Selecting detail items
More detail items can be selected. The following detail items can be selected.
If "Counter Based" is selected for the sub item
Function |
Details |
None |
Select this setting to select no detail items. |
|
|
By Function |
Select this setting to total the data according to the func- |
|
tions that were used. |
|
|
By Paper Size |
Select this setting to total all data and total data by "Large |
|
Size" and "Normal Size". |
|
|
By Color |
Select this setting to total all data, and total data by "Full |
|
Color", "2-Color", "Single Color", or "Black". |
|
|
By Color and Paper Size |
Select this setting to total the data for the counters of colors |
|
and paper used according to the selected sub item. |
|
|
By Function, Color and Paper Size |
Select this setting to total the data for the counters of func- |
|
tions, colors and paper used according to the selected sub |
|
item. |
|
|
By Device, Function, Color and |
Select this setting to total the data for the counters of de- |
Paper Size |
vices, functions, colors and paper used according to the |
|
selected sub item. |
|
2 |
|
Note |
|
When a general user is logged on, this function |
|
does not appear. |
|
|
No. of Originals/No. of Sheets |
Select this setting to total the data for the counters of the |
|
number of originals and sheets according to the selected |
|
sub item. |
|
|
Account Manager |
3-14 |
Account Manager |
3 |
|
If "Job Log Based" is selected for the sub item
|
Function |
Details |
|
None |
Select this setting to select no detail items. |
|
|
|
|
By Function |
Select this setting to total the data according to the func- |
|
|
tions using the job log. |
|
|
|
|
By Paper Size |
Select this setting to total all the job log data and to total |
|
|
data by paper size. |
|
|
|
|
By Color |
Select this setting to total all the job log data, and the total |
|
|
data by "Full Color", "2-Color", "Single Color", or "Black". |
|
|
|
2 |
|
|
Note
Some detail items may not appear, depending on the selected sub item.
1 Select Detail Item, and then click the [Result of Accounting is displayed.] button.
Account Manager |
3-15 |
Loading...