


 Loading...
Color
PageWorks™/Pro L
User’s Guide

As an ENERGY STARâ Partner, we have determined that this machine meets the ENERGY STARâ Guidelines for energy efficiency.
What is an ENERGY STARâ Printer ?
ENERGY STARâ Printers have a feature that allows them to automatically “go to sleep” after a period of inactivity. This auto-feature can reduce a machine’s annual electricity cost by 60 percent.

Foreword
This manual explains the functions and operation of the printer. It also gives some troubleshooting tips as well as general precautions to be observed when operating this printer.
To ensure the best performance and effective use of your printer, please read this manual carefully from cover to cover. After you have read through the manual, keep it near your printer for future reference. It should help in solving any operational questions you may have.
Trademark acknowledgments
Color PageWorks is a trademark of Minolta in the U.S. and Canada. Minolta is a registered trademark of MINOLTA CO., LTD.
Adobe, the Acrobat, AdobePS, and PostScript are trademarks of Adobe Systems Incorporated or its subsidiaries and may be registered in certain juridictions.
Agfa and Agfa Intelifont, Agfa Font Manager are registered trademarks of Agfa Corporation.
TrueType are registered trademarks of Apple Computer Inc.
IBM, PC/ AT and PS/ 2 are registered trademarks of International Business Machines Corporation.
Microsoft, MS-DOS, Excel, Windows 3.1, Windows NT, Windows 95 and Windows 98 are registered trademarks of Microsoft Corporation. Novell, NetWare, and NDS are registered trademarks of Novell Inc.
All other brand or product names are trademarks or registered trademarks of their respective companies or organizations.
Please follow the instructions given in this manual when handling your printer and do not touch any part of the machine which the manual does not cover. NEVER attempt to disassemble or remodel the printer.
i

Foreword
Safety Information
–The printer should be plugged into an electrical outlet that is easily accessible.
–After installing the network card, be sure to replace the cover and secure it with the screws provided.
–When moving the printer, two people are required to lift it carefully as explained in Chapter 1 of the instructions.
LASER SAFETY
This is a page printer which operates by means of a laser. There is no possibility of danger from the laser, provided the printer is operated according to the instructions in this manual. Since radiation emitted by the laser is completely confined within protective housing, the laser beam cannot escape from the machine during any phase of user operation.
INTERNAL LASER RADIATION (For All Users)
Maximum Radiation Power: 1.0 × 10⁻³ (W) Wavelength: 770810 (nm)
This is a class IIIb Laser Diode Assy. that has an invisible laser beam. The printer head unit is NOT A FIELD SERVICE ITEM. Therefore, the printer head unit should not be opened under any circumstances.
ii

Foreword
LASER SAFETY
For Users in the United States
Laser Safety
This printer is certified as a Class 1 Laser product under the U. S. Department of Health and Human Services (DHHS) Radiation Performance Standard according to the Food, Drug and Cosmetic Act of 1990. This means that the printer does not produce hazardous laser radiation.
CDRH Regulations
The Center for Devices and Radiological Health (CDRH) of the U. S. Food and Drug Administration implemented regulations for laser products on August 2, 1976. Compliance is mandatory for products marketed in the United States. The label shown below indicates compliance with the CDRH regulations and must be attached to laser products marketed in the United States.
WARNING
Use of controls, adjustments or performance of procedures other than those specified in this manual may result in hazardous radiation exposure.
For All Other Users
WARNING
Use of controls, adjustments or performance of procedures other than those specified in this manual may result in hazardous radiation exposure.
This is a semiconductor laser. The maximum power of the laser diode is 1.0 × 10⁻³ W and the wavelength is 770810 nm.
iii
Foreword
USER INSTRUCTIONS
For Users in the United States
FCC PART 15RADIO FREQUENCY DEVICES WARNING
The following applies to the Color PageWorks L.
FCC: Declaration of Conformity
Product Type |
Laser Beam Printer |
Product Name |
Color PageWorks L |
Options |
250 Sheet Third Cassette Unit |
|
Network Interface Card (4179-371: Ethernet) |
|
|
This device complies with Part 15 of the FCC Rules.
Operation is subject to the following conditions;
(1)this device may not cause harmful interference, and
(2)this device must accept any interference received, including interference that may cause undesired operation.
Minolta Corporation
101 Williams Drive, Ramsey, New Jersey 07446 Telephone number: 201-825-4000
WARNING
This equipment has been tested and found to comply with the limits for a Class B digital device, pursuant to Part 15 of the FCC Rules. These limits are designed to provide reasonable protection against harmful interference in a residential installation. This equipment generates, uses, and can radiates radio frequency energy and, if not installed and used in accordance with the instructions, may cause harmful interference to radio communications. However, there is no guarantee that interference will not occur in a particular installation. If this equipment does cause harmful interference to radio or television reception, which can be determined by one or more of the following measures:
•Reorient or relocate the receiving antenna.
•Increase the separation between the equipment and the receiver.
•Connect the equipment into an outlet on a circuit different from that to which the receiver is connected.
•Consult the dealer or an experienced radio/TV technician for help.
•Any changes or modifications not expressly to operate this
iv

Foreword
equipment.
NOTE
•This device must be used with shielded interface cables. The use of non-shielded cables is likely to result in Interference with radio communications and is prohibited under FCC rules. Parallel interface cable must be used accessories.
•The design and production of this unit conforms to FCC regulations, and any changes or modifications must be registered with the FCC and are subject to FCC control. Any changes made by the purchaser or user without first contacting the manufacturer will be subject to penalty under FCC regulations.
v

Foreword
USER INSTRUCTIONS
For Users in Canada
INTERFERENCE-CAUSING EQUIPMENT STANDARD (ICES-003 ISSUE 3) WARNING
The following applies to the Color PageWorks L.
This Class B digital apparatus complies with Canadian ICES-003.
Cet appareil numérique de la classe B est conforme à la norme NMB003 du Canada.
For All Users
WARNING
This device must be used with shield interface cables. The use of nonshielded cable is likely to result in interference with radio communications and is prohibited under the EMC regulations of your country. Especially parallel interface cables must be used accessories.
vi
Foreword
OZONE RELEASE
For All Users
During printer operation, a small quantity of ozone is released. This amount is not large enough to harm anyone adversely. However, be sure the room where the printer is being used has adequate ventilation, especially if you are printing a high volume of materials, or if the printer is being used continuously over a long period.
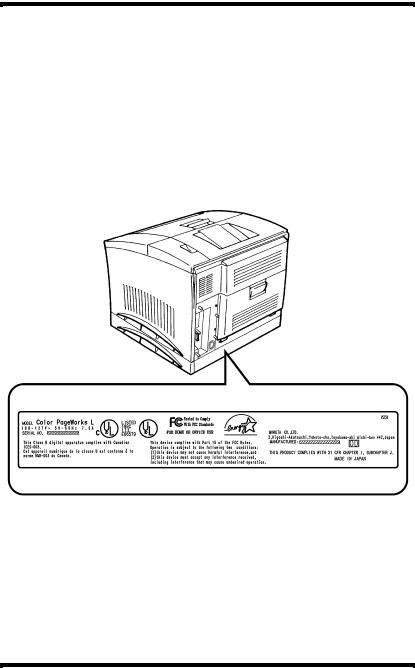
WARNING LABEL
vii

Foreword
Features
1.High quality printing
•Clear text and excellent graphics supported by 3 different resolution settings: 600 × 600 dpi, 1,200 × 600 dpi and 2,400 × 600 dpi.
•Excellent graphics (131 lpi, 128 gray levels)
•Super Fine Micro Toning (Fine-MT) developing system
•8µm small particle toner
•Color matching technology
–Windows 95/ Windows 98 ICM
–Printer embedded color matching
2.Printer Description Language (PDL)
•Windows
•Adobe PostScript Level 2 equivalent (Z Script)
3.High speed printing
•Full color 3ppm, B/W 12ppm
•High performance RISC processor
–Hitachi HD6437034F20/20 MHZ
•High speed data transfer
–IEEE 1284 IEEE1284-C, ECP/EPP compliant interface
–Network option (Ethernet)
viii
Foreword
4.Versatile paper handling
• Transparency, labels, thick paper, envelopes
5.Compact size
•Width 505mm/ 20"
•Depth 530mm/ 20-3/4"
•Height 403mm/ 15-3/4"
6.Network ready with option
•Ethernet
Server: Windows NT, NetWare 3.X/ 4.X (Bindery & NDS)
Client: Windows 95, Windows 98, Windows 3.1, Windows NT Workstation 4.0
7.Easy maintenance and operation
•Easy maintenance with cartridge type supplies
•GUI driver
8.Environmentally friendly
•Ozone free
•Power save mode (Energy Star compliant)
ix
Foreword
Symbols and Terms
This manual uses the following symbols and terms:
ATTENTION
This symbol indicates that a specified course of action is required to avoid causing damage or injury. Please be sure to follow the instructions in this manual exactly, whenever you see this symbol.
This symbol is found at the following locations: “Changing the Oiling Roller”, “Changing the Fusing Unit and Image Transfer Roller Unit”, “Cleaning the Printer” and “Clearing a Paper Misfeed”.
Note
This indicator is used to identify sections that require special attention.
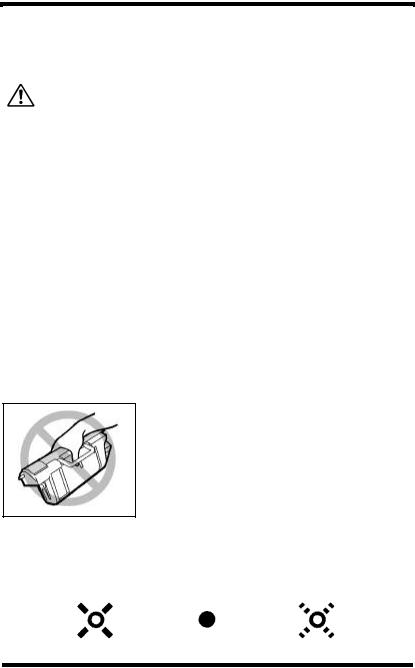
 Action Prohibited
This symbol is used over illustrations throughout this manual to indicate that a specified course of action must not be taken. Do not follow examples that are superimposed with this symbol. example:
 LED Display
The lit, blinking and unlit LED patterns of the Control Panel display the following messages.
|
On |
Off |
Blinking |
|
|
|
|
|
|
x

|
|
Contents |
|
|
CONTENTS |
|
|
|
Chapter 1: Introduction |
|
|
|
Precautions for Use ............................................ |
1-1 |
|
|
Operating Environment.................................... |
1-1 |
|
|
Using the Printer .............................................. |
1-2 |
|
|
Care of Printer Supplies ................................... |
1-4 |
|
|
Moving the Printer ............................................ |
1-5 |
|
|
Chapter 2: Using the Printer |
|
|
|
The Printer, Parts and Supplies ......................... |
2-1 |
|
|
Printer .............................................................. |
2-1 |
|
|
Supplies and Units ........................................... |
2-5 |
|
|
Control Panel ................................................... |
2-9 |
|
|
Indicator Lights .............................................. |
2-10 |
|
|
Action Key...................................................... |
2-10 |
|
|
Operation and Warning Labels ...................... |
2-15 |
|
|
Turning the Printer ON and OFF ...................... |
2-17 |
|
|
Paper .................................................................. |
2-19 |
|
|
Type............................................................... |
2-19 |
|
|
Size ................................................................ |
2-19 |
|
|
Capacity......................................................... |
2-20 |
|
|
Printable Area ................................................ |
2-21 |
|
|
Paper Supplies .............................................. |
2-21 |
|
|
|
|
|
xi

Contents
|
...................................................Loading Paper |
2-23 |
|
|
Loading Plain Paper/ Recycled Paper ........... |
2-23 |
|
|
Loading Transparencies and Labels.............. |
2-31 |
|
|
Loading Special Paper (Letterhead/ |
|
|
|
Envelopes/ Postcards/ Thick Paper).............. |
2-39 |
|
|
Printing............................................................... |
2-43 |
|
Canceling a Print Job Directly at the Printer .. 2-45
|
Chapter 3: Printer Driver and Status Display |
|
|
|
Using the Printer Driver Under Windows 95/ |
|
|
|
Windows 98 ......................................................... |
3-2 |
|
|
Displaying the Printer Driver Window .............. |
3-3 |
|
|
Exiting the Printer Driver .................................. |
3-3 |
|
|
Using the 32-bit SuperDriver Setup Dialog ...... |
3-4 |
|
|
Common Buttons ............................................. |
3-5 |
|
|
Choosing Menu Settings.................................. |
3-5 |
|
|
Driver Settings..................................................... |
3-7 |
|
|
Paper ............................................................... |
3-7 |
|
|
Page Layout................................................... |
3-11 |
|
|
Image............................................................. |
3-17 |
|
|
Device Option ................................................ |
3-21 |
|
|
About ............................................................. |
3-22 |
|
|
Processing ..................................................... |
3-23 |
|
|
|
|
|
xii

Contents
|
Using the Printer Driver Under |
|
|
|
Windows NT 4.0 ................................................. |
3-24 |
|
|
Displaying the Printer Driver Window ............ |
3-25 |
|
|
Exiting the Printer Driver ................................ |
3-25 |
|
|
Common Buttons ........................................... |
3-26 |
|
|
Choosing Menu Settings................................ |
3-26 |
|
Driver Settings................................................... |
3-27 |
Paper ............................................................. |
3-27 |
Page Layout................................................... |
3-31 |
Image............................................................. |
3-37 |
Device Option ................................................ |
3-41 |
About ............................................................. |
3-42 |
|
Using the Printer Status Display ..................... |
3-43 |
|
|
Opening the Printer Status Display................ |
3-43 |
|
|
Using the Printer Status Display .................... |
3-44 |
|
|
Controlling Pop Up Messages ....................... |
3-45 |
|
|
Switching Between the Expanded and |
|
|
|
Reduced Views .............................................. |
3-46 |
|
|
On-line Help ................................................... |
3-46 |
|
|
Displaying Printer Information........................ |
3-47 |
|
|
|
|
|
xiii

Contents
|
Chapter 4: Maintaining Your Printer |
|
|
|
Changing Cartridges........................................... |
4-1 |
|
|
Changing the Toner Cartridge ......................... |
4-1 |
|
|
Changing the Drum Cartridge, Waste Bottle |
|
|
|
and Oiling Roller ............................................ |
4-11 |
|
|
Changing the Fusing Unit and Image Transfer |
|
|
|
Roller Unit ...................................................... |
4-23 |
|
|
Changing the Image Transfer Belt Unit ......... |
4-31 |
|
|
Cleaning the Printer .......................................... |
4-39 |
|
|
Cleaning the Outside ..................................... |
4-39 |
|
|
Cleaning the Inside ........................................ |
4-40 |
|
|
Chapter 5: Troubleshooting |
|
|
|
How to Troubleshoot .......................................... |
5-1 |
|
|
Diagnosing Your Printer ................................... |
5-1 |
|
|
Customer Support ............................................ |
5-2 |
|
|
Problems During Data Transmission |
|
|
|
and the Print Cycle.............................................. |
5-3 |
|
|
Troubleshooting prior to the Transmission |
|
|
|
of Data ............................................................. |
5-3 |
|
|
Troubleshooting the Print Cycle....................... |
5-3 |
|
|
Messages ........................................................ |
5-5 |
|
|
Clearing a Paper Misfeed ................................. |
5-21 |
|
|
Improving Print Quality .................................... |
5-30 |
|
|
|
|
|
xiv

Contents
|
Chapter 6: Specifications |
|
|
|
Specifications of Printer ..................................... |
6-1 |
|
|
Specifications of 250-sheet Third Cassette |
|
|
|
Unit ....................................................................... |
6-7 |
|
Appendix A: Glossary
Appendix B: Quick Reference
Appendix C: Index
xv

MEMO

Introduction Chapter 1
Chapter 1
Introduction
Introduction Chapter 1
Precautions for Use
Precautions for Use
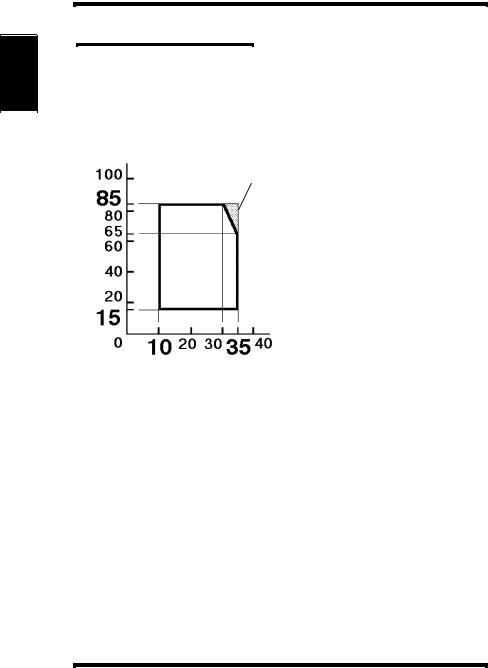
Operating Environment
The operating environmental requirements of the printer are as follows.
Humidity (%) |
• Temperature: 10°C (50°F) to |
X |
35°C (86°F) with a fluctuation |
of 10°C (18°F) per hour. |
|
|
• Humidity: 15% to 85% RH |
|
with a fluctuation of 20% per |
|
hour. |
* The environmental zone marked “X” on the left represents a critical environment in which the printer can be left to stand. However, the manufacturer does not ensure optimal paper
Temperature (°C) passage performance and image production in this zone. Be sure
to operate the printer within the operating environment identified within the bold line.
1-1
Precautions for Use
Using the Printer
To ensure the optimum performance of the printer, follow the precautions listed below.
•NEVER open any printer door, or turn OFF the printer during operation.
•NEVER bring any magnetized object or flammable gas or liquid near the printer.
•NEVER pull on the power cord and ALWAYS hold the plug when unplugging it. A damaged cord could result in a fire or cause an electrical shock.
•NEVER attempt to unplug the power cord with a wet hand, as it could cause an electrical shock.
•ALWAYS unplug the power cord whenever attempting to move the printer. Moving the printer with the power cord plugged in can damage the cord, resulting in a fire or causing an electrical shock.
•ALWAYS unplug the power cord when the printer is not to be used for an extended period of time.
•NEVER remove any panel or cover unless the procedure is described in the user’s manual. The printer contains a high-volt- age component which can cause an electrical shock.
•NEVER alter the engineering or mechanics of the printer, as a fire or electrical shock could result.
•NEVER place a heavy object on the power cord nor pull or bend it, as a fire or electrical shock could result.
•NEVER rest the printer upon the power cord or communications cables of other electrical equipment and do not allow such cords or cables to become lodged into the printer’s own mechanisms; equipment damage or fire could result.
•NEVER drop paper clips, staples, or other small pieces of metal through the vents or other openings of the printer, as a fire or electrical shock could result.
Introduction Chapter 1
1-2

Introduction Chapter 1
Precautions for Use
•NEVER place a vase or vessel containing water or other fluids on or near the printer as this can cause a fire or electrical shock. Should fluid or any foreign object get inside the printer, immediately turn it OFF, unplug the power cord, and call your technical representative. A fire or electrical shock could result if the printer is allowed to run without taking necessary action.
•NEVER leave the printer running should it become unusually hot, emit smoke, an unusual smell or noise. Should any of these occur, immediately turn OFF the printer, unplug it, and call your technical representative. A fire or electrical shock could result if the printer is allowed to run without taking necessary action.
Note
= Locate the printer in a Well Ventilated Room =
A negligible amount of ozone is generated during normal operation of this printer. An unpleasant odor may, however, be created in poorly ventilated rooms during extensive printer operations. For a comfortable, healthy, and safe operating environment, it is recommended that the room be well ventilated.
Remarque
= Placer l’imprimante dans une pièce largement ventilée =
Une quantité d’ozone négligable est dégagée pendant le fonctionnement de l’imprimante quand celle-ci est utilisée normalement. Cependant, une odeur d ésagréable pent être ressentie dans les pièces dont l’aération est insuffisante et lorsqu’une utilisation prolongée de l’imprimante est effectuée. Pour avoir la certitude de travailler dans des conditions de confort, santé et sécurit é, il est préférable de bien aérer la pièce où se trouve l’imprimante.
1-3

Precautions for Use
Care of Printer Supplies
Use the following precautions when handling the printer supplies (toner cartridge, drum cartridge, and paper).
• Avoid storing the supplies in any of the following places:
3A place subject to direct sunlight (the drum cartridge should not be exposed to fluorescent light, either).
3A hot place or near an open flame
3A humid place
3A dusty place
•Surplus paper, which has been removed from its protective packaging but not yet loaded into the printer tray, should be sealed in a plastic bag and stored in a cool, dark place.
•Use only the toner cartridge and toner specifically designed for use with this printer.
•Keep supplies out of the reach of children.
•If your hands should come into direct contact with the toner, wash them with soap and water immediately.
Note
•When removing the drum cartridge from the printer, immediately wrap it in a thick cloth to protect it from light.
Introduction Chapter 1
1-4
Introduction Chapter 1
Precautions for Use
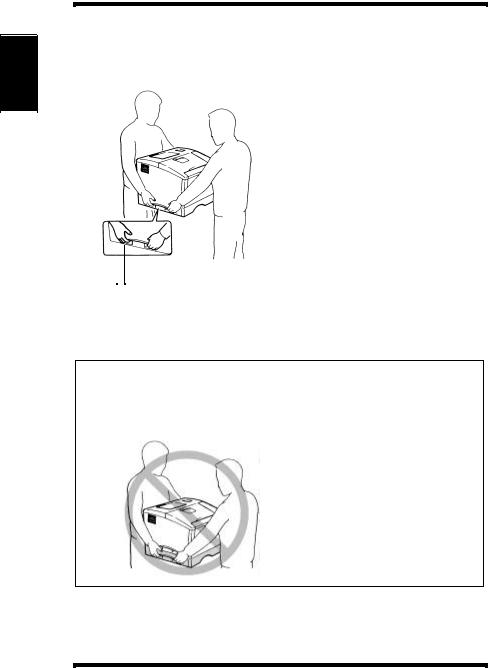
Moving the Printer
Observe the following precautions when moving the printer.
• Since the printer weighs approximately 35kg (77-1/4 lbs.), two people are required to lift it carefully.
• If you need to transport the printer over a long distance, consult your technical representative.
Grips 
Note: Moving the printer with a third cassette unit (option)
•The third cassette unit is attached to the printer through the coupling pins only. Moving the printer with the third cassette unit attached is not advised, as there is a strong possibility that the two pieces may separate and become damaged.
Be certain to move the printer and the third cassette unit separately.
1-5

Chapter 2
Using the Printer
Using the Printer Chapter 2
Using the Printer Chapter 2
The Printer, Parts and Supplies
The Printer, Parts and Supplies
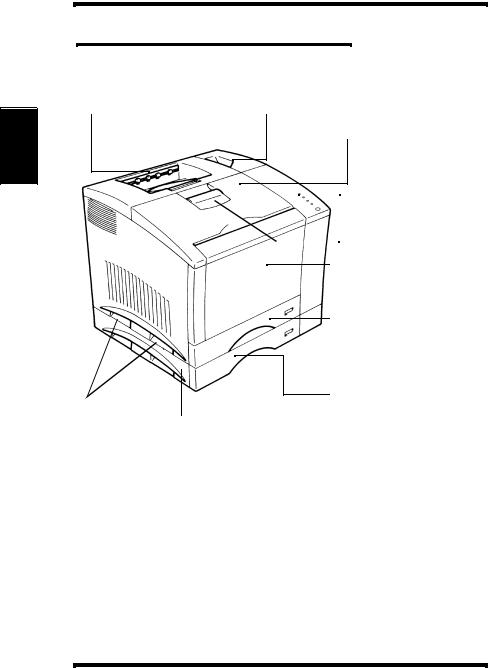
Printer
1. Output tray |
2. Power switch |
3. Front cover
 4. Control panel
 5. Front cover lock release lever
 6. Tray 1: multipurpose tray
 7. Tray 2: 250 sheet second cassette
10. Grips
8. Tray 3: 250 sheet
third cassette 9. 250 sheet third (optional)
cassette unit (optional)
1.Output tray
The printed paper is output, face down onto this tray. The tray can hold up to 250 sheets of paper. + p. 2-43
2.Power switch
Use to turn the printer ON and OFF. + p. 2-17
2-1

The Printer, Parts and Supplies
3.Front cover
Open the cover by pulling the lever up and swinging the door down to replenish supplies such as the toner cartridge, or to clear a paper misfeed.
4.Control panel
• The LED’s shows the current status of the printer. For more details, see “Control Panel” + p. 2-9
5.Front cover lock release lever
Pull down to unlock the front cover.
6.Tray 1: multipurpose tray
•Swing open toward you to load paper.
• Holds up to 150 sheets of paper. + p. 2-19
7.Tray 2: 250 sheet second cassette
Holds up to 250 sheets of paper. + p. 2-19
8.Tray 3: 250 sheet third cassette (optional)
Holds up to 250 sheets of paper. + p. 2-19
9.250 sheet third cassette unit (optional)
Houses a third cassette, increasing paper capacity to 650 sheets when installed under the printer.
10.Grips
•Two grips are provided on each side of the printer (four in all). Use to carry the printer during installation or relocation.
• The printer requires two people to be lifted safety. + p. 1-5
Using the Printer Chapter 2
2-2

Using the Printer Chapter 2
The Printer, Parts and Supplies
11. Network card panel
12. Rear cover lock  release lever
13. Rear cover
15. Interface connector
14. Power cord socket
2-3

The Printer, Parts and Supplies
11.Network card panel
Use to mount the optional network card.
12.Rear cover lock release lever
Pull down to swing open the rear cover.
13. |
Rear cover |
|
2 |
||
|
|
Chapter |
|||
|
|
misfeed. |
|
|
|
|
|
Swing open to change the oiling roller assembly or clear a paper |
|
|
|
14. |
Power cord socket |
|
|
|
|
|
|
Printer |
|||
|
|
Connect the power cord of the printer to this socket. |
|
|
|
|
|
|
|
|
|
15. |
Interface connector |
|
|
the |
|
|
|
Provides connection between the printer and host computer. |
|
|
|
|
|
|
|
Using |
|
|
|
|
|
|
|
|
|
|
|
|
|
2-4

The Printer, Parts and Supplies
Supplies and Units
|
|
1. Waste bottle |
|
2. Toner cartridge |
|
|
|
||
|
|
|||
|
|
|
|
|
Chapter 2 |
|
|
|
|
|
|
|
|
3. Image transfer belt unit |
Using the Printer |
|
|
||
|
|
|
||
|
|
|
|
|
|
|
|
|
|
 4. Drum cartridge
 5. Image transfer roller unit
2-5
Loading...