


QMS® CrownNet®
Setup Guide
1800329-001H

Trademarks
The following are trademarks or registered trademarks of their respective owners. Other product names mentioned in this manual may also be trademarks or registered trademarks of their respective owners. Registered trademarks are registered in the United States Patent and Trademark Office; some trademarks may also be registered in other countries. QMS, Crown, CrownNet, the QMS logo, and the Crown seal are registered trademarks of QMS, Inc. Adobe, Acrobat, and Illustrator/Adobe Systems Incorporated. PostScript is a trademark of Adobe Systems Incorporated for a page description language and may be registered in certain jurisdictions. Apple, AppleTalk, EtherTalk, LaserWriter, LocalTalk, Macintosh, TrueType/Apple Computer, Inc. DEC, DECnet, VMS/Digital Equipment Corporation. FrameMaker/Frame Technology Corporation. Hewlett-Packard, HP, PCL, HP-GL, HP-UX, LaserJet/Hewlett-Packard Co. AIX, IBM PC, Token-Ring/International Business Machines Corporation. Helvetica/ Linotype-Hell AG and/or its subsidiaries. Internet Explorer, Microsoft, MS-DOS/ Microsoft Corporation. Netscape/Netscape, Inc. Novell, Novell YES, and NetWare/ Novell, Inc. Transverter Pro/TechPool, Inc. UNIX/UNIX Systems Laboratories. Ethernet, Xerox/Xerox Corporation. ITC Zapf Dingbats/International Typeface Corporation. Solaris, SunOS/Sun.
Proprietary Statement
The software included with your CrownNet interface is Copyrighted © 1998 by QMS, Inc. All Rights Reserved. This software may not be reproduced, modified, displayed, transferred, or copied in any form or in any manner or on any media, in whole or in part, without the express written permission of QMS, Inc.
Copyright Notice
This manual is Copyrighted © 1998 by QMS, Inc., One Magnum Pass, Mobile, AL 36618. All Rights Reserved. This manual may not be copied in whole or in part, nor transferred to any other media or language, without the express written permission of QMS, Inc.

Contents
Introduction ..................................................................................... |
5 |
Typographic Conventions 5 |
|
What's Included in CrownNet ........................................................ |
6 |
Alternate Media 6 |
|
Manuals on the CD-ROM 7 |
|
QMS Product Registration ............................................................. |
8 |
Setting up the CrownNet Interface—Overview ............................. |
9 |
Network Connection ..................................................................... |
12 |
Ethernet Network Connection 12 |
|
Token-Ring Network Connection 15 |
|
Software Installation ..................................................................... |
17 |
Installing CrownAdmin 3 for AIX 17 |
|
Installing CrownAdmin for DOS 18 |
|
Installing CrownAdmin 3 for HP-UX 19 |
|

Installing CrownAdmin 3 for Macintosh 20 Installing CrownNet Manager for OS/2 21 Installing CrownAdmin 3 for OS/2 22 Installing CrownAdmin 3 for Solaris 23 Installing CrownAdmin 3 for SunOS 24
Installing CrownAdmin 3 for Windows/Windows 95/Windows NT/Windows for Workgroups 26
Installing the CrownNet Print Utility for Windows 27 Installing the UNIX Host Software 30
Interface Configuration ................................................................. |
32 |
EtherTalk Interface Configuration 33
OS/2 LAN Manager/LAN Server and Microsoft Windows
Network Interface Configuration 33
NetWare Interface Configuration (Netware 3.x) 33
NetWare Interface Configuration (Netware 4.x) 36
TCP/IP Interface Configuration 37
Network Configuration .................................................................. |
39 |
CrownNet Print Utility for Windows Configuration 39 EtherTalk NetWork Configuration 46
NetWare 3.x Network Configuration (Using CrownAdmin 3) 46 NetWare 3.x Network Configuration (Using PCONSOLE) 49 NetWare 4.x Network Configuration (Using PCONSOLE) 51 NetWare 4.x Network Configuration (Using NWAdmin) 52 OS/2 LAN Manager/LAN Server Network Configuration 54 TCP/IP NetWork Configuration 57
Printer Web Page ........................................................................... |
59 |
Accessing the Web Page 60
Printer Home Page 64
Operator Control Page 64
General Settings Page 64
Printer Jobs Page 65
Consumable Status Page 66
Accounting Page 66
System Support Page 66
QMS, Inc. Page 67
Online Help Page 67
CrownNet Menus ........................................................................... |
68 |
Overall View of the CrownNet Menu 68
Common Menu 69
EtherTalk Menu 70
Lan Manager Menu 71
ii |
QMS CrownNet Setup Guide |

NetWare Menu 72 |
|
TCP/IP Menu 73 |
|
Where To Go From Here ............................................................... |
74 |
If You Have Trouble... ................................................................... 75 |
|
Sources of Support ....................................................................... |
75 |
Your QMS Vendor 75 |
|
Your Application Vendor 75 |
|
Q-FAX 76 |
|
CompuServe 76 |
|
Internet 76 |
|
QMS Customer Response Center (CRC) 77 |
|
QMS World-wide Offices .............................................................. |
78 |
v
Contents |
iii |

Introduction
Introduction
Your QMS CrownNet network interface includes the hardware, utilities software, and built-in network protocol software to enable you to connect your QMS printer to your network.
This document guides you through setting up the QMS CrownNet network interface. The QMS CrownNet System Administrator’s Guide discusses the CrownNet interface configuration options and explains how to use the CrownNet software (CrownAdmin, CrownAdmin 3, CrownNet Manager, and CrownNet Print Utility for Windows).
Typographic Conventions
The following typographic conventions are used throughout this document:
Courier |
Text you type; type it exactly as it appears |
|
|
Italic Courier |
Variable text you type; replace the italicized word(s) |
|
with information specific to your printer or computer |
|
|
lowercase italic |
Variable information in the text |
|
|
|
Press the Enter key (PC or workstation) or Return key |
|
(Macintosh) |
|
|
»Note: Notes contain tips, extra information, or important information that deserves emphasis or reiteration.
▲Caution: Cautions present information that you need to know to avoid equipment damage, process failure, or extreme annoyance.
QMS CrownNet Setup Guide |
5 |

What's
Included in
CrownNet
What's Included in CrownNet
In addition to this manual, CrownNet consists of the items listed below. If your printer came standard with an Ethernet network interface, these items accompanied your printer. If you ordered an Ethernet or Token-Ring network interface card (NIC) separately, these items accompanied the NIC.
nQMS Software Utilities CD-ROM
Includes this network interface software: n CrownAdmin for DOS
n CrownAdmin 3 and on-line help for AIX, HP-UX, Macintosh, OS/2, Solaris, SunOS, and Windows/Windows 95/Windows NT/Windows for Workgroups
n CrownNet Manager for OS/2
n QMS Network Print Monitor for Windows NT n QMS Network Print Monitor for Windows 95 n CrownNet Print Utility for Windows
n QMS UNIX Host Software
Includes this PDF documentation: n QMS CrownNet Setup Guide
n QMS CrownNet System Administrator’s Guide
n QMS Network Print Monitor Administrator’s Guide
n QMS Network Print Monitor for Windows 95 Administrator’s Guide
n QMS Crown Remote Console User’s Guide
Alternate Media
QMS provides these software utilities and manuals on other media as well as on CD-ROM. Contact your QMS vendor for media availability and purchase information. You can also download them via our World
6 |
QMS CrownNet Setup Guide |

What's
Included in
CrownNet
Wide Web Server at http://www.qms.com, our FTP server at ftp.qms.com, or CompuServe at go qmsprint
Manuals on the CD-ROM
Your CrownNet Systems Administrator Guide, CrownNet Setup Guide, Network Print Monitor Administrator’s Guide, and Network Print Monitor for Windows 95 Administrator’s Guide are included on the CD-ROM in Adobe Acrobat PDF format. The Acrobat Reader program is also on the CD-ROM. The CD-ROM insert provides installation instructions.
When you use Acrobat to view your manuals, keep the following tips in mind for using some of the navigation features built into Acrobat and your manuals.
nYou may view the document in three different styles: page only, with bookmarks, or with thumbnails. Try each to see which you like best. Viewing with bookmarks will enable you to use a quick table of contents to move around the document.
nThe toolbar also gives you quick access to page navigation features. For example, you may click a button to advance (>) or reverse (<) one page, go to the start (|<) or end (>|) of the document, or use the history button (<<) to go to the previous pages you viewed. There are other buttons in the toolbar to change view or magnification of the document.
nAs you browse through the document the open hand tool will sometimes turn into a pointing hand. You have discovered an embedded link in the manual. You will find these links in the table of contents, index, www addresses, and cross references. Click on the link to jump to a new location.
nUse the Acrobat Reader online help for a more complete explanation of these features.
Using the Acrobat Reader with your Manuals
Your manuals are stored in PDF format on the QMS Software Utilities CD-ROM. Use the Adobe Acrobat Reader, also included on the CDROM, to open them. PDF-formatted manuals give you more flexibility
QMS CrownNet Setup Guide |
7 |

QMS Product
Registration
and convenience than do hardcopy manuals when you have to access needed information. Here’s a list of some of the advantages of PDF formatted manuals:
nAbility to store the PDF manuals in a central location for access by anyone on the network
nAbility to view and print the manuals on any of the supported platforms (Windows, Macintosh, UNIX)
nAbility to view the manuals on-screen in different formats (side- by-side or two-up, one page at a time, scrolling two-up, article flow, and zooming capability up to 800%)
nAbility to conduct full text search built into Acrobat Reader 3.0
nAbility to print only the pages that you need
nAbility to view the manuals on web browsers using the Acrobat plug-in
In addition, your PDF-formatted manuals have been enhanced for onscreen viewing and navigation. Throughout each manual are numerous hotlinks to cross-reference points. The table of contents and the index are fully hotlinked to their respective page references.
We hope you enjoy using the Acrobat software to access the information in your QMS CrownNet user manuals. Your PDF-formatted manuals will never become dog-eared and yellowed or collect dust on some forgotten shelf. Your manuals will empower you to take full advantage of all the capabilities of your CrownNet interface
QMS Product Registration
To register over the World Wide Web, visit the QMS web page at http://www.qms.com/support/prodreg. To register by mail, fill out and send in your warranty card. To register by telephone, in the US call QMS toll-free at (334) 633-4300. In other countries, refer to “QMS World-wide Offices” on page 78 for the appropriate telephone number.
8 |
QMS CrownNet Setup Guide |
Setting up the
CrownNet
Interface—
Overview
Setting up the CrownNet Interface— Overview
1If necessary, install the CrownNet interface card.
This might not be necessary because some printers ship standard with an Ethernet network interface. Check the printer documentation if you’re not sure.
For instructions on installing a CrownNet interface card, refer to the “Printer Options” chapter or the Options manual of your printer documentation.
2Connect the printer to the network.
If you use... |
Follow these instructions... |
|
|
Ethernet |
“Ethernet Network Connection” on page 12. |
|
|
Token-Ring |
“Token-Ring Network Connection” on page 15. |
|
|
3 Install the appropriate CrownNet software.
If you use this |
Install this software |
Following these |
operating |
(on the CD-ROM)... |
instructions*... |
system... |
|
|
|
|
|
AIX |
CrownAdmin 3 |
“Installing CrownAdmin 3 for |
|
|
AIX” on page 17 |
|
|
|
|
UNIX Host Software |
“Installing the UNIX Host |
|
|
Software” on page 30 |
|
|
|
DOS |
CrownAdmin |
“Installing CrownAdmin for |
|
|
DOS” on page 18 |
|
|
|
HP-UX |
CrownAdmin 3 |
“Installing CrownAdmin 3 for |
|
|
HP-UX” on page 19 |
|
|
|
|
UNIX Host Software |
“Installing the UNIX Host |
|
|
Software” on page 30 |
|
|
|
Macintosh |
CrownAdmin 3 |
“Installing CrownAdmin 3 for |
|
|
Macintosh” on page 20 |
|
|
|
QMS CrownNet Setup Guide |
9 |

Setting up the
CrownNet
Interface—
Overview
If you use this |
Install this software |
Following these |
operating |
(on the CD-ROM)... |
instructions*... |
system... |
|
|
|
|
|
OS/2 |
CrownNet Manager |
“Installing CrownNet |
|
|
Manager for OS/2” on |
|
|
page 21 |
|
|
|
|
CrownAdmin 3 |
“Installing CrownAdmin 3 for |
|
|
OS/2” on page 22 |
|
|
|
Sun/SPARC |
CrownAdmin 3 |
“Installing CrownAdmin 3 for |
Solaris 2.4 |
|
Solaris” on page 23 |
|
|
|
|
UNIX Host Software |
“Installing the UNIX Host |
|
|
Software” on page 30 |
|
|
|
Sun/SPARC |
CrownAdmin 3 |
“Installing CrownAdmin 3 for |
SunOS 4.1.x |
|
SunOS” on page 24 |
|
|
|
|
UNIX Host Software |
“Installing the UNIX Host |
|
|
Software” on page 30 |
|
|
|
Windows |
Windows 32s (if you’re |
“Installing CrownAdmin 3 for |
3.1,Windows 95, |
using Windows or Win- |
Windows” on page 26 |
Windows for |
dows for Workgroups |
|
Workgroups |
and don’t have Win 32s |
|
3.11, Windows |
installed) |
|
NT 3.5, or |
|
|
CrownAdmin 3 |
|
|
Windows 4.0 |
|
|
|
|
|
|
CrownNet Print Utility |
“Installing the CrownNet |
|
for Windows |
Print Utility for Windows” on |
|
|
page 27 |
|
|
|
|
Network Print Monitor |
“QMS Network Print Monitor |
|
for Windows 95 |
for Windows 95 System |
|
|
Administrator’s Guide” |
|
|
|
|
Network Print Monitor |
“QMS Network Print Monitor |
|
for NT |
for Windows NT System |
|
|
Administrator's Guide” |
|
|
|
*These instructions are also included in readme files in the appropriate directories on the CD-ROM.
10 |
QMS CrownNet Setup Guide |

|
|
Setting up the |
|
|
CrownNet |
|
|
Interface— |
|
|
Overview |
4 Configure the CrownNet interface. |
||
|
|
|
|
If you use... |
Follow these instructions... |
|
|
|
|
EtherTalk |
“EtherTalk Interface Configuration” on page 33. |
|
|
|
|
Microsoft |
“CrownNet Print Utility for Windows Configuration” |
|
Windows |
on page 39. |
|
Network |
|
|
|
|
|
NetWare |
“NetWare Interface Configuration (Netware 3.x)” on |
|
|
page 34 or “NetWare Interface Configuration |
|
|
(Netware 4.x)” on page 37 |
|
|
|
|
OS/2 LAN |
“OS/2 LAN Manager/LAN Server and Microsoft |
|
Manager/LAN |
Windows Network Interface Configuration” on |
|
Server |
page 33. |
|
|
|
|
TCP/IP |
“TCP/IP Interface Configuration” on page 38. |
|
|
|
5 Configure the network. |
||
|
|
|
|
If you use... |
Follow these instructions... |
|
|
|
|
EtherTalk |
“CrownNet Print Utility for Windows Configuration” |
|
|
on page 39. |
|
|
|
|
Microsoft |
“CrownNet Print Utility for Windows Configuration” |
|
Network Interface |
on page 39 |
|
|
|
|
NetWare |
“NetWare 3.x Network Configuration (Using |
|
|
CrownAdmin 3)” on page 46 or “NetWare 3.x |
|
|
Network Configuration (Using PCONSOLE)” on |
|
|
page 49. |
|
|
“NetWare 4.x Network Configuration (Using |
|
|
PCONSOLE)” on page 50 or “NetWare 4.x Network |
|
|
Configuration (Using NWAdmin)” on page 52 |
|
|
|
|
OS/2 LAN |
“OS/2 LAN Manager/LAN Server Network |
|
Manager/LAN |
Configuration” on page 54 |
|
Server |
|
|
|
|
|
TCP/IP |
“TCP/IP NetWork Configuration” on page 57. |
|
|
|
QMS CrownNet Setup Guide |
11 |
Network
Connection
Network Connection
The method you use to connect your printer to the network depends on whether you’re connecting to an Ethernet network (described below) or a Token-Ring network (described on page 15).
Ethernet Network Connection
nFor thin-wire Ethernet (10Base2, BNC connector) see the next section.
nFor thick-wire Ethernet (10Base5, AUI connector)—not available for some printers—see page 13.
nFor twisted-pair Ethernet (10BaseT/100BaseTX, RJ45 connector) see page 14.
Thin-Wire Ethernet Connection
Thin-wire Ethernet connections use BNC connectors.
|
|
|
|
|
|
|
|
|
|
|
|
|
|
|
|
|
|
|
|
|
|
|
|
|
|
|
|
|
|
|
|
|
|
|
|
|
|
|
|
|
|
|
|
|
|
|
|
|
|
|
|
|
|
|
|
|
|
|
|
|
|
|
|
|
|
|
|
|
|
|
|
|
|
|
|
|
|
|
|
|
|
|
|
|
|
|
|
|
|
|
|
|
|
|
|
|
|
|
|
|
|
|
|
|
|
|
|
|
|
|
|
BNC 50 Ohm |
BNC “T” |
||||||||||||
Terminator |
Connector |
||||||||||||
▲Caution: Unless the BNC “T” connector is already installed on the thin-wire Ethernet cable, your network’s operation is disrupted during the connection process.
1 Turn off the printer, and unplug the power cord.
2 If the BNC “T” connector is already installed, go to step 3. Otherwise, attach one section of thin-wire Ethernet cable to one end of the BNC “T” connector.
12 |
QMS CrownNet Setup Guide |

Network
Connection
3Attach another section of thin-wire Ethernet cable or a
50 ohm terminator to the other end of the BNC “T” connector.
4Attach the BNC “T” connector to the BNC port on the CrownNet interface.
5Plug in the printer, and turn it on.
6Go to “Software Installation” on page 17.
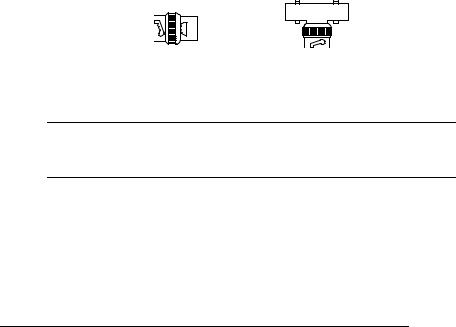
Thick-Wire Ethernet Connection
Thick-wire Ethernet connections use AUI connectors.
Transceiver with an integrated AUI connector
Transceiver with a separate AUI connector
1Turn off the printer, and unplug the power cord.
2Plug the transceiver through the retainer into the AUI port on the CrownNet interface.
n If you’re using a transceiver with an integrated AUI cable, tighten the retainer screws.
n If you’re using a transceiver without an AUI cable, attach the AUI connector to the transceiver.
3Plug in the printer, and turn it on.
4Go to “Software Installation” on page 17.
QMS CrownNet Setup Guide |
13 |

Network
Connection
Twisted-Pair Ethernet Connection
Twisted-pair Ethernet connections use RJ45 connectors.
10BaseT/100BaseTX concentrator
RJ45 Port
RJ45
Connector
1Turn off the printer, and unplug the power cord.
2Connect one end of the twisted-pair Ethernet cable to the RJ45 port on the CrownNet interface.
3Connect the other end of the cable to the 10BaseT/ 100BaseTX concentrator.
4Plug in the printer, and turn it on.
5Go to “Software Installation” on page 17.
14 |
QMS CrownNet Setup Guide |

Network
Connection
Token-Ring Network Connection
Token-Ring connections support both Type 1 (shielded twisted-pair— IBM Token-Ring Network Adapter cable or the equivalent) or Type 3 (unshielded twisted-pair) cables.
▲Caution: While Type 3 unshielded twisted-pair Token-Ring cables can be used on Ethernet networks, unshielded twisted-pair Ethernet cables may not be compatible with Token-Ring networks. Check the Electronic Industries Association (EIA) TIA 568B specification for more information.
Type 1 |
Type 3 |
To Printer |
To Network |
▲Caution: Before continuing with this procedure, make sure you know the network’s ring speed. If the printer is set to the wrong network ring speed, network operation will be disrupted.
1 Turn off the printer, and unplug the power cord.
2 Connect the network adapter cable to the appropriate TokenRing port on the CrownNet interface.
3Plug in the printer.
4Configure, if necessary, the interface. For 16 Megabit Networks (default setting)
a Connect the printer to the network with the network adapter cable.
b Turn on the printer.
For 4 Megabit Networks a Turn on the printer.
QMS CrownNet Setup Guide |
15 |

Network
Connection
bOnce the printer is on line and the message window reads IDLE, press the Online/Offline key to take it off line.
cAccess the Administration/Communications/xxxxxxxx NIC/ CrownNet/Common/Ring Speed menu (where xxxxxxxx is either Resident or Optional).
»Note: For complete information on using the control panel, see your printer documentation.
dSelect 4 Mbits/Sec as the network speed.
▲Caution: Leave the printer disconnected from the network if you are changing the ring speed.
eUse the Administration/Communications/xxxxxxxx NIC/ CrownNet/Common/Soft Reset menu to reset the CrownNet interface (where xxxxxxxx is either Resident or Optional).
fConnect the printer to the network with the network adapter cable.
5The default source routing type (Auto—Send the file as the most appropriate frame type) is fine for most Token-Ring networks.
However, if your network uses a different type of source routing, identify that now in the Administration/Communications/ xxxxxxxx NIC/CrownNet/Common/Source Routing menu (where xxxxxxxx is either Resident or Optional). Other choices are
nAll—Send as an all-routes-explorer frame, also known as an all-routes-broadcast frame.
nOff—Send without source routing information.
nSingle—Send as a spanning-tree-explorer frame, also known as a single-route-broadcast frame.
6 Go to “Software Installation” on page 17.
16 |
QMS CrownNet Setup Guide |

Software
Installation
Software Installation*
Installing CrownAdmin 3 for AIX
CrownAdmin 3 for AIX is a software utility that allows you to monitor and configure QMS printers and perform network operations on printers connected to your network..
1Insert the CD-ROM in the CD-ROM drive.
»Note: Some CD-ROM drives require that the disk be placed in a caddy before being inserted in the drive. Check your CD-ROM documentation for information.
2Logon the UNIX system as root.
3Go to the root directory by typing
cd /
4If you don't already have a CD-ROM mountpoint, create a root-level directory by typing
mkdir /cdrom
5 Mount the CD-ROM file system by typing
mount -o ro -v cdrfs device_filename /cdrom
where device_filename is the complete pathname of the device file associated with the CD-ROM drive. If you’re not sure of the pathname, check your AIX documentation.
6Verify that the CD-ROM file system has been mounted by listing the contents of the directory:
ls /cdrom
The directory contains several subdirectories, including unix.
*These instructions are also provided in readme files in the appropriate directories on the CD-ROM.
QMS CrownNet Setup Guide |
17 |

Software
Installation
7Change to the location where you want the CrownAdmin 3 directory to be created.
»Note: The directory in which the crnadm file resides must be able to be mounted by all network nodes that need to access the printer.
8Extract the files from the CD-ROM:
For example:
tar xvf /cdrom/plaform/unix/crnadm/aix/ aix.tar
This creates a crnadm directory containing CrownAdmin 3.
»Note: See the main readme file on the CD-ROM for the exact location of this file.
9 Unmount the CD-ROM file system:
umount device_filename
For device_filename, substitute the complete pathname of the device file associated with the CD-ROM drive.
10Add the name of the directory containing crnadm (the directory in which you extracted the aix.tar file) to your path.
11Install the UNIX Host Software, following the instructions in “Installing the UNIX Host Software” on page 30.
Installing CrownAdmin for DOS
CrownAdmin for DOS is a software utility that allows you to monitor and configure QMS printers and perform network operations on printers connected to your network..
1Insert the CD-ROM in the CD-ROM drive.
2At the DOS C> prompt, type the full path of the install program.
For example
x:\platform\dos\crnadm\install source destination
18 |
QMS CrownNet Setup Guide |
Software
Installation
where x is the letter of the CD-ROM drive, source is the pathname of the drive/directory containing the installation software, and destination is the full pathname of the directory in which the software will be installed.
»Note: See the main readme file on the CD-ROM for the exact location of this file.
3 Go to “Interface Configuration” on page 32.
Installing CrownAdmin 3 for HP-UX
CrownAdmin 3 for HP-UX is a software utility that allows you to monitor and configure QMS printers and perform network operations on printers connected to your network..
1Insert the CD-ROM in the CD-ROM drive.
»Note: Some CD-ROM drives require that the disk be placed in a caddy before being inserted in the drive. Check your CD-ROM documentation for information.
2Log on the UNIX system as root.
3Go to the root directory by typing
cd /
4If you don't already have a CD-ROM mountpoint, create a root-level directory by typing
mkdir /cdrom
5 Mount the CD-ROM file system by typing
mount -t cdfs device_filename /cdrom
where device_filename is the complete pathname of the device file associated with the CD-ROM drive. If you're not sure of this pathname, check your HP-UX documentation.
6Verify that the CD-ROM file system has been mounted by listing the contents of the directory:
The directory contains several subdirectories, including unix.
QMS CrownNet Setup Guide |
19 |

Software
Installation
7Change to the location in which you want the CrownAdmin 3 directory to be created.
»Note: The directory in which crnadm.exe resides must be able to be mounted by all network nodes that need to access the printer.
8Extract the appropriate files from the CD-ROM.
nFor example, if you're running HP-UX version 9.x, type
tar xvf /cdrom/platform/unix/crnadm/hp_ux/ hp9.tar
nFor example, if you're running HP-UX version 10.x, type
tar xvf /cdrom/platform/unix/crnadm/hp_ux/ hp10.tar
This creates a crnadm directory containing CrownAdmin 3.
»Note: See the main readme file on the CD-ROM for the exact location of this file.
9 Unmount the CD-ROM file system:
umount device_filename
For device_filename, substitute the complete pathname of the device file associated with the CD-ROM drive.
10Add the name of the directory containing crnadm (the directory in which you extracted the hp9.tar or hp10.tar file) to your path.
11Install the UNIX Host Software, following the instructions in “Installing the UNIX Host Software” on page 30.
Installing CrownAdmin 3 for Macintosh
CrownAdmin 3 for Macintosh is a software utility that allows you to monitor and configure QMS printers and perform network operations on printers connected to your network.
1 Insert the CD-ROM in your CD-ROM drive.
20 |
QMS CrownNet Setup Guide |

Software
Installation
2If necessary, double-click the CD-ROM icon to display the CD-ROM contents.
3Double-click the MAC folder icon to display the folder contents.
»Note: See the main readme file on the CD-ROM for the exact location of this folder.
4Double-click the CRNADM folder icon to display the folder contents.
5Double-click the install or setup file to install CrownAdmin 3.
6Go to “Interface Configuration” on page 32.
Installing CrownNet Manager for OS/2
»Note: For information on bypassing the print server and printing directly to the printer, see the QMS CrownNet System Administrator’s Guide.
OS/2 Print Server
1At the OS/2 LAN Manager/LAN Server print server, log into the network as the system administrator.
2Insert the CD-ROM in the CD-ROM drive.
3Open an OS/2 window.
4At the DOS prompt, enter the path and filename for CrownNet Manager installer and the destination.
For example:
x:\platform\os2\cnetmgr\lsminst x: y:
where x is the drive in which you inserted the CD-ROM, and y is the drive on which CrownNet Manager will be installed.
»Note: If you’ve previously installed the CrownNet Manager, you can use
x:\platform\os2\cnetmgr\lsminst x: y: /u
QMS CrownNet Setup Guide |
21 |

Software
Installation
to force installation of the upgraded software.
The installation program creates and installs the software in a directory named y:\CROWN. CrownNet Manager stores important events in a log file, also in this directory.
»Note: See the main readme file on the CD-ROM for the exact location of this file.
5To start the CrownNet Manager for OS/2 automatically each time the print server is turned on, add the following commands, in this order, at the end of the STARTUP.CMD file (but before any @EXIT command):
set crownman=c:\crown
start c:\crown\crownman.exe -m
»Note: The -m option minimizes the CrownNet Manager window to an icon after the program opens.
6To start the CrownNet Manager now, open an OS/2 window and type the following commands:
set crownman=c:\crown
start c:\crown\crownman.exe
The CrownNet Manager window appears.
7To install specific ports, choose Install from the CrownNet Manager window.
8In the Installation of CrownNet Ports dialog box, select the appropriate printer port(s) and choose Install.
The selected ports are displayed in the CrownNet Manager window.
»Note: Port names are either the default or those chosen in “Interface Configuration” on page 32.
Installing CrownAdmin 3 for OS/2
CrownAdmin 3 for OS/2 is a software utility that allows you to monitor and configure QMS printers and perform network operations on printers connected to your network.
22 |
QMS CrownNet Setup Guide |

Software
Installation
1Insert the CD-ROM in your CD-ROM drive.
2From Program Manager's File menu choose Run.
3In the Run dialog box, enter the path and filename for the install program.
For example:
x:\platform\os2\crnadm\install
where x is the letter of your CD-ROM.
»Note: See the main readme file on the CD-ROM for the exact location of this file.
4Follow the instructions on the screen. For additional information, choose the Help button.
5Go to “Installing the CrownNet Print Utility for Windows” on page 27.
Installing CrownAdmin 3 for Solaris
CrownAdmin 3 for Solaris is a software utility that allows you to monitor and configure QMS printers and perform network operations on printers connected to your network.
1Insert the CD-ROM in your CD-ROM drive.
»Note: Some drives require that the disk be placed in a caddy before being inserted in the drive. Check your CD-ROM drive documentation for information. Also, it takes a few seconds for the automounter to detect the CD.
2Log on the UNIX system as root.
3Type the following command to go to the root directory:
cd /
4Verify that the CD-ROM file system has been automounted by listing the contents of the directory:
ls /cdrom
The directory contains the several subdirectories, including unix.
QMS CrownNet Setup Guide |
23 |

Software
Installation
5Change to the location in which you want the CrownAdmin 3 directory to be created.
»Note: The directory in which crnadm.exe resides must be able to be mounted by all network nodes that need to access the printer.
6Extract the files from the CD-ROM.
For example:
tar xvf /cdrom/platform/unix/crnadm/solaris/ solaris.tar
This creates a crnadm directory containing CrownAdmin 3.
»Note: See the main readme file on the CD-ROM for the exact location of this file.
7 Unmount the CD-ROM file system:
umount device_filename
For device_filename, substitute the complete pathname of the device file associated with the CD-ROM drive.
8Add the name of the directory containing crnadm (the directory in which you extracted the solaris.tar file) to your path.
9Install the UNIX Host Software, following the instructions in “Installing the UNIX Host Software” on page 30.
Installing CrownAdmin 3 for SunOS
CrownAdmin 3 for SunOS is a software utility that allows you to monitor and configure QMS printers and perform network operations on printers connected to your network.
1Insert the CD-ROM in your CD-ROM drive.
»Note: Some drives require that the disk be placed in a caddy before being inserted in the drive. Check your CD-ROM drive documentation for information.
2Log on the UNIX system as root.
24 |
QMS CrownNet Setup Guide |
 Loading...