


 Loading...
Network Scanner (IC-306/IC-413)

Contents
1 |
Introduction |
|
|
|
1.1 |
Welcome .......................................................................................................................................... |
1-2 |
|
1.1.1 |
Composition of User's Guide............................................................................................................. |
1-2 |
|
1.1.2 |
User's Guide ...................................................................................................................................... |
1-3 |
|
1.2 |
Conventions used in this manual .................................................................................................. |
1-4 |
|
1.2.1 |
Symbols used in this manual ............................................................................................................. |
1-4 |
|
1.2.2 |
Original and paper indications ........................................................................................................... |
1-5 |
|
1.3 |
About this Manual ........................................................................................................................... |
1-6 |
|
1.3.1 |
Manual Composition.......................................................................................................................... |
1-6 |
|
1.3.2 |
Conventions Used in this Manual ...................................................................................................... |
1-6 |
|
1.3.3 |
Utility Tools of This Product............................................................................................................... |
1-6 |
2 |
Overview of the Scanning Features |
|
|
|
2.1 |
Overview of Features and Connection Modes............................................................................. |
2-2 |
|
2.2 |
Product Specifications ................................................................................................................... |
2-4 |
3 |
Preparation for Use |
|
|
|
3.1 |
Control Panel Layout ...................................................................................................................... |
3-2 |
|
3.2 |
How to Operate the Touch Panel .................................................................................................. |
3-4 |
|
3.3 |
How to Input Characters ................................................................................................................ |
3-6 |
|
3.4 |
How to Search................................................................................................................................. |
3-7 |
4 |
About the Network Scanner Features |
|
|
|
4.1 |
Overview of the Network Scanner Features................................................................................. |
4-2 |
|
4.2 |
Send by an E-Mail ........................................................................................................................... |
4-3 |
|
4.2.1 |
Items to be configured....................................................................................................................... |
4-3 |
|
4.3 |
Storing in Hard Disk........................................................................................................................ |
4-4 |
|
4.3.1 |
Items to be configured....................................................................................................................... |
4-4 |
|
4.4 |
Sending to the FTP Server ............................................................................................................. |
4-5 |
|
4.4.1 |
Items to be configured....................................................................................................................... |
4-5 |
|
4.5 |
Sending to the SMB Server ............................................................................................................ |
4-7 |
|
4.5.1 |
Items to be configured....................................................................................................................... |
4-7 |
|
4.6 |
Sending to a Group ......................................................................................................................... |
4-8 |
|
4.7 |
Send to a Queue.............................................................................................................................. |
4-9 |
|
4.8 |
The flow of operation of the Network Scanner .......................................................................... |
4-10 |
5 |
Registering (Adding) an Address for the Network Scanner Features |
|
|
|
5.1 |
Registering (Adding) an Address................................................................................................... |
5-2 |
|
5.2 |
Registering an E-mail Address ...................................................................................................... |
5-4 |
|
5.3 |
Registering a User Box................................................................................................................... |
5-6 |
|
5.3.1 |
Creating a User Box (FieryWeb ToolsWeb Tools/Command WorkStation)....................................... |
5-6 |
|
5.3.2 |
Registering a User Box (Control Panel on Main Body) ...................................................................... |
5-7 |
|
5.4 |
Registering the FTP server........................................................................................................... |
5-10 |
|
5.5 |
Registering the SMB Server......................................................................................................... |
5-13 |
|
5.6 |
Registering a Group...................................................................................................................... |
5-16 |
|
5.7 |
Changing/Deleting Registered Information................................................................................ |
5-19 |
bizhub PRESS C7000/C6000 |
Contents-1 |

|
|
|
|
|
|
|
|
6 |
Using the Network Scanner Features |
|
|
|
6.1 |
Keys on the Select Addresses Screen .......................................................................................... |
6-2 |
|
6.2 |
Transmission to an E-mail Address .............................................................................................. |
6-4 |
|
6.3 |
Storing in the Hard Disk ............................................................................................................... |
6-10 |
|
6.4 |
Transmission to the FTP Server .................................................................................................. |
6-16 |
|
6.5 |
Transmission to the SMB server ................................................................................................. |
6-22 |
|
6.6 |
Transmission to a Group.............................................................................................................. |
6-28 |
|
6.7 |
Storage as a Print Queue ............................................................................................................. |
6-30 |
|
6.8 |
About the Scan Settings Screen.................................................................................................. |
6-32 |
7 |
Utility Menu |
|
|
|
7.1 |
Displaying the Utility Menu Screen ............................................................................................... |
7-2 |
|
7.2 |
Scan Address Register................................................................................................................... |
7-3 |
|
7.3 |
Scan Initial Setting .......................................................................................................................... |
7-5 |
|
7.4 |
Scan Setting .................................................................................................................................... |
7-6 |
8 |
Troubleshooting |
|
|
|
8.1 |
Cannot connect to the scanner ..................................................................................................... |
8-2 |
|
8.2 |
When an Error Message Appears.................................................................................................. |
8-3 |
9 |
Appendix |
|
|
|
9.1 |
Glossary ........................................................................................................................................... |
9-2 |
|
9.2 |
Index................................................................................................................................................. |
9-4 |
bizhub PRESS C7000/C6000 |
Contents-2 |

1
Introduction

1.1 |
|
|
|
|
Welcome |
1 |
||||||||||||||||||||||||||||||||||||||||||||||||||||||||||||||||||||||||||||||||||||||||||||||||
|
|
|
|
|
|
|
|
|
|
|
|
|
|
|
|
|
|
|
|
|
|
|
|
|
|
|
|
|
|
|
|
|
|
|
|
|
|
|
|
|
|
|
|
|
|
|
|
|
|
|
|
|
|
|
|
|
|
|
|
|
|
|
|
|
|
|
|
|
|
|
|
|
|
|
|
|
|
|
|
|
|
|
|
|
|
|
|
|
|
|
|
|
|
|
|
|
|
|
|
|
|
|
|
|
|
|
|
|
|
|
|
|
|
|
|
|
|
|
|
|
|
|
|
|
|
|
|
|
|
|
|
|
|
|
|
|
|
|
|
|
|
|
|
|
|
|
|
|
|
|
|
|
|
|
|
|
|
|
|
|
|
|
|
|
|
|
|
|
|
|
|
|
|
|
|
|
|
|
|
|
|
|
|
|
|
|
|
|
|
|
|
|
|
|
|
|
|
|
|
|
|
|
|
|
|
|
|
|
|
|
|
|
|
|
|
|
|
|
|
|
|
|
|
|
|
|
|
|
|
|
|
|
|
|
|
|
|
|
|
|
|
|
|
|
|
|
|
|
|
|
|
|
|
|
|
|
|
|
|
|
|
|
|
|
|
|
|
|
|
|
|
|
|
|
|
|
|
|
|
|
|
|
|
|
|
|
|
|
|
|
|
|
|
|
|
|
|
|
|
|
|
|
|
|
|
|
|
|
1 Introduction
1.1Welcome
Thank you for purchasing this machine.
This User's Guide describes the functions, operating instructions, precautions for correct operation, and simple troubleshooting guidelines of this machine. In order to obtain maximum performance from this product and use it effectively, please read this User's Guide as necessary.
1.1.1 |
Composition of User's Guide |
|
|
|
|
Printed manual |
|
Overview |
|
|
|
|||
|
|
|
|
|
|
[Operation Quick Guide] |
|
This guide mainly describes how to use frequently |
|
|
|
|
used functions. Please refer to this guide for quick |
|
|
|
|
comprehension of various features available on the |
|
|
|
|
machine. |
|
|
|
|
|
|
|
[Safety Information] |
|
This guide describes trademarks, licenses and copy- |
|
|
|
|
rights concerning this machine. |
|
|
|
|
It also provides precautions and requests that should |
|
|
|
|
be followed to ensure safe usage of this machine. |
|
|
|
|
Please be sure to read this guide before using the ma- |
|
|
|
|
chine. |
|
|
User's guide CD manuals |
|
Overview |
|
|
|
|||
|
|
|
|
|
|
[User's Guide - Copier] |
|
This guide describes an outline of the machine and |
|
|
|
|
copy operations. |
|
|
|
|
• Configuration and specifications of the main body |
|
|
|
|
|
and options |
|
|
|
• Turning on/off the machine |
|
|
|
|
• |
Paper information |
|
|
|
• Making a basic copy and setting procedures |
|
|
|
|
• Supplies, disposals, and handling of output paper |
|
|
|
|
• |
Quality Adjustment |
|
|
|
• Application, Output Setting, and Job List |
|
|
|
|
• |
Troubleshooting |
|
|
|
|
|
|
[User's Guide - POD Administrator's Reference] |
|
This guide provides you with detailed information on |
|
|
|
|
machine management and how to customize the ma- |
|
|
|
|
chine according to your daily use. |
|
|
|
|
• Both Sides Adjustment, Curl Adjustment |
|
|
|
|
• |
Controller settings |
|
|
|
• Adjustment, Utility Menu Screen |
|
|
|
|
• Network settings, PageScope Web Connection |
|
|
|
|
• |
Web Utilities |
|
|
|
|
|
|
[User's Guide - Printer (IC-601)] |
|
This guide describes the settings of the printer drivers |
|
|
|
|
and utility tool of IC-601. |
|
|
|
|
• |
Adobe PS driver |
|
|
|
• PostScript3 Plug-in driver |
|
|
|
|
• |
PageScope Web Connection |
|
|
|
|
|
|
[User's Guide - Color Centro (IC-601)] |
|
This guide describes the color settings using IC-601. |
|
|
|
|
• |
Calibration |
|
|
|
• |
Tone Curve Adjustment |
|
|
|
• |
Spot Color |
|
|
|
• |
Alternative Color |
|
|
|
• |
Profile Management |
|
|
|
• |
Color Default Settings |
|
|
|
• |
Color Configuration Management |
|
|
|
|
|
bizhub PRESS C7000/C6000 |
1-2 |

1.1 |
Welcome |
|
|
|
1 |
|
|
|
|
|
|
||
|
|
User's guide CD manuals |
|
Overview |
||
|
|
|
||||
|
|
|
|
|
||
|
|
[User's Guide - Job Centro (IC-601)] |
|
This guide describes the operation of print job using |
||
|
|
|
|
IC-601. |
||
|
|
|
|
• Display of the job in progress |
||
|
|
|
|
• Reprinting of the Hold job |
||
|
|
|
|
• Editing of the Hold job |
||
|
|
|
|
|
||
|
|
[User's Guide - Network Scanner (IC-306/IC- |
|
This guide describes the operation of network scan- |
||
|
413)] |
|
ner functions using IC-306/IC-413. |
|||
|
|
|
|
• Scan to E-Mail |
||
|
|
|
|
• |
Scan to HDD |
|
|
|
|
|
• |
Scan to FTP |
|
|
|
|
|
• |
Scan to SMB |
|
|
|
|
|
• |
Scan to Queue |
|
|
|
|
|
|
||
|
|
[User's Guide - Network Scanner (IC-601)] |
|
This guide describes the operation of network scan- |
||
|
|
|
|
ner functions using IC-601. |
||
|
|
|
|
• Scan to E-Mail |
||
|
|
|
|
• |
Scan to HDD |
|
|
|
|
|
• |
Scan to FTP |
|
|
|
|
|
• |
Scan to SMB |
|
|
|
|
|
|
||
|
|
[User's Guide - Security] |
|
This guide describes the security functions. |
||
|
|
|
|
Please refer to this guide for how to use the Enhanced |
||
|
|
|
|
Security mode, and for detailed machine operation in |
||
|
|
|
|
Enhanced Security mode. |
||
|
|
|
|
|
|
|
1.1.2User's Guide
This User's Guide is intended for users ranging from those using this machine for the first time to administrators.
It describes basic operations, functions that enable more convenient operations, maintenance procedures, simple troubleshooting operations, and various setting methods of this machine.
Note that basic technical knowledge about the product is required to enable users to perform maintenance work or troubleshooting operations. Limit your maintenance and troubleshooting operations to the areas explained in this manual.
Should you experience any problems, please contact our service representative.
bizhub PRESS C7000/C6000 |
1-3 |
1.2 |
Conventions used in this manual |
1 |
|
|
|
1.2Conventions used in this manual
1.2.1Symbols used in this manual
Symbols are used in this manual to express various types of information.
The following describes each symbol related to correct and safe usage of this machine.
Safety Information
7 WARNING
-This symbol indicates that a failure to heed the instructions may lead to death or serious injury.
7 CAUTION
-This symbol indicates that negligence of the instructions may lead to mishandling that may cause injury or property damage.
NOTICE
This symbol indicates a risk that may result in damage to this machine or originals.
Follow the instructions to avoid property damage.
Procedural instruction
0This check symbol indicates that it is a precondition for steps or information that you should be noted before performing the steps.
1This format number "1" represents the first step.
2This format number represents the order of serial steps.
% This symbol indicates a supplementary explanation of a pro- |
The operation |
cedural instruction. |
procedures |
|
are described |
|
using instruction. |
%This symbol indicates transition of the control panel to access a desired menu item.
The relevant image is shown.
bizhub PRESS C7000/C6000 |
1-4 |
1.2 |
Conventions used in this manual |
1 |
|
|
|
dReference
This symbol indicates a reference.
View the reference as required.
Key symbols
[ ]
Key names on the touch panel or computer screen, or a name of user's guide are indicated by these brackets.
Bold text
Key names on the control panel, part names, product names and option names are indicated in bold text.
1.2.2Original and paper indications
Paper size
The following explains the indication for originals and paper described in this manual.
When indicating the original or paper size, the Y side represents the width and the X side the length.
Paper indication
w indicates the paper size with the length (X) being longer than the width (Y).
v indicates the paper size with the length (X) being shorter than the width (Y).
bizhub PRESS C7000/C6000 |
1-5 |

1.3 |
About this Manual |
1 |
|
|
|
1.3About this Manual
This manual is the User's Guide for bizhub PRESS C7000/C6000 Network Scanner features.
This manual describes the functions which can be used by pressing [SCAN] tab on the touch panel.
Refer to the User's Guide (POD Administrator's Reference) or the User's Guide (Copier) on how to use other buttons.
1.3.1Manual Composition
This manual is composed of the following 9 chapters:
Chapter 1: Introduction
This chapter describes this User's Guide.
Chapter 2: Overview of the Scanning Features
This chapter describes about overview of the Network Scanner features.
Chapter 3: Preparation for Use
This chapter describes how to use Control Panel, Touch Panel, character input and search features.
Chapter 4: About the Network Scanner Features
This chapter describes the operational flow of the Network Scanner features.
Chapter 5: Registering (Adding) an Address for the Network Scanner Features
This chapter describes address/storage location for the Network Scanner features.
Chapter 6: Using the Network Scanner Features
This chapter describes in detail how to use the Network Scanner features.
Chapter 7: Utility Menu
This chapter describes how to set the Utility screen.
Chapter 8: Troubleshooting
This chapter describes how to solve major problems on the Network Scanner features.
Chapter 9: Appendix
The glossary and index regarding the scanning features.
1.3.2Conventions Used in this Manual
Notation of each product
The following abbreviations are used in this manual:
1 |
bizhub PRESS C7000/C6000 Copier |
Copier (or printing system) |
2 |
Image Controller |
Image Controller |
1.3.3Utility Tools of This Product
The utility tools used in the Network Scanner features are as follows. For more information on how to operate the utility tools, refer to the User's Guide for the each or the corresponding pages of this manual.
Fiery Remote Scan
This application creates a connection between a computer and the copier, by which the scanned data stored in the hard disk is imported to the computer. You can use application software compliant with TWAIN scanner driver. For details, refer to the User's Guide that came with your IC-306/IC-413.
bizhub PRESS C7000/C6000 |
1-6 |

2 Overview of the Scanning
Features
2.1 |
|
|
|
|
Overview of Features and Connection Modes |
2 |
||||||||||||||||||||||||||||||||||||||||||||||||||||||||||||||||||||||||||||||||||||||||||||||||
|
|
|
|
|
|
|
|
|
|
|
|
|
|
|
|
|
|
|
|
|
|
|
|
|
|
|
|
|
|
|
|
|
|
|
|
|
|
|
|
|
|
|
|
|
|
|
|
|
|
|
|
|
|
|
|
|
|
|
|
|
|
|
|
|
|
|
|
|
|
|
|
|
|
|
|
|
|
|
|
|
|
|
|
|
|
|
|
|
|
|
|
|
|
|
|
|
|
|
|
|
|
|
|
|
|
|
|
|
|
|
|
|
|
|
|
|
|
|
|
|
|
|
|
|
|
|
|
|
|
|
|
|
|
|
|
|
|
|
|
|
|
|
|
|
|
|
|
|
|
|
|
|
|
|
|
|
|
|
|
|
|
|
|
|
|
|
|
|
|
|
|
|
|
|
|
|
|
|
|
|
|
|
|
|
|
|
|
|
|
|
|
|
|
|
|
|
|
|
|
|
|
|
|
|
|
|
|
|
|
|
|
|
|
|
|
|
|
|
|
|
|
|
|
|
|
|
|
|
|
|
|
|
|
|
|
|
|
|
|
|
|
|
|
|
|
|
|
|
|
|
|
|
|
|
|
|
|
|
|
|
|
|
|
|
|
|
|
|
|
|
|
|
|
|
|
|
|
|
|
|
|
|
|
|
|
|
|
|
|
|
|
|
|
|
|
|
|
|
|
|
|
|
|
|
|
|
|
|
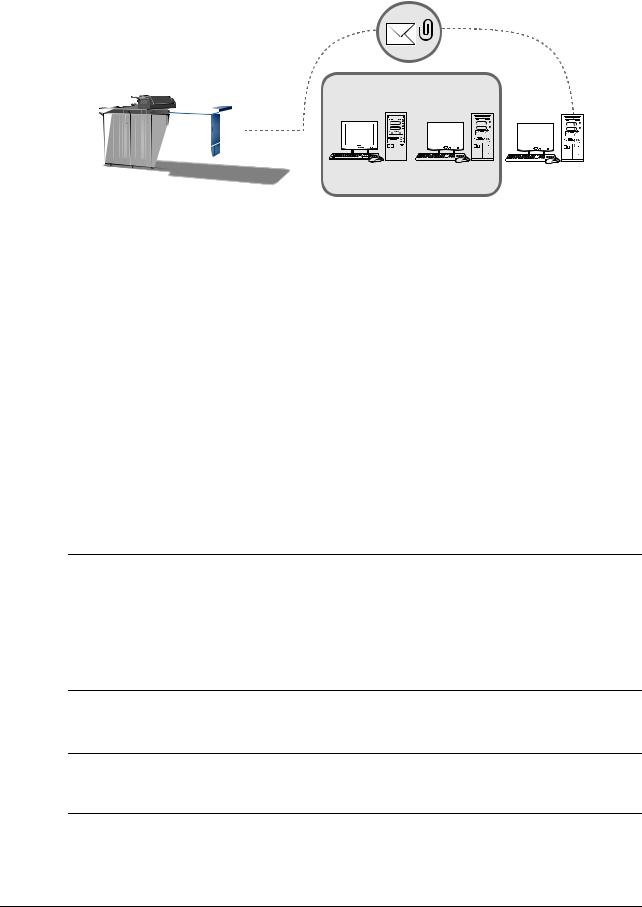
2 Overview of the Scanning Features
2.1Overview of Features and Connection Modes
bizhub PRESS C7000/C6000 copier has the Network Scanner features.
The image controller (IC-306/IC-413) is required to use the network scanner features.
For more information, contact your service representative.
Original
|
|
|
|
|
|
|
|
|
|
E-mail server |
||||||||||||||||||
|
|
|
|
|
|
|
|
|
|
|||||||||||||||||||
|
|
|
|
|
|
|
|
|
|
|
|
|
|
|
|
|
|
|
|
|
|
|
|
|
|
|
|
|
|
|
|
|
|
|
|
|
|
|
|
|
|
|
|
|
|
|
|
|
|
|
|
|
|
|
|
|
|
|
|
|
|
|
|
|
|
|
|
|
|
|
|
|
|
|
|
|
|
|
|
|
|
|
|
|
|
|
|
|
|
|
|
|
|
|
|
|
|
|
|
|
|
|
|
|
|
|
|
|
|
|
|
|
|
|
|
|
|
|
|
|
|
|
|
|
|
|
|
|
|
|
|
|
|
|
|
|
|
|
||||||
|
|
|
|
|
|
|
|
|
|
|
|
FTP server |
||||||||||||||||
|
|
|
|
|
|
|
|
|
|
|
|
|||||||||||||||||
|
|
|
|
|
|
|
|
|
|
|
|
|
|
|
|
|
|
|
|
|
|
|
|
|
|
|
|
|
|
|
|
|
|
|
|
|
|
|
|
|
|
|
|
|
|
|
|
|
|
|
|
|
|
|
|
|
|
|
|
|
|
|
|
|
|
|
|
|
|
|
|
|
|
|
|
|
|
|
|
|
|
|
|
|
|
|
|
|
|
|
|
|
|
|
|
|
|
|
|
|
|
|
|
|
|
|
|
|
|
|
FTP |
||||
|
|
|
|
|
|
|
|
|
|
|
|
SMB server |
||||||||||||||||
|
|
|
|
|
|
|
|
|
|
|
|
|
|
|
|
|
|
|
|
|
|
|
|
|
|
|
|
|
QUEUE |
|
|
|
|
|
|
|
|
|
|
|
|
|
|
|
|
|
|
|
|
|
|
|
|
|
|
|
|
(Print Job) |
|
|
|
|
|
|
|
|
|
|
|
|
|
|
|
|
|
|
|
|
|
|
|
|
|
|
|
|
|
|
|
|
Hard Disk |
|
|
|
|
|
|
|
|
|
|
|
|
|
|
|
|
|
|
|
|
|
|||
|
|
|
|
|
|
|
|
|
|
|
|
|
|
|
|
|
|
|
|
|
|
|
SMB |
|
||||
|
|
|
|
|
|
Controller |
|
|
|
|
|
|
|
|
|
|
|
|
|
|
Internet |
|||||||
The scanned data can be sent as an E-Mail attached file, upload to a FTP Server or SMB server, or stored in a hard disk.
Also, the scanned data can be stored as a print queue in PDF format.
The scanned data is sent in the following file format:
-Batched PDF/Separated PDF/Encrypted PDF
-Batched TIFF/Separated TIFF
-JPEG
bizhub PRESS C7000/C6000 |
2-2 |

2.1 |
Overview of Features and Connection Modes |
2 |
|
|
|
Network Scanner Features
The Network Scanner features are operated in the [SCAN] tab.
The Network Scanner features enable the followings by converting a scanned document to digital data.
Function |
Reference page |
|
|
Sending data by an E-Mail. |
page 4-3 |
|
|
Storing in hard disk. |
page 4-4 |
|
|
Sending to the FTP server. |
page 4-5 |
|
|
Sending to the SMB server. |
page 4-7 |
|
|
Storing as a print queue. |
page 4-9 |
|
|
7 CAUTION
-To use the copier as a network scanner, it needs to be connected to the network. For more information on the network configuration, contact your network administrator.
-Scanned data can be damaged. Make sure to keep the original back up.
bizhub PRESS C7000/C6000 |
2-3 |

2.2 |
Product Specifications |
2 |
|
|
|
2.2Product Specifications
For information on the product specifications of the copier, the image controller and the network, refer to the User's Guide for the each or contact your administrator for the each.
Product Specifications of Scanning Features
Item |
Specifications |
|
|
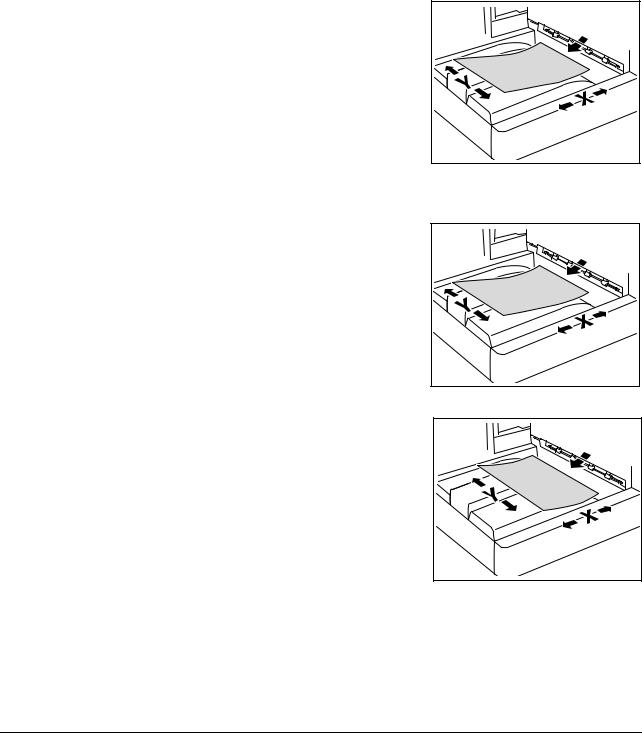
Original type |
sheet/book/cubic object |
|
|
Max. original size |
Fixed form: A3 (297mm x 420mm)/11" x 17" (279.4mm x 432mm) |
|
Custom form: 303mm x 483mm (when using an original glass) |
|
|
Cubic object |
Weight: Max. 6.8kg |
|
|
Original position |
Deep-left-sided |
|
|
Scanning resolution |
200dpi, 300dpi, 400dpi, 600dpi |
|
|
Reading speed |
A4: Max. 40 sheets/min.(simplex) |
|
8.5 x 11: Max. 40 sheets/min.(simplex) |
|
|
Interface |
Ethernet (1000BASE-T/100BASE-TX/10Base-T) |
|
|
The kind of the scan function |
Scan to E-Mail |
|
Scan to HDD |
|
Scan to FTP |
|
Scan to SMB |
|
Scan to Queue |
|
|
Compression method |
TIFF/PDF/Encrypted PDF |
|
* In the case of an encrypted PDF, a password is required to be set. |
|
|
Configurable items for reading |
Original Setting, Image Quality Setting, Zoom, Color, Color Space, |
|
Color Compression, Scan Size, Resolution, Simplex/Duplex, File Type, |
|
File Name, and Address |
|
|
dReference
The specifications of the configurable items for reading except Resolution, File Type, File Name and Address are in accordance with that of the copier. For more information, refer to the User's Guide (Copier).
bizhub PRESS C7000/C6000 |
2-4 |

3 Preparation for Use
3.1 |
|
|
|
|
Control Panel Layout |
3 |
||||||||||||||||||||||||||||||||||||||||||||||||||||||||||||||||||||||||||||||||||||||||||||||||
|
|
|
|
|
|
|
|
|
|
|
|
|
|
|
|
|
|
|
|
|
|
|
|
|
|
|
|
|
|
|
|
|
|
|
|
|
|
|
|
|
|
|
|
|
|
|
|
|
|
|
|
|
|
|
|
|
|
|
|
|
|
|
|
|
|
|
|
|
|
|
|
|
|
|
|
|
|
|
|
|
|
|
|
|
|
|
|
|
|
|
|
|
|
|
|
|
|
|
|
|
|
|
|
|
|
|
|
|
|
|
|
|
|
|
|
|
|
|
|
|
|
|
|
|
|
|
|
|
|
|
|
|
|
|
|
|
|
|
|
|
|
|
|
|
|
|
|
|
|
|
|
|
|
|
|
|
|
|
|
|
|
|
|
|
|
|
|
|
|
|
|
|
|
|
|
|
|
|
|
|
|
|
|
|
|
|
|
|
|
|
|
|
|
|
|
|
|
|
|
|
|
|
|
|
|
|
|
|
|
|
|
|
|
|
|
|
|
|
|
|
|
|
|
|
|
|
|
|
|
|
|
|
|
|
|
|
|
|
|
|
|
|
|
|
|
|
|
|
|
|
|
|
|
|
|
|
|
|
|
|
|
|
|
|
|
|
|
|
|
|
|
|
|
|
|
|
|
|
|
|
|
|
|
|
|
|
|
|
|
|
|
|
|
|
|
|
|
|
|
|
|
|
|
|
|
|
|
|
3 Preparation for Use
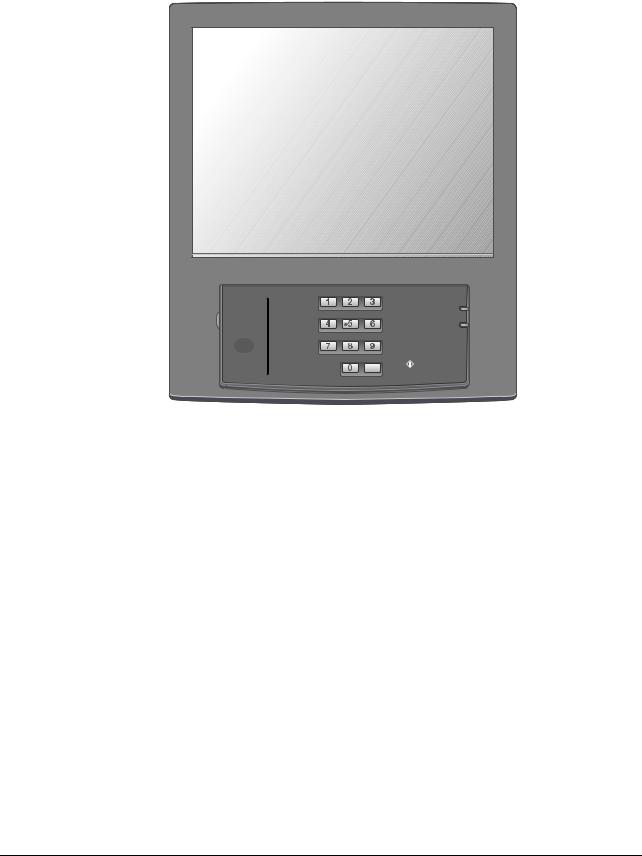
3.1Control Panel Layout
|
|
|
|
|
|
|
|
|
|
|
|
|
|
|
|
|
|
|
|
|
|
|
|
|
|
|
|
|
|
|
|
|
|
|
|
|
|
|
|
|
|
|
|
|
|
|
|
|
|
|
|
|
|
|
|
|
|
|
|
|
|
|
|
|
|
|
|
|
|
|
|
|
|
|
|
|
|
|
|
|
|
|
|
|
|
|
|
|
|
|
|
|
|
|
|
|
|
|
|
|
|
No. |
|
Item |
|
Description |
||||||||||||
|
|
|||||||||||||||
|
|
|
|
|
|
|
|
|
|
|
|
|
|
|
|
|
1 |
|
Keypad |
|
Enters values for various settings, including print |
||||||||||||
|
|
|
|
|
|
|
|
quantity and password. |
||||||||
|
|
|
|
|
|
|
|
|
|
|
|
|
|
|
|
|
2 |
|
Reset |
|
Restores machine to the initial settings. |
||||||||||||
|
|
|
|
|
|
|
|
|
|
|
|
|
|
|
|
|
3 |
|
Power LED |
|
Lights up in red when the main power switch is |
||||||||||||
|
|
|
|
|
|
|
|
turned on, then turns green when the sub power |
||||||||
|
|
|
|
|
|
|
|
switch is turned on. |
||||||||
|
|
|
|
|
|
|
|
|
|
|
|
|
|
|
|
|
4 |
|
Data LED |
|
Flashes while receiving print data. |
||||||||||||
|
|
|
|
|
|
|
|
|
|
|
|
|
|
|
|
|
5 |
|
Interrupt |
|
Stops copying/printing/scanning in progress to allow |
||||||||||||
|
|
|
|
|
|
|
|
a simple copying job. |
||||||||
|
|
|
|
|
|
|
|
|
|
|
|
|
|
|
|
|
6 |
|
Stop |
|
Ceases the machine operation; deletes the stored |
||||||||||||
|
|
|
|
|
|
|
|
memory. |
||||||||
|
|
|
|
|
|
|
|
|
|
|
|
|
|
|
|
|
7 |
|
Proof Copy |
|
Used to check the adjustments made on the Quality |
||||||||||||
|
|
|
|
|
|
|
|
Adjustment Screen. |
||||||||
|
|
|
|
|
|
|
|
|
|
|
|
|
|
|
|
|
8 |
|
Start |
|
Activates various machine operations. |
||||||||||||
|
|
|
|
|
|
|
|
|
|
|
|
|
|
|
|
|
9 |
|
Start LED |
|
Lights in blue when machine operation is available. |
||||||||||||
|
|
|
|
|
|
|
|
It turns orange if any operation cannot be started. |
||||||||
|
|
|
|
|
|
|
|
|
|
|
|
|
|
|
|
|
10 |
|
C (Clear) |
|
Allows change in entered numeric value. |
||||||||||||
|
|
|
|
|
|
|
|
|
|
|
|
|
|
|
|
|
bizhub PRESS C7000/C6000 |
3-2 |

3.1 |
Control Panel Layout |
|
|
3 |
|||
|
|
|
|
|
|
|
|
|
|
No. |
|
Item |
|
Description |
|
|
|
|
|
||||
|
|
|
|
|
|
|
|
|
11 |
|
Access |
|
Sets the machine to allow the operation only when a |
||
|
|
|
|
|
|
user/account name and password are entered, if user |
|
|
|
|
|
|
|
authentication or account track function is activated. |
|
|
|
|
|
|
|
|
|
|
12 |
|
Mode Check |
|
Used to check settings of the print job in progress or |
||
|
|
|
|
|
|
those currently made. |
|
|
|
|
|
|
|
|
|
|
13 |
|
Utility/Counter |
|
Displays the Utility Menu Screen and various |
||
|
|
|
|
|
|
counters. |
|
|
|
|
|
|
|
|
|
|
14 |
|
Mode Memory |
|
Registers/Recalls the desired copy settings. Also re- |
||
|
|
|
|
|
|
calls previous job settings. |
|
|
|
|
|
|
|
|
|
|
15 |
|
Accessibility |
|
Adjusts the response time in touch panel and control |
||
|
|
|
|
|
|
panel key operation. |
|
|
|
|
|
|
|
|
|
|
16 |
|
Help |
|
Displays the Help Screen that provides information on |
||
|
|
|
|
|
|
how to operate the screen currently displayed on the |
|
|
|
|
|
|
|
touch panel. |
|
|
|
|
|
|
|
Also provides information on various supplies and |
|
|
|
|
|
|
|
disposals when pressed with the Machine Screen dis- |
|
|
|
|
|
|
|
played. |
|
|
|
|
|
|
|
|
|
|
17 |
|
Brightness adjustment dial |
|
Turned to adjust the brightness of the touch panel. |
||
|
|
|
|
|
|
|
|
|
18 |
|
Power Save |
|
Enables temporary use of the machine when the |
||
|
|
|
|
|
|
Power Save LED is lit. Also, activates power-saving |
|
|
|
|
|
|
|
mode when pressed while the machine is inactive. |
|
|
|
|
|
|
|
|
|
|
19 |
|
Power Save LED |
|
Lights when any power-saving mode is activated, or |
||
|
|
|
|
|
|
machine power is off due to the timer function. |
|
|
|
|
|
|
|
|
|
|
20 |
|
Touch panel |
|
Displays various screens to allow the function setting. |
||
|
|
|
|
|
|
|
|
7 CAUTION
Do not press hard or pointed objects against the touch panel on the control panel.
-Otherwise, the glass may be scrached or break and you may be injured. Use fingers to operate the touch panel.
7 CAUTION
Stop the operation immediately when the Service Call Screen is displayed and copying cannot be continued any more.
-Otherwise, an unexpected trouble may be caused. Write down the report code as stated on the second line of the message, turn off the sub power switch and main power switch in this order, then disconnect from the power socket. Contact your service representative and inform them of the report code.
NOTICE
Be sure not to turn off the main power switch in usual operation.
Be sure not to turn off the main power switch before turning off the sub power switch.
Be sure not to turn off the main power switch while the following messages are displayed after turning off the sub power switch.
[Cooling in progress / Power will be off when completed]
[Power off in progress / Please do not turn the main power switch off]
Turning off the main power switch with these messages displayed may cause serious machine trouble such as toner fixation.
dReference
Refer to User's Guide (POD Administrator's Reference) for how to turn off the power.
bizhub PRESS C7000/C6000 |
3-3 |

3.2 |
How to Operate the Touch Panel |
3 |
|
|
|
3.2How to Operate the Touch Panel
To operate the Network Scanner features, use the Touch Panel of the copier.
7 CAUTION
-You can select an item by touching keys lightly on the Touch Panel.
Select a function
Touch a function displayed in a key to select the function.
The selected key is highlighted.
To input values
Touch lightly the KEYPAD on the Touch Panel to input the specified values.
7 CAUTION
-You may also input values through the KEYPAD on the Control Panel.
dReference
For more information on how to input characters, refer to page 3-6.
bizhub PRESS C7000/C6000 |
3-4 |

3.2 |
How to Operate the Touch Panel |
3 |
|
|
|
To switch between pages
When all items cannot be displayed in a single page, touch lightly  /
/ to switch between pages.
7 CAUTION
-You may also input values through the KEYPAD on the Control Panel.
dReference
For more information on how to input characters, refer to page 3-6.
bizhub PRESS C7000/C6000 |
3-5 |
3.3 |
How to Input Characters |
3 |
|
|
|
3.3How to Input Characters
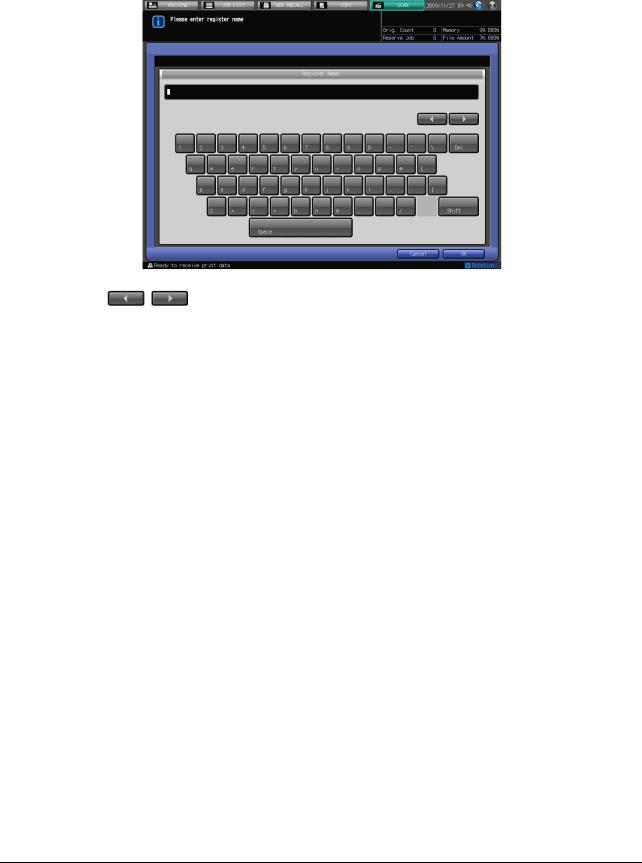
As you touch the item where you can input characters, the character input screen appears.
You can input alphabets and signs.
About keys on the character input screen
Keys on the character input screen are described here.
/ |
This key moves a cursor. |
|
|
Delete |
This key deletes the character on the left of the cursor. |
|
|
OK |
This key determines the characters you input, and the character in- |
|
put screen closes. |
|
|
Cancel |
This key cancels the characters you input, and the character input |
|
screen closes. |
|
|
About character input
The followings describe basic steps to input characters on the character input screen.
1 Press the corresponding key to input the desired character.
2 Touch [OK].
The character input screen closes. The input characters are displayed on the corresponding column.
bizhub PRESS C7000/C6000 |
3-6 |
3.4 |
How to Search |
3 |
|
|
|
3.4How to Search
The Network Scanner features enable you to search the registered address, specified storage location by their names and stored Box No..
Address Search (Search Features on the [SCAN] screen)
You can search the desired address out of the registered address.
Search
You can search the registered address by using [Search]. Searchable addresses include E-Mail addresses, storage locations on the HDD, FTP server addresses and SMB server addresses.
The following is how to use [Search].
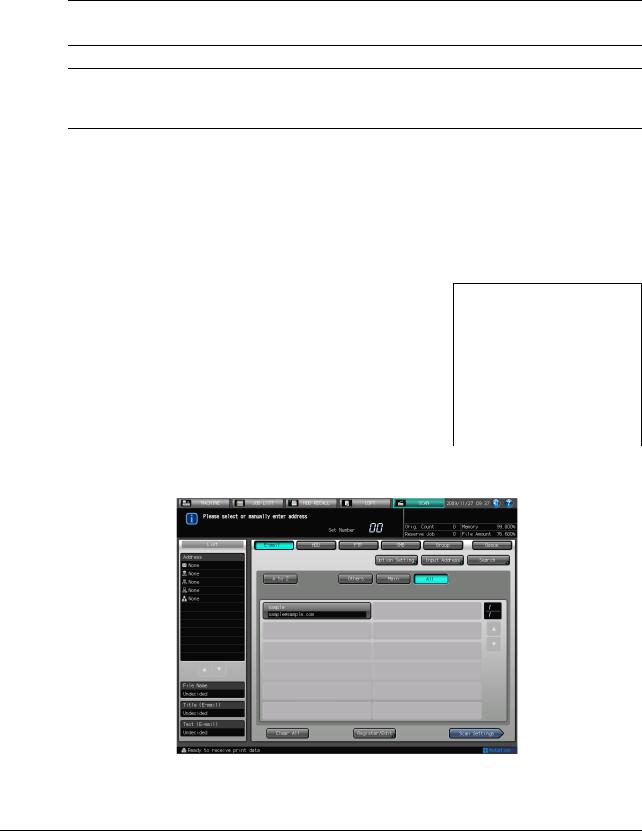
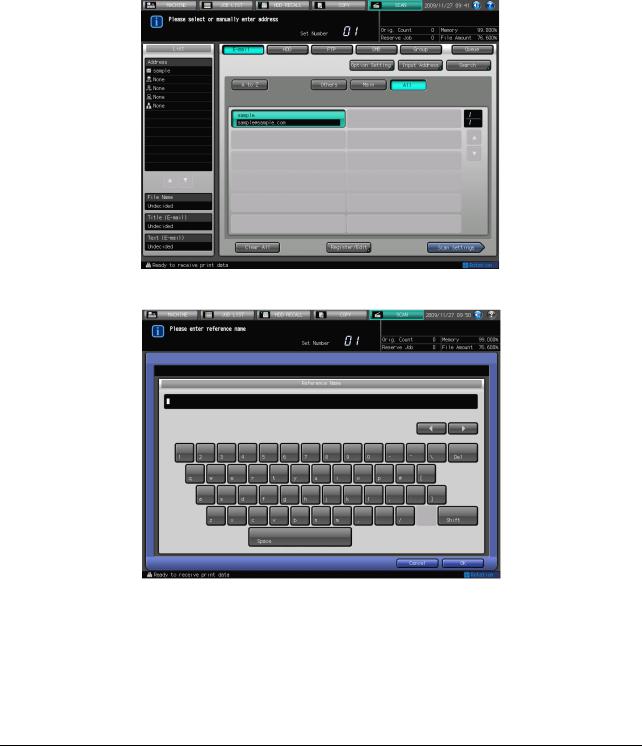
1 Press [Search].
2 Input the Character for Search you registered, and press [OK].
%You can search by at minimum one character. If the search results are too many, press [Search] to add search letters (The search letters you entered are saved until you operate scanning).
%Pressing [Cancel] cancels the input search letters, and the search letter input screen closes.
%If required information has been set for the LDAP Search, the screen to select [Normal Search]/[LDAP Search] is displayed. If you select [Normal Search], the above screen is displayed.
The desired address will be displayed.
bizhub PRESS C7000/C6000 |
3-7 |
3.4 |
How to Search |
3 |
|
|
|
LDAP Search
You can acquire the information meeting the search requirements entered on the control panel from the data base in the LDAP server. You can also select the acquired E-mail address and transmit and register the data.
1 Press [Search] on the Select E-mail Address screen.
% Before using LDAP Search, a setting is required. Contact your administrator for each setting of LDAP Search.
2 Press [LDAP Search].
bizhub PRESS C7000/C6000 |
3-8 |
3.4 |
How to Search |
3 |
|
|
|
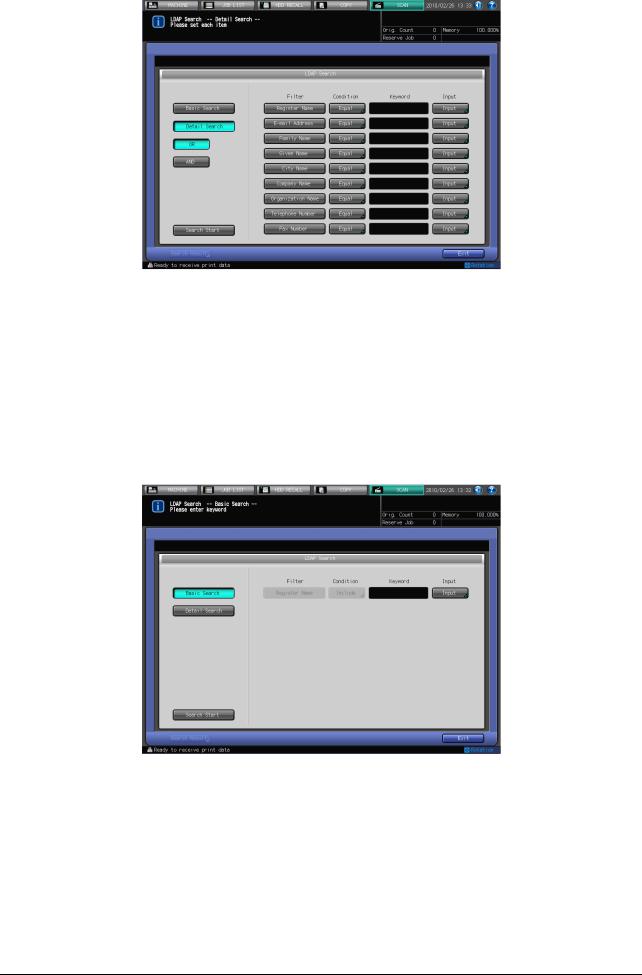
3 Press [Basic Search] or [Detail Search].
%[Basic Search]
Enter one keyword and search. Data beginning with the keyword input for [Register Name], [E-mail Address], [Family Name], [Given Name], [City Name], [Company Name], [Organization Name], [Telephone Number], [Fax Number] is searched.
%[Detail Search]
A keyword can be respectively specified for [Register Name], [E-mail Address], [Family Name], [Given Name], [City Name], [Company Name], [Organization Name], [Telephone Number], and [Fax Number].
[OR] or [And] can be specified in each field.
[Equal], [Include], [Begin], or [Close] can be set up as the search condition.
4 Press [Input], input the search condition, and then press [OK].
% In case of [Basic Search]
% You can input up to 256 characters as the search term in [Basic Search].
bizhub PRESS C7000/C6000 |
3-9 |
3.4 |
How to Search |
3 |
|
|
|
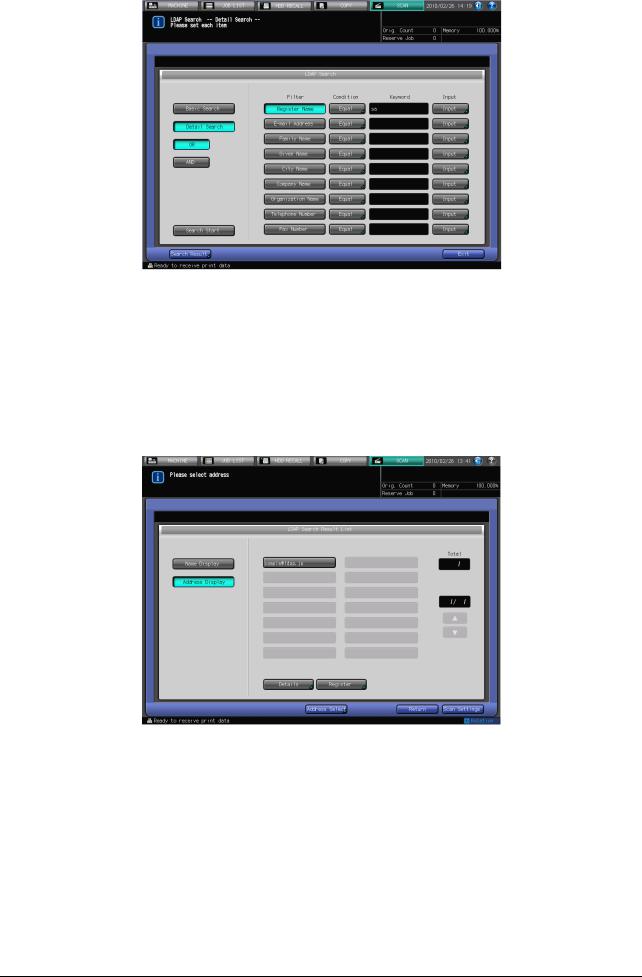
% In case of [Detail Search]
5
6
7
%To change the search condition, press a key under [Condition] and change the Condition Setting on the screen displayed.
%The search ongoing screen is displayed while in the search.
%[Detail Search] is for up to 256 and 64 input search characters for [Register Name]/[E-mail Address] and other fields at the maximum, respectively.
Press [Search Start].
%Press [Cancel] if you want to cancel the search.
%Press [Return] to return to the Search screen if you encounter with the LDAP search error.
Check the search result.
%The desired name will be displayed. Press [Address Display] to display its E-mail address. (Displays up to 100 addresses)
%Specify an address and press [Details] if you want to check its detailed information.
When transmitting:
Select an address for transmission from the result of search and press [Scan Settings] to display the Scan Settings screen.
%If you want to specify the other address, click [Address Select], specify the desired address, and click [Scan Settings].
Set an original and press [Start].
%Refer to page 6-32 for the Scan Settings screen.
%You can select multiple addresses for transmission.
bizhub PRESS C7000/C6000 |
3-10 |

3.4 |
How to Search |
3 |
|
|
|
8 When registering:
Select an address to register from the result of search and press [Register].
%If more than one address is selected, the address that is selected at last is registered.
%In the LDAP Search Results Register Screen, check [Address], [Register Name], and [Reference Name], and if there is no problem, click [OK] to register the address.
bizhub PRESS C7000/C6000 |
3-11 |

4 "4 About the Network
Scanner Features"
4.1 |
|
|
|
|
Overview of the Network Scanner Features |
4 |
||||||||||||||||||||||||||||||||||||||||||||||||||||||||||||||||||||||||||||||||||||||||||||||||
|
|
|
|
|
|
|
|
|
|
|
|
|
|
|
|
|
|
|
|
|
|
|
|
|
|
|
|
|
|
|
|
|
|
|
|
|
|
|
|
|
|
|
|
|
|
|
|
|
|
|
|
|
|
|
|
|
|
|
|
|
|
|
|
|
|
|
|
|
|
|
|
|
|
|
|
|
|
|
|
|
|
|
|
|
|
|
|
|
|
|
|
|
|
|
|
|
|
|
|
|
|
|
|
|
|
|
|
|
|
|
|
|
|
|
|
|
|
|
|
|
|
|
|
|
|
|
|
|
|
|
|
|
|
|
|
|
|
|
|
|
|
|
|
|
|
|
|
|
|
|
|
|
|
|
|
|
|
|
|
|
|
|
|
|
|
|
|
|
|
|
|
|
|
|
|
|
|
|
|
|
|
|
|
|
|
|
|
|
|
|
|
|
|
|
|
|
|
|
|
|
|
|
|
|
|
|
|
|
|
|
|
|
|
|
|
|
|
|
|
|
|
|
|
|
|
|
|
|
|
|
|
|
|
|
|
|
|
|
|
|
|
|
|
|
|
|
|
|
|
|
|
|
|
|
|
|
|
|
|
|
|
|
|
|
|
|
|
|
|
|
|
|
|
|
|
|
|
|
|
|
|
|
|
|
|
|
|
|
|
|
|
|
|
|
|
|
|
|
|
|
|
|
|
|
|
|
|
|
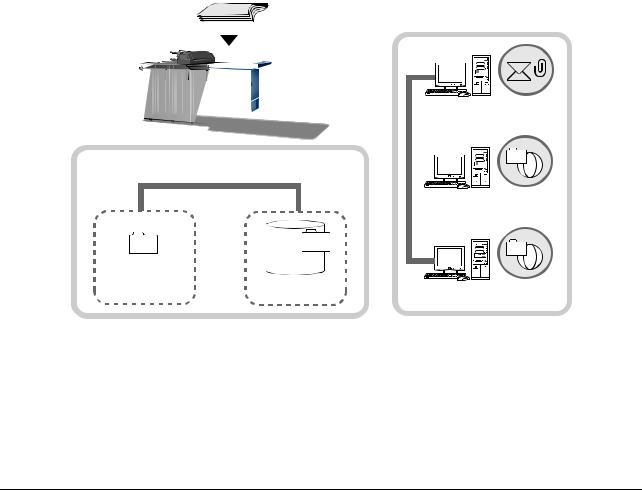
4 About the Network Scanner Features
4.1Overview of the Network Scanner Features
The Network Scanner features are operated in the [SCAN] tab. Data scanned by the Network Scanner features can be transmitted to the E-Mail addresses, the hard disk, the FTP server, the SMB server or the print queue. The scanned data stored on the hard disk can also be imported to the network-connected computers using the TWAIN-compliant applications and the Network Scanner Driver.
dReference
Send by an E-Mail (p. 4-3)
Storing in Hard Disk (p. 4-4)
Sending to the FTP Server (p. 4-5)
Sending to the SMB Server (p. 4-7)
Sending to a Group (p. 4-8)
Send to a Queue (p. 4-9)
Also, you can configure the density, zoom, scan size, resolution, quality, file type, etc. when scanning an image.
dReference
About the Scan Settings Screen (p. 6-32)
When the Enhanced Security Mode is ON, a job is unacquirable using applications compatible with TWAIN and network scanner driver. For details, contact your administrator.
Original
|
|
|
|
|
|
|
|
|
|
E-mail server |
|||||||||||||||||||
|
|
|
|
|
|
|
|
|
|
||||||||||||||||||||
|
|
|
|
|
|
|
|
|
|
|
|
|
|
|
|
|
|
|
|
|
|
|
|
|
|
|
|
|
|
|
|
|
|
|
|
|
|
|
|
|
|
|
|
|
|
|
|
|
|
|
|
|
|
|
|
|
|
|
|
|
|
|
|
|
|
|
|
|
|
|
|
|
|
|
|
|
|
|
|
|
|
|
|
|
|
|
|
|
|
|
|
|
|
|
|
|
|
|
|
|
|
|
|
|
|
|
|
|
|
|
|
|
|
|
|
|
|
|
|
|
|
|
|
|
|
|
|
|
|
|
|
|
|
|
|
|
|
|
|
|
|
|
|
||||||
|
|
|
|
|
|
|
|
|
|
|
|
FTP server |
|||||||||||||||||
|
|
|
|
|
|
|
|
|
|
|
|
||||||||||||||||||
|
|
|
|
|
|
|
|
|
|
|
|
|
|
|
|
|
|
|
|
|
|
|
|
|
|
|
|
|
|
|
|
|
|
|
|
|
|
|
|
|
|
|
|
|
|
|
|
|
|
|
|
|
|
|
|
|
|
|
|
|
|
|
|
|
|
|
|
|
|
|
|
|
|
|
|
|
|
|
|
|
|
|
|
|
|
|
|
|
|
|
|
|
|
|
|
|
|
|
|
|
|
|
|
|
|
|
|
|
|
|
|
|
|
|
FTP |
||||
|
|
|
|
|
|
|
|
|
|
|
|
SMB server |
|||||||||||||||||
|
|
|
|
|
|
|
|
|
|
|
|
|
|
|
|
|
|
|
|
|
|
|
|
|
|
|
|
|
|
QUEUE |
|
|
|
|
|
|
|
|
|
|
|
|
|
|
|
|
|
|
|
|
|
|
|
|
|
|
|
|
|
(Print Job) |
|
|
|
|
|
|
|
|
|
|
|
|
|
|
|
|
|
|
|
|
|
|
|
|
|
|
|
|
|
|
|
|
|
Hard Disk |
|
|
|
|
|
|
|
|
|
|
|
|
|
|
|
|
|
|
|
|
|
|
|||
|
|
|
|
|
|
|
|
|
|
|
|
|
|
|
|
SMB |
|
||||||||||||
|
|
|
|
|
|
|
|
|
|
|
|
|
|
|
|
|
|
|
|
|
|
|
|
|
|||||
|
|
|
|
|
|
Controller |
|
|
|
|
|
|
|
|
|
|
|
|
|
|
|
Internet |
|||||||
To use the copier as a network scanner, it needs to be connected to the network. For more information on the network configuration, contact your network administrator.
bizhub PRESS C7000/C6000 |
4-2 |
4.2 |
Send by an E-Mail |
4 |
|
|
|
4.2Send by an E-Mail
You can send the data read in from the copier's ADF or the original scanning glass (scanned data) to an E- Mail address as an attached file. E-mail
For detailed information on how to operate the function, refer to page 6-4.
Original
Scan
Copier
|
SMTP server |
POP server |
|
|
|
|
|
|
|
|
||||||||||||||||||||||
|
|
|
|
|
|
|
|
|
|
|
|
|
|
|
|
|
|
|
|
|
|
|
|
|
|
|
|
|
|
|
|
|
|
|
|
|
|
|
|
|
|
|
|
|
|
|
|
|
|
|
|
|
|
|
|
|
|
|
|
|
|
|
|
|
|
|
|
|
|
|
|
|
|
|
|
|
|
|
|
|
|
|
|
|
|
|
|
|
|
|
|
|
|
|
|
|
|
|
|
|
|
|
|
|
|
|
|
|
|
|
|
|
|
|
|
|
|
|
|
|
|
|
|
|
|
|
|
|
|
|
|
|
|
|
|
|
|
|
|
|
|
|
|
|
|
|
|
|
|
|
|
|
|
|
|
|
|
|
|
|
|
|
|
|
Internet
4.2.1Items to be configured
In order to send the scanned data to an E-Mail address, the following items need to be configured.
Address (E-mail address)
Select an E-mail address from the registered addresses, or specify an address as you operate scanning. You can specify multiple addresses.
For information on how to register an address, refer to page 5-4.
Title
You can choose an E-mail title from 5 types, or you can input a title as you operate scanning. On how to input a title, refer to page 6-4.
Text
You can choose a text from 5 types, or you can input a text as you operate scanning.
On how to input a text, refer to page 6-4.
7 CAUTION
-When transmitting a message to the E-mail address, the setting of the Administrator mail address is required. For details, refer to "Administrator registration" in the User's Guide (POD Administrator's Reference).
-You can set the maximum size of an attached file (1000 KB by default) in Scan Setting. Depending on the setting, the scanned file may be stored in HDD instead of attached to the E-mail. If such is the case, an notification E-mail is sent to the address. The scanned data can be downloaded by accessing to the URL specified on the E-mail within the specified time period.
Transmission from the copier is up to the SMTP server. If the network or the POP server has any problem, the mail may not reach a recipient. When you send an important mail, do not forget to confirm the reception.
7 CAUTION
-Depending on settings of the recipient server, the size of an attached file is regulated. For details, contact your administrator.
bizhub PRESS C7000/C6000 |
4-3 |

4.3 |
Storing in Hard Disk |
4 |
|
|
|
4.3Storing in Hard Disk
The data scanned from the copier's ADF or the original glass (the scanned data) can be stored in a user box configured in the hard disk.
For detailed information on how to operate the function, refer to page 6-10.
The data stored in the hard disk can be imported to computers through the network.
dReference
Refer to the User's Guide that came with your IC-306/IC-413 for more information about method to import the scanned data to a computer.
Original
Scan
Copier
HDD
4.3.1Items to be configured
In order to store the scanned data on the hard disk, the following items need to be configured.
User Box Name
Enter any User Box Name.
The User Box has to be created with Fiery Web Tools/Command WorkStation beforehand. The job is canceled if you enter the User Box that has not been created.
Refer to page 5-6 for more information about method to create the User Box.
Register Name
You specify a register name of the user box.
Reference Name
You specify a reference name as a keyword for searching.
dReference
You can register Box Name, Register Name, and Reference Name in advance. On how to register it, refer to page 5-6.
bizhub PRESS C7000/C6000 |
4-4 |

4.4 |
Sending to the FTP Server |
4 |
|
|
|
4.4Sending to the FTP Server
You can send the data read in from the copier's ADF or the original scanning glass (scanned data) to the FTP server.
The scanned data sent to the FTP server can be downloaded from computers that have access to the FTP server.
For detailed information on how to operate the function, refer to page 6-16.
Original
Scan
Copier
FTP server
Internet
4.4.1Items to be configured
In order to send the scanned data to the FTP server, the following items need to be configured.
Register Name
You specify a register name of the FTP server.
Reference Name
You specify a reference name as a keyword for searching.
Host Address
You specify an FTP server name or an IP Address of the FTP server.
File Path
You specify a directory in the FTP server.
Login Name
You specify a Login Name for the FTP server.
Password
You specify a corresponding Password to each Login Name for the FTP server.
Port No.
You specify a Port No. when necessary.
For information on how to configure a Port No., refer to page 6-16.
dReference
You can register a Register Name, Reference Name, Host Address, File Path, Login Name, Password, and Port No. beforehand. On how to register it, refer to page 5-10.
bizhub PRESS C7000/C6000 |
4-5 |

4.4 |
Sending to the FTP Server |
4 |
|
|
|
7 CAUTION
-Depending on a network condition, transmission to the FTP server may damage the scanned data. Make sure that the scanned data are not damaged.
bizhub PRESS C7000/C6000 |
4-6 |
Loading...