


i
EP4000/EP5000
Thank you for choosing Minolta.
This operator’s manual explains how to operate the copier and replenish its supplies. It also gives some troubleshooting tips as well as general precautions to be observed when operating the copier.
To ensure the best performance and effective use of your copier, read this manual carefully until yo u familiarize yourself thoroughly with its operation and features. After you have read through the manual, keep it for ready reference.
Please use this manual as a quick and handy reference tool for immediately clarifying any questions which may arise.
CE Marking (Declaration of Conformity)
We declare under our sole responsibility that the copier and options to which this declaration relates is in conformity with the specifications below.
This declaration is valid for the area of the European Union (EU) only.
Product Type |
Copying Machine |
||
Product Name |
EP4000/EP5000 |
||
Options |
AF-5, AFR-13, S-106, ST-104, S-208, ST-211, C-301, PF-5D, PF-205, |
||
|
PF-105, AD-9, D-102, DT-103, E2000Kit |
||
Standards |
Safety*2 |
: |
EN 60 950 / 1992 (A1 : 1993, A2 : 1993, A3 : 1995) |
|
|
|
(Safety of information technology equipment, including electrical |
|
|
|
business equipment) |
|
EMC*1 |
: |
EN 55 022 (Class B) / 1995 |
|
|
|
(Limits and method for measurement of radio disturbance |
|
|
|
characteristics of information technology equipment (ITE)) |
|
|
|
EN 50 082-1 / 1992 |
|
|
|
(Electromagnetic compatibility - Generic immunity standard |
|
|
|
Part1: Residential, commercial and light industry) |
|
|
|
IEC 801-2 / 1991 (Electrostatic discharge requirement) |
|
|
|
IEC 801-3 / 1984 (Radiated electromagnetic field requirement) |
|
|
|
IEC 801-4 / 1988 (Electrical fast transient / burst requirement) |
|
Notes |
: |
*1) EMC performance : This product was designed for operation |
|
|
|
in a typical office environment. |
|
|
|
*2) First year of labeling according to EC-directive 73/23/EEC |
|
|
|
and 93/68/EEC :97 |
EC Directives |
Safety |
: |
73 / 23 / EEC and 93 / 68 / EEC |
|
EMC |
: |
89 / 336 / EEC and 93 / 68 / EEC |

|
|
ii |
Contents |
|
|
|
|
|
|
|
|
Terms and Symbols for the Type of Originals and Copy Paper |
vi |
|
|
|
|
Chapter 1 Safety Notes |
|
p. 1 |
|
|
|
1. Installing the Copier |
p. 2 |
|
Installation Site |
|
|
Power Source |
|
|
Space Requirements |
|
|
2. Precautions for Use |
p. 3 |
|
Operating Environment |
|
|
Using the Copier Properly |
|
|
Moving the Copier |
|
|
Care of Copier Supplies |
|
|
|
|
|
Chapter 2 Getting to Know Your Copier |
p. 5 |
|
|
|
|
1.Typical Types of Copies You Can Make with Your Copier p. 6
2.System Overview p. 8
3. |
Copier Parts and Accessories p. 10 |
4. |
Control Panel Keys and Indicators p. 16 |
5. |
Using the Touch Panel p. 18 |
|
What is the Touch Panel? |
|
How the Screen is Organized |
|
Operating the Touch Panel |
6. |
Turning ON and OFF and Initial Mode p. 20 |
|
Turning ON and OFF |
|
Initial Mode |
7. |
Auxiliary Functions p. 21 |
•Panel Resetting
•Auto Panel Reset
•Auto Copy Start
•Auto Power-OFF
•Energy Saver
•Interrupt
•Mode Check
•Access Number

iii
Contents
Chapter 3 Making Copies |
p. 23 |
|
|
1.Basic Copying Overview p. 24
2.Placing Originals p. 26
3.Manual Bypass Copying p. 32
4.Basic Functions
Copy Paper Size p. 34 Zoom Ratio p. 36 Image Density p. 40
5. Selecting the Original ▲ Copy Type p. 42
• 1 |
▲ 1 |
• 1 |
▲ 2 |
• 2 |
▲ 1 |
• 2 |
▲ 2 |
• 1 |
▲ [2in1] |
• 1 |
▲ 2[2in1] |
• 1[2in1] |
▲ 1 |
• 2[2in1] |
▲ 1 |
• Book▲1 |
|
• Book▲2 |
|
6. Finishing Mode p. 48
•Non-Sort
•Sort
•Sort Staple
•Group
•Hole Punch
•Manual Staple
•Auto Dual Function
7. Auxiliary Functions p. 58
• Cover p. 58
• Auto Original Count p. 61
• Page Insertion p. 62
• OHP Interleaving |
p. 68 |
• File Margin p. 72 |
|
• Edge/Frame Erase |
p. 74 |
Chapter 1
Safety Notes
Chapter 2
Getting to Know Your Copier
Chapter 3
Making Copies
Chapter 4
Using the User
Mode
Chapter 5
When a Message
Appears
Chapter 6
Troubleshooting
Chapter 7
Miscellaneous

|
|
iv |
|
|
Contents |
|
|
|
|
|
|
|
|
|
Chapter 4 Using the User Mode |
p. 77 |
|
|
|
|
1. |
Job Memory Input and Job Recall |
|
|
Job Memory Input p. 78 |
|
|
Recalling a Job from Memory p. 81 |
|
2. |
Zoom Memory Input p. 82 |
|
3. |
Meter Count, Toner Replenisher, and Drum Dehumidifier p. 83 |
|
4. |
User’s Choice p. 84 |
|
|
• User’s Choice Functions p. 84 |
|
|
• Making the User’s Choice Settings p. 90 |
|
|
• Copy Track Function p. 92 |
|
5. |
Data Send p. 100 |
|
|
|
|
Chapter 5 When a Message Appears |
p. 101 |
|
|
|
|
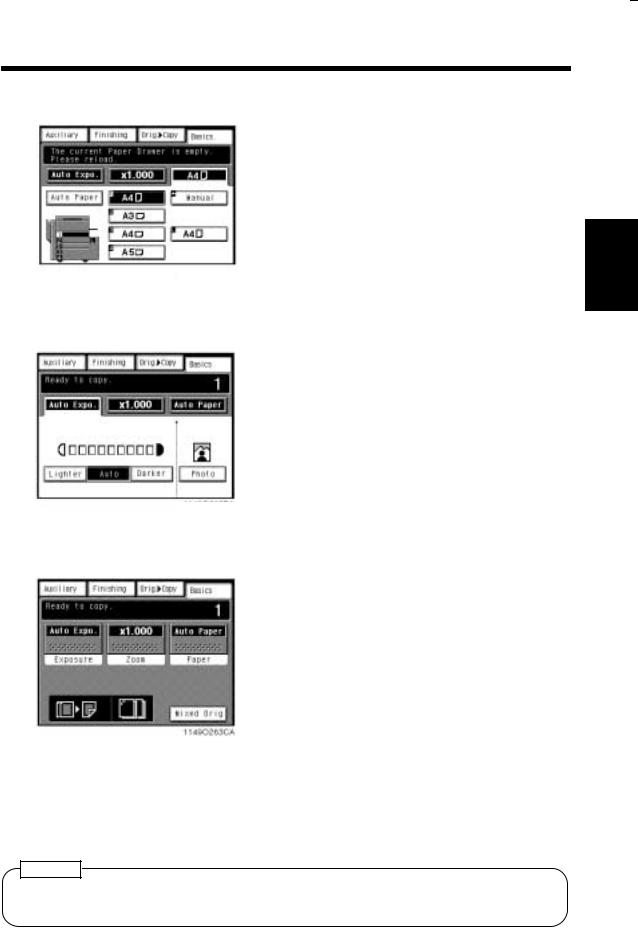
1.When the Message "The current Paper Drawer is empty." Appears p. 102
2.When the Message "Replenish Toner." Appears p. 108
3.When the Message "The Staple Cartridge is empty." Appears p. 110
4.When the Message "A paper misfeed has been detected."
Appears |
p. 114 |
|
|
• Misfeed Location Displays |
p. 114 |
|
|
• Misfeed Clearing Procedures |
|
|
|
Copier |
p. 115 |
|
|
Copier (Multi Bypass Tray) |
p. 117 |
|
|
Paper Feed Cabinet (2-Drawer Type) |
p. 118 |
||
Paper Feed Cabinet (1-Drawer Type) |
p. 119 |
||
Duplex Unit p. 120 |
|
|
|
Large Capacity Cassette p. 121 |
|
||
Duplexing Document Feeder |
p. 122 |
|
|
Automatic Document Feeder |
p. 123 |
|
|
Sorter/Staple Sorter p. 124 |
|
|
|
5.When “  ” Appears p. 125
6.What Does Each Message Mean? p. 126

v
Contents
Chapter 6 |
Troubleshooting |
p. 129 |
|
|
|
|
|
|
|
|
1. When This Type of Copy is Produced |
p. 130 |
|
|
|
Chapter 1 |
|||
|
2. The Copier is not Functioning as Designed p. 132 |
|||
|
|
|||
Chapter 7 |
Miscellaneous |
p. 133 |
|
Safety Notes |
|
|
|||
|
|
|
|
|
|
1. Specifications p. 134 |
|
|
|
|
|
|
|
|
|
• Copier |
|
|
Chapter 2 |
|
• Duplexing Document Feeder |
|
|
|
|
|
|
|
|
|
• Automatic Document Feeder |
|
|
Getting to Know |
|
• Sorter (10-Bin) |
|
|
Your Copier |
|
• Sorter (20-Bin) |
|
|
|
|
|
|
|
|
|
• Staple Sorter (10-Bin) |
|
|
Chapter 3 |
|
• Staple Sorter (20-Bin) |
|
|
|
|
|
|
|
|
|
• Paper Feed Cabinet (2-Drawer Type) |
|
|
|
|
|
|
Making Copies |
|
|
• Paper Feed Cabinet (1-Drawer Type) |
|
|
|
|
|
|
|
|
|
• Duplex Cabinet |
|
|
|
|
• Duplex Unit |
|
|
Chapter 4 |
|
• Large Capacity Cassette |
|
|
|
|
• Data Controller |
|
|
|
|
|
|
|
|
2. Care of the Copier p. 140 |
Using the User |
|
Mode |
||
• Cleaning |
||
|
3.Function Combination Matrix p. 142
4.Description of Copy Paper Size and Zoom Ratio Table p. 145
5.Index p. 146
Chapter 5
When a Message
Appears
Chapter 6
Troubleshooting
Chapter 7
Miscellaneous
vi
Terms and Symbols for the Type of Originals and Copy Paper
A few special terms and symbols are used in this manual to designate types of originals and copy paper. This page explains about these terms and symbols.
Feeding Direction (copy paper path)
In this copier system, copy paper is taken up from the right-hand side of the copier and fed through the copier toward the left-hand side, face up onto the Copy Tray. In the figure below, the direction in which the copy paper is fed, as indicated by the arrow, is called the "feeding direction."
1151O107AA
"Width" and "Length"
When we talk about the size of the original or copy, we call side
A "width" and side B "length."
A:Width
B:Length
139O1610A
Terms and Symbols Used
<Lengthwise  >
>
When the original or copy has a "length" longer than its "width," we call it "lengthwise" and use symbol "L" or " 
1139O1610A
<Crosswise  >
>
When the original or copy has a "length" shorter than its "width," we call it "crosswise" and use symbol "C" or " ."
."
1139O1620A

1
Chapter 1
Safety Notes
This chapter explains about the operating environment, conditions, and precautions for use.
1. |
Installing the Copier |
p. 2 |
|
Installation Site |
|
|
Power Source |
|
|
Space Requirements |
|
2. |
Precautions for Use |
p. 3 |
|
Operating Environment |
|
|
Using the Copier Properly |
|
|
Moving the Copier |
|
|
Care of Copier Supplies |
|
Safety Notes Chapter 1
2
1. Installing the Copier
Safety Notes Chapter 1
Installation Site
To ensure utmost safety and prevent possible malfunctions of the copier, install it in a location which meets the following requirements.
u A place away from a curtain or the like that may catch fire and burn easily.
uAn area where there is no possibility of being splashed with water or other types of
liquid.
u An area free from direct sunlight.
u A place out of the direct air stream of an air conditioner, heater, or ventilator.
u A well-ventilated place. u A dry place.
A dust-free location.
An area not subject to undue vibration. A stable and level location.
A place where ammonia or other organic gas is not generated.
A place which does not put the operator in the direct stream of exhaust from the copier.
uA place which is not near any kind of heating device.
Power Source
The power source voltage requirements are as follows.
u Use a power source with little voltage fluctuation.
Voltage Fluctuation |
: |
Within ± 10% |
Frequency Fluctuation |
: |
Within ± 0.3% |
Space Requirements
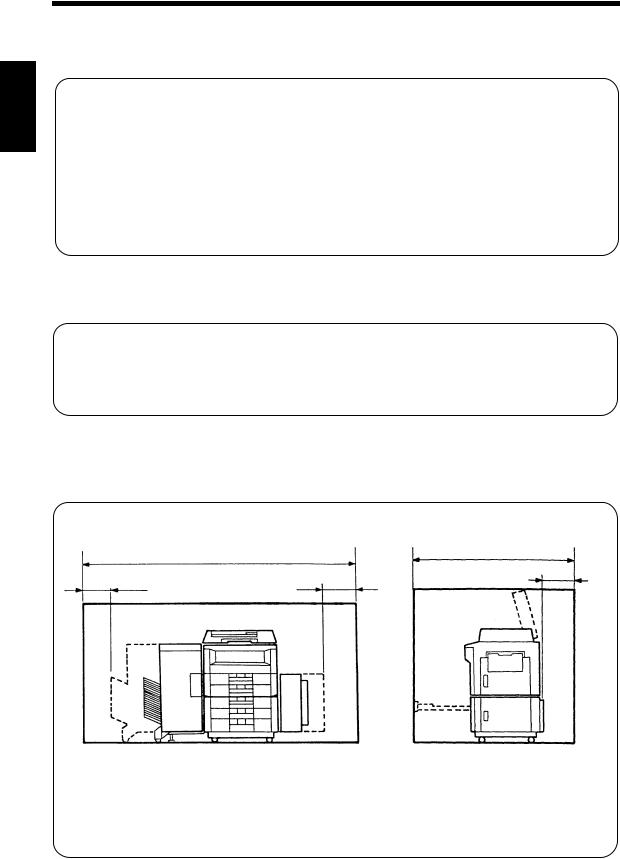
To ensure easy copier operation, supply replacement, and service maintenance, adhere to the recommended space requirements detailed below. Allow a clearance of 150mm or more at the back of the copier as there is a ventilation duct.
1,310
2,370
150
300 |
200 |
1,870
1156O008AA |
1156O009AA |
|
Unit: mm

3
2. Precautions for Use
Operating Environment
The operating environmental requirements of the copier are as follows.
Temperature |
: |
10 °C to 30°C(50°F to 86°F) with a fluctuation of 10 °C(50°F) per hour |
Humidity |
: |
15% to 85% with a fluctuation of 20% per hour. |
Using the Copier Properly
To ensure the optimum performance of the copier, follow the precautions listed below.
u NEVER place a heavy object on the copier or subject the copier to shocks.
u NEVER open any doors, or turn OFF the copier while the copier is making copies. u NEVER bring any magnetized object or use flammable sprays near the copier.
u ALWAYS insert the power plug all the way into the outlet.
u ALWAYS make sure that the outlet is visible, clear of the copier or copier cabinet.
u ALWAYS provide good ventilation when making a large number of continuous copies.
NOTE
= Locate the Copier in a Well Ventilated Room =
A negligible amount of ozone is generated during normal operation of this copier. An unpleasant odor may, however, be created in poorly ventilated rooms during extensive copier operations. For a comfortable, healthy, and safe operating environment, it is recommended that the room be well ventilated.
REMARQUE
= Placer le copieur dans une pièce largement ventilée =
Une quantité d’ozone négligable est dégagée pendant le fonctionnement du copieur quand celui-ci est utilisé normalement. Cependant, une odeur désagréable peut être ressentie dans les pièces dont l’aération est insuffisante et lors que une utilisation prolongée du copieur est effectuée. Pour avoir la certitude de travailler dans un environnement réunissant des conditions de confort, santé et de sécurité, il est préférable de bien aérer la pièce ou se trouve le copieur.
Moving the Copier
If you need to transport the copier over a long distance, consult your Technical Representative.
Care of Copier Supplies
Use the following precautions when handling the copier supplies (toner, paper, etc.).
u Store the paper, toner, and other supplies in a place free from direct sunlight and away from any heating apparatus. Keep them in a dry, cool, clean environment.
u Store paper, which has been removed from its wrapper but not loaded into the drawer, in a sealed plastic bag in a cool, dark place.
u Keep supplies out of the reach of children.
u If your hands become soiled with toner, wash them with soap and water immediately.
Safety Notes Chapter 1

4
2. Precautions for Use
Safety Notes Chapter 1
5
Chapter 2
Getting to Know Your Copier
This chapter gives you a brief description of the system and preliminary information about the different parts of the system.
1. Typical Types of Copies You Can Make with Your Copier p. 6
2.System Overview p. 8
3.Copier Parts and Accessories Outside the Copier p. 10
|
Inside the Copier |
p.11 |
|
Options p. 12 |
|
4. |
Control Panel Keys and Indicators p. 16 |
|
5. |
Using the Touch Panel p. 18 |
|
|
What is the Touch Panel? |
|
|
How the Screen is Organized |
|
|
Operating the Touch Panel |
|
6. |
Turning ON and OFF and Initial Mode p. 20 |
|
|
Turning ON and OFF |
|
|
Initial Mode |
|
7. |
Auxiliary Functions |
p. 21 |
|
Panel Resetting |
|
|
Auto Panel Reset |
|
|
Auto Copy Start |
|
|
Auto Power-OFF |
|
|
Energy Saver |
|
|
Interrupt |
|
|
Mode Check |
|
|
Access Number |
|
Getting to Know Your Copier Chapter 2
6
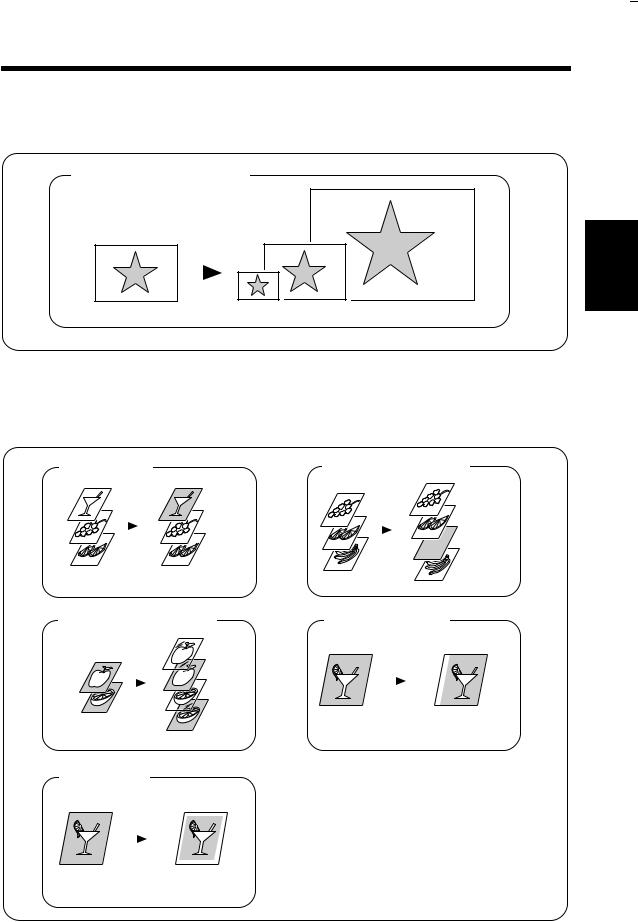
1.Typical Types of Copies You Can Make with Your Copier
Gettng to Know Your Copier Chapter 2
Here’s a rundown of the features the copier is equipped with to turn out different types of copies. For the operations, see the relevant pages indicated by p.
Original |
▲ |
Copy p. 42 |
|
|
|
|||
|
|
|
|
|
1-sided |
|
2-sided |
|
|
1-sided |
▲ |
1-sided |
|
||||
|
|
|
|
|
|
▲ |
|
|
|
|
|
|
|
|
|
|
|
|
A |
A |
|
A |
B |
A |
|
|
|
B |
|||
|
|
1149O025AA |
|
|
|
1149O026AA |
|
|
|
|
|
|
|
|
|
|
|
|
|
1149O026AA |
Book |
▲ 1-sided |
|
|
2-in-1 |
|
|
A B |
A B |
A B |
A B |
|||
|
|
1149O027AA |
|
|
1149O028AA |
|
Sort p. 48 |
|
|
|
|
|
|
Sort |
|
|
|
|
Sort-and-Staple |
|
1 |
|
1 |
1 |
1 |
1 |
|
2 |
|
2 |
2 |
2 |
2 |
1 |
3 |
|
3 |
3 |
3 |
3 |
|
|
|
|
|
1149O029AA |
|
1149O031AA |
|
|
|
|
1149O029AA |
|
1149O031AA |
Group |
|
|
|
|
Hole Punch |
|
1 |
|
1 |
2 |
3 |
1 |
1 |
2 |
|
1 |
2 |
3 |
2 |
2 |
3 |
|
1 |
2 |
3 |
3 |
3 |
|
|
|
|
1149O030AA |
|
1149O032AA |
|
|
|
|
1149O030AA |
|
1149O032AA |
7
1. Typical Types of Copies You Can Make with Your Copier
Zoom Ratio p. 36
Reduced, Full Size, Enlarged
1149O004AA |
1149O004AA |
Auxiliary Functions p. 58
Cover p. 58 |
Page Insertion p. 62 |
Getting to Know Your Copier Chapter 2
1149O013AA |
|
1149O013AA |
|
|
1149O014AA |
OHP Interleaving p. 68 |
File Margin p. 72 |
1149O015AB
1149O015AC
1149O017AA
Erase p. 74
1149O016AA
1149O016AA
8
2. System Overview
Chapter 2
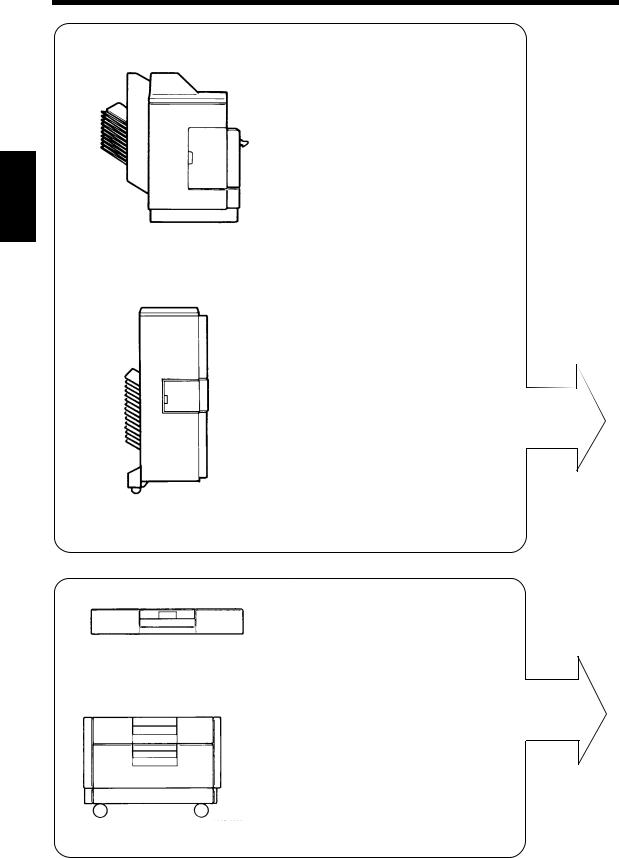
10-Bin Sorter S-106 <Option>
Permits sorting or grouping copies into up to 10 copy sets or stacks.
Staple Sorter ST-104 <Option>
Automatically staples copy sets or stacks that are sorted or grouped by the same function as that of S-106.
1136O020A
Getting to Know Your Copier
20-Bin Sorter S-208 <Option>
Permits sorting or grouping copies into up to 20 copy sets or stacks.
Staple Sorter ST-211 <Option>
Automatically staples, and/or punches holes in, copy sets or stacks that are sorted or grouped by the same function as that of S-208.
1136O059AA
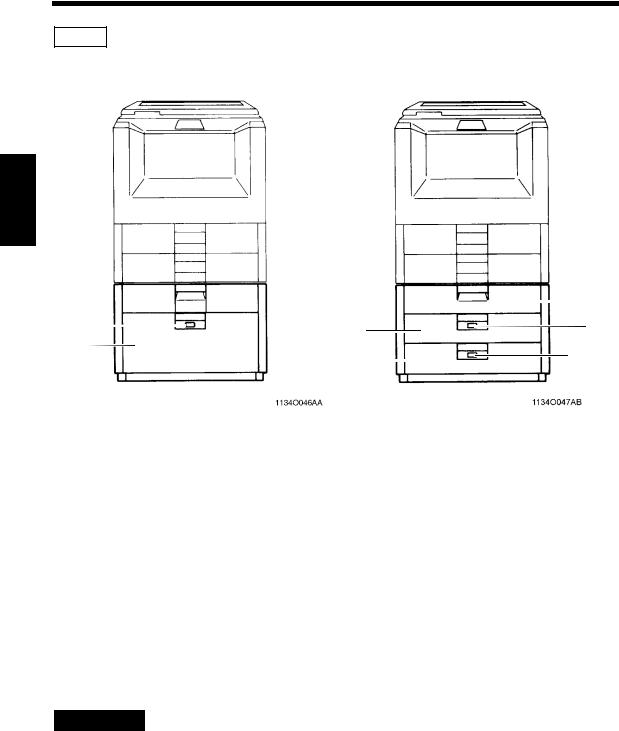
Duplex Unit AD-9 <Option>
Mounted in the Paper Feed Cabinet, AD-9 automatically turns over 1-sided copies to make 2-sided
copies.
1139O0030A
Duplex Cabinet PF-5D<Option>
Turns over 1-sided copies to make 2-sided copies. It is also equipped with a storage drawer for keeping copy paper and toner.
1139O1222A
9
2. System Overview
1151O007AA
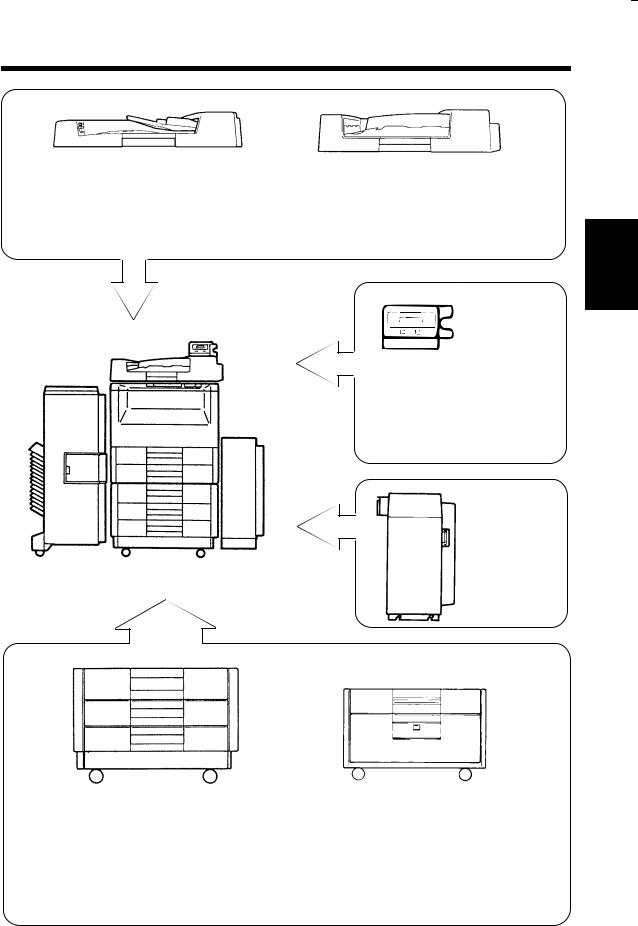
Automatic Document Feeder AF-5 <Option>
Capable of feeding in sheet originals one at a time for making a copy or copies of each.
1156O013AA
1139O0180A
1156O012AA
Duplexing Document Feeder AFR-13 <Option>
In addition to the function of the AF-5, it can turn over 2-sided originals for making copies.
1138O525A
Data Controller D-102 <Option>
Capable of controlling various types of data including the number of copies made, copy cost, and user departments by means of specific magnetic cards.
Large Capacity Cassette C-301 <Option>
Holds up to 3,000 sheets of
copy paper (80 g/m2).
1134O005AA
1139O0012A
Paper Feed Cabinet PF-205 <Option> |
Paper Feed Cabinet PF-105 <Option> |
Equipped with two paper drawers, each |
Equipped with a large-capacity drawer to hold |
capable of holding up to 500 sheets of copy |
up to 2,500 sheets of copy paper (80 g/m2). |
paper (80 g/m2). |
|
Getting to Know Your Copier Chapter 2
10
3. Copier Parts and Accessories
Getting to Know Your Copier Chapter 2
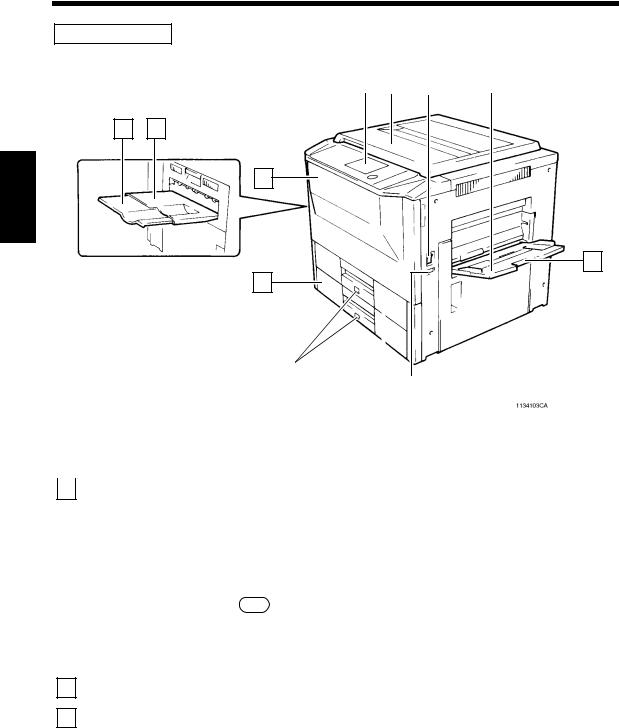
Outside the Copier
4 |
|
5 |
|
6 |
|
7 |
|
|
|
|
|
|
|
1 2
3
8
11
|
|
|
|
|
|
|
|
|
|
|
|
|
|
|
|
12 |
|
|
|
|
|
|
|
1134O103CA |
|
|
Exit Tray Extender |
10 |
|
9 |
|
|
||||||
|
|
|
|
|
|
|
|
|
||||
|
|
|
|
|
|
|
|
|
||||
|
|
|
|
|
|
|||||||
|
: Slide this Extender out when making copies on large-size paper. |
|||||||||||
1 |
||||||||||||
|
Exit Tray |
: Holds copies fed out of the copier. |
||||||||||
|
||||||||||||
2 |
||||||||||||
|
Front Door |
: Open to: |
|
|
|
|
|
|||||
|
|
|
|
|
|
|||||||
3 |
|
|
|
|
|
|||||||
•Replace the Toner Bottle. p. 108
•Clear a paper misfeed. p. 115
•Clean the Corona Unit. p. 141
|
|
Closing the Front Door after a misfeed has been cleared will turn |
|
|
the misfeed warning message on the control panel OFF. |
|
Control Panel |
: Use to start a copy cycle or to make copying job settings. |
4 |
||
|
|
See Control Panel Keys and Touch Panel. p. 16 |
|
|
|
|
Original Cover |
: Holds the original placed on the Original Glass in position. p. 29 |
5 |
||
|
<Option> |
: Use to turn the copier ON and OFF. p. 20 |
|
||
6 |
Power Switch |
|
|
|
|
7Multi Bypass Tray : Use for manual feeding of copy paper into the copier. p. 32
8Multi Bypass Extender : Slide this Extender out to make copies on large-size copy paper.
9 |
Total Counter |
: Shows the total number of copies made so far. |
|
1st Drawer |
: Holds up to 500 sheets of copy paper. p. 102 |
10 |
||
|
2nd Drawer |
: Holds up to 500 sheets of copy paper. p. 103 |
|
||
11 |
||
|
Paper Descent Key |
It can accommodate paper of different sizes. |
|
||
|
: Press before sliding the Drawer out of the copier. |
|
12 |
||
|
|
|
11
3. Copier Parts and Accessories
Inside the Copier
5
4
6
3
2
7
1
10
9
1Toner Bottle Holder
2Toner Bottle
8
10 |
1134O009AA |
:Swing open to replace the Toner Bottle.
:Contains toner. Replace it with a new one when the warning message tells you to. p. 108
3Original Width Scale : Place the original along this Scale for correct positioning.
4Original Length Scale : Place the original along this Scale for correct positioning.
5 |
Original Pad |
: Holds the original in position on the Original Glass. |
|
Original Glass |
: Place the original face down on this Glass. |
6 |
||
|
Corona Unit Cleaning |
: Operate the Lever to clean the Corona Unit if unwanted lines are |
|
||
7 |
||
|
Lever |
produced on the copy. p. 141 |
|
||
|
Dehumidifier Switch |
: Do not touch this switch, it’s for the exclusive use by the |
8 |
||
|
Transport Section |
Technical Representative. |
|
||
|
: Swing down to release the Transport Section for clearing a misfed |
|
9 |
||
|
Release Lever M2 |
sheet of paper. |
|
||
|
Misfeed Removal |
: Use to clear a misfed sheet of paper. p. 115 |
10 |
||
|
Knobs M1 , M3 |
|
|
|
Getting to Know Your Copier Chapter 2
12
3. Copier Parts and Accessories
Options
Getting to Know Your Copier Chapter 2
|
|
|
|
|
|
|
|
|
|
|
|
|
|
|
|
|
|
6 |
|
|
|
|
|
|
|
|
|
|
|
|
|
|
|
|
|
|
|
|
|
||
|
|
|
|
|
|
|
|
|
|
|
|
|
|
|
|
|
|
|
|
|
|
|
|
|
|
|
|
|
|
|
|
|
|
|
|
|
|
|
|
|
|
|
|
1 |
|
|
|
|
|
|
|
3 |
|
|
|
|
|
|
|
5 |
|
|
|
|
|
|
|
|
|
|
|
|
|
|
|
|
|
|
|
||||
|
|
|
|
|
|
|
|
|
|
|
|
|
|
|
|
|||||
|
|
|
|
|
|
|||||||||||||||
|
|
2 |
|
|
|
|
|
|
|
|
|
|
|
|
|
|
|
|
|
|
|
|
|
|
|
|
|
|
|
4 |
|
|
|
|
|
|
|
|
|
||
|
|
|
|
|
|
|
|
|
|
|
|
|
|
|
|
|
||||
|
|
|
|
|
|
|
|
|
|
|||||||||||
|
|
|
|
|
|
|
|
|
|
|
|
|
|
|
|
|
|
|
|
|
|
|
|
|
|
|
|
|
|
|
|
|
|
|
|
|
|
|
|
|
|
|
|
|
|
|
|
|
|
|
|
|
|
|
|
|
|
|
|
|
|
|
|
|
|
|
|
|
|
|
|
|
|
|
|
|
|
|
|
|
|
|
|
|
|
|
|
|
|
|
1134O046AA |
|
|
|
|
|
|
|
1134O047AB |
|||||
|
|
|
|
|
|
|
|
|
|
|
|
|
|
|
|
|
|
|
|
|
|
|
|
|
|
|
|
|
|
|
|
|
|
||||||||
|
Paper Feed Cabinet (1-Drawer Type) |
|
|
|
|
|
|
|
|
|
|
|
|
|||||||
|
|
|
|
|
|
|
|
|
|
|
|
|
|
|
|
|
||||
|
|
|
Paper Descent Key |
: Press before sliding the Drawer out of the cabinet. |
|
|
|
|
||||||||||||
|
1 |
|
|
|
|
|
||||||||||||||
|
|
|
3rd Drawer |
: Holds up to 2,500 sheets of copy paper. p. 104 |
|
|
|
|
||||||||||||
|
|
|
|
|
|
|
||||||||||||||
|
2 |
|
|
|
|
|
||||||||||||||
|
|
|
|
|
|
|
|
|
|
|
|
|
|
|
||||||
|
|
|
|
|
|
|||||||||||||||
|
Paper Feed Cabinet (2-Drawer Type) |
|
|
|
|
|
||||||||||||||
|
|
|
3rd Drawer |
: Holds up to 500 sheets of copy paper. p. 105 |
|
|
|
|
||||||||||||
|
3 |
|
|
|
|
|
||||||||||||||
|
|
|
4th Drawer |
: Holds up to 500 sheets of copy paper. p. 105 |
|
|
|
|
||||||||||||
|
|
|
|
|
|
|
||||||||||||||
|
4 |
|
|
|
|
|
||||||||||||||
|
|
|
Paper Descent Key |
: Press before sliding the Drawer out of the cabinet. |
|
|
|
|
||||||||||||
|
|
|
|
|
|
|
||||||||||||||
|
5 |
|
|
|
|
|
||||||||||||||
|
|
|
|
|
|
|
|
|
|
|
|
|
|
|
|
|
|
|
|
|
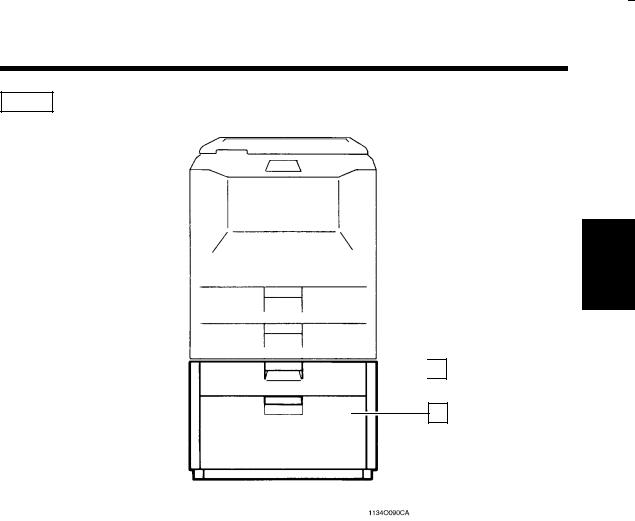
Duplex Unit
6 |
Duplex Unit |
: Turns over 1-sided copies for making 2-sided copies. |
|
|
|
13
3. Copier Parts and Accessories
Options
 1
1
2
|
|
|
|
|
|
|
1134O090CA |
|
|
|
|
|
|
||
|
|
|
|
|
|
|
|
|
|
|
|
|
|
|
|
|
|
|
|
|
|
|
|
|
Duplex Cabinet |
|
|
|
|
|
|
|
|
|
|
|
|
|
|
|
|
Duplex Unit |
: Turns over 1-sided copies for making 2-sided copies. |
||||
|
1 |
||||||
|
|
Storage Drawer |
: Holds copy paper, toner and other supplies. |
||||
|
|
||||||
|
2 |
||||||
|
|
|
|
|
|
|
|
Getting to Know Your Copier Chapter 2

Getting to Know Your Copier Chapter 2
14
3. Copier Parts and Accessories
Options
9 |
|
5 |
|
6 |
|
7 |
|
|
|
|
|
|
|
4
3
2 |
|
8 |
9 |
1
1156O010AA
20-Bin Sorter/20-Bin Staple Sorter
1Sort Bins (1st to 20th : Hold sorted or grouped copies, each capable of holding up to 50.
Bin)
2 |
Non-Sort Bin |
: Holds up to 100 copies fed out in the Non-Sort mode. |
|
Lock Release Lever |
: Press to unlock the Sorter from the copier for clearing a misfed |
|
||
3 |
||
|
Staple Cover |
sheet of paper or other service job. |
|
||
4 |
: Open to replace the Staple Cartridge. |
|
|
|
*Staple Sorter only |
|
|
Automatic Document Feeder/Duplexing Document Feeder
5 |
Document Exit Tray |
: Receives originals that are auomatically ejected from Document |
|
|
Feeder. |
|
|
6Document Feed Tray : Pull out when loading large-size originals.
Extender
7Document Feed Tray : Load the originals face up on this tray.
8Document Guide Plate Slide the plate as necessary to the size of the originals.
9 |
Single Feed Tray |
Place a single sheet of original on the tray to make a copy or |
|
|
copies of it. p. 28 |
|
|
15
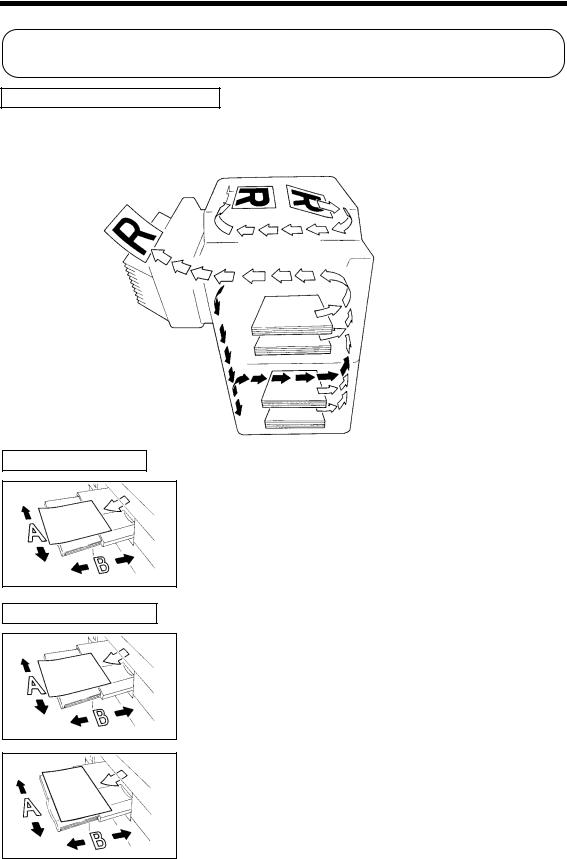
3. Copier Parts and Accessories
Options
4
1
5
2 
 6
6
7
3
|
|
|
|
|
|
1156O011AA |
|
|
|
|
|
|
|||
|
|
|
|
|
|
|
|
|
10-Bin Sorter /10-Bin Staple Sorter |
|
|
|
|||
|
|
|
|
|
|
|
|
|
|
Lock Replase Lever |
: Press to unlock the sorter. pp. 110, 124 |
||||
|
1 |
||||||
|
|
Sort Bins |
: Hold sorted or grouped copies. |
||||
|
|
||||||
|
2 |
||||||
|
|
Stapler Door |
: Open to replace the Staple Cartridge. p. 110 |
||||
|
|
||||||
|
3 |
||||||
|
|
|
|
*Staple Sorter only |
|||
|
|
|
|
||||
|
|
|
|
|
|
||
|
Data Controller |
|
|
|
|
|
|
|
|
|
|
|
|
|
|
|
|
Data Controller |
: See the operator’s manual for the Data Controller for details. |
||||
|
4 |
||||||
|
|
|
|
|
|
|
|
|
|
|
|
|
|
||
|
Large Capacity Cassette |
|
|
|
|
||
|
|
|
|
|
|
||
|
|
Lock Release Lever |
: Use to unlock the Cassette from the copier for clearing a misfed |
||||
|
5 |
||||||
|
|
|
|
sheet of paper or other service job. |
|||
|
|
|
|
||||
|
6 |
Paper Plate Descent Key : Press to lower the Paper Plate. |
|||||
|
|
Cassette Door |
: Open to add paper or clear a misfed sheet of paper. |
||||
|
|
||||||
|
7 |
||||||
|
|
|
|
|
|
|
|
Getting to Know Your Copier Chapter 2
16
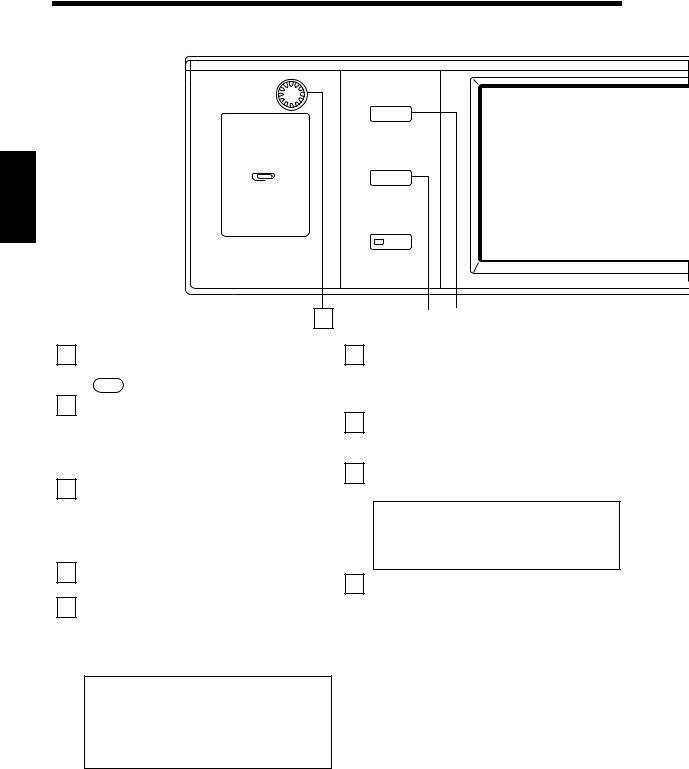
4. Control Panel Keys and Indicators
Getting to Know Your Copier Chapter 2
User Mode p d ª · e R s [ {
R s [ ¯ « |
• |
|
1 |
|
|
||
Z x I [ g |
x1.000 |
p |
I [ |
Job Recall |
|
|
|
Z x |
{ ƒ |
|
p |
Mode Check |
|
|
|
1
2
3
4
5
13
Touch Panel
• Shows various screens and messages. See Touch Panel p. 18
Start Key
•Press to start a copy cycle. p. 25
•If pressed while the copier is warming
up, it enables the Auto Copy Start Function. p. 21
Clear Key
Press to:
•Reset the multi-copy entry to 1. p. 25
•Clear a zoom ratio entered when setting one from the 10-Key Pad. p. 38
Stop Key
•Press to stop a multi-copy cycle. p. 25
Panel Reset Key
•Press to set the copier into the initial
mode, clearing all settings made previously on the control panel. p. 21
Note: It does not, however, clear the contents of the zoom and job program memory and the settings made immediately before the Interrupt mode.
|
|
|
|
|
|
12 |
|
11 |
|
10 |
|
|
|
|
|
|
|
6Interrupt Key p. 22
•Press to interrupt a current job with a different one.
•Press it again to return to the previous job.
7Energy Saver Key
•Press to set the copier into the Energy Saver mode. p. 21
8Access Mode Key
•Press to enter the access number. p. 22
Note: This key becomes valid only when Copy Track of the Administrator mode available from User’s Choice is set.
910-Key Pad
Use to enter:
•The number of copies to be made. p. 25
•The zoom ratio to be used. p. 38
•The number of originals.

17
|
|
|
|
|
|
|
|
|
4. Control Panel Keys and Indicators |
|
|
|
|
|
|
|
|
9 |
|
|
|
|
|
|
|
|
|
|
Access |
|
|
d ª |
· e |
R s [ |
|
1 |
2 |
3 |
8 |
|
|
{ |
|
|
|
|
|||
[ ¯ « |
• |
|
|
1 |
4 |
5 |
6 |
Energy Saver |
|
|
|
|
|
|
|
|
|
7 |
|
|
|
|
|
|
|
|
|
|
|
x |
I [ |
g |
x1.000 |
p |
I [ g |
7 |
8 |
9 |
|
|
|
|
|
||||||
|
|
|
|
|
|
|
|
|
Interrupt |
|
|
|
|
|
|
|
0 |
C |
6 |
Z |
x |
|
{ ƒ |
|
p |
Start |
|
|
|
|
|
|
|
|
|
||||
|
|
|
|
|
|
|
|
Stop |
|
|
|
|
|
|
|
|
|
|
Panel Reset |
5
1 |
|
2 |
|
3 |
|
4 |
1149O002EA |
|
|
|
|
|
|
|
|
10User Mode Key
• Press to show the User Mode menu.
User Mode
• Job Memory Input |
• Toner Replenisher |
• Zoom Memory Input |
• Drum Dehumidifier |
• Meter Count |
• User’s Choice |
See Using the User Mode p. 77
1156O088DA
11 Job Recall Key
•Press to show the Job Recall screen, on which you can recall or check a copy-job program previously stored in memory.
See Recalling a Job from Memoryp. 81
1149O260CA
12Mode Check Key
•Press to show the Mode Check screen. From this screen, you can access the setting screen of a particular function and
change or cancel the setting as necessary. See Mode Check p. 22
13Display Contrast Knob
•Turn to vary the brightness of the Touch Panel.
Getting to Know Your Copier Chapter 2
1149O259CA
18
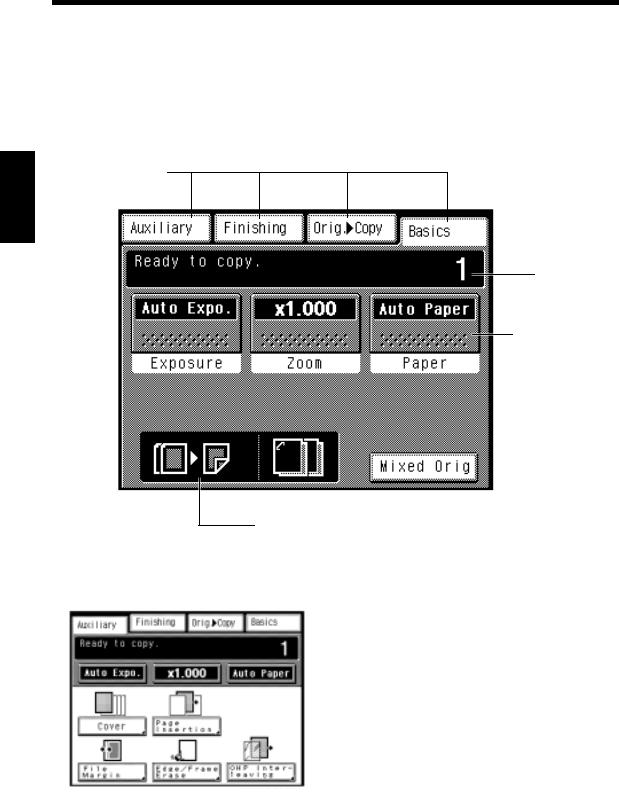
5. Using the Touch Panel
What is the Touch Panel?
When you turn ON the Power Switch, the Basic screen as shown below appears on the Touch Panel. It shows in messages and graphics the currently set functions, available functions to choose from, and the copier status.
Getting to Know Your Copier Chapter 2
How the Screen is Organized
(1) Supplementary
Function Keys
(2)Message Display
(3)Basic Function/Key
1149O263CA
(4) Set Function
(1) Supplementary Function Keys
1149O265CA
The Auxiliary, Finishing, Orig. |
▲ |
Copy, and |
|
Basics keys are displayed. When any of these keys is touched, the corresponding supplementary function screen appears.
*Touching Basics returns you to the Basic screen.
Example: Auxiliary Function
19
5. Using the Touch Panel
(2) Message Display
Shows the current copier status, operating instructions, precautions, and other data including the number of copies selected.
1156O062DA
Example: Add paper
(3) Basic Function/Key Display
Shows the basic function keys and the corresponding functions currently selected for use. Touching a basic function key shows the corresponding basic function screen.
*What is shown inside the key is the current setting.
1149O268BA
Example: Exposure
(4) Set Function Display
Shows graphic representations of the settings
currently made for Orig. |
▲ |
Copy and Finishing. |
*When you want to check for more details of the set functions, press the Mode Check key.
p. 22
|
|
|
1149O263CA |
|
|
|
|
|
|
Example: Orig. ▲ |
Copy : 1 |
▲ |
2 |
|
Finishing |
: Sort-and-Staple |
|||
Operating the Touch Panel
You need only to lightly touch the key shown on the Touch Panel to select or activate the function represented by the key.
NOTE
Getting to Know Your Copier Chapter 2
NEVER press the Touch Panel hard or use a hard or pointed object to press it, as a damaged panel could result.
20
6. Turning ON and OFF and Initial Mode
Getting to Know Your Copier Chapter 2
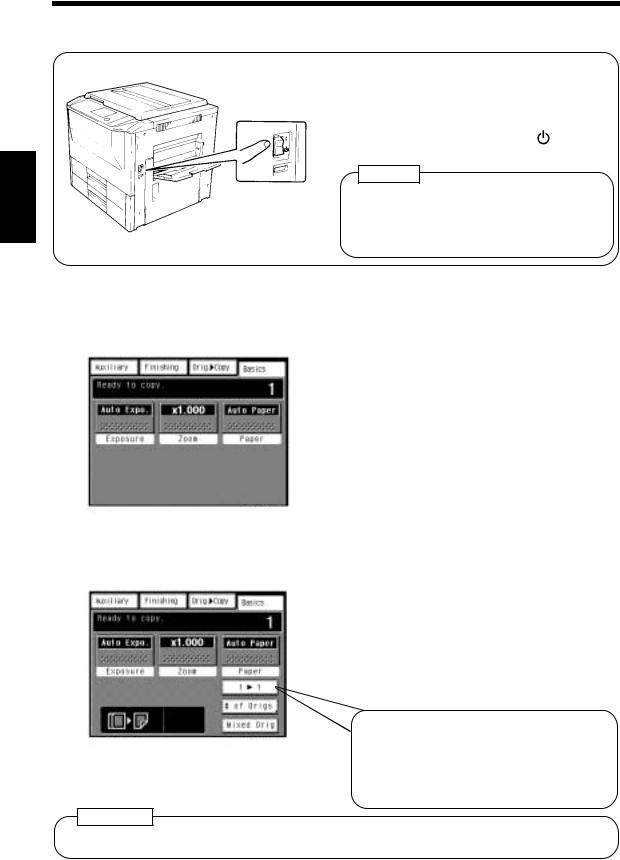
Turning ON and OFF
1134O016AA
● Turning the Copier ON |
|
Press the Power Switch to the |
I (ON) |
position. |
|
● Turning the Copier OFF |
|
Press the Power Switch to the |
(OFF) |
position. |
|
NOTE
The Auto Power-OFF function will automatically shut down the copier a given period of time after the last activity.
p. 88
Initial Mode
When the Power Switch is turned ON, the Basic screen appears on the Touch Panel. The settings on this screen are called the initial mode, serving as the reference for all panel settings to be later made.
No. of copies selected |
: |
1 |
Exposure |
: |
Auto |
Zoom |
: |
× 1.000 |
Paper |
: |
Auto Paper |
Finishing |
: |
Non-Sort |
Orig. ▼ Copy |
: |
1 ▼1 |
1149O413CA
The settings of the initial mode vary depending on which option or options are mounted on your copier.
1149O270CA
Example: When the Automatic Document Feeder and Duplex Unit are mounted
Useful Tip
No. of copies selected |
: |
1 |
Exposure |
: |
Auto |
Zoom |
: |
X1.000 |
Paper |
: |
Auto Paper |
Finishing |
: |
Non-Sort |
Orig. ▼ Copy |
: |
1 ▼2 |
 When the copier is equipped with the Document Feeder and Duplex Unit, 1 copy mode is automatically selected, Touch this Key if you want to make 1 copies.
▼ ▼
2
1
User’s Choice can be used to change the settings of initial mode. p. 84
21
7. Auxiliary Functions
Panel Resetting
The Panel Reset key resets all control panel settings to default settings including the number of copies and zoom ratio.
*If a document feeder is used, any original left on the Glass will be ejected out of the unit.
Useful Tips
•The Panel Reset key enables you to cancel all previous settings at the touch of the key.
•To avoid miscopy, try to press this key before making any setting for your own copy job.
Auto Panel Reset
If no key on the control panel is pressed within 60 sec. after a copy cycle has been completed or copying settings made, the Auto Panel Reset function is activated to return the copier to the default settings.
Useful Tip
The time for the copier to enter the Auto Panel Reset Function can be changed to 30 sec. p. 86
Auto Power-OFF
The Auto Power-OFF function shuts down the copier a given period time after the copier has been used last.
Useful Tip
The time for the copier to enter the Auto Power-OFF mode can be selected from 1 to 120 min. The Auto Power-OFF function can even be disabled.
For details, see User’s Choice. p. 88
Energy Saver
If the copier is shut down when it is not in use, it takes the copier some time to complete the warm-up cycle. Instead of turning the copier OFF, it’s a good idea to use the Energy Saver mode which will minimize the time for the copier to complete the warm-up cycle to about 30 sec.
To set the copier into the Energy Saver mode, you need only to press the Energy Saver key. Or, a given period of time after the copier has been touched last, it automatically enters the Energy Saver mode. The initial setting is 15 min.
To cancel the Energy Saver mode, press any key on the control panel.
Useful Tip
Auto Copy Start
If you load originals in the document feeder and press the Start key while the copier is warming up after it has been turned ON, the Auto Copy Start function allows that copy process to be started as soon as the copier completes warming up.
The time for the copier to enter the Energy Saver mode can be selected from 1 to 120 min.
For details, see User’s Choice. p. 86
NOTE
The copier is automatically shut down if the Auto Power-OFF function is activated while it is in the Energy Saver mode.
Getting to Know Your Copier Chapter 2
Getting to Know Your Copier Chapter 2
22
7. Auxiliary Functions
Interrupt
The Interrupt function allows you to interrupt a current job and run a different one. Pressing the Interrupt key once sets the copier into the Interrupt mode. Pressing the key again lets the copier leave the Interrupt mode, returning to the previous settings.
Useful Tips
•If the current job involves 2-sided copying, Cover function, Page Insertion or OHP Interleaving, the copier rejects an Interrupt cycle.
•If the current job involves a finishing function other than Non-Sort, Non-Sort is automatically selected at the same time when an Interrupt function is invoked.
Mode Check
By pressing the Mode Check key on the control panel, you can either check for or change the current settings.
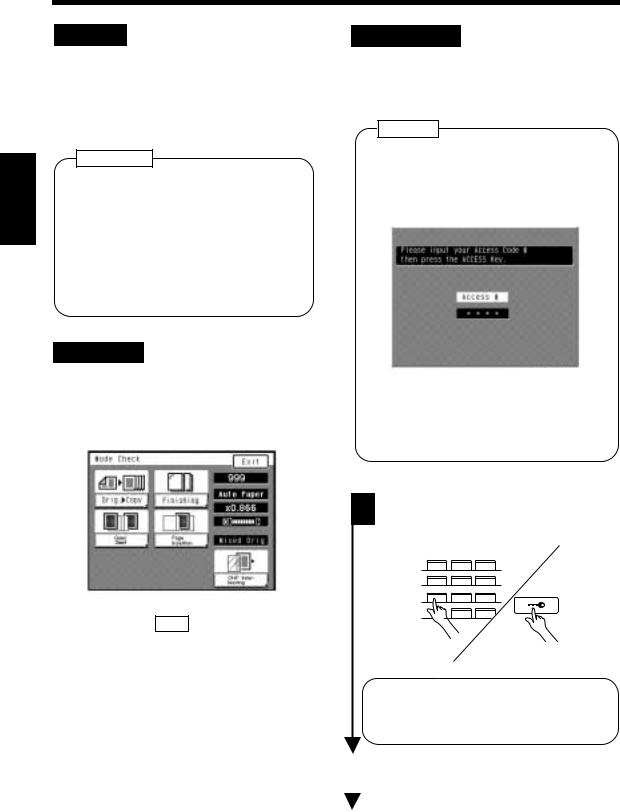
Access Number
If an access number has been programmed, it allows only particular persons to use the copier or a supervisor to keep track of the number of copies made by a particular department.
NOTES
•If an access number has been programmed, a copy cycle can be initiated only after the access number has been input to the copier.
<"Access #" Prompt Screen>
1149O271CA
•Before you can use this function, you must first turn "ON" the "Copy Track"
function of the Administrator Mode available from User’s Choice. p. 88
1149O259CA
•When you touch Exit after having checked the currently set functions, the Basic screen reappears.
•To change a certain function, touch the corresponding key and then make the necessary change.
Entering the Access Number
From the 10-Key Pad, enter the 4-digit 1 access number and press the Access
Mode key.
1 |
2 |
3 |
4 |
5 |
6 |
7 |
8 |
9 |
|
0 |
C |
|
|
|
|
|
|
|
1134P438DA |
|
|
|
|
|
|
|
|
1134P438DA |
|
|
|
|
|
|
|
|
|
|
|
|
|
|
|
|
|
|
|
|
|
|
|
|
NOTE |
|
|
|
|
|
|
|
|
To correct the 4-digit access number |
|||
|
|
|
|
|
entered, first press the Clear key, then |
|||
|
|
|
|
|
enter the new number. |
|||
|
|
|
|
|||||
|
|
|
|
|
|
|
|
|
|
|
|
|
|
|
|
|
|
|
2 |
|
When the initial screen reappears, you |
|||||
|
|
can now start a copy cycle. |
||||||
|
|
|
|
|
When the copy cycle is completed, |
|||
|
|
|
|
|
||||
|
|
|
|
|
||||
|
3 |
|||||||
|
|
press the Access Mode key again. |
||||||
|
|
|
|
|
|
|
|
|

23
Chapter 3
Making Copies
This chapter shows you how to make copies.
The "Basic Copying Overview" offers quick, at-a-glance instructions for making copies. Each step is keyed to a page number with a more detailed description.
1.Basic Copying Overview p. 24
2.Placing Originals
• |
Using the Automatic/Duplexing Document Feeder p. 26 |
• |
Placing Originals on the Original Glass p. 29 |
3.Manual Bypass Copying p. 32
4.Basic Functions
• |
Copy Paper Size |
p. 34 |
|
|
|
|
|
||||
• |
Zoom Ratio |
p. 36 |
|
|
|
|
|
|
|||
• |
Image Density p. 40 |
|
|
|
|
|
|||||
5. Selecting the Original |
▲ |
Copy Type |
p. 42 |
||||||||
|
|||||||||||
• |
1 |
▲ |
1 |
• |
1[2in1] |
▲ |
1 |
|
|||
|
|
|
|||||||||
• |
1 |
▲ |
2 |
• |
2[2in1] |
▲ |
1 |
|
|||
|
|
|
|||||||||
• |
2 |
▲ |
1 |
• |
Book |
▲ |
1 |
|
|
||
|
|
|
|
||||||||
• |
2 |
▲ |
2 |
• |
Book |
▲ |
2 |
|
|
||
|
|
|
|
||||||||
• |
1 |
▲ |
[2in1] |
|
|
|
|
|
|
|
|
|
|
|
|
|
|
|
|
|
|||
• |
1 |
▲ |
2[2in1] |
|
|
|
|
|
|
|
|
|
|
|
|
|
|
|
|
|
|||
• |
Selecting Original |
▲ |
Copy Type |
p. 44 |
|||||||
|
|||||||||||
• |
Some Precautions for Making Copies p. 46 |
||||||||||
6. Finishing Mode |
p. 48 |
|
|
|
|
|
|
||||
• |
Non-Sort |
|
|
• |
Hole Punch |
||||||
• |
Sort |
|
|
|
• |
Manual Staple |
|||||
• |
Sort Staple |
|
|
|
|
|
|
|
|
||
• |
Group |
|
|
|
|
|
|
|
|
||
• |
Select the Finishing Function p. 50 |
||||||||||
• |
Instructions for Loading Originals for the Finishing |
||||||||||
|
Functions p. 54 |
|
|
|
|
|
|
|
|||
•Auto Dual Function p. 56
7.Auxiliary Functions
Cover p. 58
Auto Original Count p. 61
Page Insertion p. 62
OHP Interleaving p. 68
File Margin p. 72
Edge/Frame Erase p. 74
Making Copies Chapter 3

Making Copies Chapter 3
24
1. Basic Copying Overview
One of the most basic copying jobs is to make full-size (× 1.000) copies of the original.
•Place the original in position (step 1), set the number of copies to be made (step 8), and press the Start key (step 9). This will allow you to make full-size copies on paper of the same size as the original.
(*Automatically selected in the initial mode are Auto Paper, full size, and Auto Exposure.)
The selections  you make on the Touch Panel will change the exposure level, zoom ratio, the type of copy and so on.
1. Placing the Original |
|
|
|
|
|
• Load the originals face up on the |
• Raise the Original Cover and place the |
||||
document feeder. |
p. 27 |
original face down on the Original Glass. |
|||
|
|
|
p. 29 |
||
|
|
|
|
|
|
|
|
|
|
|
|
|
|
1151O16AA |
|
1151O013AA |
|
|
|
|
|
|
|
|
|
|
|
|
|
To change the copy paper size
To change the zoom ratio
To change the exposure level
•To make copies from a book
•To save copy paper
Selecting the basic functions
2.Touch Paper.
p. 34
3.Touch Zoom.
p. 36
4.Touch Exposure.
p. 40
1149O413CA
Selecting the original ▲ copy type
5.Touch Orig. ▲ Copy.
p. 42
1149O272CA
 Loading...