


 Loading...
PageScope
Address Book Utility Ver. 1.4
User Manual
Address Book Utility
Ver. 1.4

Contents
Contents
1 Getting Started |
|
|
1.1 |
System Requirements .................................................................. |
1-1 |
1.2 |
Supported Models......................................................................... |
1-2 |
1.3 |
Overview of Functions.................................................................. |
1-3 |
2 |
Software Installation |
|
|
|
2.1 |
How to Install the PageScope Address Book Utility ................. |
2-1 |
|
2.2 |
How to Uninstall the PageScope Address Book Utility............. |
2-2 |
3 Using the PageScope Address Book Utility |
|
||
|
3.1 |
To Start........................................................................................... |
3-1 |
|
3.2 |
To Exit ............................................................................................ |
3-1 |
|
3.3 |
Screen Layout ............................................................................... |
3-2 |
|
3.4 |
Specify the Range of the Device Search..................................... |
3-5 |
|
3.5 |
Add Devices................................................................................... |
3-6 |
|
3.6 |
Specify Default Settings for Devices........................................... |
3-8 |
|
3.7 |
Creating an Address List............................................................ |
3-10 |
|
3.8 |
Importing Address Lists using CSV Files................................. |
3-12 |
|
3.9 |
Import Address Configurations registered in Devices............ |
3-14 |
|
3.10 |
Editing an Address List .............................................................. |
3-15 |
|
3.11 |
Transfer an Address Book to a Device ..................................... |
3-29 |
|
3.12 |
Using LDAP Server Data ............................................................ |
3-32 |
|
3.13 |
Saving the Address Book........................................................... |
3-37 |
4 |
APPENDIX |
|
|
|
4.1 |
Can I import Lotus Notes Structured Text Format? .................. |
4-1 |
|
4.2 |
Transferring Data Between Devices of Different Types ............ |
4-4 |
|
4.3 |
What do I do if this message is displayed?................................ |
4-7 |
|
4.4 |
Restrictions for each Model ....................................................... |
4-10 |
|
4.5 |
Device Connection Methods ...................................................... |
4-12 |
PageScope Address Book Utility |
i |

Contents
About this Product
PageScope Address Book Utility is an administration tool with which e- mail addresses and fax numbers that are registered in the control panel of supported devices (multifunctional OA equipment) can be edited and changed from other computers on the network.
After importing and editing address lists from devices, it can be used to then export these lists to devices.
PageScope Address Book Utility can import address lists in CSV, TAB, LDIF, Lotus Notes Structured Text, and other formats.
The LDAP protocol can be used to both search and browse destination data on directory servers such as Active Directory, and to import these addresses.
Trademarks
KONICA MINOLTA and the KONICA MINOLTA logo are trademarks of KONICA MINOLTA HOLDINGS, INC.
PageScope is a trademark of KONICA MINOLTA BUSINESS
TECHNOLOGIES, INC.
Active Directory, Microsoft and Windows are either registered trademarks or trademarks of Microsoft Corporation in the United States and/or other countries.
Domino, Lotus Notes and Lotus are trademarks of IBM Corporation in the United States, or other countries, or both.
NDS and Novell Directory Services are registered trademarks of Novell, Inc., in the United States and other countries. eDirectory is a trademark of Novell, Inc.
Intel and Pentium are trademarks or registered trademarks of Intel Corporation or its subsidiaries in the United States and other countries.
All other product names are trademarks or registered trademarks of their respective companies.
ii |
PageScope Address Book Utility |

Getting Started |
1 |
|
|
|
|
1 Getting Started
1.1System Requirements
Systems must have the following specifications in order to use this software.
Operating System
Windows 2000 Professional Windows XP Professional Edition
Computer
PC/AT compatible, with Pentium II 300MHz CPU or better
Memory (RAM)
64 MB or above
Unused hard drive capacity
150 MB or more
Display
1024 × 768 pixel, 16 bit color or better
Network
TCP/IP protocol
Applications
Microsoft Internet Explorer 5.0 (SP2) or later
PageScope Address Book Utility |
1-1 |

1 |
Getting Started |
|
1.2Supported Models
Model Names |
Controller |
Firmware Version |
Di200/Di251/Di351 |
Pi3502 |
Controller: 2.05aS or later |
|
|
|
Di200f/Di251f/Di351f |
Pi3502 (Fax) |
Controller: 2.05aS or later |
|
|
|
Di551 Copier, 7155 Copier |
|
Copier Image Control (I1): 50 or later |
|
|
|
Di650 Copier, 7165 Copier |
|
Copier Image Control (I1): 50 or later |
|
|
|
Di850 Copier, 7085 Copier |
|
Copier Image Control (I1): 30 or later |
|
|
|
CF3102/CF2002 |
CN3101e |
Controller: 4334-3FG0-06-00 |
|
|
|
C350 |
Standard |
|
|
Controller |
|
|
|
|
CF3102/CF2002 |
CN3102e |
Controller: 1.2 |
|
|
Patch: GimletTarFile030822.ps |
|
|
|
C350 |
IC-401 |
|
|
|
|
CF3102 |
CN3102Pro |
Controller: 2.0 |
|
|
Patch: 1-AZPW.PS |
|
|
|
Di3510/Di3010/Di2510/Di2010 |
Pi3505e |
|
|
|
|
Di3510f/Di3010f/Di2510f/ |
Pi3505e |
|
Di2010f |
|
|
|
|
|
7145 |
|
Copier System Control: 20 or later |
|
|
|
7222, 7228, 7235 |
|
|
|
|
|
8050, CF5001 |
|
Copier Image Control (I1): 40 or later |
|
|
|
7272, Di7210 |
|
Copier Image Control (I1): 10 or later |
|
|
|
7255, Di5510 |
|
Copier Image Control (I1): 10 or later |
|
|
|
D1610f, Di1610fp |
*1 |
|
7416MFG, 7416MFP |
|
|
|
|
|
Di1611, Di1811, Di2011 |
*2 |
|
7216, 7218, 7220 |
|
|
|
|
|
Please contact your Service Representative for details of the firmware version.
*1: Requires a Network Interface Card (Option).
*2: Requires a Fax Unit (Option) and a Network Interface Card (Option).
1-2 |
PageScope Address Book Utility |

Getting Started |
1 |
|
|
|
|
1.3Overview of Functions
Detecting supported models on the network Di351/Di251/Di200, Di351f/Di251f/Di200f, Di3510/Di3010/Di2510/Di2010, Di3510f/Di3010f/Di2510f/Di2010f, CF3102/CF2002, C350
7145, 7222, 7228, 7235 Di1610f/Di1610fp, 7416MFG/7416MFP Di1611/Di1811/Di2011, 7216/7218/7220
Importing of address book files (CSV, Tab Delimited Text, Structured Text, LDIF formats)
Display and editing of destination data
Import of destination data from multifunctional OA equipment
Export of destination data to multifunctional OA equipment
Reference and searching of destination data on LDAP servers
Supported LDAP Servers
Lotus Domino Server 5.08
Microsoft Active Directory (Windows 2000)
Novell NDS eDirectory 8.7
PageScope Address Book Utility |
1-3 |

1 |
Getting Started |
|
1-4 |
PageScope Address Book Utility |

Software Installation |
2 |
|
|
|
|
2 Software Installation
2.1How to Install the PageScope Address Book Utility
Install the PageScope Address Book Utility (below: “Address Book Utility”) as follows:
1Open the Address Book Utility folder.
Confirm the location to where you copied the Address Book Utility.
2Double-click Setup.exe. The installer starts.
3Proceed with the install as indicated on the screen.
4When the InstallShield Wizard Complete screen is displayed, click
Finish.
Confirm that the Address Book Utility icon is displayed on the desktop.
PageScope Address Book Utility |
2-1 |

2 |
Software Installation |
|
2.2How to Uninstall the PageScope Address Book Utility
Uninstall the Address Book Utility as follows:
1From the Taskbar, click Start, then Settings—Control Panel, to open the Control Panel.
2Double-click Add/Remove Programs.
3In the Currently installed programs field, select Address Book Utility, and click Change/Remove.
4When the Confirm Uninstall screen is displayed, click OK. Uninstall commences.
5When the Maintenance Complete screen is displayed, click Finish.
2-2 |
PageScope Address Book Utility |

Using the PageScope Address Book Utility |
3 |
|
|
|
|
3Using the PageScope Address Book Utility
3.1To Start
Start the Address Book Utility as follows:
Double-click the Address Book Utility icon on the desktop. or
From the Taskbar, click Start, then Programs—KONICA MINOLTA—Address Book Utility—AddressBookUtility.
The Address Book Utility screen is displayed.
3.2To Exit
Exit the Address Book Utility as follows:
From the File menu, select Exit.
PageScope Address Book Utility |
3-1 |

3 |
Using the PageScope Address Book Utility |
|
3.3Screen Layout
(1)
(2)
(3)
(4)
(5)
(6)
(7)
1.Menu bar
2.Tool bar
3.Device Type
4.Device list
5.Address book (the displayed screen may differ, depending on the selected device)
6.Importable Address: Displays files in CSV and other formats, and address data that has been imported from LDAP servers. Click “Name” or “E-mail address” to change the order of each parameter.
7.One Touch Button: A One Touch Name is displayed on the button. (Not including Di200/251/351 and Di200f/251f/351f device types). Additionally, clicking a button will highlight the corresponding address in the table above.
Icons displayed in the device list
:Indicates that Address data from this device is been imported into the Address Book Utility, and is currently being edited.
:Indicates that Address data is not being imported from the device.
3-2 |
PageScope Address Book Utility |

Using the PageScope Address Book Utility |
3 |
|
|
|
|
Menu Bar
Menu |
|
Description |
Details |
|
(Refer page) |
||
|
|
|
|
File |
Refresh Device List |
Refreshes the device list. |
page 3-5 |
|
|
Re-detects and displays |
|
|
|
supported models connected to |
|
|
|
the network. |
|
|
|
|
|
|
Display Device List |
Displays the device list of devices |
page 3-7 |
|
(only Add Device) |
added using the Add Device dialog |
|
|
|
only. |
|
|
|
|
|
|
Open Address List File |
Opens an existing address list file. |
page 3-12 |
|
|
|
|
|
Open Address Book |
Opens an Address Book Utility |
|
|
Utility File |
format file. |
|
|
|
|
|
|
Save Address Book |
Saves an edited address book file. |
page 3-37 |
|
Utility File |
|
|
|
|
|
|
|
Exit |
Exits the Address Book Utility. |
page 3-1 |
|
|
|
|
Edit |
Address edit |
Displays the edit screen for a |
page 3-10 |
|
|
destination selected in the |
|
|
|
“Address List” or “One Touch |
|
|
|
Lists”. |
|
|
|
|
|
|
Find |
Searches for mail addresses, |
|
|
|
names, and fax numbers from a |
|
|
|
currently opened address book |
|
|
|
file. |
|
|
|
Available in the Importable |
|
|
|
Address list. |
|
|
|
|
|
|
Select All |
Selects all destination data in the |
|
|
|
currently opened address book |
|
|
|
file. |
|
|
|
Available in the Importable |
|
|
|
Address list. |
|
|
|
|
|
Device |
Search Configuration |
Specifies the extent of the network |
page 3-5 |
|
|
to search for devices when the |
|
|
|
Address Book Utility is started. |
|
|
|
This utility can not search Di551, |
|
|
|
Di650, Di850, 7155, 7165, 7085, |
|
|
|
8050, CF5001, 7272, 7255, |
|
|
|
Di7210 or Di5510. |
|
|
|
|
|
|
Add Device |
Manually adds devices to the |
page 3-6 |
|
|
device list. |
|
|
|
|
|
|
Default Setting |
Specifies default destination |
page 3-8 |
|
Configuration |
settings for each device. |
|
|
|
|
|
|
Import from Device |
Imports destination data |
page 3-14 |
|
|
registered in devices into the |
|
|
|
Address Book Utility. |
|
|
|
|
|
|
Export to Device |
Transfers currently opened |
page 3-29 |
|
|
address book file data to devices. |
|
|
|
|
|
PageScope Address Book Utility |
3-3 |

3 |
Using the PageScope Address Book Utility |
|
Menu |
|
|
|
Description |
|
|
|
|
Details |
|
|
|
|
|
|
|
|
(Refer page) |
|||
|
|
|
|
|
|
|
|
|
|
|
Tools |
|
LDAP Configuration |
|
Carries out initial configuration in |
|
page 3-32 |
||||
|
|
|
|
|
order to access addresses on |
|
|
|
||
|
|
|
|
|
directory servers (LDAP Server). |
|
|
|||
|
|
|
|
|
|
|
|
|||
|
|
LDAP Search |
|
Specifies the directory on the |
|
|
page 3-35 |
|||
|
|
|
|
|
directory server, and searches |
|
|
|
||
|
|
|
|
|
address data. |
|
|
|
|
|
|
|
|
|
|
|
|
||||
|
|
LDAP Browsing |
|
Refers to the directory server in a |
|
page 3-36 |
||||
|
|
|
|
|
tree view. |
|
|
|
|
|
|
|
|
|
|
You can add necessary data to the |
|
|
|||
|
|
|
|
|
address book. |
|
|
|
|
|
|
|
|
|
|
|
|
|
|
||
Help |
|
Topics |
|
|
Opens the Address Book Utility |
|
|
|
||
|
|
|
|
|
help. |
|
|
|
|
|
|
|
|
|
|
|
|
|
|
||
|
|
About |
|
|
Displays application version |
|
|
|
||
|
|
|
|
|
information. |
|
|
|
|
|
|
|
|
|
|
|
|
|
|
|
|
Tool bar |
|
|
|
|
|
|
|
|
|
|
(1) |
|
(2) |
(3) |
(4) |
(5) |
(6) |
(7) |
(8) |
|
|
1.Open Address Book File icon: Opens an existing address book file.
2.LDAP Browsing icon: Refers to the directory server in a tree view.
3.LDAP Search icon: Specifies the directory on the directory server, and searches address data.
4.Import from Device icon: Imports destination data registered in devices into the Address Book Utility.
5.Export to Device icon: Transfers address book file data to devices.
6.Refresh Device List icon: Re-detects and displays supported models connected to the network.
7.Display Device (only Add Device) List icon: Displays the device list of devices added using the Add Device dialog only.
8.Topics icon: Opens help.
3-4 |
PageScope Address Book Utility |
Using the PageScope Address Book Utility |
3 |
|
|
|
|
3.4Specify the Range of the Device Search
Note
This utility can not search Di551, Di650, Di850, 7155, 7165, 7085, 8050, CF5001, 7272, Di7210, 7255 or Di5510, therefore add devices using the “Add Device” function. (page 3-6)
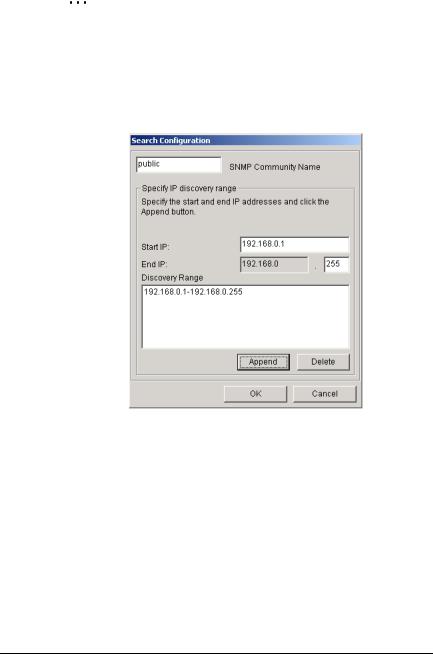
1From the Device menu, select Search Configuration. This displays the Search Configuration dialog.
2Specify the SNMP Community Name. (The default value is Public)
3Input the Start IP and End IP.
4Click Append.
5The search range is displayed in the Discovery Range box.
6Click OK to close the Search Configuration dialog.
7From the File menu, select Re-Fresh Device List to re-display the device list.
You can also click the  button on the tool bar to re-display the device list.
PageScope Address Book Utility |
3-5 |

3 |
Using the PageScope Address Book Utility |
|
3.5Add Devices
Note
Before use...
When selecting the 7085/7165/7155, Di551/650/850, 7145, 8050, CF5001, 7272/7255, Di7210/Di5510, confirm that a Network Cable is connected to the copier main body. Additionally, confirm the IP address on the copier control panel. (page 4-12) This value is required in the Add Device dialog.
1From the drop down list in the box at the top of the device list, select the Device type you wish to register in the address book.
Device |
Device Type |
Di200, Di251, Di351 |
Di200/251/351 |
|
|
Di200f, Di251f, Di351f |
Di200f/251f/351f |
|
|
Di551, Di650, Di850, 7155, 7165, |
7085/7165/7155, Di551/650/850 |
7085 |
|
|
|
CF3102 with CN3101e |
CF2002/3102 (CN3101e) |
CF2002 with CN3101e |
|
|
|
CF3102 with CN3102Pro |
CF2002/3102 (CN3102Pro/e), C350 (IC-401) |
CF3102 with CN3102e |
|
CF2002 with CN3102e |
|
C350 with IC-401 |
|
|
|
Di3510, Di3010, Di2510, Di2010 |
Di3510/3010/2510/2010 |
|
|
Di3510f, Di3010f, Di2510f, Di2010f |
Di3510f/3010f/2051f/2010f |
|
|
C350 |
C350 |
|
|
7145, 7222, 7228, 7235 |
7145/7222/7228/7235 |
|
|
8050, CF5001 |
8050/CF5001 |
|
|
7272, 5252, Di7210, Di5510 |
7272/7255, Di7210/5510 |
|
|
Di1610f, Di1610fp |
Di1610f/fp, 7416MFG/MFP |
7416MFG, 7416MFP |
|
|
|
Di1611, Di1811, Di2011 |
Di1611/1811/2011, 7210/7218/7220 |
7216, 7218, 7220 |
|
|
|
3-6 |
PageScope Address Book Utility |
Using the PageScope Address Book Utility |
3 |
|
|
|
|
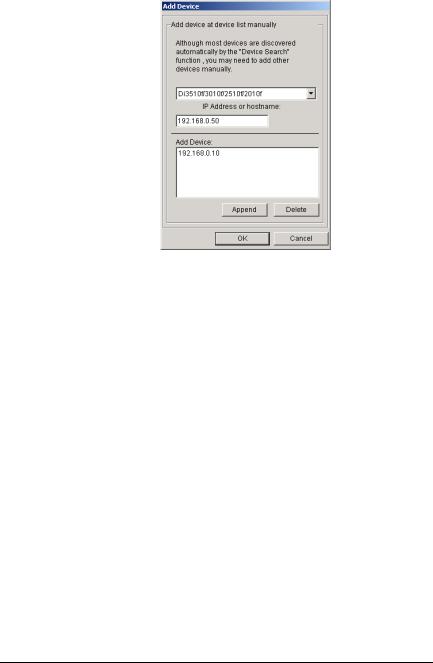
2From the Device menu, select Add Device. This displays the Add Device dialog.
3From the drop down list in the box at the top of the dialog, select the device type you wish to add.
4In the IP Address or hostname: box, input the IP address or domain name of the device you wish to add.
5Click Append, to add to the Add Device box.
6Click OK to close the Add Device dialog.
7From the File menu, select Display Device List to re-display the device list.
You can also click the  button on the tool bar to re-display the device list.
Confirm that the selected device is displayed in the device list.
PageScope Address Book Utility |
3-7 |
3 |
Using the PageScope Address Book Utility |
|
3.6Specify Default Settings for Devices
All configuration for importing into the Address Book Utility from CSV and other files is carried out here, and these are then registered in devices. If you wish to change individual settings, from the Abbreviated List click Destination, change these individual settings, and transmit to the device.
This function can only be used with the following 6 device types. Di200/251/351
Di200f/251f/351f
Di3510/3010/2510/2010
Di3510f/3010f/2510f/2010f Di1610f/fp, 7416MFG/MFP Di1611/1811/2011, 7216/7218/7220
Values that can be specified differ between devices. Here, examples using Di3510f/3010f/2510f/2010f device types are shown.
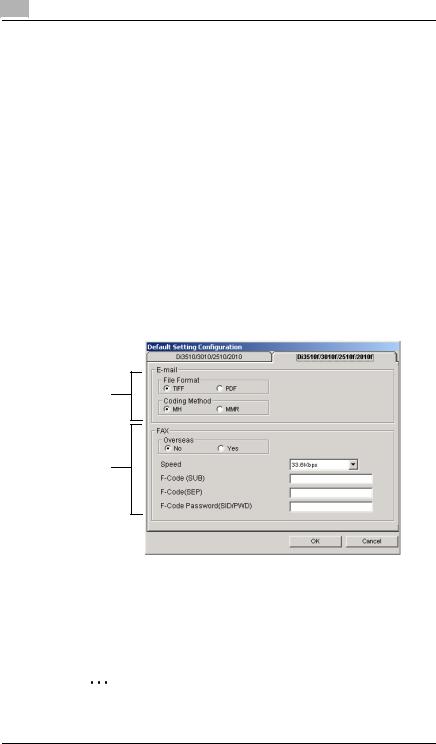
1From the Device menu, select Default Setting Configuration. This displays the Default Setting Configuration dialog.
1
2
1Settings for E-mail
2Settings for FAX transmission
2 Click the tab of the device that you wish to configure.
Note
Displayed parameters may vary depending on the device.
3-8 |
PageScope Address Book Utility |

Using the PageScope Address Book Utility |
3 |
|
|
|
|
3 |
Specify the file format for when sending scanned data. |
|
In File Format, select either PDF or TIFF. |
4 |
Specify the compression scheme to be used in transmission. |
|
Select from MH, MMR. |
5 |
Specify overseas transmission. |
|
Select either Yes or No for overseas. |
6 |
Specify the transmission speed. |
|
Select from the Speed drop down list. |
7 |
Configure when using F-Code fax transmission. |
|
Input the F-Code into the F Code (SUB) box. |
|
Input the selective polling code into the F Code (SEP) box. |
|
Input the password into the F Code Password box. |
|
|
|
Note |
|
“F-Code” can hold a text string up to 20 alphanumeric characters |
|
long, including 1-9, *, and #. |
8 |
Click OK to close the Default Setting Configuration dialog. |
PageScope Address Book Utility |
3-9 |
3 |
Using the PageScope Address Book Utility |
|
3.7Creating an Address List
You can specify recipients in the Address Book Utility Address List.
Register and edit recipients as follows:
Note
Displayed parameters may vary depending on the device. Here, examples using Di200f/251f/351f device types are shown.
Input New E-mail Addresses
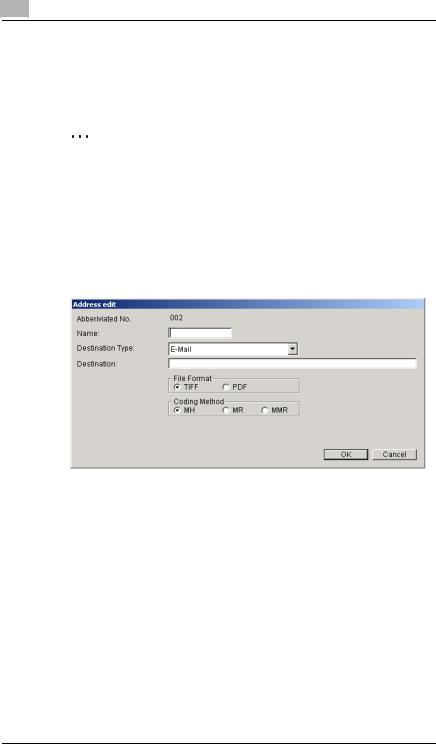
1In the Address List screen, double-click the border of the number you wish to register from Abbreviated Lists.
This displays the Address Edit dialog.
2Input the destination (Name).
3From the drop down list in the Destination Type box, select E-mail.
4Specify the recipient.
Input the e-mail address in the Destination box.
In File Format, select either PDF or TIFF.
For compression, select from MH, MR, or MMR.
5Click OK to close the Address Edit dialog.
The input recipient address will be displayed in Abbreviated Lists.
6In order to input more recipients, repeat steps 1 to 5.
3-10 |
PageScope Address Book Utility |
Loading...