


 Loading...
Operating Instructions
(For Facsimile and Internet Fax/Email Functions)
Digital Imaging Systems
Model No. DP-8020E / 8020P
Before operating this equipment, please carefully read this manual, and keep this documentation in a safe place for future reference.
(Illustration shows optional accessories that may not be installed on your machine.)
English
Getting To Know Your Machine |
|
Facsimile Features |
|
Internet Fax Features |
|
Advanced Facsimile Features |
|
Advanced Internet Fax Features |
|
Setting Your Machine |
|
Printing Journals and Lists |
|
Problem Solving |
|
Appendix |
|

Getting To Know Your Machine
Useful Office Functions/Operating Instructions
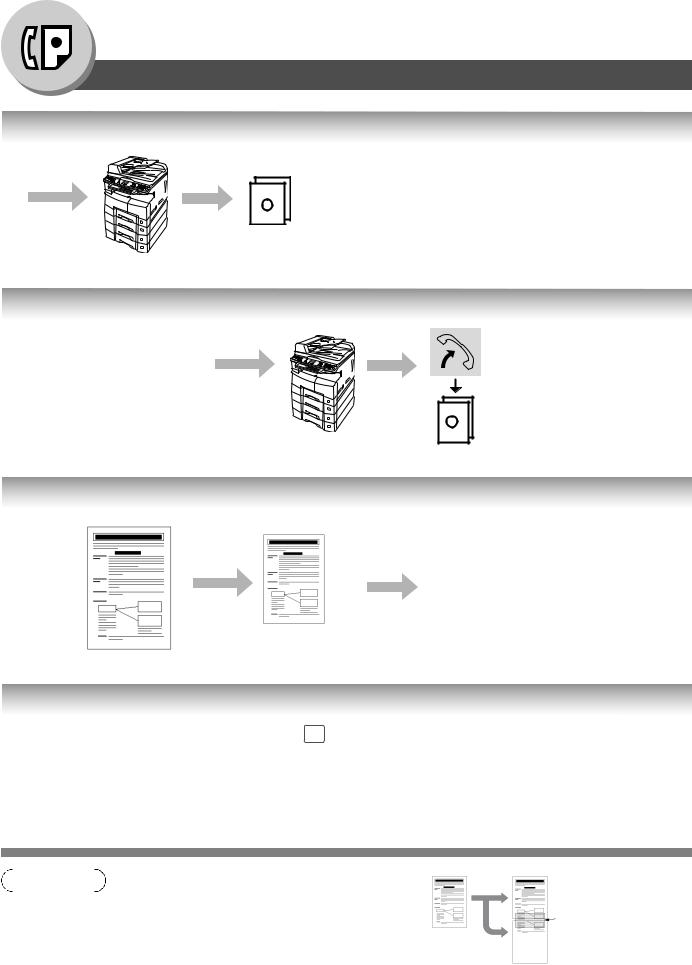
Copy
•Copy up to Legal size originals.
•Capable of copying text/photos/ halftone originals.
Scan/File
•Monochrome scanner capability (for DP-8020P*/8020E only).
•Scanning resolution up to 600 dpi
Fax/Email
•Plain Paper High-speed Super G3 compatible Fax with JBIG compression. The Facsimile function is available when optional Fax Communication Board (DA-FG180) is installed (for DP-8020P*/8020E only).
•Quick-Scan
•Quick Memory Transmission
•Email Function capability
•Digital printer controller standard, printer resolution 300 or 600 dpi.
Application Software
• Quick Image Navigator
• Network Scanner
• Utilities (Network Status Monitor, Address Book Editor, Network Configuration Editor)
• Pan a fax Desktop when optional Fax Communication Board is installed.
*DP-8020P is not available for USA, and Canada.
The following operating instruction manuals are included on the CD for this machine, please use the correct manual when an operator intervention is necessary.
<Facsimile & |
Use the information provided on the enclosed CD whenever a Fax/Internet Fax function requires intervention. |
Internet Fax/Email> |
For example: How to send/receive a Fax/Email, or when a trouble message appears, etc. |
<Copy & Network |
Use the information provided on the enclosed CD whenever a Copy & Network Scan function requires |
Scan> |
intervention. |
|
For example: How to make copies, add paper, replace the toner bottle, etc. |
<Print & |
Use the information provided on the enclosed CD for an explanation of how to use as a Network Printer, |
Other Advanced |
Network Scanner, Edit Directory Dialing Feature, Device Settings, Network Status Monitor, and/or Document |
Functions> |
Management System. |
Multi-Tasking Job Table
Current |
|
Network Scanning, |
GDI/PCL/PS |
Facsimile |
Facsimile |
|||
Job |
Copy |
Internet Fax |
Printing |
(Sending) |
(Receiving) |
|||
|
|
|
|
|
|
|
|
|
2nd Job |
|
Storing |
Receiving |
Printing |
Storing |
Memory |
Memory |
Printing Received |
|
|
Document Transmission |
Data |
Received Data |
Document |
Transmission |
Receiving |
Memory Data |
Copy |
|
|
|
|
|
|
|
|
Copy |
|
|
|
|
|
|
|
|
Network Scanning, Internet Fax |
|
|
|
|
|
|
|
|
Storing Document |
|
|
|
|
|
|
|
|
GDI/PCL/PS Printing |
|
|
|
|
|
|
|
|
Receiving Data |
|
|
|
|
|
|
|
|
Printing Receive Document |
|
|
|
|
|
|
|
|
Facsimile (Sending) |
|
|
|
|
|
|
|
|
Storing Document |
|
|
|
|
|
|
|
|
Memory Transmission |
|
|
|
|
|
|
|
|
Facsimile (Receiving) |
|
|
|
|
|
|
|
|
Memory Receiving |
|
|
|
|
|
|
|
|
Printing Received |
|
|
|
|
|
|
|
|
Memory Data |
|
|
|
|
|
|
|
|
 : Accepts and executes the 2nd Job.
 : Accepts and executes the 2nd Job (Copy) only if the Current Job is interrupted.
 : Accepts the 2nd Job and executes the 2nd Job after the Current Job is completed. : Not applicable.
NOTE |
: HDD (DA-HD18) and additional 16MB (minimum) Image memory are required. |
2
Your Machine
Getting To Know
Operating Instructions Outline
Getting To Know |
Quick Operation Chart |
Your Machine |
(See pages 2-21) |
|
Facsimile Features
Internet Fax
Features
Advanced Facsimile
Features
Advanced Internet
Fax Features
Setting Your
Machine
Printing Journals
and Lists
Problem Solving
Appendix
Instructions for Sending/Receiving Documents and Creative Features
(See pages 22-45)
General Descriptions for Internet Fax, Sending/Receiving Documents via LAN and Creative Features
(See pages 46-75)
Advanced Facsimile Features
(See pages 76-113)
Advanced Internet Facsimile Features
(See pages 114-135)
Setting/Adjusting or Customizing Your Machine
•Adjusting the Volume, etc.
•User Parameters
•One-Touch/Abbreviated Dialing Numbers
•Fax Parameters
• Access Code |
(See pages 136-155) |
Printing Journals, Fax Parameter, Program
and Phone Book (One-Touch/ABBR.) List
(See pages 156-165)
Troubleshooting
• Information Codes, etc.
(See pages 166-177)
Specifications, Glossary, Index, etc.
(See pages 178-193)
3
Getting To Know Your Machine
Symbols/Icons
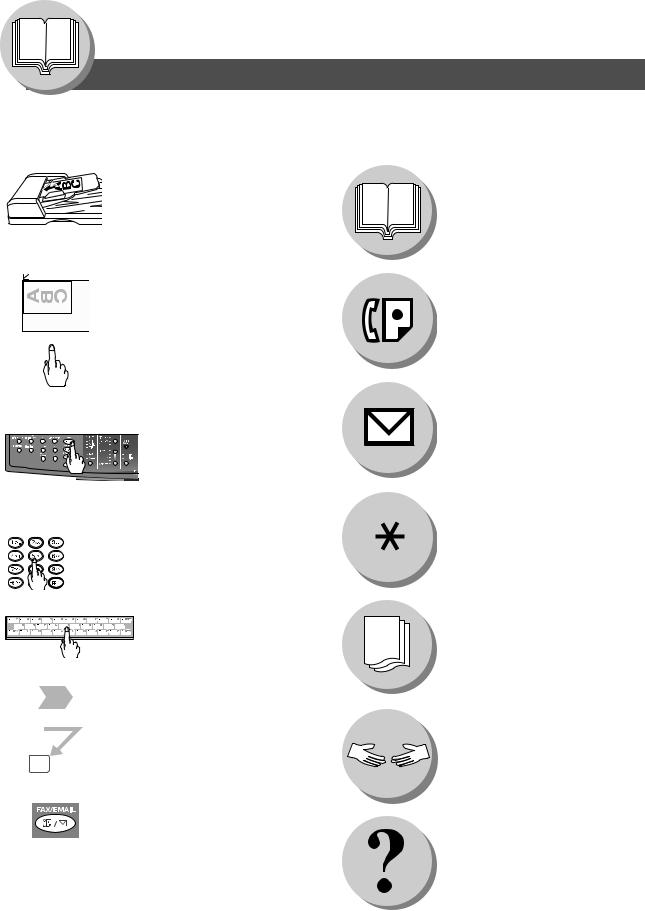
The following Symbols/Icons are used throughout this operating instructions manual.
Place original(s) on the ADF/i-ADF
Place original on the Platen (Sheet)
Press any Hard Key on the Control Panel
Getting to know your machine before starting
Facsimile Features
Internet Fax Features
Press Hard Key
Input numbers with keypad |
|
|
|||
• |
Telephone Number |
|
When setting the machine |
||
• |
Email Address, etc. |
|
modes |
||
|
|
|
|
|
|
|
|
|
|
|
|
|
|
|
|
|
|
Input text with a Keyboard (Option)
When printing the Journals and Lists
Go to next step
Go to next step (below) |
Problem solving |
|
|
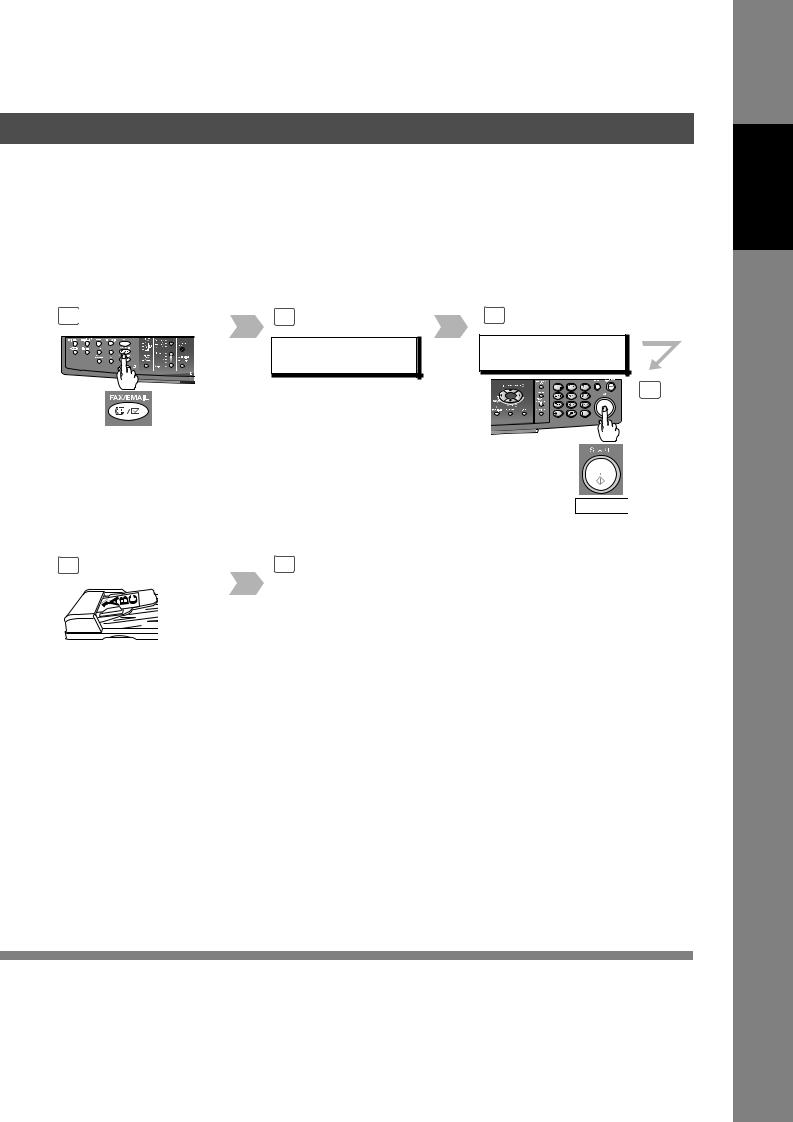
5 |
|
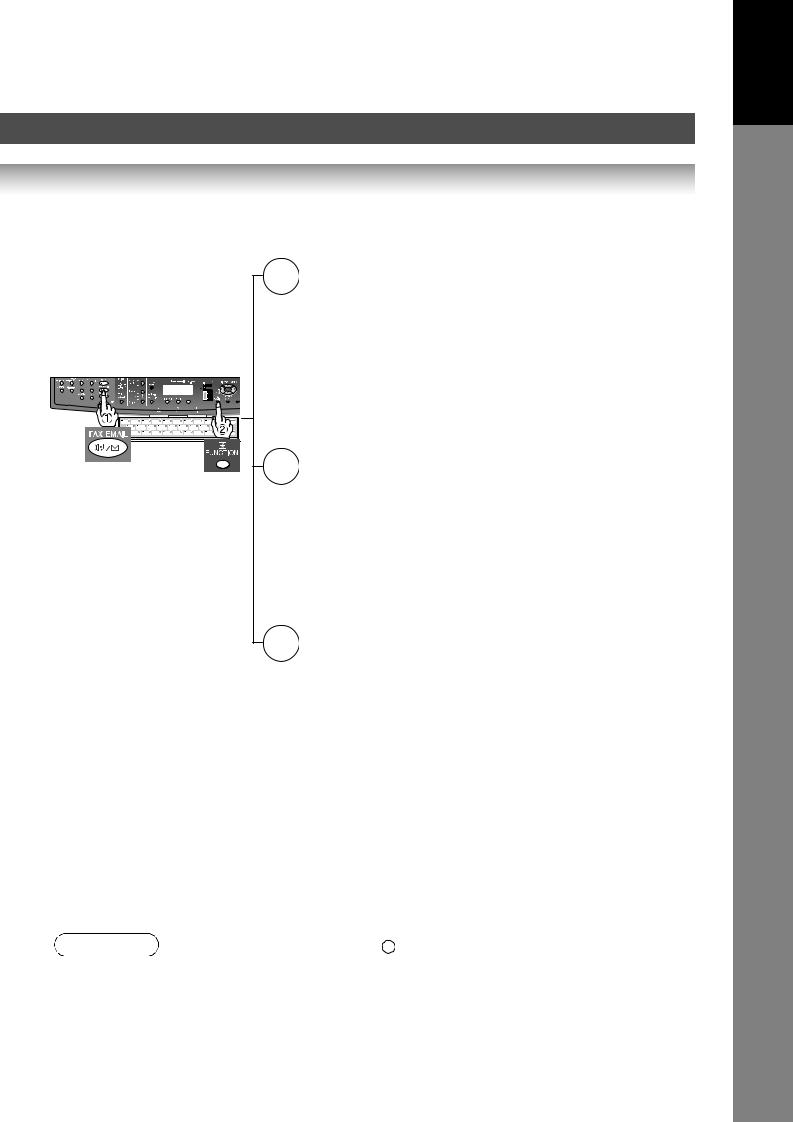
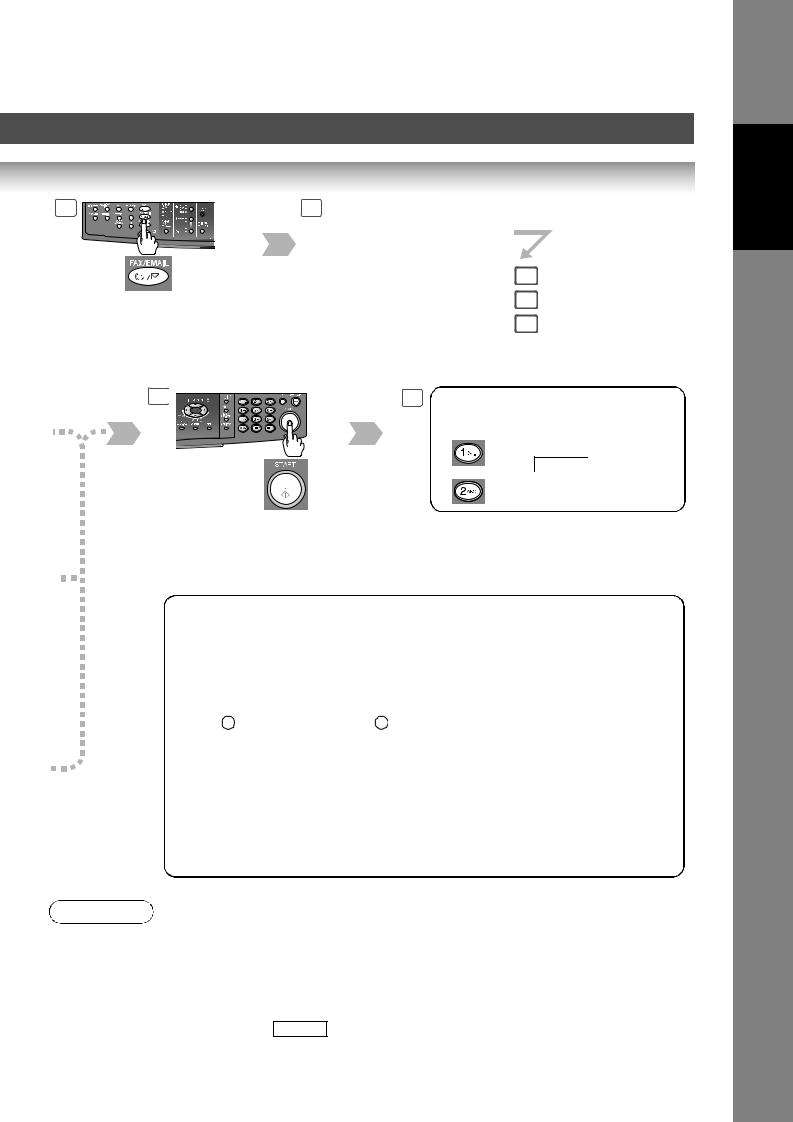
Ensure that the indicator lamp of the |
|
FAX/EMAIL button is ON. If not, press |
|
the FAX/EMAIL mode button. |
Others |
To change the input mode to |
|
Telephone Number or Email Address |
|
when the indicator lamp of FAX/ |
|
EMAIL mode button is ON. |
|
4

Getting To Know Your Machine |
|
Table of Contents |
|
Getting To Know Your Machine |
|
Useful Office Functions/Operating Instructions .............................. |
2 |
Operating Instructions Outline .......................................................... |
3 |
Symbols/Icons..................................................................................... |
4 |
Basic Operation Chart ........................................................................ |
10 |
Basic Operation ............................................................................ |
10 |
To Stop the Transmission .............................................................. |
12 |
Rotated Transmission .................................................................... |
12 |
2-Sided Transmission (Scan) (DP-8020E only) ............................. |
12 |
Mode Setting ....................................................................................... |
14 |
Changing the Modes...................................................................... |
14 |
Connecting the Cables ....................................................................... |
16 |
Safety Information .............................................................................. |
17 |
Control Panel....................................................................................... |
18 |
How To Enter Characters .............................................................. |
20 |
Facsimile Features |
|
Sending Documents ........................................................................... |
22 |
Memory Transmissions.................................................................. |
22 |
Direct Transmission Reservation |
|
(Priority Transmission Reservation)............................................... |
24 |
On-Hook Dialing............................................................................. |
26 |
Off-Hook Dialing (Voice Mode Transmission)................................ |
26 |
To Stop the Transmission .............................................................. |
26 |
To Cancel the Direct Transmission Reservation............................ |
26 |
Job Build ........................................................................................ |
28 |
Receiving Documents ........................................................................ |
30 |
Automatic Reception...................................................................... |
30 |
Manual Reception .......................................................................... |
30 |
Print Reduction Setting .................................................................. |
30 |
Substitute Memory Reception........................................................ |
30 |
Duplex (2-Sided) Receiving (DP-8020E only)................................ |
31 |
Timer Controlled Communications ................................................... |
32 |
General Description ....................................................................... |
32 |
Deferred Transmission................................................................... |
32 |
Deferred Polling ............................................................................. |
32 |
Batch Transmission............................................................................ |
34 |
General Description ....................................................................... |
34 |
Real-Time Batch Transmission...................................................... |
34 |
Polling.................................................................................................. |
36 |
General Description ....................................................................... |
36 |
Preparing to be Polled ................................................................... |
36 |
Poll Documents from Another Station............................................ |
38 |
5
Your Machine
Getting To Know

Getting To Know Your Machine |
|
Table of Contents |
|
Facsimile Features |
|
Program Keys (Option)...................................................................... |
40 |
General Description ....................................................................... |
40 |
Setting for Group Dialing ............................................................... |
40 |
Setting for Deferred Transmission ................................................. |
42 |
Setting for One-Touch Key ............................................................ |
44 |
Changing the Program Key Setting ............................................... |
44 |
Internet Fax Features |
|
Pre-Installation Information/Features .............................................. |
46 |
Setup (SMTP Mail Server/POP3 Client) ............................................ |
48 |
Internet Communication Features.................................................... |
52 |
Transmission/Reception ................................................................ |
52 |
Internet Fax Delivery Notice (MDN)............................................... |
52 |
Direct SMTP .................................................................................. |
53 |
Internet Mail Reception.................................................................. |
53 |
Important Information........................................................................ |
54 |
General Description ....................................................................... |
54 |
Differences Between Internet Fax and Regular Fax...................... |
54 |
Transmitted Document Confirmation ............................................. |
54 |
Your Machine Cannot Make a Phone Call via LAN ....................... |
54 |
Dual Port Communication.............................................................. |
54 |
Transmission Resolution ............................................................... |
54 |
Internet Mail Reception.................................................................. |
55 |
Sending a Document to a PC via LAN........................................... |
55 |
Internet Relayed Transmission ...................................................... |
55 |
Setting the Internet Parameters........................................................ |
56 |
Basic Parameters .......................................................................... |
56 |
User Parameters (Internet Parameters) ........................................ |
56 |
Sending Documents .......................................................................... |
58 |
Manual Mail Addressing ................................................................ |
58 |
One-Touch/Abbreviated and Search Mail Addressing................... |
60 |
Entering the Mail Header ............................................................... |
62 |
Ledger Size Document Transmission............................................ |
64 |
Returned Mail ................................................................................ |
66 |
Receiving Documents........................................................................ |
68 |
General Description ....................................................................... |
68 |
Internet Fax Received on a PC...................................................... |
68 |
Receiving Mail from a POP Server ................................................ |
70 |
Setting the POP Parameters ......................................................... |
70 |
Unattended Email Reception from the POP Server....................... |
72 |
Manual Email Retrieval from the POP Server ............................... |
72 |
Program Keys (Option)...................................................................... |
74 |
Setting the POP Access Key ......................................................... |
74 |
Using POP Access Key ................................................................. |
74 |
6

Your Machine
Getting To Know
Advanced Facsimile Features |
|
Confidential Mailbox........................................................................... |
76 |
Sending a Confidential Document ................................................. |
76 |
Polling a Confidential Document.................................................... |
78 |
Receiving a Confidential Document to Your Machine's |
|
Mailbox........................................................................................... |
78 |
Storing a Confidential Document ................................................... |
80 |
Printing a Confidential Document ................................................. |
80 |
Deleting a Confidential Document ................................................. |
82 |
Sub-Addressing .................................................................................. |
84 |
Sending a Fax with Sub-Address................................................... |
84 |
Setting the Sub-Address into an Phone Book................................ |
84 |
Fax Cover Sheet.................................................................................. |
86 |
Using the Fax Cover Sheet............................................................ |
86 |
Password Communications............................................................... |
88 |
Setting Password Transmission..................................................... |
88 |
Setting Password Reception.......................................................... |
88 |
Using Password Transmission....................................................... |
90 |
Using Password Reception............................................................ |
90 |
Receive To Memory ............................................................................ |
92 |
Setting RCV To Memory Password ............................................... |
92 |
Setting the RCV To Memory .......................................................... |
92 |
Printing Documents........................................................................ |
92 |
PIN Code Access ................................................................................ |
94 |
Selecting the Access Method (Prefix or Suffix).............................. |
94 |
Dialing with a PIN Code ................................................................. |
94 |
Selective Reception............................................................................ |
96 |
General Description ....................................................................... |
96 |
Setting the Selective Reception ..................................................... |
96 |
Department Code ................................................................................ |
98 |
General Description ....................................................................... |
98 |
Setting the Department Code ........................................................ |
98 |
Changing or Erasing the Department Code................................... |
100 |
Sending Document with Department Code.................................... |
100 |
Printing a Department Code Journal.............................................. |
102 |
Edit File Mode...................................................................................... |
104 |
General Description ....................................................................... |
104 |
Printing or Viewing a List ............................................................... |
104 |
Changing the Start Time or the Station of a File............................ |
106 |
Deleting a File ................................................................................ |
106 |
Printing Out a File .......................................................................... |
108 |
Adding Documents into a File ........................................................ |
108 |
Retry an Incomplete File ................................................................ |
110 |
Completion Notice .............................................................................. |
112 |
Enabling Completion Notice .......................................................... |
112 |
Disabling the Completion Notice ................................................... |
112 |
7

Getting To Know Your Machine |
|
Table of Contents |
|
Advanced Internet Fax Features |
|
Internet Communication Features.................................................... |
114 |
Inbound Routing ............................................................................ |
114 |
Dynamic Host Configuration Protocol (DHCP) .............................. |
115 |
SMTP Authentication ..................................................................... |
115 |
Lightweight Directory Access Protocol (LDAP).............................. |
115 |
Relayed Transmission ................................................................... |
116 |
Sender Selection ................................................................................ |
118 |
Setting the Sender Selection ......................................................... |
118 |
Sending Documents with Sender Selection................................... |
118 |
Inbound Routing ................................................................................ |
120 |
Setting the Routing Parameters..................................................... |
120 |
One-Touch/ABBR Dialing for Inbound Routing ............................. |
120 |
Fax Forward........................................................................................ |
122 |
Setting Fax Forward ...................................................................... |
122 |
Relayed Transmission ....................................................................... |
124 |
General Description ....................................................................... |
124 |
Relay Network ............................................................................... |
125 |
Setting Up Your Machine as an Internet Relay Station ................. |
127 |
Programming the End Receiving Station into your |
|
Auto Dialer ..................................................................................... |
128 |
Sending via an Internet Relay........................................................ |
130 |
Sending Document(s) from a PC to a G3 Fax Machine ................ |
132 |
Printouts and Reports .................................................................... |
134 |
Setting Your Machine |
|
Adjusting the Volume and Dialing Method (Tone or Pulse)........... |
136 |
Setting the Dialing Method (Tone or Pulse)................................... |
136 |
Setting the Monitor Volume ........................................................... |
136 |
Setting the Ringer Volume............................................................. |
136 |
User Parameters................................................................................. |
138 |
General Description ....................................................................... |
138 |
Setting the User Parameters ......................................................... |
138 |
One-Touch (Option)/Abbreviated Dialing Numbers........................ |
140 |
Entering One-Touch (Option)/Abbreviated Dialing Numbers......... |
140 |
Entering One-Touch (Option)/Abbreviated Email Address ............ |
140 |
Printing Out Directory Sheet (Option) ............................................ |
142 |
Changing or Erasing the Settings of the One-Touch/ |
|
Abbreviated Dialing Numbers ........................................................ |
144 |
Fax Parameters .................................................................................. |
146 |
General Description ....................................................................... |
146 |
Setting the Fax Parameters ........................................................... |
146 |
Access Code....................................................................................... |
154 |
General Description ....................................................................... |
154 |
Setting the Access Code ............................................................... |
154 |
Operating FAX/EMAIL with the Access Code................................ |
154 |
8

Your Machine
Getting To Know
Printing Journals and Lists |
|
Transaction Journal............................................................................ |
156 |
Communication Journal (COMM. JOURNAL)................................... |
158 |
One-Touch/Abbreviated and Directory Search List......................... |
160 |
Program List (Option)......................................................................... |
162 |
Fax Parameter List.............................................................................. |
164 |
Problem Solving |
|
Troubleshooting.................................................................................. |
166 |
Information Code ................................................................................ |
168 |
Email ABBR Programming Errors..................................................... |
172 |
Error Messages Sent to the Sender............................................... |
172 |
Internet Fax Return Receipt Error Messages ................................ |
173 |
Verification Stamp and Flash Memory Card..................................... |
174 |
Verification Stamp.......................................................................... |
174 |
Installing the Flash Memory Card .................................................. |
176 |
Appendix |
|
Specifications...................................................................................... |
178 |
FCC Notice for Users in USA ............................................................. |
180 |
Notice to Users in Canada ................................................................. |
182 |
Glossary............................................................................................... |
184 |
ITU-T Image No. 1................................................................................ |
191 |
Index..................................................................................................... |
192 |
9
Getting To Know Your Machine
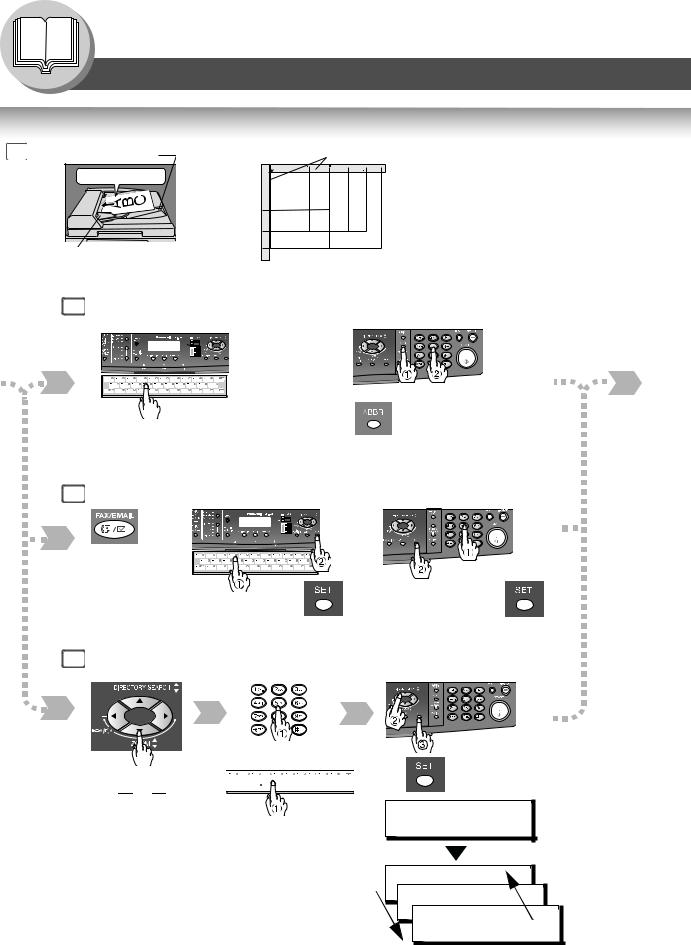
Basic Operation Chart
Basic Operation |
|
Original Guides |
|
|
||||
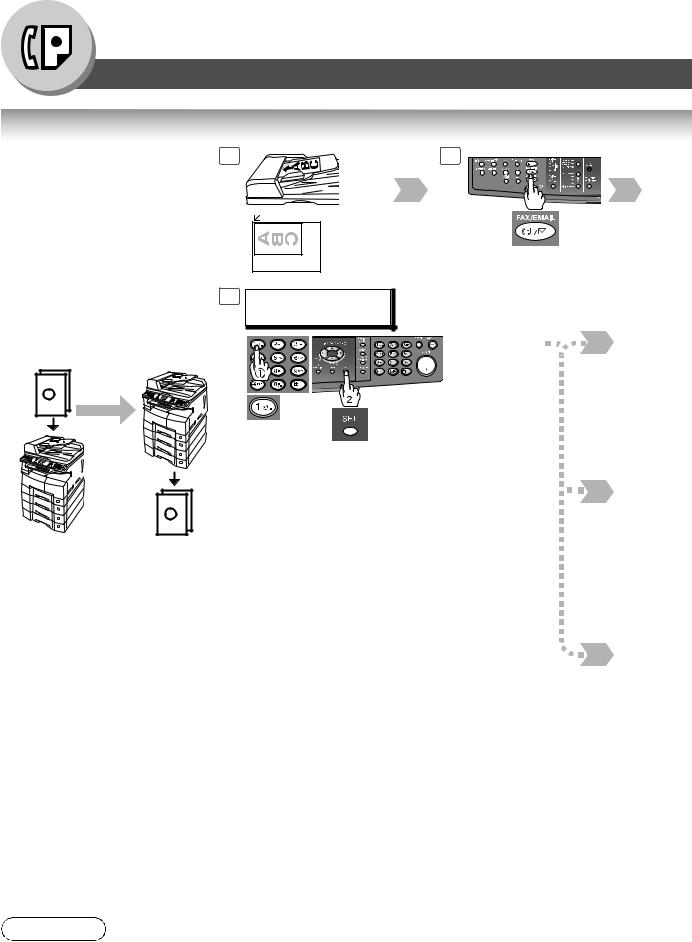
1 |
ADF Tray |
|
|
• Place originals face down on the |
||||
|
Face up |
|
INV |
INV |
LTR |
LGL |
LDR |
Platen or face up on the ADF/i-ADF. |
From |
From |
INV |
INV-R |
LTR-R |
LGL |
LDR |
• For originals smaller than Invoice |
|
ADF/ |
or |
size, position the original within the |
||||||
i-ADF |
|
Platen |
INV |
|
|
|
|
Invoice area and select Invoice. |
(Option) |
|
INV |
|
|
|
|
• Select original size when placing the |
|
|
|
|
LGV |
|
|
|
|
|
|
|
|
LTR |
|
|
|
|
|
|
Original Guides |
|
LTR |
LTR |
|
|
|
document on the Platen. |
|
|
LDR |
|
|
|
|
||
|
|
|
|
|
|
|
|
|
|
Adjust to the original’s width. |
|
INV: Invoice, LTR: Letter |
|
||||
|
|
|
LGL: Legal, LDR: Ledger |
|
||||
4a One-Touch/ABBR Dialing (see Note 3)
(One-Touch is available when a Keyboard option is installed.)
or
(Option)
When the Telephone Number(s) or Email Address(es) are registered in the One-Touch/Abbreviated Dialing.
or
4b Manual Number Dialing (Up to 50 Stations)
+ABBR No. (3-digit)
Change to Email |
|
or |
|
|
|
||
Address or |
|
|
|
Telephone No. |
|
Email Address or |
|
input mode. |
|
||
Email Address(es) + |
Telephone Number + |
||
|
or |
(When a Keyboard option is installed) |
||
|
|
|
|
4c Directory Search Dialing (see Note 3) |
|||
|
|
|
|
|
|
|
|
or


 or
or 


 (Option)
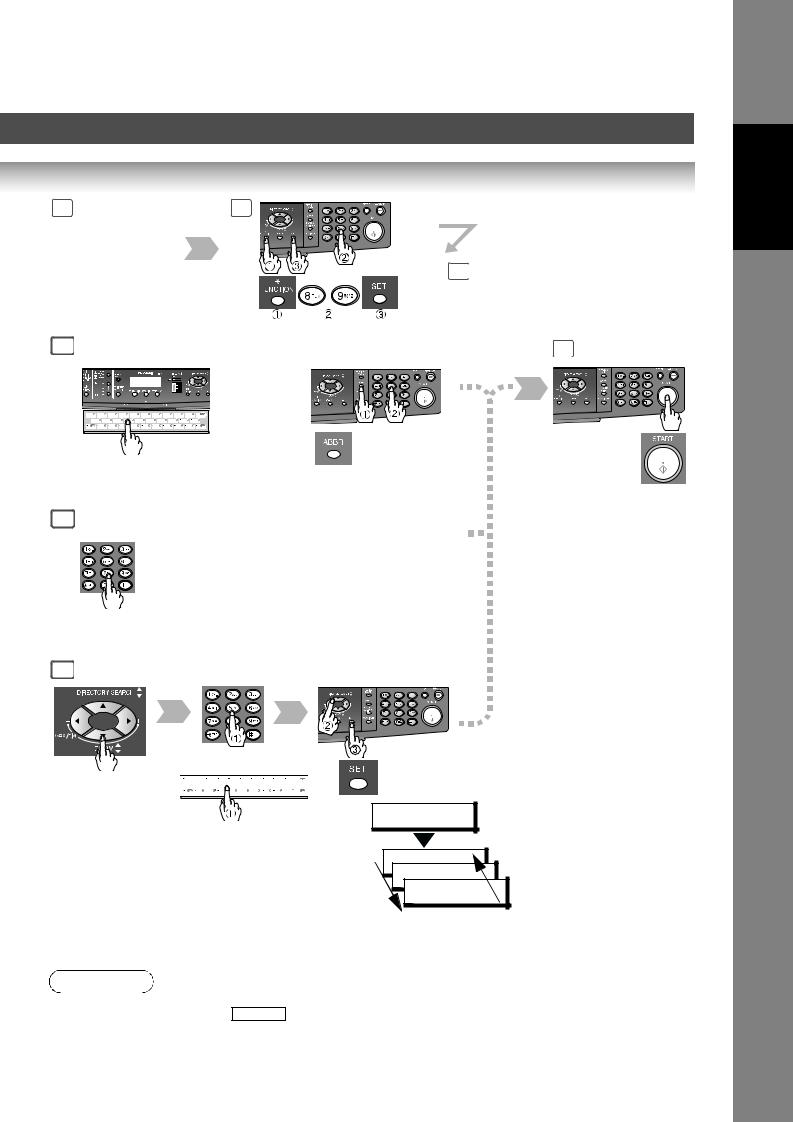
Enter the first letter(s) of the name you wish to search. Ex: "SA"
ENTER LETTER(S) SA
[100]SALES 3
5551234 [005]SALES 2
5551234
[001]SALES
5551234
10
Your Machine
Getting To Know
2 |
3 |
|
|
Select the desired |
|
|
Transmission setting. |
4a |
|
(See the right column) |
|
|
If set on other |
4b |
|
4c |
|
|
function mode. |
|
5 |
6 |
|
The document(s) is stored into memory with a file number. Then starts sending the document(s).
When an original is scanned from the Platen Glass, the message "ANOTHER ORIGINAL?" is shown.
Place another original, then press START .
Machine starts sending.
Sending Non-Standard Size Documents
When transmitting non-standard size document(s), the machine will not send the portion of the document that exceeds the standard size ("P" portion).
Transmission Settings
S-FINE
FINE STANDARD
PHOTO
TEXT/
PHOTO
for finer detailed originals (400 or 600 dpi, see page 148) for detailed originals
for standard originals (both LED lights go out)
for photo or illustration originals
for text and photo originals
TEXT for text only originals
LETTER  : Letter
LETTER  : Letter-R
INVOICE  : Invoice
INVOICE  : Invoice-R
LEDGER  : Ledger
LEGAL  : Legal
*ORIGINAL SIZE key is used for Platen Glass.
*Legal size with ADF only.
NOTE
1.If your machine sounds an alarm (pi-pi-pi) in Step 4 above, this indicates that the Dialer is Full (more than 50 full Email Addresses are entered or 50 transmission reservations including G3 communication have been already reserved).
2.To utilize the Email functions, your machine needs to be set up properly on your network. Please contact your network administrator for actual network setup.
3.Auto Dialer (One-Touch/ABBR.) is only available when stations are registered. (See page 140)
4.When transmitting in Photo or S-Fine mode, there is a possibility that printing quality may deteriorate at the remote station due to its reception capability. If this occurs, re-send with Direct Transmission or use "Fine" Resolution.
5.You can send the same document(s) to multiple stations by repeating Steps 4a, 4b or 4c, and
then pressing START .
6. To stop the transmission, see page 12.
11

Getting To Know Your Machine
Basic Operation Chart
To Stop the Transmission
1 |
2 |
COMMUNICATION STOP ? |
3 SAVE AS INCOMP.FILE? |
|
1:YES 2:NO |
1:YES 2:NO |
|
|
1 |
: Saves the file. |
|
2 |
: Deletes the file. |
• If Fax Parameter No. 31 (INC. FILE SAVE) is "Valid".
(See page 149)
• To retry an Incomplete File, see page 110.
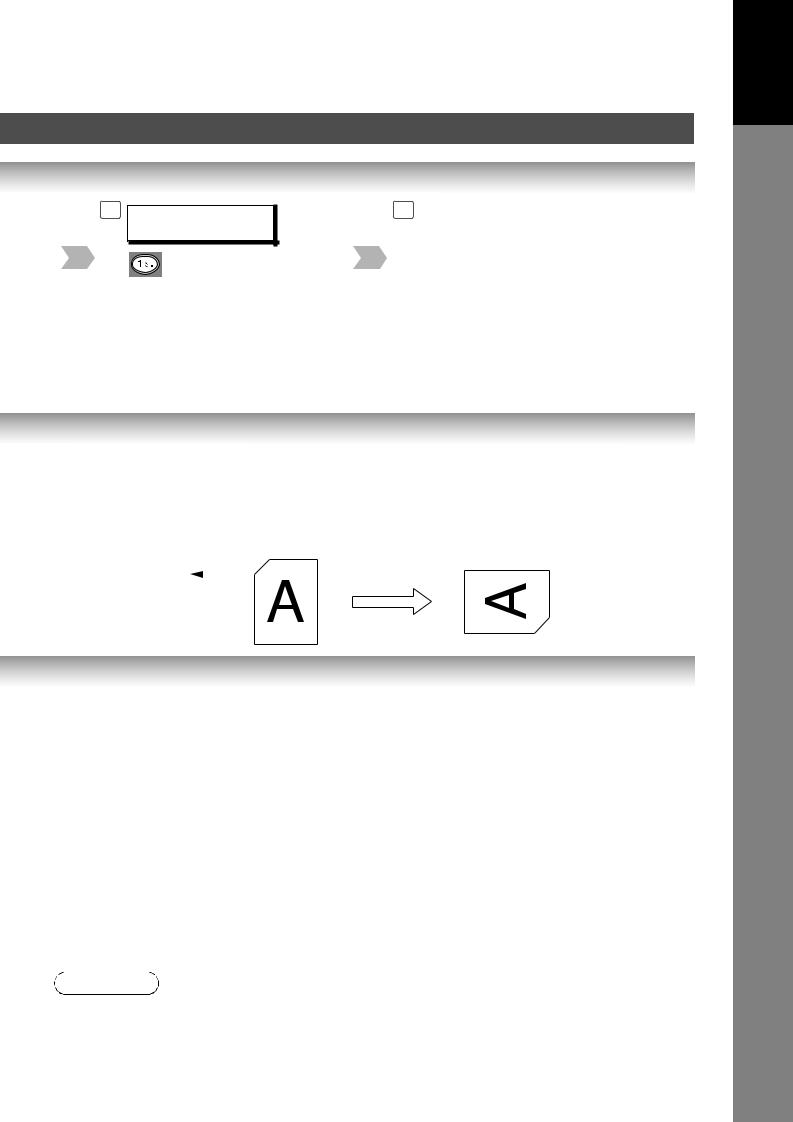
Rotated Transmission
Letter or A4 size Original(s) are placed in a Portrait (

 ) direction, the document(s) will be rotated by 90º and then transmitted in a Landscape (

 ) direction. The document(s) will be printed the same size as the transmitted originals at the Receiving Station.
Fax Parameter No. 78 (ROTATION XMT) set to:
• Invalid
Letter or A4 Original |
Receiving Station: |
|
Letter or A4 paper |
||
|
Sends with 70%
Reduction
2-Sided Transmission (Scan) (DP-8020E only)
This machine has duplex SCAN capabilities. (It is available when the i-ADF (DA-AR202) option is installed.)
Scanning 2-Sided Original(s) using the Basic Menu:
• 2-Sided Original = ON ( 1 SIDED COPY lights)
Duplex Scan |
|
|
|
|
|
|
|
|
|
|
|
|
|
|
|
|
|
|
|
|
|
Receiving Station |
|
|
|
|
|
|
|
|
|
|
|
|
|
|
|
|
|
|
|
|
|
||
|
|
|
|
|
|
|
|
|
|
|
|
|
|
|
|
|
|
|
|
|
||
|
|
|
|
|
|
|
|
|
|
|
|
|
|
|
|
|
|
|
|
|
||
|
|
|
|
|
|
|
|
|
|
|
|
|
|
|
|
|
|
|
|
|
||
|
|
|
|
|
|
|
|
|
|
|
|
|
|
|
|
|
|
|
|
|
|
|
|
|
|
|
|
|
|
|
|
|
|
|
|
|
|
|
|
|
|
|
|
|
|
|
|
|
|
|
|
|
|
|
|
|
|
|
|
|
|
|
|
|
|
|
|
|
|
|
|
|
|
|
|
|
|
|
|
|
|
|
|
|
|
|
|
|
|
|
|
|
|
|
|
|
|
|
|
|
|
|
|
|
|
|
|
|
|
|
|
|
|
|
NOTE
12
1.To select the Comm. Journal printout condition, change the setting of Fax Parameter No. 12. (See page 148)
2.If the Email transmission cannot be completed for any reason, the Email may be returned undelivered; otherwise no reply will be printed.
Your Machine
Getting To Know
4 PRINT |
COMM. JOURNAL? |
5 |
1:YES |
2:NO |
|
Stop the transmission.
Print Communication Journal
(COMM. JOURNAL).
• Valid (Default Position) |
|
|
|
|
|
||
|
|
|
|
|
|
|
Receiving Station: |
Letter or A4 Original |
|
|
|
|
|||
|
|
|
|
Letter or A4 paper |
|||
|
|
|
|
|
|
|
|
|
|
|
|
Sends with |
|
|
|
|
|
|
|
|
|
|
|
|
|
|
|
Rotated Transmission |
|
|
|
|
|
|
|
|
|||
|
|
|
|
|
|
|
|
|
|
|
|
|
|
|
|
NOTE
3.Rotation XMT requires the use of Memory Transmission.
4.Verification Stamp is disabled during 2-Sided Scanning.
13
Getting To Know Your Machine
Mode Setting
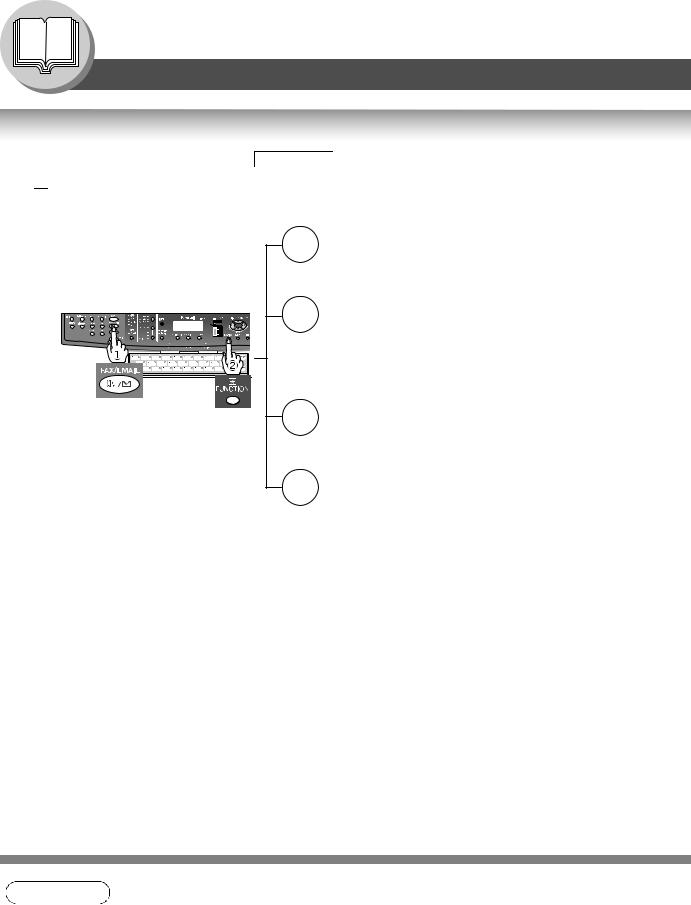
Changing the Modes
Any function can be started by first pressing FUNCTION and then entering the function number, or by pressing 

 or
or  scroll key repeatedly until the desired function appears on the display.
|
1 |
Deferred Communication |
(see page 32) |
|
|
|
1 |
= Deferred XMT |
|
|
|
2 |
= Deferred Polling |
(see page 32) |
|
|
3 |
= Advanced Communication |
|
|
2 |
Advanced Communication |
(see page 76) |
|
|
|
2 |
= Confidential Communication |
|
|
|
4 |
= Sub-Address XMT |
(see page 84) |
|
|
5 |
= LAN Relay XMT (see Note 1) |
(see page 130) |
If set on other |
3 |
Polling |
|
|
function mode. |
|
1 = Polling |
(see page 38) |
|
|
|
2 |
= Polled |
(see page 36) |
|
6 |
Print Out |
|
|
|
|
1 |
= Journal (Print/View) |
(see page 156) |
|
|
2 |
= One-Touch (see Note 2)/Abbreviated/ |
|
|
|
|
Directory Search List |
(see page 160) |
|
|
3 |
= Program List (see Note 2) |
(see page 162) |
|
|
4 |
= Fax Parameter List |
(see page 164) |
|
|
6 |
= Individual XMT Journal |
|
|
|
7 |
= Directory Sheet (see Note 2) |
(see page 142) |
NOTE
1.If Fax Parameter No. 140 is not preset to "Valid" position, which enables you to use its function, the display will not show the function. (See page 150)
2.These functions are available when the optional Keyboard (DA-KB180) is installed.
14
Your Machine
Getting To Know
7 |
Set Mode |
(see page 138) |
|
|
1 |
= User Parameters |
|
|
|
• Date & Time |
|
|
|
• Logo |
|
|
|
• Character ID |
|
|
|
• ID Number (Fax Telephone Number) |
|
|
|
• Time Zone |
|
|
|
(Internet Parameters) |
|
|
2 |
= One-Touch (see Note 2)/ |
|
|
|
Abbreviated Numbers |
(see page 140) |
|
3 |
= Program Keys (see Note 2) |
(see page 40) |
|
4 |
= Fax Parameters |
(see page 146) |
8 |
Select Mode (see Note 3) |
(see page 158) |
|
If set on other |
1 = Communication Journal = OFF/ON/INC |
||
function mode. |
2 = Delivery Notice = OFF/ON |
(see pages 52 and 152) |
|
|
3 |
= Cover Sheet = OFF/ON |
(see page 86) |
|
4 |
= Password-XMT = OFF/ON (see Note 4) |
(see pages 88 and 90) |
|
5 |
= RCV to Memory = OFF/ON/PRINT |
(see page 92) |
|
6 |
= File Type / Name = TIFF/PDF |
(see pages 59 and 61) |
|
7 |
= Stamp = OFF/ON |
|
|
8 |
= LAN Ledger XMT = OFF/ON |
(see page 64) |
|
9 |
= Memory XMT = OFF/ON |
(see page 22) |
9 |
Edit File Mode |
(see page 104) |
|
|
1 |
= File List (Print/View) |
|
|
2 |
= Change Time/Station |
(see page 106) |
|
3 |
= Delete File |
(see page 106) |
|
4 |
= Print File |
(see page 108) |
|
5 |
= Add Document |
(see page 108) |
|
6 |
= Retry Incomplete File |
(see page 110) |
|
|
|
|
NOTE |
3. The Select Mode ( |
|
8 ) settings can be temporarily changed for the current |
FUNCTION |
communication. Upon its completion, however, these parameters are returned to their preset default values (Home position). You can change the Home position of these settings in the Fax Parameters mode. (See page 146)
4.If Fax Parameter No. 43 is not preset to the "ON" position, which enables you to use its function, the display will not reveal this function. (See page 149)
15
Getting To Know Your Machine
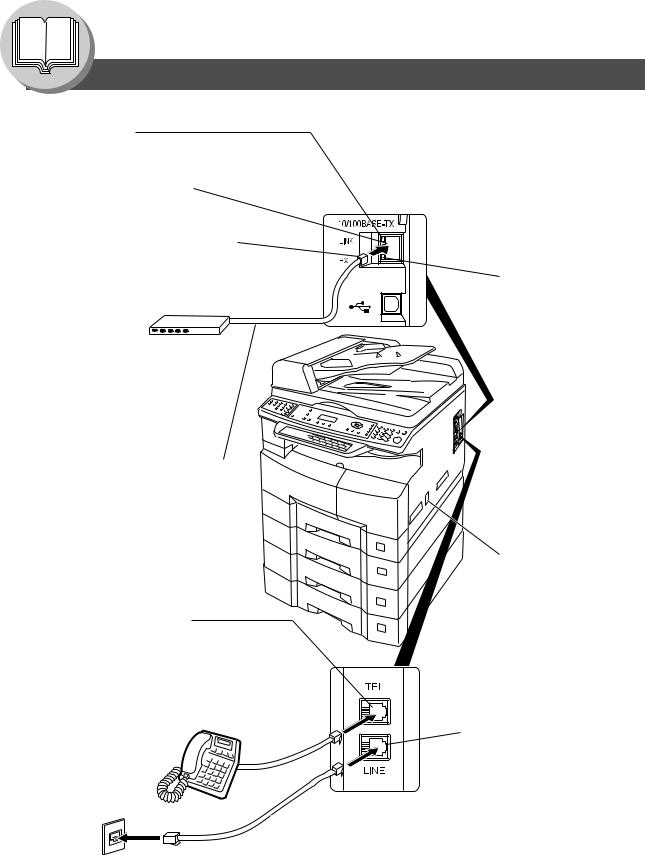
Connecting the Cables
LINK Lamp
Illuminates when connected to the LAN. Lamp will not turn ON if LAN cable is defective (contains breaks).
LAN Connection Jack (10Base-T/100Base-TX)
LAN Cable (10Base-T/100Base-TX Cable)
Insert the plug until a click is heard.
(LAN cable is not included with the product.) Purchase a Category 5 Cable, compliant with EIA/TIA 568-A-5 standard.
10Base-T/100Base-TX Ethernet Hub
Ethernet LAN Cable (10Base-T/100Base-TX) (Not included)
External Telephone Jack
You can connect an additional standard single line telephone to the machine. To connect the telephone, remove the protective tab on the TEL jack.
RJ-11C
Telephone Jack
ACTIVITY Lamp
Blinks when there is data traffic
on the LAN.
Power Switch
After connecting all cables and Power Cord, turn the Power Switch on the Right Side of the machine to the ON position.
Telephone Line Jack
Plug one end of the telephone line cable into the "RJ-11C" telephone jack supplied by the telephone company and the other end into the LINE jack on the Right Side of the machine. (Refer to the Dialing Method. See page 136.)
16

Your Machine
Getting To Know
Safety Information
 CAUTION
Denotes hazards that could result in minor injury or damage to the machine.
•TO REDUCE THE RISK OF SHOCK OR FIRE, USE ONLY NO. 26 AWG OR LARGER TELEPHONE LINE CABLE.
•DISCONNECT ALL POWER TO THE MACHINE BEFORE COVER(S) ARE REMOVED. REPLACE THE COVER(S) BEFORE THE UNIT IS RE-ENERGIZED.
 IMPORTANT SAFETY INSTRUCTIONS
When using your telephone equipment, basic safety precautions should always be followed to reduce the risk of fire, electric shock and injury to persons, including the following:
•DO NOT USE THIS PRODUCT NEAR WATER, FOR EXAMPLE, NEAR A BATH TUB, WASH BOWL, KITCHEN SINK OR LAUNDRY TUB, IN A WET BASEMENT OR NEAR A SWIMMING POOL.
•AVOID USING A TELEPHONE (OTHER THAN A CORDLESS TYPE) DURING AN ELECTRICAL STORM. THERE MAY BE A REMOTE RISK OF ELECTRIC SHOCK FROM LIGHTNING.
•DO NOT USE THE TELEPHONE TO REPORT A GAS LEAK IN THE VICINITY OF THE LEAK.
SAVE THESE INSTRUCTIONS.
17

Getting To Know Your Machine
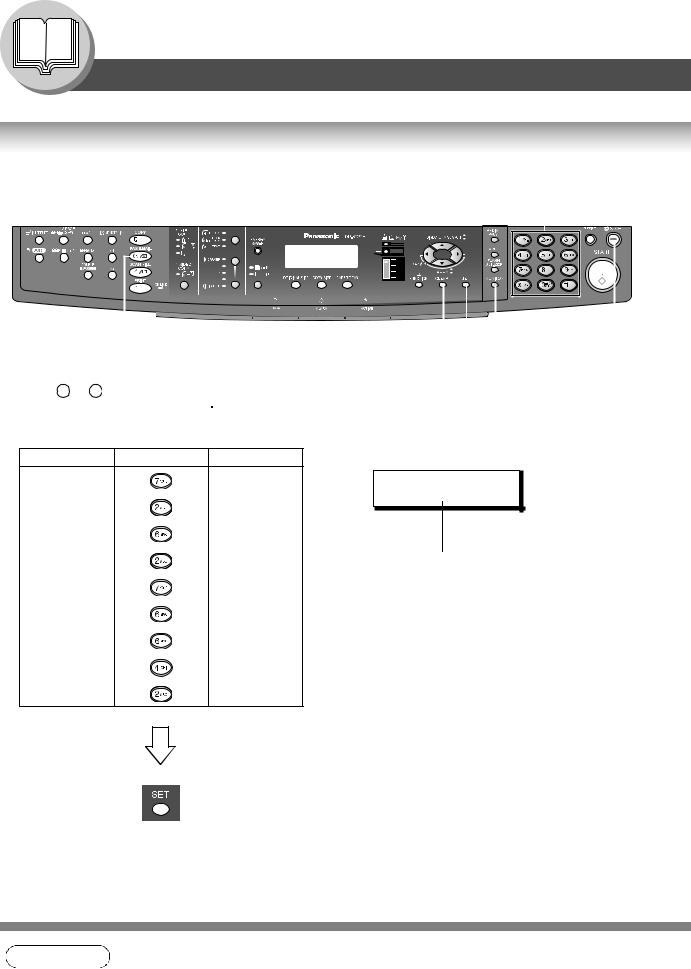
Control Panel
1 |
2 |
3 |
4 |
5 |
6 |
7 |
8 |
9 |
10 |
11 |
12 |
13 |
14 |
15 |
26 |
24 |
|
|
|
|
17 |
16 |
|
|
|
|
|
|
|
25 |
|
|
|
|
|
|
23 |
22 |
21 |
20 |
19 |
18 |
|
No. |
Icon |
Contents |
No. |
Icon |
Contents |
||
|
|
|
|
FAX/EMAIL Key |
|
|
ORIGINAL Key |
|
|
|
|
|
|
||
1 |
Used to select the FAX/EMAIL mode. |
2 |
|
To change the input mode between |
|||
|
|
Email Address and Telephone Number.
Used to select type of Original. (See page 11)
CONTRAST (Lighter/Darker) Key
Used to adjust the Manual Exposure.
3 |
4 |
ENERGY SAVER Key
Used to switch the machine into Energy Saver Mode.
5
7
9
10
12
14
|
RESOLUTION Key |
|
|
ORIGINAL SIZE Key |
|
|
|
||
|
Used to set Standard, Fine, Super-Fine |
6 |
|
Used to select the Original Size |
|
(400 or 600 dpi). (See page 11) |
|
manually. (See page 11) |
|
|
|
|
||
|
|
|
|
|
LCD Display
Indicates Number of Copies / Original(s) / Machine / User Error Code.
Cursor Keys
• Adjust the Monitor and Ringer Volume.
• Move the cursor while entering numbers and characters.
• Search the Station Name for Directory Search Dialing.
• Confirm the entered station for multi-station communication.
• Select functions.
•Confirm the current communication modes (e.g. Page Number, ID, Dialed Telephone Number or Email Address, File Number) when the unit is ON LINE.
|
REDIAL/PAUSE Key |
|
|
ABBR Key |
|
|
|
||
|
Used to enter a pause when recording |
11 |
|
Used to start Abbreviated Dialing. |
|
or dialing a Telephone Number, or to |
|
(See pages 10, 22 and 60) |
|
|
|
|
||
|
redial the last dialed number. |
|
|
|
|
FLASH/SUB-ADDR Key |
|
|
MONITOR Key |
|
|
|
||
|
Used to separate the Sub-Address from |
|
|
Used to start On-Hook Dialing or to |
|
the Telephone Number when dialing, or |
13 |
|
input a space between numerical |
|
|
|||
|
to access some features of your PBX. |
|
|
entries (such as, while entering |
|
|
|
|
telephone numbers). |
|
|
|
|
(See pages 26 and 136) |
|
RESET Key |
|
|
STOP Key |
|
Resets all features to the initial power- |
15 |
|
Press this button when you want to Stop |
|
on state. |
|
a telecommunication, registration |
|
|
|
|
operation or audible tone.
18

Your Machine
Getting To Know
No. |
Icon |
Contents |
No. |
Icon |
Contents |
|
START Key |
|
|
|
Keypad |
16
18
20
22
24
25
8
26
Press this button to Start transmitting or |
|
Used for manual number dialing, |
|
receiving a fax. |
17 |
recording phone numbers and |
|
|
numerical entries. |
||
|
|
||
|
|
Used to input Characters when a |
|
|
|
Keyboard option is not installed. |
|
SET Key |
|
CLEAR Key |
|
Used to Set operations. |
19 |
Use this button when correcting entered |
|
|
|
numbers or characters. |
|
FUNCTION Key |
|
ACTIVE LED (green) |
|
Used to start or select functions and |
|
Flashes: |
|
subfunctions. These functions are |
21 |
When machine is active. |
|
explained in detail on page 14. |
Lights: |
||
|
When the received fax message is in memory.
ALARM LED (red)
Lights/Flashes when trouble occurs.
Lights:
Machine detected a trouble status.
•No paper in the selected tray or toner has run out.
• Machine detected trouble, such as |
23 |
paper misfeed or jammed.
Flashes:
Machine detected an alarm status.
•No paper in the Tray. (Tray not selected)
•Toner is getting low, etc.
PRINT DATA LED (green)
Flashes:
When receiving printing data.
Lights:
While printing.
Keyboard (Option)
• Used to input the Characters. (To switch between Upper/Lower characters, press Shift key ( ))
))
•Used for One-Touch Keys, Program Keys.
•Used to enter a symbol for the LOGO, Character ID, Station Name
and for the Email Address. Use 

 or
or 

 to select the desired symbol(s).
2-Sided Key
Used for 2-Sided transmission. (Available when the i-ADF (DA-AR202) option is installed.) (For DP-8020E only)
Used for Copier, Network Scanner and Printer Functions.
19
Getting To Know Your Machine
Control Panel
How To Enter Characters
To enter characters or symbols follow the steps below.
Keypad 
|
|
|
|
|
|
|
|
|
|
|
|
|
|
|
|
|
|
|
|
|
|
|
|
|
|
|
|
|
|
|
|
|
|
|
|
|
|
|
|
|
|
|
|
|
|
|
|
|
|
|
|
|
|
|
|
|
|
|
|
|
|
|
|
|
|
|
|
|
|
|
|
SET |
|
STOP |
|||
FAX/EMAIL |
|
|
CLEAR |
|
MONITOR |
|||||||
•Use 0 to 9 on the keypad to enter characters and symbols. The keypad assignment for the characters and symbols is shown below. The " " key is also used to enter a period "." during Email or IP Address input.
Ex: To enter "Panasonic" |
|
|
|
Character |
Keypad |
Key Strokes |
Ex: LOGO |
|
|||
P |
|
6 |
LOGO |
a |
|
2 |
Panasonic |
|
|
||
n |
|
3 |
|
a |
|
2 |
Cursor |
s |
|
5 |
|
o |
|
4 |
|
n |
|
3 |
|
i |
|
4 |
|
c |
|
4 |
|
NOTE
20
1.When the Keyboard Option (DA-KB180) is installed, the keypad reverts to Numerical entries only.
Your Machine
Getting To Know
Character Table and Required Number of Key Strokes
|
|
1 |
|
2 |
3 |
4 |
5 |
|
6 |
7 |
8 |
9 |
10 |
11 |
12 |
13 |
14 |
|
1 @ . Å å Ä ä Ö ö Ü ü È è É é Æ æ Ñ |
|
|
|
|
|
|||||||||||
|
1 |
@ . |
|
|
|
|
|
|
|
|
|
|
|
|
|
|
|
|
|
2 |
|
a |
b |
c |
A |
|
B |
C |
|
|
|
|
|
|
|
|
|
|
|
|
|
|
|
|
|
|
|
|
|
|
|
|
|
|
|
3 |
|
d |
e |
f |
D |
|
E |
F |
|
|
|
|
|
|
|
|
|
|
|
|
|
|
|
|
|
|
|
|
|
|
|
|
|
|
|
4 |
|
g |
h |
i |
G |
|
H |
I |
|
|
|
|
|
|
|
|
|
|
|
|
|
|
|
|
|
|
|
|
|
|
|
|
|
|
|
5 |
|
j |
k |
l |
J |
|
K |
L |
|
|
|
|
|
|
|
|
|
|
|
|
|
|
|
|
|
|
|
|
|
|
|
|
|
|
|
6 |
|
m |
n |
o |
M |
|
N |
O |
|
|
|
|
|
|
|
|
|
|
|
|
|
|
|
|
|
|
|
|
|
|
|
|
|
|
|
7 |
|
p |
q |
r |
s |
|
P |
Q |
R |
S |
|
|
|
|
|
|
|
|
|
|
|
|
|
|
|
|
|
|
|
|
|
|
|
|
|
8 |
|
t |
u |
v |
T |
|
U |
V |
|
|
|
|
|
|
|
|
|
|
|
|
|
|
|
|
|
|
|
|
|
|
|
|
|
|
|
9 |
|
w |
x |
y |
z |
|
W |
X |
Y |
Z |
|
|
|
|
|
|
|
|
|
|
|
|
|
|
|
|
|
|
|
|
|
|
|
|
0 |
- / ( ) _ , ’ : % & + = |
|
|
|
|
|
|
|
|
|
||||||
|
|
|
|
|
|
|
|||||||||||
|
0 |
- / ( ) _ ’ : & + = ! " $ < > % ? [ ] ^ ` { | } |
|
|
|
|
|||||||||||
•Select and continue pressing the appropriate key on the keypad until the desired Character / Symbol is displayed, then select another key on the keypad to enter the next Characters / Symbols. If the next Character / Symbol that
you wish to enter falls on the same key, press |
, to set the first Character / Symbol before continuing. |
||
Press |
SET |
to complete the registration. |
|
Ex: To input an "o" and "n", the 6 key is used for both Characters.
Enter as follows: 6 x 4 |
6 x 3 |
|
SET |
|
||
• To delete a Character / Symbol, press |
|
|
. |
|||
|
CLEAR |
|||||
• To enter a space, press MONITOR .
•Upper case characters are typically used to enter Station Name, etc. Lower case characters are typically used to enter E-mail Addresses.
21

Facsimile Features
Sending Documents
Memory Transmissions
Your machine quickly stores the document(s) into the machine's memory. Then, starts to dial the Telephone Number. If the transmission fails, your machine will retransmit the remaining unsuccessful page(s) automatically.
A |
Transmit |
|
Store
|
1 |
|
or |
A |
(See page 10) |
Receive |
|
4a |
One-Touch/ABBR Dialing (see Note 2) |
|
(One-Touch is available when a Keyboard option is installed.) |
or
(Option)
When the Telephone Number(s) or Email Address(es) are registered in the
or One-Touch/Abbreviated Dialing.
4b Manual Number Dialing (Up to 50 Stations)
|
Telephone |
|
|
|
|
|
Number |
+ |
|
(Up to 36 digits) |
|
|
|
|
|
|
|
or
4c Directory Search Dialing (see Note 2)
+ABBR No. (3-digit)
If you make a mistake, press
CLEAR to erase the number
then reenter the correct number.
or
 or
or 
 (Option)
Enter the first letter(s) of the name you wish to search. Ex: "SA"
ENTER LETTER(S) SA
[100]SALES 3
5551234 [005]SALES 2
5551234
[001]SALES
5551234
|
|
|
|
NOTE |
1. If you need a special access number to get an outside line, dial it first then press |
|
to |
PAUSE |
enter a pause (represented by a "-") before dialing the full number. Ex: 9 PAUSE 5551234
2.Auto Dialer (One-Touch/ABBR.) is only available when stations are registered. (See page 140)
3.To stop the transmission, see page 26.
22
2 |
3 Select the desired |
|
Transmission setting. |
|
(See page 11) |
|
4a |
If set on other |
4b |
function mode. |
4c |
|
5 |
6 |
When an original is scanned from the Platen |
Glass, the message "ANOTHER ORIGINAL?" is shown.
Place another original, then press START .
Machine starts sending.
The document(s) will be stored into memory with a file number when sending from the ADF (Automatic Document Feeder). Then starts dialing the Telephone Number or connecting to the LAN immediately after storing the first page. (See Note 5) The remaining page(s) continue to store into memory.
•If memory overflow occurs while storing documents, the machine will show "MEMORY FULL" on the display. In the factory default setting (Fax Parameter No. 82 (QUICK MEMORY XMT) is set to "Valid"), the machine will transmit the stored documents automatically when transmitting to one station. If Fax Parameter No. 82 is set to "Invalid" and transmitting to one station, the machine will change the transmission mode from Memory to Direct XMT automatically when it detects that memory overflow will occur.
In the "Valid" setting, the machine will show "MEMORY FULL" and prompts you whether to transmit the successfully stored documents or to cancel the transmission.
Press 1 "YES" to cancel or press 2 "NO" to transmit. If no action is taken within 10 seconds, the machine will start transmitting the stored documents.
If memory overflows while storing the 1st page, use Direct Transmission.
•An Information Code will be displayed if the transmission has failed or there was no answer at the receiving side after the last automatic redial.
The document stored for the transmission will be erased from the memory automatically and the information code is printed for the transmission on the Communication Journal (COMM. JOURNAL).
If you need to retain the incomplete documents even after the last redial, change the Fax Parameter No. 31 (INC. FILE SAVE) to "Valid" in advance. (See page 149)
To retry the incomplete documents, refer to page 110.
|
|
|
|
NOTE |
4. If you are using Pulse dialing and you wish to change to Tone dialing in the middle of dialing, |
||
|
press |
|
(represented by a "/"). |
|
TONE |
||
The dialing mode will be changed from Pulse to Tone after dialing the digit "/".
Ex: 9 PAUSE TONE 5551234
5.This feature is called "Quick Memory Transmission". If you wish to store all the document(s) into memory first before transmitting, change the Fax Parameter No. 82 (QUICK MEMORY XMT) to "Invalid".
6.You can send the same document(s) to multiple stations by repeating Steps 4a, 4b or 4c, and
then pressing START .
7. The "QUICK MEMORY TRANSMISSION" feature is disabled if multiple stations are set.
23
Features
Facsimile
Facsimile Features
Sending Documents
Direct Transmission Reservation (Priority Transmission Reservation)
If you are in a rush to send an urgent document, however there are many files in the memory, use Direct Transmission Reservation to send. The urgent document will be sent immediately after the
current communication is finished.
If your machine's memory is full, use Direct Transmission.
Note: You cannot send document(s) to multiple stations.
1 |
2 |
|
|
or |
|
|
(Only 1 page can be |
|
|
sent from the Platen in |
If set on other |
|
this mode) |
|
|
|
function mode. |
5 |
MEMORY XMT=ON |
|
|
1:OFF 2:ON |
|
Transmit
A
A |
Does not store |
Receive |
original(s) in |
|
memory. |
|
(If you need to change the preset Memory position, change the setting of Fax Parameter No. 5. (See page 148))
|
|
|
|
NOTE |
1. If you need a special access number to get an outside line, dial it first then press |
|
to |
PAUSE |
|||
|
enter a pause (represented by a "-") before dialing the full number. Ex: 9 PAUSE 5551234
2.Auto Dialer (One-Touch/ABBR.) is only available when stations are registered. (See page 140)
24
3 Set the desired |
4 |
Transmission |
|
setting, if |
|
necessary. |
|
(See page 11) |
5 |
|
6a |
|
|
|
One-Touch/ABBR Dialing (see Note 2) |
|||
|
(One-Touch is available when a Keyboard option is installed.) |
||
or
(Option)
When the Telephone Number(s) or Email Address(es) are registered in the
or One-Touch/Abbreviated Dialing.
6b Manual Number Dialing
Telephone
Number
(Up to 36 digits)
or
6c Directory Search Dialing (see Note 2)
or


 or
or 


 (Option)
+ABBR No. (3-digit)
ENTER LETTER(S) SA
Enter the first letter(s) of the name you wish to search.
[100]SALES 3 Ex: "SA" 5551234
[005]SALES 2
5551234
[001]SALES
5551234
7
You can reserve to send an urgent document to a single station only.
|
|
|
NOTE |
3. |
To stop the transmission, see page 26. |
|
4. |
If you are using Pulse dialing and you wish to change to Tone dialing in the middle of dialing, |
press TONE (represented by a "/").
The dialing mode will be changed from Pulse to Tone after dialing the digit "/". Ex: 9 PAUSE TONE 5551234
25
Features
Facsimile
Facsimile Features
Sending Documents
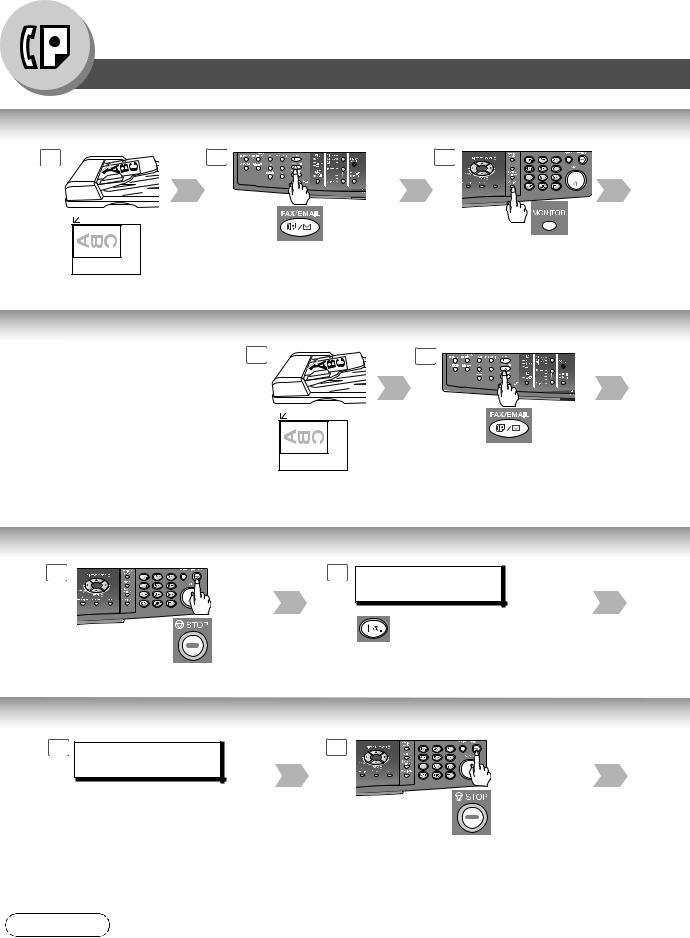
On-Hook Dialing |
|
|
1 |
2 |
3 |
or |
If set on other |
|
|
|
function mode. |
Select the original size when
placing the document on the (Only 1 page can be sent from Platen.
the Platen in this mode)
You will hear a dial tone through the monitor speaker.
Off-Hook Dialing (Voice Mode Transmission)
If you wish to send the document |
1 |
2 |
after talking with the other party first, |
|
|
use Voice Mode Transmission. Your |
|
|
machine requires an external |
or |
|
telephone. |
||
|
(Only 1 page can be sent from the Platen in this mode)
If set on other function mode.
Select the original size when placing the document on the Platen.
To Stop the Transmission
1 |
2 COMMUNICATION STOP ? |
|
1:YES 2:NO |
To Cancel the Direct Transmission Reservation
1 DIRECT XMT RESERVED |
2 |
(Station Name) |
|
Make sure the document(s) are still on the ADF/i-ADF.
|
|
|
|
NOTE |
1. If you need a special access number to get an outside line, dial it first then press |
|
to |
PAUSE |
enter a pause (represented by a "-") before dialing the full number. Ex: 9 PAUSE 5551234
26

4 * DIALING *
5551234
3
Telephone
Number
5
4 When you hear the voice of the other party, tell the other party to prepare to receive a document.
5
Then when you hear a beep, press START
and hang up the handset.
3
3
|
SAVE AS INCOMP.FILE? |
4 |
|
1:YES 2:NO |
|
|
|
|
1: Saves the file.
2: Deletes the file.
If Fax Parameter No. 31 (INC. FILE SAVE) is "Valid". (See page 149)
|
CANCEL XMT RESERVE ? |
4 |
|
|
1:YES 2:NO |
|
|
|
|
|
|
|
|
|
|
|
|
|
|
PRINT COMM. JOURNAL? 1:YES 2:NO
Print Communication Journal
(COMM. JOURNAL).
After the transmission stops, remove the document(s) from the ADF/i-ADF.
5
Stop the transmission.
|
|
|
|
NOTE |
2. If you are using Pulse dialing and you wish to change to Tone dialing in the middle of dialing, |
||
|
press |
|
(represented by a "/"). |
|
TONE |
||
The dialing mode will be changed from Pulse to Tone after dialing the digit "/".
Ex: 9 PAUSE TONE 5551234
27
Features
Facsimile

Facsimile Features
Sending Documents
Job Build
If the total document number of the job that you wish to send exceeds the maximum capacity of the ADF of 50 sheets (20 lb; 80 g/m2), change the setting of the Fax Parameter No. 133 (Job Build) to "On" in advance. (See page 150; the Example below, and Notes 1 and 2.)
You can also scan the documents manually one at a time. Ex: (one 70-sheet job is split into 2 scan jobs)
1
50
Documents: 50 sheets <1st scan>
1
70
1st and 2nd Scanning Data is 51 combined into one job
70
Documents: Remaining 20 sheets <2nd scan>
70-sheet is sent at one time (Max: 255-sheet)
1
or
NOTE
28
1.Quick Memory Transmission features are not available when using the Job Build.
2.Job Build features are not available if the Duplex sending is selected.
3.If you do not place the next documents within 5 minutes in step 5, your machine will send the already scanned documents automatically.
Features
Facsimile
2 |
|
3 |
|
4 |
|
|
ENTER STATION(S) |
<01> (Station name) |
|
|
|
THEN PRESS START 00% |
5551234 |
|
|
If set on other |
Enter the stations : |
5 |
|
|
• |
One-Touch / ABBR. Dialing |
|
|
|
function mode. |
|
||
|
• |
Manual Number Dialing |
|
|
|
|
|
||
|
|
• |
Directory Search Dialing |
|
|
|
(For details, see page 22) |
|
|
Press START .
5
5 seconds after the 1st scan, the machine will display "ANOTHER ORIGINAL?". You can place the remaining 20 documents on the ADF and select "1:YES". (If you place the documents within 5 seconds after the 1st Scan, the next scan will start immediately without displaying any notice.)
6
After the remaining documents are scanned, "ANOTHER ORIGINAL?" will display, select "2:NO" to start sending.
29
Facsimile Features
Receiving Documents
Automatic Reception
Transmit |
Documents are received automatically. |
A
Receive
Manual Reception
You may wish to receive |
Transmit |
documents manually if you use the |
|
telephone line in your office |
|
primarily as a personal telephone |
|
and occasionally for your facsimile |
|
machine. |
|
To receive documents manually, change the Fax Parameter No. 17 (RECEIVE MODE) to "Manual".
(See page 148)
A
Receive
Print Reduction Setting
Transmitted Document Received Document
|
Reduced to fit |
Oversized Document |
the loaded paper size |
(See Note 1) |
Substitute Memory Reception
If the recording paper runs out, jams or if the |
1 |
|
MESSAGE IN MEMORY |
toner runs out during reception, the machine |
|
03% |
|
automatically starts receiving documents into |
|
|
|
its image data memory. Stored documents are |
|
|
|
printed automatically after replenishing the |
|
|
|
recording paper / toner or after clearing the |
|
|
|
paper jam. (See Notes 2 and 3) |
|
|
|
When the machine completes the memory reception and there is no recording paper or toner, this error message appears on the display when set on FAX/EMAIL mode.
NOTE
1.If the received document is extremely long (over 39% longer than the recording paper), the document is divided into separate pages. (When printing on separate pages, the bottom
0.5 in (13 mm) of the 1st page's data will overlap on top of the next page.)
Overlap print. 0.5 in (13 mm)
30
Loading...