


Operating Instructions
DVD Video Recorder
Model No. DMR-E75V
Before connecting, operating or adjusting this product, please read these instructions completely.
Please keep this manual for future reference.
Web Site: http://www.panasonic-europe.com
|
VQT0H83 |
EB |

Before Use
Contents |
|
Before Use |
|
Contents ........................................................................................... |
2 |
Warning and Important Information .................................................. |
4 |
Dear Customer ................................................................................. |
5 |
Checking the Accessories ................................................................ |
5 |
Control reference guide |
|
Remote control ................................................................................. |
6 |
Batteries............................................................................................ |
7 |
Use ................................................................................................... |
7 |
Main unit ........................................................................................... |
7 |
The unit’s display .............................................................................. |
8 |
TV operation ..................................................................................... |
9 |
Remote Setting ................................................................................. |
9 |
Connection and Set up |
|
Connections (with Scart cables) ..................................................... |
10 |
Connections (without Scart cables) ................................................ |
11 |
Connections (with Video cables) .................................................... |
12 |
Connections (with S-Video cable)................................................... |
12 |
Connecting a television with Component video out terminals ........ |
12 |
Auto Setup (with Q Link Functions) ................................................ |
13 |
≥To Set Up this DVD Video Recorder |
|
with a brand-new Q Link TV................................................... |
13 |
≥To Set Up this DVD Video Recorder |
|
with an existing Q Link TV ..................................................... |
13 |
Auto Setup (without Q Link Functions) ........................................... |
14 |
Selecting TV screen type................................................................ |
14 |
Removing Interference ................................................................... |
15 |
VIDEO Plus+ Codes for Satellite Receivers/Cable TV ................... |
15 |
Recording from Set Top Boxes (STB) |
|
or other Satellite Receivers (SAT)................................................ |
16 |
≥Recording video signal by “Sky personal Planner” |
|
and “External Link 1” Functions ............................................. |
16 |
≥Recording RGB Signals ........................................................... |
16 |
DVD output and DVD/VHS output .................................................. |
17 |
Connecting a Television with Component video input terminals .... |
17 |
Connecting amplifier or system component.................................... |
18 |
≥Connecting a digital amplifier or system component................ |
18 |
≥Connecting an analog amplifier or system component ............ |
18 |
Connecting an external device ....................................................... |
18 |
≥When connecting to the AV3 input terminals |
|
on the front of the unit ............................................................ |
18 |
(^^^^^^^^^^^^^^^^^^^^^^^^^^^^^^[[[[DVD]]]^^^^^^^^^^^^^^^^^^^^^^^^^^^^^^^^)
Discs |
|
Discs you can use........................................................................... |
19 |
More about Discs............................................................................ |
19 |
Discs that cannot be played............................................................ |
20 |
Audio format logos.......................................................................... |
20 |
Which Disc Types is Playable on What TV..................................... |
20 |
Discs and accessories .................................................................... |
20 |
Maintenance ................................................................................... |
20 |
Disc handling .................................................................................. |
21 |
Inserting discs................................................................................. |
21 |
Playback |
|
Playing discs................................................................................... |
22 |
≥When a menu screen appears on the TV................................. |
22 |
Quick View (Play t1.3) .................................................................. |
22 |
Starting play from where you stopped it (Resume Function).......... |
22 |
Fast forward and rewind—SEARCH............................................... |
23 |
Slow-motion play ............................................................................ |
23 |
Frame-by-frame viewing ................................................................. |
23 |
Skipping .......................................................................................... |
23 |
Direct Play ...................................................................................... |
23 |
Displaying the TV image as a picture-in-picture/ |
|
Selecting an amount of time to skip—Time Slip........................... |
23 |
Divide a title into chapters............................................................... |
23 |
Changing audio during play............................................................ |
24 |
Using menus to play MP3 discs ..................................................... |
24 |
≥Using the tree screen to find a group....................................... |
25 |
Recording |
|
Playing while you are recording ..................................................... |
26 |
≥Chasing play ............................................................................ |
26 |
≥Simultaneous recording and play............................................. |
26 |
≥TIME SLIP................................................................................ |
26 |
Recording TV programmes ............................................................ |
27 |
Playing/Recording the VHS while recording................................... |
27 |
≥Recording modes |
|
and approximate recording times in hours ............................ |
27 |
Selecting audio to record................................................................ |
28 |
Flexible Recording mode (FR) ....................................................... |
28 |
Direct TV Recording ....................................................................... |
28 |
Linked timer recordings with external equipment (EXT LINK)........ |
29 |
Timer Recording |
|
Using VIDEO Plus_....................................................................... |
30 |
Manual programming ..................................................................... |
30 |
Check, change or delete programmes ........................................... |
31 |
Advanced Operations |
|
DISC MANAGEMENT .................................................................... |
32 |
- Disc Name ............................................................................. |
32 |
- Disc Protection ...................................................................... |
32 |
- Format Disc ........................................................................... |
33 |
- Auto-Play Select.................................................................... |
33 |
- Finalize .................................................................................. |
33 |
Entering text ................................................................................... |
34 |
Using the Direct Navigator ............................................................. |
35 |
≥Selecting recorded programmes (titles) to play ....................... |
35 |
≥Direct Navigator ....................................................................... |
35 |
- Erase ..................................................................................... |
35 |
- Properties .............................................................................. |
36 |
- Edit ........................................................................................ |
36 |
- Chapter View ......................................................................... |
38 |
Using play list ................................................................................. |
39 |
≥Creating play lists..................................................................... |
39 |
≥Playing play lists ...................................................................... |
40 |
≥Using play list to edit play lists/chapters .................................. |
40 |
- Erase ..................................................................................... |
40 |
- Properties .............................................................................. |
40 |
- Edit ........................................................................................ |
41 |
- Chapter View ......................................................................... |
42 |
Using DISPLAY menus .................................................................. |
44 |
≥Common procedures ............................................................... |
44 |
- Disc menu ............................................................................. |
44 |
- Play menu ............................................................................. |
45 |
- Picture menu ......................................................................... |
45 |
- Sound menu .......................................................................... |
45 |
Various Settings |
|
Changing the unit’s settings ........................................................... |
46 |
≥Common procedures ............................................................... |
46 |
Entering a password (Ratings) ....................................................... |
46 |
Summary of settings....................................................................... |
47 |
Channel Settings ............................................................................ |
50 |
- Selecting the manual tuning .................................................. |
50 |
- Adding, deleting, and moving channels................................. |
51 |
- Auto-Setup Restart, Download from TV ................................ |
51 |
Clock Settings ................................................................................ |
52 |
- Auto Clock Setting................................................................. |
52 |
- Manual Clock Setting ............................................................ |
52 |
FUNCTIONS window ..................................................................... |
53 |
Status displays ............................................................................... |
53 |
≥Changing the information displayed......................................... |
53 |
≥Display examples..................................................................... |
53 |
2

Before Use
(^^^^^^^^^^^^^^^^^^^^^^^^^^^^^^[[[[VHS]]]^^^^^^^^^^^^^^^^^^^^^^^^^^^^^^^^)
Before Use |
|
Inserting video cassette .................................................................. |
54 |
Video cassette information ............................................................. |
54 |
≥Video cassettes ........................................................................ |
54 |
≥Video cassette care.................................................................. |
54 |
≥Maintenance............................................................................. |
54 |
Setting Up ....................................................................................... |
54 |
≥Fine Tuning .............................................................................. |
54 |
Playback |
|
Playing a video cassette ................................................................. |
55 |
Fast-forward / Rewind..................................................................... |
55 |
Cue / Review Playback................................................................... |
55 |
Jet Search....................................................................................... |
55 |
Still playback................................................................................... |
55 |
Slow-motion play ............................................................................ |
55 |
Jet Rewind ...................................................................................... |
55 |
S-VHS Quasi Playback (SQPB) ..................................................... |
56 |
To Play back a Recorded Part Repeatedly..................................... |
56 |
VHS Index Search System (VISS).................................................. |
56 |
Adjusting the playback picture ........................................................ |
56 |
≥Manual tracking ........................................................................ |
56 |
≥Vertical locking adjustment....................................................... |
56 |
To Play back a tape in high picture quality ..................................... |
56 |
Recording |
|
Recording TV programmes............................................................. |
57 |
Playing/Recording the DVD while recording................................... |
57 |
Linked timer recordings with external equipment (EXT LINK) ........ |
57 |
(^^^^^^^^^^^^^^^^^^^^^^^^^^^[[DVD/VHS]] ^^^^^^^^^^^^^^^^^^^^^^^^^^^^^)
Advanced Operations |
|
Dubbing from VHS ......................................................................... |
62 |
≥One Touch Dubbing (VHS l DVD) ......................................... |
62 |
≥Manual Dubbing (VHS l DVD) ............................................... |
63 |
Dubbing from DVD ......................................................................... |
64 |
≥One Touch Dubbing (DVD l VHS) ......................................... |
64 |
≥Manual Dubbing (DVD l VHS) ............................................... |
65 |
Recording from an external device................................................. |
66 |
- DVD ....................................................................................... |
66 |
- VHS ....................................................................................... |
66 |
Child Lock....................................................................................... |
66 |
Helpful Hints |
|
Glossary ......................................................................................... |
67 |
Frequently asked questions ........................................................... |
69 |
Error messages .............................................................................. |
70 |
≥Common .................................................................................. |
70 |
≥DVD ......................................................................................... |
70 |
Troubleshooting guide.................................................................... |
71 |
≥Common .................................................................................. |
71 |
≥DVD ......................................................................................... |
73 |
≥VHS.......................................................................................... |
74 |
Specifications |
|
Specifications ................................................................................. |
75 |
Index |
|
Index............................................................................................... |
77 |
Timer Recording |
|
Using VIDEO Plus_ ....................................................................... |
58 |
Manual programming...................................................................... |
58 |
Tape Speed Auto Change Function ............................................... |
59 |
Check, change or delete programmes............................................ |
59 |
Advanced Operations |
|
Changing the unit’s settings............................................................ |
60 |
≥Common procedures................................................................ |
60 |
≥Summary of settings................................................................. |
60 |
QUICK ERASE ............................................................................... |
61 |
Changing audio............................................................................... |
61 |
Various indications in on-screen display......................................... |
61 |
ªSpecific features of DMR-E75V
2-channel simultaneous recording:
You can record programmes separately on DVD and VHS. Simply set the desired programmes on each unit.
One Touch Dubbing ( l 62, 64):
You can easily dub from VHS to DVD or from DVD to VHS.
Automatic creation of thumbnails (l 62):
The video dubbed from VHS to DVD is automatically displayed in thumbnail.
The tuning on DVD is automatically applied to the one on VHS (l 13, 14, 50):
Tuning on VHS is not required.
When only the video output on VHS is not natural, use the Fine Tuning function on VHS (l 54).
3

Before Use
Warning and Important Information
CAUTION!
THIS PRODUCT UTILIZES A LASER.
USE OF CONTROLS OR ADJUSTMENTS OR PERFORMANCE OF PROCEDURES OTHER THAN THOSE SPECIFIED HEREIN MAY RESULT IN HAZARDOUS RADIATION EXPOSURE.
DO NOT OPEN COVERS AND DO NOT REPAIR YOURSELF. REFER SERVICING TO QUALIFIED PERSONNEL.
WARNING:
TO REDUCE THE RISK OF FIRE, ELECTRIC SHOCK OR PRODUCT DAMAGE, DO NOT EXPOSE THIS EQUIPMENT TO RAIN, MOISTURE, DRIPPING OR SPLASHING AND ENSURE THAT NO OBJECTS FILLED WITH LIQUIDS, SUCH AS VASES, SHALL BE PLACED ON THE EQUIPMENT.
CAUTION!
≥DO NOT INSTALL OR PLACE THIS UNIT IN A BOOKCASE,
BUILT-IN CABINET OR IN ANOTHER CONFINED SPACE. ENSURE THE UNIT IS WELL VENTILATED. TO PREVENT RISK OF ELECTRIC SHOCK OR FIRE HAZARD DUE TO OVERHEATING, ENSURE THAT CURTAINS AND ANY OTHER MATERIALS DO NOT OBSTRUCT THE VENTILATION VENTS.
≥DO NOT OBSTRUCT THE UNIT’S VENTILATION
OPENINGS WITH NEWSPAPERS, TABLECLOTHS, CURTAINS, AND SIMILAR ITEMS.
≥DO NOT PLACE SOURCES OF NAKED FLAMES, SUCH AS
LIGHTED CANDLES, ON THE UNIT.
≥DISPOSE OF BATTERIES IN AN ENVIRONMENTALLY
FRIENDLY MANNER.
THIS UNIT IS INTENDED FOR USE IN MODERATE CLIMATES.
The socket outlet shall be installed near the equipment and easily accessible or the mains plug or an appliance coupler shall remain readily operable.
ªImportant
Your attention is drawn to the fact that the recording of pre-recorded tapes or discs or other published or broadcast material may infringe copyright laws.
ªFor your safety
Do not remove outer cover.
Touching internal parts of the unit is dangerous, and may seriously damage it.
To prevent electric shock, do not remove cover. There are no user serviceable parts inside. Refer all servicing to qualified service personnel.
ªDisposal of old equipment
Batteries, packaging and old equipment should not be disposed of as domestic waste, but in accordance with the applicable regulations.
ªCondensation Caution
This unit is not fitted with a condensation sensor.
If you bring the unit from a cold place, e.g. a car, into a warm house, dew may form inside the unit.
Do not switch it on for at least 1 hour.
ªCautions before you operate this unit
Avoid:
≥Humidity and dust.
≥Extreme heat such as direct sunlight. ≥Magnets or electromagnetic objects. ≥Touching internal parts of the unit.
≥Water or some other liquid.
≥Lightning. (Disconnect the aerial plug from the unit during lightning storms.)
≥Anything heavy on the unit.
≥Connecting or handling the equipment with wet hands. ≥Using a cell phone near the unit because it may cause noise
affecting the picture and sound.
Do:
≥Wipe the unit with a clean and dry cloth. ≥Install the unit in a horizontal position.
≥Keep the unit, TV and other equipment switched off until all connections are finished.
VIDEO Plus+ and PlusCode are registered trademarks of Gemstar Development Corporation.
The VIDEO Plus+ system is manufactured under license from Gemstar Development Corporation.
Manufactured under license from Dolby Laboratories. “Dolby” and the double-D symbol are trademarks of Dolby Laboratories.
“DTS” and “DTS 2.0iDigital Out” are trademarks of Digital
Theater Systems, Inc.
MPEG Layer-3 audio decoding technology licensed from Fraunhofer IIS and Thomson multimedia.
ªNotes on these instructions
≥Company names, product names and all other names in these instructions are the trademarks or registered trademarks of their respective corporations.
≥These operating instructions describe operations mainly using the remote control.
≥The contents of the screens used in these instructions may not necessarily match what you will see on your screen.
ªDisplays
The displays shown in these instructions are examples. Actual displays depend on discs.
≥In certain circumstances, icons will be displayed in gray and will not respond if clicked on. This means that the function represented by the icon is disabled.
|
|
|
VIDEO |
VIDEO |
RF IN |
COMPONENT VIDEO OUT |
|
||||
(PROGRESSIVE/INTERLACE) |
|
|
|
||
Y |
PB |
PR |
|
|
|
|
|
|
L |
L |
AV1 (TV) |
|
|
|
S-VIDEO |
|
|
|
|
|
AUDIO |
AUDIO |
|
|
OPTICAL |
|
R |
R |
|
DIGITAL AUDIO OUT |
|
|
|
RF OUT |
|
|
|
|
|
||
|
(PCM/BITSTREAM) |
|
|
DVD/VHS |
AV2 (DECODER/EXT) |
|
|
DVD OUT |
|
COMMON OUT |
|
Inside of product
DANGER |
VISIBLE AND INVISIBLE LASER RADIATION WHEN OPEN. |
||||
|
AVOID DIRECT EXPOSURE TO BEAM. |
(FDA 21 CFR) |
|||
CAUTION |
VISIBLE AND INVISIBLE LASER RADIATION WHEN OPEN. |
||||
|
AVOID EXPOSURE TO BEAM. |
(IEC60825-1) |
|||
ATTENTION |
RAYONNEMENT LASER VISIBLE ET INVISIBLE EN CAS D’OUVERTURE. |
||||
|
EXPOSITION DANGEREUSE AU FAISCEAU. |
|
|||
ADVARSEL |
SYNLIG OG USYNLIG LASERSTRÅLING VED ÅBNING. |
|
|||
|
UNDGÅ UDSÆTTELSE FOR STRÅLING. |
|
|||
VARO! |
AVATTAESSA OLET ALTTIINA NÄKYVÄÄ JA NÄKYMÄTÖN |
||||
|
LASERSÄTEILYLLE. ÄLÄ KATSO SÄTEESEEN. |
|
|||
VARNING |
SYNLIG OCH OSYNLIG LASERSTRÅLNING NÄR DENNA DEL |
||||
|
ÄR ÖPPNAD. BETRAKTA EJ STRÅLEN. |
|
|||
ADVARSEL |
SYNLIG OG USYNLIG LASERSTRÅLING NÅR DEKSEL ÅPNES. |
||||
|
UNNGÅ EKSPONERING FOR STRÅLEN. |
|
|||
VORSICHT |
SICHTBARE UND UNSICHTBARE LASERSTRAHLUNG, WENN ABDECKUNG |
||||
|
GEÖFFNET. NICHT DEM STRAHL AUSSETZEN. |
|
|||
|
|
|
|
|
|
RQLS0233
4
Before Use
Dear Customer
May we take this opportunity to thank you for purchasing this Panasonic DVD Video Recorder.
We would particularly advise that you carefully study the Operating Instructions before attempting to operate the unit and that you note the listed precautions.
Caution for AC Mains Lead
For your safety please read the following text carefully.
This appliance is supplied with a moulded three-pin mains plug for your safety and convenience.
A 5-ampere fuse is fitted in this plug.
Should the fuse need to be replaced please ensure that the replacement fuse has a rating of 5-amperes and it is approved by ASTA or BSI to BS 1362.
Check for the ASTA mark Ï or the BSI mark Ì on the body of the fuse.
If the plug contains a removable fuse cover you must ensure that it is refitted when the fuse is replaced.
If you lose the fuse cover, the plug must not be used until a replacement cover is obtained.
A replacement fuse cover can be purchased from your local Panasonic Dealer.
IF THE FITTED MOULDED PLUG IS UNSUITABLE FOR THE SOCKET OUTLET IN YOUR HOME THEN THE FUSE SHOULD BE REMOVED AND THE PLUG CUT OFF AND DISPOSED OF SAFELY. THERE IS A DANGER OF SEVERE ELECTRICAL SHOCK IF THE CUT OFF PLUG IS INSERTED INTO ANY 13-AMPERE SOCKET.
If a new plug is to be fitted please observe the wiring code as shown below.
If in any doubt, please consult a qualified electrician.
IMPORTANT
The wires in this mains lead are coloured in accordance with the following code:
Blue: Neutral, Brown: Live
As the colours of the wires in the mains lead of this appliance may not correspond with the coloured markings identifying the terminals in your plug, proceed as follows:
The wire which is coloured BLUE must be connected to the terminal in the plug which is marked with the letter N or coloured BLACK.
The wire which is coloured BROWN must be connected to the terminal in the plug which is marked with the letter L or coloured RED.
Under no circumstances should either of these wires be connected to the earth terminal of the three pin plug, marked with the letter E or the Earth Symbol Ó.
Before use
Remove the connector cover.
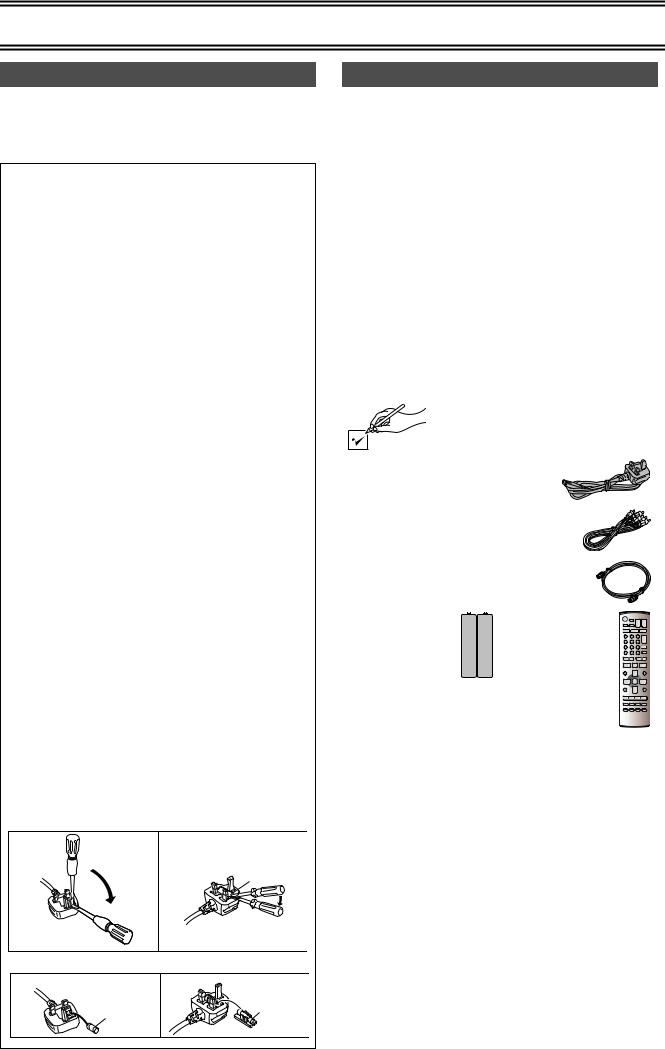
How to replace the fuse
The location of the fuse differ according to the type of AC mains plug (figures A and B). Confirm the AC mains plug fitted and follow the instructions below.
Illustrations may differ from actual AC mains plug.
1. Open the fuse cover with a screwdriver.
Figure A |
Figure B |
Fuse cover
2. Replace the fuse and close or attach the fuse cover.
Figure A |
Figure B |
Fuse Fuse (5 ampere) (5 ampere)
Checking the Accessories
ªSales and Support Information
Customer Care Centre
≥For UK customers: 08705 357357
≥For Republic of Ireland customers: 01 289 8333 ≥Visit our website for product information ≥E-mail: customer.care@panasonic.co.uk
Direct Sales at Panasonic UK
≥Order accessory and consumable items for your product with ease and confidence by phoning our Customer Care Centre Monday– Friday 9:00am–5:30pm. (Excluding public holidays)
≥Or go on line through our Internet Accessory ordering application at www.panasonic.co.uk.
≥Most major credit and debit cards accepted.
≥All enquiries transactions and distribution facilities are provided directly by Panasonic UK Ltd.
≥It couldn’t be simpler!
≥Also available through our Internet is direct shopping for a wide range of finished products, take a browse on our website for further details.
Check that you have the accessories shown
Tick off as you unpack the accessories.
∏AC Mains lead
RJA0053-3X
∏Audio/Video Cable
K2KA6CA00001
∏ RF lead to connect this unit and TV
K1TWACC00001
∏ Batteries for the |
∏ Remote Control |
Remote Control |
EUR7721X30 |
R6 size |
|
∏ Guarantee Card
∏ Quick Start Guide
5

Control reference guide
Remote control
DVD/VHS
(1)
(2) |
DIRECT TV REC |
CH |
VOLUME |
(34) |
|
AV |
|
(33) |
|
(3) |
DVD/VHS |
|
|
|
OUTPUT |
VHS |
DVD |
(32) |
TRACKING/V-LOCK
(31)
(4)
|
|
VIDEOPlus+ |
(30) (29) |
|
(5) |
CANCEL/RESET |
INPUT SELECT CREATE |
||
|
CHAPTER |
(28) |
||
|
|
|
||
(6) |
SKIP/INDEX |
SLOW/ |
(27) |
|
REW SEARCH FF |
||||
|
|
|||
(7) |
|
PLAY |
(26) |
|
|
|
|||
|
DIRECT NAVIGATOR |
FUNCTIONS |
(25) |
|
|
|
|||
(8) |
|
|
(24) |
TOP MENU
(9)


 ENTER
ENTER
(10) |
|
|
|
SUB MENU |
|
|
|
RETURN |
|
|
(23) |
||||
|
|
|
|
|
|
|
|
|
|
|
|
|
|
||
|
|
|
|
|
|
|
|
|
|
|
|
|
|
||
|
|
|
|
|
|
|
|
|
|
|
|
|
|
|
|
(11) |
|
PROG/CHECK DISPLAY |
STATUS |
|
TIME SLIP |
|
(22) |
|
|||||||
|
|
|
|
|
|
|
|
|
|
||||||
|
|
|
|
|
|
|
JET REW |
|
|
|
|||||
(12) |
|
|
EXT LINK AUDIO |
DUBBING |
(21) |
||||||||||
(14)(13) |
(20) (19) |
||||||||||||||
|
|
|
|
VHS REC REC MODE DVD REC |
|
TIMER |
|
|
|
||||||
(15) |
|
|
|
VHS |
|
DVD |
|
(18) |
|
||||||
(16) |
|
|
|
|
|
|
|
|
(17) |
||||||
|
|
|
|
|
|
|
|
|
|
|
|||||
∫[DVD] and [VHS] button
[DVD]
≥Switch the remote control mode and main unit’s common output to DVD. Make sure you press before doing DVD operations. When in DVD mode, the [DVD] button lights each time you press one of the DVD operation buttons.
[VHS]
≥Switch the remote control mode and main unit’s common output to VHS. Make sure you press before doing VHS operations. When in VHS mode, the [VHS] button lights each time you press one of the VHS operation buttons.
(1) DVD/VHS on/off button (Í, DVD/VHS) . . . . . . . . . . . . . .l 13
(2) Direct TV recording button (¥, DIRECT TV REC) . . . . .l 28
(3) DVD/VHS output button (OUTPUT, DVD/VHS) . . . . . . . .l 17
(4)Numeric buttons (0–9)
(5)Cancel/Reset and asterisk button (¢, CANCEL/RESET)
(6)Skip/Index buttons (:, 9, SKIP/INDEX)
(7)Stop button (∫, STOP)
(8)Top menu and Direct Navigator button (TOP MENU, DIRECT NAVIGATOR)
(9)Cursor buttons (3, 4, 2, 1)/Frame buttons (2;, ;1)/
Enter button (ENTER)
(10)Sub menu button (SUB MENU) . . . . . . . . . . . . . . . . . . . .l 35 (11)Manual programming and check button (PROG/CHECK) (12)Display button (DISPLAY) . . . . . . . . . . . . . . . . . . . . . . . .l 44 (13)VHS recording button (¥, VHS REC) . . . . . . . . . . . l 57, 65
When you press this button in the DVD remote control mode, it is automatically switched to the VHS remote control mode.
(14)Recording mode button (REC MODE). . . . . . . . . . . .l 27, 57 (15)External link button (EXT LINK) . . . . . . . . . . . . . . . .l 29, 57 (16)Audio button (AUDIO). . . . . . . . . . . . . . . . . . . . . .l 24, 28, 61 (17)VHS dubbing button (VHS —, DUBBING). . . . . . . . . . . . .l 64 (18)DVD dubbing button (“ DVD, DUBBING). . . . . . . . . . . . .l 62 (19)DVD recording button (¥, DVD REC) . . . . . . . . . . . .l 27, 63
When you press this button in the VHS remote control mode, it is automatically switched to the DVD remote control mode.
(20)Timer recording button ( , TIMER) . . . . . . . . . . . . .l 30, 58 (21)Status display button (STATUS) . . . . . . . . . . . . . . . .l 53, 61 (22)Time slip button (TIME SLIP)
Jet rewind button (6, JET REW) . . . . . . . . . . .l 23, 26, 55 (23)Return button (RETURN)
(24)Functions button (FUNCTIONS) . . . . . . . . . . . . . . . .l 53, 60
(25)Pause button (;, PAUSE)
(26)Play button (1, PLAY)
(27)Slow/Search, rewind, forward buttons
(6, 5, SLOW/SEARCH, REW, FF)
(28)Create Chapter button (CREATE CHAPTER) . . . . . . . . .l 23 (29)Input select button (INPUT SELECT) . . . . . . . . . . . . . . .l 66 (30)VIDEO Plus+ button (VIDEO Plus+) . . . . . . . . . . . . .l 30, 58 (31)TRACKING/V-LOCK . . . . . . . . . . . . . . . . . . . . . . . . . . . . .l 56
/Channel up/down buttons (CH, W, X)
(32)DVD select button (DVD) . . . . . . . . . . . . . . . . . . . . . . . l Left (33)VHS select button (VHS) . . . . . . . . . . . . . . . . . . . . . . . l Left (34)TV operation buttons
TV on/off button (TV, Í) . . . . . . . . . . . . . . . . . . . . . . . . . . . .l 9 TV input mode selecter (TV, AV). . . . . . . . . . . . . . . . . . . . . .l 9 Channel up/down buttons (TV, CH, W, X). . . . . . . . . . . . . . .l 9 Volume up/down buttons (TV, VOLUME, r, s) . . . . . . . . . .l 9
6

Control reference guide
Batteries
≥Insert so the poles (i and j) match those in the remote control.
≥ R6, AA, UM-3
Do not use rechargeable type batteries.
Do not;
≥mix old and new batteries.
≥use different types at the same time. ≥heat or expose to flame.
≥take apart or short circuit.
≥attempt to recharge alkaline or manganese batteries. ≥use batteries if the covering has been peeled off.
Mishandling of batteries can cause electrolyte leakage which can damage items the fluid contacts and may cause a fire.
Remove if the remote control is not going to be used for a long time. Store in a cool, dark place.
Note
≥If you cannot operate the unit or TV using the remote control after changing the batteries, please re-enter the codes (l 9).
Use
Aim at the sensor, avoiding obstacles, at a maximum range of 7 m directly in front of the unit.
≥Keep the transmission window and the unit’s sensor free from dust. ≥Operation can be affected by strong light sources, such as direct sunlight,
fluorescent light and the glass doors on cabinets.
Remote control signal sensor
20 
 20
20  30
30


30 
7 m directly in front of the unit
Main unit
(2) |
|
|
|
(1) [A] [B] |
(1) |
(3) (4) (5) |
(2) (3) (4) (5) (6) |
Í/I |
|
|
|
EJECT |
|
|
TIME SLIP |
|
|
OPEN/CLOSE |
|
VHS |
DVD |
|
|
VIDEO IN |
L/MONO – AUDIO IN – R |
|
|
|
/k1.3 |
|
|
S-VIDEO IN |
|
|
VHS |
DUBBING |
DVD |
||
|
AV3 |
X CH W REC |
X CH W |
||||
|
|
|
REC |
|
|
|
[C] |
(6) (7) |
|
[D] |
(7) (8) |
[E] |
|
|
Common to DVD/VHS |
|
|
DVD |
|
|
|
|
|
[A] |
DVD/VHS on/off button (Í/I) |
|
|
(1) |
DVD Skip/Slow/Search buttons (:/6, 5/9) . . |
l 23 |
||
[B] |
Remote control signal sensor. |
. . . . . . . . . . . . . . . . . |
l above |
(2) |
Disc tray open/close button (<, OPEN/CLOSE) . . . . . . |
l 21 |
||
[C] |
AV3 input terminals (AV3) . . . . . |
. . . . . . . . . . . . . . . . |
. . . l 18 |
(3) |
Disc tray. . . . . . . . . . . . . . . . |
. . . . . . . . . . . . . . . |
. . . . . . . . |
l 21 |
[D] |
Display . . . . . . . . . . . . . . . . . . . . |
. . . . . . . . . . . . . . . . |
. . . l 8 |
(4) |
Time slip indicator (TIME SLIP) . . . . . . . . . . . . |
. . . . . . . . |
l 26 |
|
[E] |
One Touch Dubbing operation button |
|
|
≥While both recording and play are activated, this indicator |
||||
|
≥From VHS to DVD . . . . . . . . . . |
. . . . . . . . . . . . . . . . |
. . . l 62 |
|
lights up. |
|
|
|
|
≥From DVD to VHS . . . . . . . . . . |
. . . . . . . . . . . . . . . . |
. . . l 64 |
(5) |
DVD Stop button (∫) |
|
|
|
VHS |
|
|
|
(6) |
DVD Play/t1.3 button (1/t1.3) |
|
|
|
|
|
|
(7) |
DVD Channel up/down buttons (CH, W, X) |
|
|
||
(1) |
VHS Search buttons (V/6, 5/W) |
l 55 |
|
|
||||
(8) |
DVD Recording button (¥, REC) |
|
l 27 |
|||||
(2) |
Cassette eject button (<, EJECT) |
l 54 |
. . . . . . . . |
|||||
|
|
|
|
|
||||
(3) |
VHS Stop button (∫) . . . . . . . . . |
. . . . . . . . . . . . . . . . |
. . . l 59 |
|
|
|
|
|
(4)VHS Play button (1)
(5)Cassette compartment
(6)VHS Channel up/down buttons (CH, W, X)
(7) VHS Recording button (¥, REC). . . . . . . . . . . . . . . . . . . l 57
7

Control reference guide
The unit’s display
Common to DVD/VHS
[A]Main display
≥Current time
≥VHS recording and play counter ≥Miscellaneous messages, etc.
[B]Dubbing direction indicator
[C]Main display
≥Current time ≥Disc play counter
≥Miscellaneous messages, etc.
VHS
(1)Tape speed indicator (l 57)
≥SP: When recording or playing in the Normal mode. ≥LP: When playing in the Long play mode.
≥EP: When recording or playing in the Extra long play mode.
(2)VHS output indicator
(3)External link indicator (l 57) On:
When a linked timer recording with external device is in standby mode, or being performed.
(4)S-VHS dubbing indicator (l 62)
When performing S-VHS dubbing.
(5)Remaining tape time indicator
(6)Tape operation status
≥The operation status of this unit, such as playback fast forward, etc.
(7)Channel indicator
(8)Timer programme display ( ) (l 58) On:
When in timer recording standby mode, or while timer recording is in progress.
Flashes:
10 minutes before the start of timer recording if the unit has not been put in timer recording standby mode.
(9)Tape indicator
DVD
(1)Disc operation status
(2)Disc type
(3)External link indicator (l 29) On:
When a linked timer recording with external device is in standby mode, or being performed.
(4)DVD output indicator
(5)Recording mode (l 27)
≥XP SP LP EP (all on): FR mode (l 28)
(6)Disc indicator
(7)Timer programme display ( ) (l 30) On:
When in timer recording standby mode, or while timer recording is in progress.
Flashes:
10 minutes before the start of timer recording if the unit has not been put in timer recording standby mode.
(8)Channel position indicator TRK: track number GRP: group number TTL: title number
CHP: chapter number PL: play list number
Note
≥A half mirror finish is used for the unit’s display so the display may occasionally be difficult to see depending on surrounding lighting conditions.
8

Control reference guide
TV operation
|
DVD/VHS |
|
|
|
|
|
|
|
|
|
TV, VOLUME, |
TV, Í |
DIRECT TV REC |
|
CH |
VOLUME |
, |
TV, AV |
|
AV |
|
|
TV, CH, W, X |
DVD/VHS |
|
|
|
||
|
OUTPUT |
VHS |
DVD |
DVD |
|
|
|
|
|
TRACKING/V-LOCK |
|
Numeric |
|
|
|
|
|
Buttons |
|
|
|
VIDEOPlus+ |
|
|
|
|
|
|
|
|
|
|
|
CREATE |
|
|
CANCEL/RESET |
|
INPUT SELECT CHAPTER |
|
|
|
SKIP/INDEX |
|
SLOW/ |
|
|
|
REW SEARCH FF |
|
|||
|
STOP |
PAUSE |
PLAY |
|
|
|
|
|
|
|
FUNCTIONS |
3, 4, 2, 1 |
TOP MENU |
|
|
|
|
|
ENTER |
|
|
||
ENTER |
|
|
|
||
|
|
|
|
|
|
|
SUB MENU |
|
|
RETURN |
RETURN |
|
|
|
|
|
|
|
PROG/CHECK |
DISPLAY |
STATUS TIME SLIP |
|
|
|
|
|
|
JET REW |
|
You can control TVs by entering the remote control code.
Preparation
≥Turn on the TV.
[1]Refer to the chart below for the code for your TV.
[2]Press and hold [TV, Í] and enter the 2-digit
code with the numeric buttons.
≥e.g.: “01”: [0] )[1].
≥After entering the code, test the remote control by turning on the TV and changing channels.
Note
≥If there is more than one code, repeat the procedure until you find the code that allows correct operation.
≥If your TV brand is not listed or if the code listed here does not allow control of your TV, this remote is not compatible with your TV.
|
|
Operation: |
|
|
|
|
|
|
|
Button |
|
|
|
|
|
|
|
|
|
|
|
|
|
|
|
|
|
|||||||||||||||||||||||||||||||||||
|
|
On and off: |
|
|
|
|
|
|
|
|
[TV, Í] |
|
|
|
|
|
|
|
|
|
|
|
|
|
|
|
|
|
||||||||||||||||||||||||||||||||||
|
|
Video input mode: |
|
|
|
|
|
|
|
|
[TV, AV] |
|
|
|
|
|
|
|
|
|
|
|
|
|
|
|
|
|
||||||||||||||||||||||||||||||||||
|
|
Channels: |
|
|
|
|
|
|
|
|
[TV, CH, W, X] |
|
|
|
|
|
|
|
|
|
|
|
|
|
|
|
|
|
||||||||||||||||||||||||||||||||||
|
|
Volume: |
|
|
|
|
|
|
|
[TV, VOLUME, i, j] |
|
|
|
|
|
|
|
|
|
|
|
|
|
|
|
|
|
|||||||||||||||||||||||||||||||||||
|
|
|
|
|
|
|
|
|
|
|
|
|
|
|
|
|
|
|
|
|
|
|
|
|
|
|
|
|
|
|
|
|
|
|
|
|
|
|
|
|
|
|
|
|
|
|
|
|
|
|
|
|
|
|
|
|
|
|
|
|
|
|
List of TVs Compatible with the unit’s Remote Control
Manufacture and Code No.
Panasonic |
01, 02, 03, 04, 44 |
GOODMANS |
05, 06, 31 |
|
|
|
|
|
|
|
|
|
|
NOKIA |
|
25, 26, 27 |
|
|
|
|
SANYO |
21 |
|
|
|
|
|
|
|
|
|
|
|
|
|
||||||||||||||||||||||||||||||||||||||||||||||||||||||||||||||||||||||||||||||||||||||
AIWA |
35 |
|
|
|
|
|
|
|
|
|
|
|
|
|
|
GRUNDIG |
09 |
|
|
|
|
|
|
|
|
|
|
|
|
|
|
|
|
NORDMENDE |
10 |
|
|
|
|
SBR |
06 |
|
|
|
|
|
|
|
|
|
|
|
|
|
|||||||||||||||||||||||||||||||||||||||||||||||||||||||||||||||||||
AKAI |
27, 30 |
|
|
|
|
|
|
|
|
|
|
|
HITACHI |
22, 23, 31, 40, 41, 42 |
ORION |
|
|
|
37 |
|
|
|
|
|
|
|
|
|
|
|
SCHNEIDER |
05, 06, 29, 30, 31 |
|||||||||||||||||||||||||||||||||||||||||||||||||||||||||||||||||||||||||||||||||||||||||
BLAUPUNKT |
09 |
|
|
|
|
|
|
|
|
|
|
|
|
|
|
INNO HIT |
34 |
|
|
|
|
|
|
|
|
|
|
|
|
|
|
|
|
PHILIPS |
|
|
|
05, 06 |
|
|
|
|
|
|
|
SELECO |
06, 25 |
|
|
|
|
|
|
|
|
|
|
||||||||||||||||||||||||||||||||||||||||||||||||||||||||||||||||
BRANDT |
10, 15 |
|
|
|
|
|
|
|
|
|
|
|
IRRADIO |
30 |
|
|
|
|
|
|
|
|
|
|
|
|
|
|
|
|
PHONOLA |
|
|
|
31, 33 |
|
|
|
|
|
|
|
SHARP |
18 |
|
|
|
|
|
|
|
|
|
|
|
|
|
||||||||||||||||||||||||||||||||||||||||||||||||||||||||||||||||
BUSH |
05, 06 |
|
|
|
|
|
|
|
|
|
|
|
ITT |
25 |
|
|
|
|
|
|
|
|
|
|
|
|
|
|
|
|
PIONEER |
|
|
|
38 |
|
|
|
|
|
|
|
|
|
|
|
SIEMENS |
09 |
|
|
|
|
|
|
|
|
|
|
|
|
|
||||||||||||||||||||||||||||||||||||||||||||||||||||||||||||
CURTIS |
31 |
|
|
|
|
|
|
|
|
|
|
|
|
|
|
JVC |
17, 39 |
|
|
|
|
|
|
|
|
|
|
|
|
|
PYE |
|
|
|
05, 06 |
|
|
|
|
|
|
|
SINUDYNE |
05, 06, 33 |
|
|
|
|
|
|
|
||||||||||||||||||||||||||||||||||||||||||||||||||||||||||||||||||||||
DESMET |
05, 31, 33 |
|
|
|
|
|
|
|
LOEWE |
07 |
|
|
|
|
|
|
|
|
|
|
|
|
|
|
|
|
RADIOLA |
|
|
|
05, 06 |
|
|
|
|
|
|
|
SONY |
08 |
|
|
|
|
|
|
|
|
|
|
|
|
|
||||||||||||||||||||||||||||||||||||||||||||||||||||||||||||||||||||
DUAL |
05, 06 |
|
|
|
|
|
|
|
|
|
|
|
METZ |
28, 31 |
|
|
|
|
|
|
|
|
|
|
|
|
|
SABA |
|
|
|
10 |
|
|
|
|
|
|
|
|
|
|
|
TELEFUNKEN |
10, 11, 12, 13, 14 |
||||||||||||||||||||||||||||||||||||||||||||||||||||||||||||||||||||||||||||
ELEMIS |
31 |
|
|
|
|
|
|
|
|
|
|
|
|
|
|
MITSUBISHI |
06, 19, 20 |
|
|
|
|
|
|
|
|
|
|
SALORA |
|
|
|
26 |
|
|
|
|
|
|
|
|
|
|
|
THOMSON |
10, 15 |
|
|
|
|
|
|
|
|
|
|
||||||||||||||||||||||||||||||||||||||||||||||||||||||||||||||||||
FERGUSON |
10 |
|
|
|
|
|
|
|
|
|
|
|
|
|
|
MIVAR |
24 |
|
|
|
|
|
|
|
|
|
|
|
|
|
|
|
|
SAMSUNG |
|
|
|
31, 32, 43 |
|
|
|
|
TOSHIBA |
16 |
|
|
|
|
|
|
|
|
|
|
|
|
|
||||||||||||||||||||||||||||||||||||||||||||||||||||||||||||||||
GOLDSTAR/LG |
31 |
|
|
|
|
|
|
|
|
|
|
|
|
|
|
NEC |
36 |
|
|
|
|
|
|
|
|
|
|
|
|
|
|
|
|
SANSUI |
|
|
|
05, 31, 33 |
|
|
|
|
WHITE |
05, 06 |
|
|
|
|
|
|
|
|
|
|
|||||||||||||||||||||||||||||||||||||||||||||||||||||||||||||||||||
|
|
|
|
|
|
|
|
|
|
|
|
|
|
|
|
|
|
|
|
|
|
|
|
|
|
|
|
|
|
|
|
|
|
|
|
|
|
|
|
|
|
|
|
|
|
|
|
|
|
|
|
|
|
|
|
|
|
|
|
|
|
|
|
|
|
|
|
|
|
|
|
|
|
|
|
|
|
|
|
|
|
|
|
|
|
|
|
|
|
WESTINGHOUSE |
|
|
|
|
|
|
|
|
|
|
|
|
|
|
|
|
|||||||||||||||
|
|
|
|
|
|
|
|
|
|
|
|
|
|
|
|
|
|
|
|
|
|
|
|
|
|
|
|
|
|
|
|
|
|
|
|
|
|
|
|
|
|
|
|
|
|
|
|
|
|
|
|
|
|
|
|
|
|
|
|
|
|
|
|
|
|
|
|
|
|
|
|
|
|
|
|
|
|
|
|
|
|
|
|
|
|
|
|
|
|
|
|
|
|
|
|
|
|
|
|
|
|
|
|
|
|
|
|
|
|
|
|
|
|
|
|
|
|
|
|
|
|
ª Switching to the AV input on your Panasonic TV
≥Press [AV] to switch to the AV input. Each press of [AV] switches between “TV reception” and “AV input(s)”.
Remote Setting
If other Panasonic products are placed close together, change the remote control code on the main unit and the remote control (the two must match).
≥Use “MODE 1”, the factory set code, under normal circumstances.
Preparation
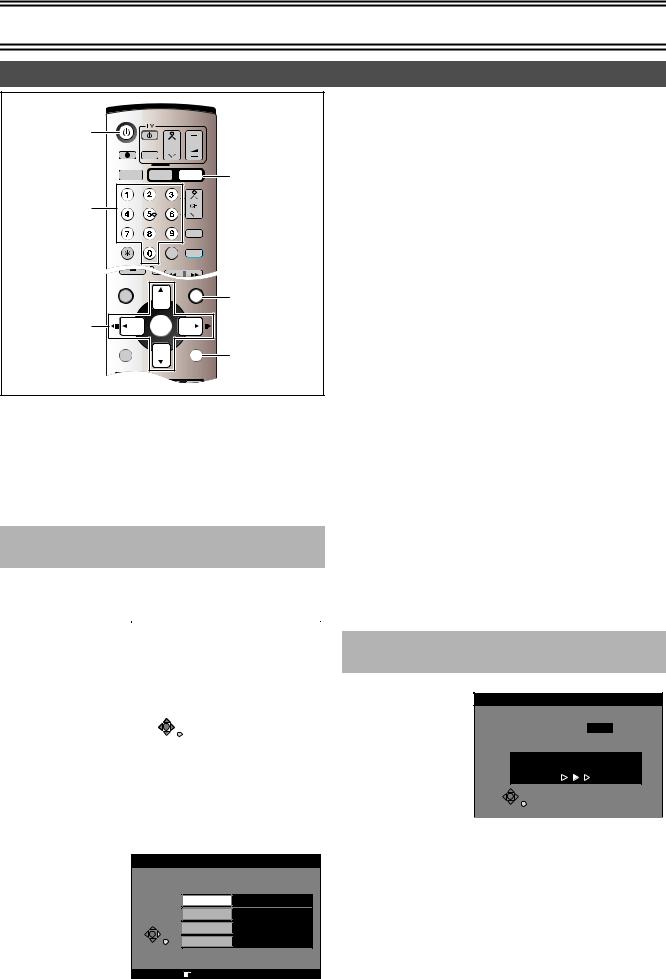
≥Press [DVD].
[1] While stopped
Press [FUNCTIONS].
[2]Select “SETUP” with [3, 4, 2, 1] and press
[ENTER].
[3]Select “Others” with [3, 4] and press [2, 1].
[4]Select “Remote Control” with [3, 4] and press
[ENTER].
[5]Press [3, 4] to select the code (MODE 1,
MODE 2 or MODE 3) and press [ENTER].
The code on the unit has been set.
[6]While pressing [ENTER], press and hold for about 2 seconds the numeric button ([1], [2], or [3]) corresponding to the code you selected in
step 5.
The code on the remote control has been set.
[7] Press [RETURN].
When the following display appears when you use a remote control with a different code.
The unit’s remote control code
If you are trying to use this unit’s remote control, change its code to match the unit’s (# step 6).
9

Connection and Set up
Connections (with Scart cables)
Follow the step-by-step guide below.
RF Input socket
RF Output socket
AV1 21-pin Scart socket
AV2 21-pin Scart socket
AC Input socket 

6
AC Mains lead (supplied)
Satellite Receiver (not supplied) |
21-pin Scart socket (DVD) |
To AC Mains socket 6
21-pin Scart socket (TV)
Aerial |
|
|
(not supplied) |
TV [with or without Q link function] |
|
1 |
||
(not supplied) |
||
Aerial Input |
||
socket |
|
|
2 |
|
|
RF lead |
|
|
(supplied) |
|
|
|
AV2 socket |
|
3 |
AV1 socket |
|
Necessary for |
||
6 To AC Mains socket |
||
TV with Q Link |
||
4 |
|
|
Necessary for Connecting |
Note: |
|
a Satellite Receiver |
||
21-pin Scart leads are not supplied.
5
[1]Connect the aerial to the RF Input socket of the DVD Video Recorder.
RF IN
This unit
[2]Connect the RF lead from the RF Output socket of the DVD Video Recorder to the TV aerial input socket.
[4]Connect the AV2 21-pin scart socket to the DVD Video Recorder Scart Socket on your Satellite Receiver/Digital Sat receiver.
≥If you are not connecting a Satellite Receiver, skip this step.
AV2(DECODER/EXT)
Satellite Receiver
|
RF OUT |
This unit |
TV |
|
[3] Connect the AV1 21-pin scart socket to TV scart socket (optional).
≥This is necessary for Download from TV with Q Link function.
≥If you use Panasonic TV with RGB output capability and want to receive RGB signals (l 16), connect this unit to the AV1 socket on the TV.
|
AV1 (TV) |
This unit |
TV |
[5]Connect the TV scart socket of your Satellite Receiver to the AV1 scart socket of your TV (optional).
≥If you are not connecting |
Satellite Receiver |
TV |
|
a Satellite Receiver, skip |
|||
|
|
||
this step. |
|
|
[6]Plug the TV, DVD
Video Recorder and Satellite Receiver into the
mains as shown at top of the page.
Hints
≥Q Link offers a range of convenient functions. For example, downloading of the tuning positions of all available TV stations into your unit’s memory if you connect the unit to your TV with a fully wired 21-pin Scart cable (not supplied). Features similar to Q Link have different names and may not work the same.
[Q Link] is a registered trademark of Panasonic. [DATA LOGIC] is a registered trademark of Metz. [Easy Link] is a registered trademark of Philips.
[Megalogic] is a registered trademark of Grundig. [SMARTLINK] is a registered trademark of Sony.
For details, refer to your TV’s operating instructions or consult your dealer.
≥Unlike in most commercially available 21-pin Scart cables, all 21 pins of one plug on a fully wired 21-pin Scart cable are connected to the matching pins on the other end of the cable.
10
Connection and Set up
Connections (without Scart cables)
If you do not have any Scart cables and your TV is not Q Link type, you can connect your DVD Video Recorder to a TV and Satellite Receiver using RF leads.
Using this connection method may however be difficult to obtain a clear picture from the Satellite Receiver. For this reason it is not recommended for inexperienced users. (See preferred connection on page 10.)
Satellite Receiver (not supplied) |
Aerial Input socket |
|
|
|
|
|
|
|
|
|
|
Aerial |
1 |
|
|
|
(not supplied) |
|
|
|
Aerial Output socket |
RF lead |
2 |
|
To AC Mains socket 4 |
|
(not supplied) |
|
|
RF Input socket |
|
|
|
|
|
|
TV (not supplied) |
||
|
|
|
||
|
Aerial Input |
|
|
|
AC Input socket |
socket |
|
|
|
|
RF Output socket |
|
|
|
AC Mains lead (supplied) 4 |
RF lead (supplied) |
3 |
|
|
≥Must be connected to |
|
4 |
||
|
watch TV channels. |
To AC Mains socket |
||
[1] Connect the aerial to the aerial input socket of the Satellite Receiver.
≥If you do not have a Satellite Receiver, connect the aerial to
the RF Input socket of the DVD
Satellite Receiver
Video Recorder and go to step 3.
[2]Connect the aerial from Satellite Receiver to the RF Input socket.
RF IN
This unit
Satellite Receiver
[3]Connect the RF Output socket to the TV aerial socket.
|
RF OUT |
This unit |
TV |
|
[4]Plug the TV, DVD Video Recorder and Satellite Receiver into the mains as shown at top of the page.
Notes
≥Ensure that your satellite receiver is switched on before starting Auto Setup.
≥If, after Auto Setup is complete, the programme position of the satellite receiver is not to your preference, you can rearrange the programme position and enter name manually (l 50).
11

Connection and Set up
Connections (with Video cables)
When use Video cables for connection, connect it as follows.
Connect it to the DVD/VHS output on this unit. (About DVD/VHS output l 17)
Audio/Video |
|
Audio/Video |
TV with Audio/Video |
|
Output socket |
RF Input socket |
Input socket |
||
Input socket |
||||
|
|
(not supplied) |
||
|
Aerial |
|
||
|
|
|
||
|
(not supplied) |
|
|
|
AC Input |
Aerial Input |
|
|
|
socket |
|
|
||
socket |
|
|
||
RF lead |
|
|
||
|
|
|
||
|
(supplied) |
|
|
|
|
RF Output |
|
|
|
|
socket |
|
|
|
AC Mains lead (supplied) |
Audio/Video cable |
|
|
|
|
|
To AC Mains |
||
|
(supplied) |
|
socket |
Connections (with S-Video cable)
Connections and preparations for a TV with S-Video socket.
The conventional video sockets of DVD Video Recorder output (input) a combination of the luminance signal (Y) and colour signal (C) which are recorded on the disc. The S (SEPARATED Y/C)-Video socket allows separate transmission of signals in order to obtain clearer pictures. The S-Video terminal on this unit is the output terminal for DVD. (l 17)
S-Video |
Audio/Video |
|
|
Output socket |
Output socket |
RF Input socket |
Audio/Video |
|
|
|
|
|
|
|
Input socket |
|
|
|
Aerial |
|
|
|
(not supplied) |
AC Input |
|
|
Aerial Input |
|
|
socket |
|
socket |
|
|
|
|
|
RF lead |
|
|
|
|
|
|
|
RF Output |
(supplied) |
|
|
|
|
|
|
socket |
|
AC Mains lead (supplied) |
S-Video cable |
|
S-Video Input |
|
(not supplied) |
Audio/Video cable |
socket |
(supplied)
TV with S-Video Input socket (not supplied)
To AC Mains socket
Connecting a television with Component video out terminals
These terminals can be used for either interlace or progressive output and provide a purer picture than the S-VIDEO OUT terminal. Connect to terminals of the same colour.
Component signal outputs the colour difference signals (PB/PR) and luminance signal (Y) separately in order to achieve high fidelity in reproducing colours. If the television is compatible with progressive output, a high quality picture can be output because this unit’s component video output terminal outputs a progressive output signal. However, the S-Video terminal on this unit is the output terminal for DVD.
≥More information about progressive output (l 17)
12
Connection and Set up
Auto Setup (with Q Link Functions)
DVD/VHS |
|
|
|
|
|
Í, DVD/VHS |
|
|
|
|
|
DIRECT TV REC |
|
CH |
|
VOLUME |
|
|
|
|
|
||
|
AV |
|
|
|
|
DVD/VHS |
|
|
|
|
DVD |
OUTPUT |
VHS |
DVD |
|||
|
|
|
TRACKING/V-LOCK |
|
|
Numeric |
|
|
|
|
|
Buttons |
|
|
|
|
|
|
|
|
|
VIDEO Plus+ |
|
CANCEL/RESET |
|
INPUT SELECT |
CREATE |
|
|
|
CHAPTER |
|
|||
|
|
|
PLAY |
|
|
DIRECT NAVIGATOR |
|
|
FUNCTIONS |
|
|
|
|
|
|
|
FUNCTIONS |
TOP MENU |
|
|
|
|
|
3, 4, 2, 1 |
ENTER |
|
|
|
|
ENTER |
|
|
|
||
|
|
|
RETURN |
|
|
SUB MENU |
|
|
|
RETURN |
|
|
|
|
|
|
|
PROG/CHECK |
DISPLAY |
STATUS |
TIME SLIP |
|
|
|
|
|
|
JET REW |
|
If you do not have a Q Link TV, ignore this page and go to page 14. The Preset Download function can automatically copy the tuning position of all available TV stations into the DVD Video Recorder’s memory when you connect the DVD Video Recorder using a fullywired 21-pin Scart cable to a TV equipped with the Q Link function.
Preparation
Perform the following operation steps exactly as described to ensure that the Preset Download function works correctly.
≥First of all, make sure that the DVD Video Recorder is switched off.
∫To Set Up this DVD Video Recorder with a brand-new Q Link TV
[1] Switch the TV on.
The TV automatically starts to tune all available TV stations and to adjust the clock. (This is called Auto Setup function.)
≥When the TV has |
|
|
|
|
|
|
|
|
Download from TV |
||||
finished its own auto |
|
|||||
|
|
|
|
|
||
setup, the DVD Video |
|
|
|
|
|
|
|
Pos |
4 |
|
|
||
Recorder is |
|
|
|
|||
|
|
|
|
|
||
automatically switched |
|
|
|
|
|
|
on, and the downloading |
|
Download in progress, please wait. |
|
|||
|
RETURN : to abort |
|
|
|
||
of the setup data from |
|
|
|
|
||
|
|
|
|
|
||
the TV to the DVD Video |
|
|
|
|
|
|
Recorder starts. |
|
|
|
|
|
|
|
|
RETURN |
|
|
|
|
|
|
|
|
|
|
|
Indication during downloading
[2]When Download has finished, the screen for the Owner ID setting menu appears.
Press [1] and the numeric buttons to enter a 4- digit PIN number.
≥Make sure that you will remember the PIN number (make a note of it).
Owner ID |
|
PIN number |
¢¢¢¢ |
Name |
|
House No. |
|
Postcode |
|
RETURN |
|
RETURN : leave |
|
Menu for Owner ID setting
[3]Press [ENTER] and [4]. The cursor moves to
“Name”.
[4]Press [1].
[5] Press [3, 4, 2, 1] to select a letter and then press [ENTER].
≥Repeat this to enter the name.
[6]Enter “House No.” and “Postcode” in the same way.
[7]Press [RETURN].
The Owner ID setting disappear.
∫If the clock setting menu appears
Set the clock manually (l 52).
∫To confirm that stations have been tuned correctly
(l 50)
∫To restart the downloading of the setup data from TV
If you accidentally switch on the DVD Video Recorder before the TV, downloading of the setup data from the TV may not be performed correctly. In this case, follow the steps below.
1)Wait until the Auto Setup is complete on both the TV and the DVD Video Recorder.
2)Press [DVD].
3)Press [FUNCTIONS] to display the top window on the TV screen and then use [3, 4, 2, 1] to select “SETUP” and press [ENTER].
4)Use [3, 4, 2, 1] to select “Tuning” and then “Download from TV”.
5)Press [ENTER] and select “Yes”. Downloading of the setup data from the TV to the DVD Video Recorder starts.
6)When the programme position and the current time appear in the DVD Video Recorder display, downloading is complete.
Note
≥If you use a Panasonic Q Link TV and perform the operation step 1, starting the downloading of the setup data will automatically display the “Download from TV” indication. However, in case of a TV of another make, the “Download from TV” indication may not appear. In this case, select the AV input on your TV if you want to see the
“Download from TV” indication.
≥The explanations in this book refer to Panasonic Q Link TV and DVD Video Recorder, however they may also apply to other makes of TV and DVD Video Recorder with similar functions to Q Link. (See page 10 for details.)
∫To Set Up this DVD Video Recorder with an existing Q Link TV
[1]Switch the TV on.
Download from TV
Pos 4
Download in progress, please wait.
RETURN : to abort
RETURN
[2]Select the AV input on your TV.
[3]Press [Í, DVD/VHS] to switch the DVD Video
Recorder on.
≥ Downloading of the setup data starts automatically.
[4]To set up the Owner ID, repeat the steps 2–7 above.
∫If the clock setting menu appears
Set the clock manually (l 52).
∫To confirm that stations have been tuned correctly
(l 50)
∫To restart Preset Download (l 51)
∫If there is interference or a very poor picture appears on the TV screen, stop the RF output
(l 15 “Removing Interference”)
13

Connection and Set up
|
DVD/VHS |
|
|
|
|
|
Í, DVD/VHS |
|
|
|
|
|
|
|
DIRECT TV REC |
|
CH |
|
VOLUME |
|
|
|
|
|
|
||
|
|
AV |
|
|
|
|
|
DVD/VHS |
|
|
|
|
DVD |
|
OUTPUT |
VHS |
DVD |
|||
|
|
|
|
TRACKING/V-LOCK |
|
|
Numeric |
|
|
|
|
|
CH, W, X |
Buttons |
|
|
|
|
VIDEO Plus+ |
VIDEO Plus+ |
|
|
|
|
|
||
, CANCEL |
CANCEL/RESET |
|
INPUT SELECT |
CREATE |
||
|
CHAPTER |
|
||||
|
|
|
|
|
|
|
/RESET |
SKIP/INDEX |
|
SLOW/ |
|
||
REW SEARCH FF |
|
|||||
|
|
|
|
PLAY |
FUNCTIONS |
|
|
|
|
|
|
|
|
3, 4, 2, 1 |
TOP MENU |
|
|
|
|
|
|
ENTER |
|
|
|
||
ENTER |
|
|
|
|
||
|
|
|
|
|
|
|
|
SUB MENU |
|
|
|
RETURN |
RETURN |
|
|
|
|
|
|
|
|
PROG/CHECK |
DISPLAY |
STATUS |
TIME SLIP |
|
|
|
|
|
|
|
JET REW |
|
Auto Setup (without Q Link Functions)
Auto Setup automatically tunes all available stations and sets the DVD Video Recorder’s clock to the current date and time.
[1]Switch the TV on.
[2]Select the AV input on your TV.
[3]Press [Í, DVD/VHS] to switch the DVD Video
Recorder on.
Auto-Setup
Ch 21
Auto-Setup in progress, please wait.
RETURN : to abort
RETURN
≥Auto Setup starts. This takes about 5 minutes.
≥(If connected to your TV using the RF lead only)
Select an unused channel pre-set on your TV and tune it to the RF output channel number shown on the DVD Video Recorder display (or until you can clearly see the Auto Setup screen).
Store the new video playback channel (refer to the instructions for your TV).
[4]To set up the Owner ID, repeat the steps 2–7 on the previous page.
∫If the clock setting menu appears
Set the clock manually (l 52).
∫To confirm that stations have been tuned correctly
(l 50)
∫To restart Auto Setup (l 51)
You can also use the following method to restart Auto-Setup. When the unit is on and stopped
Press and hold [W, CH] and [CH, X] on the DVD main unit for about 5 seconds.
≥All the settings except for the ratings level, ratings password, Owner ID and time settings return to the factory preset. The timer recording programmes are also cancelled.
Selecting TV screen type
Choose the setting to suit your television and preference.
Preparation
≥Press [DVD].
[1] While stopped
Press [FUNCTIONS].
FUNCTIONS
DVD |
No Disc |
|
|
||
Play back |
|
|
Recording |
|
|
TIMER RECORDING |
||
|
||
|
|
|
Dubbing |
|
|
Edit |
|
|
|
|
|
Setting |
SETUP |
|
|
||
|
|
 ENTER
ENTER

 RETURN
[2]Press [3, 4, 2, 1] to select “SETUP” and press [ENTER].
SETUP |
|
|
|
Manual |
|
|
|
|
|
Auto-Setup Restart |
|
|
|
|
|
Download from TV |
|
Tuning |
||
|
||
|
|
|
Others |
|
|
|
|
|
Disc |
|
|
|
|
|
Picture |
|
|
|
|
|
Sound |
|
|
|
|
|
Display |
TAB SELECT |
|
|
|
|
Connection |
RETURN |
|
|
|
[3]Press [3, 4] to select “Connection” and press [2, 1].
[4]Press [3, 4] to select “TV Aspect” and press
[ENTER].
[5]Press [3, 4] to select the TV aspect and press
[ENTER].
SETUP
Tuning
Others
Disc
Picture
Sound
Display
Connection
TV Aspect |
16:9 WIDE TV |
16:9 |
4:3 TV |
4:3 |
Letterbox |
SELECT |
ENTER |
RETURN |
≥16:9: 16:9 widescreen television (factory setting) ≥4:3: 4:3 standard aspect television
The sides of the widescreen picture are cut off so it fills the screen (unless prohibited by the disc)
(l 67, Pan & Scan). ≥Letterbox: 4:3 standard aspect television
Widescreen picture is shown in the letterbox style (l 67, Letterbox).
ªTo return to the previous screen
Press [RETURN].
For your reference
Apart from “TV Aspect”, other settings also affect how video appears on your TV. Check the following if video doesn’t appear correctly on your TV.
≥The video setting on the disc. How video appears is often specified by the disc itself.
≥The video settings on your TV.
14

Connection and Set up
Removing Interference
TV screen
The picture with interference
In some cases, interference (lines or patterning) or a very poor picture may appear on the TV when the DVD Video Recorder is connected. If this happens, follow the steps below to change the video playback channel (RF output channel) to remove the interference.
Preparation
≥Press [DVD].
[1] Press [FUNCTIONS] for more than 5 seconds.
The RF output channel number is displayed on the unit display.
[2]Press the numeric buttons, [3, 4] or [CH, W, X] to select a channel number, which differs by
2 or 3 from the present channel number.
≥(For example, if the original channel number was 28, enter 31.)
<Before Changing> |
<After Changing> |
||
RF OUTPUT CHANNEL |
|
RF OUTPUT CHANNEL |
|
DVD |
|
DVD |
|
CH : |
28 |
CH : |
31 |
SELECT |
|
SELECT |
|
ENTER |
RETURN |
ENTER |
RETURN |
Test pattern indication |
Test pattern indication |
||
Unit display |
Unit display |
||
|
|
|
|
|
|
|
|
|
|
|
|
|
|
|
Indication when the RF output |
Indication after changing the RF |
|||
channel is 28 (example) |
output channel to 31 (example) |
|||
≥Set the RF output channel of the DVD Video Recorder to [ss] (RF OFF) when the DVD Video Recorder is connected to the TV via the 21-pin Scart cable.
Press the numeric (0) button
68
or [CH, W, X] to display [ss]. Skip the step 4, if using a 21-pin Scart cable.
[3]Retune your TV until you receive the Test pattern.
≥It may be necessary to repeat steps 1 and 2 above until you can see the Test pattern clearly.
[4]Press [ENTER] to finish this setting.
The clear picture
VIDEO Plus+ Codes for Satellite Receivers/Cable TV
This unit is not designed to control (switch on or change channel) your satellite receiver or Cable TV box, however, it can be taught to recognise VIDEO Plus+ Codes for Satellite stations. The Satellite receiver or Cable TV box must be switched on and the correct station selected. Some receivers have their own timer facility for this purpose. Please refer to your Satellite Receiver/Cable TV box instructions for use of such timer facilities.
For your unit to recognise the VIDEO Plus+ Codes for each satellite station, you must teach your unit which channel or AV input to record from for the first time. Otherwise when setting a VIDEO Plus+ recording, the [ss] symbol will appear in the channel position indicating that the unit does not know which channel position to set. Once you have set the channel/AV input once the unit will remember it whenever you use a VIDEO Plus+ Code for the station again.
Preparation
≥Turn on the TV and the unit. Select video playback channel on the TV.
≥Press [DVD].
[1] Press [VIDEO Plus+].
VIDEO Plus+ |
|
|
|
|
|
|
|
|
||
|
|
|
|
|
Remain |
|
4:11 LP |
|||
|
|
12:53:00 |
15. 7. TUE |
|||||||
|
|
|
|
|
|
|
|
|
|
|
|
|
|
|
|
|
|
|
|
|
|
|
|
|
|
|
|
|
|
|
|
|
[2] Enter a VIDEO Plus+ Code from a Satellite TV
Guide for a satellite channel, e.g. Sky 1 using the numeric buttons.
≥If you make a mistake, use [2] to go back.
[3] Press [ENTER]. [ss] will appear instead of a
|
channel number/AV input. |
|
|
|
|
|
|
|
|
||||||||
[4] |
Use [3, 4, 2, 1] to select the channel or AV |
||||||||||||||||
|
input that is to be used for recording from the |
||||||||||||||||
|
satellite channel. |
|
|
|
|
|
|
|
|
|
|
|
|
|
|||
[5] |
Press [ENTER] |
|
|
|
|
|
|
|
|
|
|
|
|
|
|
|
|
|
|
TIMER |
|
|
|
|
|
|
|
|
|
|
|||||
|
to memorise the |
|
|
RECORDING |
|
|
|
Remain |
4:00 LP |
|
|||||||
|
|
|
|
|
|
12:53:00 |
|
13. 7. TUE |
|||||||||
|
setting. |
|
|
|
|
|
Name |
Date |
Start |
Stop |
Mode PDC |
|
|
||||
|
≥The unit will now |
|
|
|
|
|
|
|
|||||||||
|
|
|
|
|
|
AV2 |
15/7TUE |
20:00 |
21:00 |
SP |
|
|
|
|
|||
|
automatically set the |
|
|
|
|
|
|
|
|
|
|
|
|
|
|
|
|
|
programme position |
|
|
|
|
|
|
|
|
|
Programme Name |
|
|||||
|
|
|
|
|
|
|
|
|
|
|
|
|
|
|
|
||
|
or AV input correctly |
|
|
|
|
|
|
|
|
|
|
|
|
|
|||
|
when a VIDEO Plus+ recording is set for this satellite station in |
||||||||||||||||
|
the future. |
|
|
|
|
|
|
|
|
|
|
|
|
|
|||
[6] Use [3] to |
|
|
|
|
|
|
|
|
|
|
|
|
|
|
|
||
|
select the |
|
|
|
TIMER |
|
|
|
|
Remain |
|
4:00 LP |
|
||||
|
|
|
|
RECORDING |
|
|
|
12:57:00 |
|
13. 7. TUE |
|||||||
|
|
|
|
No. |
Name |
Date |
Start |
Stop Mode PDC |
Disc |
||||||||
|
programme that |
|
|
|
|
space |
|||||||||||
|
|
|
|
01 |
|
AV2 |
15/ 7 TUE |
20:00 |
21:00 |
SP |
OK |
|
|||||
|
you have just |
|
|
|
|
|
|
|
New Timer Programme |
|
|
|
|
|
|
||
|
|
|
|
|
|
|
|
|
|
|
|
|
|
|
|
|
|
|
set. |
|
|
|
|
|
|
|
|
|
|
|
|
|
|
|
|
|
|
|
|
|
|
|
|
|
|
|
|
|
|
|
|
|
|
|
≥Now press |
|
|
|
|
|
|
|
|
|
|
|
|
|
|
|
|
|
|
|
|
|
|
|
|
|
|
|
|
|
|
|
|||
|
|
|
|
|
|
|
|
|
|
|
|
|
|
|
|
|
|
|
[¢, CANCEL/RESET] to delete it from the timer recording list. |
||||||||||||||||
|
It is no longer needed. |
|
|
|
|
|
|
|
|
|
|
|
|
|
|||
[7]Repeat steps 1s6 above until you have set and deleted dummy timer recordings for each of the satellite stations that you will make VIDEO Plus+ recordings from.
[8]Press [RETURN] when you have finished.
15

Connection and Set up
Recording from Set Top Boxes (STB) or other Satellite Receivers (SAT)
|
DVD/VHS |
|
|
|
|
|
|
DIRECT TV REC |
|
CH |
VOLUME |
|
|
|
|
|
|
|||
|
|
AV |
|
|
VHS |
|
DVD/VHS |
DVD/VHS |
|
|
|
||
OUTPUT |
VHS |
DVD |
DVD |
|||
OUTPUT |
||||||
|
|
TRACKING/V-LOCK |
|
|||
|
|
|
|
|
FUNCTIONS |
|
3, 4, 2, 1 |
TOP MENU |
|
|
|
|
|
|
ENTER |
|
|
|||
ENTER |
|
|
|
|||
|
|
|
|
|
||
|
SUB MENU |
|
|
RETURN |
RETURN |
|
|
|
|
|
|
||
|
PROG/CHECK |
DISPLAY STATUS |
TIME SLIP |
|
||
|
|
|
|
JET REW |
|
|
|
VHS REC REC MODE DVD REC |
TIMER |
|
|||
EXT LINK |
EXT LINK |
AUDIO |
DUBBING |
|
||
|
|
VHS |
DVD |
|
||
|
|
|
|
|
||
∫Recording video signal by “Sky personal Planner” and “External Link 1” Functions
To record programmes from satellite receiver using “Sky Personal Planner” function together with the “External Link 1” function of this DVD Video Recorder:
∫ Recording RGB Signals
Most Satellite Receivers are capable of outputting RGB signals (below) for viewing on TV through a Scart terminal (called “TV Scart” on a Sky Digital STB).
In the case of a Sky Digital STB, recording of RGB signals from the “TV Scart” terminals is possible, but the “Personal Planner” function for timer recording cannot be used in conjunction with the “External Link” function of this DVD Video Recorder.
To record programmes by RGB signals:
[1]Make connections as shown.
[2]Set your Sky Digital STB to output “RGB” signals.
[3]Change the settings in the SETUP menu (l 49)
as follows.
≥To display the disired setting items, refer to the page 46. -“AV1 Output” set to “Video (with
component)” or “RGB (without component)” to suit the AV terminal of your TV.
-AV2 Input” set to “RGB (Not NTSC)”
-“AV2 Connection” set to “Normal”
TV
AV
AV1
DVD-Recorder
AV2
TV Scart
STB/SAT
[4] Set up Personal Planner programmes as
[1]Make connections as shown.
[2]Change the settings in the SETUP menu (l 49)
as follows.
≥To display the disired setting items, refer to the page 46. -“AV1 Output” set to “Video (with
component)” or “RGB (without component)” to suit the AV terminal of your TV.
-“AV2 Input” set to “Video”. -“AV2 Connection” set to
“Normal”.
-“Ext Link” set to “Ext Link 1”.
TV
AV
AV1
DVD-Recorder
AV2
VCR Scart
STB/SAT
[3]Set up Personal Planner programmes as required.
[4]When you want to record a programme on DVD
(VHS), press [DVD] ([VHS]) and then press [EXT LINK] button (l 29, 57).
“External Link 1” function can only be used with the “Sky Personal Planner” function for timer recording of video signal from the “VCR Scart” terminal of the Sky Digital Set Top Box.
required.
[5]Follow the steps for setting up manually programming timer programmings (l 30, 58).
After setting Personal Planner programmes as required, Sky Digital STB must be left on (not set to standby) to ensure continuous output of RGB signals.
It is not possible to use the “External Link” function of the DVD Video Recorder for timer recording of RGB signals from the Sky Digital STB.
∫RGB
This refers to the three primary colours of light, red (R), green (G), and blue (B) and also the method of producing video that uses them. By dividing the video signal into the three colours for transmission, noise is reduced for even higher quality images. If your TV is equipped with RGB input capability, by connecting with a fully wired 21-pin Scart cable you can see video using RGB output on this unit (PAL only) (l 10).
To output in RGB select “RGB (without component)” from “AV1 Output” in the SETUP menu (l 49).
16

Connection and Set up
DVD output and DVD/VHS output
This unit has DVD/VHS COMMON output terminals which are common to both DVD and VHS, and DVD output terminals which can exclusively be used for DVD.
|
|
AV1 21-pin Scart socket |
|
COMPONENT VIDEO OUT |
VIDEO |
VIDEO |
|
(PROGRESSIVE/INTERLACE) |
|
|
|
Y PB PR |
|
|
|
|
L |
L |
AV1 (TV) |
|
S-VIDEO |
|
|
|
AUDIO |
AUDIO |
AV2 21-pin |
OPTICAL |
R |
R |
Scart socket |
DIGITAL AUDIO OUT |
|
|
|
(PCM/BITSTREAM) |
|
DVD/VHS |
AV2 (DECODER/EXT) |
DVD OUT |
|
COMMON OUT |
|
DVD output |
|
DVD/VHS COMMON output |
|
≥For DVD/VHS COMMON output terminals, both DVD and VHS outputs can be switched.
≥The DVD output terminals can only output the DVD signal.
≥Even if “Automatic” is selected in “DVD / VHS Output“ on “Others” Menu (l 47), the desired output may not be selected depending on the operation. In this case, press [DVD/VHS OUTPUT] on the remote controller to switch manually.
≥When the Video is switched from DVD to VHS or vice versa, the audio volume may suddenly increase or decrease. This is because when the audio output of this unit is connected to the TV or other, the audio output of the DVD is generally lower.
When you increase the volume level of the TV or the amplifier to play back DVD audio, reduce it when playback is finished.
Preparation
≥Press [DVD].
[1] While stopped
Press [FUNCTIONS].
[2]Select “SETUP” with [3, 4, 2, 1] and press
[ENTER].
[3]Select “Others” with [3, 4] and press [2, 1].
[4]Select “DVD / VHS Output” with [3, 4] and press [ENTER].
[5]Select “Automatic” or “Manual” with [3, 4] and press [ENTER].
Note
≥The AV1 21-pin Scart socket and the AV2 21-pin Scart socket are common output terminal.
Connecting a Television with Component video input terminals
You can enjoy progressive video by connecting this unit’s COMPONENT VIDEO OUT terminals to an LCD or plasma TV compatible with progressive video.
(1) |
Television with |
|
|
|
Component video |
COMPONENT |
|
|
input terminals |
VIDEO IN |
(1) |
|
Y PB PR |
||
|
(not supplied) |
|
|
|
|
|
|
(2) |
Component video |
|
|
|
input (Y/PB/PR) |
|
|
(3) |
Audio input (L/R) |
(2) |
|
(4) |
Video cable |
|
|
|
(not supplied) |
|
|
(5) |
Audio cable |
|
|
|
(not supplied) |
(4) |
|
(6) |
Component video |
|
(5) |
|
out (Y/PB/PR) |
|
|
(7)To AUDIO OUT (L/R)
COMPONENT VIDEO OUT |
|
VIDEO |
VIDEO |
||
(PROGRESSIVE/INTERLACE) |
|
|
|
||
Y |
PB |
PR |
|
|
|
|
|
|
S-VIDEO |
L |
L |
|
|
|
(7) |
|
|
(6) OPTICAL |
|
|
AUDIO |
AUDIO |
|
|
|
R |
R |
||
DIGITAL AUDIO OUT |
|
|
|
|
|
(PCM/BITSTREAM) |
|
|
|
DVD/VHS |
|
|
|
|
|
|
|
|
|
DVD OUT |
|
|
COMMON OUT |
Preparation
≥Press [DVD].
[1] While stopped
Press [FUNCTIONS].
[2]Press [3, 4, 2, 1] to select “SETUP” and press [ENTER].
[3]Press [3, 4] to select “Connection” and press [2, 1].
[4]Press [3, 4] to select “Progressive” and press
[ENTER].
[5]Press [3, 4] to select “On” and press [ENTER].
Output becomes progressive.
ªTo return to the previous screen
Press [RETURN].
ªCOMPONENT VIDEO OUT terminal
These terminals can be used for either interlace or progressive output and provide a purer picture than the S-VIDEO OUT terminal. Connection using these terminals outputs the colour difference signals (PB/PR) and luminance signal (Y) separately in order to achieve high fidelity in reproducing colours.
≥The description of the component video input terminals depends on the television or monitor (e.g.: Y/PB/PR, Y/B-Y/R-Y, Y/CB/CR). Connect to terminals of the same colour.
When making this connection, ensure you connect the audio cables to the corresponding audio input terminals on the television.
ªRegarding Progressive Television Picture
Progressive image aspect (height to width ratio) is set at a standard 16:9. DVD-Video which has been set at 16:9 will be displayed correctly. However, 4:3 video material will be stretched to the right and left when displayed.
To view the picture at the right aspect
≥For televisions that allow the aspect of progressive images to be adjusted, use the function provided on the television and adjust as necessary.
≥For televisions which do not allow the aspect of progressive images to be adjusted, please set “Progressive” to “OFF”. (l 45)
Note
≥When connected to a regular television (CRT: Cathode ray tube), even if it is progressive compatible, progressive output can cause some flickering. Turn off “Progressive” if this occurs (l 49).
≥Video will not be displayed correctly if connected to an incompatible television.
≥There is no output from the COMPONENT VIDEO OUT terminals if “AV1 Output” in the SETUP menu is set to “RGB (without component)”. Set this item to “Video (with component)” (l 49).
≥If the unit is connected to the television through VIDEO OUT, S-VIDEO OUT or AV1 terminal, output will be interlace irrespective of the settings.
17
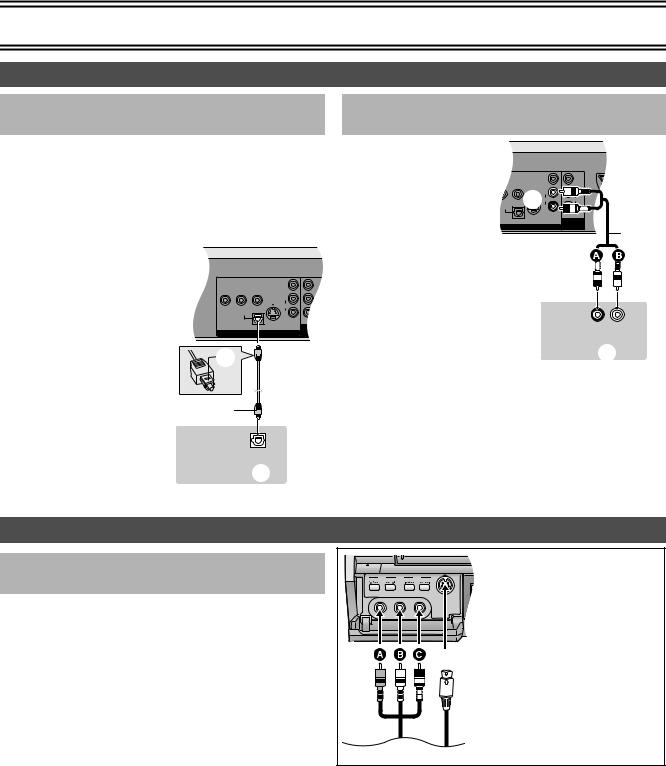
Connection and Set up
Connecting amplifier or system component
∫Connecting a digital amplifier or system component
Connect an amplifier with a Dolby Digital, DTS and MPEG decoders. (l 20)
≥Use an optical digital audio cable.
≥Change the settings in “Digital Audio Output” (l 48).
≥You cannot use DTS Digital Surround decoders not suited to DVD. ≥Even if using this connection, output will be only 2 chan nels when
playing DVD-Audio.
(1) |
Rear panel of this unit |
|
(2) |
Insert fully, with this side |
|
|
facing up. (Do not bend |
|
|
when connecting.) |
|
(3) |
Optical digital audio |
(2) |
|
cable (not supplied) |
|
(4) |
Optical digital input |
|
(5) |
Amplifier’s rear panel |
|
(3)
OPTICAL IN
(5)(4)
∫Connecting an analog amplifier or system component
(1)
(1) |
Rear panel of this unit |
(2) |
(2) |
AUDIO OUT (L/R) |
|
(3) |
Audio cable (not supplied) |
|
|
A Red (R) |
(3) |
|
B White (L) |
|
|
|
|
(4) |
Audio input (L/R) |
|
(5) |
Amplifier’s rear panel |
|
R L
AUDIO IN
(5) (4)
Connecting an external device
∫When connecting to the AV3 input terminals on the front of the unit
Before connecting any cables, first make sure that the power for both units is off. Then after connecting any cable, turn on the both units.
Note
≥If the audio output of the other equipment is monaural, connect to L/ MONO. (Both left and right channels are recorded when connected through L/MONO.)
EJECT
VHS DVD
VIDEO IN L/MONO – AUDIO IN – R
AV3 |
S-VIDEO IN |
(1) Audio/Video cable (not supplied) A Yellow (VIDEO)
(2)B White (L) C Red (R)
(2) S-Video cable (not supplied)
(3) Other playback equipment
(1)
(3)
18

Discs |
DVD |
|
|
Discs you can use
≥On DVD-Audio, DVD-Video and Video CD, the producer of the material can control how these discs are played. This means that you may not be able to control play of a disc with some operations described in these operating instructions. Read the disc’s information for details.
The features you can use with the different types of discs are as follows.
Disc type |
|
Logo |
Indication |
Possible operations° |
|
Features |
|
||||||
|
A |
|
B |
C |
D |
E |
|
|
|||||
|
|
|
|
|
|
|
|
||||||
|
|
|
|
|
|
|
|
|
|
|
|
||
DVD-RAM |
|
|
[RAM] |
Y |
|
Y |
Y |
Y |
|
Y |
This is capable of rewriting and editing. There are 2 types of |
||
4.7 GB / 9.4 GB 12 cm, |
|
|
|
|
DVD-RAM, single-sided and double-sided. The capacity of |
||||||||
2.8 GB 8 cm |
|
|
|
|
|
|
|
|
|
|
the double-sided disc is 9.4 GB. (l below) |
|
|
|
|
|
|
|
|
|
|
|
|
|
|
|
|
DVD-R |
|
|
[DVD-R] |
Y |
|
Y |
Y°° |
– |
|
– |
|
|
|
4.7 GB 12 cm, 1.4 GB 8 cm |
|
Not finalized |
|
|
This is a recordable disc with high compatibility and storage |
||||||||
for General Ver.2.0 |
|
|
|
|
|
|
|
|
|
|
|||
|
|
|
|
|
|
|
|
|
|
stability. (You cannot rewrite it.) This unit is capable of |
|
||
4.7 GB 12 cm |
|
|
[DVD-V] |
|
|
|
|
|
|
|
|
||
|
|
– |
|
Y |
– |
– |
|
– |
recording of DVD-R from 1k speed to 4k speed. (l below) |
||||
for General Ver.2.0/4k-SPEED |
|
|
|
||||||||||
|
Finalized |
|
|
|
|
|
|||||||
DVD-R Revision 1.0 |
|
|
|
|
|
|
|
|
|
|
|
|
|
|
|
|
|
|
|
|
|
|
|
|
|
|
|
|
|
|
|
|
|
|
|
|
|
|
|
|
|
DVD-Audio |
|
|
[DVD-A] |
– |
|
Y |
– |
– |
|
Y |
This is a disc for music with high sound quality. |
|
|
|
|
|
|
|
|
|
|
|
|
|
≥In this unit, it is played with 2 channels (stereos). |
|
|
|
|
|
|
|
|
|
|
|
|
|
|
|
|
|
|
|
|
|
|
|
|
|
|
|
This is a marketed software with high picture quality |
2 |
|
|
|
|
|
|
|
|
|
|
|
|
which already includes movies or music. |
||
|
|
|
|
|
|
|
|
|
|
|
≥This unit can play discs with marks (region |
|
|
DVD-Video |
|
|
[DVD-V] |
– |
|
Y |
– |
– |
|
Y |
number) shown on the right. |
ALL |
|
|
|
|
|
|
|
|
|
|
|
|
|
|
234 |
|
|
|
|
|
|
|
|
|
|
|
|
||
Video CD |
|
|
[VCD] |
– |
|
Y |
– |
– |
|
Y |
This is a marketed software which already includes music or |
||
|
|
|
|
|
|
|
|
|
|
|
video. |
|
|
|
|
|
|
|
|
|
|
|
|
|
|
||
|
|
|
[CD] |
– |
|
Y |
– |
– |
|
– |
This is a marketed software which already includes music or |
||
Audio CD |
|
|
|
|
audio. |
|
|
||||||
|
|
|
|
|
|
|
|
|
|
|
|
||
|
|
|
|
|
|
|
|
|
|
|
|
|
|
|
|
No |
[MP3] |
– |
|
Y |
– |
– |
|
– |
This is a CD-R or a CD-RW including music recorded in MP3 |
||
|
|
|
|
compression technology. |
|
|
|||||||
|
|
|
|
|
|
|
|
|
|
|
|
|
|
|
|
|
|
|
|
|
|
|
|
|
|
|
|
° Possible operations (Y: Possible, –: Impossible) |
|
|
|
|
|
|
|
|
|
|
|||
ARecording |
BPlayback |
CProgramme erase/Titling |
|
DCreating play lists |
ESelecting audios |
|
|||||||
°° The remaining of the disc will not be increased even if erased. |
|
|
|
|
|
|
|
|
|||||
Visit Panasonic’s homepage for more information about DVDs. http://www.panasonic-europe.com/ (For Continental Europe)
More about Discs
DVD-RAM
≥This unit is compatible with the Content Protection for Recordable Media (CPRM) system so you can record broadcasts that allow once copy, such as some CATV broadcasts, onto 4.7 GB/9.4 GB DVD-RAM (these are CPRM compatible). It is not possible to record onto DVD-R or 2.8 GB DVD-RAM.
≥This unit cannot record to discs containing both PAL and NTSC signals. Play of discs recorded with both PAL and NTSC on another unit is not guaranteed.
≥DVD-RAMs recorded on this unit cannot be played on incompatible players.
≥We recommend using Panasonic’s DVD-RAM, which is confirmed the compatibility with this unit.
≥The aspect ratio of the recorded images will be the same as that of the originals.
[RAM] (Cartridge discs)
∫Protection of cartridge disc
You can protect the contents of your discs. ≥With the write-protect tab in the protect
position, you cannot record to, edit, or erase PROTECT from the disc.
DVD-R
≥You can play DVD-R on compatible DVD players by finalizing it on this unit.
≥The aspect ratio of the recorded images will be 4:3. ≥DVD-R can be recorded only either of audio type (M1 or M2).
Select the desirable audio type in “Bilingual Audio Selection” (l 48).
≥Some broadcasts carry signals that allow you to copy once, but you cannot record them with DVD-R. Use DVD-RAM to record these kinds of broadcast.
≥Before finalizing, erasing programmes will not increase the disc’s available time.
≥After finalizing, these DVD-R can no longer be recorded on or edited.
≥This unit may not be able to play back DVD-Rs other than Panasonic’s product depending on the recording condition. We recommend using Panasonic’s DVD-R, which is confirmed the compatibility with this unit.
≥DVD-R recorded by this unit cannot be recorded by other Panasonic’s DVD recorders in some cases.
CD-R, CD-RW
≥This unit can play finalized CD-R/CD-RW (audio recording disc) recorded under CD-DA (digital audio), Video CD or MP3 format. Some CD-R or CD-RW may not be played due to the condition of the recording.
19
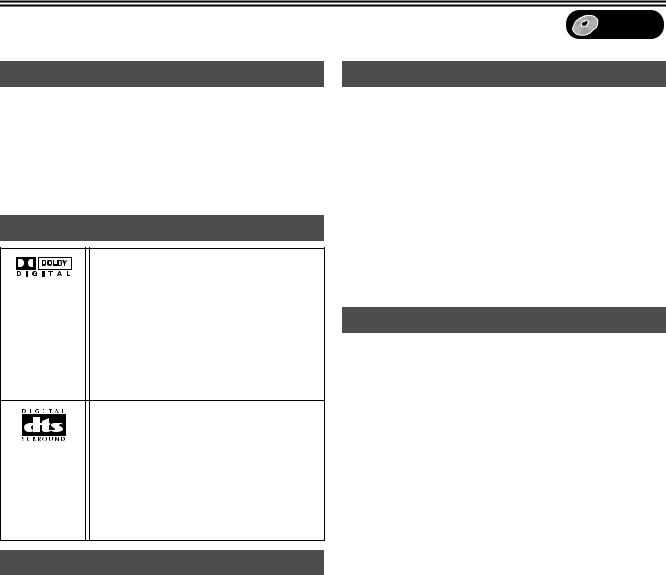
Discs |
DVD |
|
|
Discs that cannot be played
≥2.6 and 5.2 GB DVD-RAM, 12 cm ≥3.95 and 4.7 GB DVD-R for Authoring
≥Unfinalized DVD-R recorded on other equipment
≥DVD-Video with a region number other than the number for this unit
or “ALL” |
|
|
|
≥DVD-ROM |
≥DVD-RW |
≥iR |
≥iRW |
≥CD-ROM |
≥CDV |
≥CD-G |
≥Photo CD |
≥CVD |
≥SVCD |
≥SACD |
≥MV-Disc |
≥PD |
≥Divx Video Disc, etc. |
|
|
Audio format logos
Dolby Digital (l 48)
This unit can play Dolby Digital in stereo (2 channels). Connect an amplifier with a built-in Dolby Digital decoder to enjoy surround sound.
This is a method of coding digital signals developed by Dolby Laboratories. Not only stereo (2 channel) audio, these signals can also be 5.1-channel audio. A large amount of audio information can be recorded on one disc by this method.
DTS Digital Surround (l 48)
Connect this unit to equipment that has a DTS decoder to enjoy DVDs with this mark. This surround system is used in many movie theatres around the world. The separation between channels is good and the compression ratio is low, so realistic sound effects are possible.
DTS sound tracks are produced with the assumption that all channels will be used.
Which Disc Types is Playable on What TV
When you use the discs recorded either PAL or NTSC, refer to this table.
TV type |
Disc |
Playable°1 |
|
|
|
|
|
Multi-system TV |
PAL |
Y |
|
|
|
||
NTSC |
Y°2 |
||
|
|||
NTSC TV |
PAL |
– |
|
|
|
||
NTSC |
Y°3 |
||
|
|||
PAL TV |
PAL |
Y |
|
|
|
||
NTSC |
Y°4(PAL60) |
||
|
°1 Playable (Y: Possible, –: Impossible)
°2 If you select “NTSC” in “TV System” (l 49), the picture may be clearer.
°3 Select “NTSC” in “TV System” (l 49)
°4 If your TV is not equipped to handle PAL 525/60 signals the picture will not be appear correctly.
Discs and accessories
≥DVD-RAM
You can also record signals which allow you to copy once, onto these discs.
9.4 GB, double-sided, type 4 cartridge: LM-AD240E
4.7 GB, single-sided, type 2 cartridge: LM-AB120E
4.7 GB, single-sided, non-cartridge: LM-AF120E
≥DVD-R
4.7 GB, single-sided, non-cartridge: LM-RF120LE
≥DVD-RAM/PD Disc cleaner:
LF-K200DCA1
≥DVD-RAM/PD Lens cleaner:
LF-K123LCA1
Maintenance
The precision parts in this unit are readily affected by the environment, especially temperature, humidity, and dust. Cigarette smoke also can cause malfunction or breakdown.
To clean this unit, wipe with a soft, dry cloth.
≥Never use alcohol, paint thinner or benzine to clean this unit. ≥Before using chemically treated cloth, read the instructions of the
cloth carefully.
Observe the following points to ensure continued listening and viewing pleasure.
Dust and dirt may adhere to the unit’s lenses over time, possibly making it impossible to record or play discs.
Use the recommended DVD-RAM/PD Lens cleaner (LF-K123LCA1) about once every year, depending on frequency of use and the operating environment.
Read the lens cleaner’s instructions carefully before use.
20
Discs |
DVD |
|
|
Disc handling
∫How to hold a disc
Do not touch the recorded surface.
∫If there is dirt or condensation on the disc
[RAM] [DVD-R]
≥Clean with an optional DVD-RAM/PD Disc cleaner (LF-K200DCA1, where available).
≥Do not use cleaners for CDs or cloths.
[DVD-A] [DVD-V] [VCD] [CD]
Wipe with a damp cloth and then wipe dry.
∫Handling precautions
≥Do not attach labels or stickers to discs. (This may cause disc warping and un-balanced rotation, rendering it unusable.)
≥Do not write on the label side with a ball-point pen or other writing instrument.
≥Do not use record cleaning sprays, benzine, thinner, static electricity prevention liquids or any other solvent.
≥Do not use scratch-proof protectors or covers. ≥Do not use the following discs:
-Disc with exposed adhesive from removed stickers or labels (rented discs etc.).
-Discs that are badly warped or cracked.
-Irregularly shaped disc, such as heart shapes.
≥Do not place in the following areas:
-In direct sunlight
-In very dusty or humid areas
-Near a heater
Inserting discs
[1] Press [<, OPEN/CLOSE] on the main unit to open the tray.
You can insert a cartridge or non-cartridge disc.
Note
≥Load double-sided discs so the label for the side you want to record/play is facing up.
≥It is not possible to record continuously from one side of a double sided disc to the other. You will need to eject the disc and turn it over.
≥When using 8 cm DVD-RAM, remove the disc from the cartridge and insert it, making sure you align it with the groove.
Non-cartridge disc
 (1)
(1)
(2)
(3) |
Cartridge disc |
|
(1)Insert label-up.
(2)Insert inside the tray’s guides.
(3)Insert label-up with the arrow facing in.
[2]Press [<, OPEN/CLOSE] on the main unit to close the tray.
≥If you insert a DVD-RAM with the write-protect tab set to “PROTECT” (l 19), play starts automatically.
21
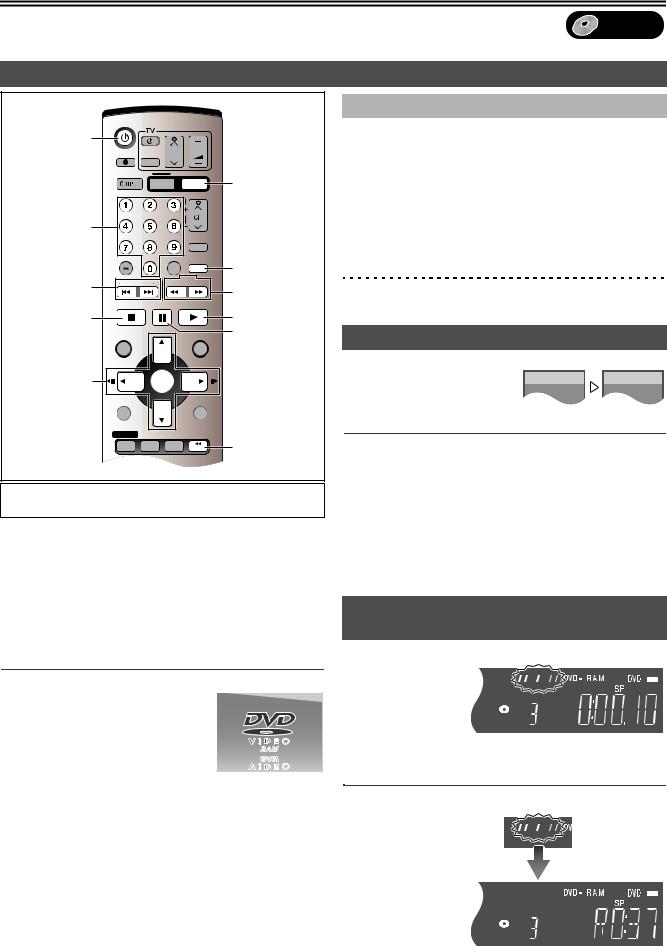
Playback |
DVD |
|
|
Playing discs
|
DVD/VHS |
|
|
|
|
Í, DVD/VHS |
|
|
|
|
|
|
DIRECT TV REC |
|
CH |
VOLUME |
|
|
|
|
|
||
|
|
AV |
|
|
|
|
DVD/VHS |
|
|
|
DVD |
|
|
|
VHS |
DVD |
|
|
|
|
TRACKING/V-LOCK |
|
|
Numeric |
|
|
|
|
|
Buttons |
|
|
|
VIDEO Plus+ |
|
|
|
|
|
|
|
|
|
|
|
CREATE |
CREATE |
|
CANCEL/RESET |
|
INPUT SELECT CHAPTER |
||
|
SKIP/INDEX |
SLOW/ |
CHAPTER |
||
:, 9 |
REW SEARCH FF |
6, 5 |
|||
|
|
|
|
||
|
|
|
|
|
|
|
STOP |
|
PAUSE |
PLAY |
|
∫ |
|
|
|
|
1 |
|
DIRECT NAVIGATOR |
|
FUNCTIONS |
; |
|
3, 4, 2, 1 TOP MENU |
|
|
|
|
|
2;, ;1 |
|
|
ENTER |
|
|
ENTER |
SUB MENU |
|
|
RETURN |
|
|
PROG/CHECK |
DISPLAY STATUS |
TIME SLIP |
|
|
|
|
|
|
JET REW |
TIME SLIP |
|
|
|
|
|
|
|
VHS REC REC MODE DVD REC |
TIMER |
|
||
Preparation
≥Press [DVD].
[RAM] [DVD-R] [DVD-A] [DVD-V] [VCD] [CD] [MP3]
[1]Press [Í, DVD/VHS] to turn the unit on.
[2]Insert a disc. (l 21)
[3]Press [1, PLAY].
The disc tray closes and play begins.
(The unit takes some time to read the disc before play starts.) ≥Playback starts from the most recently recorded title.
[RAM] [DVD-R]
≥Playback starts from the beginning of the disc.
[DVD-A] [DVD-V] [VCD] [CD] [MP3]
∫To stop play
Press [∫, STOP]. (l right, “Resume Function”)
≥A screen similar to the right may appear when you stop play. Press [∫, STOP] again and you can use this unit’s tuner to watch TV. [DVD-A] [DVD-V] [VCD] [CD] [MP3]
∫To pause play
Press [;, PAUSE]. (Press again to restart playing.)
∫ When a menu screen appears on the TV
[DVD-A] [DVD-V] [VCD]
[VCD]
Press the numeric buttons to select an item. e.g.: “5”: [0] )[5]
“15”: [1] )[5]
[DVD-A] [DVD-V]
Press [3, 4, 2, 1] to select an item and press [ENTER].
≥You can also use the numeric buttons to select an item.
Other buttons used to operate menus
Read the disc’s instructions for the further details about operation.
Note
≥If “ ” appears on the TV, the operation is prohibited by the unit or disc.
Quick View (Play t1.3)
[RAM] (Only with Dolby Digital) |
|
|
You can increase the speed of play |
DVD-RAM |
DVD-RAM |
without disrupting the soundtrack. |
PLAY |
PLAY x1.3 |
During Play
Press and hold [1, PLAY].
∫To return to normal speed
Press [1, PLAY].
Note
≥Output is in PCM when using a digital connection (l 18). ≥This is cancelled when you perform skip, pause, or when play
reaches a point where a programme recorded in sound other than Dolby Digital starts.
≥This does not work if the setting is “Off” in “PLAY t1.3 & Audio during Search” (l 48).
≥This does not work when recording is in XP or FR mode during simultaneous recording and play (l 26). [RAM]
Starting play from where you stopped it (Resume Function)
[RAM] [DVD-R] [DVD-A] [DVD-V] [VCD] [CD] [MP3]
[1] During play
Press [∫, STOP].
≥The unit memorises
the position.
[2] Press
[1, PLAY].
≥Play starts from where you stopped it.
∫To cancel the resume function
Press [∫, STOP] several times while the unit remembers the position. (The position is also cleared when you turn the unit off.)
22

Playback |
DVD |
|
|
Fast forward and rewind—SEARCH
[RAM] [DVD-R] [DVD-A] [DVD-V] [VCD] [CD] [MP3] |
|
|
DVD-RAM |
||
|
||
During play |
• • • • |
|
|
|
Press [6, SLOW/SEARCH] or [5,
L R
SLOW/SEARCH].
≥Press and hold [:/6] or [5/9] on the DVD main unit.
≥There are 5 search speeds. Each press increases the search speed.
≥Press [1, PLAY] to restart playback.
≥Sound is output only in the first level of fast forward. In the case of DVD-A (except parts of moving picture), CD and MP3, it is output in all levels.
≥You can turn this sound off if you want to (l 48, “Sound”— “PLAY t1.3 & Audio during Search”).
Slow-motion play
[RAM] [DVD-R] [DVD-A] (Motion picture parts only) [DVD-V] [VCD]
While paused
Press [6, SLOW/SEARCH] or [5, SLOW/
SEARCH].
≥Press and hold [:/6] or [5/9] on the DVD main unit.
≥It pauses automatically when the slow motion play is continued for about 5 minutes.
≥The speed increases up to 5 steps. ≥Press [1, PLAY] to restart playback. ≥Forward direction only. [VCD]
Frame-by-frame viewing
[RAM] [DVD-R] [DVD-A] (Motion picture parts only) [DVD-V] [VCD]
While paused
Press [2;], [;1], [2] or [1].
≥Each press shows the next or previous frame. ≥Press [1, PLAY] to restart playback. ≥Forward direction only. [VCD]
Skipping
[RAM] [DVD-R] [DVD-A] [DVD-V] [VCD] [CD] [MP3]
During play or while paused
Press [:, SKIP] or [9, SKIP].
≥On the DVD main unit, press [:/6] or [5/9].
≥Each press increases the number of skips.
Direct Play
[RAM] [DVD-R] [DVD-A] [DVD-V] [VCD] [CD] [MP3]
Starting play from a selected title, chapter or track.
During play
Press the numeric buttons to select the item.
e.g.: |
“5”: |
[0] )[5] |
[MP3] |
“5”: |
[0] )[0] )[5] |
|
“15”: |
[1] )[5] |
|
“15”: |
[0] )[1] )[5] |
[DVD-A] |
|
|
|
|
|
|
|
|
|
|
|
A group number can be specified while the |
|
||||
screen saver is displayed. |
|
|
|
||
e.g.: |
“5”: |
[5] |
|
|
|
≥This works only when stopped (screen |
|
||||
saver is displayed) with some discs. |
|
|
|||
≥Playing bonus groups |
|
|
|
||
|
|
|
|||
Some discs contain bonus groups. If a password screen appears after selecting a group, enter the password with the numeric buttons and press [ENTER]. Refer also to the disc’s jacket.
Displaying the TV image as a picture-in- picture/
Selecting an amount of time to skip— Time Slip
[RAM] [DVD-R]
Skips the specified time.
Displays the TV image being received as a picture-in-picture.
[1]During play
Press [TIME SLIP]. (Press again to cancel.)
≥You will hear the playback audio.
≥The grey background does not appear on the receiving screen even if you select “On” from the “Grey Background” in the SETUP menu (l 49).
[2]Press [3, 4] to enter the time and press
[ENTER].
≥Play skips the time you entered.
≥Press to alter in 1-minute units. Press and hold to alter in 10-minute units.
(1) |
PLAY |
|
0 min |
|
|
|
|
|
(2) |
1 BBC |
1 |
(1)Play images
(2)Current receiving images
PLAY |
–5 min |
1 BBC 1 |
≥You will hear the playback audio. ≥You can change the receiving channel.
≥You cannot change the channel being received while recording.
Divide a title into chapters
[RAM]
[1] During play
Press [CREATE CHAPTER].
≥Press [:, SKIP] or [9, SKIP] to skip to the start of a chapter.
≥You cannot divide when recording and playing at the same time.
23

Playback |
|
|
|
|
|
|
|
|
|
|
|
DVD |
||
|
|
|
|
|
|
Using menus to play MP3 discs |
|
|||||||
|
DVD/VHS |
|
|
|
|
[MP3] |
|
|
|
|
|
|
|
|
|
|
|
|
|
|
|
|
|
|
|
|
|
|
|
|
|
|
|
|
|
This unit can play MP3 files recorded on CD-R/RW with a computer. |
||||||||
|
DIRECT TV REC |
|
CH |
VOLUME |
|
Files are treated as tracks and folders are treated as groups. |
|
|||||||
|
AV |
|
|
|
||||||||||
|
|
|
|
|
“Total” means total number of all MP3 files (all tracks in all groups) |
|||||||||
|
DVD/VHS |
|
|
|
|
|||||||||
|
|
|
|
DVD |
recorded in the disc. |
|
|
|
|
|
|
|||
|
|
VHS |
DVD |
|
|
|
|
|
|
|||||
|
|
|
TRACKING/V-LOCK |
|
[1] During stop or play |
|
|
|
|
|
|
|||
|
|
|
|
|
|
|
|
|
|
|
|
|||
Numeric |
|
|
|
|
|
Press [TOP MENU]. |
|
|
|
|
|
|||
Buttons |
|
|
|
VIDEOPlus+ |
|
≥The file list appears. |
|
|
|
|
|
|
||
|
|
|
|
|
|
|
|
|
|
|
|
|
|
|
|
|
|
|
CREATE |
|
G: |
|
|
|
Selected Group No. and Name |
||||
|
CANCEL/RESET |
|
INPUT SELECT CHAPTER |
|
|
|
|
|||||||
|
SKIP/INDEX |
SLOW/ |
|
The Group Number |
|
|
|
|
|
|
||||
|
REW SEARCH FF |
|
T: |
|
|
|
|
|
|
|
|
|||
|
|
|
|
|
|
|
|
|
|
|
|
|
|
|
|
STOP |
PAUSE |
PLAY |
|
Track Number in the Group |
MENU |
No. |
Group |
|
|||||
|
|
1 : MP3_MUSIC |
|
|||||||||||
|
|
|
|
|
|
TOTAL: |
|
|
G |
1 |
Total |
Track |
Tree |
|
|
|
|
|
|
|
|
|
T |
1 |
1 |
001 Both Ends Freezing |
|
||
|
|
|
|
|
|
Selected Track Number/ |
|
TOTAL |
1/ 24 |
|
|
|
||
|
|
|
|
|
|
|
|
|
|
|
||||
|
DIRECT NAVIGATOR |
|
FUNCTIONS |
|
Total Track Number |
|
|
|
|
|
|
|||
TOP MENU |
|
|
|
|
|
|
0 – |
9 |
|
|
|
|||
|
|
|
|
|
|
|
|
|
|
No. |
|
|
|
|
|
TOP MENU |
|
|
|
|
|
|
|
|
|
|
|
|
|
3, 4, 2, 1 |
|
|
|
|
|
|
|
|
|
SELECT |
|
|
|
|
|
ENTER |
|
|
|
|
|
|
ENTER |
|
Prev. |
Next |
|
||
ENTER |
|
|
|
|
|
|
|
RETURN |
|
|||||
|
|
|
|
|
|
|
|
|
|
|||||
|
|
|
|
|
|
|
|
|
|
|
|
|
|
|
|
SUB MENU |
|
|
RETURN |
RETURN |
[2] Press [3, 4] to select the track and press |
|
|||||||
|
|
|
|
|
|
|||||||||
|
PROG/CHECK |
DISPLAY |
STATUS |
TIME SLIP |
|
[ENTER]. |
|
|
|
|
|
|
|
|
|
|
Play continues to the last track in the last group. |
|
|||||||||||
|
|
|
|
JET REW |
|
|
||||||||
|
|
|
|
|
≥“ |
” indicates the track currently playing. |
|
|
||||||
|
VHS REC REC MODE DVD REC |
TIMER |
|
|
|
|||||||||
|
|
≥You can also select the track with the numeric buttons, directly. |
||||||||||||
AUDIO |
|
|
|
|
|
|||||||||
EXT LINK |
AUDIO |
DUBBING |
|
e.g.: The track “006.mp3” of Group “002” of the illustration on |
||||||||||
|
|
|
VHS |
DVD |
|
|
the right, |
|
|
|
|
|
|
|
|
|
|
|
|
|
|
|
|
|
|
|
|
||
|
|
|
|
|
|
|
“6”: |
[0] )[0] |
)[6] |
|
|
|
|
|
|
|
|
|
|
|
|
The track “010.mp3” of Group “003” of the illustration on |
|||||||
Preparation |
|
|
|
|
|
|
the right, |
|
|
|
|
|
|
|
|
|
|
|
|
|
“10”: |
[0] )[1] |
)[0] |
|
|
|
|
|
|
≥Press [DVD]. |
|
|
|
|
|
|
|
|
|
|
|
|||
|
|
|
|
|
|
|
|
|
|
|
|
|
|
|
∫To show other pages
Changing audio during play |
|
|
|
Select “2 Prev.” or “Next 1” with [3, 4, 2, 1] and press [ENTER]. |
|
|
|
|
|
|
≥After listing all the tracks in one group, the list for the next group |
Press [AUDIO] to select the audio type. |
|
|
|
||
|
|
|
appears. |
||
[RAM] [VCD] (l 53) |
|
|
|
∫To exit the file list |
|
LR#L#R |
DVD-RAM |
|
Press [TOP MENU] or [RETURN]. |
||
^-------------} |
|
PLAY |
|
|
|
|
|
|
|
||
e.g.: [RAM] |
|
|
|
|
|
|
|
|
|
||
|
|
|
L R |
|
|
“L R” is selected |
|
|
|
|
|
[DVD-A] [DVD-V] (l 44)
You can change the audio channel number by pressing the button. This allows you to change items like the soundtrack language.
Soundtrack |
1 ENG Î Digital 3/2.1ch |
e.g.: [DVD-V] English is the selected language.
Note
≥If you cannot change the audio type when you have used only an optical digital cable for connection, set “Dolby Digital” to “PCM” (l 48). Alternatively, you may connect to an amplifier with an Audio/Video cable and change the input on the amplifier to suit the connection.
≥You cannot change the audio type when a DVD-R is in the disc tray.
≥You cannot change the audio while you use “TP” channel. (l 63)
24
 Loading...