


Operating Instructions
DVD Recorder
Model No. DMR-ES35V
TM
Please read the operating instructions, the safety notes and the notes on setting up the unit on page 3 before connecting, operating or setting up the unit.
Contents
|
Page |
|
Page |
|
Page |
|
Safety precautions |
3 |
TIME SLIP |
|
20 |
Checking or changing timer recordings 35 |
|
|
|
Delayed playback |
|
20 |
Timer Off/On |
35 |
Information on the unitt |
4 |
Quick View (PLAY/x1.3) |
|
20 |
Delete |
35 |
Licence information |
4 |
Simultaneous recording and playback |
|
20 |
Stop Recording |
35 |
|
|
Changing the audio channel |
|
20 |
|
|
Before you start |
5 |
|
|
|
Timer recording via external units |
36 |
Included accessories |
5 |
Playback (VHS) |
21-22 |
|
|
|
Inserting batteries |
5 |
Preparation |
|
21 |
Delete |
37 |
|
|
Playing a video cassette |
|
21 |
Deleting titles and pictures |
37 |
Remote Control |
6-7 |
Repeat playback |
|
21 |
Properties |
37 |
|
|
Stopping playback |
|
21 |
Set up Protection/Cancel Protection |
37 |
Front Panel |
8 |
Pausing playback |
|
21 |
|
|
On-screen displays |
8 |
Slow-motion playback |
|
21 |
Copy |
38-39 |
|
|
Frame playback |
|
21 |
Copying with a copy list |
38 |
Rear Panel |
9 |
Forwards/backwards search |
|
21 |
Time-triggered copying |
39 |
|
|
Fast forward/Jet rewind |
|
21 |
|
|
Connections |
10-11 |
JET REW |
|
21 |
COPYING |
40 |
Connection with 21-pin Scart cable |
10 |
VHS Index Search System (VISS) |
|
21 |
Copying from VHS to DVD |
40 |
Connection with Audio/Video cable |
10 |
S-VHS Quasi Playback (SQPB) |
|
22 |
Finalising |
40 |
Connection with S VIDEO-cable |
11 |
Manual tracking |
|
22 |
Copying from DVD to VHS |
40 |
|
|
Automatic tracking |
|
22 |
|
|
Settings |
11 |
Handling video cassettes |
|
22 |
ShowView Record |
41 |
Country |
11 |
Write-protecting cassettes |
|
22 |
ShowView Record |
41 |
Auto-Setup |
11 |
Cleaning video heads |
|
22 |
|
|
Download from TV with Q Link |
11 |
|
|
|
Playlists |
42-44 |
TV Aspect |
11 |
Recording |
23-25 |
Creating a playlist |
42 |
|
Setting the date and time |
11 |
Before recording |
|
23 |
Launching the Playlists menu |
43 |
|
|
Disc Protection,CPRM |
|
23 |
Editing playlists in the SUB MENU |
43 |
External units |
12-14 |
Formatting |
|
23 |
Editing chapters in the SUB MENU |
44 |
Connection of Set Top Box |
12 |
For recording |
|
23 |
|
|
or satellite receiver |
|
Record |
|
24 |
Flexible Rec |
45 |
Connecting a decoder |
12 |
Pause the recording |
|
24 |
Flexible recording mode (FR) |
45 |
Connecting an analogue amplifier |
13 |
DVD recording of TV programmes |
|
24 |
|
|
Connecting a digital amplifier |
13 |
Changing the recording mode |
|
24 |
DV Auto Rec |
45 |
Connecting to AV3 (e.g. camcoder) |
13 |
VHS recording of TV programmes |
|
24 |
Recording via DV input |
45 |
Connecting to DV IN |
13 |
The approx. time remaining on the cassette |
24 |
Manual recording via DV input |
45 |
|
|
|
Specifying a time as the recording duration |
25 |
|
|
|
COMPONENT VIDEO OUT |
14 |
DVD playback during recording |
|
25 |
Setup |
46-51 |
Connecting a TV with |
14 |
Direct TV recording |
|
25 |
Tuning |
46-47 |
COMPONENT VIDEO input sockets |
|
Recording from an external unit |
|
25 |
Disc, List of language codes |
47 |
Progressive television picture |
14 |
Selecting the sound track to record |
|
|
Picture |
48 |
|
|
for programmes with dual-channel sound |
|
25 |
Sound |
49 |
STATUS displays |
15 |
Recording in dual-channel audio |
|
25 |
Display |
49 |
Screen information, Symbols |
15 |
|
|
|
Connection |
50 |
|
|
FUNCTIONS |
26-53 |
AV-Link function |
50 |
|
Disc formats |
16-17 |
Notes on the menus |
|
26 |
VHS |
51 |
Playback and recording discs |
16 |
Entering text |
|
27 |
Others |
51 |
Playback discs |
17 |
|
|
|
|
|
Handling discs |
17 |
DIRECT NAVIGATOR |
28-30 |
DVD Management |
52-53 |
|
|
|
Overview of DIRECT NAVIGATOR |
|
28 |
Disc Name |
52 |
Playback (DVD) |
18-20 |
Launching the DIRECT NAVIGATOR menu |
28 |
Disc Protection |
52 |
|
Preparation, Playback |
18 |
Delete |
|
28 |
Delete all Titles |
52 |
Playback of a selected title |
18 |
Properties |
|
28 |
Format Disc |
52 |
Playback starts automatically |
18 |
Editing titles in the SUB MENU |
|
29 |
Auto-Play Select |
53 |
Selecting programmes/titles for playback |
18 |
Editing chapters in the SUB MENU |
|
30 |
Finalise |
53 |
Finalising |
18 |
|
|
|
Close First Layer |
53 |
Pausing playback |
19 |
DivX playback |
|
31 |
Create Top Menu |
53 |
Stopping playback |
19 |
MP3 playback |
|
32 |
|
|
Saving the playback position |
19 |
JPEG/TIFF playback |
|
33 |
Picture and sound settings |
54-55 |
Slow-motion playback |
19 |
|
|
|
|
|
Fast forward |
19 |
Recording |
|
34 |
If you need help |
56-58 |
Dividing a recording into chapters |
19 |
Manual programming |
|
34 |
|
|
Skipping |
19 |
VPS/PDC feature |
|
34 |
Specifications |
59 |
MANUAL SKIP |
19 |
Autom. SP/LP switching |
|
34 |
|
|
Frame playback |
19 |
Drive |
|
34 |
Index |
last page |
2

Safety precautions
Install this device in a horizontal position. Do not place anything heavy on it.
Keep this device away from high temperatures and avoid changes in temperatures.
Keep away from liquids, humidity  and dust.
Back of product, see page 9.
På baksiden av produktet (Norsk).
Laitteen takaosa (Fin).
LUOKAN 1 LASERLAITE / KLASS 1 LASER APPARAT
Inside of product
Produktets innside (Norsk)
Tuotteen sisällä (Fin)
Voltage: Only use power sources complying with the specifications for this device.
AC mains lead protection: Ensure the AC mains lead is connected correctly and not damaged. Poor connection and lead damage can cause fire or electric shock.
Service: Never attempt to repair this unit by yourself. If a problem occurs that is not described in these operating instructions, disconnect the power supply and contact your dealer or an authorised after sales service centre.
WARNING:
TO REDUCE THE RISK OF FIRE, ELECTRIC SHOCK OR PRODUCT DAMAGE, DO NOT EXPOSE THIS APPARATUS TO RAIN, MOISTURE, DRIPPING OR SPLASHING AND THAT NO OBJECTS FILLED WITH LIQUIDS, SUCH AS VASES, SHALL BE PLACED ON THE APPARATUS.
CAUTION!
DO NOT INSTALL OR PLACE THIS UNIT IN A BOOKCASE, BUILT-IN CABINET OR IN ANOTHER CONFINED SPACE. ENSURE THE UNIT IS WELL VENTILATED. TO PREVENT RISK OF ELECTRIC SHOCK OR FIRE HAZARD DUE TO OVERHEATING, ENSURE THAT CURTAINS AND ANY OTHER MATERIALS DO NOT OBSTRUCT THE VENTILATION VENTS.
DO NOT OBSTRUCT THE UNIT’S VENTILATION OPENINGS WITH NEWSPAPERS, TABLECLOTHS, CURTAINS, AND SIMILAR ITEMS.
DO NOT PLACE SOURCES OF NAKED FLAMES, SUCH AS LIGHTED CANDLES, ON THE UNIT.
DISPOSE OF BATTERIES IN AN ENVIRONMENTALLY FRIENDLY MANNER.
CAUTION!
THIS PRODUCT UTILIZES A LASER. USE OF CONTROLS OR ADJUSTMENTS OR PERFORMANCE OF PROCEDURES OTHER THAN THOSE SPECIFIED HEREIN MAY RESULT IN HAZARDOUS RADIATION EXPOSURE. DO NOT OPEN COVERS AND DO NOT REPAIR BY YOURSELF. REFER SERVICING TO QUALIFIED PERSONNEL.
THIS UNIT IS INTENDED FOR USE IN MODERATE CLIMATES.
This product may receive radio interference caused by mobile telephones during use. If such interference is apparent, please increase separation between the product and the mobile telephone.
The socket outlet shall be installed near the equipment and easily accessible or the mains plug or an appliance coupler shall remain readily operable.
The model and serial number of this product can be found on the back of the unit. Please note them and keep for future reference.
Model No. Serial No.
Sikkerhetsinstrukser (Norsk)
ADVARSEL:
FOR Å REDUSERE FAREN FOR BRANN, ELEKTRISK STØT ELLER SKADER PÅ PRODUKTET, MÅ DETTE APPARATET IKKE UTSETTES FOR REGN, FUKTIGHET, VANNDRÅPER ELLER VANNSPRUT. DET MÅ HELLER IKKE PLASSERES GJENSTANDER FYLT MED VANN, SLIK SOM BLOMSTERVASER, OPPÅ APPARATET.
ADVARSEL!
APPARATET MÅ IKKE PLASSERES I EN BOKHYLLE, ET INNEBYGGET KABINETT ELLER ET ANNET LUKKET STED HVOR VENTILASJONSFORHOLDENE ER UTILSTREKKELIGE. SØRG FOR AT GARDINER ELLER LIGNENDE IKKE FORVERRER VENTILASJONSFORHOLDENE, SÅ RISIKO FOR ELEKTRISK SJOKK ELLER BRANN FORÅRSAKET AV OVERHETING UNNGÅS.
APPARATETS VENTILASJONSÅPNINGER MÅ IKKE DEKKES TIL MED AVISER, BORDDUKER, GARDINER OG LIGNENDE.
PLASSER IKKE ÅPEN ILD, SLIK SOM LEVENDE LYS, OPPÅ APPARATET.
BRUKTE BATTERIER MÅ KASSERES UTEN FARE FOR MILJØET.
ADVARSEL!
DETTE PRODUKTET ANVENDER EN LASER. BETJENING AV KONTROLLER, JUSTERINGER ELLER ANDRE INNGREP ENN
DE SOM ER BESKREVET I DENNE BRUKSANVISNING, KAN FØRE TIL FARLIG BESTRÅLING. DEKSLER MÅ IKKE ÅPNES, OG FORSØK ALDRI Å REPARERE APPARATET PÅ EGENHÅND. ALT SERVICE OG REPARASJONSARBEID MÅ UTFØRES AV KVALIFISERT PERSONELL.
DETTE APPARATET ER BEREGNET TIL BRUK UNDER MODERATE KLIMAFORHOLD.
Dette apparatet kan under bruk fange opp høyfrekvente forstyrrelser forårsaket av en mobiltelefon som benyttes i nærheten. Hvis slik forstyrrende påvirkning konstateres, bør mobiltelefonen benyttes på større avstand fra dette apparatet.
Utstyret bør plasseres i nærheten av AC-stikkontakten, og støpslet må være lett tilgjengelig hvis det skulle oppstå problemer.
Turvallisuusohjeita (Finnish)
Norsk: Apparatet bør stilles opp i nærheten av stikkontakten på en slik måte at man uhindret får tilgang til nettpluggen hvis det skulle oppstå en feil.
Plasser apparatet horisontalt. Ikke plasser tunge gjenstander på apparatet.
Ikke utsett apparatet for høye temperaturer og temperatursvingninger.
Beskytt apparatet mot væske, fuktighet og støv.
Finnish: Laite tulisi sijoittaa verkkopistorasian lähelle siten, että verkkopistokkeeseen päästään häiriötapauksessa varmasti esteettömästi käsiksi.
Aseta laite vaakasuoraan. Älä aseta raskaita esineitä laitteen päälle.
Suojaa laite korkeiltalämpötiloilta ja lämpötilaheilahteluilta.
Suojaa laite nesteiltä, kosteudelta ja pölyltä.
VAROITUS:
TULIPALO-, SÄHKÖISKUVAARAN TAI TUOTETTA KOHTAAVAN MUUN VAHINGON VÄHENTÄMISEKSI EI LAITETTA SAA ALTISTAA SATEELLE, KOSTEUDELLE, VESIPISAROILLE TAI ROISKEELLE, EIKÄ NESTETTÄ SISÄLTÄVIÄ ESINEITÄ, KUTEN ESIMERKIKSI MALJAKOITA, SAA ASETTAA LAITTEEN PÄÄLLE.
VAROITUS!
ÄLÄ ASENNA TAI LAITA TÄTÄ LAITETTA KABINETTITYYPPISEEN KIRJAKAAPPIIN TAI MUUHUN SULJETTUUN TILAAN, JOTTA TUULETUS ONNISTUISI. VARMISTA, ETTÄ VERHO TAI MIKÄÄN MUU MATERIAALI EI HUONONNA TUULETUSTA, JOTTA VÄLTETTÄISIIN YLIKUUMENEMISESTA JOHTUVA SÄHKÖISKUTAI TULIPALOVAARA.
ÄLÄ PEITÄ LAITTEEN TUULETUSAUKKOJA SANOMALEHDELLÄ, PÖYTÄLIINALLA, VERHOLLA TAI
MUULLA VASTAAVALLA ESINEELLÄ.
ÄLÄ ASETA PALAVAA KYNTTILÄÄ TAI MUUTA AVOTULEN LÄHDETTÄ LAITTEEN PÄÄLLE.
HÄVITÄ PARISTOT LUONTOA VAHINGOITTAMATTOMALLA TAVALLA.
VAROITUS!
LAITTEEN KÄYTTÄMINEN MUULLA KUIN TÄSSÄ KÄYTTÖOHJEESSA MAINITULLA TAVALLA SAATTAA ALTISTAA KÄYTTÄJÄN TURVALLISUUSLUOKAN 1 YLITTÄVÄLLE NÄKYMÄTTÖMÄLLE LASERSÄTEILYLLE.
TÄMÄ LAITE ON TARKOITETTU KÄYTETTÄVÄKSI LEUDOSSA ILMASTOSSA.
Tämä tuotteen toimintaan saattaa tulla häiriöitä lähellä olevasta matkapuhelimesta. Mikäli matkapuhelimesta johtuvia häiriöitä ilmenee, siirrä matkapuhelin mahdollisimman kauas laitteesta jotta häiriöt poistuvat.
Laite tulee asettaa lähelle verkkopistorasiaa ja pistokkeen täytyy olla sellaisessa asennossa, että siihen on helppo tarttua ongelman sattuessa.
3
Information on the unit
 DivX-compatible
DivX files can be played back from CD-R/CD-RW and DVD-R.
Quick start
You can record to DVD-RAM about one second after switching on the unit.
COPYING
With the push of a button, you can copy the content of a VHS cassette to a disc or vice versa.
DV interface
You can connect your digital camcorder directly to this unit via the DV IN connection.
This way it’s easy to copy your movies.
Licence information
This product incorporates copyright protection technology that is protected by U.S. patents and other intellectual property rights. Use of this copyright protection technology must be authorized by Macrovision, and is intended for home and other limited viewing uses only unless otherwise authorized by Macrovision. Reverse engineering or disassembly is prohibited.


 Dolby Digital
Method of encoding digital signals. The signals are very much compressed in the process to enable recordings of large volumes of data.
Manufactured under license from Dolby Laboratories. Dolby and the double-D symbol are trademarks of Dolby Laboratories.
DTS (Digital Theater Systems)
Sound system used in cinemas or movie theaters all over the world. "DTS" and "DTS 2.0 + Digital Surround" are trademarks of Digital Theater Systems, Inc.
MP3 or MPEG 1 Audio Layer 3 is a file compression format used for digital audio files. It provides files of an extremely small size and may cause a consequential loss of quality. MPEG Layer-3 audio decoding technology licensed from Fraunhofer IIS and Thomson multimedia.
-If you see this symbol-
Information on Disposal for Users of Waste Electrical & Electronic Equipment (private households)
This symbol on the products and/or accompanying documents means that used electrical and electronic products should not be mixed with general household waste.
For proper treatment, recovery and recycling, please take these products to designated collection points, where they will be accepted on a free of charge basis. Alternatively, in some countries you may be able to return your products to your local retailer upon the purchase of an equivalent new product.
Disposing of this product correctly will help to save valuable resources and prevent any potential negative effects on human health and the environment which could otherwise arise from inappropriate waste handling.
Please contact your local authority for further details of your nearest designated collection point.
Penalties may be applicable for incorrect disposal of this waste, in accordance with national legislation.
For business users in the European Union
If you wish to discard electrical and electronic equipment, please contact your dealer or supplier for further information.
Information on Disposal in other Countries outside the European Union
This symbol is only valid in the European Union.
If you wish to discard this product, please contact your local authorities or dealer and ask for the correct method of disposal.
4

Before you start
Dear customer
Thank you for your trust and your decision to purchase this top-quality device.
Panasonic is one of the leading manufacturers of entertainment electronics devices.
We are sure that you will be completely satisfied with this device.
Matsushita Electric Industrial Co., Ltd.
http://www.panasonic.co.jp/global/
Included accessories
DVD/VHS
|
TV |
|
|
|
|
DRIVE |
|
CH |
+ |
|
|
AV |
VOLUME |
Remote Control |
AC Mains Lead |
||
SELECT |
|
_ |
|||
|
|
TRACKING/V-LOCK |
EUR7659YF0 |
RJA0043-1C |
|
1 |
2 |
3 |
+ |
|
|
4 |
5 |
6 |
CH |
|
|
- |
|
|
|||
7 |
8 |
9 |
ShowView |
|
|
|
0 |
INPUT |
DELETE |
|
|
|
SELECT |
|
|
|
|
RESET |
|
SLOW/SEARCH |
|
|
|
SKIP/INDEX |
REW |
FF |
Batteries |
Audio/Video cable |
|
STOP |
PAUSE |
PLAY |
|||
TIME SLIP/ |
JET REW MANUAL SKIP |
AA, UM3 or R6 |
K2KA6BA00003 |
||
PROG/
CH
ECK
|
|
R |
|
|
F |
|
|
O |
|
|
|
IG |
A |
T |
|
|
U |
|
|
|
N |
||
|
|
|
|
C |
|
V |
|
|
|
|
|
A |
|
|
|
|
T |
N |
|
|
|
|
I |
T |
|
|
ENTER |
O |
|
C |
|
|
N |
||
R |
|
|
|
|
S |
E |
|
|
|
|
|
I |
|
|
|
|
|
D |
|
|
|
|
|
SUB MENU |
|
|
RETURN |
||
S |
|
|
|
|
|
AUDIO |
DISPLAY |
CREATE |
STATUS |
||
CHAPTER |
|||||
A |
|
|
B |
C |
|
REC |
|
REC MODE |
EXT LINK |
DIRECT TV REC |
|
Operating Instruction |
RF Coaxial cable |
|
K1TWACC00001 |
Guarantee Card
DVD/TV
Inserting batteries
The batteries last for about a year, depending on how often you use the remote control unit.
|
Do not mix old with new batteries, or batteries of different types. |
|
|
Only use batteries without any harmful substances (lead, cadmium, mercury). |
|
|
Do not use rechargeable type batteries. |
|
|
Remove the batteries if the remote control unit will remain unused for longer |
|
R6/LR6, AA |
periods of time. |
|
Do not heat or short-circuit the batteries. |
||
|
||
|
Immediately remove used-up batteries and replace with batteries of type AA, UM3 |
|
|
or R6. |
|
|
Be sure to put in the batteries the right way round + and -. |
|
|
Dispose of batteries, packaging material and the unit according to |
|
|
statutory regulations. |
|
|
They must not be thrown into the household refuse. |
5
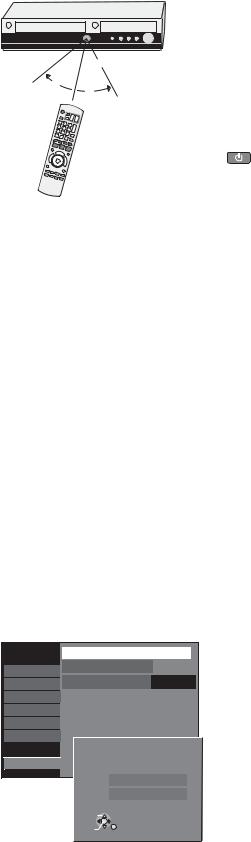
Remote Control
Remote control signal sensor
7m
30°
30°
Point the remote control at the sensor of the unit. Avoid obstacles along the transmission path. The maximum reach of the remote control is 7 metres directly in front of the unit. Make sure that the transmission window and the sensor on the unit are clean. The process can be impaired by direct sunlight and glass cabinet doors.
Child protection
You can lock the buttons on the unit and the remote control.
Press and hold the RETURN and ENTER buttons until [X HOLD] appears in the display. The buttons on the unit are locked.
To unlock the child protection, repeat the process until [X HOLD] disappears.
Operating a television
Change the code on the remote control to control your TV.
Press and hold the TV on and off button.
Enter the two-digit code for your television.
Setup |
|
Remote Control |
DVD 1 |
|
|||
|
Clock |
|
|
|
|
||
Tuning |
|
|
|
|
|
||
|
|
|
|
Off |
|
||
Disc |
|
Power Save |
|
|
|||
Picture |
|
|
|
|
|
|
|
|
Quick Start |
|
On |
|
|||
Sound |
|
|
|
|
|
|
|
|
DivX Registration |
|
|
|
|||
Display |
|
|
|
|
|
|
|
|
Initialize |
|
|
|
|
||
Connection |
|
|
|
|
|
||
|
|
|
|
|
|
|
|
VHS |
|
|
|
Remote Control |
|
||
|
|
TAB |
SELECT |
|
|
|
|
|
|
|
|
|
|
||
Others |
|
|
|
|
|
|
|
|
DVD 1 |
|
|
|
|||
|
|
|
|
|
|
||
|
|
|
|
|
|
|
|
DVD 2
DVD 3
SELECT
ENTER
RETURN
Trademark |
Code |
Trademark |
Code |
Trademark |
|
Code |
Trademark |
Code |
Panasonic |
01-04,45 |
GOODMANS |
05,06,31 |
NOKIA |
|
25-27 |
SANYO |
21 |
AIWA |
35 |
GRUNDIG |
09 |
NORDMENDE |
10 |
SBR |
06 |
|
AKAI |
27,30 |
HITACHI 22,23,31,40-42 |
ORION |
|
37 |
SCHNEIDER 05,06,29-31 |
||
BLAUPUNKT |
09 |
INNO HIT |
34 |
PHILIPS |
|
05,06 |
SELECO |
06,25 |
BRANDT |
10,15 |
IRRADIO |
30 |
PHONOLA |
|
31,33 |
SHARP |
18 |
BUSH |
05,06 |
ITT |
25 |
PIONEER |
|
38 |
SIEMENS |
09 |
CURTIS |
31 |
JVC |
17,39 |
PYE |
|
05,06 |
SINUDYNE |
05,06,33 |
DESMET |
05,31,33 |
LOEWE |
07 |
RADIOLA |
|
05,06 |
SONY |
08 |
DUAL |
05,06 |
METZ |
28,31 |
SABA |
|
10 |
TELEFUNKEN |
10-14 |
ELEMIS |
31 |
MITSUBISHI |
06,19,20 |
SALORA |
|
26 |
THOMSON |
10,15,44 |
FERGUSON |
10 |
MIVAR |
24 |
SAMSUNG |
31,32,43 |
TOSHIBA |
16 |
|
GOLDSTAR/LG 31 |
NEC |
36 |
SANSUI |
05,31,33 |
WHITEWESTINGHOUSE 05,06 |
|||
Some television models of the listed brands (e.g. older Panasonic units) cannot be controlled via the remote control.
Switching to AV input on your Panasonic television
Press AV.
Switches between TV reception and AV input each time the button is pressed.
Setting up the remote control
If you are using another Panasonic unit at the same location, change the setting of the remote control so that you can operate the units independently of each other.
Set up the remote control for the unit.
Press FUNCTIONS.
Select [To Others] with  and confirm with ENTER.
Select [Setup] with  and confirm with ENTER.
Select [Others] with  , [Remote Control] with
  and confirm with ENTER.
Select [DVD 1, 2 or 3] with  and confirm with ENTER.
Apply the selected setting [DVD 1, 2 or 3] to the remote control.
Press and hold ENTER and press the appropriate number button 1, 2 or 3 for at least 2 seconds.
Exit the menu with RETURN.
If the remote control setting does not match that of the unit, [DVD 1, 2 or 3] appears on the unit’s display.
Press ENTER and press the appropriate number key 1, 2 or 3 simultaneously for at least 2 seconds.
If you want to operate two units independently of each other using the same remote control, then change the the remote control setting.
6
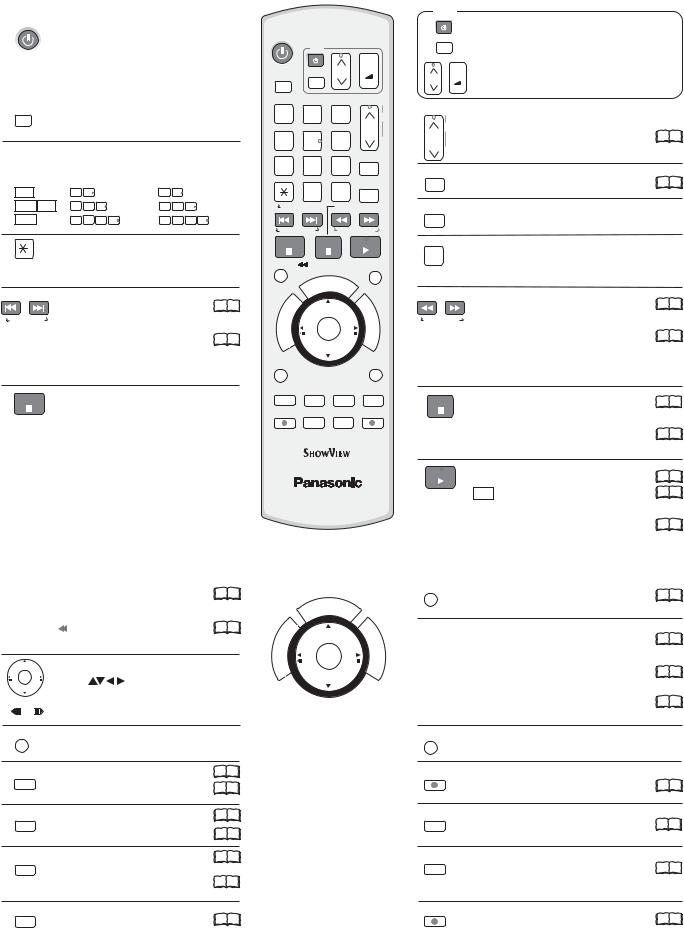
Remote Control
DVD/VHS |
Standby/on switch |
|
Press to switch the unit from on to |
|
standby mode or vice versa. In standby |
|
mode, the unit is still consuming a small |
|
amount of power. |
|
|
DRIVE |
DRIVE SELECT |
SELECT |
|
|
Select the DVD or VHS drive. |
Direct entry using the number buttons
Selection of channels, title numbers, etc.
VCD |
5: |
0 |
5 |
|
|
15: |
1 |
5 |
|
|
JPEG MP3 5: |
0 |
0 |
5 |
|
15: |
0 |
1 |
5 |
|
|
JPEG |
5: |
0 |
0 |
0 |
5 |
15: |
0 |
0 |
1 |
5 |
Delete a function.
 RESET
RESET
VHS: RESET = Reset the tape counter.
SKIP = Skip chapters, titles or |
19 |
99 |
SKIP/INDEX pictures.
VHS: INDEX = Find the beginning of a |
99 |
|
21 |
recording.
STOP |
Stop a recording or playback. |
|
VHS: Stop jet rewind.
Press for more than 3 seconds to eject the cassette.
DVD/VHS
TV
DRIVE |
|
|
|
|
CH |
+ |
|||
|
|
|
|
VOLUME |
|||||
SELECT |
AV |
|
|
_ |
|||||
|
|
|
|
|
|
||||
|
|
|
|
|
|
|
|
TRACKING/V-LOCK |
|
1 |
|
2 |
|
|
3 |
+ |
|||
4 |
|
5 |
|
|
6 |
CH |
|||
|
|
|
- |
||||||
7 |
|
8 |
|
|
9 |
ShowView |
|||
|
|
|
|
0 |
|
INPUT |
DELETE |
||
|
|
|
|
|
|
||||
|
|
|
|
|
SELECT |
|
|||
RESET |
|
|
|
SLOW/SEARCH |
|||||
SKIP/INDEX |
|
|
|
REW |
FF |
||||
STOP |
|
|
PAUSE |
PLAY |
|||||
TIME SLIP/ |
JET REW MANUAL SKIP |
||||||||
|
|
|
|
|
|
/CH |
EC |
|
|
|
|
|
|
|
OG |
|
|
||
|
|
|
|
R |
|
|
K |
|
|
|
|
|
|
P |
|
|
|
|
|
|
|
|
R |
|
|
|
|
|
F |
|
|
|
O |
|
|
|
|
|
|
G |
A |
T |
|
|
|
|
|
U |
|
|
|
|
|
|
|
|
N |
||
I |
|
|
|
|
|
|
|
|
C |
V |
|
|
|
|
|
|
|
|
I |
A |
|
|
|
|
|
|
|
|
|
N |
|
|
|
|
|
|
|
|
T |
|
|
|
|
|
|
|
|
O |
|
T |
|
|
|
|
|
ENTER |
|||
C |
|
|
|
|
|
N |
|||
E |
|
|
|
|
|
|
|
|
S |
R |
|
|
|
|
|
|
|
|
|
I |
|
|
|
|
|
|
|
|
|
D |
|
|
|
|
|
|
|
||
SUB MENU |
|
|
|
|
|
RETURN |
|||
S |
|
|
|
|
|
|
|
|
|
AUDIO |
DISPLAY |
CREATE |
STATUS |
||||||
CHAPTER |
|||||||||
A |
|
|
|
B |
|
|
C |
|
|
REC |
|
REC MODE |
EXT LINK |
DIRECT TV REC |
|||||
DVD/TV
TV
|
|
Switch the TV on and off. |
|
|
AV |
Select the AV input on the TV set. |
|
CH |
+ |
CH = Select the programme position on the TV set. |
|
VOLUME |
VOLUME = TV volume control. |
|
|
_ |
|
||
|
|
||
TRACKING/V-LOCK |
CH = Programme selection button |
|
|
|
|
|
|
|
+ |
|
|
CH VHS: TRACKING/V-LOCK+/- = Optimise the |
22 99 |
||
-playback picture.
ShowView |
ShowView Record menu |
99 |
|
|
41 |
DELETE |
Delete a title. |
|
|
|
|
INPUT |
Switch button to switch AV input between |
|
SELECT |
tuner, AV1, AV2, AV3 (front) and DV IN. |
|
|
|
|
SLOW/SEARCH |
SLOW = Slow-motion playback. |
99 |
|
|
19 |
REW FF |
SEARCH = Search during playback. |
|
VHS: REW = Jet rewind |
99 |
|
|
|
21 |
|
FF = Fast forward from STOP mode. |
|
|
REW = Rewind |
|
|
FF = Forward search during playback. |
|
PAUSE |
Pause a recording or playback. |
1 |
|
99 |
|
VHS: Press and hold for more than 2 seconds |
9921 |
|
|
for slow-motion playback. |
|
PLAY |
Start playback. |
18 99 |
|
||
|
RAM Quick View: You can increase the |
20 99 |
|
playback speed. |
|
VHS: Playback or repeat playback |
99 |
|
|
|
21 |
You can also switch on the unit from Standby mode using the DIRECT NAVIGATOR, PROG/CHECK and ShowView buttons.
TIME SLIP/ JET REW
 DVD: TIME SLIP = Select the time frame. 20
  99
99
VHS: |
JET REW = Jet rewind to the |
21 |
|
99 |
|||
|
|
beginning of the tape. |
|
|
Direction buttons in the menu guide. |
||
ENTER |
Select |
groups or titles. |
|
|
|
||
|
Frame or slow-motion playback. |
|
|
SUB MENU |
|
|
|
S |
Launch the sub-menu. |
|
|
AUDIO |
Select the audio channel/soundtrack 20 99 |
||
A |
A = Delete selected stations. |
46 |
|
|
Menu guide |
|
|
DISPLAY |
DVD only: Picture and sound settings. 54 99 |
||
B |
B = Insert station. |
46 99 |
|
|
|||
|
Menu guide |
||
|
|
||
CREATE |
DVD only: Divide a recording into |
19 |
|
CHAPTER |
chapters. |
|
99 |
C |
|
|
|
|
C = Move selected stations. |
46 99 |
|
|
Menu guide |
|
|
STATUS |
Detailed information appears on |
15 |
|
|
|||
|
|
|
99 |
the screen.
|
|
|
|
/CH |
EC |
|
|
|
|
OG |
|
||
|
|
R |
|
K |
|
|
|
|
P |
|
|
|
|
|
|
R |
|
|
|
F |
|
|
O |
|
|
|
|
G |
A |
T |
|
|
|
U |
|
|
|
|
N |
||
I |
|
|
|
|
|
C |
V |
|
|
|
|
|
I |
A |
|
|
|
|
|
|
N |
|
|
|
|
|
T |
|
|
|
ENTER |
O |
||
T |
|
|
|
|||
C |
|
|
|
N |
||
E |
|
|
|
|
|
S |
R |
|
|
|
|
|
|
I |
|
|
|
|
|
|
D |
|
|
|
|
||
ENTER = Select or save a setting.
MANUAL SKIP |
|
|
DVD only: Jump ahead 30 seconds. |
19 |
99 |
PROG/CHECK = Check or change a Timer recording |
|
35 |
|
|
99 |
DIRECT NAVIGATOR = Launches the Title View. |
18 |
99 |
FUNCTIONS = Launch the selection menu. |
26 |
99 |
RETURN |
|
|
Return to the previous menu. |
|
|
REC |
|
|
Recording |
24 |
99 |
REC MODE |
|
|
Record mode button (XP, SP, LP, EP) |
24 99 |
|
EXT LINK |
|
|
Timer Recording with external recording |
36 |
99 |
control. |
|
|
DIRECT TV REC |
|
99 |
Direct TV recording to DVD and VHS. |
|
|
|
|
25 |
7
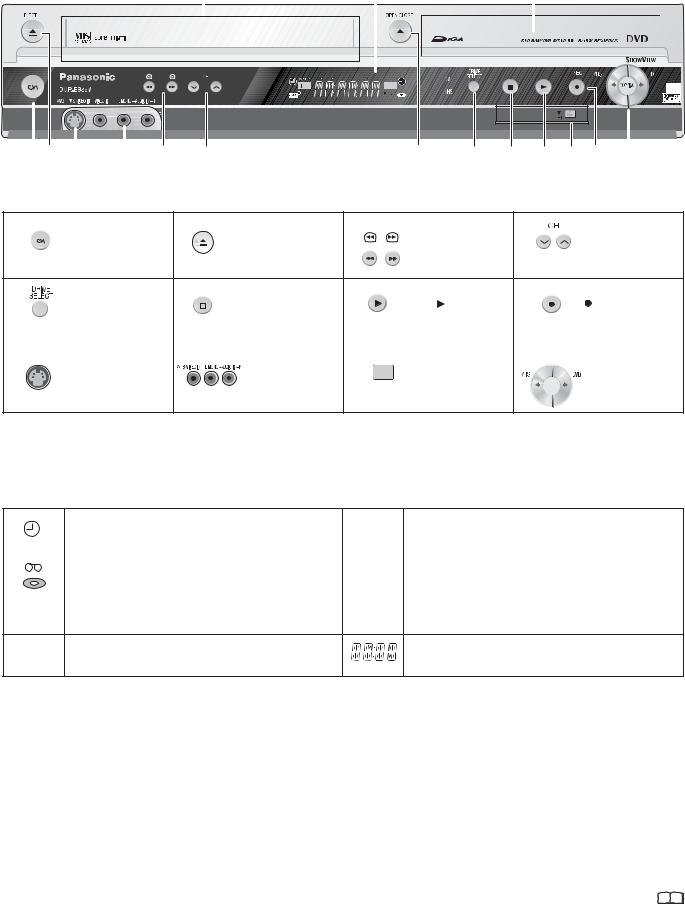
Front Panel
Cassette Compartment |
Display |
|
Disc Tray |
|||
|
|
|
|
|
|
|
|
|
|
|
|
|
|
|
|
|
|
|
|
|
|
|
|
|
|
|
|
EXT-L
VHS 


2 |
|
|
|
|
|
|
|
|
5 |
|
|
|
8 |
|
|
|
|
|
|
|
|
|
|
|
|
|
|
|
|||
|
|
|
|
|
|
|
|
|
|
|
|
|
|||
|
|
|
|
|
|
|
|
|
|
|
|
|
|||
9 |
10 |
3 |
4 |
2 |
6 |
7 |
11 |
12 |
|||||||
1 Standby/On switch 
 : Press to switch the unit from on to standby mode or vice versa. In standby mode, the unit is still consuming a small amount of power. Switching this unit into standby mode does not disconnect it from the mains.
1 |
2 |
EJECT: Eject the cassette. |
3 |
Forward/rewind |
4 |
|
Standby/On switch |
|
Channel select button |
||
|
|
|
|||
|
|
|
|
||
|
|
OPEN/CLOSE: Open and |
|
Search during playback. |
|
|
|
close the disc tray. |
|
|
|
5 |
|
Drive select |
6 |
|
STOP |
|
|
7 |
|
|
|
|
|
PLAY |
: Playback |
8 |
REC: Record |
|
|
|
|
|
|
|
|
|
|
|
|
|
|
||||||
|
|
|
|
|
|
|
|
|
|
|
|
|||||||
|
|
VHS or DVD |
|
|
|
|
|
|
|
|
|
|
|
|
|
Quick View |
|
|
|
|
|
|
|
|
|
|
|
|
|
|
|
|
RAM |
|
|
||
|
|
|
|
|
|
|
|
|
|
|
|
|
|
|
|
|
|
|
9 |
|
|
10 |
|
|
|
|
11 |
|
|
|
|
|
DV input |
12 |
|
||
|
|
S VIDEO input AV3 |
|
|
AV3 input terminal |
|
|
|
|
|
|
|
Copy |
|||||
|
|
|
|
|
|
|
|
|
|
|||||||||
|
|
|
|
|
|
|
|
|
|
|
|
|
|
|
|
|
COPYING |
|
Display
|
|
|
|
Shows Timer standby or Timer recording. |
XP, SP |
Recording mode / All on: FR mode |
|
|
|
|
LP, EP |
Flexible recordings/timer recordings. |
|
|
|
|
|
|
||
|
|
|
|
|
|
|
|
|
|
|
The inserted medium is being shown. |
DVD |
The selected drive is being displayed. |
|
|
|
|
|||
|
|
|
|
|||
|
|
|
|
|
VHS |
|
|
|
|
|
|
|
|
|
|
|
|
The selected drive is recording. |
EXT-L |
External-Link: A Timer recording is being made from an |
|
REC |
|||||
|
|
|
|
Flashes shortly before a Timer recording starts. |
|
external unit. |
PLAY The selected drive is playing.
Current time, recording/playback counter, various messages.
Other messages
PLEASE WAIT Please wait.
DVD 1, 2, 3 |
Wrong remote control code. |
SETUP |
You are in the Setup menu. |
READ |
Disc is being read. |
No READ |
Disc cannot be read. |
FINAL |
DVD is being finalised. |
No CASSETTE |
No cassette has been inserted. |
No DISC |
No disc has been inserted. |
PROTECT |
Disc is write-protected. |
RETURN |
Cancellation of a function. |
JETREW |
A cassette is being jet-rewound. |
OFF0:30 |
The recording time is set to 30 minutes. |
REPEAT |
Repeat playback is on. |
START |
A function (copying) is beginning. |
|
COPY |
Copying is taking place. |
|
STOP |
A function has been stopped (copying). |
|
PROG FULL |
All 16 timer programme positions are full. |
|
UNSUPPORT |
Disc format is not supported. |
|
UNFORMAT |
Disc is unformatted. |
|
X HOLD |
Child protection is active. |
|
Error messages |
56 99 |
|
8
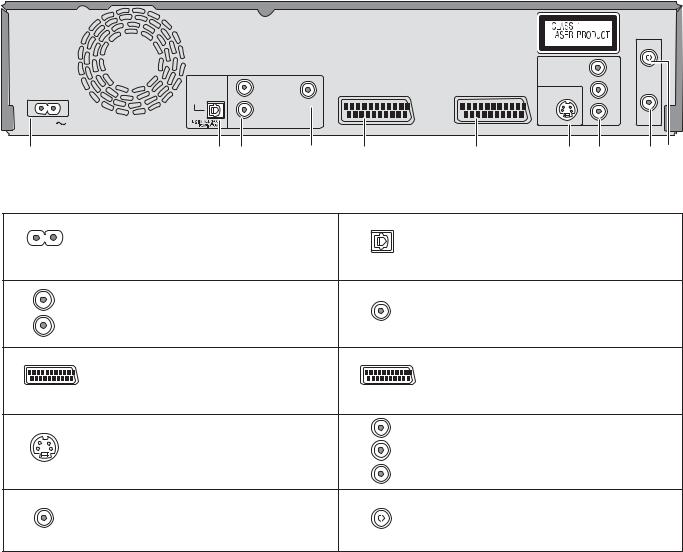
Rear Panel
RF IN
|
|
|
|
|
|
COMPONENT VIDEO OUT |
|
Y |
|
|
L |
|
|
|
|
|
PB |
|
|
|
|
|
|
|
|
|
|
OPTICAL |
|
|
|
|
S VIDEO OUT |
|
|
|
|
|
|
|
|
|
|
|
|
|
R |
VIDEO OUT |
|
|
|
|
PR |
AC IN |
|
|
|
|
|
|
|
RF OUT |
|
AUDIO OUT |
|
AV2(DECODER/EXT) |
|
AV 1 (TV) |
|
|
|
|
|
|
|
|
|
|
||
1 |
2 |
3 |
4 |
5 |
6 |
7 |
8 |
9 10 |
1 |
AC IN~ = Power supply |
2 |
|
OPTICAL |
|
|
|
||
|
Connection for the power cable. |
|
|
Digital audio output |
3 |
L |
4 |
|
|
|
Audio output, right/left channel |
|
|
Video output |
|
R |
|
|
|
|
AUDIO OUT |
|
VIDEO OUT |
|
|
|
|
|
|
5 |
AV2 (DECODER/EXT) = 21-pin Scart socket |
6 |
|
AV1 (TV) = 21-pin Scart socket |
|
|
|
||
|
AV2 (DECODER/EXT) External unit connection |
|
AV1 (TV) |
TV connection |
7 |
S VIDEO OUT |
8 |
Y |
COMPONENT VIDEO OUT |
|
|
PB |
Y = Luminance signal (brightness signal) |
|
|
S VIDEO output socket |
|
||
|
|
PB = Chrominance signal (colour difference) |
||
|
|
|
|
|
|
|
|
PR PR = Chrominance signal (colour difference) |
|
9 |
RF OUT |
10 |
|
RF IN |
|
|
|
||
|
Aerial output |
|
|
Aerial input |
The outputs of 2, 3, 4, 7 and 8 are dedicated to modules of digital signal processing (DVD).
The video and audio outputs of 5 and 6 are dedicated to modules of digital (DVD) or analogue (VHS) signal processing.
Both groups of outputs are used for analogue and digital sources. But there are limitations, e.g.: During recording or scheduled recording on DVD, the VHS playback is only possible on outputs of 5 and 6.
For a conventional tube television, we recommend using the Scart socket.
You retain a high-quality RGB video picture with an RGB-compatible television.
If you want to use a progressive-capable LCD/plasma television or LCD projector, connect it to COMPONENT VIDEO OUT to get a high quality progressive video picture.
9
Connections
|
|
|
|
|
1 Aerial |
|
|
|
|
Aerial infeed line |
|
|
21-pin Scart socket AV1 (TV) |
RF IN |
|||
|
Aerial input |
||||
|
|
|
|
|
RF IN |
|
|
|
|
COMPONENT VIDEO OUT |
Y |
|
|
L |
|
|
P |
|
|
|
|
|
|
|
OPTICAL |
|
|
S VIDEO OUT |
|
|
|
|
|
|
|
|
|
R |
VIDEO OUT |
|
P |
AC IN |
DIGITALAUDIO OUT |
|
|
|
RF OUT |
AUDIO OUT |
|
|
|
||
(PCM/BITSTREAM) |
|
AV2(DECODER/EXT) |
AV 1 (TV) |
|
|
AC IN~ |
|
|
|
|
RF OUT |
|
|
|
|
|
Aerial output |
4 AC Mains lead |
|
|
|
|
|
|
|
|
|
3 21-pin Scart cable |
|
VT |
|
|
|
Necessary for TV |
|
|
|
|
with Q Link |
|
|
|
|
|
|
|
|
Aerial input
2 RF Coaxial cable
4 AC Mains lead
|
|
|
|
1Aerial |
|
|
|
|
Aerial infeed line |
|
AUDIO- |
VIDEO- |
RF IN |
|
|
Output |
Output |
Aerial input |
|
|
|
|
|
RF IN |
|
|
|
|
COMPONENT VIDEO OUT Y |
|
|
L |
|
P |
|
OPTICAL |
|
|
S VIDEO OUT |
|
|
|
|
|
|
|
R |
VIDEO OUT |
P |
AC IN |
DIGITALAUDIO OUT |
|
|
RF OUT |
AUDIO OUT |
|
|
||
(PCM/BITSTREAM) |
|
AV2(DECODER/EXT) |
AV 1 (TV) |
|
AC IN~ |
L |
|
|
RF OUT |
|
|
|
|
Aerial output |
|
R |
|
VIDEO OUT |
|
|
AUDIO OUT |
|
|
|
4 AC Mains lead |
|
3 Audio/Video cable |
||
|
|
|
||
|
|
|
Video Yellow |
|
VT |
|
|
L |
White |
|
|
R |
Red |
|
|
|
|
||
Audio/Video input
Aerial input |
2 RF Coaxial cable |
|
|
4 AC Mains lead |
|
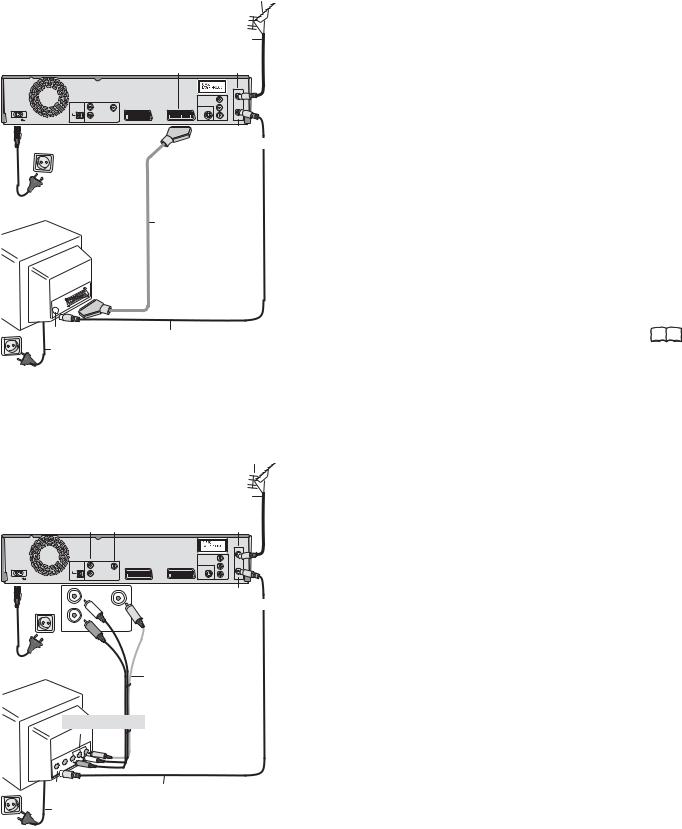
Connection with 21-pin Scart cable (not provided)
You need a fully wired 21-pin Scart cable for this optimal connection type.
Disconnect all units from the power supply system.
1Connect the aerial to RF IN (Aerial input) of the DVD Recorder.
2Connect RF OUT (Aerial output) of the DVD Recorder with the aerial input of the TV.
3Connect the AV1 socket (21-pin Scart socket) of the DVD Recorder with the Scart input of the TV.
4Connect the DVD Recorder and the television to the power supply system.
If your television supports Q Link, use a fully wired 21-pin Scart cable to connect it to the TV. The stations are automatically downloaded through [Download from TV].
If your television supports RGB, set the AV1 Output to RGB 1 |
|
or RGB 2 in the Setup menu. |
50 |
Connection with Audio/Video cable
You can use this frequently used standard connection with the provided accessories.
Disconnect all units from the power supply system.
1Connect the aerial to RF IN (Aerial input) of the DVD Recorder.
2Connect RF OUT (Aerial output) of the DVD Recorder with the Aerial input of the TV.
3Connect the AUDIO OUT (L/R) and VIDEO OUT of the DVD Recorder with the Audio/Video input of the television.
4Connect the DVD Recorder and the television to the power supply system.
10
Connections
|
|
1Aerial |
|
Aerial infeed line |
|
AUDIO-output |
S VIDEO-output |
RF IN |
Aerial input |
||
|
|
|
|
|
RF IN |
|
|
|
|
COMPONENT VIDEO OUT |
Y |
|
|
L |
|
|
P |
|
|
|
|
|
|
|
OPTICAL |
|
|
S VIDEO OUT |
|
|
|
|
S VIDEO OUT |
|
|
|
|
R |
VIDEO OUT |
P |
|
|
DIGITALAUDIO OUT |
|
|
RF OUT |
|
AC IN |
AUDIO OUT |
AV2(DECODER/EXT) |
|
||
|
|
AV 1 (TV) |
|
AC IN~ |
L |
RF OUT |
Aerial output
R |
VIDEO OUT |
|
AUDIO OUT |
|
|
|
3 Audio cable |
|
|
L White |
|
4 AC Mains lead |
R Red |
3 S VIDEO- |
|
cable |
|
|
|
|
VT |
|
|
SVIDEO-input Audio input
Aerial input
2 RF Coaxial cable
4 AC Mains lead
Settings
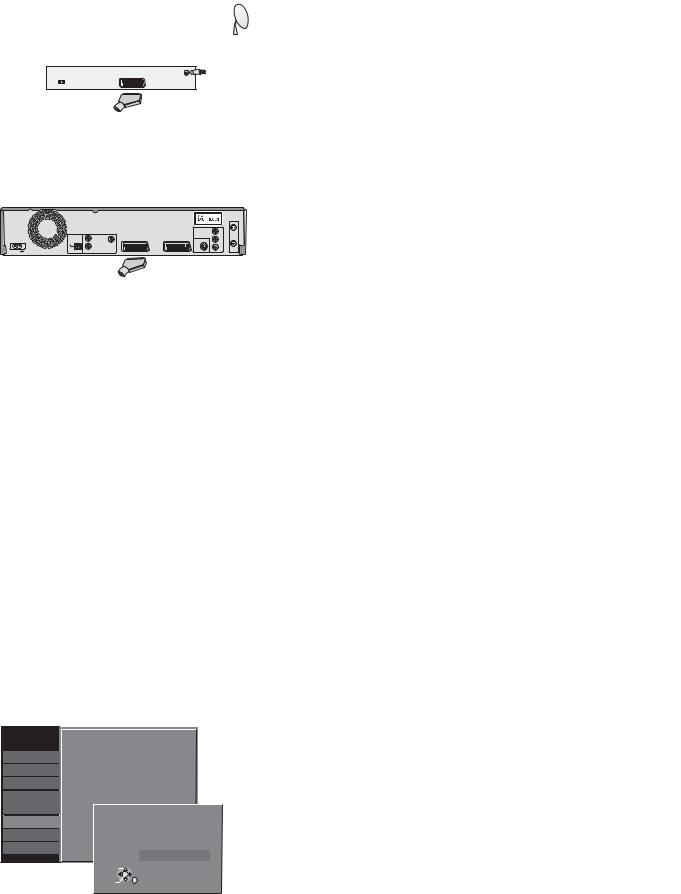
Connection with S VIDEO-cable (not provided)
Depending on the television, the connection with the S VIDEO cable results in a higher quality picture than the connection with an Audio/ Video cable.
Disconnect all units from the power supply system.
1Connect the aerial to RF IN (Aerial input) of the DVD Recorder.
2Connect RF OUT (Aerial output) of the DVD Recorder with the aerial input of the TV.
3Connect AUDIO OUT (L/R) and S VIDEO OUT of the DVD Recorder with the S VIDEO and audio input of the TV.
4Connect the DVD Recorder and the television to the power supply system.
Auto-Setup
|
|
Ch |
4 |
|
|
|
|
|
|
|
|
|
|
||
|
|
Auto-Setup in progress. Please wait. |
|
|
|||
|
|
RETURN : to cancel |
|
|
|
|
|
|
RETURN |
|
|
|
|
|
|
|
|
|
|
|
|
|
|
|
|
|
|
|
|
||
|
|
|
|
|
|
||
|
|
Download from TV |
|
|
|
||
|
|
Pos |
|
|
|
|
|
|
|
4 |
|
|
|
|
|
|
|
|
|
|
|||
|
|
Download in progress. Please wait. |
|
|
|||
|
|
RETURN : to cancel |
|
|
|
|
|
|
RETURN |
|
|
|
|
|
|
|
|
|
|
|
|
|
|
|
|
|
|
|
|
|
|
|
|
|
|
|
|
|
|
|
|
|
|
|
|
|
|
|
|
Clock |
|
|
|
|
|
|
|
|
|
|
|||
|
|
|
Automatic |
Off |
|
||
|
|
Time |
Date |
|
|
|
|
|
|
0 : 00 : 00 |
1 . 1 . |
2006 |
|||
|
Number |
|
|
|
|
|
|
0 - - 9 |
Clock cannot be set automatically. |
|
|
|
|||
|
|
Please set the clock manually. |
|
|
|
||
CHANGE |
ENTER : store RETURN : leave |
|
|
ENTER |
RETURN |
|
TV Aspect
16:9 WIDE TV
16:9
4:3 TV
4:3 Letterbox
SELECT
ENTER
RETURN
Switch on your television and select the AV channel.
Switch on the unit using the Standby/On button.
Country
Select the corresponding country with |
and confirm with ENTER. |
For EC models: If you select Schweiz, Suisse or Svizzera, the Power Save menu appears after auto setup. If you select Power Save [On], the unit’s power consumption reduced to a minimum in Standby mode.
Auto-Setup
The auto setup saves all avaiable television stations and takes approx. 5 minutes. If the station also broadcasts Date and Time, the time will be set automatically.
If the automatically set time does not match the current time, you can set it manually.
Download from TV with 
 (Registered trademark of Panasonic)
If your television is equipped with the Q Link feature, the stations are downloaded through the transfer of the station table.
In order to be able to use Q Link, the unit must be connected to a TV with Q Link or a similar feature via a fully wired 21-pin Scart cable.
Setting the date and time
If the Date and Time are not transferred via a television station, the Clock menu
appears. |
|
|
Change Time and Date with |
or 0 |
9 and . |
Confirm the change with ENTER.
An incorrect date or time affects the programmed recording of television programmes (observe summer and winter time).
TV Aspect
Select the desired screen format with |
and confirm with ENTER. |
Auto setup for your unit is complete. The availability of stations may differ regionally. The completeness of the downloaded stations can be checked in the Setup menu. 46 
11
External units
External device
21-pin Scart socket Aerial infeed line
AC Mains lead 

21-pin Scart cable |
21-pin Scart sockets |
|
|
|
AV2 |
AV1 (TV) |
|
|
(DECODER/EXT) |
|
|
|
|
|
RF IN |
|
|
COMPONENT VIDEO OUT |
Y |
L |
|
|
P |
|
|
|
|
OPTICAL |
|
S VIDEO OUT |
|
|
|
|
|
R |
VIDEO OUT |
|
P |
RF OUT
AC IN |
DIGITALAUDIO OUT |
AUDIO OUT |
|
|
AV2(DECODER/EXT) |
AV 1 (TV) |
AC IN~
AC Mains lead
21-pin Scart cable
VT
AC Mains lead
|
Setup |
AV2 Settings |
|
|
|
|
|
|||
|
Tuning |
|
|
|
|
|
|
|
||
AV2 Input |
|
Video |
|
|
|
|||||
|
Disc |
|
|
|
|
|
|
|
|
|
|
AV2 Connection |
|
Ext |
|
|
|
||||
|
Picture |
|
|
|
|
|
||||
|
|
|
|
|
|
|
|
|
||
|
Ext Link |
|
Ext Link 2 |
|
|
|
||||
|
Sound |
|
|
|
|
|
||||
|
|
|
|
|
|
|
|
|
||
|
Display |
|
|
|
|
|
|
|
||
|
|
AV2 Connection |
|
|||||||
|
|
|
|
|
|
|
||||
|
Connection |
|
|
|
|
|
|
|
|
|
|
VHS |
|
|
|
|
|
|
|
||
|
|
Decoder |
|
|||||||
Others
Ext
SELECT
ENTER
RETURN
Connection of Set Top Box or satellite receiver
If you receive your television programme via a Set Top Box (DVB-T) or a satellite receiver (digital/analogue), connect your DVD Recorder as a downstream unit.
Disconnect all units from the power supply system.
1 Connect the AV1 socket (21-pin Scart socket) of the DVD Recorder with the Scart input of the television unit.
2 Connect the external unit with a 21-pin Scart cable to the AV2 connection of the DVD Recorder.
3 Connect the aerial (DVB-T or SAT) to the aerial input of the external unit.
4 Connect the DVD Recorder, the TV and the external unit to the power supply system
5 Switch on the external unit, the TV and the DVD Recorder.
Switch your TV to the AV channel.
Select the appropriate country from the Country menu with 
 and confirm with ENTER.
[Auto-Setup] follows automatically and it ends with the note: [No stations found !].
Select [No] with  and confirm with ENTER.
The available stations are downloaded from the external unit.
Select the desired screen format with  and confirm with ENTER.
Switch the DVD Recorder to AV2 with CH  . You see the television picture from the external unit.
The date and time are not set automatically. |
|
Set them manually. |
9911 |
Connecting a decoder
1 Connect the DVD Recorder as described under Connection |
|
with 21-pin Scart cable. |
10 99 |
2 Connect the decoder to AV2 (DECODER/EXT) with an additional
21-pin Scart cable. |
|
In the connection to the Auto Setup, change the setting for the |
|
AV2 socket in the [Setup] menu. |
50 99 |
Press FUNCTIONS.
Select [To Others] with  and confirm with ENTER.
Select [Setup] with  and confirm with ENTER.
Select [Connection] with  , [AV2 Settings] with
  ,
,  and confirm with ENTER.
In the next screen, select [AV2 Connection] with  and confirm with ENTER.
Select [Decoder] with  and confirm with ENTER.
Press RETURN and return to [Connection] with  .
.
Press RETURN multiple times to return to the television picture.
12
External units
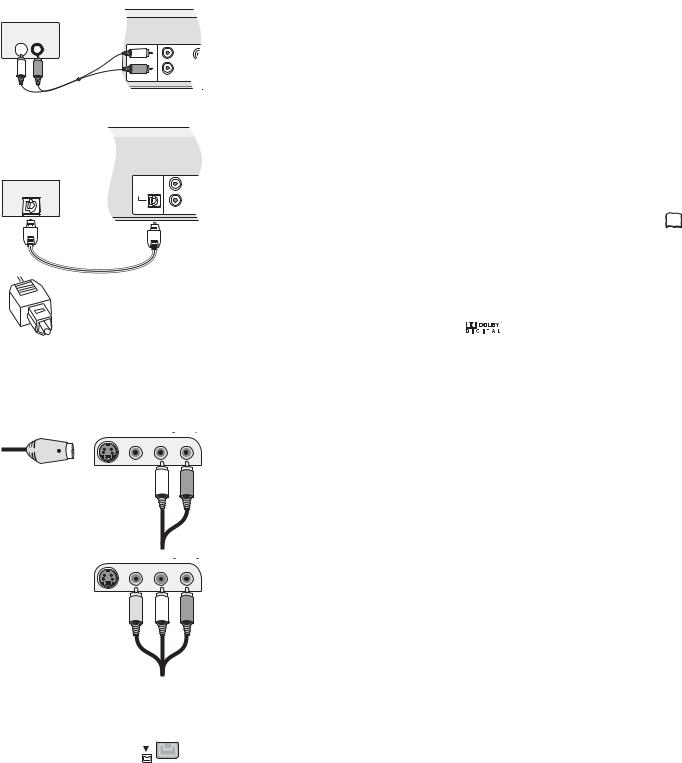
Amplifier (example)
AUDIO IN
L  R
R
L
R
DIGITALAUDIO OUT OUT (PCM/BITSTREAM) AUDIO
Audio cable
L - White
R - Red
Amplifier (example) |
|
|
|
|
L |
OPTICAL |
OPTICAL |
|
|
|
R |
|
DIGITALAUDIO OUT |
AUDIO OUT |
|
(PCM/BITSTREAM) |
|
Optical digital audio cable
Push the jack all the way into the socket with this side facing up.
AV3  S VIDEO IN VIDEO IN L/MONO AUDIO IN R
S VIDEO-cable
Audio cable
L - White
R - Red
AV3  S VIDEO IN VIDEO IN L/MONO AUDIO IN R
Audio/Video cable
Video - Yellow
L |
- White |
R |
- Red |
|
|
|
|
|
|
It is not possible to copy to a VHS cassette via DV IN..
For all connections described:
Before you connect cables, make sure that all units are switched off. Switch on the units after you have connected the cables.
Connecting an analogue amplifier or an analogue system component
In order to enjoy stereo or Dolby Pro Logic, connect a corresponding amplifier or an analogue audio component.
Connect the AUDIO OUT (L/R) output e.g. with a Dolby Pro Logic amplifier.
Connect the audio cable according to the colours and markings on the connection sockets (white/L, red/R).
Connecting a digital amplifier or a digital system component
If an amplifier equipped with Dolby Digital, DTS or an MPEG-decoder is connected, a DVD-Video-Disc with multi-channel surround sound can be played back.
Connect an amplifier with a Dolby Digital, DTS or an MPEG decoder.
Use an Optical digital audio cable.
Change the [Digital Audio Output] setting in the Setup menu Audio according  49 to your connected digital amplifier.
Select audio channel (M1) or (M2) on the external unit.
You cannot use DTS Digital Surround decoders that are not suitable for DVD.
|
|
Connect this unit to a device with |
|
|
|
This device can playback stereo |
|
|
|
|
|
||
|
|
|
|
|
||
|
|
a DTS decoder in order to be able |
|
|
|
sound in Dolby Digital (2 channels). |
|
|
|
|
|
||
|
|
|
|
|
||
|
|
to play DVDs with this symbol. |
|
Connect an amplifier with built-in Dolby Digital |
||
|
|
|
|
decoder in order to be able to enjoy Surround |
||
|
|
|
|
Sound. |
||
|
|
|
|
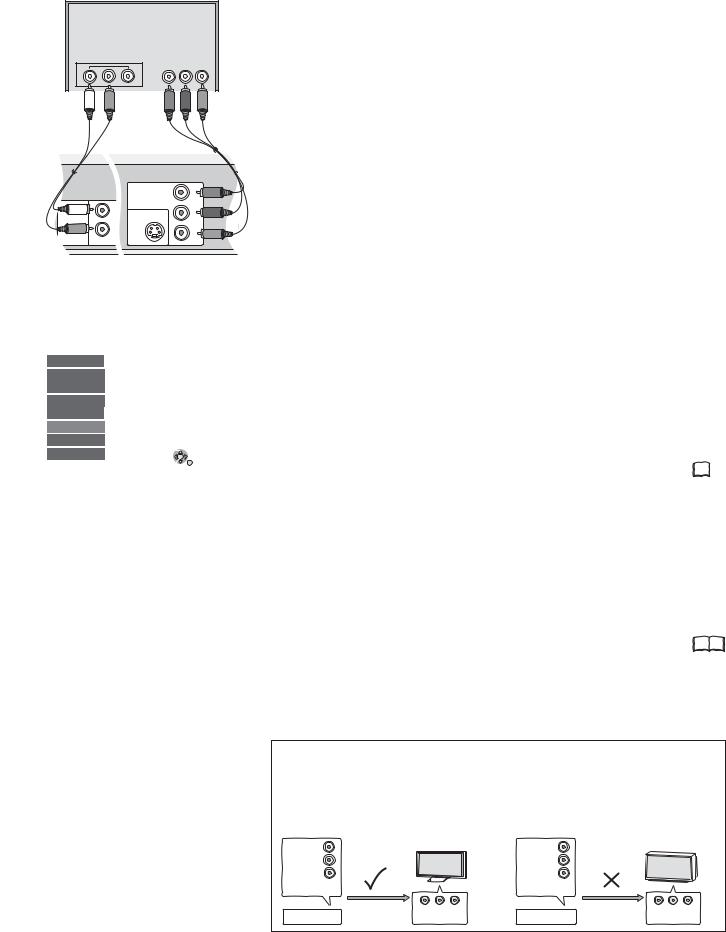
|
|
|
Connection to AV3 (e.g. camcorder)
If the audio output of the other unit is mono, connect it to the L/MONO socket. Both the left and the right channel will be recorded.
Select one of the two connection options.
The connection with S VIDEO cable and audio cable (L/R) delivers the best quality.
Connection to DV IN
DV means digital video and is a video standard.
You can connect a DV-compatible camcorder to the DVD Recorder. The DV IN connection is available for this purpose.
Digital satellite tuners and digital VHS video recorders are not compatible with this unit. The DVD Recorder cannot be controlled via an external unit that is connected to the DV IN socket.
Before you connect the DV cable, make sure that all units are switched off. After you have connected the cable, switch on the units.
Connect the DV output of the DV unit (e.g. digital camcorder) with the DV input socket of the DVD Recorder. Use a DV cable.
After you have connected the cable, switch on both units.
The DV input of this unit is only intended for DV units. For example, a computer cannot be connected. Some DV units do not allow for proper input of the picture and sound signal.
13
COMPONENT VIDEO OUT
TV |
|
|
|
COMPONENT |
|
|
VIDEO IN |
|
Audioinput L/R |
|
|
|
Y |
PB PR |
|
|
Video cable |
|
|
Y - Green |
Audio cable |
|
PB - Blue |
L - White |
|
PR - Red |
R - Red |
|
|
|
COMPONENT VIDEO OUT |
Y |
|
L |
PB |
|
|
|
|
S VIDEO OUT |
|
|
R |
PR |
|
|
|
DIGITALAUDIO OUT |
AUDIO OUT |
|
(PCM/BITSTREAM) |
|
|
COMPONENT VIDEO OUT socket
The sockets can be used for INTERLACE or PROGRESSIVE output and deliver a clearer picture than the S VIDEO OUT socket.
Connections via these sockets output the colour difference signals (PB/PR) and the brightness signal (Y) separately.
Colours can be reproduced true to the original colour.
The properties of the COMPONENT VIDEO input socket are dependent on the TV or screen.
Connect the COMPONENT VIDEO OUT sockets of the unit with the COMPONENT VIDEO IN of the TV unit. Use a Video cable.
Always connect sockets with the same colour.
Connect the audio cables to the corresponding audio input sockets on the TV.
Setup |
TV Aspect |
|
4:3 |
|
|
Tuning |
Progressive |
|
On |
|
|
Disc |
TV System |
|
PAL |
|
|
Picture |
AV1 Output |
|
Video |
|
|
Sound |
AV2 Settings |
|
|
|
|
Display |
|
|
|
|
|
Connection |
|
|
|
|
|
VHS |
SELECT |
TAB |
|||
Others |
|||||
ENTER |
RETURN |
||||
|
|||||
Connecting a TV with COMPONENT VIDEO input sockets
If your TV with LCD or plasma screen supports the progressive process, connect it to the COMPONENT VIDEO OUT sockets.
If you want to enjoy full progressive video, set Progressive to [On].
Press FUNCTIONS.
Select [To Others] with  and confirm with ENTER.
Select [Setup] with  and confirm with ENTER.
Select [Connection] with  , [Progressive] with
  ,
,  and confirm with ENTER.
Select the option [On] with  and confirm with ENTER.
Press RETURN multiple times to return to the television picture.
If the AV1 Output setting in the Setup menu is set to [RGB 1/2 ( without component )], there is no output to the COMPONENT VIDEO OUT sockets.
Set this option to [Video ( with component )]. 50  If the unit is connected to the TV via the S VIDEO OUT or the AV1 socket,
output is Interlace regardless of the settings.
Progressive television picture
The progressive picture aspect ratio (height to width) is set to 16:9. DVD-Video with a picture aspect ratio of 16:9 is properly displayed. However, video material with an image page ratio of 4:3 is shown stretched from right to left. If it is possible to adjust the picture aspect ratio on your television, select the setting [Progressive - On].
With a normal television, the progressive output can cause the picture to flicker, |
|
even if the television is progressive-compatible. |
|
Select the setting [Progressive - Off]. |
50 |
Progressive-compatible televisions (PAL)
LCD/plasma television or LCD projector |
Conventional televisions |
|
|||
If progressive output is used, videos can be viewed |
On a normal television, Progressive output can |
||||
in High Resolution, for example from DVD-Video. |
cause flickering even if the television is |
||||
COMPONENT VIDEO OUT on this unit is connected |
Progressive-compatible. |
|
|||
with the COMPONENT VIDEO IN on the television. |
Select the [Progressive - Out] setting. |
||||
Select the [Progressive - On] setting. |
|
|
|
||
COMPONENT |
|
|
COMPONENT |
|
|
VIDEO OUT |
|
|
VIDEO OUT |
|
|
COMPONENT VIDEO OUT |
Y |
|
COMPONENT VIDEO OUT |
Y |
|
|
|
|
|
||
|
PB |
|
|
PB |
|
|
PR |
|
R |
P |
|
|
|
|
COMPONENT |
|
|
|
|
|
VIDEO OUT |
|
|
|
Progressive output |
COMPONENT |
|
Progressive output |
COMPONENT |
DVD-Recorder |
|
DVD-Recorder |
|
||
|
VIDEO IN |
|
VIDEO IN |
||
14
STATUS displays
DVD-RAM
PLAY
L R
Status displays
DVD-RAM |
|
|
|
1 |
|
|
|
|
|||
PLAY |
|
|
2 |
||
|
|
||||
ZDF |
|
|
3 |
||
|
|
||||
Stereo |
|
|
4 |
||
|
|
||||
L R |
|
|
5 |
||
|
|
||||
|
|
|
|
|
|
VHS REC 
Status displays for other drive.
6 |
|
7 |
|
|||||||
|
|
|
|
|
|
|
|
|
Detail information |
|
|
|
|
|
|
|
|
|
|||
10:07:21 1.12. |
|
Remain |
0:50 SP |
|||||||
|
||||||||||
|
|
T14 0:05.14 SP |
|
|
|
T14 |
0:05.14 SP |
|||
|
|
|
|
|
||||||
|
|
|
|
|
|
|
|
|
|
|
|
|
|
|
|
|
|
|
|
|
|
|
|
|
|
|
|
|
|
|
|
|
8 |
9 |
|
VHS |
L R |
SP |
|
0:21.29 |
|
STATUS
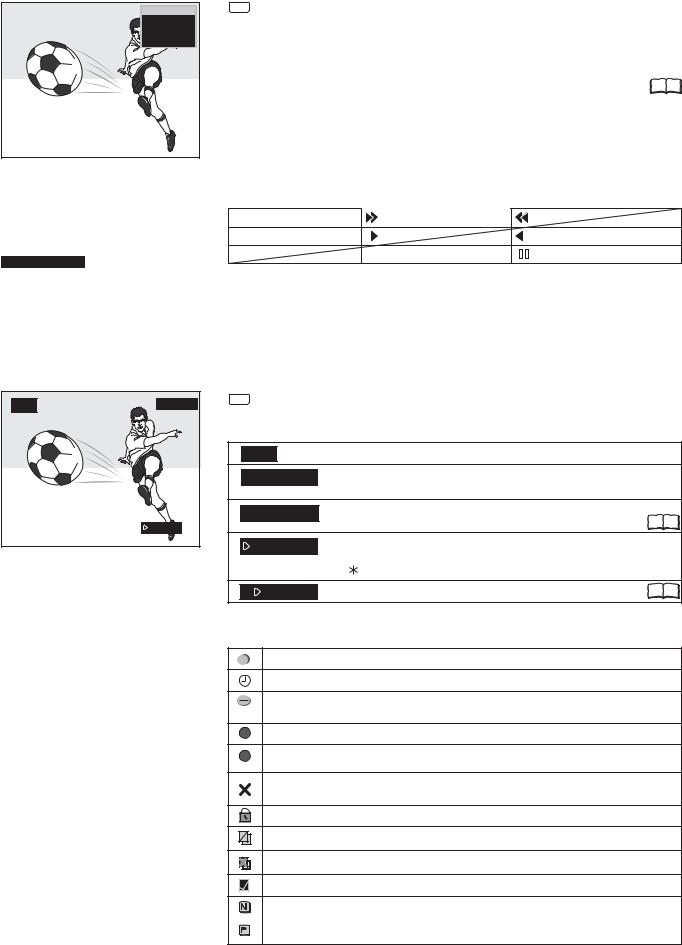
Screen information
Press STATUS.
Press STATUS again. Depending on the function, e.g. PLAY, REC or REC PLAY, the display changes each time the button is pressed.
Also press STATUS to exit the display.
You can switch off the status displays in the Setup menu. |
49 |
1:Current medium
2:Current recording, playback mode and remaining time
3:Current station
4:Sound type: Stereo = a stereo transmission is currently being received.
M1/M2 = a 2-channel transmission is currently being received.
M1 = a single-channel NICAM transmission is being received.
5:Sound mode: LR, L, R: the soundtrack can be changed with the AUDIO button.
REC |
Record |
|
Fast forward (5 stages) |
|
|
|
Rewind (5 stages) |
PAUSE |
Pause |
|
Slow motion (5 stages) |
|
|
|
Slow-motion rewind (5 stages) |
|
|
|
|
||||
PLAY |
Playback |
PLAY/x1.3 Quick View |
|
|
|
Pause playback |
|
|
|
|
|||||
|
|
||||||
6:Current date and time
7:Available recording time and recording mode: e.g. 0:50 SP shows 50 minutes in SP mode.
8:Title number: shows the recording mode and the elapsed play time of the title. VHS: Current tape counter.
9:Title number: shows the recording mode and the recording time of the title.
STATUS
VHS screen information
Press STATUS during playback. Each time the button is pressed, the display switches between tape counter and remaining tape time
VHS |
Current medium |
|
|
L R |
SP |
LR, L, R: The soundtrack can be changed with the AUDIO button. |
|
|
|
SP: Selected recording mode. |
|
REMAIN: 0:24 |
Remaining tape time: The display depends on the |
51 |
|
|
|
correct setting of the tape length. |
|
0:21.29 |
Tape counter: It is automatically set to 0:00.00 when a video |
|
|
cassette is inserted. |
|
||
|
|
|
|
|
|
Use / RESET to reset the counter to 0:00.00. |
|
R |
0:21.29 |
Repeat |
21 |
Symbols
The title is being recorded.
Shows a Timer programming.
A daily or weekly Timer recording was stopped. The icon disappears when next Timer recording starts.
W The title overlaps other recordings.
F |
The disc was full so the programme failed to record. |
The programme cannot be played due to damaged data or could not be recorded for another reason.
The title is write-protected.
The programme was copy-protected; the title was not recorded.
Title that can only be copied once.
The title has been selected.
|
The title or the playlist was recorded with a TV system other than the one currently |
NTSC |
selected. Title and playback lists with these markings cannot be played back. |
|
|
PAL |
To playback this title/playlist, switch your TV system. |
|
15

Disc formats |
DVD |
DVD-RAM: DVD Video Recording format
DVD-RAM RAM
4.7 GB 12 cm
9.4GB 12 cm
2.8GB 8 cm rewritable
DVD-R : DVD-Video format +R : +VR format
|
DVD-R |
-R |
|
4.7 GB 12 cm |
|
|
1.4 GB 8 cm |
|
|
writable |
|
|
|
|
- - |
+R |
+R |
4.7 GB 12 cm |
|
|
|
|
|
|
writable |
|
|
|
|
DVD-RW : DVD-Video format +RW : +VR format
DVD-RW -RW
4.7 GB, 12 cm
1.4 GB, 8 cm rewritable
- - |
+RW |
+RW |
4.7 GB, 12 cm
1.4 GB, 8 cm rewritable
DVD-R DL: DVD-Video format
+R DL |
: +VR format |
|
|
|
DVD-R DL |
|
|
|
-R DL |
|
|
R DL |
8.5 GB 12 cm, writable |
|
|
|
|
|
|
|
|
|
|
- - |
+R DL |
+R DL |
|
8.5 GB 12 cm,writable |
|
||
|
|
||
Playback and recording discs
DVD-RAM
The DVD-RAM can be compared with the hard disk and can be written to 100,000 times on average. The disc can only be played on DVD-RAM-compatible players.
The recording occurs in DVD Video Recording format (VR). Movies and parts of movies can be edited and deleted. The deletion of movies frees previously used storage space.
The creation of playlists does not require any additional storage space.
Dual-channel sound and 16:9 format are supported in addition to the TIME SLIP. function A DVD-RAM with Cartridge is write-protected and is CPRM-compatible.
DVD Video Recording format (VR)
This format enables recording and playback.
Digital programmes limited to "one-time recording" can be recorded to a CPRM-compatible disc. You can record to a CPRM-compatible DVD-RAM.
Playback is only possible with a compatible DVD player. Use a DVD-RAM to record in DVD Video Recording format.
DVD-R/+R (Recordable)
The DVD-R/+R can only be recorded once. Movies or parts of them can be deleted during processing, but storage space is still taken up and cannot be used for other movies. Through finalisation, the DVD-R/+R becomes DVD-V that can be played on other units.
DVD-R/+R/-R DL/+R DL |
Finalisation |
18 9953 |
-R +R -R DL +R DL |
On the recording unit |
|
The movies can no longer be edited after finalisation.
Recording with this recorder |
Playback on another unit |
Recording with another unit |
Playback on this recorder |
DVD-RW/+RW (Rewritable)
DVD-RW/+RW is rewritable and erasable. You must delete it completely to be able to rewrite it again. Through finalisation, the DVD-RW becomes a DVD-V that can be played on other units. A finalised DVD-RW can be reformatted and rewritten. Formatting deletes
all data! 9953 A DVD+RW becomes a DVD-V by creating a Top Menu.
DVD-RW -RW |
Finalisation |
Formatting |
DVD-RW -RW |
On the recording unit
The movies can no longer be edited after finalisation. |
|
Recording with this recorder |
Playback on another unit |
Recording with another unit |
Playback on this recorder |
DVD-R DL/+R DL (Double Layer DVD/Dual Layer DVD) |
2nd Layer |
The data are saved on two parallel layers. They have more space available. If the laser changes layers during playback, brief interruptions to the image and sound may occur.
You cannot switch layers during a recording. The recording stops when
the storage space on the first Layer is full. You must close the first Layer |
1st Layer |
|
|
to be able to record on the second Layer. |
|
DVD-Video format (V)
This recording format is the standard DVD-Video. Digital programmes that are limited to "one-time recording" cannot be recorded. Not for recording and playback of still pictures.
+VR format
Digital programmes limited to "one-time recording" can not be recorded. Not for recording and playback of still pictures.
16

Disc formats |
DVD |
DVD-RW -RW(VR)
(DVD-VR format)
12 cm/ 8 cm, playable only
DVD-Video DVD-V
12 cm/ 8 cm, playable only
DVD-Audio DVD-A
12 cm/ 8 cm, playable only
CD |
CD |
CD-R/RW |
|
- - 12 cm/ 8 cm, playable only
Video CD |
VCD |
CD-R/RW |
|
12 cm/ 8 cm, playable only
Regional codes
2 2 34 ALL DVD-Video only
DVD-Videos with the regional code 2 or ALL can be played with this unit. The code is listed on the backside of the unit. England and Continental Europe: 2.
Only play round discs.
Do not touch the disc recording surface.
Cartridge discs |
RAM |
With active write protection, you can neither record to the disc nor edit or delete content.
Playback discs
A DVD-RW that was recorded on another DVD recorder is played back in DVD-VR format on this unit. Programmes limited on "one-time recording" can be played back if recorded to a CPRM-compatible disc. If you format the disc, you can record and play it in DVD-Video format with this unit.
High-quality video and music discs.
Digital-quality music discs. Playback in dual-channel sound.
Music and audio recordings, music in MP3 format, pictures in JPEG and TIFF format.
Music and video recordings.
SVCD in compliance with IEC62107.
DivX 
 MP3
MP3 
 JPEG You can play DivX, MP3 and JPEG/TIFF data from a finalised CD-R, CD-RW or DVD-R. Depending on the recording conditions, playback may nonetheless be faulty.
Some DVD-Audio discs with multi-channel sound are designed by the manufacturer to prevent inter-mixing on the entire disc or at certain places. Depending on the disc type, the regional code and the recording conditions, it may not be possible to play the discs in some cases.
See the jewel case for more information.
Non playable discs
-2.6 GB and 5.2 GB DVD-RAM, 12 cm.
-3.95 GB and 4.7 GB DVD-R for Authoring.
-DVD-R that was recorded in DVD Video Recording format (VR).
-DVD-R (V), DVD-R DL, DVD-RW (V), +R, +R DL that was recorded on another unit and not finalised.
-Blu-ray, DVD-ROM, +R (8 cm), CD-ROM, CDV, CD-G, photo CD, CVD, SACD, MV disc, PD, “Chaoji VCD” that can be purchased in stores, including CVD, DVCD and SVCD that are not IEC62107-compliant, etc.
Handling discs
If the surface of a disc, which has no Cartridge or was removed from one, is scratched, dirty, dusty or has finger prints, playback or processing can be impaired. Such impairments can also occur when the disc is placed back in the Cartridge.
Note: Only write on the label side of the disc. Use a soft, oil-based felt-tip pen. Do not use a ball-point pen or any other hard writing instrument. Do not affix stickers or labels to the disc. When not in use, put the disc in its case or Cartridge.
Cleaning the DVD-RAM
Clean the disc with a special DVD-RAM cleaner (optional) and read the cleaner instructions throughly before use. Bad scratches and stubborn dirt may not be able to be removed so that recording, editing or playback is still compromised even after cleaning. The disc should then no longer be used.
Do not use benzine, alcohol, water, cleaning sprays, household cleaners or other solvents.
Cartridge write protection
Remove the 8-cm disc from the cartridge before using it with this unit.
DVD lens cleaner (RP-CL720E)
Compatible models: Only for Panasonic's DVD recorders.
Do NOT use this cleaner with any other Panasonic DVD products or with the DVD products of any other companies since doing so may damage the products.
Cleaning DVD-Videos, Video-CDs and CDs
Wipe with a moist and then with a dry cloth.
17
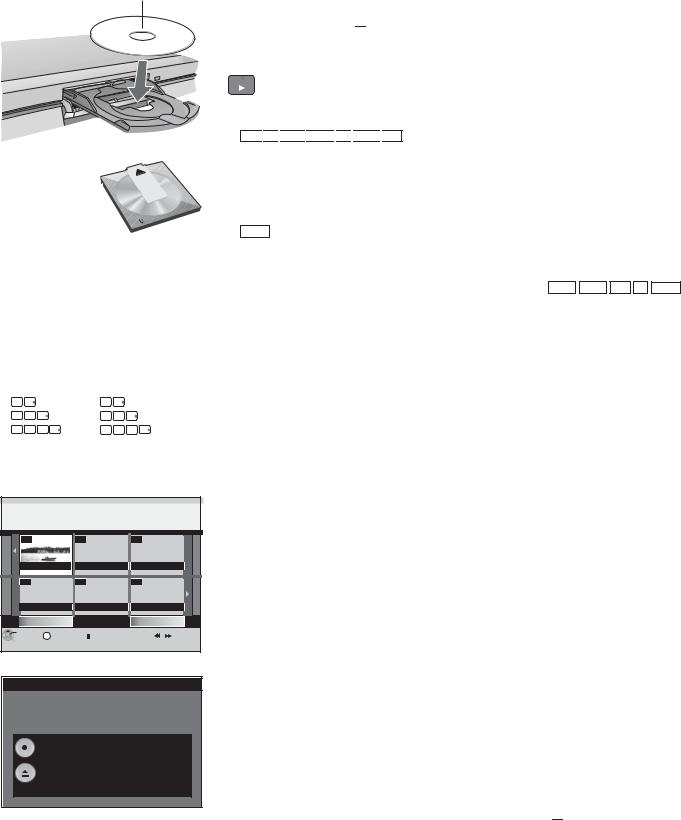
Playback
Insert with label facing upwards. In the case of double-sided discs, the label of the side that you want to play should be facing upwards.
Insert a Cartridge disc in the direction of the arrow, label facing upwards.
Direct input via the number buttons
5: |
0 |
5 |
|
|
15: |
1 |
5 |
|
|
5: |
0 |
0 |
5 |
|
15: |
0 |
1 |
5 |
|
5: |
0 |
0 |
0 |
5 |
15: |
0 |
0 |
1 |
5 |
DIRECT NAVIGATOR Title View
 DVD-RAM
07 |
|
-- |
-- |
ZDF |
12.9. THU |
|
|
-- |
|
-- |
-- |
Previous |
Page 02/02 |
Next |
|
ENTER |
S |
SUB MENU |
Select |
Previous |
|
|
|
Next |
|
|
|
||||||
RETURN |
|
|
|
|
|
|
|
|
Finalize
Finalize the disc so that it can be played on other DVD players.
Note: Recording or Editing is not possible after finalizing. This may take up to 9 min.
Press the REC button to start finalize.
Press the OPEN/CLOSE button to exit.
This disc cannot be played on other
DVD players without finalizing.
 DVD
DVD
Preparation
Switch on your television and select the appropriate AV channel.
Switch on the DVD Recorder.
Press OPEN/CLOSE  on the unit to open the disc tray.
Insert a disc in the disc tray and close it. It may take some time to read the disc!
PLAY Playback
Press PLAY  to start playback.
Playback begins with the last title recorded.
RAM
 -R
-R 
 -R DL
-R DL 
 -RW(V)
 +R
+R 
 +R DL
+R DL 
 +RW Disc playback stops when a Timer recording starts.
Playback of a selected title
During playback, use the number buttons to select the desired title, chapter or piece and confirm with ENTER.
When the screen saver is shown, you can enter a group number. On some
discs, this function is only available when playback stops. |
|
Playback starts automatically |
DVD-A DVD-V VCD CD -R(MP3) |
Playback always starts at the beginning of the disc. If the disc has its own disc menu, then this is displayed. The operation of the disc menu depends on the inserted disc.
Due to the programme structure determined by the manufacturer, all described functions may not be available.
In the case of VCD, use the number buttons to select the number of the title.
In the case of DVD-A/DVD-V, use 

 or the number buttons to select a title and confirm with ENTER.
Use the following buttons to launch the disc menu again:
DVD-V: SUB MENU, DVD-A: DIRECT NAVIGATOR, VCD: RETURN
If  appears on the television unit, the procedure is interrupted by the unit or the disc.
Selecting programmes/titles for playback
Use the DIRECT NAVIGATOR button to launch the menu during playback, recording and in STOP mode.
Press DIRECT NAVIGATOR.
Select the desired title with 

 and confirm with ENTER. Playback starts.
Press RETURN to exit the menu.
You can select other pages with SKIP  Previous or
 Next.
Next.
Finalising |
-R |
|
-RW(V) |
|
+R |
|
-R DL |
|
+R DL |
Auto finalisation is always offered before an unfinalised disc is ejected. You can only play an unfinalised disc on this DVD Recorder.
Press OPEN/CLOSE  on the unit.
Press REC on the unit to start the finalisation.
After successful finalisation, the disc is ejected automatically. It can now be played on any DVD unit.
If you do not want to finalise the disc, press OPEN/CLOSE  on the unit again.
18
 Loading...