


 Loading...
Operating Instructions
DVD Recorder
Model No. DMR-ES25
Dear customer
Thank you for purchasing this product. For optimum performance and safety, please read these instructions carefully.
Before connecting, operating or adjusting this product, please read the instructions completely.
Please keep this manual for future reference.
Region number supported by this unit
Region numbers are allocated to DVD players and software according to where they are sold.
•The region number of this unit is “1”.
•The unit will play DVDs marked with labels containing “1” or “ALL”.
Example:
If you have any questions contact
In the U.S.A.: 1-800-211-PANA(7262)
In Canada: 1-800-561-5505
For U.S.A. only
The warranty can be found on page 55.
For Canada only
The warranty can be found on page 55.
La referencia rápida en español se puede encontrar en la página 56–59.
Recording Getting started
Playing back
Editing
Copying
Convenient functions
Reference
Español
|
P PC |
RQT8327-1P |
|
||
|
|
|
|
|
|

CAUTION!
THIS PRODUCT UTILIZES A LASER.
USE OF CONTROLS OR ADJUSTMENTS OR PERFORMANCE OF PROCEDURES OTHER THAN THOSE SPECIFIED HEREIN MAY RESULT IN HAZARDOUS RADIATION EXPOSURE.
DO NOT OPEN COVERS AND DO NOT REPAIR YOURSELF. REFER SERVICING TO QUALIFIED PERSONNEL.
CAUTION!
DO NOT INSTALL OR PLACE THIS UNIT IN A BOOKCASE, BUILT-IN CABINET OR IN ANOTHER CONFINED SPACE. ENSURE THE UNIT IS WELL VENTILATED. TO PREVENT RISK OF ELECTRIC SHOCK OR FIRE HAZARD DUE TO OVERHEATING, ENSURE THAT CURTAINS AND ANY OTHER MATERIALS DO NOT OBSTRUCT THE VENTILATION VENTS.
WARNING:
TO REDUCE THE RISK OF FIRE, ELECTRIC SHOCK OR PRODUCT DAMAGE, DO NOT EXPOSE THIS APPARATUS TO RAIN, MOISTURE, DRIPPING OR SPLASHING AND THAT NO OBJECTS FILLED WITH LIQUIDS, SUCH AS VASES, SHALL BE PLACED ON THE APPARATUS.
THE FOLLOWING APPLIES ONLY IN THE U.S.A.
Note to CATV system installer:
This reminder is provided to call the CATV system installer’s attention to Article 820-40 of the NEC that provides guidelines for proper grounding and, in particular, specifies that the cable ground shall be connected to the grounding system of the building, as close to the point of cable entry as practical.
CAUTION |
RISK OF ELECTRIC SHOCK |
DO NOT OPEN |
CAUTION: TO REDUCE THE RISK OF ELECTRIC |
SHOCK, DO NOT REMOVE SCREWS. |
NO USER-SERVICEABLE PARTS INSIDE. |
REFER SERVICING TO QUALIFIED SERVICE |
PERSONNEL. |
The lightning flash with arrowhead symbol, within an equilateral triangle, is intended to alert the user to the presence of uninsulated “dangerous voltage” within the product’s enclosure that may be of sufficient magnitude to constitute a risk of electric shock to persons.
The exclamation point within an equilateral triangle is intended to alert the user to the presence of important operating and maintenance (servicing) instructions in the literature accompanying the appliance.
THE FOLLOWING APPLIES ONLY IN THE U.S.A.
FCC Note:
This equipment has been tested and found to comply with the limits for a Class B digital device, pursuant to Part 15 of the FCC Rules. These limits are designed to provide reasonable protection against harmful interference in a residential installation. This equipment generates, uses, and can radiate radio frequency energy and, if not installed and used in accordance with the instructions, may cause harmful interference to radio communications. However, there is no guarantee that interference will not occur in a particular installation. If this equipment does cause harmful interference to radio or television reception, which can be determined by turning the equipment off and on, the user is encouraged to try to correct the interference by one or more of the following measures:
•Reorient or relocate the receiving antenna.
•Increase the separation between the equipment and receiver.
•Connect the equipment into an outlet on a circuit different from that to which the receiver is connected.
•Consult the dealer or an experienced radio/TV technician for help.
FCC Caution: To assure continued compliance, follow the attached installation instructions and use only shielded interface cables when connecting to peripheral devices.
Any changes or modifications not expressly approved by the party responsible for compliance could void the user’s authority to operate this equipment.
This device complies with Part 15 of the FCC Rules. Operation is subject to the following two conditions: (1) This device may not cause harmful interference, and (2) this device must accept any interference received, including interference that may cause undesired operation.
Responsible Party:
Panasonic Corporation of North America One Panasonic Way
Secaucus, NJ 07094 Telephone No.: 1-800-211-7262
The socket outlet shall be installed near the equipment and easily accessible. The mains plug of the power supply cord shall remain readily operable. To completely disconnect this apparatus from the AC Mains, disconnect the power supply cord plug from AC receptacle.
(Inside of product)
RQT8327
2
Read these operating instructions carefully before using the unit. Follow the safety instructions on the unit and the applicable safety instructions listed below. Keep these operating instructions handy for future reference.
1) Read these instructions.
2) Keep these instructions.
3) Heed all warnings.
4) Follow all instructions.
5) Do not use this apparatus near water.
6) Clean only with dry cloth.
7) Do not block any ventilation openings. Install in accordance with the manufacturer’s instructions.
8) Do not install near any heat sources such as radiators, heat registers, stoves, or other apparatus (including amplifiers) that produce heat.
9) Do not defeat the safety purpose of the polarized or groundingtype plug. A polarized plug has two blades with one wider than the other. A grounding-type plug has two blades and a third grounding prong. The wide blade or the third prong are provided for your safety. If the provided plug does not fit into your outlet, consult an electrician for replacement of the obsolete outlet.
IMPORTANT SAFETY INSTRUCTIONS

Table of contents
Getting started
IMPORTANT SAFETY INSTRUCTIONS . . . . . . . . . . . . . . .2 Accessories. . . . . . . . . . . . . . . . . . . . . . . . . . . . . . . . . . . . .3 Disc and card information . . . . . . . . . . . . . . . . . . . . . . . . .4 The remote control information. . . . . . . . . . . . . . . . . . . . .6 Disc and card handling . . . . . . . . . . . . . . . . . . . . . . . . . . .6 Inserting/Removing SD card . . . . . . . . . . . . . . . . . . . . . . .6 Control reference guide . . . . . . . . . . . . . . . . . . . . . . . . . . .7 STEP 1 Connection. . . . . . . . . . . . . . . . . . . . . . . . . . . . . . .8 STEP 2 Plug-in Auto Tuning . . . . . . . . . . . . . . . . . . . . . .14 Channel captions/Selecting television type. . . . . . . . . .16 Remote control settings. . . . . . . . . . . . . . . . . . . . . . . . . .17 Clock settings . . . . . . . . . . . . . . . . . . . . . . . . . . . . . . . . . .17
Recording
Important notes for recording . . . . . . . . . . . . . . . . . . . . .18
Recording modes and approximate recording times . . . . . . . 19
Disc Insertion/Ejection . . . . . . . . . . . . . . . . . . . . . . . . . . . . . . 19
Recording television programs . . . . . . . . . . . . . . . . . . . .20
To specify a time to stop recording –One Touch Recording . . 21 Flexible Recording . . . . . . . . . . . . . . . . . . . . . . . . . . . . . . . . . 21 Playing while you are recording . . . . . . . . . . . . . . . . . . . . . . . 21
Selecting the audio to record . . . . . . . . . . . . . . . . . . . . . . . . . 21
Scheduled recording . . . . . . . . . . . . . . . . . . . . . . . . . . . .22
Cancel scheduled recording that has already begun . . . . . . . 23 Release program from recording standby . . . . . . . . . . . . . . . 23 Notes on scheduled recording . . . . . . . . . . . . . . . . . . . . . . . . 23 Check, change or delete a program . . . . . . . . . . . . . . . . . . . . 23
Playing back
Playing discs. . . . . . . . . . . . . . . . . . . . . . . . . . . . . . . . . . .24
Selecting recorded titles to play –Direct Navigator . . . . . . . . . 24 Status messages . . . . . . . . . . . . . . . . . . . . . . . . . . . . . . . . . . 24
Operations during play . . . . . . . . . . . . . . . . . . . . . . . . . . . . . . 25
Using menus to play still pictures (JPEG/TIFF). . . . . . .26
Useful functions during still picture play . . . . . . . . . . . . . . . . . 27
Using menus to play MP3 . . . . . . . . . . . . . . . . . . . . . . . .28 Using on-screen menus . . . . . . . . . . . . . . . . . . . . . . . . . .29
Accessories
Editing
Editing titles/chapters . . . . . . . . . . . . . . . . . . . . . . . . . . 30
Editing titles/chapters and playing chapters . . . . . . . . . . . . . . 30 Title operations . . . . . . . . . . . . . . . . . . . . . . . . . . . . . . . . . . . . 31
Chapter operations . . . . . . . . . . . . . . . . . . . . . . . . . . . . . . . . . 31
Creating, editing and playing playlists . . . . . . . . . . . . . 32
Creating playlists . . . . . . . . . . . . . . . . . . . . . . . . . . . . . . . . . . . 32 Editing and playing playlists/chapters . . . . . . . . . . . . . . . . . . . 33 Playlist operations . . . . . . . . . . . . . . . . . . . . . . . . . . . . . . . . . . 33
Chapter operations . . . . . . . . . . . . . . . . . . . . . . . . . . . . . . . . . 33
Editing still pictures . . . . . . . . . . . . . . . . . . . . . . . . . . . . 34
Album and picture operations . . . . . . . . . . . . . . . . . . . . . . . . . 35
Copying
Copying still pictures . . . . . . . . . . . . . . . . . . . . . . . . . . . 36
Copying using the copying list . . . . . . . . . . . . . . . . . . . . . . . . . 36 Copying all the still pictures on a card
–Copy All Pictures (JPEG) . . . . . . . . . . . . . . . . . . . . . . . . . . 36 Copying settings . . . . . . . . . . . . . . . . . . . . . . . . . . . . . . . . . . . 37
To edit the copying list . . . . . . . . . . . . . . . . . . . . . . . . . . . . . . . 37
Copying from a video cassette recorder . . . . . . . . . . . 38
DV camcorder recording . . . . . . . . . . . . . . . . . . . . . . . . . . . . . 38 Manual recording. . . . . . . . . . . . . . . . . . . . . . . . . . . . . . . . . . . 38
Convenient functions
Entering text . . . . . . . . . . . . . . . . . . . . . . . . . . . . . . . . . . 39 Delete Navigator . . . . . . . . . . . . . . . . . . . . . . . . . . . . . . . 39
Deleting a title or a still picture during play . . . . . . . . . . . . . . . 39
DVD and card Management . . . . . . . . . . . . . . . . . . . . . . 40
Providing a disc with a name –Disc Name . . . . . . . . . . . . . . . 40 Setting the protection –Disc Protection . . . . . . . . . . . . . . . . . . 40 Deleting all titles and playlists –Delete All Titles . . . . . . . . . . . 40 Deleting all contents of a disc or card –Format . . . . . . . . . . . . 40 Selecting whether to show the Top Menu first
–Playback will start with:. . . . . . . . . . . . . . . . . . . . . . . . . . . . 41 Enabling discs to be played on other equipment –Finalize . . . 41 Creating Top Menu –Create DVD Top Menu . . . . . . . . . . . . . . 41 Enabling the second layer on DL (dualor doublelayer on single
side) discs to be recordable –Close First Layer . . . . . . . . . . 41
Changing the unit’s settings . . . . . . . . . . . . . . . . . . . . . 42
Common procedures. . . . . . . . . . . . . . . . . . . . . . . . . . . . . . . . 42 Summary of settings . . . . . . . . . . . . . . . . . . . . . . . . . . . . . . . . 42 Changing the speaker setting to suit your speakers . . . . . . . . 46
Reference
Messages. . . . . . . . . . . . . . . . . . . . . . . . . . . . . . . . . . . . . 47 Frequently asked questions . . . . . . . . . . . . . . . . . . . . . 48 Troubleshooting guide . . . . . . . . . . . . . . . . . . . . . . . . . . 49 Product Service. . . . . . . . . . . . . . . . . . . . . . . . . . . . . . . . 52 Unit care. . . . . . . . . . . . . . . . . . . . . . . . . . . . . . . . . . . . . . 52 Glossary. . . . . . . . . . . . . . . . . . . . . . . . . . . . . . . . . . . . . . 53 Specifications . . . . . . . . . . . . . . . . . . . . . . . . . . . . . . . . . 54 Limited Warranty (ONLY FOR U.S.A.) . . . . . . . . . . . . . . 55 Limited Warranty (ONLY FOR CANADA). . . . . . . . . . . . 55
Referencia rápida en español . . . . . . . . . . . . . . . . . . . . 56 (Spanish Quick Reference)
Index. . . . . . . . . . . . . . . . . . . . . . . . . . . . . . . . . . Back cover
IMPORTANT SAFETY INSTRUCTIONS/Table of contents/Accessories
Please check and identify the supplied accessories. Use numbers indicated in parentheses when asking for replacement parts. (Product numbers correct as of March 2006. These may be subject to change.)
Only for U.S.A.: To order accessories, refer to “Accessory Purchases” on page 55.
Only for Canada: To order accessories, call the dealer from whom you have made your purchase.
1 |
Remote control |
1 |
Audio/video cable |
|
(EUR7659Y20) |
|
(K2KA6BA00003) |
2 |
Batteries |
1 |
DVD-RAM disc |
|
for remote control |
|
|
• For use with this unit only.
Do not use it with other equipment.
Also do not use the cords for other equipment with this unit.
1 75 Ω coaxial cable 1 AC power supply cord
(K2KZ2BA00001) (K2CB2CB00018)
(U.S.A. only)
Product Registration Card
Please complete and return the included product registration card, or register via the Internet at: http://www.prodreg.com/panasonic/
RQT8327
3

Disc and card information |
|
|
|
|
|
|||
Discs you can use for recording and play |
|
|
|
|
||||
Disc type |
DVD-RAM |
DVD-R |
DVD-R DL*1 |
DVD-RW |
+R*2 |
+R DL*1 |
+RW |
|
|
|
|
(dual layer on |
|
|
(double layer |
|
|
|
|
|
single side) |
|
|
on single side) |
|
|
Indication in these |
|
-R |
-R DL |
-RW(V) |
+R |
+R DL |
|
|
instructions |
|
Before |
Before |
Before |
Before |
Before |
|
|
|
RAM |
finalization |
finalization |
finalization |
finalization |
finalization |
+RW |
|
|
DVD-V |
DVD-V |
DVD-V |
DVD-V |
DVD-V |
|||
|
|
|
||||||
|
|
After |
After |
After |
After |
After |
|
|
|
|
finalization |
finalization |
finalization |
finalization |
finalization |
|
|
Logo |
|
|
|
|
|
|
|
|
|
|
|
|
|
–––– |
–––– |
–––– |
|
Recording format |
VR |
DVD-Video |
DVD-Video |
DVD-Video |
+VR |
+VR |
+VR |
|
(Ô below) |
||||||||
|
|
|
|
|
|
|
||
Data that can be |
Video |
|
|
|
|
|
|
|
recorded and |
Video |
Video |
Video |
Video |
Video |
Video |
||
Still picture |
||||||||
played |
|
|
|
|
|
|
||
|
|
|
|
|
|
|
||
Re-writable*3 |
Yes |
No |
No |
Yes |
No |
No |
Yes |
|
What you can do on this unit |
|
|
|
|
|
|
||
|
Recording |
|
|
|
|
|
|
|
|
broadcasts that |
Yes*4 |
No |
No |
No |
No |
No |
No |
|
allow one copy |
|
|
|
|
|
|
|
|
Recording both |
|
|
|
|
|
|
|
|
|
|
|
|
|
|
|
|
|
Main and SAP of |
Yes |
No |
No |
No |
No |
No |
No |
|
MTS broadcast |
|
|
|
|
|
|
|
|
Recording 16:9 |
|
|
|
|
|
|
|
|
Yes |
No |
No |
No |
No |
No |
No |
|
|
aspect picture |
|||||||
|
|
|
|
|
|
|
|
|
|
Creating playlists |
|
|
|
|
|
|
|
|
Yes |
No |
No |
No |
No |
No |
No |
|
Compatibility |
|
|
|
|
|
|
|
|
|
Usable high |
|
|
|
|
|
|
|
|
speed recording |
Up to 5x |
Up to 16x |
Up to 4x |
Up to 6x |
Up to 16x |
Up to 2.4x |
Up to 4x*6 |
|
disc type*5 |
|
|
|
|
|
|
|
|
Play on other |
Only on DVD- |
|
|
|
|
|
|
|
players |
RAM |
Yes |
Yes*7 |
Yes |
Yes |
Yes*8 |
Yes |
|
|
compatible |
|
|
|
|
|
(It is not |
|
|
players. (It is |
|
|
|
|
|
possible to |
|
|
|
|
|
|
|
||
|
|
not possible to |
Only on compatible players after finalizing the disc (Ô page 41). |
finalize the |
||||
|
|
finalize the |
disc.) |
|||||
|
|
disc.) |
|
|
|
|
|
|
|
|
|
|
|
|
|
|
|
•We recommend using Panasonic discs. We also recommend using DVD-RAM discs with cartridges to protect them from scratches and dirt.
•You may not be able to record depending on the condition of the discs and you may not be able to play due to the condition of the recording.
•For the recording time, refer to “Recording modes and approximate recording times” on page 19.
*1 You can record onto the second layer of dualor double-layer discs after closing the first layer (Ô page 41). You will no longer be able to record to the first layer after you do this (Ô page 18).
When playing a title recorded on both layers, video and audio may momentarily cut out when the unit is switching layers.
*2 You may not be able to use +R recorded on this unit in another Panasonic DVD recorder and vice versa. Once the disc is finalized, however, it can be played in the other unit.
*3 The amount of the recordable disc space doesn’t increase even if the program is deleted when you use a one time recording disc. *4 CPRM (Ô page 53) compatible discs only.
*5 This unit can use the high-speed recording discs shown in the chart, but using them will not shorten the recording time. *6 You can play 8x recording speed discs recorded on another equipment.
*7 Play on DVD-R DL compatible equipment. *8 Play on +R DL compatible equipment.
Regarding recording format
VR (DVD Video Recording) format
This is a recording method which allows you to freely record and edit television broadcasts and so on.
•Digital broadcasts that allow “One time only recording” can be recorded to a CPRM compatible disc. You can record to CPRM compatible DVD-RAM on this unit.
•Play is only possible on a compatible DVD player.
DVD-Video format
This recording method is the same as commercially available DVD-Video.
•Digital broadcasts that allow “One time only recording” cannot be recorded.
•You can play on compatible equipment such as DVD players after finalizing the disc on this unit.
+VR (+R/+RW Video Recording) format
This is method for recording moving pictures to +R/+RW discs. You can play back such discs recorded in this method in a similar way as contents recorded in the DVD-Video format.
•Digital broadcasts that allow “One time only recording” cannot be recorded.
•After finalizing the disc or creating the top menu, you can play the disc on DVD players and other equipment.
RQT8327
4

Play-only discs
Disc type
Indication in these instructions
Logo
Instructions
DVD-Video |
DVD-Audio |
DVD-RW (VR format) |
|
CD |
Video CD |
||||||||||||||
|
|
|
|
|
|
|
|
|
|
|
|
|
|
|
|
|
|
||
|
DVD-V |
|
|
DVD-A |
|
|
-RW(VR) |
|
|
CD |
|
|
VCD |
|
|||||
|
|
|
|
|
|
|
|
|
|
|
|
|
|
|
|
|
|
|
|
|
|
|
|
|
|
|
|
|
|
|
|
|
|
–––– |
|
|
|
|
|
|
|
|
|
|
|
|
|
|
|
|
|
|
|
|
|
|
|
|
|
|
|
|
|
|
|
|
|
|
|
|
|
|
|
|
|
|
|
|
|
|
|
|
|
|
|
|
|
|
|
|
|
|
|
|
|
|
|
|
|
|
|
|
|
|
|
|
|
|
|
|
|
|
|
|
|
|
|
|
|
|
|
|
|
|
|
|
|
|
|
|
|
|
|
|
|
|
|
|
|
High quality |
High fidelity |
DVD-RW recorded on another DVD |
Music and |
CD-R and |
Music and |
||||||||||||||
movie and |
music discs |
Recorder* |
audio recorded |
CD-RW* with |
video recorded |
||||||||||||||
music discs |
• Played on |
• You can play programs that allow |
(including CD- |
music |
(including CD- |
||||||||||||||
|
|
|
|
this unit in |
“One time only recording” if they |
R/RW*) |
recorded in |
R/RW*) |
|||||||||||
|
|
|
|
have been recorded to a CPRM |
|||||||||||||||
|
|
|
|
2 channels. |
|
|
MP3 |
|
|
|
|
|
|||||||
|
|
|
|
compatible disc. |
|
|
|
|
|
|
|
||||||||
|
|
|
|
|
|
|
|
|
|
|
|
|
|
|
|
|
|||
|
|
|
|
|
|
|
|
• By formatting (Ô page 40) the |
|
|
Still pictures |
|
|
|
|
|
|||
|
|
|
|
|
|
|
|
disc, you can record to it in DVD- |
|
|
(JPEG and |
|
|
|
|
|
|||
|
|
|
|
|
|
|
|
Video format. |
|
|
TIFF) recorded |
|
|
|
|
|
|||
|
|
|
|
|
|
|
|
• It may be necessary to finalize the |
|
|
on CD-R and |
|
|
|
|
|
|||
|
|
|
|
|
|
|
|
disc on the equipment used for |
|
|
CD-RW* |
|
|
|
|
|
|||
|
|
|
|
|
|
|
|
recording. |
|
|
|
|
|
|
|
||||
|
|
|
|
|
|
|
|
|
|
|
|
|
|
|
|
|
|||
|
|
|
|
|
|
|
|
|
|
|
|
|
|
|
|
|
|
|
|
•The producer of the disc can control how discs are played. So you may not always be able to control play as described in these operating instructions. Read the disc’s instructions carefully.
•Operation and sound quality of CDs that do not conform to CD-DA specifications (copy control CDs, etc.) cannot be guaranteed.
* Close the session after recording. Play may be impossible on some discs due to the condition of the recording.
Regarding DVD-Audio
Some multi-channel DVD-Audio will prevent down-mixing (Ô page 53) of all or part of their contents if this is the manufacturer’s intention. Tracks that are prevented from being down-mixed will not play properly on this unit (e.g. audio is played from the front two channels only). Refer to the disc’s jacket for more information.
Note about using a DualDisc
The digital audio content side of a DualDisc does not meet the technical specifications of the Compact Disc Digital Audio (CD-DA) format so play may not be possible.
Disc and card information
Discs that cannot be played
•2.6 and 5.2 GB DVD-RAM, 12 cm (5″)
•3.95 and 4.7 GB DVD-R for Authoring
•DVD-R recorded in VR format
•DVD-R (DVD-Video format), DVD-R DL, DVD-RW (DVD-Video format), +R, +R DL recorded on another unit and not finalized (Ô page 53)
Cards you can use on this unit
Type |
SD Memory Card, miniSD™ Card* |
||
|
MultiMediaCard |
||
Indication in these |
|
|
|
|
SD |
|
|
instructions |
|
|
|
|
|
|
|
Data that can be |
|
|
|
|
|
|
|
recorded and |
Still pictures |
||
played |
|
|
|
Instructions |
|
|
|
You can insert directly into the SD card slot. |
|||
|
* A miniSD™ card adaptor included with the |
||
|
miniSD™ card is necessary. |
||
|
• You can play and copy still pictures taken |
||
|
on a digital camera, etc. (Ô page 26, 36). |
||
|
• You can set the DPOF (Digital Print Order |
||
|
Format) for automatic printing on your |
||
|
home printer or at a photo developing |
||
|
store (Ô page 35, 53). |
||
|
|
|
|
•PAL discs (you can still play the audio on DVD-Audio)
•DVD-Video with a region number other than “1” or “ALL”
•Blu-ray
•DVD-ROM, +R 8 cm (3″), CD-ROM, CDV, CD-G, Photo CD, CVD, SVCD, SACD, MV-Disc, PD, Divx Video Disc, etc.
Suitable SD Memory Cards
You can use SD Memory Cards with the following capacities (from 8 MB to 2 GB).
8 MB, |
16 MB, |
32 MB, |
64 MB, |
128 MB, |
256 MB, |
512 MB, |
1 GB, |
2 GB (Maximum) |
|
|
|
|
|
|
•Useable memory is slightly less than the card capacity.
•Please confirm the latest information on the following website. http://panasonic.co.jp/pavc/global/cs
(This site is in English only.)
•If the SD Memory Card is formatted on other equipment, the time spent for recording may become longer. Also if the SD Memory Card is formatted on a PC, you may not be able to use it on this unit.
In these cases, format the card on this unit (Ô page 40, 53).
•This unit supports SD Memory Cards formatted in FAT 12 system and FAT 16 system based on SD Memory Card Specifications.
•We recommend using a Panasonic SD card.
Structure of still picture (JPEG/TIFF) folders displayed by this unit
The following  can be displayed on this unit.
DVD-RAM |
Card |
CD |
JPEG |
|
|
DCIM (Higher folder) |
|
DCIM |
|
* |
||
|
|
|
|
|
|
|
|
||
DCIM |
(Higher folder) |
|
XXXXX (Picture folder) |
X |
.JPG |
|
|||
|
|
|
|
|
|
|
|
||
|
XXXXX (Picture folder) |
|
|
|
|
X |
.JPG |
|
|
|
|
XXXX |
.JPG |
|
X |
.JPG |
|
||
|
|
|
|
XXXX |
.TIF |
|
|
|
|
|
XXXX |
.JPG |
|
|
|
* |
|
|
|
|
XXXX |
.TIF |
IM |
CDPF or IMEXPORT |
X |
.JPG |
|
||
|
|
|
|
|
|
|
X |
.JPG |
|
DCIM |
|
* |
|
XXXX |
.JPG |
|
|
|
|
|
|
|
|
|
|
|
|||
|
|
|
|
XXXX |
.TIF |
|
|
|
|
XXXXX |
|
|
|
|
|
DCIM |
|
|
|
|
|
|
|
|
|
|
|
||
|
XXXX |
.JPG |
|
|
|
|
X |
.JPG |
: Numbers |
|
|
|
|
|
X |
.JPG |
XXX: Letters |
||
|
XXXX |
.TIF |
|
|
|
|
|||
* Folders can be created on other equipment. However, these folders cannot be selected as a copying destination.
•The folder cannot be displayed if the numbers are all “0” (e.g., DCIM000, etc.).
•If a folder name or file name has been input using other equipment, the name may not be displayed properly or you may not be able to play or edit the data.
• When the highest level folders are “DCIM” folders, they are displayed first on the tree.
RQT8327
5

Press the protruding
Press on the center of part to open the cover.Inserting the card
the card until it clicks
into place.
If you are using a miniSD™ card, insert it into the miniSD™ card adaptor that
comes with the card.
ADAPTER
Insert and remove this adaptor from the unit.
Removing the card Closing the cover
1Press on the center of the card.
2 Pull it straight out.
Insert the card label up with the cut-off corner on the right. (Do not forget to close the cover. Ô right)

Control reference guide
Remote control
Instructions for operations are generally described using the remote control.
|
bo |
|
1 |
|
|
|
bp |
|
2 |
|
|
3 |
bq |
|
|
||
|
br |
|
4 |
bs |
|
bt |
||
|
||
5 |
|
|
6 |
ck |
|
|
cl |
|
7 |
cm |
|
8 |
|
9 |
cn |
bk |
co |
bl |
cp |
bm |
cq |
bn |
cr |
1 Turn the unit on (Ô page 14)
2Select the drive (DVD or SD) (Ô page 20, 24)
3Select channels and title numbers, etc./ Enter numbers
4 Cancel
5 Basic operations for recording and play
6 Skip the specified time (Ô page 25)
7Show Direct Navigator/Top menu (Ô page 24, 26, 28, 30, 34)
8Selection/Enter, Frame-by-frame cursor (Ô below)
9 Show sub menu (Ô page 27, 30, 33)
bk Show on-screen menu (Ô page 29) [B] for Direct Navigator (Ô page 34)
bl Select audio (Ô page 21, 25)
[A] for Direct Navigator (Ô page 24) bm Start recording/Specify the time to stop
recording (Ô page 20, 21)
n Using the cursor
bn Change recording mode (Ô page 20) bo Transmission window
bp Television operations (Ô page 17) bq Channel select (Ô page 20)
br Add/delete channel (Ô page 15) bs Input select (IN1 or IN2 or DV) bt Delete items (Ô page 39)
ck Skip a minute forward (Ô page 25)
cl Show scheduled recording list (Ô page 22)
cm Show FUNCTIONS window cn Return to previous screen co Create chapters (Ô page 25)
cp Show Setup menu (Ô page 16, 42) cq Start Flexible Recording (Ô page 21) cr Show status messages (Ô page 24)
•Select items on menu screens and set items.
Press up, down, left or right to select an item.
 Press [ENTER] to confirm.
This operation is also possible...
•Frame-by-frame (backward/forward):
While paused, press [w h] or [h q] (left/right)
Main unit
1 |
2 |
3 |
4 |
5 |
8 |
bl |
CH |
|
|
|
|
DV IN |
|
IN2 |
|
|
|
Opening the front panel |
|
|
7 |
9 bk bm |
|||||
|
|
|
|
|
|
|
|||
Press down on the |
|
part |
|
|
6 |
|
|||
|
|
|
|
|
|
|
|
||
|
|
|
|
|
|
|
|
||
with your finger. |
|
|
|
|
|
|
|
||
|
|
|
|
|
|
||||
1 POWER button (POWER 8) (Ô page 14) |
7 Open/close disc tray (Ô page 20) |
|
|||||||
Press to switch the unit from on to standby mode or vice versa. In |
8 Display (Ô below) |
|
|||||||
standby mode, the unit is still consuming a small amount of power. |
9 Stop (Ô page 20, 25) |
|
|||||||
2 Disc tray (Ô page 20) |
bk Start play (Ô page 24) |
|
|||||||
3 Connector for digital video (DV) camcorder (Ô page 38) |
bl Remote control signal sensor |
|
4 SD card slot (Ô page 6) |
||
bm Start recording (Ô page 20)/ |
||
5 Connector for external equipment (Ô page 38) |
||
Specify the time to stop recording (Ô page 21) |
||
6 Channel select (Ô page 20) |
||
|
The remote control information/Disc and card handling/Inserting/Removing SD card/Control reference guide
The unit’s display
123
|
|
|
|
|
|
|
|
|
|
|
|
|
|
|
|
|
|
|
|
|
|
|
|
|
|
|
|
|
|
|
|
|
|
|
|
|
|
|
|
|
|
|
|
|
|
|
|
|
|
|
|
|
|
|
|
|
|
|
|
|
|
|
4 |
5 |
6 |
||||||
1Disc indicator
•This indicator lights up when a disc that is supported by this unit is inserted.
2SD card indicator
• This indicator lights up when card is inserted.
3 Scheduled recording indicator |
|
|
4 Main display section |
|
|
5 Playing indicator |
RQT8327 |
|
6 Recording indicator |
|
|
7 |
||
|
||
|
|

STEP 1 Connection
This section includes diagrams of four common methods of connections (A-D, pages 8-9). Please connect using the one that best suits you.
•Visit Panasonic’s homepage for more information about connection methods. (This is in English only.) http://www.panasonic.com/consumer_electronics/dvd_recorder/dvd_connection.asp
•Before doing any connection, turn off all equipment and read the appropriate operating instructions.
•Peripheral equipment and optional cables are sold separately unless otherwise indicated.
n The unit’s RF OUT terminal |
n Connect the unit directly to the television |
|||||
The picture and sound signal from this unit does not go |
Video signals fed through video cassette recorders will be |
|||||
through the RF OUT terminal to the television. |
affected by copyright protection systems and the picture will |
|||||
Make sure you connect one of the following terminals on this |
not be shown correctly on the television. |
|||||
unit to the television: the AUDIO/VIDEO OUT terminal, the S |
|
|
|
|
|
|
|
|
|
|
|
|
|
|
|
|
|
|
|
|
VIDEO OUT terminal or the COMPONENT VIDEO OUT |
|
|
Television |
|
|
|
terminal. |
|
|
|
|
|
|
|
|
|
|
|
|
|
• Refer to page 11 if the antenna connectors don’t match. |
|
|
|
|
|
|
|
|
VCR |
|
|||
n When the unit is not to be used for a long time |
|
|
|
|||
|
|
|
|
|
|
|
To save power, unplug it from the household AC outlet. This unit |
|
|
|
|
|
|
|
|
This unit |
|
|||
consumes a small amount of power, even when it is turned off |
|
|
|
|||
|
|
|
|
|
|
|
|
|
|
|
|
|
|
(approx. 2.1 W). |
|
|
|
|
|
|
A |
Connection with a television |
|
|
|
|
|||
|
Cable from the wall or |
AUDIO IN VIDEO |
VHF/UHF |
Television |
||||
|
antenna signal |
R L |
IN |
RF IN |
|
|||
|
|
|
• If your television does not |
Red White Yellow |
|
|
||
|
|
|
|
have AUDIO/VIDEO |
|
|
||
|
|
|
|
|
|
|
|
|
|
|
|
|
terminals (Ô page 10, a). |
|
|
|
|
|
75 Ω |
|
• If you would like to enjoy |
|
|
|
|
|
|
|
|
higher picture quality |
|
Audio/video |
|
75 Ω coaxial cable |
|
|
coaxial |
1 |
|
|
|
|||
|
cable |
|
(Ô page 11). |
3 |
cable |
2 |
(Included) |
|
|
|
|
|
|
|
(Included) |
|
|
|
To a household |
To RF IN |
|
To OUT |
|
|
||
|
AC outlet |
|
|
|
|
|
|
|
|
|
|
|
|
|
|
|
|
|
(AC 120 V, 60 Hz) |
Red White Yellow |
|
|
||||
|
|
|
|
To RF OUT |
|
|
|
This unit’s rear panel |
|
|
|
|
4 |
|
|
|
|
AC power supply cord (Included)
Connect only after all other connections are complete.
B Connection with a television and a video cassette recorder
The connection will allow the video cassette recorder to be used for playback and recording when this unit is turned off.
AUDIO IN VIDEO |
VHF/UHF |
|
R L |
IN |
RF IN |
VHF/UHF |
OUT |
IN |
RF IN |
|
|
|
VIDEO |
VIDEO |
|
OUT |
IN |
|
AUDIO |
AUDIO |
|
L |
L |
|
AUDIO |
AUDIO |
VHF/UHF |
R |
R |
RF OUT |
|
|
RQT8327
8
der1652yAsupplcor
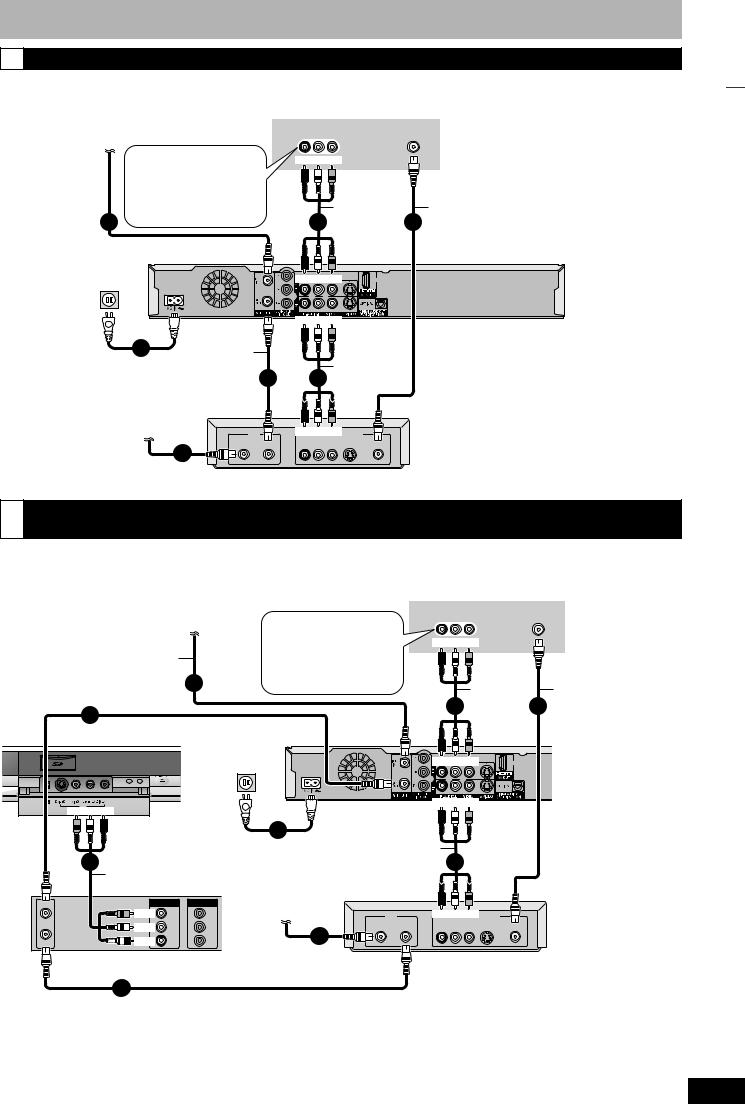
CConnection with a television and a cable box or satellite receiver
•You need to subscribe to a cable TV service to enjoy viewing their programming.
•Consult your service provider regarding an appropriate cable TV box or satellite receiver.
Cable from the wall or antenna signal
|
|
|
• If your television does not |
|
|
|
have AUDIO/VIDEO |
75 Ω coaxial |
|
|
terminals (Ô page 10, c). |
|
|
• If you would like to enjoy |
|
|
|
||
cable |
|
|
higher picture quality |
|
2 |
(Ô page 11). |
|
|
|
||
Television
AUDIO IN VIDEO |
VHF/UHF |
|
R L |
IN |
RF IN |
Red White Yellow
|
Audio/video |
75 Ω coaxial cable |
|
5 |
cable |
4 |
|
(Included) |
|||
|
|
To a household |
To RF IN |
To OUT |
|
|
|
AC outlet |
|
|
(AC 120 V, 60 Hz) |
|
Red White Yellow |
|
|
To RF OUT |
|
Red White Yellow |
This unit’s rear panel |
|
|
|
|
|
To IN1 |
||
7 |
|
|
|
|
|
|
75 |
Ω coaxial |
|
|
|
|
|
AC power supply cord (Included) |
|
|
|
|
||
|
cable |
3 |
6 |
Audio/video |
|
|
Connect only after all other |
|
(Included) |
cable |
|
||
connections are complete. |
|
|
|
|
|
|
Satellite antenna |
|
|
(Satellite receiver only) |
IN |
Red White Yellow OUT |
|
Satellite Cable |
AUDIO |
1 |
R L VIDEO S-VIDEO RF |
|
|
Cable box or Satellite receiver |
|
|
|
|
75 Ω coaxial cable |
|
|
STEP 1 Connection
DConnection with a television, a video cassette recorder and a cable box or satellite receiver
•You need to subscribe to a cable TV service to enjoy viewing their programming.
•Consult your service provider regarding an appropriate cable TV box or satellite receiver.
•The connection will allow the video cassette recorder to be used for playback and recording when this unit is turned off.
|
|
|
|
|
|
Television |
|
|
|
|
|
|
Cable from the wall or |
|
|
AUDIO IN VIDEO |
|
VHF/UHF |
|
||
|
|
antenna signal |
• If your television does not |
R L IN |
|
|
RF IN |
|
||
|
|
|
|
|
|
|
||||
|
|
|
|
have AUDIO/VIDEO |
Red White Yellow |
|
|
|||
|
|
|
|
terminals (Ô page 10, d). |
|
|
||||
75 Ω coaxial cable |
|
|
|
|
|
|
||||
|
• If you would like to enjoy |
|
|
|
|
|
||||
|
|
|
2 |
higher picture quality |
|
|
|
|
|
|
|
|
|
(Ô page 11). |
|
|
Audio/video |
75 Ω coaxial cable |
|||
|
|
|
|
|
|
|
||||
3 |
|
|
|
|
|
5 |
cable |
4 |
|
|
|
|
|
|
|
(Included) |
|
||||
75 |
Ω coaxial cable (Included) |
|
|
|
|
|||||
|
To RF IN |
|
|
|
|
|
||||
This unit’s front panel |
To a household |
|
|
To OUT |
|
|
||||
|
|
|
AC outlet |
|
|
|
|
|
|
|
(AC 120 V, 60 Hz) |
Red White Yellow |
|
 CH
CH 

This unit’s rear panel
DV IN |
IN2 |
To RF OUT |
Red White Yellow |
||
|
Yellow White Red |
|
To IN1 |
||
|
|
|
|||
|
To IN2 |
9 |
|
|
|
|
|
|
|
|
|
|
8 |
AC power supply cord (Included) |
Audio/video |
7 |
|
|
Connect only after all other |
|
cable |
||
|
Audio/video |
connections are complete. |
|
|
|
|
cable |
|
|
|
|
VHF/UHF |
|
|
OUT |
IN |
Satellite antenna |
|
|
RF IN |
|
Yellow |
OUT |
IN |
(Satellite receiver only) |
IN |
Red White Yellow OUT |
|
|
||||||
|
|
|
VIDEO |
VIDEO |
|
|
|
|
|
White |
L |
L |
|
Satellite Cable |
AUDIO |
|
|
|
R L VIDEO S-VIDEO RF |
||||
|
|
|
AUDIO |
AUDIO |
1 |
|
|
|
|
Red |
AUDIO |
AUDIO |
|
|
|
VHF/UHF |
|
R |
R |
|
|
|
|
RF OUT |
|
|
|
|
75 Ω coaxial |
|
|
|
Video cassette recorder |
|
Cable box or Satellite receiver |
||||
|
cable |
|
|||||
|
|
|
|
|
|
|
|
|
6 |
75 |
Ω coaxial cable |
|
|
||
|
|
|
|
||||
RQT8327
9

terminals, RF Modulator is necessary
|
IN |
|
OUT |
VHF/UHF |
AUDIO |
|
RF IN |
||
|
|
|
|
|
R L |
VIDEO S-VIDEO |
RF |
RF |
|
cassette recorder (Ô page 8, B)
Television
|
|
|
box or satellite receiver (Ô page 9, C) |
|
|||
|
|
|
recorder and a cable box or satellite receiver (Ô page 9, D) |
||||
|
Audio/video cable (Included) |
|
|
|
|
||
|
|
|
5 |
|
|
|
|
This unit’s rear panel |
|
|
|
|
RF Modulator |
Television |
|
Red White Yellow |
|
Red White Yellow IN |
|
OUT |
VHF/UHF |
||
|
|
RF IN |
|||||
|
|
|
AUDIO |
|
|
|
|
|
|
|
R L VIDEO S-VIDEO |
RF |
RF |
|
|
Cable box or Satellite receiver |
|
|
|
|
|||
AUDIO |
OUT |
|
|
|
|
75 Ω coaxial cable |
|
|
|
|
|
|
|
|
|
R L VIDEO S-VIDEO |
RF |
4 |
|
|
|
|
|
|
|
|
75 Ω coaxial cable |
|
|||
|
|
|
|
|
|||
RQT8327 |
10 |
OUTRFHF/UHFVIDEOINRF43 |

To enjoy higher picture quality
Connecting to the S VIDEO IN terminal
The S VIDEO OUT terminal achieves a more vivid picture than the VIDEO OUT terminal. (Actual results depend on the television.)
Television
COMPONENT |
AUDIO IN VIDEO S VIDEO |
|
VIDEO IN |
R L IN |
IN |
Red White
Audio/video cable |
S Video cable |
(Included)
Red White


 This unit’s


 rear panel
Connecting to the COMPONENT VIDEO IN terminal
These terminals can be used for either interlace or progressive output (Ô page 53) and provide a purer picture than the
S VIDEO OUT terminal.
• Connect to terminals of the same color.
|
R |
C |
A |
V |
( |
|
R |
T r
STEP 1 Connection
Use one of the following connections to suit the antenna lead to the unit’s RF IN terminal, and the 75 Ω coaxial cable to the antenna terminals on the equipment (television etc.). Refer to other equipment’s operating instructions.
|
T |
|
|
|
|
A |
|
|
|
|
|
|
|
|
75–300 Ω |
|
|
|
|
|
ansfortr |
mer |
VHF or UHF |
|
|
|
75 Ω coaxial |
|
|
|
|
|
|
|
|
|
|
|
cable |
|
Television |
A |
from the antenna |
|
|
|
|
a |
|
|
|
|
|
|
|
|
|
|
|
|
|
|
VHF/UHF band separator |
VHF |
|
|
|
|
75 Ω coaxial |
|
UHF |
|
|
To this unit’s |
cable |
|
Television |
|
|
|
|
|
|
|
|
RF IN terminal |
|
|
|
T |
from the antenna |
|
|
|
|
|
|
|
|
|
|
|
(Flat) Twin lead |
VHF/UHF |
|
|
VHF |
|
band mixer |
VHF/UHF band separator |
|
||
|
300 Ω cable |
|
|
||
|
|
|
|
UHF |
|
|
|
|
75 Ω coaxial |
|
|
|
|
To this unit’s |
|
Television |
|
|
|
cable |
|
||
|
300–75 Ω |
RF IN terminal |
|
|
|
|
|
|
|
|
|
|
transformer |
|
|
|
|
|
|
|
|
|
RQT8327 |
|
|
|
|
|
11 |
ACOMPONENTS VIDEO |
|
|
|
|
|

STEP 1 Connection
Connecting an amplifier or system component
n Connecting an amplifier with a digital input |
n Connection to a stereo amplifier |
terminal |
|
•When connecting this unit to a television with an HDMI cable, set “HDMI Audio Output” to “Off” in the Setup menu
(Ô page 45).
•To enjoy multi-channel surround on a
DVD-Video, connect an amplifier with a built-in decoder displaying these logo marks using an optical digital audio cable and change the settings in Digital Audio Output (Ô page 44).
• Before purchasing an optical digital audio cable, check the terminal shape of the equipment to be connected.
•You cannot use DTS Digital Surround decoders not suited to DVD.
•Even if using this connection method, output will be in only 2 channels when playing DVD-Audio.
Amplifier’s rear panel
OPTICAL IN
Optical digital audio cable
Do not bend sharply when connecting.
Insert fully, with this side facing up.
This unit’s rear panel
RQT8327
12
Connecting with an HDMI (High Definition Multimedia Interface) terminal
HDMI is the next-generation interface for digital devices. When connected to an HDMI compatible unit, an uncompressed digital audio and video signal is transmitted. You can enjoy high quality, digital video and audio with just one cord. When connecting to an HDMI-compatible HDTV (High Definition Television), the output can be switched to 1080i or 720p HD video.
Set the following:
From the Setup menu (Ô page 45), set “HDMI Video Output” and “HDMI Audio Output” to “On”.
• Please use HDMI cables that have the HDMI logo (as shown on the cover).
Connecting to a TV
Television
HDMI IN
This unit

 HDMI AV OUT
•If connecting to equipment incompatible with CPPM (Ô page 53, Content Protection for Prerecorded Media), copy-protected DVDAudio cannot be output through the HDMI terminal. Connect the audio cables (red and white) to the corresponding audio input terminals.
•If you are connecting to equipment that is only compatible with 2 channel output, audio with 3 channels or more will be down mixed (Ô page 53) and output as 2 channels. (Some discs cannot be down mixed.)
•For units compatible with HDCP (High-Bandwidth Digital Content Protection) copyright protection that are equipped with a digital DVI input terminal (PC monitors, etc.):
Depending on the unit, images may not display properly or at all when connecting with a DVI/HDMI switching cable. (Audio cannot be output.)
Connecting to an amplifier
Television
HDMI IN
Amplifier
HDMI IN |
HDMI OUT |
This unit
HDMI AV OUT
•If the speaker setup cannot be completed on the amplifier, then use the “HDMI Connection Speakers Setting” setting (Ô page 45).
•If connecting to equipment incompatible with CPPM (Ô page 53, Content Protection for Prerecorded Media), copy-protected DVDAudio cannot be output through the HDMI terminal. Connect to the amplifier with an optical digital cable or audio cables (red and white).
STEP 1 Connection
Control with HDMI (HDAVI Control™)
What is HDAVI Control?
HDAVI Control is a convenient function that offers linked operations of this unit, and a Panasonic TV (VIERA) or Receiver under HDAVI Control. You can use this function by connecting the equipment with the HDMI cable. See the operating instructions for connected equipment for operational details.
After connecting the unit to a television using an HDMI cable, set “Ctrl with HDMI” to “On” (Ô page 45).
•It is recommended that you use Panasonic’s HDMI cable.
Recommended part number: RP-CDHG15 (1.5 m/4.9 ft.), RP-CDHG30 (3.0 m/9.8 ft.), RP-CDHG50 (5.0 m/16.4 ft.), etc.
•Non-HDMI-compliant cables cannot be utilized.
Turn on all HDAVI Control compatible equipment and select this unit’s input channel on the connected television so that the HDAVI Control function works properly. Also when the connection or settings are changed, repeat this procedure.
Automatic input switching
When the following operations are performed the television will automatically switch the input channel and displays the corresponding action.
–When play starts on the unit
–When an action that uses the display screen is performed (e.g., Direct Navigator screen, scheduled recording screen)
Power on link
The television automatically turns on and the corresponding display appears when the following operations are performed with the television in standby mode.
–When play starts on the unit
–When an action that uses the display screen is performed (e.g., Direct Navigator screen, scheduled recording screen)
Power off link
All connected equipment compatible with HDAVI Control including this unit automatically turns off when you switch the TV off.
The unit automatically turns off even when the FUNCTIONS screen, any of the status messages, or any of the on-screen menus is displayed on the TV. The unit automatically turns off while in playback or when scheduled to record. (In the latter case, scheduled recordings remain effective after the unit turns off.)
•Only this unit turns off when you press [DVD POWER] for shutting it down. Other connected equipment compatible with HDAVI Control stay on.
Note
•Even if the television is turned off, the unit will not turn off at the same time in the following conditions:
–When you pressed [* REC] and the unit is recording
–When copying
–When finalizing
For your reference
•When [q] (PLAY) is pressed on this unit for “Automatic input switching” or “Power on link”, the playback image is not immediately displayed on the screen and it may not be possible to watch the contents from where playback started.
In this case, press [u] or [t] to go back to where playback started.
•When the DIGITAL AUDIO OUT (OPTICAL) terminal is used for audio output and the unit is connected to the television with an HDMI cable, set “HDMI Audio Output” to “Off” in the Setup menu (Ô page 45).
RQT8327
13

STEP 2 Plug-in Auto Tuning
|
CH |
DV IN |
IN2 |
POWER 8 |
2 CH 1 |
^ DVD |
|
POWER |
|
Numbered |
1 2 CH |
|
|
buttons |
ADD/DLT |
|
|
e,r,w,q |
|
ENTER |
RETURN |
|
|
* REC |
|
After pressing [^ DVD POWER] to turn the unit on for the first time, the unit starts necessary setup.
Regarding DST (Daylight Saving Time) (Ô page 17)
Legal revision is expected to change the DST period in 2007. When you use the unit with DST on, the change may cause the unit’s clock to go behind the actual time. Check the DST setting in “Set Clock Manually” in the Setup menu, set DST off and reset the clock correctly if you are using this function.
Preparation
Turn on the television and select the appropriate video input to suit the connections to this unit.
1 Press [^ DVD POWER].
Select Language
Seleccione el idioma
Sélection de Langue
English
Español
Français
Press ENTER
Pulse ENTER
Appuyer sur ENTER
2 Press [e,r] to select the language and press [ENTER].
If you make a mistake, press [RETURN] to return to an earlier screen.
Aspect Ratio Selection
Select TV type and press ENTER. (Please refer to Operation Instruction for details)
4:3 |
4:3 TV |
16:9 16:9 Widescreen TV
3 Press [e,r] to select “4:3 TV” or
“16:9 Widescreen TV” and press [ENTER].
Quick Start setting
The unit can be turned on faster, in about 1 second. Please note that Quick Start mode slightly increases power consumption when the unit is off.
(See Operation Instructions for details) Turn Quick Start on ?
On
Off
4 Press [e,r] to select “On” or “Off” and press [ENTER].
If you activate “Quick Start” function, select “On”.
About “Quick Start” function
If you set Quick Start to on, you can start recording to DVD-RAM about 1 second after you press [^ DVD POWER] to turn the unit on and then press [* REC].
The following happens when you have selected “On”.
•Power consumption in standby mode increases because power is supplied to the unit.
Default Recording Source
Please select the source from which this unit will record each time it is turned on. Note: Selecting "Internal TV Tuner" will start the Auto Channel Clock Settings process.
This one time process takes a few minutes.
Internal TV Tuner
Input
5 Press [e,r] to select “Internal TV Tuner” or “Input” and press [ENTER].
When you do not set channels on this unit, select “Input”. The unit then displays “Set Clock Manually” screen. Set the clock manually (Ô page 15).
(Continued on next page)
RQT8327
14
6 Press [ENTER] to start Plug-in Auto Tuning.
Set Channels Automatically
Ch. 1
Set Channels Automatically
Proceeding . . .
The unit then proceeds with Auto Clock Setting. The time is displayed when finished.
Set Clock Automatically
Auto Clock Setting is complete.
4/4/2006 12:15 AM
DST..................... |
On |
Time Zone........ |
CST |
n When one of the following screen appears
“No channels were found.” screen
Set Channels Automatically
No channels were found.
Please check antenna or cable connection. then...
press ENTER again
After turning off the unit, confirm following and perform setup again.
•Confirm the antenna cable is firmly connected to RF IN terminal.
•If you do not set channels on this unit, select “Input” in step 5.
“Auto Clock Setting is incomplete.” screen
Set Clock Automatically
Auto Clock Setting is incomplete.
Press ENTER
to set clock manually.
Press [ENTER] and set clock manually (Ô right).
7 Press [ENTER].
A picture or a blue background screen is displayed.
n If the clock is an hour slower or faster than the actual time
Select “–1” or “+1” in “Adjust Time Zone” in the Setup menu (Ô page 17).
The unit configures channels according to the Signal Source (RF IN) settings (Ô page 42) as follows.
Signal Source |
Band |
Channel |
|
(RF IN) |
|||
|
|
||
|
|
|
|
Antenna |
VHF |
2–13 |
|
|
|
|
|
|
UHF |
14–69 |
|
|
|
|
|
Cable TV |
VHF |
2–13 |
|
|
CATV LOW BAND |
95–99 |
|
|
|
|
|
|
CATV MID/SUPER BAND |
14–36 |
|
|
|
|
|
|
CATV HYPER BAND |
37–65 |
|
|
|
|
|
|
ULTRA BAND |
66–94 |
|
|
100–125 |
||
|
|
||
|
|
|
|
|
SPECIAL CATV CHANNEL |
1 |
|
|
|
|
Adding and deleting channels
After channel setting on this unit completed, you can add or delete |
|
|
|||||
channels if necessary channels are not set or unnecessary channels |
Tuning |
|
|||||
|
|||||||
1 Press the numbered buttons to select |
|
||||||
are set. |
|
|
|
|
|
|
|
|
a channel. |
Auto |
|
||||
|
Antenna |
Unit’s display |
|
||||
|
-in |
|
|||||
|
e.g., |
5: |
[0] Ô [5] |
|
|
|
|
|
|
|
|
||||
|
|
||||||
|
e.g., |
5: |
[0] Ô [0] Ô [5] |
|
|
Plug2 |
|
|
|
15: |
[1] Ô [5] |
|
|
|
|
|
Cable TV |
|
|
|
|
|
|
|
|
15: [0] Ô [1] Ô [5] |
|
|
STEP |
|
|
|
|
|
|
|
|||
|
|
115: [1] Ô [1] Ô [5] |
|
|
|
||
|
|
|
|
|
|
||
|
• You can also use [1 2 CH] when you are going to delete a |
|
|
||||
2 |
channel. |
|
|
|
|
|
|
Press [ADD/DLT]. |
|
|
|||||
e.g., The channel is deleted.
Channel 15 Deleted
Restart Plug-in Auto Tuning (after relocation, for example)
The setting of the clock and channel is cleared when you perform the procedure below. Scheduled recording settings are also cleared.
1 When the unit is on and stopped
Press and hold [2 CH] and [1 CH] on the main unit for about five seconds.
The unit turns off.
2 Press [^ DVD POWER].
The language selection screen is displayed.
When “Set Clock Manually” screen is displayed
The “Set Clock Manually” screen is automatically displayed when:
–there is an error while setting the clock automatically.
–you have selected “Input” in step 5 while setting (Ô page 14).
1 Press [w,q] to select the item you
want to change and press [e,r] to change the setting.
Set Clock Manually
Month |
|
Day |
|
Year |
Hour |
Minute |
|||||
|
1 |
|
/ |
1 |
/ |
2000 |
SAT |
12 |
: |
00 |
AM |
|
|
|
|
|
|
|
|
|
|
|
|
DST |
Time Zone |
DST, Time Zone |
Off |
EST |
|
|
|
(Ô below) |
•DST (Daylight Saving Time):
If you select “On”, the clock is advanced one hour starting at 2 a.m. on the first Sunday in April and ending at 2 a.m. on the last Sunday in October.
•Time Zone shows the time difference from Greenwich Mean Time (GMT).
EST (Eastern Standard Time) |
= GMT –5 |
CST (Central Standard Time) |
= GMT –6 |
MST (Mountain Standard Time) = GMT –7 |
|
PST (Pacific Standard Time) |
= GMT –8 |
AST (Alaska Standard Time) |
= GMT –9 |
HST (Hawaii Standard Time) |
= GMT –10 |
2 Press [ENTER].
A picture or a blue background screen is displayed. The clock starts.
RQT8327
15

Channel captions/Selecting television type
TV operation buttons
Numbered
buttons
CANCEL 
e,r,w,q |
|
ENTER |
RETURN |
|
|
|
SETUP |
Channel captions
You can apply the preset captions, or manually enter new ones yourself.
The captions you enter are displayed when the channel is displayed and in the Direct Navigator screen.
•You can set channel captions after channel setting on this unit is completed (Ô page 14–15).
1 While stopped
Press [SETUP].
|
Setup |
|
|
|
|
|
|
|
Signal |
Source (RF IN) |
Cable TV |
|
|
|
|
|
Set Channels Automatically |
|
|
|
|
|
|
Channel Captions |
|
|
|
|
Channel |
|
|
|||
|
|
|
|
|
|
|
|
Setup |
|
Preset Channel Captions |
|
|
|
|
|
|
|
|
|
|
|
Disc |
|
Manual Channel Captions |
|
|
|
|
Video |
|
|
|
|
|
2 Press [e,r] to select “Channel” and press [q].
Preset Channel Captions
3 Press [e,r] to select “Preset Channel Captions” and press [ENTER].
|
Setup |
Preset Channel Captions |
|
|
|
|
|
|
|
Caption Channel Number |
|
|
Channel |
GLOB |
--- |
|
|
|
|
|
Setup |
|
|
|
Disc |
ABC |
--- |
|
Video |
|
|
|
Audio |
PBS |
--- |
|
Display |
CBS |
--- |
|
TV Screen |
ENTER |
|
4 |
|
|
|
Press [e,r] to select the caption and |
|||
|
press [q]. |
|
|
You can choose from the following captions.
ABC, PBS, CBS, CNN, FOX, ESPN, NBC, HBO, A&E, AMC, FAM, MAX, MTV, SHOW, TBS, USA, TNT, CBC, UPN, CTV, WB, TSN, DSC, GLOB
• When selecting the caption, press and hold [e,r] to scroll up and down the screen.
5 Press [e,r] to select the channel
corresponding to the caption and press [w].
•Channels are only displayed if they contain a station and if captions have not been added manually.
•To delete the channel number, press [CANCEL  ].
].
RQT8327 |
6 |
Repeat steps 4 and 5 to enter other channels. |
|
|
|
Press [ENTER]. |
|
16 |
|
||
|
|
|
|
Manual Channel Captions
3 Press [e,r] to select “Manual
Channel Captions” and press [ENTER].
4 Press [e,r] to select the channel and press [q].
• Channels are only displayed if they contain a station and if preset captions have not been added.
5 Press [e,r] to select the first character and press [q].
•You can choose from the following characters: A–Z, 0–9, -, &, !, /, (space)
•To delete the caption, press [CANCEL  ].
].
•Repeat this step to enter the other characters.
|
Setup |
Manual Channel Captions |
|
|
|
|
|
|
|
Channel Number |
Caption |
|
Channel |
6 |
---- |
|
8 |
---- |
|
|
Setup |
||
|
|
|
|
|
Disc |
10 |
AAAA |
|
Video |
|
|
|
Audio |
12 |
---- |
|
Display |
23 |
---- |
|
TV Screen |
ENTER |
|
6 |
|
|
|
Press [w,q] to return to the “Channel |
|||
|
Number” column. |
||
7 |
Repeat steps 4–6 to enter other channels. |
||
Press [ENTER]. |
|
||
To exit the screen
Press [SETUP].
To return to the previous screen
Press [RETURN].
Selecting television type
Do the following if you have connected a progressive television or if you have connected a different type of television after choosing a type during initial setup just after turning the unit on for the first time. Select the item that matches your television.
1 While stopped
Press [SETUP].
2 Press [e,r] to select “TV Screen” and press [q].
3 Press [e,r] to select “TV Type” and press [ENTER].
Setup |
TV Type |
|
|
||
|
4:3 TV |
|
Channel |
Aspect 4:3 & 480i |
|
Aspect 4:3 & 480p |
||
Setup |
||
16:9 Aspect ( Widescreen TV ) |
||
Disc |
||
Aspect 16:9 & 480i |
||
Video |
||
|
||
Audio |
Aspect 16:9 & 480p |
|
Display |
ENTER |
|
TV Screen |
||
|
• 480p/480i:
Select “480p” if the television is compatible with progressive output.
4 Press [e,r] to select the item and press [ENTER].
To exit the screen
Press [SETUP].
To return to the previous screen
Press [RETURN].

Remote control settings
Refer to the control reference on page 16.
Television operation
You can operate the TV through the unit’s remote control.
Point the remote control at the television
While pressing [^ POWER TV], enter the code with the numbered buttons.
e.g., 0250: [0] Ô [2] Ô [5] Ô [0]
Manufacturer and Code No.
Panasonic |
0051/ 0250 |
|
PHILIPS (RC-5) |
0054 |
National |
|
|
|
|
|
|
RCA |
0047 |
|
QUASAR |
|
|
||
|
|
|
|
|
|
|
SAMSUNG |
0060/ 0587/ |
|
|
|
|
||
|
|
|
|
0702 |
|
|
|
|
|
FISHER |
0154 |
|
SANYO |
0154 |
|
|
|
|
|
GE |
0047 |
|
SHARP |
0093/ 0165 |
|
|
|
|
|
GOLDSTAR |
0178/ 0317/ |
|
SONY |
0000 |
|
0457 |
|
|
|
|
|
|
|
|
HITACHI |
0145 |
|
SYLVANIA |
0054 |
|
|
|
|
|
JVC |
0053 |
|
THOMSON |
0047 |
|
|
|
|
|
LG |
0178/ 0317/ |
|
TOSHIBA |
0156 |
|
0457 |
|
|
|
|
|
|
|
|
MAGNAVOX |
0054 |
|
ZENITH |
0017 |
|
|
|
|
|
MITSUBISHI |
0150 |
|
|
|
|
|
|
|
|
Test by turning on the television and changing channels. Repeat the procedure until you find the code that allows correct operation.
•If your television brand is not listed or if the code listed for your television does not allow control of your television, this remote control is not compatible with your television.
When other Panasonic products respond to this remote control
Change the remote control code on the main unit and the remote control (the two must match) if you place other Panasonic products close together.
Use “1”, the factory set code, under normal circumstances.
To change the code on the main unit
1 While stopped
Press [SETUP].
2 Press [e,r] to select “Setup” and press [q].
3 Press [e,r] to select “Remote Control Code” and press [ENTER].
4 Press [e,r] to select the code (“1”, “2”, or “3”) and press [ENTER].
Setup |
|
Remote Control Code |
||
|
|
Press " " and "ENTER" together |
|
|
|
|
for more than 2 seconds on the remote. |
|
|
Channel |
||||
|
|
|
||
Setup |
|
|
|
|
Disc |
|
|
|
|
Video |
|
|
|
|
|
|
|
|
|
To change the code on the remote control
5 While pressing [ENTER], press and
hold the numbered button ([1], [2] or [3]) for more than 2 seconds.
6 Press [ENTER].
nWhen the following indicator appears on the unit’s display
Press and hold [ENTER] and the indicated number button at the same time for more than
2 seconds.
To exit the screen
Press [SETUP].
Clock settings
Refer to the control reference on page 16.
In the case of a power failure, the clock setting remains in memory for approximately 1 minute.
1 While stopped
Press [SETUP].
2 Press [e,r] to select “Setup” and press [q].
3 Press [e,r] to select “Clock Settings” and press [ENTER].
4 Press [e,r] to select “Set Clock Manually” and press [ENTER].
5 Press [w,q] to select the item you
want to change and press [e,r] to change the setting.
•DST (Daylight Saving Time): On or Off
If you select “On”, the clock is advanced one hour starting at 2 a.m. on the first Sunday in April and ending at 2 a.m. on the last Sunday in October.
•Time Zone shows the time difference from Greenwich Mean Time (GMT).
6 Press [ENTER].
The clock starts.
Adjust the time zone (–1 or +1) if it was not set correctly with auto clock setting.
You can set this menu only after “Set Clock Automatically” is completed.
1 While stopped
Press [SETUP].
2 Press [e,r] to select “Setup” and press [q].
3 Press [e,r] to select “Clock Settings” and press [ENTER].
4 Press [e,r] to select “Adjust Time Zone” and press [ENTER].
5 Press [e,r] to select “–1” or “+1” and press [ENTER].
To exit the screen
Press [SETUP].
To return to the previous screen
Press [RETURN].
RQT8327
To return to the previous screen |
17 |
|
Press [RETURN]. |
||
|

Important notes for recording
Recording of MTS broadcasting
RAM
Both main and secondary audio can be recorded
You can change the audio during playback. (Ô page 25, Changing audio)
Main SAP
Hello Hola
If you record from external equipment
–Select both “Main” and “SAP” on the external equipment.
-R -R DL -RW(V) +R +R DL +RW
Select the main or secondary audio before recording
(Ô page 44, “Multi-channel TV Sound ( MTS )”) The selected audio only is recorded.
Main
Hello
If you record from external equipment
– Select “Main” or “SAP” on the external equipment.
Recording of
Widescreen broadcasting
RAM |
|
|
-R |
|
-R DL |
|
-RW(V) |
|
+R |
|
+R DL |
|
+RW |
|||
Recorded in 16:9 aspect (Widescreen) |
Recorded in 4:3 aspect |
|||||||||||||||
|
|
|
|
|
|
|
|
|
|
|
|
|
|
|
|
|
|
|
|
|
|
|
|
|
|
|
|
|
|
|
|
|
|
|
|
|
|
|
|
|
|
|
|
|
|
|
|
|
|
|
It is not possible to record digital broadcasts that allow “One time only recording” onto DVD-R, DVD-R DL,
DVD-RW, +R, +R DL, +RW or 8 cm (3″) DVD-RAM discs. Use a CPRM (Ô page 53) compatible DVD-RAM.
RAM |
(CPRM compatible disc only) |
-R |
|
-R DL |
|
-RW(V) |
|
+R |
|
+R DL |
|
+RW |
Recording of digital broadcasting
•“One time only recording” titles cannot be copied.
•Even when copying to video tape the title may not be copied correctly because of the copy guard.
•You cannot copy a playlist created from “One time only recording” titles.
-R -R DL -RW(V) +R +R DL
The disc must be finalized after recording (Ô page 41).
It is necessary to finalize DVD-R, etc. on this unit after recording or copying titles to them. You can then play them as a commercially sold DVD-Video. However, the discs become play-only and you can no longer record or copy.*
* You can record and copy again if you format DVD-RW.
Playing the disc on other DVD players
To enable play on other DVD equipment, please use “Create DVD Top Menu” in DVD Management menu (Ô page 41).
DVD-R DL and +R DL discs have two layers of recording surface on one side.
It is not possible to record continuously from the first layer to the second layer. Recording stops when space on the first layer becomes full. You must close the first layer to start recording on the second layer. Closing makes the first layer unavailable for recording (editing is still available). You cannot cancel closing. Make certain before proceeding.
Recording to a
DVD-R DL and +R DL
RQT8327
18
Loading...