


DVD Video Recorder Grabadora de DVD vídeo
Operating Instructions Instrucciones de funcionamiento
Model No.
Modelo N.
DMR-E100H DMR-E100H
Before connecting, operating or adjusting this product, please read these instructions completely.
Please keep this manual for future reference.
Antes de conectar, utilizar o ajustar este producto, rogamos que lea enteramente estas instrucciones. Guarde este manual para futuras consultas.
HARD DISK DRIVE
Web Site: http://www.panasonic-europe.com
|
RQT7099-E |
|
EG |
||
|

∫ Before Use |
|
Contents |
|
Before Use |
|
Contents ...................................................................................................... |
2 |
Warning and Important Information ............................................................. |
3 |
Control reference guide ............................................................................... |
4 |
•Remote control ....................................................................................... |
4 |
•Batteries.................................................................................................. |
5 |
•Use ......................................................................................................... |
5 |
•Main unit ................................................................................................. |
5 |
•The unit’s display .................................................................................... |
6 |
TV operation ................................................................................................ |
7 |
Discs ............................................................................................................ |
8 |
•Discs you can use................................................................................... |
8 |
•Features.................................................................................................. |
8 |
Discs that cannot be played ......................................................................... |
9 |
Audio format logos ....................................................................................... |
9 |
Which Disc Types and Programme Types (on HDD) are |
|
Playable on What TV ............................................................................... |
9 |
Discs and accessories ................................................................................. |
9 |
HDD (Hard disk drive) .................................................................................. |
9 |
SD/PC CARD ............................................................................................. |
10 |
Still pictures/SD VIDEO (MPEG4) ............................................................. |
10 |
Connections ............................................................................................... |
11 |
•Connections 1....................................................................................... |
11 |
•Connections 2....................................................................................... |
11 |
Setting Up .................................................................................................. |
12 |
•Preset Download .................................................................................. |
12 |
•Auto Setup ............................................................................................ |
12 |
Selecting between HDD and DVD drives ................................................... |
13 |
Inserting discs ............................................................................................ |
13 |
Playback |
|
Playing discs/programmes recorded on HDD ............................................ |
14 |
•When a menu screen appears on the TV ............................................. |
14 |
Erasing a programme that is being played ................................................ |
14 |
Quick View (Play t1.3) .............................................................................. |
15 |
Starting play from where you stopped it (Resume Function) ..................... |
15 |
Position Memory ........................................................................................ |
15 |
Fast forward and rewind—SEARCH .......................................................... |
15 |
Slow-motion play ....................................................................................... |
15 |
Frame-by-frame viewing ............................................................................ |
15 |
Skipping ..................................................................................................... |
15 |
Direct Play ................................................................................................. |
15 |
Selecting an amount of time to skip—Time Slip ........................................ |
16 |
Manual Skip ............................................................................................... |
16 |
Changing audio .......................................................................................... |
16 |
Marking places to play again—MARKER .................................................. |
17 |
Using menus to play MP3 discs ................................................................. |
18 |
Recording |
|
Playing while you are recording ................................................................. |
19 |
•Chasing play ......................................................................................... |
19 |
•Simultaneous recording and play ......................................................... |
19 |
•TIME SLIP ............................................................................................ |
19 |
Watching the TV while recording ............................................................... |
19 |
Recording TV programmes ........................................................................ |
20 |
•Recording modes and approximate recording times in hours............... |
20 |
Flexible recording mode (FR) .................................................................... |
21 |
One Touch Recording ................................................................................ |
22 |
Direct TV Recording .................................................................................. |
22 |
EXT LINK ................................................................................................... |
22 |
Using the FUNCTIONS window ................................................................. |
23 |
•About the FUNCTIONS window ........................................................... |
23 |
•Using the FUNCTIONS window............................................................ |
23 |
•FUNCTIONS window icons .................................................................. |
23 |
Timer Recording |
|
Using SHOWVIEW ......................................................................................... |
24 |
Manual programming ................................................................................. |
24 |
Auto Renewal Recording ........................................................................... |
26 |
Check, change or delete programmes ....................................................... |
26 |
Advanced Operations |
|
One Touch Dubbing ................................................................................... |
27 |
Approximate recording time ....................................................................... |
27 |
Dubbing programmes, play list or SD VIDEO ............................................ |
28 |
Entering titles ............................................................................................. |
30 |
DISC INFORMATION ................................................................................ |
31 |
•Enter Title ............................................................................................. |
31 |
•Disc Protection...................................................................................... |
31 |
•Erase all programmes........................................................................... |
31 |
•Format .................................................................................................. |
32 |
•Top Menu.............................................................................................. |
32 |
•Auto-Play Select ................................................................................... |
32 |
•Finalize ................................................................................................. |
32 |
Using the DIRECT NAVIGATOR ................................................................ |
33 |
•Selecting programmes to play .............................................................. |
33 |
•About the programme list...................................................................... |
33 |
DIRECT NAVIGATOR ................................................................................ |
34 |
•Erase.................................................................................................... |
34 |
•Enter Title............................................................................................. |
34 |
•Properties............................................................................................. |
34 |
•Protection ............................................................................................. |
34 |
•Partial Erase......................................................................................... |
35 |
•Divide ................................................................................................... |
35 |
•Change thumbnail ................................................................................ |
35 |
Creating play lists ...................................................................................... |
36 |
Using PLAY LIST ...................................................................................... |
37 |
•Playing play lists................................................................................... |
37 |
•Playing Scenes .................................................................................... |
37 |
Using PLAY LIST to edit programmes ...................................................... |
38 |
•Edit ....................................................................................................... |
38 |
•PL Copy ............................................................................................... |
39 |
•PL Erase .............................................................................................. |
39 |
•Enter Title............................................................................................. |
39 |
•Properties............................................................................................. |
39 |
Using DISPLAY menus ............................................................................. |
40 |
•Common procedures............................................................................ |
40 |
•Disc menu ............................................................................................ |
40 |
•Play menu ............................................................................................ |
41 |
•Picture menu ........................................................................................ |
41 |
•Sound menu......................................................................................... |
41 |
Playing still pictures ................................................................................... |
42 |
•Inserting/Removing the SD/PC Card ................................................... |
42 |
•Selecting the folder (Input) ................................................................... |
42 |
•Displaying still pictures (Album) ........................................................... |
43 |
•To display still pictures one by one with |
|
constant interval (Slide Show) ......................................................... |
43 |
Editing still pictures ................................................................................... |
44 |
•Common procedures............................................................................ |
44 |
•Copy..................................................................................................... |
44 |
•Copy all of card .................................................................................... |
45 |
•Erase.................................................................................................... |
45 |
•Protect.................................................................................................. |
45 |
•Print (DPOF) ........................................................................................ |
45 |
•Others .................................................................................................. |
46 |
Editing SD VIDEO (MPEG4) programmes ................................................ |
47 |
•Play ...................................................................................................... |
47 |
•Erase all programmes .......................................................................... |
47 |
•Format SD CARD................................................................................. |
47 |
Using Play to edit programmes ................................................................. |
48 |
•Erase.................................................................................................... |
48 |
•Enter Title............................................................................................. |
48 |
•Properties............................................................................................. |
48 |
•Protection ............................................................................................. |
48 |
Child Lock ................................................................................................. |
48 |
Recording from an external device ........................................................... |
49 |
•Manual Recording ................................................................................ |
49 |
•DV Automatic Recording (DV AUTO REC).......................................... |
49 |
Upgrading your system ............................................................................. |
50 |
Connecting a digital amplifier or system component [A] ........................... |
50 |
Connecting an analog amplifier or system component [B] ........................ |
50 |
Connecting a decoder, satellite receiver or digital receiver ....................... |
51 |
Connecting an external device .................................................................. |
51 |
Various Setting |
|
Changing the unit’s settings ...................................................................... |
52 |
•Common procedures............................................................................ |
52 |
Entering a password (Ratings) .................................................................. |
52 |
Digital output ............................................................................................. |
52 |
Summary of settings ................................................................................. |
53 |
To Manually Adjust the Audio Recording Level ......................................... |
56 |
Remote Setting ......................................................................................... |
56 |
Clock Settings ........................................................................................... |
57 |
•Manual Clock Setting ........................................................................... |
57 |
•Auto Clock Setting................................................................................ |
57 |
Channel Settings ....................................................................................... |
58 |
•Selecting the manual tuning................................................................. |
58 |
•Adding, deleting, and moving channels ............................................... |
59 |
•Auto-Setup Restart, Download............................................................. |
59 |
Status displays .......................................................................................... |
60 |
•Changing the information displayed..................................................... |
60 |
•Display examples ................................................................................. |
60 |
Helpful Hints |
|
Maintenance and Handling ....................................................................... |
61 |
•Maintenance......................................................................................... |
61 |
•Disc handling........................................................................................ |
61 |
Glossary .................................................................................................... |
61 |
Error messages ......................................................................................... |
64 |
Troubleshooting guide ............................................................................... |
65 |
Specifications ............................................................................................ |
69 |
Index ......................................................................................................... |
70 |
2

∫ Before Use
Warning and Important Information
CAUTION!
THIS PRODUCT UTILIZES A LASER.
USE OF CONTROLS OR ADJUSTMENTS OR PERFORMANCE OF PROCEDURES OTHER THAN THOSE SPECIFIED HEREIN MAY RESULT IN HAZARDOUS RADIATION EXPOSURE.
DO NOT OPEN COVERS AND DO NOT REPAIR YOURSELF. REFER SERVICING TO QUALIFIED PERSONNEL.
WARNING:
TO REDUCE THE RISK OF FIRE, ELECTRIC SHOCK OR PRODUCT DAMAGE, DO NOT EXPOSE THIS EQUIPMENT TO RAIN, MOISTURE, DRIPPING OR SPLASHING AND ENSURE THAT NO OBJECTS FILLED WITH LIQUIDS, SUCH AS VASES, SHALL BE PLACED ON THE EQUIPMENT.
NORSK
ADVARSEL!
DETTE PRODUKTET ANVENDER EN LASER. BETJENING AV KONTROLLER, JUSTERINGER ELLER
ANDRE INNGREP ENN DE SOM ER BESKREVENT I DENNE BRUKSANVISNING, KAN FØRE TIL FARLIG BESTRÅLING. DEKSLER MÅ IKKE ÅPNES, OG FORSØK ALDRI Å REPARERE APPARATET PÅ EGENHÅND. ALT SERVICE OG REPARASJONSARBEID MÅ UTFØRES AV KVALIFISERT PERSONELL.
ADVARSEL:
FOR Å REDUSERE FAREN FOR BRANN, ELEKTRISK STØT ELLER SKADER PÅ PRODUKTET, MÅ DETTE APPARATET IKKE UTSETTES FOR REGN, FUKTIGHET, VANNDRÅPER ELLER VANNSPRUT. DET MÅ HELLER IKKE PLASSERES GJENSTANDER FYLT MED VANN, SLIK SOM BLOMSTERVASER, OPPÅ APPARATET.
SUOMI
VAROITUS!
LAITTEEN KÄYTTÄMINEN MUULLA KUIN TÄSSÄ KÄYTTÖOHJEESSA MAINITULLA TAVALLA SAATTAA ALTISTAA KÄYTTÄJÄN TURVALLISUUSLUOKAN 1 YLITTÄVÄLLE NÄKYMÄTTÖMÄLLE LASERSÄTEILYLLE.
VAROITUS:
TULIPALO-, SÄHKÖISKUVAARAN TAI TUOTETTA KOHTAAVAN MUUN VAHINGON VÄHENTÄMISEKSI EI LAITETTA SAA ALTISTAA SATEELLE, KOSTEUDELLE, VESIPISAROILLE TAI ROISKEELLE, EIKÄ NESTETTÄ SISÄLTÄVIÄ ESINEITÄ, KUTEN ESIMERKIKSI MALJAKOITA, SAA ASETTAA LAITTEEN PÄÄLLE.
As this equipment gets hot during use, operate it in a well ventilated place;
do not install this equipment in a confined space such as a book case or similar unit.
Keep the small memory cards such as the SD Memory Card out of reach of children. If swallowed, seek medical advice immediately.
≥SD logo is a trademark.
≥Portions of this product are protected under copyright law and are provided under license by ARIS/SOLANA/4C.
ªImportant
Your attention is drawn to the fact that the recording of pre-recorded tapes or discs or other published or broadcast material may infringe copyright laws.
ªFor your safety
Do not remove outer cover.
Touching internal parts of the unit is dangerous, and may seriously damage it.
To prevent electric shock, do not remove cover. There are no user serviceable parts inside. Refer all servicing to qualified service personnel.
ªConserve the environment
See “Power Save” of page 53.
ªDisposal of old equipment
Batteries, packaging and old equipment should not be disposed of as domestic waste, but in accordance with the applicable regulations.
ªCautions before you operate this unit
Avoid:
≥Humidity and dust.
≥Extreme heat such as direct sunlight. ≥Magnets or electromagnetic objects. ≥Touching internal parts of the unit.
≥Water or some other liquid.
≥Lightning. (Disconnect the aerial plug from the unit during lightning storms.)
≥Anything heavy on the unit.
≥Connecting or handling the equipment with wet hands. ≥Using a cell phone near the unit because it may cause noise
affecting the picture and sound.
Do:
≥Wipe the unit with a clean and dry cloth. ≥Install the unit in a horizontal position.
≥Keep the unit, TV and other equipment switched off until all connections are finished.
SHOWVIEW is a trademark of Gemstar Development Corporation. The SHOWVIEW system is manufactured under licence from Gemstar Development Corporation.
MPEG Layer-3 audio decoding technology licensed from Fraunhofer IIS and Thomson multimedia.
ªNotes on these instructions
≥Company names, product names and all other names in these instructions are the trademarks or registered trademarks of their respective corporations.
≥These operating instructions describe operations mainly using the remote control.
≥The contents of the screens used in these instructions may not necessarily match what you will see on your screen.
ªDisplays
The displays shown in these instructions are examples. Actual displays depend on discs.
≥In certain circumstances, icons will be displayed in gray and will not respond if clicked on. This means that the function represented by the icon is disabled.
Manufactured under license from Dolby Laboratories.
“Dolby”, “Pro Logic” and the double-D symbol are trademarks of Dolby Laboratories.
“DTS” and “DTS Digital Out” are trademarks of Digital Theater Systems, Inc.
Standard Accessories 1 pc. RF Coaxial cable 1 pc. Remote Control
(EUR7624KC0)
2 pcs. R6 size batteries
1 pc. AC mains lead
1 pc. Audio/Video cable
1 pc. DVD-RAM disc
ENGLISH
3

∫ Before Use
Inside of unit
DANGER |
VISIBLE AND INVISIBLE LASER RADIATION WHEN OPEN. |
|
|
|
||||
|
AVOID DIRECT EXPOSURE TO BEAM. |
(FDA 21 CFR) |
|
|
|
|||
CAUTION |
VISIBLE AND INVISIBLE LASER RADIATION WHEN OPEN. |
|
|
|
||||
|
AVOID EXPOSURE TO BEAM. |
(IEC60825-1) |
|
|
|
|||
ATTENTION |
RAYONNEMENT LASER VISIBLE ET INVISIBLE EN CAS D’OUVERTURE. |
|
|
|
||||
|
EXPOSITION DANGEREUSE AU FAISCEAU. |
|
|
|
|
|||
ADVARSEL |
SYNLIG OG USYNLIG LASERSTRÅLING VED ÅBNING. |
|
|
|
|
|||
|
UNDGÅ UDSÆTTELSE FOR STRÅLING. |
|
|
|
|
|||
VARO! |
AVATTAESSA OLET ALTTIINA NÄKYMÄTÖN |
|
|
|
|
|||
|
LASERSÄTEILYLLE. ÄLÄ KATSO SÄTEESEEN. |
|
|
|
|
|||
VARNING |
SYNLIG OCH OSYNLIG LASERSTRÅLNING NÄR DENNA DEL |
|
|
|
||||
|
ÄR ÖPPNAD. BETRAKTA EJ STRÅLEN. |
|
|
|
|
|||
ADVARSEL |
SYNLIG OG USYNLIG LASERSTRÅLING NÅR DEKSEL ÅPNES. |
|
|
|
||||
|
UNNGÅ EKSPONERING FOR STRÅLEN. |
|
|
|
|
|||
VORSICHT |
SICHTBARE UND UNSICHTBARE LASERSTRAHLUNG, WENN ABDECKUNG |
|
|
|
||||
|
GEÖFFNET. NICHT DEM STRAHL AUSSETZEN. |
|
|
|
|
|||
|
|
|
|
|
|
|
|
|
RQLS0233
Control reference guide
Remote control
DVD
 TV
TV
DVD TV
HDD DVD
ShowView DIRECTTVREC INPUTSELECT |
AV |
1 2 3
CH
4 5 6
VOLUME
7 8 9
CANCEL
0 -/--
SKIP |
SLOW/SEARCH |
STOP PAUSE PLAY/x1.3
DIRECTNAVIGATOR |
PLAY LIST |
TOP MENU |
MENU |
|
ENTER |
FUNCTIONS |
RETURN |
FRAME |
MANUAL SKIP TIME SLIP |
PROG/CHECK |
TIMER |
ERASE |
REC |
STATUS |
MARKER |
DUBBING REC MODE |
|
DISPLAY |
POSITION |
AUDIO |
AV LINK |
MEMORY |
|||
A |
B |
C |
D |
Page
(1) DVD on/off button (DVD, Í) . . . . . . . . . . . . . . . . . . . . . . 12
≥To switch the unit from on to standby mode or vice versa. In the standby mode, the unit is still connected to the mains.
(2) TV on/off button (TV, Í) . . . . . . . . . . . . . . . . . . . . . . . . . . 7
(3) SHOWVIEW button (ShowView) . . . . . . . . . . . . . . . . . . . . . 24
(4) Direct TV recording button (¥, DIRECT TV REC) . . . . . 22
(5) Numeric buttons (0–9, – /– –) . . . . . . . . . . . . . . . . . . . . . . 7
(6) Cancel button (CANCEL) . . . . . . . . . . . . . . . . . . . . . . . . 17
(7) Skip buttons (:, 9, SKIP) . . . . . . . . . . . . . . . . . . . 15
(8) Stop button (∫, STOP) . . . . . . . . . . . . . . . . . . . . . . . . . . 14
(9) Pause button (;, PAUSE) . . . . . . . . . . . . . . . . . . . . . . . . 14 (10)Top menu and Direct Navigator button
(TOP MENU, DIRECT NAVIGATOR) . . . . . . . . . . . . . 14, 33 (11)Cursor buttons (3, 4, 2, 1)/
Enter button (ENTER) . . . . . . . . . . . . . . . . . . . . . . . . . . . 12 (12)Functions button (FUNCTIONS) . . . . . . . . . . . . . . . . . . . 23 (13)Frame buttons (2;, ;1, FRAME) . . . . . . . . . . . . . . . . 15 (14)Manual programming and check button
(PROG/CHECK) . . . . . . . . . . . . . . . . . . . . . . . . . . . . . . . . 24 (15)Timer recording button ( , TIMER) . . . . . . . . . . . . . . . 24 (16)Status display button (STATUS) . . . . . . . . . . . . . . . . 22, 60 (17)Marker button (MARKER) . . . . . . . . . . . . . . . . . . . . . . . . 17 (18)Display button (DISPLAY) . . . . . . . . . . . . . . . . . . . . . . . . 17 (19)Position memory button (POSITION MEMORY) . . . . . . 15 (20)DVD/TV switch (DVD, TV) . . . . . . . . . . . . . . . . . . . . . . . . . 5 (21)HDD button (HDD) . . . . . . . . . . . . . . . . . . . . . . . . . . . . . . 13 (22)DVD button (DVD) . . . . . . . . . . . . . . . . . . . . . . . . . . . . . . 13 (23)TV input mode selector (AV). . . . . . . . . . . . . . . . . . . . . . . 7 (24)Input select button (INPUT SELECT) . . . . . . . . . . . . . . . 49 (25)Channel up/down buttons (CH, W, X) . . . . . . . . . . . . . . 20 (26)TV volume up/down buttons (VOLUME, r, s) . . . . . . . . 7 (27)Slow/Search buttons (6, 5, SLOW/SEARCH) . . . . 15 (28)Play button (1, PLAY/t1.3) . . . . . . . . . . . . . . . . . . . . . . 14 (29)Menu and Play List button (MENU, PLAY LIST) . . . 14, 37 (30)Return button (RETURN) . . . . . . . . . . . . . . . . . . . . . . . . 14 (31)Time slip button (TIME SLIP) . . . . . . . . . . . . . . . . . . 16, 19 (32)Manual skip button (MANUAL SKIP) . . . . . . . . . . . . . . . 16 (33)Recording button (¥, REC). . . . . . . . . . . . . . . . . . . . . . . 20 (34)Erase button (ERASE) . . . . . . . . . . . . . . . . . . . . . . . . . . . 14 (35)Recording mode button (REC MODE) . . . . . . . . . . . . . . 20 (36)Dubbing button (DUBBING) . . . . . . . . . . . . . . . . . . . . . . 27 (37)AV link button (AV LINK) . . . . . . . . . . . . . . . . . . . . . . . . . 51 (38)Audio button (AUDIO) . . . . . . . . . . . . . . . . . . . . . . . . 16, 56
4

∫ Before Use
Batteries
≥Do not use rechargeable type batteries.
Do not;
≥mix old and new batteries.
≥use different types at the same time. ≥heat or expose to flame.
≥take apart or short circuit.
≥attempt to recharge alkaline or manganese batteries.
≥use batteries if the covering has been peeled off.
Mishandling of batteries can cause electrolyte leakage which can damage items the fluid contacts and may cause a fire.
Remove if the remote control is not going to be used for a long time. Store in a cool, dark place.
Opening the rear cover |
Closing the rear cover |
1 Slide it with your finger.
Slide into place.
PUSH
PUSH |
+ - |
3
-
+
2
R6, AA, UM-3
Use
Aim at the sensor, avoiding obstacles, at a maximum range of 7 m directly in front of the unit.
≥Keep the transmission window and the unit’s sensor free from dust.
≥Operation can be affected by strong light sources, such as direct sunlight, and the glass doors on cabinets.
≥Switch [DVD, TV] to “DVD”.
Remote control signal sensor
20 
20 
30
30 
7 m directly in front of the unit
Main unit
1
|
|
EJECT |
S D C A R D |
P C C A R D |
|
S-VIDEO IN |
VIDEO IN |
L/MONO-AUDIO IN-R |
AV3 |
|
|
|
|
DV IN |
|
E F |
I |
R ? |
|
OPEN/CLOSE |
REC |
HDD |
REC |
DVD |
|
|
|
REC MODE |
CH |
CH |
REC |
ERASE |
TIMERREC |
EXT LINK |
|
TIME SLIP TIME SLIP |
|
/x1.3 |
|
|
|
|
S |
O 8LQ |
|
|
|
|||
Page (39)Remote control signal sensor. . . . . . . . . . . . . . . . . . . . . . 5 (40)SD card slot (SD CARD) . . . . . . . . . . . . . . . . . . . . . . . . . 42 (41)PC card slot (PC CARD) . . . . . . . . . . . . . . . . . . . . . . . . . 42 (42)PC card eject button (EJECT) . . . . . . . . . . . . . . . . . . . . . 42 (43)Disc tray . . . . . . . . . . . . . . . . . . . . . . . . . . . . . . . . . . . . . . 13 (44)Disc tray open/close button (<, OPEN/CLOSE) . . . . . . 13 (45)HDD record lamp (HDD REC) . . . . . . . . . . . . . . . . . . . . . 13 (46)DVD record lamp (DVD REC). . . . . . . . . . . . . . . . . . . . . . 13 (47)External link button (EXT LINK) . . . . . . . . . . . . . . . . . . . 22
(48)Standby indicator
≥When the unit in connected to the AC mains lead, this indicator lights up in standby mode and goes out when the unit is turned on.
(49)AV3 input terminals (AV3). . . . . . . . . . . . . . . . . . . . . . . . 51 (50)DV input terminal (DV IN) . . . . . . . . . . . . . . . . . . . . . . . . 51 (51)Display . . . . . . . . . . . . . . . . . . . . . . . . . . . . . . . . . . . . . . . . 6 (52)Time slip indicator (TIME SLIP) . . . . . . . . . . . . . . . . 16, 19
≥While both recording and play are activated, this indicator lights up.
(53)Skip/Slow/Search buttons (:/6, 5/9) . . . . . . 15
Buttons such as 1 function the same as the buttons on the remote control. (page 4)
5
∫ Before Use
The unit’s display
Rotating (REC): recording |
Rotating (REC, PLAY): |
Rotating (PLAY): playing |
||||||||||||||
Stopped (REC): recording paused |
Chasing play, Simultaneously recording |
Stopped (PLAY): play paused |
||||||||||||||
|
|
|
and play |
|
|
|
|
|
|
|
|
|||||
|
|
|
|
|
|
|
|
|
|
|
|
|
|
|
|
|
|
|
|
|
|
|
|
|
|
|
|
|
|
|
|
|
|
|
|
|
|
|
|
|
|
|
|
|
|
|
|
|
|
|
|
|
|
|
|
|
|
|
|
|
|
|
|
|
|
|
|
|
|
|
|
|
|
|
|
|
|
|
|
|
|
|
|
|
|
|
|
|
|
|
|
|
|
|
|
|
|
|
|
|
|
(10)
(1)Timer programme display ( ) (pages 24 and 25)
On:
When a programme for timer recording is on.
Flashes:
When there are less than 10 minutes to go before timer recording is programmed, but the unit is not on standby.
(2)Disc type
(3)Recording mode (page 20)
XP SP LP EP (all on): FR mode (page 21)
(4)The display mode of the main display section GRP: group number
TITLE: title number PL: play list number CHAP: chapter number
PG: programme number TRACK: track number
(5)DVD indicator On:
In the DVD mode with AV LINK Function. (page 51)
(6)External link display (page 22)
On:
When a linked timer recording with external device is in standby mode, or being performed.
(7)SD/PC Card indicator (CARDuPC card, SDuSD card)
On:
When a SD or PC card is set in the unit.
Flashes:
When a SD or PC card is being read/written to.
(11)
(8)Down-mix indicator (D.MIX) On:
When a multi-channel soundtrack is downmixed to 2 channel output.
(9)MPEG4 indicator
On:
When the SD VIDEO (MPEG4) can be simultaneously recorded.
(10)Channel
(11)Main display section
Remaining recording time/PG (recorded programme on the HDD/DVD-RAM)/Title etc. of the currently selected drive (HDD/DVD)
≥Remaining recording time: (For example)
1 hour )Displayed as “R 1:00”
Note
≥A half mirror is used for the unit’s display so the display may occasionally be difficult to see depending on surrounding conditions.
≥If “FL Display” is set to “Automatic” (page 55) or the power save setting is active (page 53), the unit’s display will not light up. Also, in addition to the aforementioned conditions, if the power is off
and the unit is in timer recording standby mode, only lights up in the display.
If the unit is carrying out a timer recording, the  of the unit’s display and HDD/DVD record lamp light.
6

∫ Before Use
TV operation
|
DVD |
TV |
TV |
|
|
DVD TV |
|
||
|
|
|
||
Í, TV |
HDD |
DVD |
|
|
ShowView DIRECTTVREC INPUTSELECT |
AV |
AV |
||
|
||||
|
|
|
|
1 |
2 |
3 |
CH |
Numeric |
|
|
CH |
|
4 |
5 |
6 |
|
|
Buttons |
|
|||
|
|
VOLUME |
|
|
|
7 |
8 |
9 |
VOLUME |
|
CANCEL |
|
||
|
STATUS |
MARKER DUBBING REC MODE |
|
|
|
DISPLAY |
POSITION |
AUDIO |
AV LINK |
|
|
A |
MEMORY |
D |
||||
A |
B |
C |
D |
|||
|
|
|||||
|
B |
|
|
|
C |
You can control TVs by entering the remote control code.
List of TVs Compatible with the unit’s Remote Control Manufacture and Code No.
Preparation
≥Turn on the TV.
[1]Refer to the chart below for the code for your TV.
[2]Press and hold [TV, Í] and enter the
2-digit code with the numeric buttons.
≥e.g.: “01”: [0] )[1].
≥After entering the code, test the remote control by turning on the TV and changing channels.
Note
≥If there is more than one code, repeat the procedure until you find the code that allows correct operation.
≥If your TV brand is not listed or if the code listed here does not allow control of your TV, this remote is not compatible with your TV.
|
|
|
|
|
|
|
|
Operation: |
|
|
|
|
|
|
|
|
|
|
|
|
|
Button |
|
|
|
|
|
|
|
|
|
|
|
|
|
|||||||||||||||||||||||||||||||
|
|
|
|
|
|
|
|
On and off: |
|
|
|
|
|
|
|
|
|
|
|
|
|
[TV, Í] |
|
|
|
|
|
|
|
|
|
|
|
|
|
|||||||||||||||||||||||||||||||
|
|
|
|
|
|
|
|
Video input mode: |
|
|
|
|
|
|
|
|
|
|
|
|
|
[AV] |
|
|
|
|
|
|
|
|
|
|
|
|
|
|||||||||||||||||||||||||||||||
|
|
|
|
|
|
|
|
Channels: |
|
|
|
|
|
|
|
|
|
|
|
|
|
[CH, W, X] |
|
|
|
|
|
|
|
|
|
|
|
|
|
|||||||||||||||||||||||||||||||
|
|
|
|
|
|
|
|
Volume: |
|
|
|
|
|
|
|
|
|
|
|
|
|
[VOLUME, i, j] |
|
|
|
|
|
|
|
|
|
|
|
|
|
|||||||||||||||||||||||||||||||
|
|
|
|
|
|
|
|
Numeric: |
|
|
|
|
|
|
|
|
|
|
|
|
|
[0–9, -/--] |
|
|
|
|
|
|
|
|
|
|
|
|
|
|||||||||||||||||||||||||||||||
|
|
|
|
|
|
|
|
|
|
|
|
|
|
|
|
|
|
|
|
|
|
|
|
|
|
|
|
|
|
|
|
|
|
|
|
|
|
|
|
|
|
|
|
|
|
|
|
|
|
|
|
|
|
|
|
|
|
|
|
|
|
|
|
|
|
|
Panasonic |
01, 02, 03, 04, 44 |
GOODMANS |
05, 06, 31 |
|
|
|
|
|
|
|
|
|
|
NOKIA |
|
25, 26, 27 |
|
|
|
|
SANYO |
21 |
|
|
|
|
|
|
|
|
|
|
|
|
|
|||||||||||||||||||||||||||||||||||||||||||||||||||||||||||||||||||||||||||||||||||||||||
AIWA |
35 |
|
|
|
|
|
|
|
|
|
|
|
|
|
|
GRUNDIG |
09 |
|
|
|
|
|
|
|
|
|
|
|
|
|
|
|
|
|
NORDMENDE |
10 |
|
|
|
|
SBR |
06 |
|
|
|
|
|
|
|
|
|
|
|
|
|
|||||||||||||||||||||||||||||||||||||||||||||||||||||||||||||||||||||
AKAI |
27, 30 |
|
|
|
|
|
|
|
|
|
|
|
HITACHI |
22, 23, 31, 40, 41, 42 |
ORION |
|
|
|
37 |
|
|
|
|
|
|
|
|
|
|
|
SCHNEIDER |
05, 06, 29, 30, 31 |
||||||||||||||||||||||||||||||||||||||||||||||||||||||||||||||||||||||||||||||||||||||||||||
BLAUPUNKT |
09 |
|
|
|
|
|
|
|
|
|
|
|
|
|
|
INNO HIT |
34 |
|
|
|
|
|
|
|
|
|
|
|
|
|
|
|
|
|
PHILIPS |
|
|
|
05, 06 |
|
|
|
|
|
|
|
|
SELECO |
06, 25 |
|
|
|
|
|
|
|
|
|
|
|||||||||||||||||||||||||||||||||||||||||||||||||||||||||||||||||
BRANDT |
10, 15 |
|
|
|
|
|
|
|
|
|
|
|
IRRADIO |
30 |
|
|
|
|
|
|
|
|
|
|
|
|
|
|
|
|
|
PHONOLA |
|
|
|
31, 33 |
|
|
|
|
|
|
|
|
SHARP |
18 |
|
|
|
|
|
|
|
|
|
|
|
|
|
|||||||||||||||||||||||||||||||||||||||||||||||||||||||||||||||||
BUSH |
05, 06 |
|
|
|
|
|
|
|
|
|
|
|
ITT |
25 |
|
|
|
|
|
|
|
|
|
|
|
|
|
|
|
|
|
PIONEER |
|
|
|
38 |
|
|
|
|
|
|
|
|
|
|
|
SIEMENS |
09 |
|
|
|
|
|
|
|
|
|
|
|
|
|
||||||||||||||||||||||||||||||||||||||||||||||||||||||||||||||
CURTIS |
31 |
|
|
|
|
|
|
|
|
|
|
|
|
|
|
JVC |
17, 39 |
|
|
|
|
|
|
|
|
|
|
|
|
|
|
PYE |
|
|
|
05, 06 |
|
|
|
|
|
|
|
|
SINUDYNE |
05, 06, 33 |
|
|
|
|
|
|
|
|||||||||||||||||||||||||||||||||||||||||||||||||||||||||||||||||||||||
DESMET |
05, 31, 33 |
|
|
|
|
|
|
|
LOEWE |
07 |
|
|
|
|
|
|
|
|
|
|
|
|
|
|
|
|
|
RADIOLA |
|
|
|
05, 06 |
|
|
|
|
|
|
|
|
SONY |
08 |
|
|
|
|
|
|
|
|
|
|
|
|
|
|||||||||||||||||||||||||||||||||||||||||||||||||||||||||||||||||||||
DUAL |
05, 06 |
|
|
|
|
|
|
|
|
|
|
|
METZ |
28, 31 |
|
|
|
|
|
|
|
|
|
|
|
|
|
|
SABA |
|
|
|
10 |
|
|
|
|
|
|
|
|
|
|
|
TELEFUNKEN |
10, 11, 12, 13, 14 |
||||||||||||||||||||||||||||||||||||||||||||||||||||||||||||||||||||||||||||||
ELEMIS |
31 |
|
|
|
|
|
|
|
|
|
|
|
|
|
|
MITSUBISHI |
06, 19, 20 |
|
|
|
|
|
|
|
|
|
|
SALORA |
|
|
|
26 |
|
|
|
|
|
|
|
|
|
|
|
THOMSON |
10, 15 |
|
|
|
|
|
|
|
|
|
|
|||||||||||||||||||||||||||||||||||||||||||||||||||||||||||||||||||||
FERGUSON |
10 |
|
|
|
|
|
|
|
|
|
|
|
|
|
|
MIVAR |
24 |
|
|
|
|
|
|
|
|
|
|
|
|
|
|
|
|
|
SAMSUNG |
|
|
|
31, 32, 43 |
|
|
|
|
TOSHIBA |
16 |
|
|
|
|
|
|
|
|
|
|
|
|
|
||||||||||||||||||||||||||||||||||||||||||||||||||||||||||||||||||
GOLDSTAR/LG |
31 |
|
|
|
|
|
|
|
|
|
|
|
|
|
|
NEC |
36 |
|
|
|
|
|
|
|
|
|
|
|
|
|
|
|
|
|
SANSUI |
|
|
|
05, 31, 33 |
|
|
|
|
WHITE |
05, 06 |
|
|
|
|
|
|
|
|
|
|
|||||||||||||||||||||||||||||||||||||||||||||||||||||||||||||||||||||
|
|
|
|
|
|
|
|
|
|
|
|
|
|
|
|
|
|
|
|
|
|
|
|
|
|
|
|
|
|
|
|
|
|
|
|
|
|
|
|
|
|
|
|
|
|
|
|
|
|
|
|
|
|
|
|
|
|
|
|
|
|
|
|
|
|
|
|
|
|
|
|
|
|
|
|
|
|
|
|
|
|
|
|
|
|
|
|
|
|
|
|
WESTINGHOUSE |
|
|
|
|
|
|
|
|
|
|
|
|
|
|
|
|
|
|||||||||||||||
|
|
|
|
|
|
|
|
|
|
|
|
|
|
|
|
|
|
|
|
|
|
|
|
|
|
|
|
|
|
|
|
|
|
|
|
|
|
|
|
|
|
|
|
|
|
|
|
|
|
|
|
|
|
|
|
|
|
|
|
|
|
|
|
|
|
|
|
|
|
|
|
|
|
|
|
|
|
|
|
|
|
|
|
|
|
|
|
|
|
|
|
|
|
|
|
|
|
|
|
|
|
|
|
|
|
|
|
|
|
|
|
|
|
|
|
|
|
|
|
|
|
|
|
|
ªThe 3 methods for switching to the AV input on your
Panasonic TV
Your Panasonic TV uses one of 3 different methods for switching between TV reception and the AV input(s). Follow the steps on the switching methods A, B and C to determine which one your Panasonic TV uses.
A
1)Switch [DVD, TV] to “TV”.
2)Press [AV] to switch to the AV input.
Each press of [AV] switches between “TV reception” and “AV input(s)”.
B (for the remote control code No.44)
1)Switch [DVD, TV] to “TV”.
2)Press [AV].
Colour bars for selecting the AV input appear on the TV screen.
3)Follow the instructions displayed on the TV screen to select the desired AV input from the displayed colour bars for the AV input by pressing [A], [B], [C] or [D] on the remote control.
C (for the remote control code No.01)
1)Switch [DVD, TV] to “TV”.
2)Press [AV].
The last previously selected AV input indication appears on the TV screen. The indications for selecting another AV input also appear, but they disappear a few seconds later.
3)Before the indications for selecting another AV input disappear, press [A], [B], [C] or [D] to select the desired AV input.
With the following four buttons, you can move and select as follows:
[A]: Move left [B]: Move down [C]: Move up [D]: Move right
7

∫ Before Use
Discs
Discs you can use
≥On DVD-Audio, DVD-Video and Video CD, the producer of the material can control how these discs are played. This means that you may not be able to control play of a disc with some operations described in these operating instructions. Read the disc’s information for details.
The features you can use with the different types of discs are as follows.
Disc type |
Logo |
Indication |
Possible operations° |
Example of configuration |
|
|
|
|
|
|
|
|
|
|
|
||||||||
A |
B |
C |
D |
E |
|
|
|
|
|
|
|
|
|
|
|
||||||||
|
|
|
|
|
|
|
|
|
|
|
|
|
|
|
|
|
|
|
|
|
|
|
|
DVD-RAM |
|
|
|
|
|
|
|
Programme |
|
|
|
|
|
|
|
|
|
|
|
|
|||
|
|
|
|
|
|
|
1 |
2 |
3 |
4 |
|
|
|
5 |
|
|
|||||||
4.7 GB / 9.4 GB, 12 cm (5z) |
|
[RAM] |
≤ |
≤ |
≤ |
≤ |
≤ |
Scene (Play List) |
|
|
|
|
|
|
|
|
|
|
|
|
|||
|
|
|
|
|
|
|
|
|
|
|
|
|
|||||||||||
2.8 GB 8 cm (3z) |
|
|
|
|
|
|
|
1 |
2 |
3 |
4 |
|
|
|
5 |
|
|
||||||
|
|
|
|
|
|
|
|
|
|
|
|
|
|
|
|
|
|
|
|
|
|
|
|
|
|
|
|
|
|
|
|
|
|
|
|
|
|
|
|
|
|
|
|
|
|
|
|
DVD-R |
|
[DVD-R] |
≤ |
≤ |
≤°° |
t |
t |
Programme |
|
|
|
|
|
|
|
|
|
|
|
|
|
|
|
4.7 GB 12 cm (5z), 1.4 GB 8 cm (3z) |
|
Not finalized |
|
|
|
1 |
2 |
3 |
4 |
|
5 |
|
|
|
|||||||||
for General Ver.2.0 |
|
|
|
|
|
|
|
|
|
|
|
|
|
|
|
|
|
|
|
|
|
|
|
|
|
|
|
|
|
|
Title |
|
|
|
|
|
|
|
|
|
|
|
|
|
|||
4.7 GB 12 cm (5z) |
|
[DVD-V] |
t |
≤ |
t |
t |
t |
|
|
1 |
|
|
2 |
|
|
|
|
||||||
for General Ver.2.0/4k-SPEED |
|
Finalized |
Chapter |
|
|
|
|
|
|
|
|
|
|
|
|
|
|||||||
|
|
1 |
2 |
3 |
4 |
|
|
|
5 |
|
|
||||||||||||
DVD-R Revision 1.0 |
|
|
|
|
|
|
|
|
|
|
|
|
|
||||||||||
|
|
|
|
|
|
|
|
|
|
|
|
|
|
|
|
|
|
|
|
|
|
|
|
DVD-Audio |
|
|
|
|
|
|
|
Group |
|
|
|
|
|
|
|
|
|
|
|
|
|
||
|
[DVD-A] |
t |
≤ |
t |
t |
≤ |
|
|
1 |
|
|
2 |
|
|
|
|
|||||||
|
Track |
|
|
|
|
|
|
|
|
||||||||||||||
(Play is in stereo only.) |
|
|
1 |
2 |
3 |
4 |
|
|
|
5 |
|
|
|||||||||||
|
|
|
|
|
|
|
|
|
|
|
|
|
|
||||||||||
|
|
|
|
|
|
|
|
|
|
|
|
|
|
|
|
|
|
|
|
|
|
|
|
|
|
|
|
|
|
|
|
|
|
|
|
|
|
|
|
|
|
|
|
|
|
|
|
|
|
|
|
|
|
|
|
|
|
|
|
|
|
|
|
|
|
|
|||||
DVD-Video |
|
|
|
|
|
|
|
.......................Title |
|
|
1 |
|
|
2 |
|
|
|
|
|||||
|
[DVD-V] |
t |
≤ |
t |
t |
≤ |
.................Chapter |
|
1 |
2 |
3 |
4 |
|
|
|
5 |
|
|
|||||
|
|
|
|
|
|
|
|
|
|
|
|
|
|
|
|
|
|
|
|
|
|
|
|
|
|
|
|
|
|
|
|
Track |
|
|
|
|
|
|
|
|
|
|
|
|
|
|
|
|
|
[CD] |
t |
≤ |
t |
t |
t |
|
|
|
1 |
2 |
3 |
4 |
|
|
5 |
|
|
|
|||
|
|
|
|
|
|
|
|
|
|
||||||||||||||
Audio CD |
|
|
|
|
|
|
|
|
|
|
|
|
|
|
|
|
|
|
|
|
|
|
|
|
|
|
|
|
|
|
Group |
|
|
|
|
|
|
|
|
|
|
|
|
|
|||
(Including discs recorded with |
|
|
|
|
|
|
|
|
|
|
|
|
|
|
|
|
|
||||||
|
|
|
|
|
|
|
|
|
1 |
|
|
2 |
|
|
|
|
|||||||
MP3.) |
|
|
|
|
|
|
|
|
|
|
|
|
|
|
|
|
|
|
|
|
|
|
|
– |
[MP3] |
t |
≤ |
t |
t |
t |
Track |
1 |
2 |
3 |
1 |
|
|
|
2 |
|
|
||||||
|
|
|
|
||||||||||||||||||||
|
|
|
|
|
|
|
|
.............Total track |
1 |
2 |
3 |
4 |
|
|
|
5 |
|
|
|||||
|
|
|
|
|
|
|
|
|
|
|
|
|
|
|
|||||||||
|
|
|
|
|
|
|
|
|
|
|
|
|
|
|
|
|
|
|
|
|
|
|
|
|
|
|
|
|
|
|
|
Track |
|
|
|
|
|
|
|
|
|
||||||
Video CD |
|
[VCD] |
t |
≤ |
t |
t |
≤ |
|
|
1 |
2 |
3 |
4 |
|
5 |
|
|
|
|||||
|
|
|
|
|
|
|
|
|
|
|
|
|
|
|
|
|
|
|
|
|
|
|
|
° Possible operations (≤: OK t: NG)
A Recording B Playback |
C Programme erase/Titling |
D Creating play lists |
E Selecting audios |
°° The remaining of the disc will not be increased even if erased.
For your reference
≥Functions that can use the card (page 10) are indicated by [SD] (SD card) [CARD] (PC card).
≥Functions that can use the internal hard disk (page 9) are indicated by [HDD].
Features
DVD-RAM
This capable of rewriting and editing. There are 2 types of DVD-RAM, single-sided and double-sided. The capacity of the double-sided disc is 9.4 GB.
≥This unit is compatible with the Content Protection for Recordable Media (CPRM) system so you can record broadcasts that allow one copy, such as some CATV broadcasts, onto 4.7 GB/9.4 GB DVD-RAM (these are CPRM compatible). It is not possible to record onto DVD-R or 2.8 GB DVD-RAM.
≥This unit cannot record to discs containing both PAL and NTSC signals. (However, both types of programme may be recorded onto the HDD.) Play of discs recorded with both PAL and NTSC on another unit is not guaranteed.
≥DVD-RAMs recorded on this unit cannot be played on incompatible players.
≥We recommend using Panasonic’s DVD-RAM, which is confirmed the compatibility with this unit.
≥The aspect ratio of the recorded images will be the same as that of the originals.
DVD-R
This is a recordable disc with high compatibility and storage stability. (You cannot rewrite it.) This unit is capable of recording of DVD-R from 1k speed to 4k speed.
≥You can play DVD-R on compatible DVD players by finalizing it on this unit.
≥The aspect ratio of the recorded images will be 4:3.
≥DVD-R can be record only either of bilingual audio (M1 or M2). Select the desirable audio type in “Bilingual Audio Selection” (page 54).
≥Some broadcasts carry signals that allow you to copy once, but you cannot record them with DVD-R. Use DVD-RAM to record these kinds of broadcast.
≥Before finalizing, erasing programmes will not increase the disc’s available time.
≥After finalizing, these DVD-R can no longer be recorded on or edited.
≥This unit may not be able to play back DVD-Rs other than Panasonic’s product depending on the recording condition.
≥DVD-R recorded by this unit cannot be recorded by other Panasonic’s DVD recorders in some cases.
≥Recording to DVD-R (maximum) with k24 speed
-If you use DVD-R which is compatible with high speed, you can record from HDD to DVD-R with the speed up to 24 times faster than as usual (in EP mode). The programmes stored on HDD can be quickly recorded on DVD-R.
DVD-Audio
This is a disc for music with high sound quality.
≥In this unit, it is played with 2 channels (stereos).
DVD-Video
2
This is a marketed software with high picture quality which
already includes movies or music. |
ALL |
|
≥This unit can play discs with marks (region number) shown on the |
||
|
||
right. |
234 |
|
Audio-CD |
This is a marketed software which already includes music or audio. This is a CD-R or a CD-RW including music recorded in MP3 compression technology.
≥This unit can play finalized CD-R/CD-RW (audio recording disc) recorded under CD-DA (digital audio), Video CD or MP3 format. Some CD-R or CDRW may not be played due to the condition of the recording.
Video-CD
This is a marketed software which already includes music or audio.
Visit Panasonic’s homepage for more information about DVDs. http://www.matsushita-europe.com/ (For Continental Europe)
8

∫ Before Use
Discs that cannot be played
≥DVD-Video with a region number other than the number for this
unit or “ALL” |
|
|
≥Some DVD-R |
≥DVD-RAM (2.6 GB/5.2 GB) |
|
≥DVD-ROM |
≥DVD-RW |
≥iRW |
≥CD-ROM |
≥CDV |
≥CD-G |
≥CVD |
≥SVCD |
≥SACD |
≥MV-Disc |
≥PD |
≥Photo CD |
≥Divx Video Disc, etc.
≥Play of non-standard Video CDs and Super Video CDs is not guaranteed.
Audio format logos
Dolby Digital (pages 50 and 61)
This unit can play Dolby Digital in stereo (2 channels). Connect an amplifier with a built-in Dolby Digital decoder to enjoy surround sound.
DTS Digital Surround (pages 50 and 61)
Connect this unit to equipment that has a
DTS decoder to enjoy DVDs with this mark.
Which Disc Types and Programme Types (on HDD) are Playable on What TV
When you use either PAL or NTSC discs or playback a programme recorded on HDD using PAL or NTSC, refer to this table.
TV type |
Disc/Programmes |
Yes/No |
|
recorded on HDD |
|
|
|
|
|
|
|
Multi-system TV |
PAL |
Yes |
|
|
|
|
NTSC |
Yes |
|
|
|
NTSC TV |
PAL |
No |
|
|
|
|
NTSC |
Yes°1 |
|
|
|
PAL TV |
PAL |
Yes |
|
|
|
|
NTSC |
Yes°2(PAL60) |
|
|
|
°1 If you select “NTSC” in “TV System” (page 55), the picture may be clearer.
°2 If your TV is not equipped to handle PAL 525/60 signals the picture will not be appear correctly.
≥When playing back a programme recorded on the HDD, ensure that you match the “TV System” setting to the encoding system you are using i.e. for PAL recordings set “TV System” to “PAL”, for NTSC recordings set to “NTSC” (page 55).
Discs and accessories
≥DVD-RAM
You can also record signals which allow you to copy once, onto these discs.
9.4 GB, double-sided, type 4 cartridge: LM-AD240E
4.7 GB, single-sided, type 2 cartridge: LM-AB120E
(set of 3, LM-AB120E3) 4.7 GB, single-sided, non-cartridge:
LM-AF120E
(set of 3, LM-AF120E3)
≥DVD-R
4.7 GB, single-sided, non-cartridge: LM-RF120E
≥DVD-RAM/PD Disc cleaner:
LF-K200DCA1
≥DVD-RAM/PD Lens cleaner:
LF-K123LCA1
HDD (Hard disk drive)
Follow the precautions indicated below to prevent damage to the internal HDD. (Not following precautions may result in a loss of recording, stop of operation or recording of noise.)
ªDuring setup
≥Do not place in an enclosed area so that the rear cooling fan and the cooling vents on the side are covered up.
≥Place the unit on a surface that is flat and not subject to vibration or impact.
≥Place in an area where condensation does not occur.
Conditions where condensation may occur
≥During the rainy season in tropical and sub tropical areas. ≥When the room humidity is high (Steam gets into the unit). ≥When there is an extreme change in temperature (moving from a very hot location to a very cold location, or when an extreme change in a air conditioning or cooled air directly
impacts the unit).
#In the above situation, with the power off, let the unit adjust to the room temperature and wait 2-3 hours until condensation is gone.
ªWhile operating
≥Do not remove the AC mains plug from the household AC outlet, or flip the power breaker switch.
≥Do not move the unit or subject to vibration or impact.
#When moving the unit:
1Press [DVD, Í] to switch the unit off. (Wait until “BYE” disappears from the display.)
2 Remove the AC mains plug from the household AC outlet. 3 Wait 2 minutes before moving.
While the unit is on, the HDD will be spinning at high speed and it is normal to hear sounds. These sounds are not problems.
ªIn the event of a power failure
If a power failure occurs, contents in the process of playback/ recording (including contents in SD VIDEO (MPEG4)) may be damaged.
ªSafeguards against accidental loss
Data may be lost if the HDD suffers damage. Any contents you wish to keep permanently should be dubbed or moved to DVD-RAM or DVD-R.
ªWhen “HDD SLEEP” appears on the unit’s display
To keep the lifetime of HDD, HDD is automatically paused. (The [HDD] lamp blinks and then turns off.)
≥HDD starts when pressing [HDD].
≥You cannot record or play back on HDD soon after it is paused because it takes time to be started.
≥If you do not operate this unit without a disc for 30 minutes or more, HDD is paused.
We recommend removing discs when you do not use this unit.
HDD remaining time
This units records using a VBR (Variable bit recording) data compression system to vary recorded data segments to match video data segments which may cause differences in the displayed amount of time and space remaining for recording.
If the remaining time is insufficient, erase any unwanted programmes to create enough space before you start recording. (Erasing a play list will not increase the amount of time.)
9

∫ Before Use
SD/PC CARD
ªCards capable of displaying and saving
|
SD card slot |
PC card slot |
|
≥SD Memory Card°1°2°3 |
≥SD Memory Card°2°4 |
|
≥MultiMediaCard°1°2°3 |
≥MultiMediaCard°2°4 |
|
|
≥CompactFlash°2°4 |
|
|
≥SmartMedia°2°4 |
|
|
≥MEMORY STICK°2°4 |
|
|
≥xD-Picture Card°2°4 |
|
|
≥Microdrive°2°4 |
|
|
≥ATA Flash PC Card°2 |
|
|
≥Mobile hard disk°3°5°6 |
°1 |
You can dub, edit or play back SD VIDEO (MPEG4). |
|
°2 |
You can dub, edit or play back still pictures (JPEG, TIFF). |
|
°3 |
You can dub SD VIDEO (MPEG2) to HDD or DVD-RAM. |
|
|
≥You can also dub SD VIDEO (MPEG2) recorded by other |
|
|
equipment such as Panasonic video cameras of the future |
|
|
model. (page 28) |
|
°4 |
A PC Card adapter conforming to PC Card standards is |
|
|
necessary. |
|
°5 Content saved on SD media storage (SV-PT1).
°6 Still pictures (JPEG, TIFF) and SD VIDEO (MPEG4) in the cards can be played, and dubbed to HDD and DVD-RAM.
≥Compatible with: FAT 12 or FAT 16
≥We recommend using Panasonic SD Memory Card.
≥Only use the memory cards recommended (refer to the left). ≥You cannot use SD Memory Card with the capacity of 2 GB or
more.
≥Format a memory card on this unit when using for the first time (pages 46, 47). Note that the memory card may no longer be usable on other equipment once formatted on this unit.
≥SD Memory Card may be disabled if you format it on a computer.
≥Files created by other equipment may not be displayed on this unit correctly (e.g. you cannot play back the files, the picture or the title is not correct, etc.). Similarly, files created by this unit
may not be correctly displayed on other equipment. ≥Some of SD Memory Card cannot be used.
ªRegarding Write Protect
For cards provided with a write protect switch, if the switch is on, they will not be written, erased or formatted.
Still pictures/SD VIDEO (MPEG4)
ªStill pictures that can be displayed/saved |
ªAbout SD VIDEO (MPEG4) |
|
|
|
||||||||||||||||||||||||
≥This unit can play DCF°1 compliant JPEG and TIFF files taken on |
≥Compatible formats: SD-Video format conforming (ASF) |
|||||||||||||||||||||||||||
a digital camera. |
Video: MPEG4 conforming/Audio: G.726 conforming (Monaural) |
|||||||||||||||||||||||||||
°1 Design rule for Camera File system: unified standard |
≥Maximum bit rate: 64 kbps–1050 kbps |
|
|
|
||||||||||||||||||||||||
established by Japan Electronics and Information Technology |
≥Average bit rate: 60 kbps–768 kbps |
|
|
|
||||||||||||||||||||||||
Industries Association (JEITA). |
≥Pixels: 176k144 (QCIF), 320k240 (QVGA) |
|
|
|
||||||||||||||||||||||||
≥Picture definition: |
≥Frame note: 6 fps–15 fps |
|
|
|
|
|
|
|
|
|
|
|
|
|
||||||||||||||
Compatible in the range of 320k240–6144k4096 |
≥It is compatible up to 999 files. |
|
|
|
|
|
|
|
|
|
|
|
|
|
||||||||||||||
(sub sampling is 4:2:2 or 4:2:0) |
ªFolders that can be displayed/saved |
|
|
|
||||||||||||||||||||||||
≥This unit can handle 300 folders (including header folders) and |
|
|
|
|||||||||||||||||||||||||
Still pictures (denoted as Filename : xxxxxxxx.JPG) saved in |
||||||||||||||||||||||||||||
3,000 files at its maximum. Files and folders exceeding the |
||||||||||||||||||||||||||||
folders ( ) as shown below can be displayed/saved. |
||||||||||||||||||||||||||||
maximum cannot be displayed, copied or erased. |
||||||||||||||||||||||||||||
≥Audio, video and still pictures (MOTION JPEG etc.) that are not |
Folders below |
|
|
the compatible folder (including the still pictures |
||||||||||||||||||||||||
compliant with the DCF standard and still pictures other than |
|
|
||||||||||||||||||||||||||
inside those folders) cannot be displayed or saved. |
|
|
|
|||||||||||||||||||||||||
JPEG and TIFF cannot be displayed. |
|
|
|
|||||||||||||||||||||||||
|
|
|
|
|
|
|
|
|
|
|
|
|
|
|
|
|
|
|
|
|
|
|
|
|
|
|
||
≥Still pictures created or edited on a computer may not be |
: Valid folder°2 |
|
|
|
|
|
|
|
|
|
|
|
|
|
||||||||||||||
playable. |
|
|
|
|
|
|
|
|
|
|
|
|
|
|
|
|
|
|
|
|
|
|
|
|
|
|
|
|
≥TIFF is compatible with uncompressed RGB chunky formats. |
: Upper level folder |
|
|
|
|
|
|
|
|
|
|
|
|
|
||||||||||||||
Other types of TIFF files cannot be played. |
¢¢: Numbers |
|
|
|
|
|
|
|
|
|
|
|
|
|
|
|
|
|
|
|
|
|
||||||
≥When playing TIFF files, it may take time for them to be |
|
|
|
|
|
|
|
|
|
|
|
|
|
|
|
|
|
|
|
|
|
|||||||
xx: Letters |
|
|
|
|
|
|
|
|
|
|
|
|
|
|
|
|
|
|
|
|
|
|||||||
displayed. |
|
|
|
|
|
|
|
|
|
|
|
|
|
|
|
|
|
|
|
|
|
|||||||
|
|
|
|
|
|
|
|
|
|
|
|
|
|
|
|
|
|
|
|
|
|
|
|
|
|
|
||
≥When there are many folders and files, it may take a long time to |
°2 Valid folder: |
|
|
|
|
|
|
|
|
|
|
|
|
|
||||||||||||||
display, copy or erase. |
This term indicates a folder which is recognized by this unit and |
|||||||||||||||||||||||||||
≥Folder titles that were input on equipment other than this unit may |
which contains still pictures the unit is capable of displaying. |
|||||||||||||||||||||||||||
not be displayed properly. |
≥Folders made on a computer will not be recognized by this unit. If |
|||||||||||||||||||||||||||
≥When saving still pictures on HDD, it is recommended that you |
using a folder made by a computer, refer to the folder structure |
|||||||||||||||||||||||||||
copy them to the memory card or DVD-RAM also (page 44). |
below. |
|
|
|
|
|
|
|
|
|
|
|
|
|
|
|
|
|
|
|
|
|
||||||
|
|
|
|
|
|
|
|
|
|
|
|
|
|
|||||||||||||||
Folder structure |
Card |
|
|
|
|
|
|
|
|
DVD-RAM |
|
|
|
|||||||||||||||
§ Folders can be created on other equipment. However, these folders |
|
|
DCIM 1 |
|
JPEG |
1 |
||||||||||||||||||||||
cannot be selected as a copy destination of still pictures. |
|
|
|
|
|
|
|
|
|
|
|
|
|
|
|
|
|
|
|
|
|
|
|
|
||||
|
|
|
|
|
|
|
|
|
|
|
|
|
|
|
|
|
|
|
|
|
|
|
|
|
|
|
||
≥The folder cannot be displayed if the numbers are all “0” |
|
|
|
|
|
|
|
|
|
|
XXXXXXXX.JPG |
|
|
|
|
|
|
|
|
|
|
|
|
|
||||
(e.g., DCIM000 etc.). |
|
2 |
|
|
|
|
|
|
XXXXXXXX.TIF |
|
|
|
|
|
|
|
|
|
|
|
|
|
||||||
|
|
|
|
|
|
|
|
|
|
|
|
|
|
|
|
|||||||||||||
≥This unit may not be able to display or use some folder you have |
|
|
|
|
|
|
|
2 |
|
|
|
|
|
|
|
|
XXXXXXXX.JPG |
|||||||||||
|
|
|
|
IM |
|
CDPF/IMEXPORT |
|
|
|
|
|
|
|
|
|
|||||||||||||
|
|
|
|
|
|
|
|
|
|
|
|
|
|
|
|
|
|
|||||||||||
created on a computer. |
|
|
|
|
|
|
|
|
|
|
|
|
|
|
|
|
|
|
XXXXXXXX.TIF |
|||||||||
|
|
|
|
|
|
|
|
|
|
|
|
|
|
|
|
|
|
|||||||||||
|
|
|
|
|
|
|
|
|
|
|
|
|
|
|
|
|
|
|
|
|
|
|
|
|
|
|
||
≥If you enter folder names or title names on other equipment, the picture |
|
|
|
|
|
|
XXXXXXXX.JPG |
|
|
DCIM |
|
|
|
|||||||||||||||
|
|
|
|
|
|
|
|
|
|
|||||||||||||||||||
|
|
|
|
|
|
|
|
|
|
|||||||||||||||||||
files may not be displayed correctly or may be disabled. |
|
|
|
|
|
|
XXXXXXXX.TIF |
|
|
|
|
|
|
|
|
|
|
|
|
|
|
|||||||
|
|
|
|
|
|
|
|
|
|
|
|
|
|
|
|
|
|
|
|
|||||||||
|
|
3 |
|
4 |
|
|
|
|
|
|
|
|
|
|
|
|
|
XXXXXXXX.JPG |
||||||||||
|
|
|
|
|
|
|
|
|
|
|
|
|
|
|
|
|||||||||||||
|
|
|
|
|
|
|
|
|
|
|
|
|
|
|
|
|||||||||||||
|
|
|
|
|
|
|
|
|
|
|
|
|
|
|
|
|
|
|
|
|||||||||
|
|
|
|
|
|
|
|
|
|
|
|
|
|
|
|
|
|
|
|
|||||||||
|
|
|
|
|
|
|
|
|
|
|
|
|
|
|
|
|
|
|
|
|||||||||
1 Still picture folder |
|
|
|
|
|
|
|
|
|
|
|
|
|
|
|
|
|
|
|
|
|
|
|
|
XXXXXXXX.TIF |
|||
|
|
|
|
|
|
|
|
|
|
|
|
|
|
|
|
|
|
|
|
|
|
|
|
|
|
|
||
2 Press [:, 9] to change between folders. (page 42) |
|
|
|
|
|
|
|
|
|
|
|
|
|
|
3 |
|
|
|
|
|
|
|
|
|
||||
|
|
|
|
|
|
|
|
|
|
|
|
|
|
|
|
|
|
|
|
|
|
|
||||||
|
|
|
|
|
|
5 |
|
|
|
4 |
||||||||||||||||||
3 SD VIDEO (SD VIDEO folder) |
|
|
|
|
|
|
|
|
|
|
|
|
|
|
|
|
|
|
|
|||||||||
|
|
|
|
|
|
|
|
|
|
|
|
|
|
|
|
|
|
|
||||||||||
4 (MPEG4 folder) |
|
|
|
|
|
|
|
|
|
|
|
|
|
|
|
|
|
|
|
|
|
|
|
|
|
|
|
|
5 (MPEG2 folder) |
|
|
|
|
|
|
|
|
|
|
|
|
|
|
|
|
|
|
|
|
|
|
|
|
|
|
|
|
6 (Folder for management information on MPEG2) |
|
|
|
|
|
|
MGRINFO 6 |
|
|
|
|
|
|
|
|
|
|
|
|
|
||||||||
|
|
|
|
|
|
|
|
|
|
|
|
|
|
|
|
|
|
|
|
|
|
|
|
|
|
|
|
|
|
|
|
|
|
|
|
|
|
|
|
|
|
|
|
|
|
|
|
|
|
|
|
|
|
|
|
|
|
10
∫ Before Use
Connections
Preparation
≥Refer to the TV’s operating instructions.
≥Turn the TV off and disconnect its AC mains leads.
Situation |
Connections |
Setting Up (page 12) |
|
|
|
TV with [Q Link] and a 21-pin Scart socket. |
Connections 1 |
Preset Download |
|
|
|
Use a 21-pin Scart cable. |
Connections 1 |
Auto Setup |
|
|
|
Use a S-Video cable and Audio/Video cable. |
Connections 2 |
Auto Setup |
|
|
|
Connections 1
ªConnect as following steps
1 |
RF Coaxial cable (supplied) |
(1) |
|
2 |
Fully-wired 21-pin Scart cable (not supplied) |
||
|
|||
3 |
Aerial lead (not supplied) |
(2) |
|
4 |
AC mains leads (supplied) |
3 |
|
5 |
AC mains leads (not supplied) |
|
|
Sockets |
(4) |
||
(1) |
AV1 21-pin Scart socket |
1 |
|
(2) |
Aerial Input socket |
||
(3) |
|||
(3) |
Aerial Output socket |
4 |
|
(4) |
Aerial Input socket |
||
|
|||
(5) |
21-pin Scart socket |
(5) |
|
|
|
||
|
|
2 |
|
|
|
5 |
|
Connections 2
ªConnect as following steps
1 |
RF Coaxial cable (supplied) |
|
|
|
2 |
Audio/Video cable (supplied) |
|
|
|
3 |
S-Video cable (not supplied) |
(2) |
(1) |
(3) |
4 |
Aerial lead (not supplied) |
|
||
|
|
4 |
||
5 |
AC mains leads (supplied) |
|
|
|
|
|
|
||
6 |
AC mains leads (not supplied) |
|
|
|
Sockets |
|
|
(6) |
|
(1) |
S-Video Output socket |
|
|
(5) |
(2) |
Audio/Video Output socket |
|
|
1 |
(3) |
Aerial Input socket |
|
|
|
(4) |
Aerial Output socket |
|
|
(4) |
5 |
|
3 |
||
(5) |
Aerial Input socket |
|
||
|
|
|
||
(6) |
S-Video Input socket |
|
|
|
(7) |
Audio/Video Input socket |
|
|
(7) |
|
|
|
|
6 |
|
|
|
|
2 |
≥If your TV is equipped with RGB input capability, you can see the picture of DVD Recorder by RGB output. Check if the 21-pin Scart cable is capable of RGB output, and then connect the DVD Recorder and your TV with it. (“AV1 Output”, page 55)
Note about Q Link
≥Q Link offers a range of convenient functions. For example, downloading of the tuning positions of all available TV stations into your unit’s memory if you connect the unit to your TV with a fully wired 21-pin Scart cable (not supplied).
≥Following systems from other manufacturers have similar function with Q Link from Panasonic. ≥List of registered trade marks:
Q Link (Panasonic), DATA LOGIC (Metz), Easy Link (Philips), Megalogic (Grundig), SMARTLINK (Sony) For details, refer to your TV’s operating instructions or consult your dealer.
11

∫ Before Use
Setting Up
|
|
DVD |
TV |
DVD |
TV |
|
|
Í, DVD |
|
HDD |
DVD |
ShowView DIRECTTVREC INPUTSELECT |
AV |
||
1 |
2 |
3 |
|
4 |
|
6 |
CH |
5 |
|
||
7 |
8 |
9 |
VOLUME |
|
|||
CANCEL |
|
|
|
|
0 |
-/-- |
|
SKIP |
|
SLOW/SEARCH |
|
STOP |
|
PAUSE PLAY/x1.3 |
|
DIRECTNAVIGATOR |
|
PLAY LIST |
|
TOP MENU |
|
|
MENU |
3, 4, 2, 1 |
|
ENTER |
|
ENTER |
|
|
|
|
|
|
|
FUNCTIONS |
|
|
RETURN |
FUNCTIONS |
|
|
|
FRAME |
MANUAL SKIP TIME SLIP |
||
Preset Download
[1]Switch on the TV.
[2]Select the AV input on your TV.
[3]Press [DVD, Í] to switch the unit on.
≥Downloading of the setup data starts from the TV (if your TV has [Q Link]).
Download
Pos 4
Download in progress, please wait.
RETURN: to abort
RETURN
≥If the Country setting menu appears on the TV, use [3, 4, 2, 1] to select the country and press [ENTER].
Country
|
|
België |
|
Deutschland |
|
|
|
Belgique |
|
Österreich |
|
|
|
Belgien |
|
Portugal |
|
|
|
Danmark |
|
Suomi |
|
|
|
España |
|
Sverige |
|
|
|
Italia |
|
Schweiz |
|
SELECT |
|
Nederland |
|
Suisse |
|
|
|
Norge |
|
Svizzera |
|
ENTER |
|||||
RETURN |
Others |
||||
|
|||||
 RETURN : leave ENTER : access
≥Downloading starts.
≥Downloading is complete when you see the TV picture.
Hint
≥If you have a Panasonic TV, starting downloading will automatically display “Download”. If you have a different TV, however, “Download” may not appear. Select the AV input on your TV to see “Download”.
Auto Setup
Auto Setup automatically tunes all available stations and sets the unit’s clock to the current date and time.
[1]Press [DVD, Í] to switch the unit on.
[2]Select the country with [3, 4, 2, 1].
Country
|
|
België |
|
Deutschland |
|
|
|
Belgique |
|
Österreich |
|
|
|
Belgien |
|
Portugal |
|
|
|
Danmark |
|
Suomi |
|
|
|
España |
|
Sverige |
|
|
|
Italia |
|
Schweiz |
|
SELECT |
|
Nederland |
|
Suisse |
|
|
|
Norge |
|
Svizzera |
|
ENTER |
|||||
RETURN |
Others |
||||
|
|||||
 RETURN : leave ENTER : access
[3] Press [ENTER].
≥Auto Setup starts. This takes about 5 minutes.
Auto-Setup
Ch 1
Auto-Setup in progress, please wait.
RETURN: to abort
RETURN
If the clock setting menu appears after Auto Setup finishes
1)Use [3, 4, 2, 1] to set the correct time and date.
2)Press [ENTER] to conclude the setting.
To confirm that stations have been tuned correctly
See pages 58 and 59.
Hint
≥You can restart the Auto Setup if the screen of the unit’s tuner is displayed in the stop mode. Hold down [CH, W] and [CH, X] on the main unit simultaneously for about 5 seconds.
Hint for Preset Download and Auto Setup
≥If you select “Schweiz”, “Suisse”, or “Svizzera” in the Country setting menu, another menu appears to let you set “Power Save” to “On”. In this setting, the unit’s power consumption is minimised when it is turned to standby. To turn the unit on, press and hold [Í/I] on the main unit. It will not work on the remote control.
12

∫ Before Use
Selecting between HDD and DVD drives
This unit incorporates an HDD and a DVD drive.
Select the drive (HDD/DVD) you intend to use—you may carry out recording and playback on the drive selected.
The HDD/DVD mode lamp on the front panel of the unit will light when you select a drive. The lit lamp indicates the current drive.
|
|
(1) |
(2) |
2 |
||
|
|
|
|
1 |
|
|
|
|
OPEN/CLOSE |
REC |
HDD |
REC |
DVD |
1 |
HDD button |
|
|
|
|
|
2 |
DVD button |
REC MODE |
CH |
CH |
REC |
ERASE TIMERREC EX |
|
|
|
|
|
||
(1) |
HDD record lamp |
TIME SLIP TIME SLIP |
|
/x1.3 |
|
|
(2) |
DVD record lamp |
|
|
|
|
|
To use the HDD:
Press [HDD].
≥The HDD button on the front panel will light (green). ≥It blinks when HDD pauses or starts from the pause.
To use the DVD:
Press [DVD].
≥The DVD button on the front panel will light (green). ≥The DVD button blinks when a disc is read.
For your reference
≥It is possible to watch playback from one drive while recording from another (editing is not possible).
≥When switching drives, the functions (playback, record or pause etc.) operate with respect to the current drive. For example, if you are recording using DVD and playing back using the HDD, pressing [∫, STOP] will stop the HDD playback. To stop the DVD recording, select the DVD drive before pressing [∫, STOP].
≥HDD drive and DVD drive cannot perform playback simultaneously.
If one drive is selected, the another will stop playback (if in progress).
≥It is not possible to record a programme to both HDD and DVD simultaneously.
≥When the HDD drive is selected and a disc is being read after the disc tray has been opened/closed, the DVD mode lamp will flash. It is not possible to switch between HDD/DVD drives while a disc is being read.
ªRegarding the HDD/DVD record lamp
When recording on the HDD drive, the HDD record lamp will light (red).
When recording on the DVD drive, the DVD record lamp will light (red).
Inserting discs
[1]Press [<, OPEN/CLOSE] on the main unit to open the tray.
You can insert a cartridge or non-cartridge disc.
Non-cartridge disc
(1) 
(3)
(1)Insert label-up.
(2)Insert inside the tray’s guides.
(3)Insert label-up with the arrow facing in.
(2)
Cartridge disc
Note
≥Load double-sided discs so the label for the side you want to record/play is facing up.
≥When using 8 cm (3q) DVD-RAM, remove the disc from the cartridge and insert it, making sure you align it with the groove.
[2] Press [<, OPEN/CLOSE] on the main unit to close the tray.
≥If you insert a DVD-RAM with the write-protect tab set to “PROTECT” (page 64), play starts automatically.
13

∫ Playback
|
DVD |
TV |
DVD |
|
|
|
|
DVD |
TV |
|
HDD |
Í, DVD |
|
|
|
HDD |
DVD |
DVD |
|
ShowView DIRECTTVREC INPUTSELECT |
AV |
|
|
Numeric |
4 |
|
6 |
CH |
|
5 |
|
|
|||
Buttons |
|
|
|||
7 |
8 |
9 |
VOLUME |
|
|
|
|
|
|||
|
CANCEL |
|
|
|
|
|
|
0 |
-/-- |
|
|
:, 9 |
SKIP |
|
SLOW/SEARCH |
6, 5 |
|
|
|
|
|
||
∫ |
STOP |
|
PAUSE |
PLAY/x1.3 |
|
|
|
|
|
1 |
|
|
|
|
|
|
|
; |
DIRECTNAVIGATOR |
|
|
PLAY LIST |
|
|
|
|
MENU |
||
TOP MENU |
|
|
|
|
|
TOP MENU |
|
|
MENU |
|
|
|
|
|
|
||
3, 4, 2, 1 |
|
|
ENTER |
|
|
ENTER |
|
|
|
|
|
|
|
|
|
|
|
FUNCTIONS |
FUNCTIONS |
|
|
RETURN |
RETURN |
|
|
|
|
||
2;, ;1 |
FRAME |
MANUAL SKIP TIME SLIP |
|
||
|
|
|
|
|
|
|
PROG/CHECK |
TIMER |
ERASE |
REC |
ERASE |
|
STATUS |
MARKER |
DUBBING REC MODE |
||
|
|
||||
|
DISPLAY |
POSITION |
AUDIO |
AV LINK |
|
POSITION |
MEMORY |
|
|||
A |
B |
C |
D |
|
|
|
|
||||
MEMORY
Playing discs/programmes recorded on HDD
[HDD] [RAM] [DVD-A] [DVD-R] [DVD-V] [CD] [VCD] [MP3]
Regarding the HDD (Hard Disk Drive)
When using this unit for the first time, the HDD has nothing recorded on it. You must record a programme etc. to the HDD before you can enjoy playback.
[1]Press [DVD, Í] to turn the unit on.
[2]Press [HDD] or [DVD] to select the playback drive. (page 13)
[3]When DVD mode was selected above:
Insert a disc. (page 13)
[4]Press [1, PLAY/t1.3].
The disc tray closes and play begins. (The unit takes some time to read the disc before play starts.)
≥Playback start from the most recently recorded programme.
[HDD] [RAM] [DVD-R]
≥Playback start from the beginning of the disc.
[DVD-A] [DVD-V] [CD] [VCD] [MP3]
ªTo stop play
Press [∫, STOP]. (page 15, Starting play from where you stopped it)
≥A screen similar to the right may appear when you stop play. Press [∫, STOP] again and you can use this unit’s tuner to watch TV.
ªTo pause play
Press [;, PAUSE]. (Press again to restart playing.)
When a menu screen appears on the TV
[DVD-A] [DVD-V] [VCD]
[VCD]
Press the numeric buttons to select an item. e.g.: “5”: [0] )[5].
“15”: [1] )[5].
[DVD-A] [DVD-V]
Press [3, 4, 2, 1] to select an item and press [ENTER].
≥You can also use the numeric buttons to select an item.
Other buttons used to operate menus
Read the disc’s instructions for the further details about operation. ≥You can return to menus after starting play by pressing
[TOP MENU] ([DVD-A] [DVD-V]) or [MENU] ([DVD-V]), or [RETURN] ([VCD]).
Note
≥If “ ” appears on the TV, the operation is prohibited by the unit or disc.
≥When playing back a programme recorded on the HDD, ensure that you match the “TV System” setting to the encoding system you are using i.e. for PAL recordings set “TV System” to “PAL”, for NTSC recordings set to “NTSC” (page 55).
Erasing a programme that is being played
[HDD] [RAM] [DVD-R]
You can erase the programmes while playing.
[1] During play
Press [ERASE].
[2]Use [2] to select “Erase” and press [ENTER].
Erase Programme
Remaining Time 0 : 58 SP
Corresponding PLAY LIST will also be erased.
|
Erase |
Cancel |
|
|
ERASE |
|
SELECT |
|
ENTER |
RETURN |
|
SELECT |
ENTER |
||
≥On the main unit, press [:/6] and [ERASE].
For your reference
≥It is not possible to erase a programme when you are carrying out simultaneous recording and play (page 19). [RAM]
≥It is not possible to erase a programme that is in the process of being recorded.
≥The available recording time on DVD-R does not increase when you erase programmes.
14

∫ Playback
Quick View (Play t1.3)
[HDD] [RAM] (Only with Dolby Digital) |
|
|
|
You can increase the speed of play |
|
|
|
DVD-RAM |
|
DVD-RAM |
|
without disrupting the soundtrack. |
|
||
PLAY |
|
PLAY x1.3 |
During Play
Press and hold [1, PLAY/t1.3].
ªTo return to normal speed.
Press [1, PLAY/k1.3].
Note
≥Output is in PCM when using a digital connection ([A] page 50). ≥This is cancelled when you perform skip, pause, or when play reaches a point where a programme recorded in sound other
than Dolby Digital starts.
≥This does not work if the setting is “Off” in “PLAY t1.3 & Audio during Search” (page 54).
≥This does not work when recording is in XP or FR mode during simultaneous recording and play (page 19). [RAM]
Starting play from where you stopped it (Resume Function)
[HDD] [RAM] [DVD-R] [DVD-A] [DVD-V] [CD] [VCD] [MP3]
[1] During play
Press [∫, STOP].
≥The unit memorises the position.
[2] Press [1, PLAY/t1.3].
≥Play starts from where you stopped it.
ªTo cancel the resume function
Press [∫, STOP] while the unit remembers the position.
(The position is also cleared when you turn the unit off.)
Position Memory
[HDD] [RAM] [DVD-R] [DVD-A] [DVD-V] [CD] [VCD] [MP3]
You can start play from a momorised position even after turning the unit off.
[1] During play
Press [POSITION MEMORY].
The message “Position Memorized” appears on the TV.
[2] After switching the unit to standby and back on
Press [1, PLAY/t1.3].
Play starts from the momorised position. (The position is cleared.)
Note
[DVD-R] [DVD-A] [DVD-V] [CD] [VCD] [MP3]
≥The position is cleared when you open the disc tray.
[RAM]
≥Positions remain memorised even after the disc tray is opened. ≥You cannot mark positions if the disc is write-protected with DISC INFORMATION (page 31) or with the write protect tab (page 64).
Release the protection before marking position.
Fast forward and rewind—SEARCH
[HDD] [RAM] [DVD-R] [DVD-A] [DVD-V] [CD] [VCD] [MP3] |
|
DVD-RAM |
|
During play |
• • • • |
|
|
Press [6, SLOW/SEARCH] or |
|
L R |
|
[5, SLOW/SEARCH]. |
|
|
≥Press and hold [:/6] or [5/9] on the main unit.
≥There are 5 search speeds. Each press increases the search speed.
≥Press [1, PLAY/k1.3] to restart playback.
≥Sound is output only in the first level of fast forward. In the case of DVD-A (except parts of moving picture), CD and MP3, it is output in all levels.
≥You can turn this sound off if you want to (page 54, “Sound”— “PLAY t1.3 & Audio during Search”).
Slow-motion play
[HDD] [RAM] [DVD-R] [DVD-A] (Motion picture parts only) [DVD-V]
[VCD]
While paused
Press [6, SLOW/SEARCH] or [5,
SLOW/SEARCH].
≥Press and hold [:/6] or [5/9] on the main unit.
≥It pauses automatically when the slow motion play is continued for about 5 minutes.
≥The speed increases up to 5 steps. ≥Press [1, PLAY/k1.3] to restart playback.
≥Backward ([6], [:/6]) does not work with Video CDs.
Frame-by-frame viewing
[HDD] [RAM] [DVD-R] [DVD-A] (Motion picture parts only) [DVD-V]
[VCD]
While paused
Press [2;, FRAME], [;1, FRAME], [2] or [1].
≥Each press shows the next or previous frame. ≥Press [1, PLAY/k1.3] to restart playback. ≥Backward ([2;], [2]) does not work with Video CDs.
Skipping
[HDD] [RAM] [DVD-R] [DVD-A] [DVD-V] [CD] [VCD] [MP3]
During play or while paused
Press [:, SKIP] or [9, SKIP].
You can skip programmes, scenes and tracks each time you press them.
For your reference
≥When the marker (page 17) is set, you can skip the marker position.
Direct Play
[HDD] [RAM] [DVD-R] [DVD-A] [DVD-V] [CD] [VCD] [MP3]
Starting play from a selected programme, title, chapter or track.
During play or while stopped
Press the numeric buttons to select the item.
e.g.: |
“5”: |
[0] )[5]. |
[HDD] [MP3] |
“5”: |
[0] )[0] )[5] |
|
|
“15”: |
[1] )[5]. |
|
“15”: |
[0] )[1] )[5] |
|
[DVD-A] |
|
|
|
|
|
|
|
|
|
|
|
|
|
≥A group number can be specified while |
|
|
||||
the screen saver is displayed. |
|
|
|
|||
e.g.: |
“5”: |
[5] |
|
|
|
|
≥Playing bonus groups |
|
|
|
|
||
Some discs contain bonus groups. If a |
|
|
||||
password screen appears after selecting |
|
|
||||
|
|
|||||
a group, enter the password with the numeric buttons and press [ENTER]. Refer also to the disc’s jacket.
≥To playback still pictures (page 42)
≥To playback SD Video (MPEG4) (page 47)
15

∫ Playback
Numeric
Buttons
CANCEL
3, 4, 2, 1
ENTER
DVD 
 TV
TV
DVD
DVD TV
HDD DVD
ShowView DIRECTTVREC INPUTSELECT |
AV |
1 |
2 |
3 |
|
4 |
|
6 |
CH |
5 |
|
||
7 |
8 |
9 |
VOLUME |
|
|||
CANCEL |
|
|
|
STOP |
|
PAUSE |
PLAY/x1.3 |
DIRECTNAVIGATOR |
PLAY LIST |
TOP MENU |
MENU |
|
ENTER |
FUNCTIONS |
RETURN |
|
FRAME |
MANUAL SKIP TIME SLIP |
TIME SLIP |
||
|
PROG/CHECK |
TIMER |
ERASE |
REC |
MANUAL SKIP |
|
STATUS |
MARKER |
DUBBING REC MODE |
|
|
MARKER |
DISPLAY |
POSITION |
AUDIO |
AV LINK |
|
DISPLAY |
MEMORY |
|
|||
A |
B |
C |
D |
|
|
 AUDIO
AUDIO
Selecting an amount of time to skip — Time Slip
[HDD] [RAM] [DVD-R]
[1] During play
Press [TIME SLIP].
0 min |
–5 min |
[2] Within 5 seconds
Press [3, 4] to enter the time and press [ENTER].
≥Play skips the time you entered.
≥Press to alter in one-minute units. Press and hold to alter in 10-minute units.
Manual Skip
[HDD] [RAM] [DVD-R]
You can skip for approximately 30 seconds by one press.
During play
Press [MANUAL SKIP].
Changing audio
[HDD] [RAM] [DVD-A] [DVD-V] [VCD]
You can change the audio being played.
During play
Press [AUDIO] to select the audio type.
[HDD] [RAM] [VCD] (page 60) |
|
|
DVD-RAM |
|
LR#L#R |
|
|
PLAY |
|
^-------------} |
e.g.: [RAM] |
|
|
|
|
|
|||
|
|
|
||
|
“L R” is selected |
|
|
L R |
|
|
|
|
|
|
|
|
|
|
[DVD-A] [DVD-V] (page 40)
You can change the audio channel number by pressing the button. This allows you to change items like the soundtrack language.
Soundtrack |
1 ENG Î Digital 3/2.1ch |
e.g.: [DVD-V] English is the selected language
Note
If you cannot change the audio type when you have used only an optical digital cable for connection, set “Dolby Digital” to “PCM” (page 54). Alternatively, you may connect to an amplifier with an Audio/Video cable and change the input on the amplifier to suit the connection.
You cannot switch the audio mode in the following cases. ≥When a DVD-R disc is inserted in the disc tray while DVD drive is
selected.
≥When the recording mode is set to “XP” and “Audio Mode for XP Recording” is set to “LPCM” (page 54).
≥When “DVD-R Rec for High Speed mode” is set to “On”. (page 53)
16

∫ Playback
Marking places to play again —
MARKER
[HDD] [RAM] [DVD-R]
You can mark up to 999 points on a disc to return to later.
[DVD-A] [DVD-V] [CD] [VCD] [MP3]
You can mark up to 5 points on a disc to return to later.
ªMarking positions directly
During play
Press [MARKER].
≥One marker is added.
ªUsing DISPLAY menus to mark positions
Displaying the marker icon
[1] During play
Press [DISPLAY].
e.g.: When DVD-RAM is used
Disc |
Soundtrack |
|
|
|
|
|
|
1 |
|
Î Digital 2/0ch |
|||||
|
|
||||||
Play |
|
|
|
|
|
|
|
|
Subtitle |
|
|
|
OFF |
|
|
|
|
||||||
Picture |
|
|
|
|
|
|
|
|
Audio channel |
|
|
|
L R |
|
|
|
|
||||||
Sound |
|
|
|
|
|
|
|
[2] Select “Play” with [3, 4] and press [1].
Disc |
Repeat Play |
|
|
|
|
|
OFF |
||
|
|
|
||
Play |
|
|
|
|
|
Marker |
1s10 |
†††††††††† |
|
|
||||
Picture |
|
|||
Sound |
|
|
|
|
[3] Select “Marker” with [3, 4] and press [1] to highlight the first asterisk (¢).
[HDD] [RAM] [DVD-R] |
|
[DVD-A] [DVD-V] [CD] [VCD] [MP3] |
|||||||
|
|
|
|
|
|
|
|
|
|
|
1s10 |
|
|
|
|
|
|
|
|
|
|
† |
††††††††† |
|
|
† |
†††† |
|
|
|
|
|
|
|
|
|
|
|
|
Marking positions
[1] Use [2, 1] to select an asterisk (¢) and press [ENTER].
≥One marker is added.
When marking positions 11 and above
[HDD] [RAM] [DVD-R]
[1]Use [2, 1] to highlight “1–10”.
[2]Use [3, 4] to select “11–20”.
[3]Use [1].
≥The first asterisk is highlighted.
[4] Press [ENTER] to mark a position.
To play from a marked position
[1] Use [2, 1] to select a marker number and press [ENTER].
≥Play starts from the marked position.
ªTo clear a marker
Use [2, 1] to select a marker number and press [CANCEL]. ≥An asterisk replaces the number and the position is cleared.
ªTo clear the DISPLAY menus
Press [DISPLAY].
Note
[HDD] [RAM]
≥This feature doesn’t work while using a play list.
≥Markers cannot be added to or removed from protected discs (pages 31, 64).
[HDD] [RAM] [DVD-R]
≥Markers are ordered by time. This means that the marker numbers can be changed when you add and erase markers.
≥Markers are cleared when you finalize DVD-R (page 32).
[DVD-A] [DVD-V] [CD] [VCD] [MP3]
≥This feature only works if the elapsed playing time of the disc is shown on the unit’s display.
≥All the markers are cleared when the disc tray is opened.
17
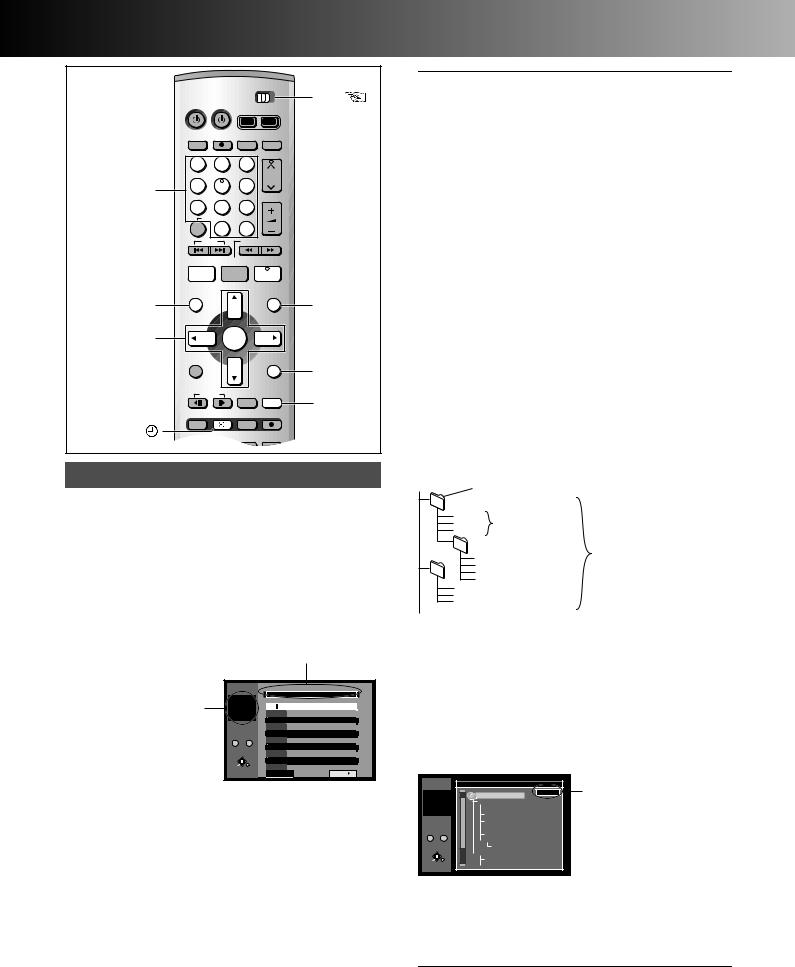
∫ Playback
DVD 
 TV
TV
DVD
DVD TV
HDD DVD
ShowView DIRECTTVREC INPUTSELECT |
AV |
Numeric |
1 |
2 |
3 |
|
4 |
|
6 |
CH |
|
|
|
|||
Buttons |
5 |
|
||
7 |
8 |
9 |
VOLUME |
|
|
|
|||
|
CANCEL |
|
|
|
|
|
0 |
-/-- |
|
|
SKIP |
|
SLOW/SEARCH |
|
|
STOP |
|
PAUSE |
PLAY/x1.3 |
∫ 


 1
1
DIRECT NAVIGATOR |
DIRECTNAVIGATOR |
PLAY LIST |
|
TOP MENU |
|
MENU |
|
TOP MENU |
MENU |
||
|
|||
3, 4, 2, 1 |
|
ENTER |
|
ENTER |
|
||
|
|
||
|
FUNCTIONS |
RETURN |
|
|
|
RETURN |
|
|
FRAME |
MANUAL SKIP TIME SLIP |
TIME SLIP
PROG/CHECK |
TIMER |
ERASE |
REC |
STATUS |
MARKER |
DUBBING REC MODE |
|
Using menus to play MP3 discs
[MP3]
This unit can play MP3 files recorded on CD-R/RW with a computer. Files are treated as tracks and folders are treated as groups.
“Total” means total number of all MP3 files (all tracks in all groups) recorded in the disc.
[1] During stop or play
Press [TOP MENU] or [MENU].
≥The file list appears.
G:
The Group Number
T:
Track Number in the Group
TOTAL:
Selected Track Number/
Total Track Number
Selected Group No. and Name
MENU |
No. |
Group |
|
||
1 : MP3_MUSIC |
|
||||
G |
|
1 |
|
||
|
Total |
Track |
Tree |
||
T |
|
1 |
1 |
001 Both Ends Freezing |
1 |
TOTAL |
1/ 24 |
|
|
1 |
|
|
|
|
|
1 |
|
|
|
|
|
|
|
|
|
|
|
|
1 |
|
No. |
|
|
|
1 |
|
|
|
|
1 |
|
0 |
– |
9 |
|
|
|
|
|
1 |
|||
|
|
|
|
|
|
SELECT |
|
|
|
1 |
|
ENTER |
|
|
|
|
1 |
RETURN |
|
|
1 |
||
|
Back |
Next |
|||
|
|
|
|
||
[2] Press [3, 4] to select the track and press [ENTER].
Play continues to the last track in the last group. ≥“ ” indicates the track currently playing.
≥You can also select the track with the numeric buttons, directly.
e.g.: The track “006.mp3” of Group “002” of the illustration on top right,
“6”: [0] )[0] )[6]
The track “010.mp3” of Group “003” of the illustration on top right,
“10”: [0] )[1] )[0]
ªTo show other pages
Select “2 Back” or “Next 1” with [3, 4, 2, 1] and press [ENTER].
≥After listing all the tracks in one group, the list for the next group appears.
ªTo exit the file list
Press [TOP MENU], [MENU] or [RETURN].
Note
≥Sometimes the counter may not display correctly during fast forward/rewind of VBR recorded MP3.
≥If you play a MP3 track that includes still picture data, it will take some time before the music itself starts playing and the elapsed time will not be displayed during this time. Even after the track
starts, the correct play time will not be displayed.
≥Maximum number of tracks and groups recognizable: 999 tracks and 99 groups
≥Compatible compression rate: from 32 kbps to 320 kbps ≥Compatible sampling rate: 16 kHz, 22.05 kHz, 24 kHz, 32 kHz,
44.1kHz, 48 kHz
ªLimitations on MP3
≥This unit is compatible with multi-session but if there are a lot of sessions it takes more time for play to start. Keep the number of sessions to a minimum to avoid this.
≥This unit cannot play files recorded using packet write.
≥If the disc includes both MP3 and other types of audio data (e.g. WMA or WAV), the unit plays only the MP3.
≥If the disc includes both MP3 and normal audio data (CD-DA), the unit plays the type recorded in the inner part of the disc.
≥Depending on how you create MP3 files, they may not play in the order you numbered them or may not play at all.
≥This unit cannot play MP3 data recorded on SD Memory Card.
ªNaming folders and files
At the time of recording, give folder and file names a 3-digit numeric prefix in the order you want them to play (this may not work at times).
Folder = Group
001
File = Track
001.mp3
002.mp3
003.mp3
002 |
Track total = Total |
|
004.mp3
005.mp3 003 006.mp3 007.mp3
008.mp3
009.mp3
010.mp3
≥Discs must conform to ISO9660 level 1 or 2 and Joliet (except for extended formats).
≥MP3 files must have the extension “.MP3” or “.mp3”. ≥This unit is not compatible with ID3 tags.
≥English alphabets and a Arabic numerals are indicated properly. Other characters may not be indicated properly.
ªUsing the tree screen to find a group
[1] While the file list is displayed
Press [1] to display the tree screen.
MENU |
|
|
Tree |
|
|
Selected Group Number/ |
||
G |
|
1 |
3 |
MP3_MUSIC |
G |
1/ 15 |
Total Group Number |
|
|
|
|
||||||
T |
|
1 |
|
001 My favorite |
|
|
|
|
TOTAL |
1/ 24 |
|
002 |
Chinese pops |
|
|
≥If the group has no |
|
|
|
|
|
001 |
Brazillian pops |
|
|
|
|
|
|
|
003 Czech pops |
|
|
track, “– –” is displayed |
|
|
|
|
|
004 |
PC Files |
|
|
|
|
No. |
|
|
005 Japanese pops |
|
|
as group number. |
|
0 |
– |
9 |
|
006 Swedish pops |
|
|
||
SELECT |
|
|
001 Momoko |
|
|
|
||
|
|
002 Standard Number |
|
|
|
|||
|
|
|
|
|
|
|
||
ENTER |
RETURN |
3 |
001 |
Piano solo |
|
|
|
|
|
|
002 |
Vocal |
|
|
|
||
|
|
|
|
|
|
|
||
≥The folder in which has no MP3 files is indicated in black. You cannot select groups including no MP3 files.
[2] Press [3, 4] to select a group and press [ENTER].
≥The file list for the group appears.
For your reference
≥Press [2, 1] to jump layers in the tree screen.
ªTo return to the file list
Press [RETURN].
18

∫ Recording
Playing while you are recording
[HDD] [RAM]
Hint
≥Sound is not output while fast-forwarding.
Chasing play
[HDD] [RAM]
You can start play from the beginning of a programme while continuing to record it.
While recording or timer recording
Press [1, PLAY/t1.3].
Time slip indicator lights.
For your reference
≥Chasing play can only be used with programmes of the same encoding system (PAL/NTSC).
≥Play cannot be started until at least 2 seconds after recording starts.
Simultaneous recording and play
You can start play of the programme you are recording or play a programme previously recorded.
While recording or timer recording
[1] Press [DIRECT NAVIGATOR].
Time slip indicator lights.
[2] Use [3, 4] to select a programme and press [ENTER].
e.g.,
You want to watch the movie |
Programme 1 is played back |
you recorded yesterday |
while programme 2 (sport) is |
(programme 1) while recording |
being recorded. |
programme 2 (sport). |
|
DIRECT NAVIGATOR |
DIRECT NAVIGATOR |
|
HDD |
|
|
|
|
|
|
|
HDD |
|
|
|
|
|
|
|
No. Name |
Date |
Time |
|
Title |
Edit |
|
No. Name |
Date |
Time |
|
Title |
Edit |
||
3 |
01 |
4 |
13/ 8 WED |
10:00 |
Dinosaur |
1 |
3 |
01 |
4 |
13/ 8 WED |
10:00 |
Dinosaur |
1 |
||
|
|
||||||||||||||
|
¥ 02 |
6 |
13/ 8 WED |
9:00 |
Soccer |
1 |
|
¥ 02 |
6 |
13/ 8 WED |
9:00 |
Soccer |
1 |
||
|
|
|
|
|
|
|
1 |
|
|
|
|
|
|
|
1 |
|
|
|
|
|
|
|
1 |
|
|
|
|
|
|
|
1 |
3 |
|
|
|
|
|
|
1 |
3 |
|
|
|
|
|
|
1 |
|
TOTAL 2 |
|
No. |
SELECT |
|
|
|
TOTAL 2 |
|
No. |
SELECT |
|
|
||
|
|
|
0 – 9 |
ENTER |
RETURN |
|
|
|
|
0 – 9 |
ENTER |
RETURN |
|
||
|
|
|
|
|
|
|
|
|
|
||||||
|
|
|
|
|
|
|
|
|
|
|
|
|
|
||
For your reference
≥During simultaneous recording and play, you cannot edit or erase with the direct navigator or play lists.
≥If you start play while the unit is on standby for timer recording, recording starts when the time you set is reached.
TIME SLIP
You can play the programme being recorded to check that it is being recorded correctly. You can also check parts that were recorded previously.
While recording or timer recording
[1] Press [TIME SLIP].
Time slip indicator lights. Play starts from 30 seconds previous. The current recording images appear as a picture-in-picture and you will hear the playback audio.
(1)Play images
(30 seconds before)
(2)Current recording
[2] Within 5 seconds
Press [3, 4] to enter the time.
≥Press [3, 4] to alter in one-minute units. Press and hold [3, 4] to alter in 10-minute units.
(1) |
|
PLAY |
|
0 min |
|
|
(2) |
REC |
|
|
|
|
|
PLAY |
–5 min
REC
ªTo show the play images in full
Press [TIME SLIP].
≥Press [TIME SLIP] to return to the picture-in-picture screen.
For your reference
≥The image on the small screen may be distorted or flicker depending on the scene. However, this does not affect the image recorded.
ªTo stop play and recording
1)Press [∫, STOP]. Play stops. (Wait 2 or more seconds)
2)Press [∫, STOP]. Recording stops.
≥You cannot stop recording with [∫, STOP] during timer recording. To stop timer recording, press [ , TIMER].
Watching the TV while recording
Preparation
Switch [DVD, TV] to “TV”.
[1]Press [AV] to change the input mode to “TV”.
[2]Press [CH, W, X] to change channels.
≥You can also select the channel with the numeric buttons.
For your reference
≥You can also do this if the unit is making a timer recording. ≥The recording is unaffected.
19

∫ Recording
Í, DVD
Numeric
Buttons
∫
;
3, 4, 2, 1
ENTER
FUNCTIONS
DVD |
TV |
DVD, TV |
|
|
|
DVD TV |
|
HDD |
|
|
|
HDD |
DVD |
DVD |
ShowView DIRECTTVREC INPUTSELECT |
AV |
AV |
|
|
1 |
2 |
3 |
|
CH, W, X |
4 |
|
6 |
CH |
|
5 |
|
|
||
7 |
8 |
9 |
VOLUME |
|
|
|
|||
CANCEL |
0 |
-/-- |
|
|
|
|
|
||
SKIP |
|
SLOW/SEARCH |
|
|
STOP |
|
PAUSE |
PLAY/x1.3 |
|
DIRECTNAVIGATOR |
|
PLAY LIST |
|
TOP MENU |
|
|
MENU |
|
ENTER |
|
|
FUNCTIONS |
|
|
RETURN |
FRAME |
MANUAL SKIP TIME SLIP |
||
PROG/CHECK |
TIMER |
ERASE |
REC |
|
|
|
µ |
STATUS |
MARKER |
DUBBING REC MODE |
|
REC MODE
DISPLAY |
POSITION |
AUDIO |
AV LINK |
MEMORY |
|||
A |
B |
C |
D |
Recording TV programmes
[HDD] [RAM] [DVD-R]
ªTo check the remaining time and the current mode
(page 60)
≥Recording will take place on open space in the HDD or on disc. Data will not be overwritten.
≥If there is no space left on the recording drive, you will need to erase unwanted programmes (page 34) or use a new disc.
Preparation
≥Release protection (disc # page 31, cartridge # page 64). [RAM] ≥Confirm there is sufficient empty space for recording on the HDD.
(page 20)
≥You can dub recorded picture on DVD-R with High Speed only when the pictures were recorded with setting “DVD-R Rec for High Speed mode” to “On” in advance. (page 53) [HDD]
[1]Press [DVD, Í] to turn the unit on.
[2]Press [HDD] or [DVD] to select the recording drive. (page 13)
[3]When DVD mode was selected above:
Insert a disc. (page 13)
≥When using a DVD-RAM for the first time with this unit, format it to ensure accurate recording (page 32, “Format”).
[4]Press [CH, W, X] to select the channel.
[5]Press [REC MODE] to select the
recording mode.
≥To record sound using LPCM (possible only in XP mode), set “Audio Mode for XP Recording” to “LPCM”. (page 54)
[6] Press [¥, REC] to start recording.
≥The HDD or DVD record lamp on the main unit lights.
ªTo pause recording
Press [;, PAUSE]. (Press again to restart recording.) ≥The programme cannot be divided.
≥The HDD or DVD record lamp on the main unit flashes.
ªTo stop recording
Press [∫, STOP].
ªTo enjoy SD VIDEO (MPEG4) programmes [HDD]
≥If you set “MPEG4 Rec Mode” (page 53) to “SF”, “F”, “N” or “E” in advance, you can record SD VIDEO (MPEG4) on HDD simultaneously with the recording of the programme. The
recorded SD VIDEO (MPEG4) programmes can be dubbed when dubbing them on SD Memory Card in “High Speed” mode (page 28).
≥You cannot directly record on SD Memory Card.
≥The audio for the SD VIDEO (MPEG4) is monaural. You can select the audio for bilingual broadcasting on “Bilingual Audio Selection” (page 54).
≥The aspect ratio of the recorded picture is 4:3.
≥Set the item in “SD CARD capacity” (page 53) according to the capacity of your card. The recording of the programme is divided according to the setting. The programme is divided even the recording is stopped or paused. (“When dubbing programmes to DVD-RAM or DVD-R (t1–t4) in High Speed mode”, page 27)
ªSD VIDEO (MPEG4) Title
≥When recording SD VIDEO (MPEG4) programme, it is automatically divided by “SD CARD capacity” (page 53) to be recorded within the capacity of SD Memory Card.
≥In case of a TV station with Teletext information, the title of the TV programme is entered automatically, provided the “Title page” is correctly set. (page 58)
≥If a programme is divided before entering its title by Teletext information, the title is not entered to the divided programmes. Until the title of the programme is entered by Teletext information, serial numbers (e.g. “MOL***”) are automatically
given as the title of divided programmes.
≥When the title of the programme is entered, it becomes effective to all subsequent programmes.
≥In case of a TV station with Teletext information, it may take over 30 minutes to get the title or may fail to get.
Recording modes and approximate recording times in hours
The time shown below is an approximation at the moment of purchase. The available recording time depends on the content of recording.
|
|
DVD-RAM |
|
|
|
HDD |
Single- |
Double- |
DVD-R |
|
(80 GB) |
sided |
sided |
(4.7 GB) |
|
|
(4.7 GB) |
(9.4 GB) |
|
|
|
|
|
|
XP (High quality) |
17° |
1 |
2 |
1 |
|
|
|
|
|
SP (Normal) |
34° |
2 |
4 |
2 |
|
|
|
|
|
LP (Long play) |
68° |
4 |
8 |
4 |
|
|
|
|
|
EP (Extra long play) |
106° |
6 |
12 |
6 |
|
|
|
|
|
°If you set “MPEG4 Rec Mode” (page 53) to “SF”, “F”, “N” or “E”, the available recording time is reduced.
FR (Flexible recording):
≥You can use this function in dubbing or timer recording. ≥When dubbing content stored on the HDD, the picture quality is
automatically adjusted to fit on 4.7 GB DVD-RAM/R discs. ≥The picture quality is automatically adjusted among “XP”, “SP”,
“LP” and “EP” according to the remained capacity of the disc.
≥All of recording mode indicators on the unit’s display are lit during FR.
For your reference
≥You cannot change the channel or recording mode during recording. You can change them while recording is paused, but the material is recorded as a separate programme.
≥Even if you try to switch from HDD to DVD or vice versa while recording, the channel will not be changed.
Also, it is not possible to record a programme to both HDD and DVD simultaneously.
≥[RAM] [DVD-R]
Discs cannot be recorded correctly if you try to record PAL system when they already contain records using NTSC.
For any one DVD-RAM/DVD-R disc, programme is recorded using only one TV system (PAL or NTSC) that is defined by the first programme recorded on the disc. However, both types of programme (PAL/NTSC) may be recorded onto the HDD.
20
∫ Recording
≥You can record up to 250 programmes on HDD, 99 on a disc. (1 programme may be recorded continuously for 6 hours at its maximum.)
≥[HDD]
- When a programme is being recorded, or the unit is on standby for timer recording, only programmes of the same encoding system as selected in “TV System” (i.e. either PAL or NTSC) (page 55) can be played.
≥DVD-R has limitations on recording (page 8).
≥In RGB recording, set “AV2 Input” to “RGB (PAL only)”. (page 55)
ªRecording/Dubbing/Moving of a programme
This unit incorporates copyright protection technology for recording equipment known as CPRM (page 8). With some programmes recording, dubbing and/or moving may not be possible.
(1) |
|
|
|
|
|
|
(2) |
|
|
|
|
|
|
|
|
|
|
|
|
|
|
|
|
1 |
2 |
|
3 |
|
RAM |
|
||
|
(6) |
|
HDD |
|
|
|
(7) |
|
4 |
|
|
|
|
|
|
|
|
||||
|
|
|
|
|
DVD-R |
|||||
|
|
|
|
|
|
|
|
|||
|
|
|
|
|
|
|
|
|
|
|
|
|
|
|
|
|
|
|
|
SD |
5 |
(3) |
|
|
|
|
|
|
|
|
|
|
|
|
|
|
|
|
|
|
|
|
|
(6) |
|
|
|
|
|
(7) |
|
HDD |
|
|
|
RAM |
|
|
|
|
|||||
|
|
|
|
|
|
|
||||
|
|
|
|
SD |
5 |
|||||
|
|
|
|
|
|
|
|
|
||
|
|
|
|
|
|
|
|
|
|
|
|
(6) |
|
|
|
|
(7) |
(8) |
|
||
|
|
DVD-R |
|
|||||||
|
|
|
|
|
|
|
|
|
|
|
|
(6) |
|
|
|
|
|
(9) |
7 |
|
|
|
|
HDD |
|
RAM |
|
|||||
(4) 6 |
|
|
|
|
|
|
|
|
|
|
(6) |
|
|
|
(7) |
|
|
8 |
|||
|
RAM |
|
||||||||
|
|
|
HDD |
|||||||
|
|
|
|
|
|
|
|
|
|
|
|
(6) |
|
|
|
|
|
(10) |
|
|
|
|
|
|
|
|
|
|
|
|
|
|
(5) |
(6) |
|
|
|
|
|
(11) |
|
|
|
|
|
|
|
|
|
|
|
|
|
|
(1) |
Recording limit |
(7) |
Dub |
(2) |
Usable Media |
(8) |
You cannot dub. |
(3) |
Copy free |
(9) |
Move |
(4) |
Recording limited to one |
(10)You cannot record on |
|
|
time |
|
DVD-R. |
(5) |
Recording not possible |
(11)You cannot record/dub on |
|
(6) |
Record |
|
any media. |
°1 You can dub pictures on DVD-R in High Speed if you set “DVD-R Rec for High Speed mode” to “On” (page 53).
°2 If you set “MPEG4 Rec Mode” (page 53) to “SF”, “F”, “N” or “E” in advance, you can record SD VIDEO (MPEG4) simultaneously with the recording of the programme.
°3 When recording an SD VIDEO (MPEG4) programme without recording limits after recording programmes with recording limits, the first 10 seconds or around of the SD VIDEO (MPEG4) programme may not be recorded.
°4 You can dub except SD VIDEO (MPEG4). °5 You can dub SD VIDEO (MPEG4) only.
°6 You cannot record or dub programmes with recording limits as SD VIDEO (MPEG4).
°7 Pictures are erased from HDD when moving them to DVD-RAM. °8 It can be dubbed to the HDD but cannot be played back.
Move:
This is when a programme is moved to another storage media. The original programme will be erased.
When using DVD-R
≥You can play DVD-R on compatible DVD players by finalizing them on this unit, effectively making them into DVD-Video.
≥The video is recorded in a 4:3 aspect irrespective of the video signal input.
When using DVD-R or discs with LPCM recording or setting “DVD-R Rec for High Speed mode” to “On”
≥When recording bilingual TV broadcast while receiving a bilingual TV broadcast
You can use the SETUP menus to select which audio type is recorded, either “M1” or “M2”. “M1” is the default setting. (page 54, “Sound”— “Bilingual Audio Selection”)
≥When recording bilingual audio with connecting to a decoder or a digital receiver
Select the audio type either “M1” or “M2” on the connected devices. (You cannot select the audio type on this unit.)
≥During play
The audio type selected for recording is played. This is displayed as “LR”.
ªRecording sound using LPCM
To obtain higher quality recordings using LPCM, prepare as follows:
1)Select “LPCM” in the SETUP menu, “Sound”— “Audio Mode for XP Recording” (page 54).
2)Set recording mode to “XP”.
Note
≥Sound recordings under LPCM require more information than usual. Consequently the picture quality of LPCM recordings may be less than that of normal XP mode recordings.
Flexible recording mode (FR)
[HDD] [RAM] [DVD-R]
The unit calculates a recording rate that enables the recording to fit in the time you set (within the remaining time on the disc) with the best picture quality.
e.g.: disc is DVD-RAM |
|
Before FR |
After FR |
A Recorded
BRemained (45 min.)
≥Recordable for 45 minutes in SP mode
CProgramme to be recorded
(The programme is 60-minute long.)
D The recording mode automatically switches from SP to LP according to the remaining time.
EThe programme exactly fits into the remaining.
[1]While stopped
Press [FUNCTIONS]. (page 23)
[2]Select “FLEXIBLE REC” with [3, 4, 2, 1] and press [ENTER].
FLEXIBLE RECORDING
Recording in FR mode
Maximum rec. time |
1 Hour 23 Min. |
|
||
Set rec. time |
|
1 Hour 23 Min. |
|
|
|
|
|
|
|
Start |
|
|
Cancel |
|
SELECT |
|
|
||
ENTER |
RETURN |
|
||
[3] Press [3, 4, 2, 1] to set the recording time.
≥Maximum recording time is 6 hours.
[4] Select “Start” with [3, 4, 2, 1] and press [ENTER].
≥Recording starts.
For your reference
≥It is not possible to change channel or recording mode while flexible recording is paused.
≥FR is not activated in EXT LINK (page 22) and DV AUTO REC (page 49).
21
 Loading...