


 Loading...
Open Networking Hardware Diagnostic Guide
June 2018
Notes, cautions, and warnings

 NOTE: A NOTE indicates important information that helps you make better use of your computer.

 CAUTION: A CAUTION indicates either potential damage to hardware or loss of data and tells you how to avoid the problem.
 WARNING: A WARNING indicates a potential for property damage, personal injury, or death.
Copyright © 2018 Dell Inc. or its subsidiaries. All rights reserved. Dell, EMC, and other trademarks are trademarks of Dell Inc. or its subsidiaries. Other trademarks may be trademarks of their respective owners.
2018 - 06
Rev. A05

Contents
1 About this guide............................................................................................................................................. |
7 |
Notices................................................................................................................................................................................. |
7 |
Related documents............................................................................................................................................................ |
7 |
2 ONIE and Dell EMC OS installation instructions............................................................................................. |
8 |
ONIE expansion.................................................................................................................................................................. |
8 |
DIAG-OS installation.......................................................................................................................................................... |
8 |
ONIE and DIAG OS installation......................................................................................................................................... |
9 |
ONIE service discovery and OS installation.................................................................................................................... |
9 |
Installation ONIE from BIOS............................................................................................................................................ |
10 |
ONIE UEFI-based installation using USB................................................................................................................. |
10 |
3 ONIE overview............................................................................................................................................. |
16 |
ONIE expansion................................................................................................................................................................. |
16 |
Boot processes................................................................................................................................................................. |
16 |
POST............................................................................................................................................................................ |
16 |
Capture support data from ONIE............................................................................................................................. |
16 |
Change default grub boot entry................................................................................................................................ |
17 |
View system information.................................................................................................................................................. |
17 |
4 Dell EMC DIAG OS....................................................................................................................................... |
19 |
Diagnostic package download......................................................................................................................................... |
19 |
Diagnostic test suite.................................................................................................................................................. |
22 |
View DIAG versions.......................................................................................................................................................... |
22 |
View CPLD versions........................................................................................................................................................ |
22 |
Install or upgrade DIAG tools.......................................................................................................................................... |
23 |
Restore factory defaults.................................................................................................................................................. |
23 |
5 Dell EMC DAIG-OS tools............................................................................................................................. |
25 |
Diagnostic tools................................................................................................................................................................ |
25 |
edatool............................................................................................................................................................................... |
26 |
Tests............................................................................................................................................................................ |
26 |
CLI options.................................................................................................................................................................. |
26 |
Output......................................................................................................................................................................... |
26 |
Verbose mode............................................................................................................................................................. |
28 |
cpldupgradetool................................................................................................................................................................ |
29 |
Tests............................................................................................................................................................................ |
29 |
CLI options.................................................................................................................................................................. |
29 |
Output......................................................................................................................................................................... |
30 |
cputool............................................................................................................................................................................... |
30 |
Tests............................................................................................................................................................................ |
30 |
CLI options.................................................................................................................................................................. |
30 |
Contents 3
Output.......................................................................................................................................................................... |
31 |
eepromtool........................................................................................................................................................................ |
32 |
Tests............................................................................................................................................................................ |
32 |
CLI options.................................................................................................................................................................. |
32 |
Output......................................................................................................................................................................... |
33 |
ethtool............................................................................................................................................................................... |
35 |
fantool............................................................................................................................................................................... |
35 |
Tests............................................................................................................................................................................ |
35 |
CLI options.................................................................................................................................................................. |
35 |
OutputTest output..................................................................................................................................................... |
36 |
€ashrom............................................................................................................................................................................. |
37 |
gpiotool.............................................................................................................................................................................. |
38 |
CLI options.................................................................................................................................................................. |
38 |
Output......................................................................................................................................................................... |
38 |
list output.................................................................................................................................................................... |
38 |
get output................................................................................................................................................................... |
39 |
set output................................................................................................................................................................... |
39 |
i2ctool................................................................................................................................................................................ |
39 |
Tests............................................................................................................................................................................ |
39 |
CLI options.................................................................................................................................................................. |
39 |
Outputscan Output................................................................................................................................................... |
40 |
test Output.................................................................................................................................................................. |
41 |
read Output................................................................................................................................................................ |
42 |
write Output............................................................................................................................................................... |
42 |
ledtool................................................................................................................................................................................ |
42 |
Tests............................................................................................................................................................................ |
42 |
CLI options.................................................................................................................................................................. |
43 |
Outputlist output........................................................................................................................................................ |
44 |
get Output.................................................................................................................................................................. |
44 |
lpctool................................................................................................................................................................................ |
45 |
CLI options.................................................................................................................................................................. |
45 |
OutputRead output................................................................................................................................................... |
45 |
Write output............................................................................................................................................................... |
45 |
memtool............................................................................................................................................................................ |
45 |
Tests............................................................................................................................................................................ |
46 |
CLI options.................................................................................................................................................................. |
46 |
OutputList output...................................................................................................................................................... |
47 |
Info output.................................................................................................................................................................. |
48 |
Test output................................................................................................................................................................. |
49 |
Read output................................................................................................................................................................ |
49 |
Write output............................................................................................................................................................... |
49 |
Constraints.................................................................................................................................................................. |
49 |
Data €ow..................................................................................................................................................................... |
49 |
nputool.............................................................................................................................................................................. |
49 |
Tests............................................................................................................................................................................ |
50 |
4 Contents
CLI options.................................................................................................................................................................. |
50 |
nvramtool.......................................................................................................................................................................... |
55 |
Tests............................................................................................................................................................................ |
55 |
CLI option................................................................................................................................................................... |
55 |
OutputRead outputWrite output............................................................................................................................. |
55 |
opticstool.......................................................................................................................................................................... |
56 |
Tests............................................................................................................................................................................ |
56 |
CLI options.................................................................................................................................................................. |
56 |
Outputshow=brief outputshow outputshow --int=interface # output............................................................... |
57 |
pcitool................................................................................................................................................................................ |
60 |
Tests............................................................................................................................................................................ |
60 |
CLI options.................................................................................................................................................................. |
60 |
Outputscan outputtest outputshow output............................................................................................................ |
61 |
phytool............................................................................................................................................................................... |
64 |
Tests............................................................................................................................................................................ |
64 |
CLI optionsOutput..................................................................................................................................................... |
64 |
pltool.................................................................................................................................................................................. |
66 |
Tests............................................................................................................................................................................ |
66 |
CLI options.................................................................................................................................................................. |
66 |
OutputList outputListdevicenames outputRead outputWrite outputTest output............................................. |
67 |
psutool............................................................................................................................................................................... |
68 |
Tests............................................................................................................................................................................ |
68 |
CLI optionstest option............................................................................................................................................... |
68 |
rtctool................................................................................................................................................................................ |
70 |
Tests............................................................................................................................................................................. |
70 |
CLI options.................................................................................................................................................................. |
70 |
smartctl.............................................................................................................................................................................. |
71 |
smarttool............................................................................................................................................................................ |
71 |
SMF upgrade binariesCLI options............................................................................................................................. |
71 |
SMF MSS upgrade.................................................................................................................................................... |
72 |
Upgrading SMF FPGA............................................................................................................................................... |
74 |
smbiostool......................................................................................................................................................................... |
76 |
CLI options.................................................................................................................................................................. |
76 |
Output......................................................................................................................................................................... |
77 |
storagetool........................................................................................................................................................................ |
77 |
Tests............................................................................................................................................................................. |
77 |
CLI options.................................................................................................................................................................. |
77 |
Outputlist outputtest outputsmart outputbonnie output..................................................................................... |
78 |
smartctl....................................................................................................................................................................... |
80 |
bonnie++..................................................................................................................................................................... |
82 |
temptool............................................................................................................................................................................ |
82 |
Tests............................................................................................................................................................................ |
82 |
CLI options.................................................................................................................................................................. |
83 |
Outputtest output...................................................................................................................................................... |
83 |
updatetool......................................................................................................................................................................... |
84 |
Contents 5
Tests............................................................................................................................................................................ |
84 |
CLI options.................................................................................................................................................................. |
84 |
Output......................................................................................................................................................................... |
85 |
vmetool............................................................................................................................................................................. |
85 |
CLI options.................................................................................................................................................................. |
85 |
Diagnostic package.......................................................................................................................................................... |
85 |
6 Dell EMC support........................................................................................................................................ |
86 |
6 Contents
1
About this guide
This guide provides site preparation recommendations, step-by-step procedures for rack mounting and desk mounting, inserting optional modules, and connecting to a power source.
Notices

 CAUTION: To avoid electrostatic discharge (ESD) damage, wear grounding wrist straps when handling this equipment.
WARNING: Only trained and quali•ed personnel can install this equipment. Read this guide before you install and power up this equipment. This equipment contains two power cords. Disconnect both power cords before servicing.
WARNING: This equipment contains optical transceivers, which comply with the limits of Class 1 laser radiation.
Figure 1. Class 1 laser product tag
WARNING: When no cable is connected, visible and invisible laser radiation may be emitted from the aperture of the optical transceiver ports. Avoid exposure to laser radiation and do not stare into open apertures.
Related documents
For more information about the Open Networking (-ON) platform, see the following documents.
•Dell EMC OS10 User Guide
•Dell EMC OS9 Command Line Reference Guide
•Dell EMC OS9 Con€guration Guide
•Dell EMC Getting Started Guide or Dell EMC Setup Guide
•Dell EMC Installation Guide
•Dell EMC Release Notes
About this guide |
7 |

2
ONIE and Dell EMC OS installation instructions
This section describes the different methods to install ONIE and the Dell EMC OS on your system.
NOTE: After installing the networking operating software (NOS) and diagnostics operating system (DIAG-OS), if you boot into ONIE Install mode, ONIE assumes ownership of the system; ONIE Install mode is sticky. In this situation, ONIE stays in Install mode until NOS and DIAG-OS are successfully installed again. If you want to boot into ONIE for any reason other than installation, use Rescue mode or Update mode.

 NOTE: To access ONIE, use the RJ-45 console port.
ONIE expansion
To view all the ONIE commands available, from the ONIE prompt, enter onie- and click <tab> twice.
ONIE:/ # onie- <TAB><TAB> |
onie-syseeprom |
|
onie-boot-mode |
onie-fwpkg |
|
onie-console |
onie-nos-install |
onie-sysinfo |
onie-discovery-start |
onie-self-update |
onie-uninstaller |
onie-discovery-stop |
onie-support |
|
Topics:
•DIAG-OS installation
•ONIE and DIAG OS installation
•ONIE service discovery and OS installation
•Installation ONIE from BIOS
DIAG-OS installation

 NOTE: If you have a recovery USB plugged into your system, you must remove it before installing the DIAG-OS.
1Assign an IP address to the management interface. Confirm you can reach the network.
2Install the DIAG-OS from the ONIE prompt using the following command:
ONIE:/ # onie-nos-install tftp://x.x.x.x/diag-installer-x86_64-dell_<platform>_<processor id>-r0.bin
After the DIAG-OS installs, the system reboots and displays following menu:
|
NOTE: By default, the system boots in DIAG-OS mode. |
|
|
|
|
GNU GRUB version 2.02~beta2+e4a1fe391 |
|
|
+---------------------------------------------- |
|
+ |
|*EDA-DIAG |
| |
|
| ONIE |
| |
|
| |
|
| |
| |
|
| |
| |
|
| |
8 ONIE and Dell EMC OS installation instructions

| |
| |
| |
| |
| |
| |
| |
| |
| |
| |
| |
| |
| |
| |
+---------------------------------------------- |
+ |
Use the ^ and v keys to select which entry is highlighted. Press enter to boot the selected OS, `e' to edit the commands before booting or `c' for a command-line.
ONIE and DIAG OS installation
The following steps describe how to load ONIE and DIAG-OS on your system:
•Installing ONIE—these instructions use the universal serial bus (USB) method. To boot from a Linux USB, you must preinstall BIOS on your system.
•Installing the DIAG-OS—Install the DIAG-OS from the ONIE prompt. Ensure that your TFTP server is reachable over your network.
•ONIE operates using a 115200 baud rate. Ensure that any equipment attached to the serial port supports the required 115200 baud rate.

 NOTE: The following output examples are for reference only; your output may vary.
NOTE: The management port IP, FTP server IP address, MAC address, and user-id shown are for illustration purpose only. Use your system’s applicable values.
ONIE service discovery and OS installation
ONIE attempts to locate the installer through several discovery methods, as shown. To download and run an installer, the ONIE Service Discovery feature uses the first successful method found.
1Pass from the boot loader.
2Search locally attached storage devices for one of the ONIE default installer filenames—for example, USB.
3Discover the URLs from DHCPv4.
4Report discovered URLs based on the DHCPv4 responses.
5Query to the IPv6 link-local neighbors using HTTP for an installer.
6Start TFTP waterfall—from the DHCPv4 option 66.
ONIE ifconfig eth0 command examples
If none of the ONIE Service Discovery methods are successful, you can disable this using the onie-discovery-stop command.
You can install an operating system manually from HTTP, USB, FTP, or TFTP using the onie-nos-install <URL> command.
NOTE: If you have a recovery USB plugged into your system, you must remove it before installing the DIAG-OS using the onie- nos-install <URL> command.
The ONIE Install environment uses DHCP to assign an IP address to the management interface, eth0. If that fails, it uses the link-local IPv4 address 169.254.209.190/16.
To display the IP address, use the ifconfig eth0 command, as shown:
ONIE:/ # ifconfig eth0
eth0 Link encap:Ethernet HWaddr 90:B1:1C:F4:9C:76 inet addr:x.x.x.x Bcast:x.x.x.x Mask:x.x.x.x
inet6 addr: fe80::92b1:1cff:fef4:9c76/64 Scope:Link UP BROADCAST RUNNING MULTICAST MTU:1500 Metric:1 RX packets:18 errors:0 dropped:0 overruns:0 frame:0
TX packets:24 errors:0 dropped:0 overruns:0 carrier:0 collisions:0 txqueuelen:1000 RX bytes:1152 (1.1 KiB) TX bytes:6864 (6.7 KiB)
Interrupt:21 Memory:ff300000-ff320000
ONIE and Dell EMC OS installation instructions |
9 |

To assign an IP address to the management interface, eth0, and verify network connectivity, use the ifconfig eth0 <ip address> command, as shown:
ONIE:/ # ifconfig eth0 x.x.x.x netmask x.x.x.x UP
Then set speed on management interface as below
ONIE:/ # ethtool -s eth0 speed 100 duplex full Verify the network connection with ping. ONIE:/ # ping x.x.x.x
PING x.x.x.x (x.x.x.x): 56 data bytes
64 bytes from x.x.x.x: seq=0 ttl=62 time=1.357 ms
64 bytes from x.x.x.x: seq=1 ttl=62 time=0.577 ms ^C
Installation ONIE from BIOS
There are two options for installing ONIE from the BIOS.
•Media (usb) boot using the ONIE installer USB (using the OCP Procedure)
•Media (usb) boot using the Ubuntu installer USB (using the custom-bootable USB procedure)
Pre-requisites
The BIOS running on your system must meet the following requirements:
•Allows a change to the boot order so the system can boot from media (USB).
•Allows a baud-rate change. This feature is optional; you do not need it if your BIOS is running at 115200 baud rate. The default baud rate for ONIE is 115200.
CAUTION:
•These procedures are for x86-based targets only, particularly targets using Rangeley or Centerton CPU-based boards.
•Check the console (UART-0/1) used on the target.
•The log messages included in this guide are subject to change.
NOTE: The following procedure is generic and does not list a particular target. Therefore, the ONIE images are speci•ed using the <platform>_<cpu> notation. For example, the ONIE media (usb) iso image is onie-recovery-x86_64- dell_<platform>_<cpu>-r0.iso.
ONIE UEFI-based installation using USB
The following steps describe how to create a bootable unified extensible firmware interface (UEFI) ONIE-based USB to install ONIE using Embed mode:
To install ONIE UEFI on your system, use any existing ONIE-based system to make an ONIE UEFI-based bootable USB. To make a bootable USB, use the ONIE ISO file.
1Boot the ONIE target in ONIE Rescue mode.
Use ONIE Rescue mode to make the ONIE UEFI-bootable USB.
To select which entry is highlighted, use the up and down arrow keys. Press Enter to select an operating software-selected OS or enter e to edit the commands before booting. Enter c for a command line. The highlighted entry, displaying *, executes automatically in the operating system.
GNU GRUB version 2.02~beta2+e4a1fe391
+--------------------------- |
+ |
|ONIE: Install OS |
| |
10 ONIE and Dell EMC OS installation instructions
|*ONIE: Rescue |
| |
|ONIE: Uninstall OS |
| |
|ONIE: Update ONIE |
| |
|ONIE: Embed ONIE |
| |
|EDA-DIAG |
| |
| |
| |
| |
| |
| |
| |
+--------------------------- |
+ |
2Confirm that your system can reach the network.
3Copy the ONIE ISO image to the solid-state drive (SSD) of the ONIE target.
ONIE:/ # wget --quiet http://xx.xx.x.xxx/tftpboot/users/<name>/onie-recovery-x86_64- dell_<platform>_c2538-r0.iso
To copy the image, you can use SCP, TFTP, or WGET (ftp/http).
scp username@xx.xx.xxx.xxx:/tftpboot/onie-recovery-x86_64-dell_<platform>_c2538-r0.iso .
4Confirm that the ISO file copied to the SDD over the network.
ONIE:/ # ls -l
…
-rw-r--r-- 1 root 0 39780352 Apr 10 11:55 onie-recovery-x86_64-dell_<platform>_c2538-r0.iso
…
5Insert a blank USB in the ONIE target's USB slot. Verify the USB block device using the ONIE logs.
Info: eth0: Checking link... scsi 6:0:0:0: Direct-Access Kingston DataTraveler 2.0 1.00 PQ: 0 ANSI: 4
sd 6:0:0:0: [sdb] 15148608 512-byte logical blocks: (7.75 GB/7.22 GiB) sd 6:0:0:0: [sdb] Write Protect is off
sd 6:0:0:0: [sdb] Write cache: disabled, read cache: enabled, doesn't support DPO or FUA sd 6:0:0:0: [sdb] Attached SCSI removable disk
The logs show that the USB device is present: /dev/sdb. You can also check /sys/block.
ONIE:/ # cd /sys/block/sdb ONIE:/sys/block/sdb # ls -l
-r--r--r-- 1 root 0 4096 Apr 10 13:12 alignment_offset
lrwxrwxrwx 1 root 0 0 Apr 10 13:12 bdi -> ../../devices/virtual/bdi/8:16 -r--r--r-- 1 root 0 4096 Apr 10 13:12 capability
-r--r--r-- 1 root 0 4096 Apr 10 13:12 dev
lrwxrwxrwx 1 root 0 0 Apr 10 13:12 device -> ../../devices/pci0000:00/0000:00:16.0/ usb1/1-1/1-1.1/1-1.1.1/1-1.1.1:1.0/host6/target6:0:0/6:0:0:0
…
6Copy the ISO image to the USB using the dd command.
ONIE:/ # dd if=./onie-recovery-x86_64-dell_<platform>_c2538-r0.iso of=/dev/sdb bs=10M 3+1 records in
3+1 records out
39780352 bytes (37.9MB) copied, 6.890503 seconds, 5.5MB/s ONIE:/ #
7Move the USB from the ONIE target—the system with ONIE—to the USB slot in your switch—the system without ONIE.
8Turn-on your system and enter the BIOS setup menu by selecting Del when BIOS message is displayed.
If you already powered on your system, reboot the system and enter the BIOS setup menu by selecting Del.
9In the BIOS Boot menu, select UEFI USB. Select Save and Exit.
ONIE and Dell EMC OS installation instructions |
11 |

Figure 2. Setup utility
After the system exits the BIOS Boot menu, the system boots with the ONIE USB and presents the following menu:
Figure 3. Embed ONIE menu
10Select the Embed ONIE option.
This step installs the UEFI ONIE version 3.26.1.1 on system. Any previous installation is removed. Do not press any key during the Embed ONIE installation.
The following are the Embed ONIE logs:
ONIE: Embedding ONIE ...
Platform : x86_64-dell_<platform>_c2538-r0 Version : x.xx.x.x
Build Date: 2016-04-26T09:14-0700
[ 4.066378] dummy-irq: no IRQ given. Use irq=N
[ 14.296290] esas2r: driver will not be loaded because no ATTO esas2r devices were found
12 ONIE and Dell EMC OS installation instructions

[ 14.463587] mtdoops: mtd device (mtddev=name/number) must be supplied [ 16.328319] i8042: No controller found
[ 16.397853] fmc_write_eeprom fake-design-for-testing-f001: fmc_write_eeprom: no busid passed, refusing all cards
[ 16.568122] intel_rapl: driver does not support CPU family 6 model 77 Info: Mounting kernel filesystems... done.
Info: Mounting ONIE-BOOT on /mnt/onie-boot ...
Info: Using eth0 MAC address: 4c:76:25:f4:7c:80
Info: eth0: Checking link... [ 18.571495] scsi 6:0:0:0: Direct-Access Kingston DataTraveler 2.0 1.00 PQ: 0 ANSI: 4
[ 18.707185] sd 6:0:0:0: Attached scsi generic sg1 type 0
[ 18.707703] sd 6:0:0:0: [sdb] 15148608 512-byte logical blocks: (7.75 GB/7.22 GiB) [ 18.796392] sd 6:0:0:0: [sdb] Write Protect is off
[ 18.797033] sd 6:0:0:0: [sdb] Write cache: disabled, read cache: enabled, doesn't support DPO or FUA
[ 19.159563] sd 6:0:0:0: [sdb] Attached SCSI removable disk up.
Info: Trying DHCPv4 on interface: eth0
ONIE: Using DHCPv4 addr: eth0: 1[ 20.053045] random: dropbearkey urandom read with 94 bits of entropy available
x.xx.xxx.xx / xxx.xxx.xxx.x
Starting: dropbear ssh daemon... done. Starting: telnetd... done.
discover: ONIE embed mode detected. Running updater. Starting: discover... done.
Please press Enter to activate this console. Info: eth0: Checking link... up. Info: Trying DHCPv4 on interface: eth0
ONIE: Using DHCPv4 addr: eth0: x.xx.xxx.xx / xxx.xxx.xxx.x ONIE: Starting ONIE Service Discovery
Info: Found static url: file:///lib/onie/onie-updater [ 29.744855] random: nonblocking pool is initialized
ONIE: Executing installer: file:///lib/onie/onie-updater Verifying image checksum ... OK.
Preparing image archive ... OK. ONIE: Version : x.xx.x.x
ONIE: Architecture : x86_64
ONIE: Machine : dell_<platform>_c2538 ONIE: Machine Rev : 0
ONIE: Config Version: 1 Installing ONIE on: /dev/sda
/proc/devices: No entry for device-mapper found /proc/devices: No entry for device-mapper found
ONIE: Success: Firmware update URL: file:///lib/onie/onie-updater ONIE: Success: Firmware update version: x.xx.x.x
ONIE: Rebooting...
discover: ONIE embed mode detected.
Stopping: discover...start-stop-daemon: warning: killing process 1441: No such process Stopping: dropbear ssh daemon... done.
Stopping: telnetd... done.
Stopping: syslogd... done.
Info: Unmounting kernel filesystems
The system is going down NOW!
Sent SIGTERM to all processes
Sent SIGKILL to all processes
Requesting system reboot
After the Embed-ONIE installation completes, the system bootups and presents the ONIE menu.
ONIE and Dell EMC OS installation instructions |
13 |
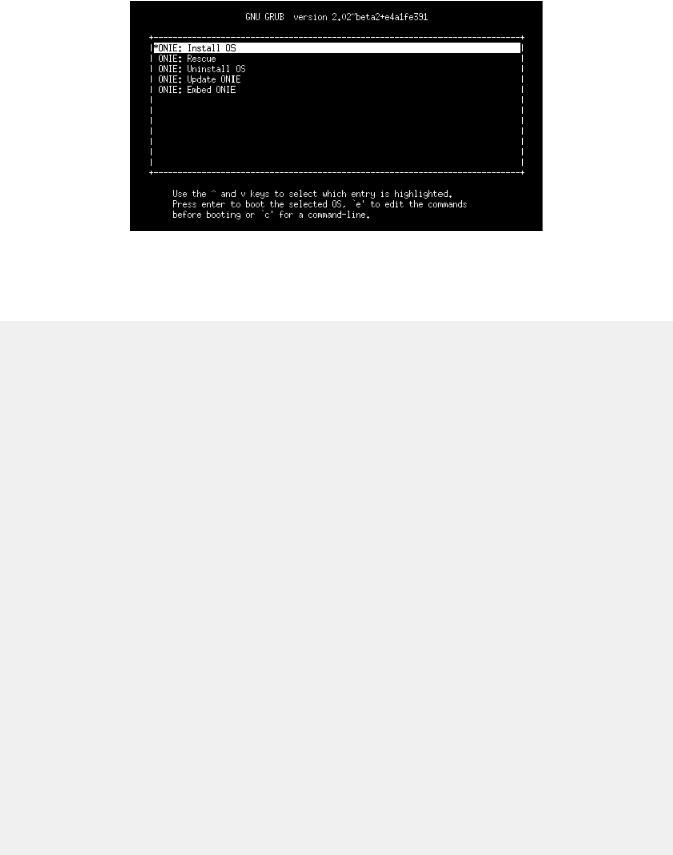
Figure 4. ONIE install menu
The system comes up in ONIE Install mode by default, as shown:
ONIE: OS Install Mode ...
Version : x.xx.x.x
Build Date: 2016-04-26T09:14-0700 ONIE: OS Install Mode ...
Version : x.xx.x.x
Build Date: 2016-04-26T09:14-0700
[ 4.759116] dummy-irq: no IRQ given. Use irq=N
[ 4.835970] esas2r: driver will not be loaded because no ATTO esas2r devices were found
[ 5.003050] mtdoops: mtd device (mtddev=name/number) must be supplied [ 6.867708] i8042: No controller found
[ 6.937375] fmc_write_eeprom fake-design-for-testing-f001: fmc_write_eeprom: no busid passed, refusing all cards
[ 7.107669] intel_rapl: driver does not support CPU family 6 model 77 Info: Mounting kernel filesystems... done.
Info: Mounting ONIE-BOOT on /mnt/onie-boot ...
[ 8.018377] random: fsck urandom read with 73 bits of entropy available Info: Mounting EFI System on /boot/efi ...
Info: Using eth0 MAC address: 4c:76:25:f4:7c:80
Info: eth0: Checking link... [ 8.902787] scsi 6:0:0:0: Direct-Access Kingston DataTraveler 2.0 1.00 PQ: 0 ANSI: 4
[ 9.038475] sd 6:0:0:0: Attached scsi generic sg1 type 0
[ 9.038993] sd 6:0:0:0: [sdb] 15148608 512-byte logical blocks: (7.75 GB/7.22 GiB)
[ 9.253877] sd 6:0:0:0: [sdb] Write Protect is off
[ 9.254546] sd 6:0:0:0: [sdb] Write cache: disabled, read cache: enabled, doesn't support DPO or FUA
[ 9.492124] sd 6:0:0:0: [sdb] Attached SCSI removable disk up.
Info: Trying DHCPv4 on interface: eth0
ONIE: Using DHCPv4 addr: eth0: x.xx.xxx.xx / xxx.xxx.xxx.x Starting: dropbear ssh daemon... done.
Starting: telnetd... done.
[ 11.789298] random: nonblocking pool is initialized discover: installer mode detected. Running installer. Starting: discover... done.
Please press Enter to activate this console. Info: eth0: Checking link... up. Info: Trying DHCPv4 on interface: eth0
ONIE: Using DHCPv4 addr: eth0: x.xx.xxx.xx / xxx.xxx.xxx.x ONIE: Starting ONIE Service Discovery
Info: Fetching
14 ONIE and Dell EMC OS installation instructions

http://xx.xx.xxx.x/onie-installer-x86_64-dell_<platform>_c2538-r0 ...
Info: Fetching http://xx.xx.xxx.x/onie-installer-x86_64-dell_<platform>_c2538
...
Info: Fetching http://xx.xx.xxx.x/onie-installer-dell_<platform>_c2538 ...
Info: Fetching http://xx.xx.xxx.x/onie-installer-x86_64 ...
Info: Fetching http://xx.xx.xxx.x/onie-installer ...
Info: Fetching
http://xx.xx.xxx.x/onie-installer-x86_64-dell_<platform>_c2538-r0 ...
Info: Fetching http://xx.xx.xxx.x/onie-installer-x86_64-dell_<platform>_c2538
...
11Stop ONIE Discovery mode.
ONIE:/ # onie-discovery-stop
The operation has completed successfully. ONIE:/ #
12Verify the ONIE Linux kernel version and partition layout.
This step verifies that you are running the correct kernel in ONIE as the kernel is separate from the ONIE environment.
ONIE:/ # uname -a
Linux onie 4.1.28-onie+ #1 SMP Wed Sep 7 14:38:43 PDT 2016 x86_64 GNU/Linux ONIE:/ # sgdisk -p /dev/sda
Disk /dev/sda: 31277232 sectors, 14.9 GiB Logical sector size: 512 bytes
Disk identifier (GUID): 763E53FF-B894-40FD-B0F9-FBAE2ED4B0B5 Partition table holds up to 128 entries
First usable sector is 34, last usable sector is 31277198 Partitions will be aligned on 2048-sector boundaries Total free space is 30490733 sectors (14.5 GiB)
Number Start (sector) End (sector) Size Code Name 1 2048 526335 256.0 MiB EF00 EFI System
2 526336 788479 128.0 MiB 3000 ONIE-BOOT ONIE:/ #
13Verify that efibootmgr runs and displays the valid boot options.
ONIE:/ # efibootmgr BootCurrent: 0000 Timeout: 1 seconds
BootOrder: 0000,0006,0001,0003
Boot0000* ONIE: Open Network Install Environment Boot0001* Hard Drive
Boot0003* UEFI: Built-in EFI Shell
Boot0006* UEFI: KingstonDataTraveler 2.01.00 14
ONIE and Dell EMC OS installation instructions |
15 |

3
ONIE overview
This chapter describes system diagnostics and troubleshooting. After running the diagnostic tools, your system displays pass or fail test results. If all tests pass, the diagnostic tools exit normally. If a test fails, each diagnostic tool offers a different result.
NOTE: The troubleshooting package includes a README •le that lists the tools version and the overall troubleshooting package version. For more information, see this README •le.

 NOTE: To download the Release Notes, go to www.dell.com/support.
This system uses the power-on self test (POST) diagnostic tool that automatically runs during the system power-on at the BIOS level. This tool tests for catastrophic hardware failures that prevent booting the system. The error code is saved in CMOS for the next boot. There is no physical alarm indication.
ONIE expansion
To view all the ONIE commands available, from the ONIE prompt, enter onie- and click <tab> twice.
|
|
|
ONIE:/ # onie- <TAB><TAB> |
onie-syseeprom |
|
onie-boot-mode |
onie-fwpkg |
|
onie-console |
onie-nos-install |
onie-sysinfo |
onie-discovery-start |
onie-self-update |
onie-uninstaller |
onie-discovery-stop |
onie-support |
|
Topics:
•Boot processes
•View system information
Boot processes
After the BIOS, POST runs to verify the devices required to boot to ONIE GRUB.
POST
POST diagnostics verify the system DRAM, DIMM, SPD, memory, RTC/NVRAM, and PCI devices. Test configuration parameters and test results are saved in NVRAM.
Capture support data from ONIE
1Capture support data to the screen.
ONIE:/ # dmesg
2Capture support data to the onie-support.tar.bz2 gzip file.
ONIE-support creates the support file. To store the file, enter the location; for example, ONIE:/# onie-support/tmp.
ONIE:/ # onie-support <output_directory>
16 ONIE overview

The ONIE support file includes the following:
•kernel_cmdline
•runtime-export-env
•runtime-process
•runtime-set-env
•log/messages
•log/onie.log
Output example
Success: Support tarball created: /tmp/onie-support.tar.bz2
Change default grub boot entry
To view or set the default Boot mode, the onie-boot-mode command has two options —l, the default, and —o. The Grub boot default shows the current default entry.
View or set the default Grub boot entry.
ONIE:/ # onie-boot-mode [-o <onie_mode>]
The -o command options include:
•install—ONIE OS Installer mode
•rescue—ONIE Rescue mode
•uninstall—ONIE OS Uninstall mode
•update—ONIE Self-Update mode
•embed—ONIE Self-Update mode and Embed ONIE
•none—Uses System Default Boot mode. This mode uses the first ONIE boot menu entry.
The -l command option lists the current default entry—this is the default setting.
View system information
To view your system information; for example, the model, part number, serial number, and service tag, use the following commands:
1Boot into ONIE.
2Enter the onie-syseeprom command.
ONIE:/ # onie-syseeprom |
|
|
|
TlvInfo Header: |
TlvInfo |
|
|
Id String: |
|
|
|
Version: |
1 |
|
|
Total Length: 162 |
|
|
|
TLV Name |
Code Len Value |
||
-------------------- ---- --- ----- |
|||
Part Number |
0x22 |
6 |
0W1K08 |
Serial Number |
0x23 |
20 |
CN0W1K08779316470002 |
Product Name |
0x21 |
8 |
<platform> |
Device Version |
0x26 |
1 |
0 |
Label Revision |
0x27 |
3 |
X00 |
Manufacture Date |
0x25 |
19 |
04/08/2016 08:43:05 |
Manufacturer |
0x2B |
5 |
77931 |
Country Code |
0x2C |
2 |
CN |
Vendor Extension |
0xFD |
1 |
0x00 |
MAC Addresses |
0x2A |
2 |
256 |
ONIE overview |
17 |

Service Tag |
0x2F |
7 |
2WCSG02 |
Vendor Name |
0x2D |
4 |
DELL |
Diag Version |
0x2E |
6 |
01_010 |
Base MAC Address |
0x24 |
6 |
34:17:EB:05:B4:00 |
Platform Name |
0x28 |
26 |
x86_64-dell_<platform>_c2538-r0 |
ONIE Version |
0x29 |
8 |
x.xx.x.x |
CRC-32 |
0xFE |
4 |
0x99415608 |
Checksum is valid. |
|
|
|
ONIE:/ # |
|
|
|
3Enter the onie-sysinfo –a command.
ONIE:/ # onie-sysinfo -a
CN0W1K08779316470002 0W1K08 34:17:EB:05:B4:00 3.28.1.2 674 dell_<platform>_c2538 0 x86_64- dell_<platform>_c2538-r0 x86_64 1 gpt 2016-09-21T10:01-0700 bcm
ONIE:/ #
18 ONIE overview

4
Dell EMC DIAG OS
These sections describe the Dell EMC diagnostics. These instructions apply to systems where ONIE diagnostics are not available.
Topics:
•Diagnostic package download
•View DIAG versions
•View CPLD versions
•Install or upgrade DIAG tools
•Restore factory defaults
Diagnostic package download
Load or update the DIAG-OS—the diag installer image—using the onie-nos-install command. The DIAG-OS installer runs in two modes: Update mode or Install mode.
•In Update mode, the DIAG-OS updates the existing DIAG-OS and boots back to ONIE.
•In Install mode, the DIAG-OS erases the existing DIAG-OS and loads the new DIAG-OS.
NOTE: If you have a recovery USB plugged into your system, remove it before installing the DIAG-OS using the onie-nos- install command.

 NOTE: Before you begin, go to www.dell.com/support and download the diagnostic package.
1Enter the onie-discovery-stop command to stop ONIE Discovery mode.
2Assign an IP address to the management interface and verify the network connectivity.
ONIE:/ # ifconfig eth0 xx.xx.xx.xx netmask xxx.xxx.x.x up
ONIE:/ # ifconfig |
|
|
|
eth0 |
Link encap:Ethernet HWaddr 34:17:EB:05:B4:00 |
||
|
inet addr:xx.xx.xx.xx |
Bcast:xx.xx.xxx.xxx |
Mask:xxx.xxx.x.x |
|
inet6 addr: fe80::3617:ebff:fe05:b400/64 Scope:Link |
||
|
UP BROADCAST RUNNING MULTICAST MTU:1500 |
Metric:1 |
|
|
RX packets:43 errors:0 dropped:0 overruns:0 frame:0 |
||
|
TX packets:31 errors:0 dropped:0 overruns:0 carrier:0 |
||
|
collisions:0 txqueuelen:1000 |
|
|
|
RX bytes:5118 (4.9 KiB) |
TX bytes:7104 (6.9 KiB) |
|
Memory:dff40000-dff5ffff
3Upgrade the DIAG Installer.
Again, boot to ONIE Rescue mode and install the onie diag installer.
NOTE: In Install mode, the DIAG-OS installation removes any existing NOS and DIAG-OS partition. If you do not create file /tmp/diag_os_install_mode, the DIAG-OS installs in Upgrade mode. In this case, the installation process does NOT touch any existing NOS.
ONIE:/ onie-nos-install tftp://<tftp-server ip>/<filepath>/filename/diag-install er-x86_64-dell_<platform>_c2538-r0-2016-08-12.bin
discover: installer mode detected. Stopping: discover... done.
Info: Fetching tftp://<tftp-server ip>/users/<user>/<platform>/diag-installer-x86_64-
Dell EMC DIAG OS |
19 |

dell_<platform>_c2538-r0-2016-08-12.bin ...
users/<user>/<platform> 100% |*******************************| 154M 0:00:00 ETA
ONIE: Executing installer: tftp://<tftp-server ip>/users/<user>/<platform>/diag-installer- x86_64-dell_<platform>_c2538-r0-2016-08-12.bin
Ignoring Verifying image checksum ... OK.
cur_dir / archive_path /var/tmp/installer tmp_dir /tmp/tmp.qlnVIY
Preparing image archive ...sed -e '1,/^exit_marker$/d' /var/tmp/installer | tar xf - OK. Diag-OS Installer: platform: x86_64-dell_<platform>_c2538-r0
EDA-DIAG Partiton not found.
Diag OS Installer Mode : INSTALL
Creating new diag-os partition /dev/sda3 ...
Warning: The kernel is still using the old partition table.
The new table will be used at the next reboot.
The operation has completed successfully.
EDA-DIAG dev is /dev/sda3 mke2fs 1.42.13 (17-May-2015)
Creating filesystem with 262144 4k blocks and 65536 inodes Filesystem UUID: 63fc156f-b6c1-415d-9676-ae4478704c5a Superblock backups stored on blocks:
32768, 98304, 163840, 229376
Allocating group tables: done
Writing inode tables: done
Creating journal (8192 blocks): done
Writing superblocks and filesystem accounting information: done
Created filesystem on /dev/sda3 with label EDA-DIAG
Mounted /dev/sda3 on /tmp/tmp.BBEygm
Preparing /dev/sda3 EDA-DIAG for rootfs install untaring into /tmp/tmp.BBEygm
rootfs copy done
Success: Support tarball created: /tmp/tmp.BBEygm/onie-support.tar.bz2 Updating Grub Cfg /dev/sda3 EDA-DIAG
ONIE uefi_uuid 69AD-9CBF
INSTALLER DONE...
Removing /tmp/tmp.qlnVIY
ONIE: NOS install successful: tftp://<tftp-server ip>/users/<user>/<platform>/diag-installer- x86_64-dell_<platform>_c2538-r0-2016-08-12.bin
ONIE: Rebooting...
ONIE:/ # discover: installer mode detected.
Stopping: discover...start-stop-daemon: warning: killing process 2605: No such process done.
Stopping: dropbear ssh daemon... done. Stopping: telnetd... done.
Stopping: syslogd... done.
Info: Unmounting kernel filesystems umount: can't umount /: Invalid argument The system is going down NOW!
Sent SIGTERM to all processes
Sent SIGKILL tosd 4:0:0:0: [sda] Synchronizing SCSI cache reboot: Restarting system
reboot: machine restart
BIOS Boot Selector for <platform>
Primary BIOS Version x.xx.x.x_MRC48
20 Dell EMC DIAG OS
SMF Version: MSS 1.3.1, FPGA 0.3
Last POR=0x11, Reset Cause=0x55
POST Configuration
CPU Signature 406D8
CPU FamilyID=6, Model=4D, SteppingId=8, Processor=0
Microcode Revision 125
Platform ID: 0x10041A43
PMG_CST_CFG_CTL: 0x40006
BBL_CR_CTL3: 0x7E2801FF
Misc EN: 0x840081
Gen PM Con1: 0x203808
Therm Status: 0x884C0000
POST Control=0xEA000100, Status=0xE6000000
BIOS initializations... |
|
|
CPGC |
Memtest ................................ |
PASS |
CPGC |
Memtest ................................ |
PASS |
Booting `EDA-DIAG'
Loading DIAG-OS ...
[3.786758] dummy-irq: no IRQ given. Use irq=N
[ 3.792812] esas2r: driver will not be loaded because no ATTO esas2r devices were found [ 3.818171] mtdoops: mtd device (mtddev=name/number) must be supplied
[4.880285] i8042: No controller found
[ 4.890134] fmc_write_eeprom fake-design-for-testing-f001: fmc_write_eeprom: no busid passed, refusing all cards
[ 4.901699] intel_rapl: driver does not support CPU family 6 model 77
Debian GNU/Linux 8 dell-diag-os ttyS1
dell-diag-os login: root Password:
Linux dell-diag-os 3.15.10 #1 SMP Fri Aug 12 05:14:52 PDT 2016 x86_64
The programs included with the Debian GNU/Linux system are free software; the exact distribution terms for each program are described in the individual files in /usr/share/doc/*/copyright.
Debian GNU/Linux comes with ABSOLUTELY NO WARRANTY, to the extent permitted by applicable law.
Diag OS version <platform>_DIAG_OS_x.xx.x.x Build date/time Fri Aug 12 05:23:56 PDT 2016
Build server |
netlogin-eqx-03 |
|
|
Build |
by |
<name> |
|
Kernel Info: |
SMP Fri Aug 12 |
05:14:52 PDT 2016 x86_64 GNU/Linux |
|
Linux |
3.15.10 #1 |
||
Debian GNU/Linux |
8 \n \l |
|
|
Done Initializing Ethernet root@dell-diag-os:~# root@dell-diag-os:~# root@dell-diag-os:~# root@dell-diag-os:~# root@dell-diag-os:~# root@dell-diag-os:~#
4Start diagnostics.
To start the ONIE diagnostics, use the DIAG-OS option from the GRUB menu.
Dell EMC DIAG OS |
21 |

aBoot into the DIAG OS.
bLog in as root. Password: calvin.
cInstall the EDA-DIAG tools package.
dRun /opt/dellemc/diag/bin/edatool.

 NOTE: To return to your networking operating software, enter the reboot command.
Diagnostic test suite
After the system boots up, select the EDA-DIAG option to run the diagnostic test suite.
To select which entry is highlighted, use the up and down arrow keys. Press Enter to select an operating software-selected OS or enter e to edit the commands before booting. Enter c for a command line. The highlighted entry, displaying *, executes automatically in the operating system.
GNU GRUB version 2.02~beta2+e4a1fe391
+--------------------------- |
+ |
|ONIE: Install OS |
| |
|ONIE: Rescue |
| |
|ONIE: Uninstall OS |
| |
|ONIE: Update ONIE |
| |
|ONIE: Embed ONIE |
| |
|*EDA-DIAG |
| |
| |
| |
| |
| |
| |
| |
+--------------------------- |
+ |
View DIAG versions
To display the DIAG version installed in the DIAG OS, use the dpkg -l | grep dn-diags command at the root@dell-diag-os:~ prompt.
root@dellemc-diag-os:~# dpkg -l | grep dn-diags
ii dn-diags-<platform>-on.deb 3.xx.4.1-x amd64 Dell Networking Diagnostics
View CPLD versions
To view CPLD data, including the fan status, PSU status, current programmed version, and image packed version, use the cpldupgradetool or updatetool command at the prompt.
•For the cpldupgradetool command:
root@dell-diag-os:/# cpldupgradetool --cpldver CPLD1 Version 0x00
CPLD2 Version 0x01 CPLD3 Version 0x01 CPLD4 Version 0x01 root@dell-diag-os:/#
•For the updatetool command:
root@dellemc-diag-od~#updatetool --device_version --dev=CPU_CPLD CPU_CPLD version:
System CPLD Version : offset 0x00 = 0xc 7: 4 Major Revision = 0
3: 0 Minor Revision = c
Scratch Register : offset 0x01 = 0x0
22 Dell EMC DIAG OS

Install or upgrade DIAG tools
To install or upgrade the DIAGs in the DIAGs OS, use the dpkg --install dn-diags-<platform>-DiagOS-<version>- <date>.deb command.
root@dell-diag-os:~#dpkg --install dn-diags-<platform>-DiagOS-<version>-<date>.de Selecting previously unselected package dn-diags-<platform>.deb.
(Reading database ... 18873 files and directories currently installed.) Preparing to unpack dn-diags-<platform>-DiagOS-<version>-<date>.deb ...
Unpacking dn-diags-<platform>.deb (1.10) ...
Setting up dn-diags-<platform>.deb (1.10) ...
root@dell-diag-os:~#
Restore factory defaults
To restore your system factory defaults, reboot the system to ONIE: Uninstall OS mode.
If it is not possible to restore your factory defaults with the installed OS, reboot the system from the Grub menu and select ONIE: Rescue. ONIE Rescue bypasses the installed OS and boots the system into ONIE until you reboot the system. After ONIE Rescue completes, the system resets and boots to the ONIE console.

 CAUTION: Restoring factory defaults erases any installed OS and requires a long time to erase storage.
1Restore the factory defaults on your system from the Grub menu using the ONIE: Uninstall OS command. To select which entry is highlighted, use the up and down arrow keys.
GNU GRUB version 2.02~beta2+e4a1fe391
+--------------------------------- |
+ |
| ONIE: Install OS |
| |
| ONIE: Rescue |
| |
|*ONIE: Uninstall OS |
| |
| ONIE: Update ONIE |
| |
| ONIE: Embed ONIE |
| |
| EDA-DIAG |
| |
| |
| |
| |
| |
| |
| |
+--------------------------------- |
+ |
2Press ENTER to activate the console.
3Return to the default ONIE settings using the onie-uninstaller command.
ONIE:/ # onie-uninstaller
Erasing internal mass storage device: /dev/sda4 (32MB) Percent complete: 100%
Erase complete.
Deleting partition 4 from /dev/sda
Erasing internal mass storage device: /dev/sda5 (300MB) Percent complete: 100%
Erase complete.
Deleting partition 5 from /dev/sda
Erasing internal mass storage device: /dev/sda6 (300MB) Percent complete: 100%
Erase complete.
Deleting partition 6 from /dev/sda
Erasing internal mass storage device: /dev/sda7 (12461MB) Percent complete: 100%
Erase complete.
Deleting partition 7 from /dev/sda Installing for i386-pc platform. Installation finished. No error reported. Uninstall complete. Rebooting...
Dell EMC DIAG OS |
23 |

ONIE:/ # discover: Rescue mode detected. No discover stopped. Stopping: dropbear ssh daemon... done.
Stopping: telnetd... done. Stopping: syslogd... done.
Info: Unmounting kernel filesystems The system is going down NOW!
Sent SIGTERM to all processes
Sent SIGKILL tosd 4:0:0:0: [sda] Synchronizing SCSI cache Restarting system.
machine restart
24 Dell EMC DIAG OS

5
Dell EMC DAIG-OS tools
This section describes how to use the Dell EMC diagnostics operating system (DIAG-OS). The DIAG-OS provides a suite of tools to help diagnose issues seen on the system, or to run a health check to ensure that the hardware is operating properly.
Diagnostic tools
The DIAG-OS uses standard Linux drivers and contains the following tools you can use to evaluate the health of your system. The tools are packaged for both the DIAG-OS, which is a simple OS of the same kernel version, and small rootfs to support the tools and drivers.
NOTE: By default, the system’s I/O modules are down. Power up the I/O modules or the Opticstool and NPUtool reports failures. For information about how to power up the I/O modules, see the Dell EMC Installation Guide for your system at www.dell.com/ support.
Topics:
•edatool
•cpldupgradetool
•cputool
•eepromtool
•ethtool
•fantool
•€ashrom
•gpiotool
•i2ctool
•ledtool
•lpctool
•memtool
•nputool
•nvramtool
•opticstool
•pcitool
•phytool
•pltool
•psutool
•rtctool
•smartctl
•smarttool
•smbiostool
•storagetool
•temptool
•updatetool
•vmetool
Dell EMC DAIG-OS tools |
25 |

•Diagnostic package
edatool
The diagnostics tools include edatool. To test the basic functionality of the system, use the edatool.
The edatool executes a script of simple commands, similar to commands in the CLI. Usually, the diagnostics tools run these types of tests. The success or failure of these tools is reported. At the end of the edatool run, reports the PASSED or FAILED results in a standard format the test scripts can easily parse.
Tests
The edatool does not have a test command, but instead runs all the tests that are scripted.
CLI options
DellEmc Diag - Extended Diagnostics Application version 1.4, x.xx.x.x-x
build, 2017/05/23,
Syntax: edatool |
<option> |
|
|
Show the Help-text:= |
|
(or) |
|
edatool |
--h |
|
|
edatool |
-h |
|
|
Lists tests in |
config files:= |
(or) |
|
edatool |
--list |
|
|
edatool |
-l |
|
|
Config file to |
use for tests:= |
(or) |
|
edatool |
--config=<config_file> |
||
edatool |
-f <config_file> |
|
|
Config file to |
use for extended tests:= |
(or) |
|
edatool |
--extended-config=<config_file> |
||
edatool |
-X <config_file> |
|
|
Display test list or test result or modify test item status:= |
|
||
edatool |
--testlist=show/result/<on/off,<test_id>,<test_id>...>(or) |
||
edatool |
-L show/result/<on/off,<test_id>,<test_id>...> |
|
|
Run all or selected test item in test list:= |
(or) |
||
edatool |
--testrun=all/<test_id> |
||
edatool |
--R all/<test_id> |
|
|
Execute repeatedly command by count:= |
(or) |
||
edatool |
--iteration=max/<count> [option1] [option2]... |
||
edatool |
-I max/<count> [option1] [option2]... |
|
|
Usage:= |
|
Show the help text |
|
-h, --h |
|
|
|
-l, --list |
|
List the understood TLV codes and names |
|
-I, --iteration= |
Iteration command execution |
|
|
-L, --testlist= |
Test list status |
|
|
-R, --testrun= |
|
Run test item |
|
-f, --config= |
|
To specify the location of the config file e.g. /etc/dn/diag/ |
|
<file_name> |
|
Config file to use for extended tests |
|
-X, --extended-config= |
|
||
Output
root@dell-diag-os:~# edatool
*****************************
* Diagnostics Application *
*****************************
Dell-EMC Diag edatool version 1.4, package x.xx.x.x 2016/11/21
26 Dell EMC DAIG-OS tools
Loading...