


 Loading...
About Warnings
WARNING: A WARNING indicates a potential for property damage, personal injury, or death.
Installing the Rack Stabilizer Feet
WARNING: Installing systems in a rack without the front and side stabilizer feet installed could cause the rack to tip over, potentially resulting in bodily injury under certain circumstances. Therefore, always install the stabilizer feet before installing components in the rack.
WARNING: After installing systems in a rack, never pull more than one system out of the rack on its slide assemblies at one time. The weight of more than one extended system could cause the rack to tip over and cause injury.
WARNING: For stability, you must ensure that a minimum of 50 lbs. is installed in the bottom 3-U spaces of the rack cabinet.
NOTE: For complete rack installation instructions, see your rack installation guide.
The stabilizer feet help prevent the rack from tipping over when a system or other component is pulled out of the rack with the slide assemblies fully extended.
Install stabilizer feet on the rack as follows:
•Install front and side stabilizer feet on a standalone rack.
•Install front stabilizer feet on all racks in a suite, and install left or right stabilizer feet on the racks at each end of a suite.
Recommended Tools and Supplies
You may need the following tools and supplies to install the rack:
•12-mm wrench
•Keys to the rack doors and side panels
October 2008
Installing the Front Stabilizer Feet
1Open the front door.
2Reach into the rack and pull up firmly on each stabilizer to detach them from the frame.
3Remove the plastic fasteners from the stabilizer feet.
4Position each front stabilizer foot against the base of the rack frame and align its holes with the corresponding holes in the frame.
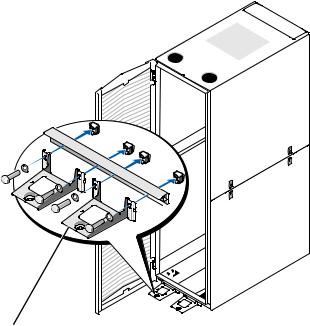
5Use the provided bolts, washers, and cage nuts to secure each foot to the rack as shown in Figure 1-1.
Figure 1-1. Installing the Front Stabilizer Feet
1
1 front stabilizer foot (2)

Installing the Side Stabilizer Feet
1Remove the lower side panels (see "Removing the Lower Side Panels" in your rack installation guide).
2On the side of the rack frame’s bottom rail, locate the four holes (see Figure 1-2).
3Position each stabilizer foot against the base of the rack frame and align its holes with the corresponding holes in the frame.
4Use the provided bolts, washers, and cage nuts to secure each foot to the rack as shown in Figure 1-2.
Figure 1-2. Installing the Side Stabilizer Feet
1
1 side stabilizer foot (2)
____________________
Information in this document is subject to change without notice.
© 2008 Dell Inc. All rights reserved. Printed in China. Printed on recycled paper.
Reproduction of these materials in any manner whatsoever without the written permission of Dell Inc. is strictly forbidden.
Dell and the DELL logo are trademarks of Dell Inc.
Other trademarks and trade names may be used in this document to refer to either the entities claiming the marks and names or their products. Dell Inc. disclaims any proprietary interest in trademarks and trade names other than its own.

À propos des avertissements
AVERTISSEMENT : Un AVERTISSEMENT vous avertit d’un risque d'endommagement du matériel, de blessure corporelle ou de mort.
Installation des stabilisateurs
AVERTISSEMENT : L'installation de systèmes dans un rack sans stabilisateurs avant et latéraux peut provoquer le basculement du rack, et dans certaines situations, un risque de blessure. C'est pourquoi il faut toujours installer les stabilisateurs avant d'installer les composants du rack.
AVERTISSEMENT : Après avoir installé des systèmes dans un rack, ne faites jamais coulisser hors du rack plus d'un système à la fois. Le poids de plusieurs systèmes sortis du rack risquerait de le faire basculer et de blesser quelqu'un.
AVERTISSEMENT : Pour des raisons de stabilité, placez un poids d'au moins 23 kilos dans les espaces 3-U du bas du rack.
REMARQUE : Pour obtenir des instructions d'installation complètes, reportez-vous au guide d'installation fourni avec le rack.
Les stabilisateurs évitent au rack de basculer lorsque vous étendez les assemblages à glissière au maximum pour tirer un système ou un composant hors du rack.
Installez les stabilisateurs sur le rack en procédant comme suit :
•Sur un rack isolé, installez les stabilisateurs avant et latéraux.
•Sur des racks associés, installez les stabilisateurs avant sur chacun, et le stabilisateur gauche ou droit sur le rack aux extrémités correspondantes.
Outils et fournitures recommandés
Pour installer le rack, vous pourrez avoir besoin des outils et fournitures suivants :
•Clé de 12 mm
•Clés des portes et des panneaux latéraux
Octobre 2008

Installation des stabilisateurs avant
1Ouvrez la porte avant.
2Passez la main dans le rack et tirez les stabilisateurs un à un pour les dégager du cadre.
3Retirez les cales en plastique des stabilisateurs.
4Placez chaque stabilisateur avant contre la base du cadre du rack et faites correspondre ses trous avec ceux du cadre.
5Utilisez les vis, rondelles et écrous à cage fournis pour fixer chaque stabilisateur au rack, comme indiqué à la figure 1-1.
Figure 1-1. Installation des stabilisateurs avant
1
1 stabilisateur avant (2)
Loading...