


 Loading...
Dell Precision™ M6400
Setup and Quick Reference Guide
This guide provides a features overview, specifications, and quick setup, software, and troubleshooting information for your computer. For more information about your operating system, devices, and technologies, see the Dell Technology Guide at support.dell.com.
Model PP08X
w w w . d e l l . c o m | s u p p o r t . d e l l . c o m

Notes, Notices, and Cautions
NOTE: A NOTE indicates important information that helps you make better use of your computer.
NOTICE: A NOTICE indicates either potential damage to hardware or loss of data and tells you how to avoid the problem.
CAUTION: A CAUTION indicates a potential for property damage, personal injury, or death.
If you purchased a Dell™ n Series computer, any references in this document to Microsoft® Windows® operating systems are not applicable.
Macrovision Product Notice
This product incorporates copyright protection technology that is protected by method claims of certain U.S. patents and other intellectual property rights owned by Macrovision Corporation and other rights owners. Use of this copyright protection technology must be authorized by Macrovision Corporation, and is intended for home and other limited viewing uses only unless otherwise authorized by Macrovision Corporation. Reverse engineering or disassembly is prohibited.
____________________
Information in this document is subject to change without notice. © 2008 Dell Inc. All rights reserved.
Reproduction of these materials in any manner whatsoever without the written permission of Dell Inc. is strictly forbidden.
Trademarks used in this text: Dell, the DELL logo, Dell Precision, the YOURS IS HERE logo, Wi-Fi Catcher, and DellConnect are trademarks of Dell Inc.; Bluetooth is a registered trademark owned by Bluetooth SIG, Inc., and is used by Dell under license; Intel is a registered trademark, and Core is a trademark of Intel Corporation in the U.S. and other countries; Microsoft, Windows, Windows Vista, and the Windows Vista start button logo are either trademarks or registered trademarks of Microsoft Corporation in the United States and/or other countries.
Other trademarks and trade names may be used in this document to refer to either the entities claiming the marks and names or their products. Dell Inc. disclaims any proprietary interest in trademarks and trade names other than its own.
Model PP08X
August 2008 |
P/N D446C |
Rev. A01 |

Contents
1 About Your Computer. . . . . . . . . . . . . . . . . |
7 |
Front View . . . . . . . . . . . . . . . . . . . . . . . . . |
7 |
Back View . . . . . . . . . . . . . . . . . . . . . . . . . |
8 |
Battery Removal . . . . . . . . . . . . . . . . . . . . . . |
9 |
Wireless Switch and Dell™ Wi-Fi Catcher™ |
|
Network Locator . . . . . . . . . . . . . . . . . . . . . |
10 |
2 Setting Up Your Computer . . . . . . . . . . . . |
11 |
Quick Setup . . . . . . . . . . . . . . . . . . . . . . . |
11 |
Connecting to the Internet . . . . . . . . . . . . . . . . |
14 |
Setting Up Your Internet Connection . . . . . . . . |
14 |
Transferring Information to a New Computer . . . . . . |
15 |
Microsoft® Windows Vista® Operating |
|
System . . . . . . . . . . . . . . . . . . . . . . . |
15 |
Microsoft Windows® XP . . . . . . . . . . . . . . |
15 |
3Specifications . . . . . . . . . . . . . . . . . . . . . 19
4Troubleshooting Tips . . . . . . . . . . . . . . . . 27
Using the Hardware Troubleshooter . . . . . . . . . . 27
Contents 3

Tips . . . . . . . . . . . . . . . . . . . . . . . . . . . . |
27 |
Power Problems . . . . . . . . . . . . . . . . . . . |
27 |
Memory Problems . . . . . . . . . . . . . . . . . . |
29 |
Lockups and Software Problems . . . . . . . . . . |
29 |
Dell Technical Update Service. . . . . . . . . . . . |
31 |
Dell Support Utility . . . . . . . . . . . . . . . . . . |
31 |
Dell Diagnostics . . . . . . . . . . . . . . . . . . . |
31 |
5 Reinstalling Software . . . . . . . . . . . . . . . 33
Drivers . . . . . . . . . . . . . . . . . . . . . . . . . . . |
33 |
Identifying Drivers . . . . . . . . . . . . . . . . . . |
33 |
Reinstalling Drivers and Utilities. . . . . . . . . . . |
34 |
Restoring Your Operating System. . . . . . . . . . . . . |
36 |
Using Microsoft® Windows® System Restore . . . |
36 |
Using Dell Factory Image Restore . . . . . . . . . . |
38 |
Using the Dell™ Operating System Media. . . . . . |
39 |
6Finding Information . . . . . . . . . . . . . . . . . 41
7Getting Help . . . . . . . . . . . . . . . . . . . . . . 43
Obtaining Assistance . . . . . . . . . . . . . . . . . . . |
43 |
Technical Support and Customer Service . . . . . . |
44 |
DellConnect™ . . . . . . . . . . . . . . . . . . . . |
44 |
Online Services . . . . . . . . . . . . . . . . . . . |
44 |
AutoTech Service . . . . . . . . . . . . . . . . . . |
45 |
Automated Order-Status Service . . . . . . . . . . |
45 |
Problems With Your Order . . . . . . . . . . . . . . . . |
45 |
4 Contents

Product Information . . . . . . . . . . . . . . . . . . . |
46 |
Returning Items for Warranty Repair or Credit . . . . . |
46 |
Before You Call . . . . . . . . . . . . . . . . . . . . . |
47 |
Contacting Dell . . . . . . . . . . . . . . . . . . . . . |
49 |
Index . . . . . . . . . . . . . . . . . . . . . . . . . . . . . . . |
51 |
Contents 5

6 Contents

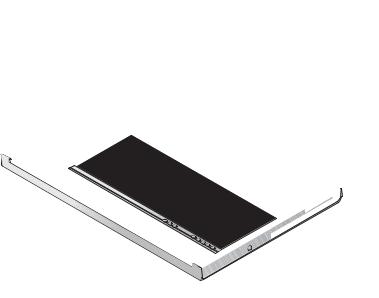
About Your Computer
Front View
 1
1
 2
2
 3
3
|
|
|
|
21 |
|
|
|
20 |
|
|
|
19 |
|
|
|
|
|
|
4 |
|
|
|
|
5 |
18 |
|
|
|
6 |
|
|
|
|
|
|
17 |
|
|
7 |
|
|
|
|
|
|
|
16 |
|
8 |
|
|
|
9 |
|
|
|
|
|
|
|
|
|
15 |
10 |
|
|
|
11 |
|
|
|
|
|
|
|
|
|
|
14 |
|
|
13 |
12 |
1 |
camera (optional) and microphone (2) |
2 |
display latch (2) |
3 |
display |
4 |
fingerprint swipe/FIPS reader |
5 |
power button |
6 |
USB 2.0 and eSATA connector |
About Your Computer |
7 |
7 |
VGA |
8 |
DisplayPort |
9 |
network connector (RJ-45) |
10 |
ExpressCard slot |
11 |
wireless switch and Wi-Fi Catcher™ |
12 |
keyboard |
|
network locator button |
|
|
13 |
wireless smartcard reader |
14 |
track stick |
15 |
track stick buttons (3) |
16 |
display latch release |
17 |
touch pad/jog shuttle |
18 |
touch pad buttons (3) |
19 |
keyboard status lights |
20 |
device status lights |
21 |
speakers (2) |
|
|
Back View
9 |
1 |
|
2 |
||
|
||
|
3 |
|
8 |
4 |
|
5 |
||
|
||
|
6 |
|
|
7 |
1 |
PC Card slot and Smart Card |
2 |
optical bay |
|
slot |
|
|
3 |
8-in-1 card reader slot |
4 |
USB 2.0 ports (2) |
8 |
About Your Computer |

5 |
audio and microphone |
6 |
1394 port (6-pin, powered) |
|
connectors |
|
|
7 |
security cable slot |
8 |
AC adapter connector |
9 |
air vents (2) |
|
|
CAUTION: Do not block, push objects into, or allow dust to accumulate in the air vents. Do not store your Dell™ computer in a low-airflow environment, such as a closed briefcase, while it is running. Restricting the airflow can damage the computer or cause a fire.The computer turns on the fan when the computer gets hot. Fan noise is normal and does not indicate a problem with the fan or the computer.
Battery Removal
CAUTION: Before you begin any of the procedures in this section, follow the safety instructions that shipped with your computer.
CAUTION: Using an incompatible battery may increase the risk of fire or explosion. Replace the battery only with a compatible battery purchased from Dell. The battery is designed to work with your Dell™ computer. Do not use a battery from other computers with your computer.
CAUTION: Before removing or replacing the battery, turn off the computer, disconnect the AC adapter from the electrical outlet and the computer, disconnect the modem from the wall connector and computer, and remove any other external cables from the computer.
1Slide the battery release latch.
2Use a plastic scribe to pry the battery up from the laptop.
3Rotate one side of the battery up at an angle.
4Remove the battery from the battery bay.
About Your Computer |
9 |

Wireless Switch and Dell™ Wi-Fi Catcher™
Network Locator
wireless switch icon
Dell Wi-Fi Catcher Network Locator icon
Use the wireless switch to enable or disable wireless network devices and the Wi-Fi Catcher Network Locator to locate networks. For information about connecting to the Internet, see "Connecting to the Internet" on page 14.
10 |
About Your Computer |
Setting Up Your Computer
Quick Setup
CAUTION: Before you begin any of the procedures in this section, follow the safety instructions that shipped with your computer.
CAUTION: The AC adapter works with electrical outlets worldwide. However, power connectors and power strips vary among countries. Using an incompatible cable or improperly connecting the cable to the power strip or electrical outlet may cause fire or equipment damage.
NOTICE: When you disconnect the AC adapter cable from the computer, grasp the connector, not the cable itself, and pull firmly but gently to avoid damaging the cable. When you wrap the AC adapter cable, ensure that you follow the angle of the connector on the AC adapter to avoid damaging the cable.
NOTE: Some devices may not be included if you did not order them.
1Connect the AC adapter to the AC adapter connector on the computer and to the electrical outlet.
Setting Up Your Computer |
11 |
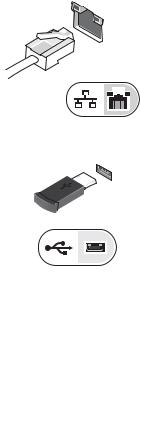
2 Connect the network cable.
3 Connect USB devices, such as a mouse or keyboard.
4 Connect IEEE 1394 devices, such as a DVD player.
5Open the computer display and press the power button to turn on the computer.
12 |
Setting Up Your Computer |

NOTE: It is recommended that you turn on and shut down your computer at least once before you install any cards or connect the computer to a docking device or other external device, such as a printer.
6Connect to the Internet. See "Connecting to the Internet" on page 14 for more information.
 4
4
 5
5
|
3 |
|
3 |
|
2 |
|
2 |
|
1 |
|
1 |
1 |
Internet service |
2 |
cable or DSL modem |
3 |
wireless router |
4 |
laptop with wired connection |
5 |
laptop with wireless connection |
|
|
Setting Up Your Computer |
13 |

Connecting to the Internet
NOTE: ISPs and ISP offerings vary by country.
To connect to the Internet, you need a modem or network connection and an Internet service provider (ISP). If you are using a dial-up connection, connect a telephone line to the modem connector on your computer and to the telephone wall connector before you set up your Internet connection. If you are using a DSL or cable/satellite modem connection, contact your ISP or cellular phone service for setup instructions.
Setting Up Your Internet Connection
To set up an Internet connection with a desktop shortcut provided by your ISP:
1Save and close any open files, and exit any open programs.
2Double-click the ISP icon on the Microsoft® Windows® desktop.
3Follow the instructions on the screen to complete the setup.
If you do not have an ISP icon on your desktop or if you want to set up an Internet connection with a different ISP, perform the steps in the appropriate section below.
NOTE: If you cannot connect to the Internet, see the Dell Technology Guide. If you have successfully connected in the past, the ISP might have a service outage. Contact your ISP to check the service status, or try connecting again later.
NOTE: Have your ISP information ready. If you do not have an ISP, consult the
Connect to the Internet wizard.
1Save and close any open files, and exit any open programs.
2Click the Windows Vista Start button  → Control Panel
3Under Network and Internet, click Connect to the Internet.
4In the Connect to the Internet window, click either Broadband (PPPoE) or Dial-up, depending on how you want to connect:
•Choose Broadband if you will use a DSL, satellite modem, cable TV modem, or Bluetooth wireless technology connection.
•Chose Dial-up if you will use a dial-up modem or ISDN.
NOTE: If you do not know which type of connection to select, click Help me choose or contact your ISP.
14 |
Setting Up Your Computer |

5Follow the instructions on the screen and use the setup information provided by your ISP to complete the setup.
Transferring Information to a New Computer
Microsoft® Windows Vista® Operating System
1Click the Windows Vista Start button  , and then click Transfer files and settings→ Start Windows Easy Transfer.
2In the User Account Control dialog box, click Continue.
3Click Start a new transfer or Continue a transfer in progress.
4Follow the instructions provided on the screen by the Windows Easy Transfer wizard.
Microsoft Windows® XP
Windows XP provides the Files and Settings Transfer Wizard to move data from a source computer to a new computer.
You can transfer the data to the new computer over a network or serial connection, or you can store it on removable media, such as a writable CD, for transfer to the new computer.
NOTE: You can transfer information from an old computer to a new computer by directly connecting a serial cable to the input/output (I/O) ports of the two computers.
For instructions on setting up a direct cable connection between two computers, see Microsoft Knowledge Base Article #305621, titled How to Set Up a Direct Cable Connection Between Two Computers in Windows XP. This information may not be available in certain countries.
For transferring information to a new computer, you must run the Files and Settings Transfer Wizard.
Running the Files and Settings Transfer Wizard With the Operating System Media
NOTE: This procedure requires the Operating System media. This media is optional and may not be included with certain computers.
Setting Up Your Computer |
15 |
To prepare a new computer for the file transfer:
1Open the Files and Settings Transfer Wizard: click Start→ All Programs→ Accessories→ System Tools→ Files and Settings Transfer Wizard.
2When the Files and Settings Transfer Wizard welcome screen appears, click Next.
3On the Which computer is this? screen, click New Computer→ Next.
4On the Do you have a Windows XP CD? screen, click I will use the wizard from the Windows XP CD→ Next.
5When the Now go to your old computer screen appears, go to your old or source computer. Do not click Next at this time.
To copy data from the old computer:
1On the old computer, insert the Windows XP Operating System media.
2On the Welcome to Microsoft Windows XP screen, click Perform additional tasks.
3Under What do you want to do?, click Transfer files and settings→ Next.
4On the Which computer is this? screen, click Old Computer→ Next.
5On the Select a transfer method screen, click the transfer method you prefer.
6On the What do you want to transfer? screen, select the items you want to transfer and click Next.
After the information has been copied, the Completing the Collection Phase screen appears.
7Click Finish.
To transfer data to the new computer:
1On the Now go to your old computer screen on the new computer, click
Next.
2On the Where are the files and settings? screen, select the method you chose for transferring your settings and files and click Next.
The wizard applies the collected files and settings to your new computer.
3On the Finished screen, click Finished, and restart the new computer.
16 |
Setting Up Your Computer |
Running the Files and Settings Transfer Wizard Without the Operating System Media
To run the Files and Settings Transfer Wizard without the Operating System media, you must create a wizard disk that will allow you to create a backup image file to removable media.
To create a wizard disk, use your new computer with Windows XP and perform the following steps:
1Open the Files and Settings Transfer Wizard: click Start→ All Programs→ Accessories→ System Tools→ Files and Settings Transfer Wizard.
2When the Files and Settings Transfer Wizard welcome screen appears, click Next.
3On the Which computer is this? screen, click New Computer→ Next.
4On the Do you have a Windows XP CD? screen, click I want to create a Wizard Disk in the following drive→ Next.
5Insert the removable media, such as a writable CD, and click OK.
6When the disk creation completes and the Now go to your old computer message appears, do not click Next.
7Go to the old computer.
To copy data from the old computer:
1On the old computer, insert the wizard disk, and click Start→ Run.
2In the Open field on the Run window, browse to the path for fastwiz (on the appropriate removable media) and click OK.
3On the Files and Settings Transfer Wizard welcome screen, click Next.
4On the Which computer is this? screen, click Old Computer→ Next.
5On the Select a transfer method screen, click the transfer method you prefer.
6On the What do you want to transfer? screen, select the items you want to transfer and click Next.
After the information has been copied, the Completing the Collection Phase screen appears.
7Click Finish.
Setting Up Your Computer |
17 |
Loading...