


Dell™ PowerConnect™ 3324/3348 User's Guide
Overview
Hardware Description
Installing the PowerConnect 3324/3348 Switch
Configuring the PowerConnect 3324/3348 Switch
Getting Started
Configuring System Information
Configuring Switch Information
Viewing Statistics
Configuring Quality of Service
Getting Help
NOTE: Notes indicate important information that helps you make better use of your device.
NOTICE: Notices indicate either potential damage to hardware or loss of data and tells you how to avoid the problem.
CAUTION: Caution indicates a potential for property damage, personal injury, or death.
Information in this document is subject to change without notice.
© 2003 Dell Inc. All rights reserved.
Reproduction in any manner whatsoever without the written permission of Dell Inc. is strictly forbidden.
Trademarks used in this text: Dell, the DELL logo, PowerConnect, Dell OpenManage, PowerEdge, Inspiron, Dell Precision, Dimension, OptiPlex, Axim, PowerVault, PowerApp, DellNet, and
Latitude are trademarks of Dell Inc.; Microsoft and Windows are registered trademarks of Microsoft Corporation.
Other trademarks and trade names may be used in this document to refer to either the entities claiming the marks and names or their products. Dell Inc. disclaims any proprietary interest in trademarks and trade names other than its own.
November 2003

Back to Contents Page
Configuring the PowerConnect 3324/3348 Switch
Dell™ PowerConnect™ 3324/3348 User's Guide
Configuration Overview |
Sample Configuration Process |
General Configuration Information |
Configuring Stacking |
Terminal Connection Configuration |
Rebooting the Device |
Other Configuration Requirements |
Startup Menu Functions |
Booting the Device |
Downloading the Software to Stacking Units |
Device Configuration Introduction |
Defining SNMP Settings |
Initial Configuration |
Connecting Devices |
Advanced Configuration |
|
|
|
Configuration Overview
This section describes the initial device configuration and includes:
•Initial Device Bootup
•Preliminary Configuration Requirements
•Configuring Stacking
After all the device external connections are in place, a terminal must be connected to the device to monitor the boot and other procedures. The order of installation and configuration procedures are illustrated in the following flowchart:
Instructions for setting up the device and hardware are provided in the preceding sections. For a first-time installation, the standard device installation is performed. There are other special functions which can be performed, but this suspends the installation process and results in a system reboot. This option is described later in this section.

General Configuration Information
Dell™ PowerConnect™ 3324/3348 is provided with pre-defined implemented features and setup configuration.
Auto-Negotiation
Auto-negotiation allows a device to advertise modes of operation and share information with another device that shares a point-to-point link segment. This automatically configures both devices to take maximum advantage of their abilities.
Auto-negotiation is performed completely within the physical layers during link initiation, without any additional overhead to either the MAC or higher protocol layers. Auto-negotiation allows the ports to do the following:
•Advertise their abilities.
•Acknowledge receipt and understanding of the common modes of operation that both devices share.
•Reject the use of operational modes that are not shared by both devices.
•Configure each port for the highest-level operational mode that both ports can support.
If connecting a port of the switch to the network interface controller (NIC) of a workstation or server that does not support auto-negotiation or is not set to auto-negotiation, both the switching port and the NIC must be manually set with the Web browser interface or CLI commands to the same speed and duplex mode.
NOTICE: If the station on the other side of the link attempts to auto-negotiate with a port that is manually configured to full duplex, the autonegotiation results in the station attempting to operate in half duplex. The resulting mismatch may lead to significant frame loss. This is inherent in the auto-negotiation standard.
Switching Port Default Settings
The following table describes the Port default settings.
Function |
Default Setting |
|
|
Port speed and mode |
10/100M copper ports: auto-negotiation |
|
1000M auto-negotiation |
|
|
Port forwarding state |
Enabled |
|
|
Port tagging |
No tagging |
|
|
Head of line blocking prevention |
On (Enabled) |
|
|
Flow Control |
Off |
|
|
Back Pressure |
Off |
|
|
Port Default Settings
The following is an example for changing the port speed on port 1/e5 using CLI commands:
console> enable
console# configure
Console (config)# interface ethernet 1/e5
Console (config-if)# speed 100
The following is an example for enabling flow control on port 1/e5 using CLI commands:

console> enable
console# configure
Console (config)# interface ethernet 1/e5
Console (config-if)# flowcontrol on
The following is an example for enabling back pressure on port 1/e5 using CLI commands:
console> enable
console# configure
Console (config)# interface ethernet 1/e5
Console (config-if)# back-pressure
Baud Rate
The baud rates can be manually changed to any of the following values:
•2400
•4800
•9600
•19,200
•38,400
•57,600
•115,200
NOTE: The default baud rate is 9600.
NOTE: Closing the device does not return the default baud rate. It must be specifically configured.
NOTE: In order to enter configuration mode, you must specify administrative level 15 privileges.
The following is an example configuration for changing the default baud rate using CLI commands:
console> enable
console# configure
console(config)# line console
console(config-line)# speed 9600

console(config-if)# exit
console(config)# exit
Terminal Connection Configuration
The PowerConnect 3324/3348 requires the following Terminal Connection parameters for configuration:
•no parity
•one stop bit
•8 data bits
Other Configuration Requirements
The following is required for downloading embedded software and configuring the device:
•ASCII terminal (or emulation) connected to the Serial port in the back of the unit.
•Assigned IP address for PowerConnect 3324/3348 for device remote control using with Telnet, SSH, etc.
NOTE: The configuration process defines only one port.
Booting the Device
When power is turned on with the local terminal already connected, a device goes through POST (Power On Self Test). This built-in power-on test runs every time the device is initialized. The POST checks hardware components to determine if the device is fully operational before completing boot up.
If a critical problem is detected, the program flow stops. If POST passes successfully, the code is decompressed into the RAM memory.
The POST messages are displayed on the terminal and indicate test success or failure.
To boot the device:
1.Ensure the ASCII cable is connected to the terminal.
2.Connect the power supply to the device; the device begins booting up. The boot-up test first counts the device memory availability and then continues to boot-up. The following screen is an example of the displayed POST test:
------ Performing the Power-On Self Test (POST) ------
UART Channel Loopback Test...... |
PASS |
Testing the System Cache....... |
PASS |
Testing the System SDRAM....... |
PASS |

Boot1 Checksum Test........ |
PASS |
Boot2 Checksum Test........ |
PASS |
Flash Image Validation Test |
......PASS |
Testing CPU PCI Bus Device Configuration...PASS
BOOT Software Version 1.30.11 Built 27-JAN-2003 10:06:03
Processor: MPC8245 Rev 0.12, 250 MHz (Bus: 100MHz), 32 MByte SDRAM.
I-Cache 16 KB, linesize 32.D-Cache 16 KB, linesize 32.
Cache Enabled.
Autoboot in 2 seconds - press RETURN or Esc. to abort and enter prom.
The auto-boot message that appears at the end of the POST (see the last lines) indicates that no problems were encountered during boot.
At this point, a user input can be entered to get the Startup menu if it is necessary to run special procedures that can be invoked from this menu. To enter the Startup menu, the <Esc> or <Enter> keys must be pressed within the first two seconds after the auto-boot message appears. For details regarding the Startup menu, see Startup Menu Functions.
If no user input is entered, the system continues operation by decompressing the code into RAM. The code starts running from RAM and the list of available port numbers and their states (up or down) are displayed.
NOTE: The following screen is an example configuration. Items such as addresses, versions, and dates may differ for each device.
Preparing to decompress.
Decompressing SW from RSCOD_2
85e000
OK
Running from RAM.
******************************************************Running SW Ver. 3.30 Date 03-Feb-2003 Time 10:10:37
******************************************************
HW version is X.X
Base Mac address is: 00:01:02:03:04:05
Dram size is: 32M bytes
Dram first block size is: 20M bytes
Dram first PTR is: 0xB70000
Flash size is: 8M
STAND ALONE
The BCM5625_A1 0 initiate successfully
The BCM5625_A1 1 initiate successfully
02-Jan-2000 01:01:11%SSHD-W-NOHOSTKEY: SSHG_init: The SSH daemon cannot listen
for incoming connections, because a host key has not been generated.
The service will start automatically when a host key is generated.
01-Jan-2000 01:01:11 %INIT-I-InitCompleted: Initialization task is completed
console> 01-Jan-2000 01:01:12 %PS-I-PSUP: Power Supply #1 is up
01-Jan-2000 01:01:12%PS-W-PSDOWN: Power Supply #2 is down
01-Jan-2000 01:01:12%LINK-W-Up: 1/e1
01-Jan-2000 01:01:12%LINK-W-UP: 1/e2
01-Jan-2000 01:01:12%LINK-W-Up: 1/e3
01-Jan-2000 01:01:12%LINK-W-UP: 1/e4
01-Jan-2000 01:01:12%LINK-W-Up: 1/e5
01-Jan-2000 01:01:13%LINK-W-Up: 1/e9

After the device has been booted successfully, the system prompt appears (console>) and the configuration process can be started. The local terminal can be used for configuration.
Device Configuration Introduction
There are two types or levels of configuration. The initial configuration describes basic configuration functions with basic security considerations. The advanced configuration includes dynamic IP configuration and more advanced security considerations.
NOTICE: After making any configuration changes, the new configuration must be saved before rebooting. To save the configuration, enter:
console> enable
console# copy running-config startup-config
Initial Configuration
Initial configuration starts after the device has booted successfully. The initial configuration scope for the device includes:
•Static IP address and Subnet Mask
•Default gateway
•User name and privilege level must be configured to allow remote management.
If the device is to be managed from an SNMP-based management station, SNMP community strings must also be configured.
Static IP Address and Subnet Mask
In PowerConnect 3324/3348 devices, IP interfaces can be configured on each port and no limitation on the number of IP interfaces is imposed. After entering the configuration command, it is recommended to check if a port was configured with the IP address by entering the "show ip interface" command.
NOTICE: Only one VLAN can be assigned an IP address. If you assign an address to any other VLAN, the new address overrides the original IP address.
To configure an interface on a VLAN, enter the commands at the system prompt as shown in the following configuration example:
console> enable
console# configure
console(config)# interface vlan 1
console(config-if)# ip address 100.1.1.1 /8
console(config-if)# exit
console(config)# exit
console# show ip interface
Gateway IP Address Activity status
----------------------- -----------------------
IP Address I/F
----------------------- ----------------------
100.1.1.1/8 vlan 1
console#
To configure an interface on a port, enter the commands at the system prompt as shown in the following configuration example:
console> enable
console# configure
console(config)# interface ethernet 1/e1
console(config-if)# ip address 10.1.1.1 255.0.0.0
console(config-if)# exit
console(config)# exit
console# show ip interface
Gateway IP Address Activity status
----------------------- -----------------------
IP Address I/F
----------------------- ----------------------
10.1.1.1/8 1/e1
console#
Default Gateway
To manage a PowerConnect 3324/3348 device from a remote network, a default gateway, which is the gateway that a device uses if a specific gateway is not specified, must be configured. The configured gateway IP address must belong to the same subnet as one of the device IP interfaces.
To configure a default gateway, enter the command at the system prompt as shown in this configuration example:
console> enable
console# configure
console(config)# ip default-gateway 100.1.1.100
console(config)# exit
User Name, Password, and Privilege Level
IMPORTANT: To manage a device from a remote terminal or Web Management Interface, a user name, a password, and the highest privilege level (15) must be entered. (The highest level provides access to the CLI configure context.) For details about the privilege level, see the CLI Reference Guide.
The configured user name is entered as a login name for remote management sessions. To configure user name and privilege level, enter the command at the system prompt as shown in the configuration example:
console> enable
console# configure
console(config)# username admin password admin level 15
console(config)# exit
SNMP Community Strings
Simple Network Management Protocol (SNMP) provides a method for managing network devices. Devices supporting SNMP run a local software (agent). The SNMP agents maintain a list of variables, used to manage the device. The variables are defined in the Management Information Base (MIB). The MIB presents the variables controlled by the agent. The SNMP agent defines the MIB specification format, as well as the format used to access the information over the network. Access rights to the SNMP agents are controlled by access strings and SNMP community strings.
The device is SNMP-compliant. It contains an SNMP agent that supports a set of standard and private MIB variables. Developers of management stations require the exact structure of the MIB tree and receive the complete private MIBs information before being able to manage the MIBs.
All parameters are manageable from any SNMP management platform, except the SNMP management station IP address and community (community name and access rights). The SNMP management access to the device is disabled if no community strings exist. The device is delivered with no community strings configured.
The following screen displays the default device configuration:
console# enable
console# show snmp
Community-String Community-Access IP address
-------------------- ---------------- ---------------
Traps are enabled.
Authentication-failure trap is enabled.
The community-string, community-access and IP address can be set during the initial configuration procedure through the local terminal.
The SNMP configuration options are:
•Community string
•Access rights options: ro (read only), rw (read-and-write) or su (super).
•An option to configure IP address or not: if IP address is not configured, it means that all community members having the same community name are granted the same access rights.
The accepted practice is to use two community strings for the device - one (public community) with read only access and the other (private community) with read-and-write access:
•Public — Allow authorized management stations to retrieve MIB objects.
•Private —Allow authorized management stations to retrieve and modify MIB objects.
During initial configuration, it is recommended to configure the device according to the network administrator requirements, in accordance with using an SNMPbased management station.
To configure SNMP station IP address and community string(s):
1.At the console prompt, type Enable. The prompt is displayed as #.
2.Type configure and press <Enter>.
3.In the configuration mode, type the SNMP configuration command with the parameters including community name (private), community access right (read and write) and IP address, as shown in the example below:
console> enable

config# configure
config(config)# snmp-server community private rw 11.1.1.2
config(config)# exit
config# show snmp
Community-String Community-Access IP address
-------------------- ---------------- ---------------
private readWrite 11.1.1.2
Traps are enabled.
Authentication-failure trap is enabled.
Trap-Rec-Address Trap-Rec-Community Version
---------------- -------------------- -------
System Contact:
System Location:
This completes the initial configuration of the device from a local terminal. The configured parameters enable further device configuration from any remote location.
Advanced Configuration
This chapter contains information about dynamic allocation of IP addresses and security management based on the AAA (authentication, authorization and accounting) mechanism. The chapter includes the following topics:
•Configuring IP Addresses through DHCP.
•Configuring IP Addresses through BOOTP.
•Security Management and Password Configuration.
When configuring/receiving IP addresses through DHCP and BOOTP, the configuration received from these servers includes IP address, and may include subnet mask and default gateway.
Retrieving an IP address from a DHCP Server

When using the DHCP protocol to retrieve an IP address, the device acts as a DHCP client.
To retrieve an IP address from a DHCP server:
1.Select and connect any port to a DHCP server or to a subnet which has a DHCP server on it, in order to retrieve the IP address.
2.Enter the following commands to use the selected port for receiving the IP address, as shown in the following example.
console> enable
console# configure
console(config)# interface vlan 1
console(config-if)# ip address dhcp hostname <string>
console(config-if)# exit
console(config)# exit
3.The device receives the IP address automatically.
To verify the IP address:
1.Type show ip interface at the system prompt. See the following display example.
console> enable
console# show ip interface
Gateway IP Address Activity status
----------------------- -----------------------
IP Address I/F
----------------------- ----------------------
10.1.1.1/8 vlan1
console#
NOTE: The device configuration does not need to be deleted to retrieve an IP address for the DHCP server.

Receiving an IP address from a BOOTP Server
The standard BOOTP protocol is supported enabling the device to automatically download their IP host configuration from any standard BOOTP server in the internet. In this case, the device acts as a BOOTP client.
To retrieve an IP address from a BOOTP server:
1.Select and connect any port to a BOOTP server or subnet containing such a server, to retrieve the IP address.
2.At the system prompt, type in the delete startup configuration command to delete the Startup configuration from flash. The device reboots with no configuration and in 60 seconds starts sending BOOTP requests.
3.The device receives the IP address automatically.
NOTE: Once the "delete startup configuration" begins, any input at the ASCII terminal or keyboard automatically aborts the configuration process before completion and the device does not recieve an IP address from BOOTP.
The following example illustrates the process:
console> enable
console# delete startup-config
To verify the IP address, see the following display example.
console> enable
console# show ip interface
Gateway IP Address Activity status
----------------------- -----------------------
IP Address I/F
----------------------- ----------------------
10.1.1.1/8 vlan1
console#
Now the device is configured with an IP address.

The device configuration must be deleted to retrieve an IP address from the BOOTP server.
Security Management and Password Configuration
System security is handled through the AAA (Authentication, Authorization and Accounting) mechanism that manages user access rights, privileges and management methods. AAA uses both local and remote user databases. Data encryption is handled through the SSH mechanism.
The system is delivered with no default user name or password configured—all user names and passwords are user-defined. If a user-defined password is lost, a password recovery procedure can be invoked from the Startup menu. The procedure is applicable for the local terminal only and allows a one-time access to the device from the local terminal with no password entered.
NOTE: Ensure that you always include administrative level 15 privileges when entering your user name and password.
Configuring Security Passwords
The security passwords can be configured for the following services:
•Console
•Telnet
•SSH
•HTTP
•HTTPS
NOTE: Passwords are user-defined.
NOTE: When creating a user name, the default priority is "1", which allows access but not configuration rights. A priority of "15" must be specifically set to enable access and configuration rights to the device.
For more information about password limitation, see "Configuring Network Security".
Configuring an Initial Console Password
To configure an initial console password, enter the following commands:
console> enable
console# configure
console(config)# aaa authentication login default line
console(config)# aaa authentication enable default line
console(config)# line console
console(config-line)# login authentication default
console(config-line)# enable authentication default
console(config-line)# password console
console(config-line)# exit
console(config)# exit
•When initially logging on to a device through a console session, enter console at the password prompt.
•When changing a device's mode to enable, enter console at the password prompt.
Configuring an Initial Telnet Password
To configure an initial Telnet password, enter the following commands:
console> enable
console# configure
console(config)# aaa authentication login default line
console(config)# aaa authentication enable default line
console(config)# line telnet
console(config-line)# login authentication default
console(config-line)# enable authentication default
console(config-line)# password admin
console(config-line)# exit
console(config)# exit
•When initially logging onto a device through a Telnet session, enter admin.
•When changing a device mode to enable, enter admin.
Configuring an Initial SSH Password
To configure an initial SSH password, enter the following commands:
console> enable
console# configure
console(config)# aaa authentication login default line
console(config)# aaa authentication enable default line
console(config)# line ssh
console(config-line)# login authentication default
console(config-line)# enable authentication default
console(config-line)# password admin
console(config-line)# exit
console(config)# exit
•When initially logging onto a device through a SSH session, enter admin as the password.
•When changing a device's mode to enable, enter admin as the password.
Configuring an Initial HTTP Password
To configure an initial HTTP password, enter the following commands:
console> enable
console# configure
console(config)# ip http authentication local
console(config)# username admin password admin level 15
console(config)# exit
Configuring an Initial HTTPS Password
To configure an initial HTTPS password, enter the following commands:
console> enable
console# configure
console(config)# ip https authentication local

console(config)# username admin password admin level 15
console(config)# exit
Enter the following commands once when configuring a console, a telnet, or an SSH session in order to use an HTTPS session.
NOTE: In the Web browser, enable SSL 2.0 or greater for the content of the page to appear.
console> enable
console# configure
console(config)# crypto certificate generate key-generate
console(config)# ip https server
console(config)# exit
When initially enabling an HTTP or HTTPs session, enter admin for user name and user1 for password.
NOTE: HTTP and HTTPS services require level 15 access and connect directly to the configuration level access.
Sample Configuration Process
The purpose of this chapter is to present the basic steps required in order to establish a remote network management connection with the PowerConnect 3324/3348 device. This chapter does not explain the various configurations available on the device or the relevant commands.
This chapter describes accessing a device for the first time—still with the factory configuration and definitions. If a previously entered configuration causes problems, the startup-configuration file (configuration of device when powered up) should be erased and device rebooted, see "Device Default Settings".
Device Setup Requirements
The following components are required for the purpose of this example:
•PowerConnect 3324/3348 device
•PC workstation with the following installed:
¡A NIC (network adapter) card installed
¡An ASCII terminal application (for example Microsoft® Windows® MS Hyper Terminal or Procomm Plus Terminal)
¡A browser application
•One Null Modem F2F cable.
•Straight or cross UTP (cat 5) cable(s)
Initial Connection
The initial connection is as follows:

1.Connect the PowerConnect 3324/3348 device to the RS232 interface of a computer operating as an ASCII terminal.
2.Set the ASCII terminal with the following settings and select the appropriate COM port (In this example using Windows Hyper Terminal application):
NOTE: 9600 is the default baud rate for new device. If using 9600 baud rate does not result in viewing the device terminal, try another baud rate setting (the device may be set at a different baud rate).
3.Use an F2F Null Modem cable to connect the PC running the ASCII terminal to the device.
4.Insert the device's power cord into an electrical outlet to power up the device. The following screen is displayed:
**************************************************
***************** SYSTEM RESET *****************
**************************************************
Booting...
------ Performing the Power-On Self Test (POST( |
------ |
UART Channel Loopback Test........................ |
PASS |
Testing the System Cache.......................... |
PASS |
Testing the System SDRAM.......................... |
PASS |
Boot1 Checksum Test............................... |
PASS |
Boot2 Checksum Test............................... |
PASS |
Flash Image |
Validation Test....................... |
PASS |
Testing CPU |
PCI Bus Device Configuration.......... |
PASS |
BOOT Software Version 1.0.0.13 Built 11-May-2003 14:58:20
Processor: MPC8245 Rev 0.14, 250 MHz (Bus: 100MHz), 32 MByte SDRAM.
I-Cache 16 KB, linesize 32.D-Cache 16 KB, linesize 32.
Cache Enabled.
Autoboot in 2 seconds - press RETURN or Esc. to abort and enter prom.
Preparing to decompress...
After the Image file is decompressed the following screen showing device information, SW/HW version, and status (up/down) of all existing interfaces is displayed:
Decompressing SW from image-2
8cc000
OK
Running from RAM...
Update Host params for stand-alone
******************************************************************
*** Running SW Ver. 1.0.0.52 Date 29-Jun-2003 Time 19:04:06 ***
******************************************************************
HW version is 00.00.01
Base Mac address is: 00:06:5b:ff:59:4d
Dram size is : 32M bytes
Dram first block size is : 20M bytes
Dram first PTR is : 0xB20000
Flash size is: 8M
STAND ALONE
The BCM5615_A1 0 initiate successfully
01-Jan-2000 01:01:10 %SSHD-W-NOHOSTKEY: SSH has been enabled but an encryption key was not found.
For key generation use the 'crypto key generate' commands. The service will start automatically when a host key is generated.
01-Jan-2000 01:01:11 %INIT-I-InitCompleted: Initialization task is completed
console> 01-Jan-2000 01:01:11 %BOX-I-PSUP: Power Supply #1 is up
01-Jan-2000 01:01:11 %BOX-W-PSNOTPRES: Power Supply #2 is not present
01-Jan-2000 01:01:11 %LINK-W-Down: 1/e1
01-Jan-2000 01:01:11 %LINK-W-Down: 1/e2
01-Jan-2000 01:01:11 %LINK-W-Down: 1/e3
.....
.....
Jan-2000 01:01:13 %LINK-W-Down: 1/e22
01-Jan-2000 01:01:13 %LINK-W-Down: 1/e23
01-Jan-2000 01:01:13 %LINK-W-Down: 1/e24
01-Jan-2000 01:01:13 %LINK-W-Down: 1/g1
01-Jan-2000 01:01:13 %LINK-W-Down: 1/g2
01-Jan-2000 01:01:14 %LINK-I-Up: Vlan 1
01-Jan-2000 01:01:14 %LINK-I-Up: 1/e1
console>
The device is ready for configuration.
Device Default Settings
To return to device default settings use delete startup-config command at the privileged mode prompt (#), and reboot the device. Once device reloads—it is set with the default settings.
console>
console> enable
console# delete startup-config
Startup file was deleted
console# reload
This command will reset the whole system and disconnect your current
session. Do you want to continue (y/n) [n] ?
y
**************************************************
***************** SYSTEM RESET *****************
**************************************************
.
.
.
.
Remote Management Access
To allow remote device management (Telnet, Web etc.) perform the following:
1.Enter the command enable at the console to enter the Privileged EXEC screen mode as follows:
console>enable
console#
2. Connect the management station (PC) to the device via one of the Ethernet ports (or via a network connected to the device) using a CAT5 Cable, to port e1 in this example. Ensure (on the ASCII terminal) that the interface status changed to "up" and that the STP status is forwarding (after 30 seconds):
console>enable
Console#
01-Jan-2000 01:43:03 %LINK-I-Up: Vlan 1
01-Jan-2000 01:43:03 %LINK-I-Up: 1/e1
01-Jan-2000 01:43:34 %STP-I-PORTSTATUS: Port 1/e1: STP status Forwarding
3.Enter the command configure at the console to enter the Configuration screen mode as follows:
console> enable
console# configure
console(config)#
4.Enter the command interface ethernet at the console to enter the Device Configuration screen mode through VLAN1 as follows:
console> enable
console# configure
console(config)# interface vlan 1
console (config)# exit
5. Define an IP address on the device by assigning an IP address to the interface connected to the management station (in this example 50.1.1.1). If the management station is connected directly to the interface, the IP address on the interface must have the same subnet as the management station.
console> enable
console# configure
console(config)#
console(config-if)# ip address 50.1.1.2 /8
01-Jan-2000 01:48:37 %LINK-W-Down: Vlan 1
console(config-if)# exit
console(config)# exit
6. If the management station is not directly connected to the interface, that is a member of a remote network, define a default gateway on the device. The gateway configured IP address is the router interface IP connected to the device.
console> enable
console# configure
console(config-if)#
console(config-if)# exit
console(config)# ip default-gateway 50.1.1.100
console(config)# exit
7. Ping the management station from device to make sure that connectivity has been achieved (wait 30 seconds for port to be in STP forwarding before doing this). Management station IP is (in this example) 50.1.1.3:
console> enable
console# configure
console(config)#
console(config)# exit
console# ping 50.1.1.2
64 bytes from 50.1.1.2: icmp_seq=1. time=0 ms
64 bytes from 50.1.1.2: icmp_seq=2. time=0 ms
64 bytes from 50.1.1.2: icmp_seq=3. time=0 ms
64 bytes from 50.1.1.2: icmp_seq=4. time=0 ms
----50.1.1.2 PING Statistics----
4 packets transmitted, 4 packets received, 0% packet loss
round-trip (ms) min/avg/max = 0/0/0
console#
8. Define a username and password to allow full (privileged level 15) device access for a remote user (telnet, Web Server etc.). In this example the username and password is "Dell".
console#
console# configure
console(config)# username Dell password Dell level 15
console(config)#
9.Configure Console, Telnet, SSH, HTTP, and HTTPS security passwords:
console> enable
console# configure
console(config)# aaa authentication login default line
console(config)# aaa authentication enable default line
console(config)# line console
console(config-line)# login authentication default
console(config-line)# enable authentication default
console(config-line)# password admin
console(config-line)# exit
console(config)# aaa authentication login default line
console(config)# aaa authentication enable default line
console(config)# line telnet
console(config-line)# login authentication default
console(config-line)# enable authentication default
console(config-line)# password admin
console(config-line)# exit
console(config)# aaa authentication login default line
console(config)# aaa authentication enable default line
console(config)# line ssh
console(config-line)# login authentication default
console(config-line)# enable authentication default
console(config-line)# password admin
console(config-line)# exit
console(config)# ip http authentication local
console(config)# username admin password admin 15
console(config)# ip https authentication local
console(config)# username admin password admin 15
console(config)# crypto certificate generate key-generate

console(config)# ip https server
console(config)# exit
console# copy running-config startup-config
The device is now configured and is ready for running the Web Management Interface.
Start Running the Management Station
To start running the device perform the following:
1.Define an IP address for the PC which will be used as the remote management station. From the Windows start menu click Start> Settings > Network and Dial-up Connections.
2.Right click on the network connection which is used for management. The connection properties window is displayed.
3.Select the option to configure the internet protocol (TCP/IP) and click Properties. The Internet Protocol (TCP/IP) properties window is displayed.

4.Select Use the following IP address option.
5.In the Internet Protocol (TCP/IP) properties windows define statically (not via DHCP) an IP address, Mask and default gateway for the PC.
NOTE: If the PC is connected to a router and not directly to PowerConnect 3324/3348 device, the default gateway must be configured as the IP address of the router interface connected to the PC (which leads to the PowerConnect device).
Telnet access
Use windows/DOS command line or a telnet application to access the device via a telnet. Remember to enter the appropriate password. The connection is done with the IP address defined on the device.
Once Access is granted, command usage is the same as in direct device management:
1.Under Windows click Start>Run and enter the command cmd. The standard windows command line interface is displayed.
2.Enter the command Telnet and the device IP address.
Microsoft Windows 2000 [Version 5.00.2195]
(C) Copyright 1985-2000 Microsoft Corp.
C:\>telnet 50.1.1.2
01-Jan-2000 02:40:23 %MSCM-I-NEWTERM: New TELNET connection from 50.1.1.2
User Name:Dell
Password:****
console# show ip interface
Gateway IP Address Activity status
----------------------- -----------------------
50.1.1.100 inactive
IP Address I/F
----------------------- ----------------------
50.1.1.1/8 vlan 1
console#
Notice that Device indicates (In ASCII terminal) Telnet session status:
console> 01-Jan-2000 02:39:04 %MSCM-I-NEWTERM: New TELNET connection from 50.1.1.3
01Jan-2000 02:39:11 %MSCM-I-TERMTERMINATED: TELNET connection from 50.1.1.3 terminated
Web Access (HTTP server)
For web access to the device perform the following:
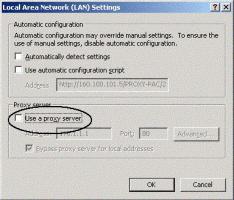
1. To prevent certain problems which may occur when using an HTTP proxy server, disable (unchecked) proxy setting on the browser (in Microsoft Internet Browser>Tools>Internet Options>Connections>LAN settings):
Disabling Proxy Window
2.In the browser window type the IP previously configured on the device (with or without http:// prefix):

Logging on Interface
3.When the authentication window is displayed, enter the Username and password:
Password Prompt
The device Web Management Interface is displayed.
 Loading...