


|
|
|
|
|
|
User guide |
|
|
GB/IE/CY |
|
Käyttöohje FI
Bruksanvisning SE
Brugervejledning DK
Οδηγιεσ χρησησ |
GR/CY |
Gebrauchsanweisung SKDE/AT/CH
TWINTALKER 4810 3 
V 1.0 - 05/09
GB / IE / CY The features described in this manual are published with reservation to modifications
FI |
Tässä ohjekirjassa julkaissut tiedot voivat muuttua ilman ennakkoilmoitusta. |
SE |
Funktionerna i denna bruksanvisning publiceras med reservation för ändringar. |
DK |
Vi forbeholder os retten til ændringer af de specifikationer, der er beskrevet i |
|
denne brugsanvisning. |
GR / CY |
Οι λειτουργίες που περιγράφονται στο παρόν εγχειρίδιο, δημοσιεύονται με |
|
επιφύλαξη τυχόν τροποποιήσεων. |
DE / AT / CH Die in dieser Bedienungsanleitung umschriebenen Möglichkeiten werden vorbehaltlich Änderungen publiziert.
GB / IE / CY The CE symbol indicates that the unit complies with the essential requirements
|
of the R&TTE directive. |
FI |
Laite noudattaa R&TTE-direktiivien vaatimuksia, mikä on vahvistettu |
|
CE-merkillä. |
SE |
CE-märket bekräftar att apparaten uppfyller de grundläggande kraven i R&TTE |
|
direktivet. |
DK |
CE-mærkningen bekræfter, at produktet er i overensstemmelse med kravene i |
|
Rådets teleterminaldirektiv. |
GR / CY |
Το σύμβολο CE δείχνει ότι η μονάδα συμμορφώνεται με τις βασικές |
|
απαιτήσειςτης οδηγίας R&TTE. |
DE / AT / CH Die Übereinstimmung des Gerätes mit den grundlegenden Anforderungen der R&TTE-Directive ist durch das CE-Kennzeichen bestätigt.

11
10
9
8
A |
|
B |
|
|
|
3
12 |
13 |
14 |
15 |
1 2 
|
24 |
|
16 |
|
23 |
|
17 |
|
|
|
|
4 |
22 |
|
18 |
|
|
||
|
|
|
|
5 |
|
|
|
6 |
21 |
20 |
19 |
|
7
26
25
C |
|
D |
|
|
|

|
|
Twintalker 4810 |
1 |
Introduction |
5 |
2 |
Intended purpose |
5 |
3 |
CE Mark |
5 |
4 |
Safety instructions |
5 |
4.1 |
General |
5 |
4.2 |
Burning injuries |
5 |
4.3 |
Injuries |
5 |
4.4 |
Danger of explosion |
6 |
4.5 |
Poisoning danger |
6 |
4.6 |
Legal |
6 |
4.7 |
Notes |
6 |
5 |
Cleaning and maintenance |
6 |
6 |
Disposal of the device (environment) |
7 |
7 |
Using a PMR device |
7 |
8 |
Included in the package |
7 |
9 |
Getting started |
8 |
9.1 |
Installing/Removing the Belt Clip |
8 |
9.2 |
Battery Installation |
8 |
10 |
Charging the batteries |
9 |
11 |
Description |
9 |
12 |
LCD display information |
10 |
13 |
Using the Twintalker 4810 |
10 |
13.1 |
Turning the Unit ON/OFF |
10 |
13.2 |
Battery Charge Level/Low Battery Indication |
10 |
13.3 |
Adjusting Speaker Volume |
11 |
13.4 |
Receiving a Signal |
11 |
13.5 |
Transmitting a Signal |
11 |
13.6 |
Changing Channels |
12 |
13.7CTCSS (Continious Tone Coded Squelch System) /
|
DCS (Digital Coded Squelch) |
12 |
13.8 |
Monitor |
13 |
13.9 |
VOX Selection |
13 |
13.10 |
Channel Scan |
14 |
13.11 |
Call Tones |
15 |
13.12 |
Roger Beep On/Off |
15 |
13.13 |
Key-Tone On/Off |
16 |
13.14 |
Dual Channel Monitor function |
16 |
13.15 |
Button Lock |
16 |
13.16 |
Stopwatch function |
17 |
13.17 |
Display back light |
17 |
ENGLISH
Twintalker 4810 |
3 |

Twintalker 4810
14 |
Earpiece connection |
17 |
15 |
Troubleshooting |
18 |
16 |
Technical specifications |
18 |
17 |
Service address and hotline support |
19 |
18 |
Declaration of conformity and manufacturer |
19 |
19 |
Warranty |
20 |
19.1 |
Warranty period |
20 |
19.2 |
Warranty handling |
20 |
19.3 |
Warranty exclusions |
20 |
4 |
Twintalker 4810 |

Twintalker 4810
1Introduction
Thank you for purchasing the Twintalker 4810. It’s a long range, low powered radio communication device with a range of maximum 8 Km. It has no running costs other than the minimal cost of re-charging the batteries.
The Twintalker operates on 8 channels.
The Twintalker is protected against vertically falling water drops when enclosure tilted up to 15° according to the IPX2 standard.
2Intended purpose
It can be used for recreational purposes. For example: to keep in contact during travelling with 2 or more cars, biking, skiing. It can be used to keep in contact with your children when they are playing outside, etc...
3CE Mark
The CE symbol on the unit, user guide and giftbox indicates that the unit complies with the essential requirements of the R&TTE directive 1995/5/EC.
4Safety instructions
4.1General
Please read carefully through the following information concerning safety and proper use. Make yourself familiar with all functions of the device. Keep this manual in a safe place for future use.
4.2Burning injuries
•If the cover of the antenna is damaged, do not touch because when an antenna comes in contact with the skin, a minor burn may result when transmitting.
•Batteries can cause property damage such as burns if conductive material such as jewellery, keys or beaded chains touches exposed terminals.The material may complete an electrical circuit (short circuit) and become quite hot. Exercise care in handling any charged battery, particularly when placing it inside a pocket, purse or other container with metal objects.
4.3Injuries
•Do not place your device in the area over an air bag or in the air bag deployment area. Air bags inflate with great force. If a PMR is placed in the bag deployment area and the air bag inflates, the communicator may be propelled with great force and cause serious injury to the occupants of the vehicle.
•Keep the PMR at least 15 centimetres away from a pacemaker.
•Turn your PMR OFF as soon as interference is taking place with medical equipment.
ENGLISH
Twintalker 4810 |
5 |

Twintalker 4810
4.4Danger of explosion
•Do not replace batteries in a potentially explosive atmosphere. Contact sparking may occur while installing or removing batteries and cause an explosion.
•Turn your PMR off when in any area with a potentially explosive atmosphere. Sparks in such areas could cause an explosion or fire resulting in bodily injury or even death.
•Never throw batteries in fire as they may explode.
Areas with potentially explosive atmospheres are often, but not always, clearly marked. They include fuelling areas such as below deck on boats, fuel or chemical transfer or storage facilities; areas where the air contains chemicals or particles, such as grain, dust or metal powders; and any other area where you would normally be advised to turn off your vehicle engine.
4.5Poisoning danger
•Keep batteries away from small children.
4.6Legal
•In some countries it is prohibited to use your PMR while driving a vehicle. In this case leave the road before using the device.
•Turn your PMR OFF when on board an aircraft when instructed to do so. Any use of the PMR must be in accordance with airline regulations or crew instructions.
•Turn your PMR OFF in any facilities where posted notices instruct you to do so. Hospitals or health care facilities may be using equipment that is sensitive to external RF energy.
•Replacing or modifying the antenna may affect the PMR radio specifications and violate the CE regulations. Unauthorised antennas could also damage the radio.
4.7Notes
•Do not touch the antenna while transmitting, it could affect the range.
•Remove the batteries if the device is not going to be used for a long period.
5Cleaning and maintenance
•To clean the unit, wipe with a soft cloth dampened with water. Don’t use a cleaner or solvents on the unit; they can damage the case and leak inside, causing permanent damage.
•Battery contacts may be wiped with a dry lint-free cloth.
•If the unit gets wet, turn it off and remove the batteries immediately. Dry the battery compartment with a soft cloth to minimize potential water damage. Leave the cover off the battery compartment overnight or until completely dry. Do not use the unit until completely dry.
6 |
Twintalker 4810 |
Twintalker 4810
6Disposal of the device (environment)
At the end of the product lifecycle, you should not throw this product into the normal household garbage but bring the product to a collection point for the recycling of electrical and electronic equipments. The symbol on the product,
user guide and/or box indicate this.
 Some of the product materials can be re-used if you bring them to a recycling point. By re-using some parts or raw materials from used products you make an important contribution to the protection of the environment. Please contact your local authorities in case you need more information on the collection points in your area.
7Using a PMR device
To communicate between PMR devices they need to be set all on the same channel and CTCSS/DCS code (see chapter “13.7 CTCSS (Continious Tone Coded Squelch System) / DCS (Digital Coded Squelch)”) and within receiving range (up to max. 8 km in open field). Since these devices use free frequency bands (channels), all devices in operation share these channels(total 8 channels). Therefore, privacy is not garanteed. Anybody with a PMR set to your channel can overhear the conversation. If you want to communicate (transmitting a voice signal) you need to press the PTT-button 11 .
Once this button pressed, the device will go into transmit mode and you can speak into the microphone. All other PMR devices in range , on the same channel and in standby mode (not transmitting) will hear your message. You need to wait until the other party stops transmitting before you can reply to the message. At the end of each transmission the unit will send a beep if the Roger Beep is enable (see chapter “13.12 Roger Beep On/Off”). To reply, just press the PTT-button 11 and speak into the microphone.
If 2 or more users press the PTTbutton 11 at the same time the receiver will receive only the stongest signal and the other signal(s) will be supressed. Therefore you should only transmit a signal (press PTTbutton 11 ) when the channel is free.
The range of radio waves is strongly affected by obstacles such as buildings, concrete/metal structures, the unevenness of the landscape, woodland, plants, … This implies that the range between two or more PMR's may in some extreme cases be restricted to a maximum of a few tens of meters. You will soon notice that PMR works best when there is a minimum of obstacles between users.
8Included in the package
•2 x Twintalker 4810
•2 x Beltclip
•1 x Duo Charger
•1 x Power adapter
•8 x AAA NiMh battery
•2 x Earpiece with microphone and PTT - button
•User guide
•Card with service address and Hotline
ENGLISH
Twintalker 4810 |
7 |
Twintalker 4810
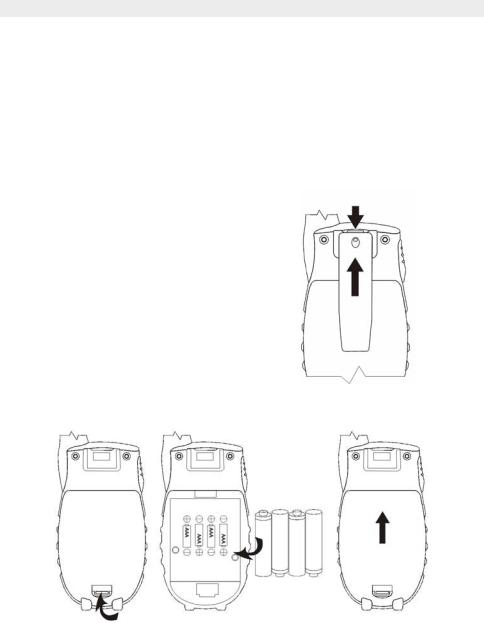
9Getting started
A
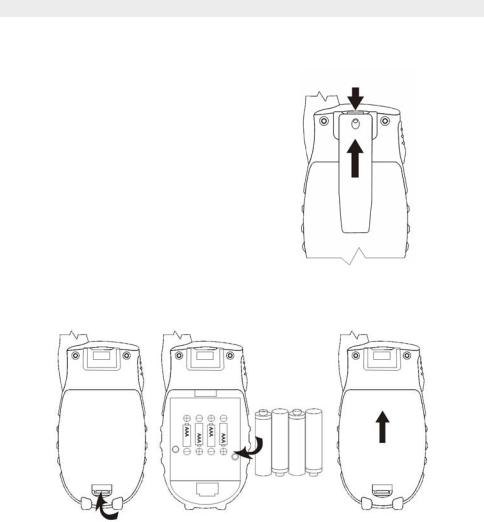
9.1Installing/Removing the Belt Clip
1.To remove the belt clip from the unit, push the belt clip (B) towards the antenna, while pulling the clip tab (A).
2.When re-installing the belt clip, a click indicates the belt clip is locked into position.
B
9.2Battery Installation
C
1.Remove the belt clip (See chapter “9.1 Installing/Removing the Belt Clip”).
2.Lift the battery door by gently pushing the door clip (C) using your finger nail.
3.Install the NiMh batteries. Make sure that the polarity of the NiMh batteries is correct.
4.Close the battery door.
5.Re-install the belt clip.
8 |
Twintalker 4810 |

Twintalker 4810
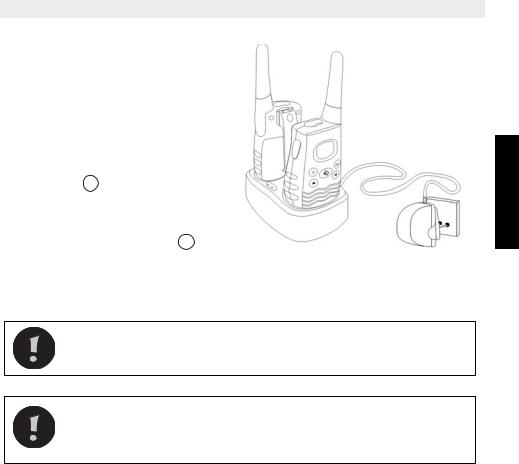
10 Charging the batteries
When the batteries are installed, the desktop charger provides drop-in charging conveniency.
1.Put the desktop charger on a flat surface.
2.Plug one end of the supplied adapter into an easy accessible electric socket and the other end into the connector on the backside of the desktop charger 25 .(See folded cover page - illustration C)
3.Put the radio in the charger as indicated.
4.The charging LED 26 will turn on
if it’s properly inserted and charging.(See folded cover page - illustration D)
It will take about 8 to 10 hours to fully charge the batteries.
Do not press the PTT-button of the PMR’s while they are placed in the charger !
Do not short-circuit the batteries or dispose in fire. Remove the batteries if this device is not going to be used for a long period.
Do not charge non rechargeable batteries like Alkaline batteries in the charger. This might damage the PMR’s and charger unit.
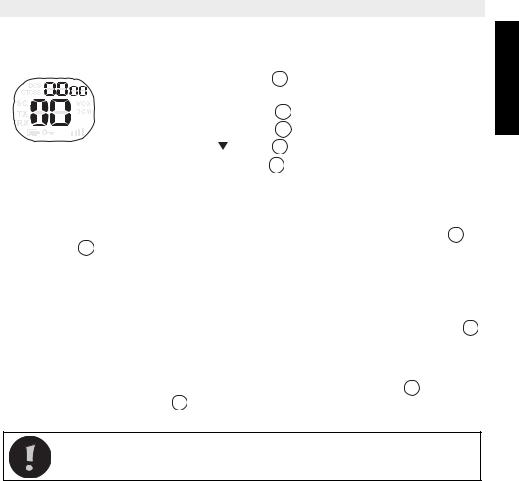
11 Description
See folded cover page - illustration A
1.LCD display
2.Headset connection
3.Antenna
4.Call button 

5.Menu button 
–Enter the menu settings
6.Down button
–Decrease the speaker volume
–Select the previous value in the menu
7.Charger contacts
8.Microphone
ENGLISH
Twintalker 4810 |
9 |
Twintalker 4810
9.UP button
–Increase the speaker volume
–Select the next value in the menu
10.On-off button 
11.Push to talk button PTT
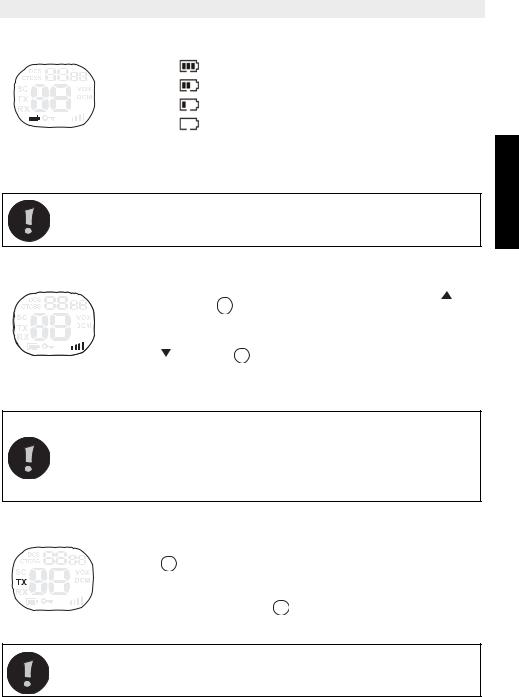
12 LCD display information
See folded cover page - illustration B
12.CTCSS indication
13.DCS indication
14.CTCSS/DCS/ Stopwatch seconds / Menu option -value
15.Stopwatch 1/100 value
16.VOX indication
17.Dual Channel Mode (DCM) indication
18.Channel/Menu item indication
19.Speaker volume indication
20.Key pad lock icon
21.Battery level indication
22.RX icon
–Displayed when receiving
23.TX icon
–Displayed when transmitting
24.Scanning indication
–Displayed during scan mode
13 Using the Twintalker 4810
The display illustrations in next pages only show the icons or display
informations of the functions that are explained in the text.
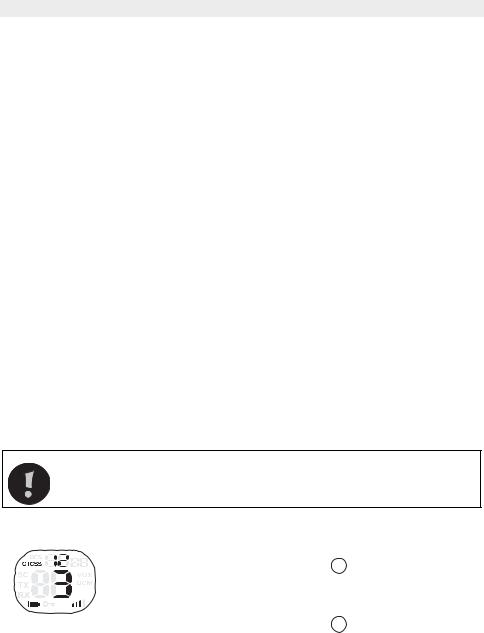
13.1 Turning the Unit ON/OFF
To turn ON:
• Press and hold the  - button 10 for 3 seconds. The unit will “beep” and the LCD display will display the current channel.
To switch OFF:
•Press and hold the  - button 10 for 3 seconds. The unit will “beep” and the LCD display will turn blank.
13.2Battery Charge Level/Low Battery Indication
The battery charge level is indicated by the number of squares present inside the battery icon on the LCD Screen.
10 |
Twintalker 4810 |
Twintalker 4810
Battery Full
Battery 2/3 charged
Battery 1/3 charged
Battery empty
When the battery charge level is low, the battery icon will flash and a beep will be heard to indicate that the batteries need to be replaced or recharged.
Never recharge non-rechargable batteries like for exemple Alkaline batteries.
13.3 Adjusting Speaker Volume
• |
Press the |
- button |
9 |
in stand-by-mode to increase the |
|
speaker volume. The volume level is displayed. |
|||
• |
Press the |
- button |
6 |
to decrease the speaker volume. |
13.4 Receiving a Signal
The unit is continuously in the receive mode when the unit is switched ON and not transmitting.
In order for other people to receive your transmission, they must also be on the same channel and have set the same CTCSS code or DCS code. (See chapter “13.6 Changing Channels” and “13.7 CTCSS (Continious Tone Coded Squelch System) / DCS (Digital Coded Squelch)”)
Either CTCSS or DCS can be used but never both at the same time.
13.5 Transmitting a Signal
• Press and hold the PTT - button 11 to transmit. The TX symbol is displayed.
• Hold the unit in a vertical position with the microphone 10cm from the mouth and speak into the microphone.
•Release the PTT - button 11 when you want to stop transmitting.
To check the channel activity use the monitor function (See chapter “13.8 Monitor”).
ENGLISH
Twintalker 4810 |
11 |
Twintalker 4810
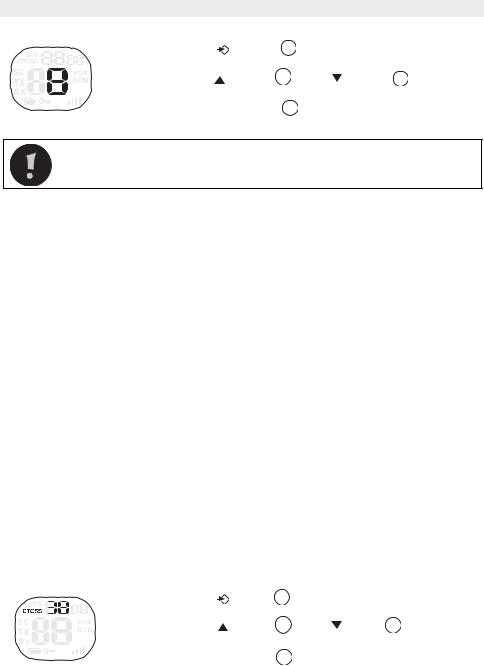
13.6 Changing Channels
• |
Press the |
- button |
5 |
once, the current channel |
|
|
number flashes on the display. |
|
|||
• |
Press the |
- button |
9 |
or the |
- button 6 to change |
|
the channel. |
|
|
|
|
•Press the PTT - button 11 to confirm and return to stand-by mode.
If no button is pressed within 5 seconds during setting, the unit will return to standby.
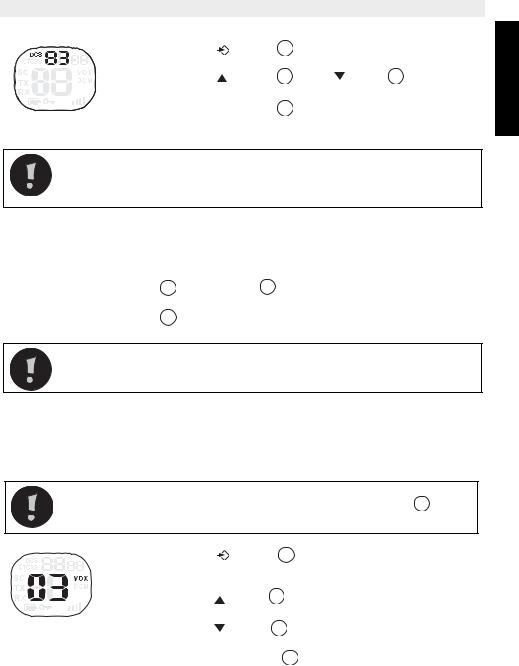
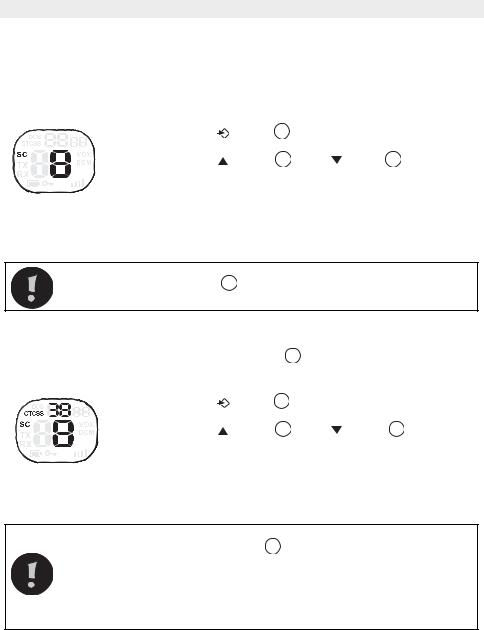
13.7CTCSS (Continious Tone Coded Squelch System) / DCS (Digital Coded Squelch)
License free PMR radio's operating on the 446 MHz frequency band, like the Twintalker 4810 PMR, have 8 available radio channels. If there are many PMR users in your neighborhood, there is a chance that some of these users are operating on the same radio channel.
To prevent that you receive signals from other users, sub-channels have been integrated. Two PMR radio's will only be able to communicate with each other when they are operating on the same radio channel and when they have selected exactly the same sub-channel.
There are two kind of sub-channels :
•Continuous Tone Coded Squelch System (CTCSS)
•Digital Coded Squelch (DCS)
When using CTCSS, a low frequency tone (between 67 and 250 Hz) will be transmitted along with the voice signal. There are 38 available tones to choose from. You are free to choose one of these 38 available tones. Due to filtering, these tones will generally not be audible so they will not disturb the communication.
DCS is similar to CTCSS, but instead of sending a continuous tone of a selected frequency, a digital data transmission is added to the radio signal. This Digital Code is transmitted at a really low rate, around 134 bits per second (the code is 23 bits long). Only the PMR's of the latest generation will support DCS. There are 83 available DCS codes that can be used.
Since earlier models will only support CTCSS it will be better to use DCS to prevent that other users will be audible during your PMR conversations.
13.7.1 CTCSS
• |
Press the |
-button |
5 |
twice : "CTCSS" and the current |
|
CTCSS code flashes on the display. |
|||
• |
Press the |
-button |
9 |
or the -button 6 to change to |
another code.
•Press the PTT-button 11 to confirm and return to stand-by mode.
12 |
Twintalker 4810 |
|
|
|
|
Twintalker 4810 |
13.7.2 DCS |
|
|
|
|
• |
Press the |
-button |
5 |
three times : "DCS" and the |
|
current DCS code flashes on the display. |
|||
• |
Press the |
-button |
9 |
or the -button 6 to change to |
another code.
•Press the PTT-button 11 to confirm and return to stand-by mode.
To disable CTCSS or DCS, select code "00" for CTCSS or for DCS in the menu. When the entry is confirmed, "OF" will be displayed.
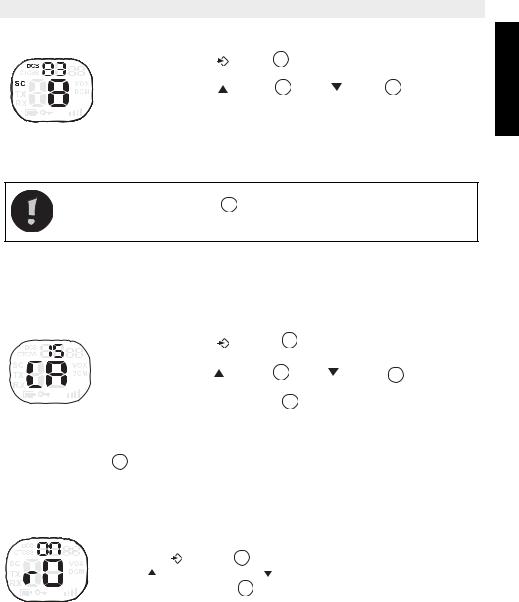
13.8 Monitor
You can use the monitor feature to check for weaker signals in the current channel.
•Press the  -button 5 and
  -button 6 simultaneously to activate channel monitoring.
•Press the  -button 5 to stop channel monitoring.
During channel monitoring the receiver circuit in the PMR will not listen to CTCSS or DCS codes.
13.9 VOX Selection
The PMR is capable of voice activated (VOX) transmission. In VOX mode, the radio will transmit a signal when it is activated by your voice or other sound around you. VOX operation is not recommended if you plan to use your radio in a noisy or windy environment.
VOX mode will be overrided when you press the PTT - button 11 .
• |
Press the |
- button |
5 four times, the current VOX |
|
|
setting flashes on the display and the VOX icon is |
|||
|
displayed. |
|
9 |
|
• |
Press the |
-button |
to set the VOX sensitivity level |
|
|
between 1 and 3 (level 3 is the most sensitive level). |
|||
• |
Press the |
button |
6 |
until ‘OF’ appears on the display, |
|
to turn VOX OFF. |
|
|
|
•Press the PTT - button 11 to confirm and return to stand-by mode.
ENGLISH
Twintalker 4810 |
13 |
Twintalker 4810
13.10 Channel Scan
Channel scan performs searches for active signals in an endless loop from channel 1 to 8. Once an active channel is found you have the option to search for the CTCSS code or the DCS code that is set by the user who is broadcasting on the channel.
13.10.1 Scanning for an active radio channel
• |
Press the |
-button |
5 |
five times : "SC" and the current |
|
channel flashes on the display. |
|||
• |
Press the |
-button |
9 |
or the -button 6 to start the |
channel scan.
Once an active channel is found, the scanning will stop and you can listen to the transmission.
When the transmission on the found channel stops, the scanning will resume automatically.
If you press the PTT button 11 while listening to a found channel, the
PMR will go back in stand-by mode on the found channel.
13.10.2 Scanning for a CTCSS code
When an active channel is found press the PTT button 11 to select the found active channel. Now you have to option to search for the CTCSS/DCS code that is used by the found user.
• |
Press the |
-button |
5 |
six times : "SC" and "CTCSS 00" |
|
flashes on the display for the selected radio channel. |
|||
• |
Press the |
-button |
9 |
or the -button 6 to start the |
CTCSS scan.
Once there is a transmission on the channel, the CTCSS code (if used) will be detected and displayed.
•If you press the PTT button 11 while listening to a found CTCSS code, the PMR will go back in stand-by mode on the channel with the CTCSS code.
•If no CTCSS code is detected there is a chance that DCS is selected by the user. In this case you can scan for the DCS code.
(section 13.10.3)
14 |
Twintalker 4810 |
|
|
|
|
Twintalker 4810 |
13.10.3 Scanning for a DCS code |
|
|
|
|
• |
Press the |
-button |
5 |
seven times : "SC" and "DCS 00" |
|
flashes on the display for the selected radio channel. |
|||
• |
Press the |
-button |
9 |
or the -button 6 to start the |
DCS scan.
Once there is a transmission on the channel, the DCS code (if used) will be detected and displayed.
If you press the PTT button 11 while listening to a found DCS code, the
PMR will go back in stand-by mode on the channel with the DCS code.
13.11 Call Tones
A call tone alerts others that you want to start talking.
13.11.1 Setting the Call Tone
The Twintalker 4810 has 15 call tones.
• |
Press the |
- button |
5 eight times, “CA” |
is displayed |
|
and the current call tone is flashing. |
|
||
• |
Press the |
- button 9 |
or the - button 6 |
to change to |
|
another Call Tone. |
|
|
|
•Press the PTT - button 11 to confirm and return to stand-by mode.
13.11.2 Sending a call Tone
Press the 
 button 4 briefly. The call tone will be transmitted on the set channel.
13.12 Roger Beep On/Off
After the PTT -button is released, the unit will send out a roger beep to confirm that you have stopped talking.
To set the Roger Beep. |
5 nine times. ‘rO’ will be displayed. |
|||
• |
Press the |
- button |
||
• |
Press to enable (ON) or |
to disable the Roger-Beep (OF). |
||
• |
Press the PTT - button |
11 |
to confirm your selection and return to the |
|
|
standby mode. |
|
|
|
ENGLISH
Twintalker 4810 |
15 |
Twintalker 4810
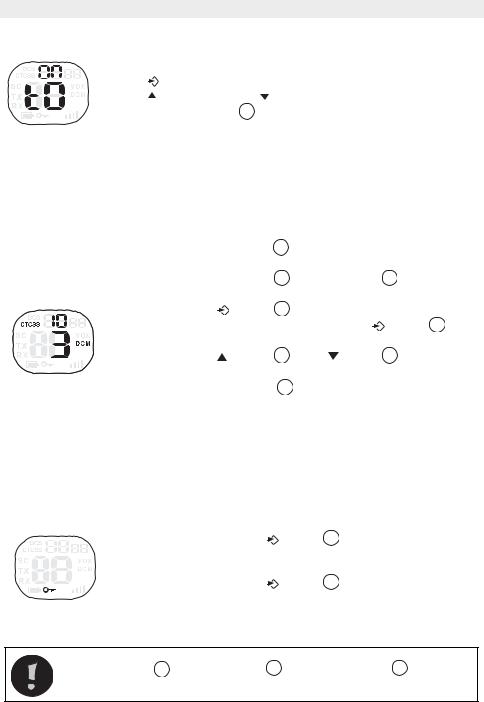
13.13 Key-Tone On/Off
When a button is pressed, the unit will beep briefly.
To set the key-tone.
• |
Press |
ten times. ‘tO’ will be displayed. |
• |
Press |
to enable (ON) or disable the Key Tones (OF). |
• |
Press the PTT - button 11 to confirm your selection and return to the. |
|
|
standby mode. |
|
13.14 Dual Channel Monitor function
In stand-by, the PMR is set on one channel with CTCSS/DCS code. The PMR will only receive signals transmitted on that channel with the CTCSS/DCS code.
Dual Channel Monitor (DCM) allows you to monitor a second channel with CTCSS/DCS code.
•Press the  -button 5 eleven times,” DCM OF" will flash on the display.
•Press the  -button 9 or the
  -button 6 to change the
|
channel. |
-button 5 |
|
|
• |
Press the |
to confirm the channel selection |
||
|
and go to CTCSS selection. (Press the |
-button 5 |
||
|
again to go to DCS selection) |
6 to change the |
||
• |
Press the |
-button 9 |
or the -button |
|
CTCSS code or DCS code.
•Press the PTT-button 11 to confirm and return to stand-by mode.
•To disable the function select "OF" when selecting the DCM channel.
When the Dual Channel Monitor function is activated, the PMR will switch sequentially between the standby channel + CTCSS/DCS code and the Dual Channel + CTCSS/DCS code.
13.15 Button Lock
• |
Press and hold the |
-button |
5 |
for three seconds to |
|
activate the Button lock mode. The button lock icon is |
|||
|
displayed on the LCD Screen. |
5 |
|
|
• |
Press and hold the |
-button |
again for three seconds |
|
|
deactivate button lock |
|
|
|
The PTT-button 11 , the 
 -button 4 and the
  -button 10 will still be functional when the Button Lock is activated.
16 |
Twintalker 4810 |
Twintalker 4810
13.16 Stopwatch function
The Twintalker 4810 has a stopwatch that will count to 59'59''99.
• Press the 
 -button 4 and hold for three seconds , the stopwatch display will appear.
• Press the  -button 9 to start the stopwatch.
• Press the  -button 9 to stop the stopwatch.
• |
Press the |
-button 6 to reset the stopwatch to zero. |
•Press the 
 -button 4 and hold for three seconds to deactivate the stopwatch.
13.17Display back light
To activate the backlight of the LCD display, press any button except the PTT- button 11 or the 
 button 4 .
The LCD backlight will light up for 6 seconds.
14 Earpiece connection
The Twintalker 4810 can be used with the included earpiece.
The connector is located under the protective rubber cover on the upper side of the unit 2 . To attach the earpiece, open the rubber flap to expose the connector. The rubber flap cannot be removed from the PMR as it is fixed to the unit.
Insert the earpiece plug into the connector (2,5mm jack).
The small button on the earpiece has the same function as the PTT - button 11 on the unit When you use the PTT - button 11 from the Earpiece, you must also use the microphone from the earpiece to talk into.
Do not connect other earpieces. This may damage your device.
ENGLISH
Twintalker 4810 |
17 |

Twintalker 4810
15 Troubleshooting
No power |
Clean the battery contacts with a soft cloth. |
|
Replace the batteries. |
|
|
No transmission |
Make sure the PTT - button 11 is pressed completely |
|
before you speak. |
|
Monitor the channel activity and switch to another channel |
|
if the current is used. |
|
|
No reception |
Check the speaker volume. |
|
Make sure that you are in the reception range of the sender |
|
and change if necessary your location. |
|
|
Limited Range and noice |
The talking range depends on the terrain. |
during transmission |
Steal constructions, concrete buildings or the use in |
|
vehicles have a bad influence on the range. |
|
Try to avoid as many obstacles as possible and |
|
communicate in a clear line of sight. |
|
Change your locations. |
|
|
Interference |
The receiver and transmitter are too close. The mimimum |
|
distance between 2 units is 1,5m. |
|
|
16 Technical specifications
Channels |
8 |
Sub-code |
CTCSS 38 / DCS 83 |
Frequency |
446.00625MHz - 446.09375 MHz |
Range |
Up to 8 Km (Open field) |
Batteries |
4 x AAA Alkaline or 4 x AAA NiMH rechargeable |
Transmission Power |
=< 500mW ERP |
Modulation Type |
FM - F3E |
Channel spacing |
12,5 kHz |
Duo Charger adapter |
Input : 230V AC / 50Hz - Output : 9V DC / 200mA |
|
|
18 |
Twintalker 4810 |

Twintalker 4810
|
|
|
|
|
|
|
|
|
|
|
|
|
|
|
|
|
|
|
|
|
Channel Frequency Chart: |
CTCSS Code Chart |
|
|
|
|
|
|
|
|
|
|
|
|
|
ENGLISH |
|||||
4 |
446,04375 |
3 |
74,4 |
13 |
103,5 |
23 |
146,2 |
33 |
210,7 |
|
||||||||||
Channel |
Frequency (MHz) |
|
Code |
Frequency (Hz) |
|
Code |
Freq. (Hz) |
Code |
Freq. (Hz) |
Code |
|
Freq. (Hz) |
|
|
||||||
1 |
446,00625 |
0 |
|
Disabled |
10 |
94,8 |
20 |
131,8 |
30 |
|
186,2 |
|
|
|||||||
2 |
446,01875 |
1 |
67,0 |
11 |
97,4 |
21 |
136,5 |
31 |
|
192,8 |
|
|
||||||||
3 |
446,03125 |
2 |
71,9 |
12 |
100,0 |
22 |
141,3 |
32 |
|
203,5 |
|
|
||||||||
|
|
|
|
|
|
|
|
|
|
|
|
|
|
|
|
|
|
|
|
|
5 |
446,05625 |
4 |
77,0 |
14 |
107,2 |
24 |
151,4 |
34 |
|
218,1 |
|
|
||||||||
6 |
446,06875 |
5 |
79,7 |
15 |
110,9 |
25 |
156,7 |
35 |
|
225,7 |
|
|
||||||||
7 |
446,08125 |
6 |
82,5 |
16 |
114,8 |
26 |
162,2 |
36 |
|
233,6 |
|
|
||||||||
|
||||||||||||||||||||
8 |
446,09375 |
7 |
85,4 |
17 |
118,8 |
27 |
167,9 |
37 |
|
241,8 |
|
|
||||||||
|
|
|
8 |
88,5 |
18 |
123,0 |
28 |
173,8 |
38 |
|
250,3 |
|
|
|||||||
|
|
|
9 |
91,5 |
19 |
127,3 |
29 |
179,9 |
|
|
|
|
|
|
|
|||||
|
|
|
|
|
|
|
|
|
|
|
|
|
|
|
|
|
|
|
|
|
DCS Code Chart |
|
|
|
|
|
|
|
|
|
|
|
|
|
|
|
|
|
|
||
No |
|
DCS code |
|
No |
|
DCS code |
|
No |
|
|
DCS code |
|
No |
|
|
DCS code |
|
|
||
|
|
|
|
|
|
|
|
|
|
|
|
|
|
|
|
|
|
|
|
|
0 |
|
Disabled |
|
21 |
|
134 |
|
42 |
|
|
311 |
|
63 |
|
|
516 |
|
|
|
|
1 |
|
23 |
|
22 |
|
143 |
|
43 |
|
|
315 |
|
64 |
|
|
532 |
|
|
|
|
2 |
|
25 |
|
23 |
|
152 |
|
44 |
|
|
331 |
|
65 |
|
|
546 |
|
|
|
|
3 |
|
26 |
|
24 |
|
155 |
|
45 |
|
|
343 |
|
66 |
|
|
565 |
|
|
|
|
4 |
|
31 |
|
25 |
|
156 |
|
46 |
|
|
346 |
|
67 |
|
|
606 |
|
|
|
|
5 |
|
32 |
|
26 |
|
162 |
|
47 |
|
|
351 |
|
68 |
|
|
612 |
|
|
|
|
6 |
|
43 |
|
27 |
|
165 |
|
48 |
|
|
364 |
|
69 |
|
|
624 |
|
|
|
|
7 |
|
47 |
|
28 |
|
172 |
|
49 |
|
|
365 |
|
70 |
|
|
627 |
|
|
|
|
8 |
|
51 |
|
29 |
|
174 |
|
50 |
|
|
371 |
|
71 |
|
|
631 |
|
|
|
|
9 |
|
54 |
|
30 |
|
205 |
|
51 |
|
|
411 |
|
72 |
|
|
632 |
|
|
|
|
10 |
|
65 |
|
31 |
|
223 |
|
52 |
|
|
412 |
|
73 |
|
|
654 |
|
|
|
|
11 |
|
71 |
|
32 |
|
226 |
|
53 |
|
|
413 |
|
74 |
|
|
662 |
|
|
|
|
12 |
|
72 |
|
33 |
|
243 |
|
54 |
|
|
423 |
|
75 |
|
|
664 |
|
|
|
|
13 |
|
73 |
|
34 |
|
244 |
|
55 |
|
|
431 |
|
76 |
|
|
703 |
|
|
|
|
14 |
|
74 |
|
35 |
|
245 |
|
56 |
|
|
432 |
|
77 |
|
|
712 |
|
|
|
|
15 |
|
114 |
|
36 |
|
251 |
|
57 |
|
|
445 |
|
78 |
|
|
723 |
|
|
|
|
16 |
|
115 |
|
37 |
|
261 |
|
58 |
|
|
464 |
|
79 |
|
|
731 |
|
|
|
|
17 |
|
116 |
|
38 |
|
263 |
|
59 |
|
|
465 |
|
80 |
|
|
732 |
|
|
|
|
18 |
|
125 |
|
39 |
|
265 |
|
60 |
|
|
466 |
|
81 |
|
|
734 |
|
|
|
|
19 |
|
131 |
|
40 |
|
271 |
|
61 |
|
|
503 |
|
82 |
|
|
743 |
|
|
|
|
20 |
|
132 |
|
41 |
|
306 |
|
62 |
|
|
506 |
|
83 |
|
|
754 |
|
|
|
|
17 Service address and hotline support
The service adresses are printed on the extra service card included in the package or can be found on www.ucom.be.
18 Declaration of conformity and manufacturer
Topcom Europe Nv.
Grauwmeer 17
3001 Heverlee
Belgium
The declaration of conformity can be found on the last page of this user guide.
Twintalker 4810 |
19 |

Twintalker 4810
19 Warranty
19.1 Warranty period
The devices have a 36-month warranty period. The warranty period starts on the day the new unit is purchased. There is no warranty on standard or rechargeable batteries (AA/AAA type). Consumables or defects causing a negligible effect on operation or value of the equipment are not covered. The warranty has to be proven by presentation of the original or copy of the purchase receipt, on which the date of purchase and the unit-model are indicated.
19.2 Warranty handling
A faulty unit needs to be returned to an authorized service centre including a valid purchase note and a filled in service card. If the unit develops a fault during the warranty period, the service centre will repair any defects caused by material or manufacturing faults free of charge, by either repairing or exchanging the faulty units or parts of the faulty units. In case of replacement, colour and model can be different from the original purchased unit.
The initial purchase date shall determine the start of the warranty period. The warranty period is not extended if the unit is exchanged or repaired by the service centre.
19.3 Warranty exclusions
Damage or defects caused by incorrect treatment or operation and damage resulting from use of non-original parts or accessories are not covered by the warranty.
The warranty does not cover damage caused by outside factors, such as lightning, water and fire, nor any damage caused during transportation. No warranty can be claimed if the serial number on the units has been changed, removed or rendered illegible. Any warranty claims will be invalid if the unit has been repaired, altered or modified by the buyer.
20 |
Twintalker 4810 |
|
|
Twintalker 4810 |
|
|
1 |
Johdanto |
23 |
|
|
2 |
Käyttötarkoitus |
23 |
|
|
3 |
CE-merkintä |
23 |
|
|
4 |
Turvaohjeet |
23 |
|
|
4.1 |
Yleiset |
23 |
|
|
4.2 |
Palovammat |
23 |
|
|
4.3 |
Tapaturmat |
23 |
|
|
4.4 |
Räjähdysvaara |
23 |
|
|
4.5 |
Myrkytysvaara |
24 |
|
|
4.6 |
Lakiasiaa |
24 |
|
SUOMI |
4.7 |
Huomautukset |
24 |
|
|
5 |
Puhdistaminen ja kunnossapito |
24 |
|
|
6 |
Laitteen hävittäminen (ympäristöystävällisesti) |
25 |
|
|
7 |
PMR-laitteen käyttö |
25 |
|
|
8 |
Pakkaukseen sisältyvät |
26 |
|
|
9 |
Käytön aloittaminen |
26 |
|
|
9.1 |
Vyökiinnikkeen irrottaminen/asentaminen |
26 |
|
|
9.2 |
Akkujen asettaminen |
26 |
|
|
10 |
Akkujen lataaminen |
27 |
|
|
11 |
Kuvaus |
27 |
|
|
12 |
Nestekidenäytön tiedot |
28 |
|
|
13 |
Twintalker 4810:n käyttö |
28 |
|
|
13.1 |
Laitteen kytkeminen päälle/pois |
28 |
|
|
13.2 |
Akun lataustason / heikon latauksen näyttö |
29 |
|
|
13.3 |
Kaiuttimen äänenvoimakkuuden säätäminen |
29 |
|
|
13.4 |
Signaalin vastaanottaminen |
29 |
|
|
13.5 |
Signaalin lähettäminen |
29 |
|
|
13.6 |
Kanavien vaihtaminen |
30 |
|
|
13.7CTCSS (Continuous Tone Coded Squelch System) /
|
DCS (Digital Coded Squelch) |
30 |
13.8 |
Tarkkailu |
31 |
13.9 |
VOX-valinta |
31 |
13.10 |
Kanavahaku |
31 |
13.11 |
Soittoäänet |
33 |
13.12 |
Vahvistuspiippaus päälle/pois |
33 |
13.13 |
Näppäinääni päälle/pois |
33 |
13.14 |
Kahden kanavan tarkkailutoiminto |
33 |
13.15 |
Näppäinlukko |
34 |
13.16 |
Sekuntikellotoiminto |
34 |
13.17 |
Näytön taustavalo |
35 |
Twintalker 4810 |
21 |

Twintalker 4810
14 |
Kuulokeliitäntä |
35 |
15 |
Vianmääritys |
35 |
16 |
Tekniset tiedot |
36 |
17 |
Palveluosoite ja palvelulinjan tuki |
37 |
18 |
Vaatimustenmukaisuusvakuutus ja valmistaja |
37 |
19 |
Takuu |
37 |
19.1 |
Takuuaika |
37 |
19.2 |
Takuumenettely |
37 |
19.3 |
Tilanteet, joissa takuuta ei ole |
37 |
22 |
Twintalker 4810 |

Twintalker 4810
1Johdanto
Kiitos, että ostit Twintalker 4810:n. Se on pitkällä alueella toimiva, vähän virtaa kuluttava radioviestintälaite, jonka kantama on enintään 8 km. Sen käytöstä ei aiheudu muita kuluja kuin akkujen lataamisesta syntyvät pienet kulut.
Twintalker toimii 8 kanavalla.
Twintalker on suojassa pystysuoraan tippuvilta vesipisaroilta, kun koteloa kallistetaan ylös 15° kulmaan IPX2-standardin mukaisesti.
2Käyttötarkoitus
Sitä voi käyttää erilaisiin virkistystarkoituksiin. Esimerkiksi: yhteydenpitoon matkustettaessa kahdella tai useammalla autolla, pyöräillessä, hiihtoretkillä. Sen avulla voit pitää yhteyttä lapsiin heidän leikkiessään ulkona jne.
3CE-merkintä
CE-merkintä laitteessa, käyttöoppaassa ja lahjapakkauksessa ilmaisee, että laite täyttää radioja telepäätelaitedirektiivin 1999/5/EY olennaiset vaatimukset.
4Turvaohjeet
4.1Yleiset
Lue huolellisesti seuraavat turvallisuutta ja asianmukaista käyttöä koskevat ohjeet. Tutustu kaikkiin laitteen toimintoihin. Säilytä tämä käyttöohje varmassa paikassa tulevaa tarvetta varten.
4.2Palovammat
•Jos antennin suojus on vioittunut, älä koske siihen, sillä kun antenni koskettaa ihoa, lähetyksen aikana voi syntyä pieni palovamma.
•Akut voivat aiheuttaa omaisuudelle vahinkoa, kuten palovammoja, jos sähköä johtava materiaali, kuten korut, avaimet tai helminauhat, koskettaa paljaita liittimiä. Materiaali voi muodostaa sähköpiirin (oikosulku) ja kuumentua huomattavasti. Ole varovainen ladatun akun käsittelyssä, etenkin jos se on taskussa, kukkarossa tai muussa metalliesineitä sisältävässä paikassa.
4.3Tapaturmat
•Älä aseta laitetta turvatyynyn yläpuolelle tai alueelle, jolla sitä käytetään. Turvatyyny täyttyy suurella voimalla. Jos PMR-laite asetetaan tyynyn käyttöalueelle ja ilmatyyny täyttyy, viestintälaite voi sinkoutua liikkeelle suurella voimalla ja aiheuttaa ajoneuvossa oleville vakavia vammoja.
•Pidä PMR-laite ainakin 15 senttimetrin päässä sydämentahdistajasta.
•Katkaise PMR-laitteesta virta heti, jos se aiheuttaa häiriöitä lääketieteellisiin laitteisiin.
4.4Räjähdysvaara
•Älä vaihda akkuja mahdollisesti räjähdysalttiissa ympäristössä. Koskettimet voivat kipinöidä akkuja asennettaessa tai poistettaessa ja aiheuttaa räjähdyksen.
SUOMI
Twintalker 4810 |
23 |

Twintalker 4810
•Katkaise PMR-laitteesta virta oleskellessasi alueella, jolla ympäristö voi olla räjähdysaltis. Sellaisilla alueilla kipinät voisivat aiheuttaa räjähdyksen tai tulipalon, josta voi olla seurauksena fyysinen vamma tai jopa kuolema.
•Älä koskaan heitä akkuja tuleen, sillä ne voivat räjähtää.
Alueet, joilla ympäristö voi olla räjähdysaltis, on usein merkitty selvästi, muttei aina. Sellaisia ovat tankkausalueet, kuten veneiden takakansi, polttoaineen tai kemikaalin kuljetustai varastointialueet; alueet, joilla ilma sisältää kemikaaleja tai hiukkasia, kuten vilja-, pölytai metallijauheita; samoin kaikki alueet, joilla normaalisti kehotettaisiin sammuttamaan ajoneuvon moottori.
4.5Myrkytysvaara
•Pidä akut poissa pienten lasten ulottuvilta.
4.6Lakiasiaa
•Joissakin maissa henkilökohtaisten kannettavien radioiden käyttö on kiellettyä ajoneuvon ajamisen aikana. Poistu siinä tapauksessa tieltä ennen laitteen käyttöä.
•Katkaise laitteesta virta lentokoneessa ollessasi, jos sinua kehotetaan tekemään niin. PMR-laitetta saa käyttää ainoastaan lentoyhtiön sääntöjen tai miehistön ohjeiden mukaan.
•Katkaise PMR-laitteesta virta kaikissa tiloissa, joissa on kylttejä, joissa kehotetaan tekemään niin. Sairaaloissa tai terveydenhuoltolaitoksissa käytetään kenties laitteita, jotka ovat herkkiä ulkoiselle radiotaajuiselle energialle.
•Antennin vaihtaminen tai muuttaminen voi vaikuttaa henkilökohtaisen kannettavan radion ominaisuuksiin ja olla CE-määräysten vastaista. Luvattomat antennit voivat myös vioittaa radiota.
4.7Huomautukset
•Älä koske antenniin lähetyksen aikana, se voi vaikuttaa kantama-alueeseen.
•Poista akut, jos laite on käyttämättä pidemmän aikaa.
5Puhdistaminen ja kunnossapito
•Puhdista laite pyyhkimällä se vedellä kostutetulla pehmeällä liinalla. Älä käytä laitteeseen puhdistusaineita tai liuotinaineita; ne voivat vaurioittaa kuorta ja vuotaa laitteen sisään aiheuttaen pysyvää vahinkoa.
•Akkujen kosketuspinnat voidaan pyyhkiä kuivalla, nukkaamattomalla liinalla.
•Jos laite kastuu, katkaise siitä virta ja poista akut välittömästi. Kuivaa akkulokero pehmeällä liinalla veden aiheuttamien vahinkojen minimoimiseksi. Jätä akkulokeron kansi auki yön yli tai kunnes lokero on täysin kuiva. Älä käytä laitetta, ennen kuin se on kuivunut kokonaan.
24 |
Twintalker 4810 |

Twintalker 4810
6Laitteen hävittäminen (ympäristöystävällisesti)
Kun et enää käytä laitetta, älä heitä sitä tavallisen kotitalousjätteen sekaan vaan vie se sähköja elektroniikkalaitteiden kierrätystä varten perustettuun
keräyspisteeseen. Tuotteessa, käyttöoppaassa ja/tai tuotepakkauksessa on tästä kertova merkki.
 Jos viet laitteen kierrätyspisteeseen, joitakin sen osia voidaan käyttää uudelleen. Käyttämällä uudelleen tuotteen joitakin osia tai raaka-aineita teet arvokasta ympäristötyötä. Ota yhteyttä paikallisiin viranomaisiin, jos tarvitset lisätietoja alueellasi sijaitsevista keräyspisteistä.
7PMR-laitteen käyttö
Jotta PMR-laitteiden välinen viestintä olisi mahdollista, ne on kaikki viritettävä samalle kanavalle, niillä on oltava sama CTCSS/DCS-koodi (katso luku “13.7 CTCSS (Continuous Tone Coded Squelch System) / DCS (Digital Coded Squelch)”), ja niiden on oltava vastaanottoalueen sisällä (enintään 8 km avoimessa maastossa). Koska nämä laitteet käyttävät vapaita taajuuskaistoja (kanavia), kaikki käytössä olevat laitteet jakavat nämä kanavat (yhteensä 8 kanavaa). Siksi yksityisyyttä ei voida taata. Kuka tahansa, jonka PMRlaite on viritetty samalle kanavalle kuin omasi, voi kuulla keskustelun. Jos haluat kommunikoida (lähettää puhesignaalin), sinun on painettava PTT-näppäintä 11 .
Kun olet painanut tätä näppäintä, laite siirtyy lähetystilaan ja voit puhua mikrofoniin. Viestisi kuuluu kaikista muista alueella, samalla kanavalla ja valmiustilassa (ei lähettämässä) olevista PMR-laitteista. Sinun on odotettava, kunnes toinen osapuoli lopettaa lähettämisen, ennen kuin voit vastata viestiin. Kunkin lähetyksen lopussa laite lähettää piip-äänen, jos vahvistuspiippaus on aktiivisena (ks. luku “13.12 Vahvistuspiippaus päälle/pois”). Voit vastata painamalla PTT-näppäintä 11 ja puhumalla mikrofoniin.
Jos 2 tai useampi käyttäjä painaa PTT-näppäintä 11 samanaikaisesti, vastaanottaja saa vain voimakkaimman signaalin ja muut signaalit vaimennetaan. Siksi signaali tulee lähettää (painaa PTT-näppäintä 11 ) vain silloin, kun kanava on vapaa.
Radioaaltojen kantamaan vaikuttavat voimakkaasti erilaiset esteet kuten rakennukset, betoniset/metalliset rakenteet, pinnanmuotojen epätasaisuus, metsä, kasvillisuus, ... Tämä tarkoittaa sitä, että kantama kahden tai useamman PMR-laitteen välillä voi ääriolosuhteissa olla vain muutamia kymmeniä metrejä. Huomaat pian, että PMR-laite toimii parhaiten silloin, kun käyttäjien välillä on mahdollisimman vähän esteitä.
SUOMI
Twintalker 4810 |
25 |
Twintalker 4810
8Pakkaukseen sisältyvät
•2 x Twintalker 4810
•2 x vyökiinnike
•1 x 2-paikkainen laturi
•1 x muuntaja
•8 x AAA NiMh-akku
•2 x kuuloke, johon sisältyy mikrofoni ja PTT- näppäin
•Käyttöopas
•Kortti, johon on painettu huoltoliikkeen osoite ja palvelulinjan numero
9 Käytön aloittaminen |
A |
9.1Vyökiinnikkeen irrottaminen/ asentaminen
1.Voit irrottaa vyökiinnikkeen laitteesta painamalla vyökiinnikettä (B) kohti antennia ja vetämällä samalla kiinnikkeen liuskaa (A).
2.Vyökiinnikettä asennettaessa napsahdus tarkoittaa, että vyökiinnike on lukittunut paikalleen.
B
9.2Akkujen asettaminen
C
1.Irrota vyökiinnike (ks. luku “9.1 Vyökiinnikkeen irrottaminen/asentaminen”).
2.Nosta akkulokeron kansi varovasti työntämällä kannen kiinnikettä (C) kynnen avulla.
3.Aseta NiMh-akut paikoilleen. Varmista NiMh-akkujen oikea polaarisuus.
4.Sulje akkulokero.
5.Kiinnitä vyökiinnike.
26 |
Twintalker 4810 |
Twintalker 4810
10 Akkujen lataaminen
Kun akut on asennettu, pöytälaturi varmistaa kätevän latauksen vähän kerrallaan.
1.Aseta pöytälaturi tasaiselle pinnalle.
2.Kytke mukana toimitetun muuntajan toinen pää läheiseen pistorasiaan ja toinen pää pöytälaturin takapuolella olevaan liittimeen 25 . (Katso taiteltu kansilehti, kuva C)
3.Aseta radio laturiin kuten kuvassa.
4.Latauksen LED-merkkivalo 26 syttyy, jos puhelin on oikein
asetettu ja latautuu. ( Katso taiteltu kansilehti, kuva D)
Akkujen lataaminen täyteen kestää noin 8–10 tuntia.
Älä paina PMR-laitteiden PTT-näppäintä silloin, kun ne on asetettu laturiin!
Älä aiheuta oikosulkua tai heitä akkuja tuleen. Poista akut, jos laite on käyttämättä pidemmän aikaa.
Älä lataa paristoja, joita ei voi ladata uudelleen, kuten alkaliparistoja. Tämä voi vahingoittaa PMR-laitetta tai latausyksikköä.
11 Kuvaus
Katso taiteltu kansilehti, kuva A
1.Nestekidenäyttö
2.Kuulokkeen liitäntä
3.Antenni
4.Soittonäppäin 

5.Valikkopainike 
–Siirry valikon asetuksiin
6.Alas-näppäin
–Pienennä kaiuttimen äänenvoimakkuutta
–Valitse valikon edellinen arvo
7.Laturin kosketuspinnat
SUOMI
Twintalker 4810 |
27 |
Twintalker 4810
8.Mikrofoni
9.YLÖS-näppäin 
–Lisää kaiuttimen äänenvoimakkuutta
–Valitse valikon seuraava arvo
10.Virtakatkaisin 
11.PUSH TO TALK -näppäin PTT
12 Nestekidenäytön tiedot
Katso taiteltu kansilehti, kuva B
12.CTCSS-ilmaisin
13.DCS-ilmaisin
14.CTCSS/DCS/ Sekuntikellon sekunnit / Valikkovaihtoehdon arvo
15.Sekuntikellon 1/100-arvo
16.VOX-ilmaisin
17.2-kanavaisen tilan (DCM) ilmaisin
18.Kanavan/valikkokohdan ilmaisin
19.Kaiuttimen äänenvoimakkuuden ilmaisin
20.Näppäimistön lukituskuvake
21.Varaustason merkki
22.RX-kuvake
–Näkyy vastaanotettaessa
23.TX-kuvake
–Näkyy lähetettäessä
24.Haun ilmaisin
–Näkyy hakutilassa
13 Twintalker 4810:n käyttö
Seuraavien sivujen kuvissa näytöstä esitellään vain niiden toimintojen
kuvakkeet tai näyttötiedot, jotka on esitelty tekstissä.
13.1 Laitteen kytkeminen päälle/pois
Laitteen kytkeminen päälle:
• Paina  -näppäintä ja pidä sitä pohjassa 10 3 sekuntia. Laite “piippaa” ja nestekidenäytöllä näkyy nykyinen kanava.
Kytkeminen pois päältä:
• Paina  -näppäintä ja pidä sitä pohjassa 10 3 sekuntia. Laite “piippaa” ja nestekidenäyttö tyhjenee.
28 |
Twintalker 4810 |
Twintalker 4810
13.2 Akun lataustason / heikon latauksen näyttö
Akun lataustaso käy ilmi neliöiden määrästä nestekidenäytön Akku-kuvakkeen sisällä.
Akku täynnä
Akussa latausta 2/3
Akussa latausta 1/3
Akku tyhjä
Kun akun lataustaso on heikko, Akku-kuvake vilkkuu ja kuuluu merkkiääni merkkinä siitä, että akut on joko vaihdettava tai ladattava.
Älä koskaan lataa paristoja, joita ei voi ladata uudelleen, kuten alkaliparistot.
13.3 Kaiuttimen äänenvoimakkuuden säätäminen
• |
Voit lisätä kaiuttimen äänenvoimakkuutta painamalla - |
|
näppäintä 9 valmiustilassa. Näytöllä näkyy |
|
äänenvoimakkuuden taso. |
• |
Voit pienentää kaiuttimen äänenvoimakkuutta painamalla |
|
-näppäintä 6 . |
13.4 Signaalin vastaanottaminen
Laite on aina Vastaanotto-tilassa, kun se on käynnissä eikä lähetä mitään.
Jotta muut voisivat vastaanottaa lähetyksesi, heidän on oltava viritettyinä samalle kanavalle ja käytettävä samaa CTCSStai DCS-koodia. (Katso lukuja “13.6 Kanavien vaihtaminen” ja “13.7 CTCSS (Continuous Tone Coded Squelch System) / DCS (Digital Coded Squelch)”)
Käytössä voi olla joko CTCSS tai DCS, mutta ei kumpikin samaan aikaan.
13.5 Signaalin lähettäminen
• Lähetä painamalla PTT-näppäintä ja pitämällä sitä pohjassa 11 . Näytölle tulee TX-symboli.
• Pidä laitetta pystyasennossa mikrofoni 10 cm:n päässä suusta ja puhu mikrofoniin.
•Päästä PTT-näppäin 11 , kun haluat lopettaa lähettämisen.
Voit tarkistaa kanavan toiminnan käyttämällä tarkkailutoimintoa (ks. luku “13.8 Tarkkailu”).
SUOMI
Twintalker 4810 |
29 |

Twintalker 4810
13.6 Kanavien vaihtaminen
• |
Paina |
-näppäintä 5 kerran, nykyisen kanavan numero |
|
vilkkuu näytöllä. |
|
• |
Voit vaihtaa kanavaa painamalla -näppäintä 9 tai - |
|
|
näppäintä |
6 . |
•Vahvista ja palaa valmiustilaan painamalla PTT-näppäintä
11 .
Jos mitään painiketta ei paineta 5 sekuntiin asetusten määrittämisen aikana, laite palaa valmiustilaan.
13.7CTCSS (Continuous Tone Coded Squelch System) / DCS (Digital Coded Squelch)
Lisenssittömissä PMR-radioissa, jotka toimivat 446 MHz:n taajuuskaistalla, kuten Twintalker 4810 PMR, on 8 mahdollista radiokanavaa. Jos lähistöllä on useita PMR-laitteen käyttäjiä, on mahdollista, että jotkut näistä käyttäjistä ovat samalla radiokanavalla.
Alakanavia on integroitu estämään muiden käyttäjien signaalien vastaanottaminen.
Kaksi PMR-radiota voi kommunikoida keskenään ainoastaan silloin, kun ne toimivat samalla radiokanavalla ja ovat valinneet täsmälleen saman alakanavan.
Alakanavia on kahdenlaisia:
•CTCSS (Continuous Tone Coded Squelch System)
•DCS (Digital Coded Squelch)
Kun käytetään CTCSS:ää, puhesignaalin mukana lähetetään ääntä matalalla taajuudella (67 - 250 Hz). Valittavana on 38 eri ääntä. Voit vapaasti valita näiden 38 äänen joukosta. Äänen suodatuksen vuoksi äänet eivät yleisesti ole kuultavissa, joten ne eivät häiritse kommunikointia.
DCS on CTCSS:n kaltainen, mutta sen sijaan, että se lähettäisi valitun taajuuden jatkuvaa ääntä, radiosignaaliin lisätään digitaalinen tiedonsiirto. Tätä digitaalista koodia lähetetään hyvin alhaisella nopeudella, noin 134 bittiä sekunnissa (koodi on 23 bitin pituinen). Vain uuden sukupolven PMR-laitteet tukevat DCS:ää. Saatavana on 83 DCS-koodia, joita voidaan käyttää. Koska aiemmat mallit tukevat vain CTCSS:ää, on parempi käyttää DCS:ää, koska tällä estetään se, että muut käyttäjät kuulevat PMR-keskustelusi.
13.7.1 CTCSS
• |
Paina |
-painiketta 5 kahdesti: "CTCSS" ja nykyinen |
|
|
CTCSS-koodi vilkkuvat näytöllä. |
-näppäintä 9 tai - |
|
• |
Voit vaihtaa koodia painamalla |
||
|
näppäintä |
6 . |
|
•Vahvista ja palaa valmiustilaan painamalla PTT- näppäintä 11 .
30 |
Twintalker 4810 |
 Loading...