


|
|
|
|
4 |
Wave Heater SWW 1500 A1 |
|
|
KOMPERNASS GMBH
BURGSTRASSE 21 · D-44867 BOCHUM www.kompernass.com
ID-Nr.: SWW 1500 A1-05/11-V3
IAN: 66900
Wave Heater |
Grzejnik |
Operating instructions |
Instrukcja obsługi |
Hőhullámos fűtőkészülék |
Grelnik s toplotnimi valovi |
Használati utasítás |
Navodila za uporabo |
Topení |
Teplovlnný ohrievač |
Návod k obsluze |
Návod na obsluhu |
Wärmewellen-Heizgerät |
|
Bedienungsanleitung |
|
SWW 1500 A1
9 0
8
t
1
2  3
3  4
4  5
5
6
7
q w
e
r

Index
GB
Introduction . . . . . . . . . . . . . . . . . . . . . . . . . . . . . . . . . . . . . . . . . . . . . . . . . . . 2
Information regarding these operating instructions . . . . . . . . . . . . . . . . . . . . . . . . . . . . . . . 2 Copyright. . . . . . . . . . . . . . . . . . . . . . . . . . . . . . . . . . . . . . . . . . . . . . . . . . . . . . . . . . . . . . . 2 Limited liability . . . . . . . . . . . . . . . . . . . . . . . . . . . . . . . . . . . . . . . . . . . . . . . . . . . . . . . . . . . 2 Warnings . . . . . . . . . . . . . . . . . . . . . . . . . . . . . . . . . . . . . . . . . . . . . . . . . . . . . . . . . . . . . . . 3 Intended use . . . . . . . . . . . . . . . . . . . . . . . . . . . . . . . . . . . . . . . . . . . . . . . . . . . . . . . . . . . . 4
Safety. . . . . . . . . . . . . . . . . . . . . . . . . . . . . . . . . . . . . . . . . . . . . . . . . . . . . . . . 4
Risks from electrical current . . . . . . . . . . . . . . . . . . . . . . . . . . . . . . . . . . . . . . . . . . . . . . . . . 4 Basic Safety Instructions. . . . . . . . . . . . . . . . . . . . . . . . . . . . . . . . . . . . . . . . . . . . . . . . . . . . 5
Initial use . . . . . . . . . . . . . . . . . . . . . . . . . . . . . . . . . . . . . . . . . . . . . . . . . . . . . 6
Package contents and transport inspection . . . . . . . . . . . . . . . . . . . . . . . . . . . . . . . . . . . . . 6 Disposal of the packaging . . . . . . . . . . . . . . . . . . . . . . . . . . . . . . . . . . . . . . . . . . . . . . . . . . 6 Requirements for the set-up location . . . . . . . . . . . . . . . . . . . . . . . . . . . . . . . . . . . . . . . . . . 7 Before initial use . . . . . . . . . . . . . . . . . . . . . . . . . . . . . . . . . . . . . . . . . . . . . . . . . . . . . . . . . 7 Electrical connection . . . . . . . . . . . . . . . . . . . . . . . . . . . . . . . . . . . . . . . . . . . . . . . . . . . . . . 8 Inserting batteries into the remote control . . . . . . . . . . . . . . . . . . . . . . . . . . . . . . . . . . . . . . 8
Operating components. . . . . . . . . . . . . . . . . . . . . . . . . . . . . . . . . . . . . . . . . . 8
Assembly . . . . . . . . . . . . . . . . . . . . . . . . . . . . . . . . . . . . . . . . . . . . . . . . . . . . . 9
Stationary assembly. . . . . . . . . . . . . . . . . . . . . . . . . . . . . . . . . . . . . . . . . . . . . . . . . . . . . . . 9 Wall mounting . . . . . . . . . . . . . . . . . . . . . . . . . . . . . . . . . . . . . . . . . . . . . . . . . . . . . . . . . . . 9
Handling and operation . . . . . . . . . . . . . . . . . . . . . . . . . . . . . . . . . . . . . . . . 11
Switching the device on and o . . . . . . . . . . . . . . . . . . . . . . . . . . . . . . . . . . . . . . . . . . . . 11 Heating operation . . . . . . . . . . . . . . . . . . . . . . . . . . . . . . . . . . . . . . . . . . . . . . . . . . . . . . . 11 Setting the nominal temperature . . . . . . . . . . . . . . . . . . . . . . . . . . . . . . . . . . . . . . . . . . . . 12 Programming the switch o time . . . . . . . . . . . . . . . . . . . . . . . . . . . . . . . . . . . . . . . . . . . . 12 Programming the switch on time . . . . . . . . . . . . . . . . . . . . . . . . . . . . . . . . . . . . . . . . . . . . 12 Overheating protection . . . . . . . . . . . . . . . . . . . . . . . . . . . . . . . . . . . . . . . . . . . . . . . . . . . 13 Frost protection function. . . . . . . . . . . . . . . . . . . . . . . . . . . . . . . . . . . . . . . . . . . . . . . . . . . 13 Topple over protection . . . . . . . . . . . . . . . . . . . . . . . . . . . . . . . . . . . . . . . . . . . . . . . . . . . . 13
Cleaning . . . . . . . . . . . . . . . . . . . . . . . . . . . . . . . . . . . . . . . . . . . . . . . . . . . . 14
Storage . . . . . . . . . . . . . . . . . . . . . . . . . . . . . . . . . . . . . . . . . . . . . . . . . . . . . 14
Disposal . . . . . . . . . . . . . . . . . . . . . . . . . . . . . . . . . . . . . . . . . . . . . . . . . . . . . 14
Troubleshooting . . . . . . . . . . . . . . . . . . . . . . . . . . . . . . . . . . . . . . . . . . . . . . 15
Malfunction causes and remedies . . . . . . . . . . . . . . . . . . . . . . . . . . . . . . . . . . . . . . . . . . . 15
Appendix . . . . . . . . . . . . . . . . . . . . . . . . . . . . . . . . . . . . . . . . . . . . . . . . . . . . 16
Technical data . . . . . . . . . . . . . . . . . . . . . . . . . . . . . . . . . . . . . . . . . . . . . . . . . . . . . . . . . . 16 Information regarding the EG conformity declaration . . . . . . . . . . . . . . . . . . . . . . . . . . . 16 Warranty . . . . . . . . . . . . . . . . . . . . . . . . . . . . . . . . . . . . . . . . . . . . . . . . . . . . . . . . . . . . . . 17 Service . . . . . . . . . . . . . . . . . . . . . . . . . . . . . . . . . . . . . . . . . . . . . . . . . . . . . . . . . . . . . . . . 17 Importer . . . . . . . . . . . . . . . . . . . . . . . . . . . . . . . . . . . . . . . . . . . . . . . . . . . . . . . . . . . . . . . 17
SWW 1500 A1 |
1 |

Introduction
Introduction
GB
Information regarding these operating instructions
These operating instructions are a component of the Thermal wave heater SWW 1500 A1 (subsequently refered to as the device) and provide you with important information for proper use, safety, connections as well as operation of the device.
These operating instructions must be constantly kept available close to the device. They are to be read and applied by anyone assigned to operate, and/or repair faults to the device.
Retain these operating instructions and pass them on, together with the device, to any future owners.
Copyright
This documentation is copyright protected.
Any copying and/or reproduction, wholly or partially, including reproduction of the illustrations, also in a modified format is only permitted with written consent from the manufacturer.
Limited liability
All technical information, data and instructions for the installation, connection and operation contained in these operating instructions correspond to the latest available at the time of printing and, to the best of our knowledge, take into account our previous experience and know-how.
No claims can be derived from the details, illustrations and descriptions in these instructions.
The manufacturer assumes no responsibility for damage caused by failure to observe the instructions, improper use, inappropriate repairs, making unauthorised changes or for using unauthorised replacement parts.
2 |
SWW 1500 A1 |
Introduction
Warnings
In the current operating instructions the following warnings are used: GB
 DANGER
A warning of this danger level indicates a life-threatening dangerous situation
If the dangerous situation is not avoided, it could lead to death or serious physical injury.
►Observe the instructions in this warning to avoid the death of or serious physical injury to people.
 WARNING
A warning of this danger level signifies a possible dangerous situation.
If the dangerous situation is not avoided it could lead to physical injuries. ► Observe the instructions in this warning to avoid personal injuries.
CAUTION
A warning of this danger level signifies possible property damage.
If the situation is not avoided it could lead to property damage.
► Observe the instructions in this warning to avoid property damage.
NOTICE
►A notice signifies additional information that assists in the handling of the device.
SWW 1500 A1 |
3 |
|
|
|
|
Introduction/Safety |
|
|
|
|
Intended use |
||
|
GB |
|
|||
|
|
|
This device is only intended for heating in indoor living spaces and only for private |
||
|
|
|
|
purposes. This device can be used free standing or mounted on a wall. This |
|
|
|
|
|
device is not intended for any other use or for uses beyond those mentioned. |
|
|
|
|
|
|
|
|
|
|
|
WARNING |
|
|
|
|
|
Danger from unintended use! |
|
|
|
|
|
Danger can come from the device if used for unintended purposes and/or |
|
|
|
|
|
other types of use. |
|
►Use the device exclusively for intended purposes.
►Observe the procedures described in these operating instructions.
Claims of any kind for damage resulting from unintended use will not be excepted.
The operator alone bears liability.
Safety
In this chapter you will receive important safety information regarding the handling of the device.
This device complies with the statutory safety regulations. Incorrect usage can lead to personal injury and property damage.
Do not cover the device!
Covering the device can lead to overheating and thus result in a fire!
Risks from electrical current
 DANGER
Risk of potentially fatal electrical current!
Contact with wires or components that are under voltage could be potentially fatal!
Observe the following safety instructions to avoid risks from electrical current:
►Do not use the device if the mains power cord or the plug is damaged.
►Before putting the device back into service have a new mains power cord installed by an authorised specialist.
►Under no circumstances should you open the device housing. There is a danger of electric shock if voltage carrying connections are touched or the electrical and/or mechanical construction is changed.
4 |
SWW 1500 A1 |

Safety
Basic Safety Instructions
For safe handling of the device observe the following safety information: GB
■Before use check the device for visible external damage. Do not put into operation a device that is damaged or has been dropped.
■If the device's mains power cord is damaged, it must be replaced by the manufacturer, the manufacturer's customer service department or by a qualified technician so that hazards can be prevented.
■This device is not intended for use by individuals (including children) with restricted physical, physiological or intellectual abilities or deficiences in experience and/ or knowledge unless they are supervised by a person responsible for their safety or receive from this person instruction on how the device is to be used.
■Children should be supervised to ensure that they do not play with the device.
■Repairs should only be carried out by authorised specialist companies or by the Customer Service Department. Incompetent repairs can result in significant risks for the user. In addition, warranty claims become void.
■A repair to the device during the warranty period may only be carried out by a customer service department authorised by the manufacturer otherwise no additional warranty claims can be considered for subsequent damages.
■Defective components may only be replaced with original replacement parts. Only by using original replacement parts can it be guaranteed that the safety requirements are being complied with.
■Protect the device from moisture and liquid penetration.
■Always pull the mains power cord from the wall socket by the plug, never pull on the cord.
■Do not use the device in the vicinity of open flames.
■The device must not be placed immediately under or over a mains wall socket.
■In the event of malfunctions and during thunderstorms pull the plug from the mains wall socket.
■The device must not be used in the immediate vicinity of a bath, a shower or a swimming pool.
■The device is to be installed so that a person in the bath or shower is unable to touch the switch and other controls.
■Do not subject the device to spray and/or dripping water and do not place any objects filled with liquid, such as vases or open drink containers, on or near the device.
SWW 1500 A1 |
5 |
Initial use
Initial use
GB
Package contents and transport inspection
The device is delivered with the following components as standard:
Thermal wave heater
Remote control
2 Batteries type AAA/Micro
2 Pedestals with securing screws
4 Wall brackets (U shaped)
1 Angle bracket (Z shaped)
5 Rawlplugs S8
5 Screws M4 x 42 mm
7 Screws M4 x 13 mm
This operating manual
NOTICE
►Check the contents to ensure that everything is present and for signs of visible damage.
►If the contents are not complete or are damaged due to defective packaging or through transportation contact the service hotline (see service).
Disposal of the packaging
The packaging protects the device from transport damage. The packaging materials are selected from the point of view of their environmental friendliness and disposal technology and are therefore recyclable.
The recirculation of packaging into the material circuit saves on raw material and reduces generated waste. Dispose of packaging material that is no longer needed according to the regionally established regulations.
NOTICE
►If possible preserve the device's original packaging during the warranty period so that in the case of a warranty claim you can package the device properly for return.
6 |
SWW 1500 A1 |

Initial use
Requirements for the set-up location
For safe and faultless operation of the device the set-up location must satisfy the |
GB |
following criteria: |
|
■The device must only be operated in an upright position and completely assembled.
■When using the pedestals the device must be placed on a firm, flat and even floor.
■When wall mounting the device must only be mounted in a fixed position on a verticle wall.
■The minimum distances of the housing from other objects must be maintained, they are; 100 mm at the sides, 300 mm above, 150 mm below (with wall mounting) and 500 mm in front.
■Do not stand and/or hang the device in a hot, wet or very moist environment or in the vicinity of flammable materials.
■The mains wall socket must be easily accessible so that the mains power cord can be easily removed in an emergency.
■Environment temperature range: +5 to +45 °C
■Humidity (no condensation): 5 - 90 %
 DANGER
Fire hazard through contact with materials!
The risk of fire exists if the heating elements come into contact with flammable materials!
►Do not place and/or hang the device in the vicinity of curtains and other flammable materials.
►Do not allow flammable materials (i.e. draperies) to come into contact with the device.
►Do not cover the device.
Before initial use
■ Remove all packaging materials and all transport securing devices from the device.
NOTICE
►With initial use, for a brief period, a light odour accumulation can occur. This is normal and completely harmless.
SWW 1500 A1 |
7 |

|
|
|
Initial use/Operating components |
|
|
|
Electrical connection |
|
GB |
|
|
|
|
For safe and faultless operation of the device with electrical connection observe |
|
|
|
|
the following advice: |
|
|
|
|
CAUTION
►Before connecting the device compare the connection data (voltage and frequency) on the rating plate with that of your mains power supply. This data must be in agreement so as to avoid damage to the device.
►Make sure that the mains power cord is not damaged and is not running over hot surfaces and/or sharp edges.
►Make sure that the mains power cord is not stretched or knoted.
Inserting batteries into the remote control
♦Open the battery compartment on the rear panel of the remote control.
♦Insert the batteries, type AAA/Micro into the battery compartment. Make sure the polarities are correct.
♦Close the battery compartment.
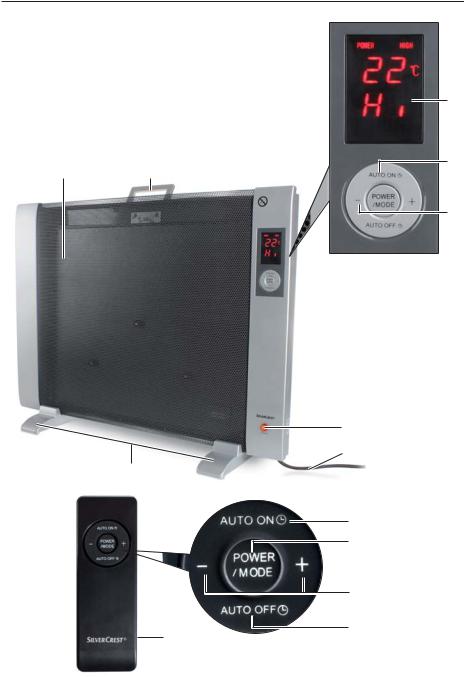
Operating components
Device
Display
2AUTO ON button
3POWER/MODE button
4+/- buttons
5AUTO OFF button
6POWER main switch
7Mains power cord
8Pedestals
9Heating element
10 Carrying handle
Remote control
11AUTO ON button
12POWER/MODE button
13+/- buttons
14AUTO OFF button
15Battery compartment
8 |
SWW 1500 A1 |
Assembly
Assembly
GB
CAUTION
►For assembly place the device on a soft underlay such as, for example, a carpet in order to avoid damages.
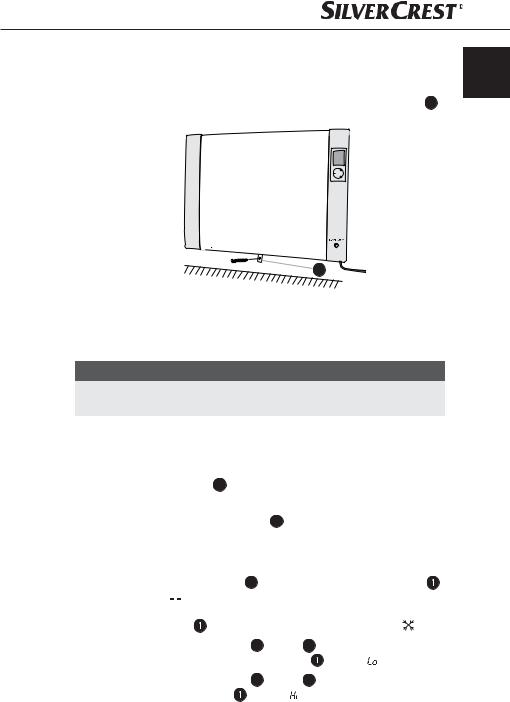
Stationary assembly
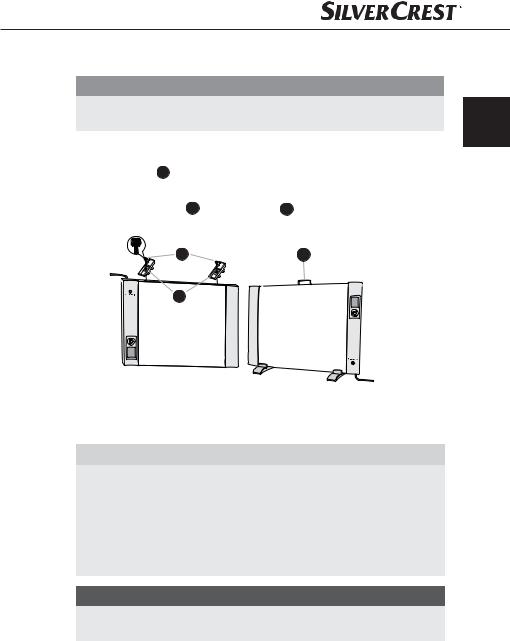
♦Fold the carrying handle 10 backwards and place the device with the underside upwards, on a soft underlay.
♦Assemble the pedestals 8 with both screws A to the device (see diagram Pedestal assembly).
A |
10 |
8 |
|
Diagram Pedestal assembly
Wall mounting
 WARNING
►Make sure that when you are drilling you do not damage any electrical wires or other installations in the wall such as water pipes.
►The supplied rawlplugs are only suitable for a mounting on concrete or stone. Before starting the installation, please check your installation location carefully for its suitability for the rawlplugs. If in doubt, call a professional.
NOTICE
►When selecting the mounting location make sure that a suitable mains wall socket is located within the plug-in radius of the mains power cord.
SWW 1500 A1 |
9 |
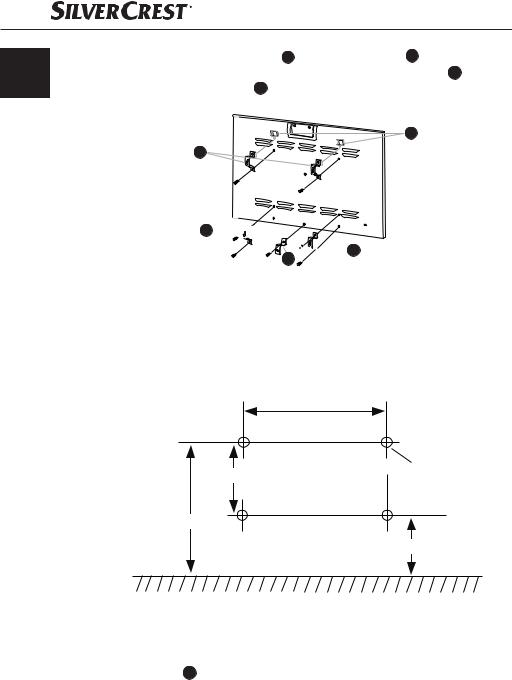
|
Assembly |
♦ |
Slide the upper wall brackets B into the holding fixtures C on the device's |
GB |
rear panel and firmly screw these, together with the angle bracket D and |
|
the lower wall brackets B , to the rear panel of the device. For this purpose |
|
use the 7 screws M4 x 13 mm (see diagram Wall bracket assembly). |
|
C |
|
B |
B 


 B
B
D
Diagram Wall bracket assembly
♦Mark two drill holes at a height of 600-650 mm and at a distance of 330 mm.
♦Mark two more drill holes at a height of 250-300 mm and at a distance of 330 mm. Make sure that the distance between the upper and lower drill holes is 350 mm (see diagram Drill scheme).
♦Now with an electric drill and an 8 mm drill bit drill four holes to a depth of, at least, 40 mm.
330 mm
ø 8 mm, 40 mm
350 mm
600 mm - 650 mm
250 mm - 300 mm
Diagram Drilling scheme
♦Insert the rawlplugs into the holes and screw in the M4 x 42 screws. Allow the screw heads to stick out slightly.
♦Now hang the device on the screws and mark the drill hole for the angle bracket D .
10 |
SWW 1500 A1 |
Assembly/Handling and operation
♦ Remove the device from the wall again. With an electric drill and an 8 mm
drill bit drill the hole to a depth of, at least, 40 mm, subsequently insert the GB rawlplug into the hole.
♦Hang the device on the wall and tighten the screw with the angle bracket D (see diagram Tightening the angle bracket).
 +
+
OW R
D
Diagram Tightening the angle bracket
♦ Insert the power plug into a mains wall socket.
Handling and operation
NOTICE
►All functions can be switched both with the buttons on the device and with the remote control.
In this section you receive important information for the handling and operation of the device.
Switching the device on and o
With the main switch POWER 6 the device is completely disconnected from the mains power.
♦Firstly switch the main switch POWER 6 on and/or lastly o when you are no longer operating the device.
Heating operation
♦ Activate the main switch POWER |
6 to switch the device on. In the display |
||||||
appears briefly and subsequently the current device temperature in the |
|||||||
area of the integrated temperature sensor. The device is now in standby |
|||||||
mode. In the display |
the symbol for the frost protection function |
|
|
|
blinks. |
||
|
|
|
|||||
|
|||||||
♦ Press the button POWER/MODE |
3 and/or 12. The device switches on |
||||||
with the low heat output (LOW). In the display |
appears . |
||||||
♦ Press the button POWER/MODE |
3 and/or 12 again to set the high heat |
||||||
output (HIGH). In the display |
appears . |
|
|
|
|
|
|
SWW 1500 A1 |
11 |
|
|
|
Handling and operation |
|
|
|
Setting the nominal temperature |
|
GB |
|
|
|
|
♦ Press the button POWER/MODE 3 and/or 12 repeatedly until, in the dis- |
|
|
|
|
play , the nominal temperature and the indicator LOW blinks for 5 seconds. |
|
|
|
|
♦Whilst the nominal temperature is blinking in the display  press one of the buttons +/- 4 and/or 13 to set the desired nominal temperature from 15°C to 27°C. Each press of the button +/- 4 and/or 13 increases or
reduces the nominal temperature by 1°C. Wait approx. 5 seconds until the nominal temperature is continuously shown in the display  . The setting is now saved and the heating element 9 switches on.
♦Press the button POWER/MODE 3 and/or 12 again if you want to set the high heat output (HIGH). In the display  the nominal temperature as well as the indicator HIGH blink for 5 seconds.
NOTICE
►As soon as the temperature at the temperature sensor integrated into the
device has reached the set nominal temperature the heating element 9 switches o and in the display  the indicator HIGH and/or LOW blinks.
►As soon as the temperature falls below the nominal temperature the heating element 9 switches on again and in the display  the indicator HIGH and/or LOW lights up continuously.
Programming the switch o time
♦Beforehand, select the desired heating mode (HIGH or LOW) and, if desired, the nominal temperature (see Chapter “Heating operation” and “Setting the nominal temperature”).
♦Press the button AUTO OFF 5 and/or 14. In the display  appears the indicator for automatic switch o AUTO OFF
  and the preset time blinks for 5 seconds.
♦Whilst the preset time is blinking in the display  press one of the buttons +/- 4 and/or 13 to set the desired switch o time between 1 hour and
24 hours. As soon as the set heating mode (HIGH or LOW) or the set target temperature is again indicated in the display  , the setting has been accepted and the appliance switches itself o with the lapse of the time period.
♦Press the button AUTO OFF 5 and/or 14 again if you want to deactivate the switch o time. In the display  the indicator AUTO OFF
  goes out.
Programming the switch on time
♦Activate the main switch POWER 6 to switch the device on and to shift into standby operation.
♦Press the button AUTO ON 2 and/or 11. In the display  appears the indicator for automatic switch on AUTO ON
  and the preset time blinks for 5 seconds.
12 |
SWW 1500 A1 |
Handling and operation
♦ Whilst the preset time is blinking in the display |
press one of the buttons |
|
+/- 4 and/or 13 to set the desired switch on time between 1 hour and 24 |
GB |
|
hours. As soon as the switch on time lights up continuously in the display  the setting is adopted and the device switches on, after the time has expired, to the high heating output (HIGH).
♦Press the button AUTO ON 2 and/or 11 again if you want to deactivate the switch on time. In the display  the indicator AUTO ON
  goes out.
Overheating protection
With excessive temperature rise the device automatically switches o and in the display  appears
  .
.
Should this occur...
♦Switch the device o at the main switch POWER 6 and pull the mains power plug from the wall socket. Allow the device to cool down for a few minutes
♦After the cause of the overheating has been removed, i.e. a covered heating element, the device can be switched on again.
Frost protection function
The device is equipped with a frost protection function which automatically switches to the high heat output (HIGH) as soon as the room temperature falls below 7°C. When the room temperature has reached 10°C the appliance automatically switches back to standby mode.
♦Activate the main switch POWER 6 to switch the device on and to shift
into standby operation. In the display  the symbol for the frost protection function

 blinks.
The device now switches on if the room temperature drops below 7°C.
Topple over protection
The device is equipped with topple over protection which automatically switches the heating element 9 o if the device topples over. In addition a warning tone sounds for 1 minute.
SWW 1500 A1 |
13 |
Cleaning/Storage/Disposal
Cleaning
GB
 WARNING
Observe the following safety information to avoid danger and property damage: ► Only clean the device when it is switched o and cold.
IMPORTANT
Possible damage to the device.
Penetrating moisture can lead to the device becoming damaged.
►Make sure when you are cleaning the device that no moisture gets inside in order to avoid irreparable damage to it.
■Clean the housing exclusively with a soft damp cloth and a mild dishwashing liquid.
■Remove dust deposits on the protective screen with a vacuum cleaner.
Storage
■Pull out the mains power plug if you do not intend to use the device for an extended period of time.
■Store the device in a dry environment.
Disposal
Disposal of the device
Do not dispose of this device in your normal domestic waste. This product is subject to the European directive 2002/96/EC-WEEE (Waste Electrical and Electronic Equipment).
Dispose of the device through an approved disposal centre or at your community waste facility. Observe the currently applicable regulations. In case of doubt, please contact your waste disposal centre.
Disposing of the batteries
Do not dispose of the batteries with household waste. Every consumer is legally obliged to dispose of batteries at a collection site in his community/city district or at a retail store. This obligation is intended to ensure that batteries are disposed of in an environmentally safe fashion. Batteries should only be returned in a fully discharged condition.
14 |
SWW 1500 A1 |
Troubleshooting
Troubleshooting
GB
In this section you will receive important information for malfunction localization and remedies.
 WARNING
Observe the following safety information to avoid danger and property damage:
►Repairs to electronic devices may only be carried out by specialists who have been trained by the manufacturer. Considerable danger to the consumer and damage to the device can occur as a result of incorrect repairs.
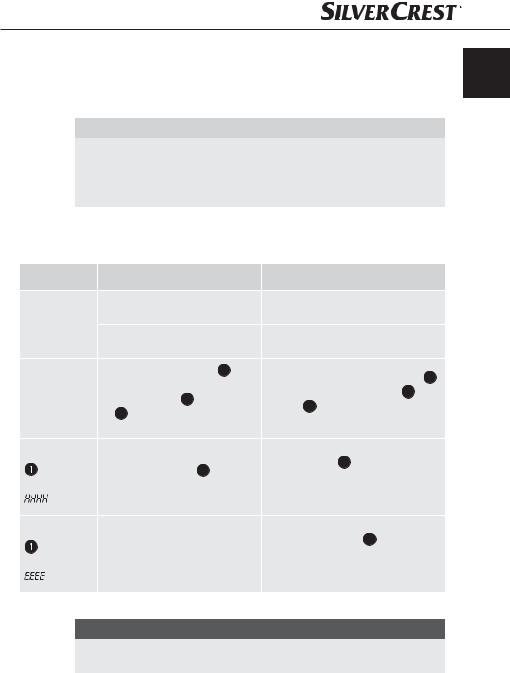
Malfunction causes and remedies
The following table will help with localizing and remedying minor malfunctions:
Defect |
Possible cause |
|
Solution |
|
|
The mains plug is not inserted. |
Insert the plug into the mains power |
||
The device will |
socket. |
|||
|
|
|||
not switch on |
The mains power socket is not |
Check the house fuses |
||
|
providing power |
|
||
|
|
|
||
The device is |
The main switch POWER 6 is |
Switch on the main switch POWER 6 . |
||
not switched on. |
|
|||
|
Activate the POWER/MODE 3 |
|||
not providing |
POWER/MODE 3 |
button and/ |
||
and/or 12 button. |
||||
heat. |
or 12 has not been activated. |
|||
Get in touch with customer service. |
||||
|
The heating element is defective. |
|||
|
|
|||
In the display |
|
|
Switch o the device at the main |
|
|
|
switch POWER 6 and pull out the |
||
appears |
The heating element |
9 is exces- |
||
mains plug. |
||||
the indicator |
sively overheated |
|
||
|
Allow the device to cool for a few |
|||
|
|
|
||
|
|
|
minutes. |
|
In the display |
|
|
Switch the device o and on at the |
|
|
|
main switch POWER 6 . |
||
appears |
Malfunction of the integrated |
|||
If the indicator continues to appear |
||||
the indicator |
temperature sensor |
|
||
|
get in touch with the customer service |
|||
|
|
|
||
|
|
|
department. |
|
NOTICE
►If you cannot solve the problem with the aforementioned methods please contact customer service.
SWW 1500 A1 |
15 |
|
|
|
|
|
|
Appendix |
|
|
|
|
Appendix |
|
|
|
|
|
GB |
|
|
|
|
||
|
|
|
|
|
|
|
|
|
|
|
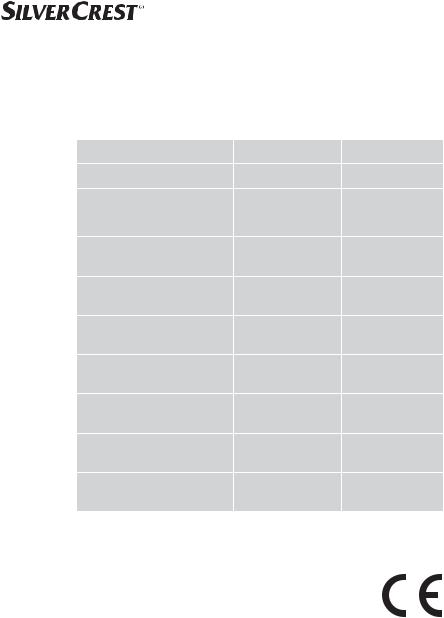
Technical data |
|
|
|
|
|
|
|
|
|
|
||
|
|
|
|
|
|
|
|
|
|
|
|
General |
|
|
|
|
|
|
|
|
|
|
|
|
|
|
|
Input voltage |
220 - 240 |
V ~ |
|
|
|
|
|
Mains voltage frequency |
50 |
Hz |
|
|
|
|
|
Power consumption |
|
|
|
|
|
|
|
Heat output LOW |
1000 |
W |
|
|
|
|
|
Heat output HIGH |
1500 |
W |
|
|
|
|
|
Thermostat setting range |
15 - 27 |
°C |
|
|
|
|
|
Switch on time setting range |
1 - 24 |
h |
|
|
|
|
|
Switch o time setting range |
1 - 24 |
h |
|
|
|
|
|
Environmental temperature |
+5 to +45 |
°C |
|
|
|
|
|
Humidity (no condensation) |
5 to 90 |
% |
|
|
|
|
|
Dimensions incl. pedestal |
approx. 75 x 56 x 22 |
cm |
|
|
|
|
|
(W x H x D) |
|||
|
|
|
|
|
|
|
|
|
|
|
|
Weight |
approx. 6 |
kg |
|
Information regarding the EG conformity declaration
This device conforms with regard to compliance with the basic requirements and other relevant provisions of the low voltage directive 2006/95/EC and the electromagnetic compatibility directive 2004/108/EC.
The complete original declaration of conformity can be obtained from the importer.
16 |
SWW 1500 A1 |
Appendix
Warranty
The warranty for this appliance is for 3 years from the date of purchase. The |
GB |
appliance has been manufactured with care and meticulously examined before |
|
delivery. |
|
Please retain your receipt as proof of purchase. In the case of a warranty claim, |
|
please make contact by telephone with our Customer Service Department. Only |
|
in this way can a post-free despatch for your goods be assured. |
|
NOTICE
►The warranty covers only claims for material and manufacturing defects, but not for transport damage, wearing parts or for damage to fragile components, e.g. buttons or batteries.
This product is for domestic use only and is not intended for commercial use. The warranty is void in the case of abusive and improper handling, use of force and internal tampering not carried out by our authorised service branch.
Your statutory rights are not restricted in any way by this warranty. The warranty period is not extended by repairs made under the warranty. This applies also to replaced and repaired parts.
Damages and defects extant at the time of purchase must be reported immediately after unpacking, resp. no later than two days after the date of purchase.
Repairs made after the lapse of the warranty period are subject to charge.
Service
 Service Great Britain
Tel.: 0871 5000 720 (£ 0.10/Min.)
E-Mail: kompernass@lidl.co.uk
IAN 66900
 Service Ireland
Tel.: 1890 930 034 (0,08 EUR/Min., (peak))
(0,06 EUR/Min., (o peak)) E-Mail: kompernass@lidl.ie
IAN 66900
Importer
KOMPERNASS GMBH
BURGSTRASSE 21
44867 BOCHUM, GERMANY
www.kompernass.com
SWW 1500 A1 |
17 |
Spis treści
Wprowadzenie . . . . . . . . . . . . . . . . . . . . . . . . . . . . . . . . . . . . . . . . . . . . . . . 20
Informacje o niniejszej instrukcji obsługi . . . . . . . . . . . . . . . . . . . . . . . . . . . . . . . . . . . . . . 20
Prawo autorskie . . . . . . . . . . . . . . . . . . . . . . . . . . . . . . . . . . . . . . . . . . . . . . . . . . . . . . . . . 20 Ograniczenie od odpowiedzialności . . . . . . . . . . . . . . . . . . . . . . . . . . . . . . . . . . . . . . . . 20 PL
Wskazówki ostrzegawcze . . . . . . . . . . . . . . . . . . . . . . . . . . . . . . . . . . . . . . . . . . . . . . . . . 21 Użycie zgodne z przeznaczeniem . . . . . . . . . . . . . . . . . . . . . . . . . . . . . . . . . . . . . . . . . . 22
Bezpieczeństwo . . . . . . . . . . . . . . . . . . . . . . . . . . . . . . . . . . . . . . . . . . . . . . 22
Niebezpieczeństwo porażenia prądem elektrycznym . . . . . . . . . . . . . . . . . . . . . . . . . . . 22 Podstawowe wskazówki bezpieczeństwa . . . . . . . . . . . . . . . . . . . . . . . . . . . . . . . . . . . . . 23
Uruchomienie . . . . . . . . . . . . . . . . . . . . . . . . . . . . . . . . . . . . . . . . . . . . . . . . 24
Zakres dostawy i przegląd po rozpakowaniu . . . . . . . . . . . . . . . . . . . . . . . . . . . . . . . . . . 24 Utylizacja opakowania . . . . . . . . . . . . . . . . . . . . . . . . . . . . . . . . . . . . . . . . . . . . . . . . . . . 24 Wybór odpowiedniego miejsca ustawienia . . . . . . . . . . . . . . . . . . . . . . . . . . . . . . . . . . . 25 Przed pierwszym użyciem . . . . . . . . . . . . . . . . . . . . . . . . . . . . . . . . . . . . . . . . . . . . . . . . . 25 Przyłącze elektryczne . . . . . . . . . . . . . . . . . . . . . . . . . . . . . . . . . . . . . . . . . . . . . . . . . . . . 26 Wkładanie baterii do pilota zdalnego sterowania . . . . . . . . . . . . . . . . . . . . . . . . . . . . . . 26
Elementy obsługowe . . . . . . . . . . . . . . . . . . . . . . . . . . . . . . . . . . . . . . . . . . 26
Montaż. . . . . . . . . . . . . . . . . . . . . . . . . . . . . . . . . . . . . . . . . . . . . . . . . . . . . . 27
Montaż stojący . . . . . . . . . . . . . . . . . . . . . . . . . . . . . . . . . . . . . . . . . . . . . . . . . . . . . . . . . 27 Montaż na ścianie . . . . . . . . . . . . . . . . . . . . . . . . . . . . . . . . . . . . . . . . . . . . . . . . . . . . . . . 27
Obsługa i użytkowanie . . . . . . . . . . . . . . . . . . . . . . . . . . . . . . . . . . . . . . . . 29
Włączenie i wyłączenie urządzenia . . . . . . . . . . . . . . . . . . . . . . . . . . . . . . . . . . . . . . . . . 29 Ogrzewanie. . . . . . . . . . . . . . . . . . . . . . . . . . . . . . . . . . . . . . . . . . . . . . . . . . . . . . . . . . . . 29 Regulacja temperatury zadanej. . . . . . . . . . . . . . . . . . . . . . . . . . . . . . . . . . . . . . . . . . . . . 30 Programowanie czasu wyłączania . . . . . . . . . . . . . . . . . . . . . . . . . . . . . . . . . . . . . . . . . . 30 Programowanie czasu włączania . . . . . . . . . . . . . . . . . . . . . . . . . . . . . . . . . . . . . . . . . . . 30 Ochrona przed przegrzaniem. . . . . . . . . . . . . . . . . . . . . . . . . . . . . . . . . . . . . . . . . . . . . . 31 Funkcja ochrony przed mrozem. . . . . . . . . . . . . . . . . . . . . . . . . . . . . . . . . . . . . . . . . . . . . 31 Zabezpieczenie przed przewróceniem . . . . . . . . . . . . . . . . . . . . . . . . . . . . . . . . . . . . . . . 31
Czyszczenie . . . . . . . . . . . . . . . . . . . . . . . . . . . . . . . . . . . . . . . . . . . . . . . . . 32
Przechowywanie . . . . . . . . . . . . . . . . . . . . . . . . . . . . . . . . . . . . . . . . . . . . . 32
Utylizacja. . . . . . . . . . . . . . . . . . . . . . . . . . . . . . . . . . . . . . . . . . . . . . . . . . . . 32
Usuwanie usterek . . . . . . . . . . . . . . . . . . . . . . . . . . . . . . . . . . . . . . . . . . . . . 33
Przyczyny błędów i ich usuwanie . . . . . . . . . . . . . . . . . . . . . . . . . . . . . . . . . . . . . . . . . . . |
33 |
Załącznik . . . . . . . . . . . . . . . . . . . . . . . . . . . . . . . . . . . . . . . . . . . . . . . . . . . . 34
Dane techniczne . . . . . . . . . . . . . . . . . . . . . . . . . . . . . . . . . . . . . . . . . . . . . . . . . . . . . . . . 34 Wskazówki dotyczące deklaracji zgodności WE . . . . . . . . . . . . . . . . . . . . . . . . . . . . . . . 34 Gwarancja. . . . . . . . . . . . . . . . . . . . . . . . . . . . . . . . . . . . . . . . . . . . . . . . . . . . . . . . . . . . . 35 Serwis . . . . . . . . . . . . . . . . . . . . . . . . . . . . . . . . . . . . . . . . . . . . . . . . . . . . . . . . . . . . . . . . 35 Importer . . . . . . . . . . . . . . . . . . . . . . . . . . . . . . . . . . . . . . . . . . . . . . . . . . . . . . . . . . . . . . . 35
SWW 1500 A1 |
19 |

|
Wprowadzenie |
|
Wprowadzenie |
|
Informacje o niniejszej instrukcji obsługi |
|
|
PL |
Niniejsza instrukcja obsługi stanowi część grzejnika falowego SWW 1500 A1 |
|
(zwanego dalej urządzeniem) i przekazuje ważne wskazówki dotyczące użyt- |
|
kowania zgodnego z przeznaczeniem, bezpieczeństwa, podłączania, a także |
|
|
|
obsługi urządzenia. |
|
Instrukcję obsługi należy przechowywać stale w pobliżu urządzenia. Musi ją |
|
przeczytać, a także jej przestrzegać każdy, kto podejmuje się montażu, obsługi |
|
i usuwania usterek w urządzeniu. |
|
Zachowaj instrukcję obsługi i przekaż ją nowemu właścicielowi w wypadku |
|
odsprzedaży urządzenia. |
|
Prawo autorskie |
|
Niniejsza dokumentacja jest prawnie chroniona. |
|
Wszelkiego rodzaju rozpowszechnianie, wzgl. przedruk, także we fragmentach, |
|
jak również odtwarzanie ilustracji, także w zmienionej postaci, dozwolone |
|
wyłącznie za zgodą producenta. |
|
Ograniczenie od odpowiedzialności |
|
Wszystkie zawarte w niniejszej instrukcji obsługi informacje techniczne, dane |
|
i wskazówki montażu, podłączania i obsługi, są zgodne z ostatnim stanem |
|
przekazania do druku i uwzględniają nasze dotychczasowe doświadczenie |
|
i orientację według najnowszej wiedzy. |
|
Na podstawie zawartych tu informacji, ilustracji i opisów nie można wysuwać |
|
żadnych roszczeń. |
|
Producent nie ponosi żadnej odpowiedzialności za szkody, spowodowane nie- |
|
przestrzeganiem instrukcji, użytkowaniem urządzenia niezgodnie z przeznacze- |
|
niem, niefachowymi naprawami, niedozwolonymi przeróbkami ani używaniem |
|
niedozwolonych części zamiennych. |
20 |
SWW 1500 A1 |
Wprowadzenie
Wskazówki ostrzegawcze
W niniejszej instrukcji obsługi zastosowano następujące wskazówki ostrzegawcze:
NIEBEZPIECZEŃSTWO |
|
|
|
|
|
|
|
|
|
Wskazówka ostrzegawcza tego stopnia niebezpieczeństwa |
|
PL |
|
|
oznacza niebezpieczną sytuację. |
|
|
|
|
|
|
|
|
|
Doprowadzenie do tego rodzaju niebezpiecznej sytuacji grozi odniesieniem poważnych obrażeń.
►Instrukcje w niniejszej wskazówce ostrzegawczej stosuje się, by uniknąć śmierci lub poważnych obrażeń osób.
 OSTRZEŻENIE
Wskazówka ostrzegawcza tego stopnia zagrożenia oznacza możliwą do wystąpienia sytuację niebezpieczną.
W razie braku możliwości uniknięcia niebezpiecznej sytuacji, może to doprowadzić do odniesienia obrażeń.
►Instrukcje w niniejszej wskazówce ostrzegawczej stosuje się, by uniknąć odniesienia obrażeń osób.
UWAGA
Wskazówka ostrzegawcza tego stopnia zagrożenia oznacza możliwą szkodę materialną.
W razie braku możliwości uniknięcia niebezpiecznej sytuacji, może to doprowadzić do szkód materialnych.
►Instrukcje w niniejszej wskazówce ostrzegawczej stosuje się, by uniknąć szkód materialnych.
WSKAZÓWKA
►Wskazówka oznacza dodatkowe informacje, ułatwiające korzystanie z urządzenia.
SWW 1500 A1 |
21 |
|
|
Wprowadzenie/Bezpieczeństwo |
|
|
Użycie zgodne z przeznaczeniem |
||
|
|
Urządzenie jest przeznaczone wyłącznie do ogrzewania zamkniętych pomiesz- |
|
|
|
czeń i wyłącznie do prywatnego użytku. Urządzenie można stawiać na podłodze |
|
|
|
lub zawiesić na ścianie. Inne lub wykraczające poza powyższe użytkowanie, |
|
PL |
|
uznaje się za niezgodne z przeznaczeniem. |
|
|
|
OSTRZEŻENIE |
|
|
|||
|
|
Niebezpieczeństwo spowodowane użytkowaniem niezgodnie |
|
|
|
z przeznaczeniem! |
|
|
|
Użytkowanie urządzenia niezgodnie z jego przeznaczeniem i/lub inne wyko- |
|
|
|
rzystanie urządzenia może wiązać się z różnymi zagrożeniami. |
|
►Urządzenie należy użytkować wyłącznie zgodnie z jego przeznaczeniem.
►Należy przestrzegać opisanych w niniejszej instrukcji obsługi metod postępowania.
Wszelkie roszczenia z tytułu szkód wynikających z użytkowania niezgodnie z przeznaczeniem są wykluczone. Wszelkie ryzyko ponosi wyłącznie użytkownik.
Bezpieczeństwo
W tym rozdziale znajdziesz ważne wskazówki bezpieczeństwa związane z użytkowaniem urządzenia.
Niniejsze urządzenie jest zgodne z odpowiednimi przepisami bezpieczeństwa. Nieprawidłowe użycie może prowadzić do szkód osobowych i materialnych.
Nie zasłaniać urządzenia!
Zasłonięcie pracującego urządzenia może spowodować jego przegrzanie, a następnie powstanie pożaru!
Niebezpieczeństwo porażenia prądem elektrycznym
 NIEBEZPIECZEŃSTWO
Niebezpieczeństwo odniesienia śmiertelnych obrażeń w wyniku porażenia prądem elektrycznym!
Niebezpieczeństwo odniesienia śmiertelnych obrażeń w wyniku dotknięcia przewodów elektrycznych pod napięciem!
W celu uniknięcia niebezpieczeństwa porażenia prądem elektrycznym należy przestrzegać następujących wskazówek bezpieczeństwa:
►Nie używaj urządzenia, w którym doszło do uszkodzenia przewodu zasilającego lub wtyczki.
►Zanim ponownie włączysz urządzenie, napraw przewód zasilający w autoryzowanym punkcie serwisowym.
►Nigdy nie otwieraj obudowy urządzenia. Dotknięcie przyłączy pod napięciem i próba zmiany konstrukcji elektrycznej lub mechanicznej grozi porażeniem prądem elektrycznym.
22 |
SWW 1500 A1 |

Bezpieczeństwo
Podstawowe wskazówki bezpieczeństwa
Mając na uwadze bezpieczne użytkowanie urządzenia, przestrzegaj następujących wskazówek bezpieczeństwa:
■ Przed przystąpieniem do użytkowania sprawdź, czy urządzenie nie jest nigdzie |
PL |
uszkodzone. Nie uruchamiaj uszkodzonego ani upuszczonego urządzenia. |
■W wypadku uszkodzenia kabla zasilającego, zleć jego naprawę producentowi lub autoryzowanemu serwisowi lub innej osobie o odpowiednich kwalifikacjach.
■Urządzenie nie jest przeznaczone do użytkowania przez osoby (w tym dzieci) o ograniczonej sprawności fizycznej, ruchowej bądź umysłowej lub nieposiadające doświadczenia i / lub wiedzy, chyba że będą one przebywały pod opieką osoby odpowiedzialnej za ich bezpieczeństwo lub uzyskają od niej wskazówki dotyczące właściwego używania urządzenia.
■Nie można pozwolić dzieciom na zabawę urządzeniem.
■Naprawy urządzenia zlecaj wyłącznie autoryzowanym serwisom lub obsłudze klienta. Nieprawidłowo wykonane naprawy mogą powodować poważne zagrożenie dla użytkownika. Do tego można stracić gwarancję.
■Naprawy urządzenia w okresie trwania gwarancji zlecaj wyłącznie autoryzowanym serwisom, ponieważ w przeciwnym razie może dojść do utraty gwarancji.
■Uszkodzone elementy wymieniaj zawsze na oryginalne części zamienne.
Tylko te części gwarantują odpowiednie bezpieczeństwo użytkowania urządzenia.
■Chroń urządzenie przed wilgocią i przedostaniem się do środka płynów.
■Przewód zasilający wyciągaj z gniazdka zawsze za wtyczkę, nigdy nie ciągnij za przewód.
■Nie używaj urządzenia w pobliżu otwartych źródeł ognia.
■Urządzenia nie stawiaj bezpośrednio pod lub nad gniazdkami zasilającymi.
■W razie pojawienia się usterek i w czasie burzy wyjmij wtyczkę z gniazdka zasilającego.
■Urządzenia nie używaj w pobliżu wanny, prysznica ani basenu.
■Urządzenie należy ustawić w taki sposób, by przełączniki i inne regulatory nie znajdowały się w zasięgu osoby znajdującej się w wannie lub pod prysznicem.
■Zwracaj uwagę na to, by na urządzenie nie tryskała, ani nie kapała woda, a także nie stawiaj na urządzeniu żadnych przedmiotów wypełnionych wodą, np. wazonów lub otwartych napojów.
SWW 1500 A1 |
23 |

|
Uruchomienie |
|
Uruchomienie |
|
Zakres dostawy i przegląd po rozpakowaniu |
|
|
PL |
Urządzenie jest wyposażone standardowo w następujące elementy: |
|
Grzejnik falowy |
|
Pilot zdalnego sterowania |
|
2 baterie typu AAA/Micro |
|
2 podstawki ze śrubami mocującymi |
|
4 uchwyty naścienne (U-kształtne) |
|
1 kątownik mocujący (Z-kształtny) |
|
5 kołków S8 |
|
5 wkrętów M4 x 42 mm |
|
7 wkrętów M4 x 13 mm |
|
Niniejsza instrukcja obsługi |
WSKAZÓWKA
►Po rozpakowaniu nowego urządzenia sprawdź, czy w środku są wszystkie części.
►W przypadku stwierdzenia niekompletnej zawartości opakowania lub uszkodzeń spowodowanych nieprawidłowym opakowaniem lub transportem, skontaktuj się z infolinią obsługi klienta (patrz Serwis).
Utylizacja opakowania
Opakowanie chroni urządzenie przed uszkodzeniami podczas transportu.
W trosce o ochronę środowiska, wszystkie zastosowane elementy opakowania nadają się do ponownego przetworzenia.
Zwracanie opakowania do obiegu materiałów oszczędza surowce naturalne i zmniejsza zanieczyszczenie odpadami. Zbędne materiały opakowania utylizuj zgodnie z obowiązującymi przepisami.
WSKAZÓWKA
►W miarę możliwości zachowaj oryginalne opakowanie na czas trwania gwarancji, by w razie odsyłania urządzenia móc je prawidłowo zapakować.
24 |
SWW 1500 A1 |

Uruchomienie
Wybór odpowiedniego miejsca ustawienia
Warunkiem bezpiecznej i bezbłędnej pracy urządzenia jest wybór odpowiedniego miejsca ustawienia:
■ Urządzenie można włączać wyłącznie po jego uprzednim ustawieniu w pionowym |
PL |
|
położeniu i po całkowitym skompletowaniu. |
||
|
■W wypadku użycia podstawek, urządzenie należy ustawić na twardej, płaskiej i poziomej podłodze.
■W wypadku zawieszania na ścianie, urządzenie należy przymocować na stałe do pionowej ściany.
■Należy zachować wymagane minimalne odstępy od obudowy, 100 mm po bokach, 300 mm od góry, 150 mm od dołu (przy montażu na ścianie) i 500 mm od przodu.
■Urządzenia nie stawiaj, ani nie zawieszaj w gorącym, mokrym lub bardzo wilgotnym pomieszczeniu ani w pobliżu łatwopalnych materiałów.
■Gniazdko zasilające musi być łatwo dostępne tak, by w sytuacji awaryjnej można było szybko wyciągnąć przewód zasilający.
■Zakres temperatury otoczenia: od +5 do +45 °C
■Wilgotność powietrza (bez skraplania): 5–90 %
 NIEBEZPIECZEŃSTWO
Niebezpieczeństwo wybuchu pożaru po kontakcie z materiałami!
Kontakt grzałki w łatwopalnymi materiałami może spowodować wybuch pożaru!
►Urządzenia nie stawiaj ani nie wieszaj w pobliżu zasłon i innych łatwopalnych materiałów.
►Unikaj dotykania urządzeniem łatwopalnych materiałów (np. tkanin).
►Nie zasłaniaj urządzenia.
Przed pierwszym użyciem
■Zdejmij z urządzenia wszystkie materiały opakowania i wszystkie zabezpieczenia transportowe
WSKAZÓWKA
►Przy pierwszym użyciu może przez chwile być wyczuwalny zapach spalenizny. Jest to objaw normalny i nie świadczy o żadnej usterce.
SWW 1500 A1 |
25 |


 Uruchomienie/Elementy obsługowe
|
|
|
Przyłącze elektryczne |
|
|
|
|
|
W celu zapewnienia bezpiecznej i bezusterkowej pracy urządzenia, przy podłą- |
|
|
|
|
czaniu go do zasilania elektrycznego przestrzegaj następujących wskazówek: |
|
|
|
|
|
|
PL |
|
|
UWAGA |
|
|
|
► Przed podłączeniem urządzenia sprawdź na tabliczce znamionowej, czy |
|
|
|
|
|
|
|
|
|
|
znajdujące się tam dane (napięcie i częstotliwość) zgadzają się z danymi |
|
|
|
|
technicznymi sieci elektrycznej. Dane te muszą być zgodne, by nie doszło |
|
|
|
|
do żadnych uszkodzeń urządzenia. |
|
|
|
|
► Przewód zasilający nie może być uszkodzony ani też nie może być ułożony |
|
|
|
|
nad gorącymi powierzchniami i/ani ostrymi krawędziami. |
|
|
|
|
► Przewód zasilający nie może być naprężony ani zagięty. |
|
|
|
|
|
Wkładanie baterii do pilota zdalnego sterowania
♦Otwórz komorę na baterie z tyłu pilota zdalnego sterowania.
♦Włóż dwie baterie typu AAA/Micro do komory. Uważaj przy tym na poprawne przyłączenie biegunów.
♦Zamknij komorę na baterie.
Elementy obsługowe
Urządzenie
wyświetlacz
2przycisk AUTO ON
3przycisk POWER/MODE
4przyciski +/-
5przycisk AUTO OFF
6wyłącznik główny POWER
7przewód zasilający
8podstawki
9grzałka
10 uchwyt
Pilot zdalnego sterowania
11przycisk AUTO ON
12przycisk POWER/MODE
13przyciski +/-
14przycisk AUTO OFF
15komora na baterie
26 |
SWW 1500 A1 |
Montaż
Montaż
UWAGA |
|
► W celu uniknięcia uszkodzeń, urządzenie na czas montażu połóż na |
PL |
miękkim podłożu, np. na dywanie. |
Montaż stojący
♦Złóż uchwyt 10 do tyłu i połóż urządzenie dołem skierowanym do góry na miękkim podłożu.
♦Przykręć podstawki 8 dwoma wkrętami A do urządzenia (zobacz ilustracja Montaż podstawek).
A |
10 |
8 |
|
Ilustracja Montaż podstawek
Montaż na ścianie
 OSTRZEŻENIE
►Przy wykonywaniu otworów w ścianie upewnij się, że w pobliżu miejsc wyznaczonych na otwory nie biegną w ścianie przewody elektryczne ani żadne inne instalacje, np. rury instalacji wodnej.
►Dołączone kołki rozporowe nadają się wyłącznie do montażu w betonie lub kamieniu. Przed przystąpieniem do montażu sprawdź dokładnie, czy kołki rozporowe nadają się do danego rodzaju ściany. W razie wątpliwości zwróć się o pomoc do specjalisty.
WSKAZÓWKA
►Przy wyborze miejsca montażu zwróć uwagę na to, czy w zasięgu przewodu zasilającego znajduje się odpowiednie gniazdko zasilające.
SWW 1500 A1 |
27 |

Montaż
♦ Wsuń górne uchwyty ścienne B w mocowania C z tyłu urządzenia i przykręć je wraz z kątownikiem mocującym D i dolnymi uchwytami ściennymi B z tyłu urządzenia. Użyj do tego 7 wkrętów M4 x 13 mm (zobacz ilustracja Montaż uchwytów ściennych).
PL

 C
C
B
B 


 B
B
D
Ilustracja Montaż uchwytów ściennych
♦Na wysokości 600–650 mm i w rozstawie 330 mm zaznacz dwa punkty na otwory.
♦Na wysokości 250–300 mm i w rozstawie 330 mm zaznacz dwa następne punkty na otwory. Zwróć uwagę na to, by odstęp między górnymi a dolnymi otworami wynosił 350 mm (zobacz ilustracja Schemat otworów).
♦Następnie wiertarką i wiertłem o średnicy 8 mm wykonaj cztery otwory o głębokości co najmniej 40 mm.
330 mm
ø 8 mm, 40 mm
350 mm
600 mm - 650 mm
250 mm - 300 mm
Ilustracja Schemat otworów
♦Włóż kołki do otworów i wkręć wkręty M4 x 42. Łby wkrętów muszą nieco wystawać.
♦Zawieś urządzenie na wkrętach i zaznacz miejsce na otwór do przymocowania kątownika mocującego D .
28 |
SWW 1500 A1 |
 Loading...