


HiPath 4000
optiPoint WL1 professional optiPoint W1 professional
Operating Instructions
Operating instructions
Operating instructions
These operating instructions describe the optiPoint WL1 professional and optiPoint W1 professional mobile telephones and their functions on the HiPath 4000 Version 1.0 communication server.
All functions that can be performed via your telephone are described here. If some of the required functions are not available on your telephone, it may be due to one of the following:
•The function is not configured for you or your telephone - please contact System Support.
•Your communications platform does not feature this function - please contact System Support.
Important information
•Do not operate the telephone in a potentially explosive environment.
• Do not install the handset in the vicinity of electronic equipment to avoid mutual interference.
•Do not use the handset in wet rooms! Devices are not splash-proof.
•A transmitter signal is emitted by your handset. Please observe safety procedures for your area.
•Information for hearing aid users: Radio signals may interfere with hearing aids.
•If you give your handset to someone else, please include the operating instructions with it.
•The ringing tone and signal tones are played over the loudspeaker. Do not hold the telephone to your ear when it is ringing. Otherwise you may seriously impair your hearing.
Batteries |
• Only use permitted batteries. |
|
• Do not use conventional batteries. Failure to observe this advice can |
|
lead to danger. |
|
• Avoid contact with fire and water. |
|
• Only use the approved power supply unit to operate the charging |
|
shell. |
|
|
|
Please dispose of the battery, the handset, the charging shell and the |
|
plug-in power supply unit in accordance with the environmental speci- |
|
fications. |
The information in this document contains only general descriptions and features that may not always apply as described in specific cases or that may change as a result of the further development of the products.
The required features are only binding if they are expressly agreed when the contract is signed.
2

Important information
Symbols
This device meets the requirements contained in the EU Directive 1999/5/ EG and thus carries the CE symbol.
This device has been manufactured in accordance with our certified environmental management system (ISO 14001). This process ensures that energy consumption and the use of primary raw materials are kept to a minimum, thus reducing waste production.
3

Contents
Contents
Basic facts of operation . . . . . . . . . . . . . . . . . . . . . . . 8
optiPoint WL1 professional . . . . . . . . . . . . . . . . . . . . . . . . . . . . . . . . . . . 8 optiPoint W1 professional . . . . . . . . . . . . . . . . . . . . . . . . . . . . . . . . . . . . 9 Line indicator . . . . . . . . . . . . . . . . . . . . . . . . . . . . . . . . . . . . . . . . . . . . . 10 Description of the keys . . . . . . . . . . . . . . . . . . . . . . . . . . . . . . . . . . . . . 11 Function keys. . . . . . . . . . . . . . . . . . . . . . . . . . . . . . . . . . . . . . . . . . 11 Soft keys . . . . . . . . . . . . . . . . . . . . . . . . . . . . . . . . . . . . . . . . . . . . . 12 Shortcut Menu. . . . . . . . . . . . . . . . . . . . . . . . . . . . . . . . . . . . . . . . . . . . 13 View Shortcut Menu features . . . . . . . . . . . . . . . . . . . . . . . . . . . . . 13 Use Shortcut Menu features . . . . . . . . . . . . . . . . . . . . . . . . . . . . . . 15 How to access a function of the communication system . . . . . . . . . . . 16
... through direct dialogue . . . . . . . . . . . . . . . . . . . . . . . . . . . . . . . . 16
... by using the Service menu . . . . . . . . . . . . . . . . . . . . . . . . . . . . . 16 Which functions can I use? . . . . . . . . . . . . . . . . . . . . . . . . . . . . . . . . . . 17 Basic and enhanced functions . . . . . . . . . . . . . . . . . . . . . . . . . . . . . 17 How can I use them most effectively? . . . . . . . . . . . . . . . . . . . . . . 17
Putting the handset into service . . . . . . . . . . . . . . . 18
Removing the protective cover . . . . . . . . . . . . . . . . . . . . . . . . . . . . . . . 18 Inserting the batteries . . . . . . . . . . . . . . . . . . . . . . . . . . . . . . . . . . . . . . 18 Charging and using the batteries. . . . . . . . . . . . . . . . . . . . . . . . . . . . . . 19 Battery operating and charging times . . . . . . . . . . . . . . . . . . . . . . . . . . 20 Activating/deactivating the handset. . . . . . . . . . . . . . . . . . . . . . . . . . . . 21
Setting the handset . . . . . . . . . . . . . . . . . . . . . . . . . . 22
Display active settings. . . . . . . . . . . . . . . . . . . . . . . . . . . . . . . . . . . . . . 22 Setting the handset display language . . . . . . . . . . . . . . . . . . . . . . . . . . 22 Setting the handset ring type . . . . . . . . . . . . . . . . . . . . . . . . . . . . . . . . 23 Setting the handset noise mode . . . . . . . . . . . . . . . . . . . . . . . . . . . . . . 23 View the current IP Address . . . . . . . . . . . . . . . . . . . . . . . . . . . . . . . . . 24 Setting the extension for the handset . . . . . . . . . . . . . . . . . . . . . . . . . . 24 Setting preferences for Push-to-Talk . . . . . . . . . . . . . . . . . . . . . . . . . . . 25
Enable/Disable Push-to-Talk. . . . . . . . . . . . . . . . . . . . . . . . . . . . . . . 25 Select a channel. . . . . . . . . . . . . . . . . . . . . . . . . . . . . . . . . . . . . . . . 25
4

Contents
Accepting and placing calls . . . . . . . . . . . . . . . . . . 26
Answering a call . . . . . . . . . . . . . . . . . . . . . . . . . . . . . . . . . . . . . . . . . . 26 Last number redial. . . . . . . . . . . . . . . . . . . . . . . . . . . . . . . . . . . . . . . . . 26 Activating and deactivating the microphone . . . . . . . . . . . . . . . . . . . . . 26 Using the camp-on function . . . . . . . . . . . . . . . . . . . . . . . . . . . . . . . . . 27 Activating and deactivating the camp-on function . . . . . . . . . . . . . . 27 Accepting a second call . . . . . . . . . . . . . . . . . . . . . . . . . . . . . . . . . . 27 Using the mailbox . . . . . . . . . . . . . . . . . . . . . . . . . . . . . . . . . . . . . . . . . 28 Viewing the mailbox. . . . . . . . . . . . . . . . . . . . . . . . . . . . . . . . . . . . . 28 Making a requested callback . . . . . . . . . . . . . . . . . . . . . . . . . . . . . . 28 Deleting mailbox entries . . . . . . . . . . . . . . . . . . . . . . . . . . . . . . . . . 29 Ending the mailbox viewing. . . . . . . . . . . . . . . . . . . . . . . . . . . . . . . 29 Using the HiPath Xpressions mailbox function (optional) . . . . . . . . . . . 29 Using the appointment reminder function. . . . . . . . . . . . . . . . . . . . . . . 30 Activating/deactivating do not disturb . . . . . . . . . . . . . . . . . . . . . . . . . . 31 Identifying an anonymous caller (MCID) . . . . . . . . . . . . . . . . . . . . . . . . 32
Placing a call . . . . . . . . . . . . . . . . . . . . . . . . . . . . . . . 33
Suppressing call ID display for called party . . . . . . . . . . . . . . . . . . . . . . 33 Entering commands via tone dialling (DTMF suffix dialling) . . . . . . . . . 34
Conducting calls – with multiple users. . . . . . . . . 35
Calling a second user (consultation) . . . . . . . . . . . . . . . . . . . . . . . . . . . 35 Toggling between two calls. . . . . . . . . . . . . . . . . . . . . . . . . . . . . . . . . . 35 Setting up a three-way conference . . . . . . . . . . . . . . . . . . . . . . . . . . . . 35 System-supported conference . . . . . . . . . . . . . . . . . . . . . . . . . . . . . . . 36 Setting up a conference. . . . . . . . . . . . . . . . . . . . . . . . . . . . . . . . . . 37 Expanding a conference. . . . . . . . . . . . . . . . . . . . . . . . . . . . . . . . . . 38 Transferring the conference. . . . . . . . . . . . . . . . . . . . . . . . . . . . . . . 39 During the conference . . . . . . . . . . . . . . . . . . . . . . . . . . . . . . . . . . . 40 Transferring a call . . . . . . . . . . . . . . . . . . . . . . . . . . . . . . . . . . . . . . . . . 41
System-wide call parking . . . . . . . . . . . . . . . . . . . . 42
Parking and resuming a call . . . . . . . . . . . . . . . . . . . . . . . . . . . . . . . . . . 42 Parking . . . . . . . . . . . . . . . . . . . . . . . . . . . . . . . . . . . . . . . . . . . . . . . 42 Resuming a parked call . . . . . . . . . . . . . . . . . . . . . . . . . . . . . . . . . . 42 Parking is not possible. . . . . . . . . . . . . . . . . . . . . . . . . . . . . . . . . . . . . . 43
Making calls with cost billing. . . . . . . . . . . . . . . . . 44
Making project calls. . . . . . . . . . . . . . . . . . . . . . . . . . . . . . . . . . . . . . . . 44 Call duration display. . . . . . . . . . . . . . . . . . . . . . . . . . . . . . . . . . . . . . . . 45
5

Contents
If you do not get through... . . . . . . . . . . . . . . . . . . . . 46
Using the callback function . . . . . . . . . . . . . . . . . . . . . . . . . . . . . . . . . . 46 Storing a callback request . . . . . . . . . . . . . . . . . . . . . . . . . . . . . . . . 46 Answering a callback request . . . . . . . . . . . . . . . . . . . . . . . . . . . . . 46 Viewing and deleting stored callback requests . . . . . . . . . . . . . . . . 47 Camp-on – making yourself noticed . . . . . . . . . . . . . . . . . . . . . . . . . . . 47 Override – intruding on a conversation . . . . . . . . . . . . . . . . . . . . . . . . . 48
Telephone settings . . . . . . . . . . . . . . . . . . . . . . . . . . 49
Locking the telephone line to prevent misuse . . . . . . . . . . . . . . . . . . . 49
Setting reminders. . . . . . . . . . . . . . . . . . . . . . . . . . . . 51 Forwarding calls . . . . . . . . . . . . . . . . . . . . . . . . . . . . 52
Using call forwarding . . . . . . . . . . . . . . . . . . . . . . . . . . . . . . . . . . . . . . . 52 Fixed forwarding . . . . . . . . . . . . . . . . . . . . . . . . . . . . . . . . . . . . . . . 53 Variable forwarding . . . . . . . . . . . . . . . . . . . . . . . . . . . . . . . . . . . . . 55 Activating and deactivating forwarding by means of a switch. . . . . 58 Automatic call forwarding . . . . . . . . . . . . . . . . . . . . . . . . . . . . . . . . 58 Call forwarding with codes . . . . . . . . . . . . . . . . . . . . . . . . . . . . . . . 59
Delayed call forwarding . . . . . . . . . . . . . . . . . . . . . . . . . . . . . . . . . . . . . 61 Forwarding calls for a different terminal . . . . . . . . . . . . . . . . . . . . . . . . 62
Storing a destination for another telephone/
activating call forwarding . . . . . . . . . . . . . . . . . . . . . . . . . . . . . . . . . 62 Checking/deactivating call forwarding for another telephone . . . . . 63 Changing call forwarding for a different terminal. . . . . . . . . . . . . . . 63
Using a different telephone in the
same way as your own . . . . . . . . . . . . . . . . . . . . . . . 64
Logging on to a different telephone . . . . . . . . . . . . . . . . . . . . . . . . . . . 64 Identifying yourself with a System-PIN and dialling. . . . . . . . . . . . . 64
Push-to-Talk (optiPoint W1 professional only) . . 66
Initiating a call . . . . . . . . . . . . . . . . . . . . . . . . . . . . . . . . . . . . . . . . . . . . 66 Subsequent transmissions . . . . . . . . . . . . . . . . . . . . . . . . . . . . . . . 67 Receiving transmissions . . . . . . . . . . . . . . . . . . . . . . . . . . . . . . . . . 67 Terminate incoming broadcasts. . . . . . . . . . . . . . . . . . . . . . . . . . . . 68 End transmissions . . . . . . . . . . . . . . . . . . . . . . . . . . . . . . . . . . . . . . . . . 68 PBX call during a PTT call . . . . . . . . . . . . . . . . . . . . . . . . . . . . . . . . . . . 68 Incoming a PBX call during a PTT call . . . . . . . . . . . . . . . . . . . . . . . 69 Making a PBX call during a PTT call . . . . . . . . . . . . . . . . . . . . . . . . . 69
6

Contents
Documentation. . . . . . . . . . . . . . . . . . . . . . . . . . . . . . 70
Tips . . . . . . . . . . . . . . . . . . . . . . . . . . . . . . . . . . . . . . . . 71
Cleaning the telephone . . . . . . . . . . . . . . . . . . . . . . . . . . . . . . . . . . . . . 71 Troubleshooting. . . . . . . . . . . . . . . . . . . . . . . . . . . . . . . . . . . . . . . . . . . 71 Reacting to error messages on the display . . . . . . . . . . . . . . . . . . . . . . 72 EU-guidelines. . . . . . . . . . . . . . . . . . . . . . . . . . . . . . . . . . . . . . . . . . . . . 80 Declaration of conformity . . . . . . . . . . . . . . . . . . . . . . . . . . . . . . . . . . . 80 Your contact in the event of problems . . . . . . . . . . . . . . . . . . . . . . . . . 80
Index . . . . . . . . . . . . . . . . . . . . . . . . . . . . . . . . . . . . . . 81
7
Basic facts of operation
Basic facts of operation
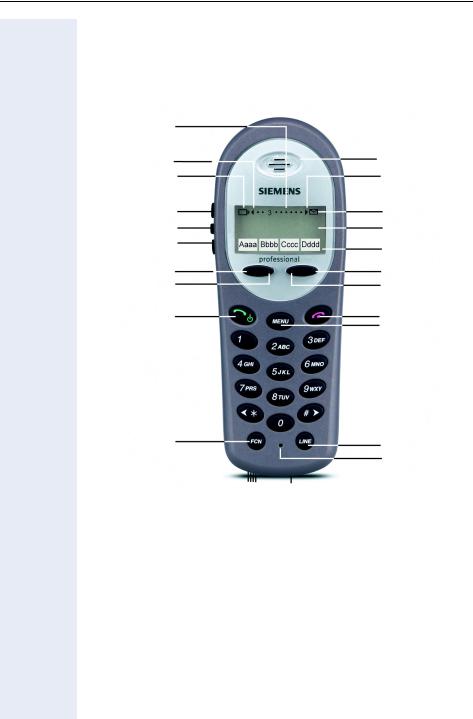
optiPoint WL1 professional
Line indicators
Left/Up arrow
Low battery icon
Up
Select
Down
Soft key A
Soft key B
Power On
Off-Hook/On-Hook
Function
Charging contacts |
Headset jack |
How to use the keys: Æ page 11
Earpiece
Right/Down arrow
Voicemail icon Shortcut Menu & Main display area Soft key Function display area
Soft key D
Soft key C
Power Off/On-Hook
Menu
Line
Microphone
8
Basic facts of operation
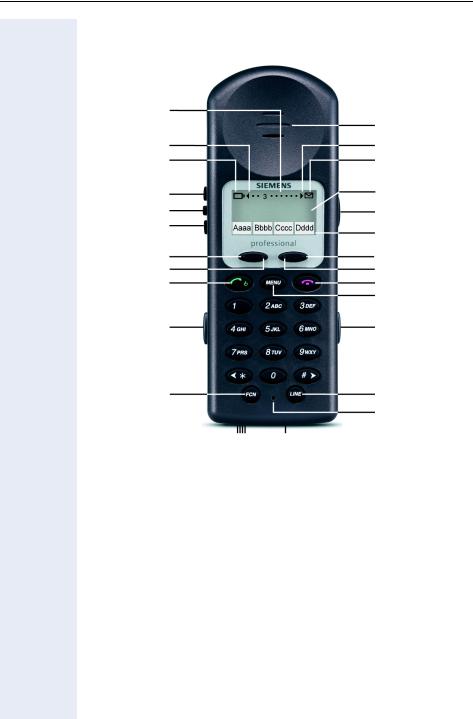
optiPoint W1 professional
Line indicators
Left/Up arrow
Low battery icon
Up
Select
Down
Soft key A
Soft key B
Power On
Off-Hook/
On-Hook
Battery release
Function
Charging contacts |
Headset jack |
How to use the keys: Æ page 11
Earpiece
Right/Down arrow
Voicemail icon
Shortcut Menu & Main display area Push-to-Talk radio control Soft key Function display area
Soft key D
Soft key C
Power Off/On-Hook
Menu
Battery release
Line
Microphone
9

Basic facts of operation
Step by Step
LINE |
# |
or LINE |
*
Line indicator
If the whole display content can not be shown at once, the line indicator will appear with an arrow to the right or the left.
Line indicator
Scroll horizontally (according the displayed arrow) to see the covered part of the display.
10
Basic facts of operation
Description of the keys
Function keys
The following function keys are available:
Key
a
t
MENU
FCN
LINE
Name |
Use |
|
Power On |
• |
Answer a call |
Off-Hook |
• |
Dial a phone number |
|
• Access to system functions |
|
Power Off |
• |
End a call |
On-Hook |
• |
Jump back in the Idle mode |
|
• Activate or deactivate the handset |
|
Soft key A |
• |
Scroll through functions |
Soft key B |
• |
Select functions |
|
|
|
Soft key C |
|
|
Soft key D |
|
|
Menu key |
• |
Open the Shortcut Menu Æ page 13 |
Function key |
• |
Use Shortcut Menu features Æ page 15 |
|
• Open the idle menu Menu Æ page 22 |
|
Line key |
• |
Scroll horizontal Æ page 10 |
Up |
• |
Scroll through items (in Shortcut/Function |
|
|
Menu) |
|
• |
Volumesetting (while operating) |
Select |
• |
Select item |
Down |
• |
Scroll through items (in Shortcut/Function |
|
|
Menu) |
|
• |
Volumesetting (while operating) |
|
|
|
Only optiPoint W1 professional

 PTT
PTT
Push-to-Talk key |
• Operate in a push-to-talk (PTT) group |
|
broadcast mode Æ page 66. |
|
|
11

Basic facts of operation
Soft keys
Soft keys are the toggle keys located directly beneath the display. The current function is shown on the display immediately above them.
Example:
optiPoint W1 professional |
optiPoint WL1 professional |
Depending on the settings which were made in the gateway you can use various functions. Ask your system administrator!
Example for soft key labelling:
Soft key |
Meaning when key is pressed |
Mute |
Activate "Mute" |
<-- |
Scroll previous to select HiPath menu items |
OK |
Confirm/Select |
--> |
Scroll forward to select HiPath menu items |
12
Basic facts of operation
Step by Step
a
MENU


 or
or 


Shortcut Menu
Your administrator can assign up to 16 features to a shortcut key. Each shortcut key may have only one feature assigned to it. There are 16 possible softkey combinations. The feature abbreviation is viewed in the softkey display, the feature description is viewed in the Shortcut Menu.
The softkey display area has four levels that may be stepped through by pressing FCN while off hook. This is different from the Shortcut Menu as it just displays the softkeys, not the menu.
Select items by pressing the corresponding softkey soft key or shortcut keys.
View Shortcut Menu features
Prerequisite: The phone is in idle state Æ page 21.
Press the off-hook key once (handset is in active offhook state).
Press the Menu key.
Scroll through the menu by pressing the Up and Down keys.
Select an item by pressing the Select key or the corresponding soft key, see Æ page 12.
As you scroll through the features, the feature abbreviation is highlighted in the soft key function display area.
Programmed features may have the number
1-9, *, 0, or # in the left column of the Shortcut Menu. This is the shortcut key that activates that feature.
No shortcut indicates that the feature does not have a shortcut and this is generally the case with primary level soft key functions.
13

Basic facts of operation
Step by Step
For fast access while operating, note the programmed Shortcut numbers and menu labels for the associated actions in the following table.
Level |
Soft |
Short |
Menu |
Action |
|
key |
cut |
Label |
|
|
|
|
|
|
0 |
A |
|
|
|
|
|
|
|
|
0 |
B |
|
|
|
|
|
|
|
|
0 |
C |
|
|
|
|
|
|
|
|
0 |
D |
|
|
|
|
|
|
|
|
1 |
A |
|
|
|
|
|
|
|
|
1 |
B |
|
|
|
|
|
|
|
|
1 |
C |
|
|
|
|
|
|
|
|
1 |
D |
|
|
|
|
|
|
|
|
2 |
A |
|
|
|
|
|
|
|
|
2 |
B |
|
|
|
|
|
|
|
|
2 |
C |
|
|
|
|
|
|
|
|
2 |
D |
|
|
|
|
|
|
|
|
3 |
A |
|
|
|
|
|
|
|
|
3 |
B |
|
|
|
|
|
|
|
|
3 |
C |
|
|
|
|
|
|
|
|
3 |
D |
|
|
|
|
|
|
|
|
14

Basic facts of operation
Step by Step
Use Shortcut Menu features
You can activate Shortcut Menu features while operating calls or system settings with the Shortcut number or with its softkey.
To use this function you have to know either the Shortcut Menu number or the Shortcut Menu abbreviation of the feature!
Example: You want to transfer a call; "Transfer" is programmed to shortcut key 2 and labelled with "TRAX".
p You are on a call.
FCN
2
ABC
If you know the Shortcut Menu number:
Press keys in sequence.
FCN
TRAX
p
t
If you know the soft key labelling:
Step through the levels until the right abbreviation is shown in the soft key display area.
Press the corresponding soft key.
Enter the phone number of the required user.
Press the on-hook key.
The person you were speaking with is now connected to the desired party.
15

Basic facts of operation
Step by Step
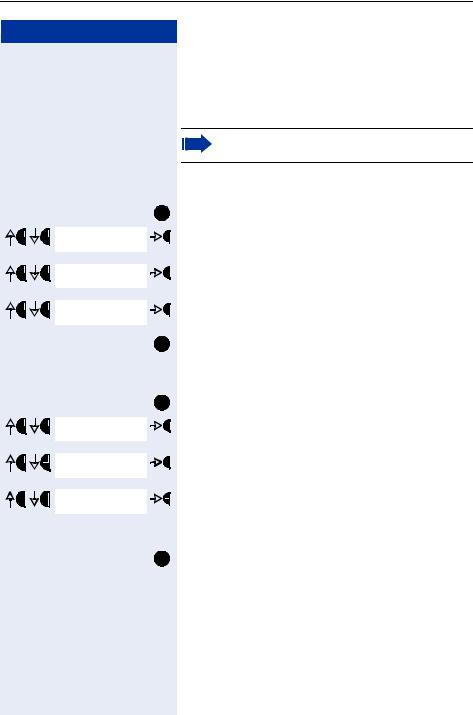
|
Callback |
OK |
|
|
or |
|
|
|
|
|
|
--> |
Dial again |
OK |
|
|
|
p
a |
a |
--> |
SERVICE |
|
|
|
OK |
|
|
|
|
|
|
8 |
TUV |
2 |
ABC |
||
|
|
|
|
||
a |
or |
a |
--> |
SERVICE |
OK |
|
|
|
|
|
|
--> |
More features |
OK |
|
|
|
|
|
|
--> |
Display |
OK |
|
|
|
How to access a function of the communication system
... through direct dialogue
Functions can be selected directly while making a call, depending on the situation.
 Detailed description of the soft keys Æ page 12.
You place a call, but the connection is busy:
Confirm with the soft key corresponding to "OK".
Select with the soft keys corresponding to "Previous" or "Next" and confirm with soft key corresponding to "OK".
Dial another phone number.
... by using the Service menu
Press the off-hook key twice.
Select with the soft keys corresponding to "Previous" or "Next" and confirm with the soft key corresponding to "OK".
Skip to the function "Suppress call ID for called party" with the service code. You will find service codes in the Brief Operating Instructions (Appendix).
Press the off-hook key twice.
Select with the soft key "Next" and confirm with the soft key "OK".
Select with the soft key "Next" and confirm with the soft key "OK".
Select with the soft key "Next" and confirm with the soft key "OK".
16

Basic facts of operation
Which functions can I use?
Basic and enhanced functions
You can use all the basic and enhanced functions of your communication platform that are offered via dialogue and in the menu "SERVICE" in the display.
How can I use them most effectively?
More often than not, a phone number that you have dialled is busy. In the course of a busy working day, you can easily forget to try again later. This is why you should take advantage of the Callback function Æ page 46.
17
Putting the handset into service
Putting the handset into service
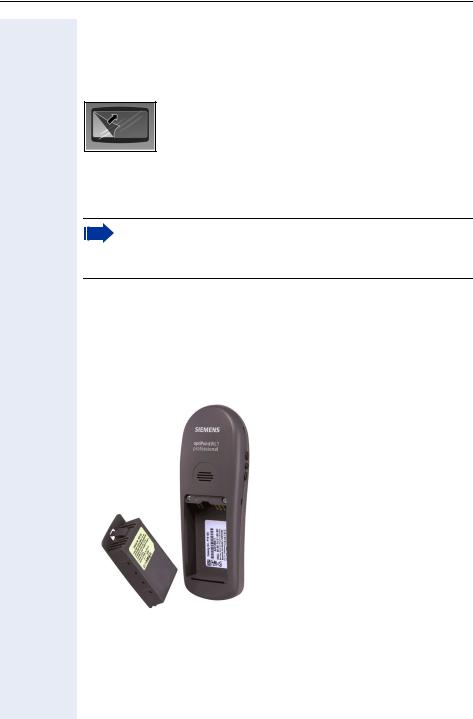
Removing the protective cover
Remove the protective cover from the display before putting the handset into service.
Inserting the batteries
•Please observe the safety notes (Æ page 2).
•Only use approved batteries.
•Open the battery compartment in a dust-free environment only.
•When you remove the batteries all settings will be retained.
optiPoint WL1 professional
To remove the Battery Pack, press down on the latch on the Battery Pack on the back of the Wireless Telephone. The Battery Pack releases outward. To replace it, slide the lip of the Battery Pack into the bottom of the cavity. Push the top of the Battery Pack until it snaps into place. You should not have to force it against the Wireless Telephone.
18
Putting the handset into service
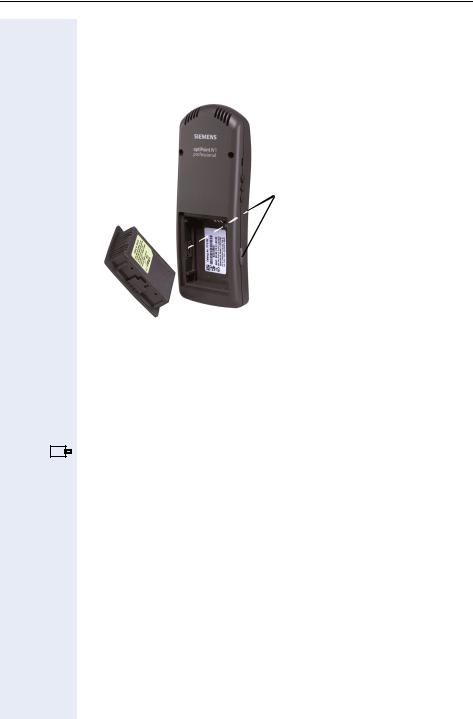
optiPoint W1 professional
To remove the Battery Pack press both battery release buttons. The Battery Pack releases outward. To replace it, slide the Battery Pack straight into the cavity.
Battery release buttons
Charging and using the batteries
The Wireless Telephone will need to have its Battery Pack recharged periodically. To charge the batteries, insert the handset into the charging shell.The Telephone will notify you when the charge on the Battery Pack is low by displaying the battery icon.
The battery icon displays whenever the Battery Pack charge is low.
During a call:
If you are in a call you will hear a soft beep through the earpiece every 6 seconds. The User has 15-30 minutes of battery life left.
Not in call:
Low Battery The message and a loud beep indicate that the handset cannot be used until the Battery Pack is charged.
19

Putting the handset into service
•Initial charging: Charge the batteries for at least 1.5 hours without a break, regardless of the charging status display. Without replacing it in the charging shell, use the handset until the "battery low" beep is heard. This action aligns the charge status display with the battery operating times.
•To attain full operating and charging times (see below): Without replacing it in the charging shell, use the handset until the "battery low" beep is heard.
•For future charging: you can replace your handset in the charging shell each time it has been used. Charging is electronically controlled, which ensures that the batteries are charged optimally and with care.
Battery operating and charging times
The operating times are only achieved after several charging and discharging cycles.
Stand-by mode (hours) Talk time (hours) Charging time (hours) |
||
80 h |
4 h |
approx. 1.5 |
20
Putting the handset into service
Step by Step
a t
t
or
a
a |
a |
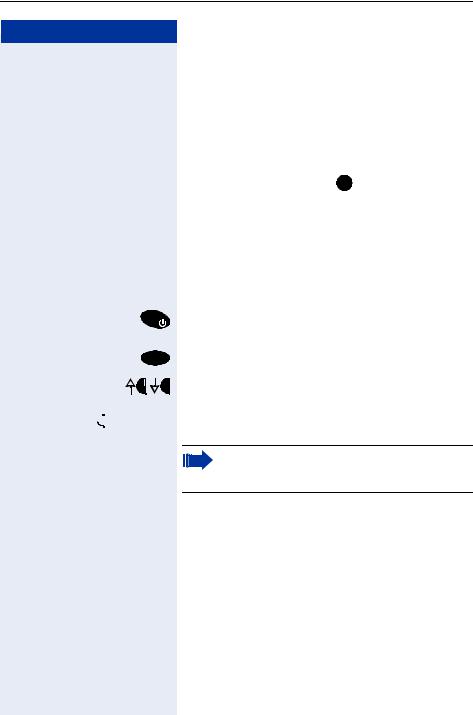
Activating/deactivating the handset
Activate by pressing the off-hook key. A confirmation beep is heard.
Deactivate by pressing and holding down the on-hook key while in idle state (confirmation beep).
Note:
•The handset can only be fully switched off when removed from the charging shell.
•When a handset that is ready for operation is placed in the charging shell it goes to idle status and shows the idle display.
Return to idle status from anywhere in the menu:
Press the on-hook key for approximately 1 second.
do not press any key: the display reverts to idle status automatically after 2 minutes.
Make and answer calls:
To start press the off-hook key once (active off-hook state).
Display settings in the Service menu:
To start press the off-hook key twice (active on-hook state).
21
Setting the handset
Step by Step
FCN
t
FCN
Sprache
or
Language
Deutsch |
* English |
FCN
Setting the handset
You can change this standard settings in the idle menu of the handset if you are not happy with them.
Display active settings
When the Wireless Telephone is in idle state (on but not in use), press and briefly hold the FCN key to display user options.
Check with your system administrator for specific features supported by your Wireless Telephone.
Scroll through the menu and select functions.
Exit menus.
 Active functions are indicated with an *.
Setting the handset display language
If your preferred language for display text is not set as the default, you can set this yourself.
Open the idle menu.
Confirm
if the user interface is in English:
Confirm.
Select and confirm the language you require (the current language is indicated with an *).
Go up one level and exit the menu.
22
Setting the handset
Step by Step
FCN
Ring Type
* Normal
FCN
FCN
Noise Mode
* High
FCN
Setting the handset ring type
Select the standard ring type for your handset. You can choose:
•Normal (for an audible ring)
•Vibrate (vibrates until answered)
•Vib/Norm (vibrates for 6 seconds, then rings)
Open the idle menu.
Select and confirm.
Select and confirm.
Go up one level and exit the menu.
Setting the handset noise mode
Select the standard noise mode for your handset. You can choose:
•Normal (for most office environments)
•High (for moderate background noise)
•Severe (for extremely noisy conditions)
Open the idle menu.
Select and confirm.
Select and confirm.
Go up one level and exit the menu.
23

Setting the handset
Step by Step
FCN
Current IP Addr.
Current IP Addr. 192.168.010.120
FCN
FCN
Extension
p
or
FCN
View the current IP Address
In IP systems, the IP address of the Wireless Telephone is displayed. This number may not be edited.
Open the idle menu.
Select and confirm.
The IP adress of the phone is displayed.
Go up one level and exit the menu.
Setting the extension for the handset
Set the extension number associated with your Wireless Telephone.
Open the idle menu.
Select and confirm.
Enter the new number.
Use the soft keys to save entry, delete characters or cancel editing Æ page 12.
Go up one level and exit the menu.
24
Setting the handset
Step by Step
FCN
Push-to-talk |
Channel |
Enable/Disable |
PTT Enabled |
* PTT Disabled |
FCN
FCN
Push-to-talk |
Channel |
Enable/Disable |
Current Chan: 1 |
New Chan (1-8)? |
p
FCN
Setting preferences for Push-to-Talk
These settings are used for the Push-to-Talk function Æ page 66.
This function is only available on optiPoint W1 professional.
Enable/Disable Push-to-Talk
Open the idle menu.
Select and confirm.
Select "Enable/Disable" and confirm.
Select and confirm.
Go up one level and exit the menu.
Select a channel
Open the idle menu.
Select and confirm.
Select "Channel" and confirm.
Select "New Chan (1-8)?" and confirm.
Enter a number for a channel.
Go up one level and exit the menu.
25
 Loading...