


 Loading...
HiPath 4000
Gigaset M1 professional in
HiPath Cordless Enterprise
Operating Instructions

Safety notes for the mobile telephone
Danger:
•Do not use the mobile telephone in potentially explosive atmospheres.
•A transmitter power is emitted by your mobile telephone, see page 57. Please observe safety procedures for your area.
Note:
•For people with hearing aids: radio signals may interfere with hearing aids.
•Please provide the operating instructions with the mobile telephone if giving it to another user.
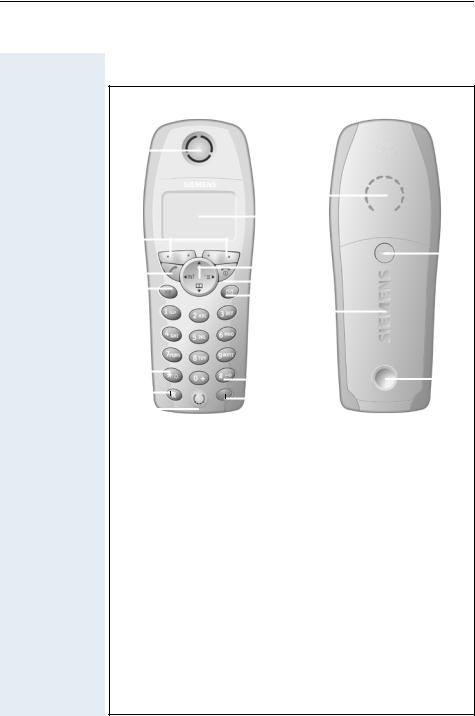
Overview of unit parts
1 |
|
|
|
|
|
|
|
|
|
|
|
2 |
|
14 |
|
|
|
|
|
|
|
|
|
|
|
|
|
|
|
|
|
|
|
|
|
||||
3 |
|
|
|
|
|
|
|
|
|
|
|
|
|
|
|
15 |
|||
|
|
|
|
|
|
|
|
|
|
|
|
|
|
|
|||||
|
|
|
|
|
|
|
|
|
|
|
|
|
|||||||
|
|
|
|
|
|
|
|
|
|
|
|||||||||
|
|
|
|
|
|
|
|
|
|
4 |
|
|
|
|
|
||||
|
|
|
|
|
|
|
|
|
|
|
|
|
|
|
|||||
5 |
|
|
|
|
|
|
|
|
|
|
|
|
|
||||||
|
|
|
|
|
|
|
|
|
|
|
|
||||||||
|
|
|
|
|
|
|
|
|
|
|
|
|
|||||||
|
|
|
|
|
|
|
|
|
|
|
|
||||||||
|
|
|
|
|
|
|
|
|
|
|
6 |
|
|
|
|
|
|
|
|
7 |
|
|
|
|
|
|
|
|
|
|
|
|
|
|
|
|
|
||
9 |
|
|
|
|
|
|
|
|
|
8 |
|
16 |
|
|
|
|
17 |
||
|
|
|
|
|
|
|
|
|
|
|
|
|
|
||||||
|
|
|
|
|
|
|
|
||||||||||||
|
|
|
|
|
|
|
|
|
|
|
10 |
|
|
|
|
|
|||
|
|
|
|
|
|
|
|
|
|
|
|
|
|
|
|
||||
|
|
|
|
|
|
|
|
|
|
|
|
|
|
|
|
|
|||
|
|
|
|
|
|
|
|
|
|
|
|
|
|
|
|
|
|||
11 |
|
|
|
|
|
|
|
|
|
||||||||||
|
|
|
|
|
|
|
|
|
|||||||||||
|
|
|
|
|
|
|
|
|
|
12 |
|
|
|
|
|
|
|
||
|
|
|
|
|
|
|
|
|
|
|
|
|
|
|
|
||||
|
|
|
|
|
|
|
|
|
|
|
|
|
|
|
|
|
|||
13 |
|
|
|
|
|
|
|
|
|
|
|
|
|||||||
|
|
|
|
|
|
|
|
|
|
|
|
|
|||||||
|
|
|
|
|
|
|
|
|
|
|
|
|
|
|
|
|
|
|
|
|
|
|
|
|
|
|
|
|
|
|
|
|
|
|
|
|
|
|
|
|
|
|
|
|
|
|
|
|
|
|
|
|
|
|
|
|
|
||
1 |
|
Receiver inset |
10 |
Hash key |
|||||||||||||||
2 |
|
Display |
11 |
NET/callback |
|||||||||||||||
|
|
|
|
|
|
|
|
|
|
|
|
|
|
key |
|||||
3 |
|
Display keys |
12 |
Direct call key |
|||||||||||||||
4 |
|
Control key |
13 |
Microphone |
|||||||||||||||
5 |
|
Talk key |
14 |
Ringer loudspeaker |
|||||||||||||||
6 |
|
On-hook and on/off key |
15 Screws for battery compart- |
||||||||||||||||
|
|
|
|
|
|
|
|
|
|
|
|
|
|
ment lid |
|||||
7 |
|
Speakerphone key |
16 |
Battery compartment lid |
|||||||||||||||
8 |
|
Missed calls list |
17 Slot for attachment clip |
||||||||||||||||
9 |
|
Star key |
|
|
|
|
|
|
|
||||||||||
I
Safety notes for using the battery
 Caution:
•Only used approved batteries, see page 10.
•Avoid contact with fire and water.
•Only use the approved C39280-Z4-C373 power supply unit in accordance with the environmental specifications.
Note:
Please dispose of the battery, the telephone, the charging shell and the plug-in power supply unit in accordance with the environmental specifications.
II

Quick reference guide
Performing a direct call:
Press the direct call key.
Activating or deactivating the mobile telephone: a Hold down the on/off key.
Activating or deactivating the keypad lock:
ª Hold down the hash key.
Activating or deactivating the ringer volume:
« Hold down the star key.
Starting a call:
c/u+ o Press the talk or speakerphone key and enter the phone number. or
o+ c/u Enter the phone number and press the talk or speakerphone key.
Opening the mobile telephone’s telephone directory:
D Press the control key.
Activating or deactivating speakerphone mode: u Press the speakerphone key.
Ending a call:
aor k • Press the on-hook key or
•Place the mobile telephone in the charging shell.
Answering a call:
c/uor k • Press the talk or speakerphone key or
•Remove the mobile telephone from the charging shell (only if "Auto Answer" is active, see page 35).
III

IV

Contents |
|
Overview of unit parts ............................................ |
I |
Quick reference guide ......................................... |
III |
Operating instructions ............................................ |
1 |
Useful information about the mobile telephone 1 |
|
Features ........................................................................ |
1 |
Environmental conditions.............................................. |
2 |
Radio range ................................................................... |
2 |
Displaying the radio range ........................................ |
2 |
Leaving the radio network........................................ |
2 |
Keys, function selection and display ................... |
3 |
Function keys................................................................ |
3 |
NET/Callback key .......................................................... |
4 |
Control key.................................................................... |
4 |
Display keys .................................................................. |
5 |
Operating status display ............................................... |
5 |
Function selection......................................................... |
8 |
Function selection with the on or message status... |
8 |
Selection in dial/ringing/call status............................ |
9 |
Putting the mobile telephone into service........ |
10 |
Removing the protective cover ................................... |
10 |
Inserting the battery.................................................... |
10 |
Charging and using the battery ................................... |
11 |
Operating and charging times ................................ |
12 |
Permitted batteries................................................. |
12 |
Fitting the attachment clip .......................................... |
13 |
Activating/deactivating the mobile telephone ............. |
13 |
Setting the language ................................................... |
14 |
Registering the mobile telephone at the system ........ |
15 |
Overview ................................................................ |
15 |
V

Preparing for registration ........................................ |
15 |
Registering at the system for the first time............ |
17 |
Registering at another system................................ |
17 |
Determining direct call numbers ................................. |
18 |
Activating/deactivating the keypad lock....................... |
18 |
Conducting calls .................................................... |
19 |
Internal/external dialling............................................... |
19 |
Dialling via the telephone directory or NET |
|
carrier list ..................................................................... |
21 |
Answering a call .......................................................... |
21 |
Speakerphone mode ................................................... |
22 |
Conducting direct calls ................................................ |
23 |
Muting the microphone ............................................... |
23 |
Number redial......................................................... |
24 |
Overview ..................................................................... |
24 |
Manual number redial.................................................. |
24 |
Automatic redial........................................................... |
24 |
Processing the redial list.............................................. |
25 |
Telephone directory and NET carrier list .......... |
26 |
Overview ..................................................................... |
27 |
Telephone directory functions ..................................... |
27 |
Sending and receiving entries ..................................... |
28 |
Entering an anniversary ............................................... |
28 |
Dialling with the telephone directory or NET |
|
carrier list ..................................................................... |
29 |
Settings .................................................................... |
30 |
Overview ..................................................................... |
30 |
Default state ................................................................ |
31 |
Setting the sound setting functions ............................ |
32 |
Menus..................................................................... |
32 |
Activating/deactivating the ringer............................ |
34 |
Activating/deactivating the warning tone................ |
34 |
Activating/deactivating the vibration alarm ............. |
35 |
Setting the auto answer function ................................ |
35 |
VI

Resetting the defaults................................................. |
35 |
Selecting a base.......................................................... |
36 |
Enhanced functions............................................... |
37 |
Telephone system functions....................................... |
37 |
Overview ................................................................ |
37 |
Using the service codes ......................................... |
38 |
Forwarding calls ..................................................... |
40 |
Variable call forwarding...................................... |
40 |
Fixed call forwarding.......................................... |
40 |
Call forwarding for other phone numbers.......... |
40 |
Using the mailbox................................................... |
41 |
Using the missed calls list...................................... |
41 |
Opening the digital telephone directory ................. |
42 |
Performing the display test .................................... |
42 |
Using the message waiting indication.................... |
42 |
Performing the code functions............................... |
43 |
Mobile telephone functions ........................................ |
44 |
Room monitor and walkie-talkie mode ................... |
44 |
Overview ........................................................... |
44 |
Using as a room monitor ................................... |
44 |
Operating in walkie-talkie mode ........................ |
45 |
Performing the time functions................................ |
47 |
Overview ........................................................... |
47 |
Functions ........................................................... |
48 |
Switching functions .............................................. |
49 |
Ringing status ............................................................. |
49 |
Overview ................................................................ |
49 |
Functions................................................................ |
49 |
Call status ................................................................... |
50 |
Overview ................................................................ |
50 |
Functions................................................................ |
51 |
Setting up an enquiry during a call..................... |
51 |
Toggle – switching between two users............. |
51 |
Adding callers to a conference .......................... |
51 |
Transferring a call............................................... |
52 |
Picking up a call ................................................. |
52 |
VII

Entering text............................................................ |
53 |
Character table ............................................................ |
53 |
Key utilisation .............................................................. |
54 |
Appendix.................................................................. |
55 |
Troubleshooting........................................................... |
55 |
Cleaning the mobile telephone.................................... |
56 |
Technical data.............................................................. |
57 |
HiPath Cordless Enterprise..................................... |
57 |
Mobile telephone.................................................... |
57 |
Accessories ................................................................. |
58 |
Declaration of conformity ............................................ |
59 |
List of abbreviations .................................................... |
60 |
Index......................................................................... |
61 |
VIII
Mobile telephone
HiPath Cordless
Enterprise
Operating instructions
These operating instructions describe your mobile telephone and its functions on your communications system.
All functions that can be performed via your mobile telephone are described here. If some of the required functions are not available on your mobile telephone, it may be due to one of the following:
•The function is not configured for you or your mobile telephone - please contact your system administrator.
•Your communications platform does not feature this function - please contact your Siemens contract partner to upgrade.
Useful information about the mobile telephone
Features
Your mobile telephone includes the following features:
•Mobile telephone registration and operation at up to four DECT telephone systems
•Automatic call acceptance on removal from the charging shell
•Speakerphone mode
•Number redial for the last five numbers
•Protection against inadvertent key activation
•Telephone directory for 200 entries
HiPath Cordless Enterprise is a cordless DECT telephone system and is comprised of the following components:
•Radio exchange for the communications system
•Bases (transmitter/receiver)
•Mobile telephones
•Charging shells
HiPath Cordless Enterprise has the following features:
•Internal and external calls in the entire HiPath Cordless Enterprise radio network
•Internal and external availability at one telephone number throughout the entire radio network (roaming)
•Automatic handover between bases
•Call forwarding to internal users
•Automatic callback for internal calls
•Consultation during a call
•Conference for up to eight users
1

Environmental conditions
For safety information, see the back cover. Permitted temperature range, see page 57.
Note:
Do not install the mobile telephone in the vicinity of electronic equipment to avoid mutual interference.
Radio range
Displaying the radio range
Connection The strength of the incoming signal is displayed by the "receive field quality strength" icon in on or message status:
| |
no receive field strength |
Ò |
low receive field strength |
Ñ |
50% receive field strength |
Ð |
100% receive field strength |
Range problems The radio range is different indoors and outdoors, see page 57.
Note:
Please consult your system administrator in the event of range problems.
Leaving the radio network
After leaving the radio network
The base name flashes on the display. The mobile telephone attempts repeatedly to synchronise with a base. The intervals between synchronisation attempts increase on account of the integrated power saving function.
Note:
In order to save the battery you can switch off your mobile telephone (this will reset the date and time, see page 40).
Re-registering Switch off the mobile telephone and switch it back on again.
2

Keys, function selection and display
Function keys
The following function keys are available:
Key |
Name |
Use |
|
|
|
|
|
a |
On-hook and |
• |
End a call |
on/off key |
• |
Cancel functions |
|
|
|
• Jump back to the previous menu |
|
|
|
• Switch the mobile telephone to |
|
|
|
|
off status; activate or deactivate |
|
|
|
(see page 13) |
|
|
|
|
c |
Talk key |
• |
Answer a call |
|
• Dial a phone number |
||
|
|
• Switch from speakerphone mode |
|
|
|
|
to handset mode |
|
|
• Access telephone system func- |
|
|
|
|
tions |
|
|
|
|
u |
Speakerphone |
• |
Answer a call |
|
key |
• Dial a phone number |
|
|
|
• Switch from handset to speaker- |
|
|
|
|
phone mode |
|
|
• Access telephone system func- |
|
|
|
|
tions |
|
|
|
|
? |
Missed calls |
Access message lists |
|
|
list |
|
|
« |
Star key |
Activate/deactivate the ringer |
|
ª |
Hash key |
Activate/deactivate keypad lock |
|
R |
NET/Callback |
• Open the NET carrier list |
|
|
key |
• |
R-key function |
|
|
(see page 4) |
|
|
|
|
|
|
Direct call key |
Select a predefined direct call |
|
|
|
number, (see page 23) |
|
|
|
|
|
3

NET/Callback key
The NET/Callback key provides access to the following functions depending on how it is operated:
Operation |
Function |
|
|
Press and hold (min. |
Open the Net carrier list |
1 second) |
|
|
|
Press |
R-key function: |
|
• Insert Pause (e.g. between the |
|
prefix and the phone number, or |
|
when checking a mailbox) |
|
• End connection to a mailbox |
|
(e.g. when performing a call- |
|
back, setting up a conference or |
|
transferring a call) |
|
|
Control key
The control key is assigned different functions depending on the operating situation:
Control |
In idle status |
In lists and |
In an input field |
Key |
|
menus |
|
|
|
|
|
E |
|
Next menu level |
Move the cursor |
|
up |
up one line |
|
D |
Open the mo- |
Next menu level |
Move the cursor |
bile’s telephone |
down |
down one line |
|
|
directory |
|
|
|
|
|
|
G |
Open the menu |
Select an entry |
Move the cursor |
|
(OK) |
right |
|
F |
Open the list of |
Next menu level |
Move the cursor |
internal users |
up, cancel |
left |
Note:
Some functions associated with the right display key can also be performed with the control key.
4

Display keys
Each display key can be programmed with one function. Display key programming depends on the operating status. A function can be represented by text or an icon. The following icons exist:
Icon |
Name |
Use |
|
|
|
z |
Redial |
Open a list of the last five phone |
|
|
numbers called |
|
|
|
© |
Menu |
Open the general menu |
Î |
Go Back |
Next menu level up, |
|
|
cancel |
|
|
|
[ |
OK |
Confirm and select function |
X |
Delete |
Delete inputs from right to left |
|
Up/Down |
Select function (in dial/ringing and |
|
|
call status only, see page 5) |
|
|
|
I |
Internal |
Call up system menu |
J |
Missed calls |
Open the missed calls list, display |
|
list |
text messages |
|
|
|
Operating status display
The following operating statuses are available:
Operating status |
Display |
|
|
Off status |
Blank display – calls cannot be re- |
|
ceived. |
|
|
On or message status |
The user interface of the mobile tel- |
|
ephone is displayed. The base |
|
name is visible. |
|
|
Dial status |
The user interface of the telephone |
(after pressing the talk key |
system is displayed. The telephone |
without entering the phone |
system functions valid for the oper- |
number) |
ating status are visible. |
|
|
Ringing status |
The user interface of the telephone |
(after entering the phone |
system is displayed. The telephone |
number and pressing the talk |
system functions valid for the oper- |
key) |
ating status are visible. |
|
|
5

Operating status |
Display |
|
|
Call status |
The user interface of the telephone |
|
system is displayed. The telephone |
|
system functions valid for the oper- |
|
ating status are visible. |
|
|
|
|
Note:
The display language set by default is English. For information on changing the language, please see pages 14 and 30.
On or message Example for on or message status display: status
|
|
|
|
|
|
|
|
|
|
|
|
|
|
1 |
Charging status |
1 |
|
|
|
|
|
|
|
|
|
|
|
|
|
||
|
|
|
|
|
|
|
|
|
|
|
|
|
|
|
|
|
|
|
Ð |
|
|
|
|
U |
2 |
Receive field strength |
|||||
2 |
|
|
|
|
|
|
|
||||||||
|
|
|
|
|
|
|
|
|
|
|
|
|
|||
|
|
|
|
|
|
|
|
|
|
|
|
|
|||
3 |
|
|
|
|
|
|
|
|
|
|
|
|
|
3 |
Current base display |
|
|
|
|
|
|
|
|
|
|
||||||
4 |
|
|
|
|
|
|
Base |
|
1 |
|
|
|
|||
|
|
|
22.09.01 |
|
|
|
06:25 |
|
4 |
Date and time |
|||||
|
|
|
|
|
|||||||||||
5 |
|
|
|
|
z |
|
|
© |
|
|
|||||
|
|
|
|
|
|
|
|
|
|||||||
|
|
|
|
|
|
|
|
|
|
|
|
|
5 |
Current functions of the dis- |
|
|
|
|
|
|
|
|
|
|
|
|
|
|
|||
|
|
|
|
|
|
|
|
|
|
|
|||||
|
|
|
|
|
|
|
|
|
|
|
|
|
|
|
play keys |
|
|
|
|
|
|
|
|
|
|
|
|
|
|
|
|
Dial status Example for dial status display:
|
|
|
|
|
|
|
|
|
|
|
1 |
Prompt to enter phone |
|
|
|
|
|
|
|
|
|
|
|
|
number |
1 |
|
|
|
Please select |
2 |
Functions offered by the tele- |
||||||
|
|
|||||||||||
2 |
|
|
|
|
|
|
|
|
|
|
|
|
Lst no redial? |
|
|
|
phone system |
||||||||
|
|
|
|
|
|
|||||||
|
|
|
|
I |
[ |
|
||||||
3 |
|
|
|
|
|
|
|
3 |
Current functions of the dis- |
|||
|
|
|
|
|
|
|||||||
|
|
|
|
|
|
|||||||
|
|
|
|
|
|
|
|
|
|
|
play keys |
|
|
|
|
|
|
|
|
|
|
|
|
||
|
|
|
|
|
|
|
|
|
|
|
|
|
Ringing status Example for ringing status display:
1 |
|
|
|
|
|
|
|
|
|
1 |
Name of the user |
|
|
|
|
|
|
|
|
|
2 |
Internal phone number of the |
|
|
|
|
|
|
|
|
|
|
|||
2 |
|
|
|
|
|
|
|
|
|
|
user |
123456789 MOORE |
|
|
|||||||||
|
|
|
|||||||||
3 |
|
|
|
|
|
|
|
|
|
|
|
CALLBACK |
|
|
|
3 |
Functions offered by the tele- |
||||||
|
|
|
|
||||||||
|
|
|
|
|
|
I[ |
|||||
4 |
|
|
|
|
|
|
phone system |
||||
|
|
|
|
|
|
|
|
|
4 |
Current functions of the display |
|
|
|
|
|
|
|
|
|
|
|||
|
|
|
|
|
|
|
|
|
|
||
|
|
|
|
|
|
|
|
|
|
|
keys |
|
|
|
|
|
|
|
|
|
|
|
|
6

Call Example for call status display: status
1
2 123456789 MOORE
3 MUTE ON

 I[
I[
4
1Name of the user
2Internal phone number of the user
3Functions offered by the telephone system
4Current functions of the display keys
7

Function selection
Function selection with the on or message status
With the on or message status, the mobile telephone functions are listed in the display. These are summarized in the menus.
Overviews of menus are displayed in this operating manual, e.g.:
|
GOn or message status |
|
|
|
|
|
|
|
|
or |
|
|
|
|
|
|
|
|
© |
xt |
|
|
|
|
|
|
|
Î |
|
|
|
|
|||
|
D |
Main menu |
|
|
|
|
|
|
|
Family/Fun |
|
|
|
|
|
|
|
|
|
Calendar/Clock |
|
[ |
|
|
|
|
|
|
Sound Settings |
|
|
|
|
||
|
|
H/Set Settings |
|
|
|
|
H/Set Settings |
|
|
E |
|
D |
|
|
|||
|
Base Settings |
|
|
Auto Answer |
|
|||
|
|
˜˜˜˜˜˜˜˜˜˜˜˜˜˜˜˜ |
|
|
|
|
Language |
|
|
|
|
|
|
|
|
Register H/Set |
|
|
|
|
|
E |
Select Base |
|
||
|
|
|
|
Reset Handset |
|
|||
|
|
|
|
|
|
|
˜˜˜˜˜˜˜˜˜˜˜˜˜˜˜˜ |
|
|
|
|
|
|
|
|
|
|
©
Eor D
[
Î
or
Go Back
To select a function or a supplementary menu, please follow the overview for the relevant section and press the function and display keys shown:
Press the menu key.
Mark the function or the supplementary menu you want by pressing the control key.
Confirm with OK.
A line of stars indicates the end of a menu. If you scroll further, the first function in the menu is marked again.
If you press one of the two display keys when the star line is selected, the system jumps to the next menu level up or to on or message status.
8

Selection in dial/ringing/call status
The telephone system functions appear in the display in dial, ringing and call statuses.
For example, you can scroll through the following functions in call status:
MUTE ON
xt
CONSULT
xt
START CONF. xt
START TRANSFER xt

 PICKUP
Proceed as follows to select a function:
 or
or  Mark the function you want by pressing the display key.
[ Confirm with OK.
9
Putting the mobile telephone into service
Removing the protective cover
Remove the protective cover from the display before putting the mobile telephone into service.
Inserting the battery
Note:
The battery supplied is not charged. It gets charged once it is in the mobile telephone.
Note:
•Please observe the safety notes on the back cover and page II.
•Only use permitted battery, see page 12.
•Open the battery compartment in a dust-free environment only.
•Your telephone directory entries and all settings remain stored even if you remove the battery. The date and time settings, however, are lost. See page 47.
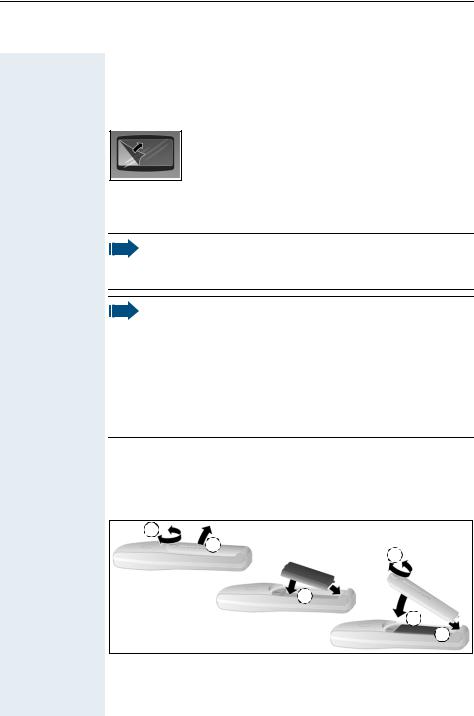
Opening the Unscrew the battery compartment lid with a coin, for example (1), and battery remove it (2).
compartment
Inserting the Insert the permitted battery (3).
battery
1
2
6
3
5
4
Closing the Replace the lid (4), slide it back over the battery compartment (5) and battery screw it on tightly (6).
compartment
10
Charging and using the battery
To charge the battery, insert the mobile telephone into the charging shell with the keypad facing forwards.
Caution:
Only use the approved C39280-Z4-C373 power supply unit to operate the charging shell.
The charging status is indicated by the charge status display. This flashes during charging:
=Battery empty
e |
Battery 33% charged |
V |
Battery 66% charged |
U |
Battery 100% charged |
Note:
•Initial charging: charge the battery for at least 16 hours, regardless of the charging status icon. Without replacing it in the charging shell, use the mobile telephone until the "battery low" beep is heard. This action aligns the charge status display with the battery operating times.
•To achieve full operating and charging times (see page 12), let the mobile telephone discharge a number of times without replacing it in the charging shell until the battery low beep sounds.
•For future charging: you can place your mobile telephone in the charging shell each time it is used. Charging is electronically controlled which ensures that the battery is charged optimally.
11

Operating and charging times
The operating times are only achieved after several charging and discharging cycles.
Capacity |
Standby mode |
Talk time |
Charging time |
(mAh) |
(hours) |
(hours) |
(hours) |
|
|
|
|
500 |
up to 250 |
over 15 |
approx. 5.5 |
|
|
|
|
Permitted batteries
The following battery is permitted for the mobile telephone:
Nickel Metal Hydrid (NiMH), 500 mAh
Order no. V30145-K1310-X229
12
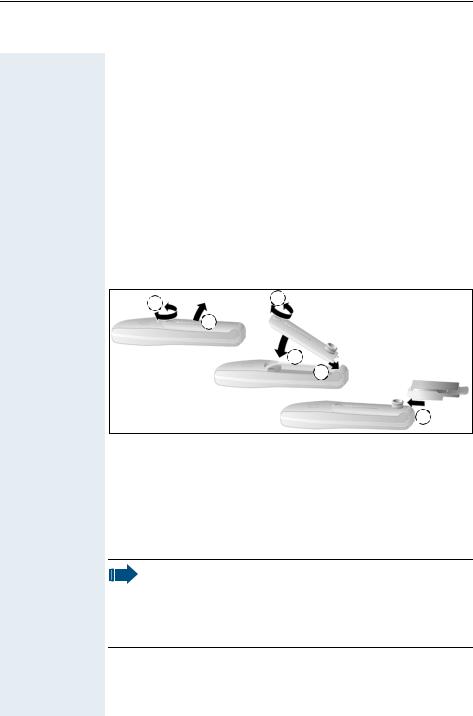
Fitting the attachment clip
A second battery compartment lid is supplied with the mobile telephone featuring a slot for the attachment clip. Assemble the attachment clip as follows:
Opening the Unscrew the battery compartment lid with a coin, for example, (1) and battery remove it (2).
compartment
Closing the Replace it with the second lid featuring the clip slot (3). Slide this back battery over the battery compartment (4) and screw it on tightly (5).
compartment
Assembling the Press the attachment clip until it locks into the slot (6). attachment clip
1 |
5 |
|
2
4
3
6
Activating/deactivating the mobile telephone
a Press the on-hook key until the activation or deactivation is confirmed by a crescendo tone sequence.
See page 5 for display when the handset is on or in message status.
Note:
•The mobile telephone can only be fully switched off when removed from the charging shell.
•The mobile telephone is automatically set to on or message status if it is placed in the charging shell, see page 5.
13
Loading...