


 Loading...
D-link DFL-860, DFL-800, DFL-260, DFL-2500, DFL-210 User Manual
...NETWORK SECURITY FIREWALL
USER MANUAL
DFL-210/ 800/1600/ 2500
DFL-260/ 860
SECURITYSECURITY
VER. 1.05
NETWORK SECURITY SOLUTION http://www.dlink.com

User Manual
DFL-210/260/800/860/1600/2500 NetDefendOS version 2.12
D-Link Corporation No. 289, Sinhu 3rd Rd, Neihu District, Taipei City 114, Taiwan R.O.C. http://www.DLink.com
Published 2007-05-29
Copyright © 2007

User Manual
DFL-210/260/800/860/1600/2500
NetDefendOS version 2.12
Published 2007-05-29
Copyright © 2007
Copyright Notice
This publication, including all photographs, illustrations and software, is protected under international copyright laws, with all rights reserved. Neither this manual, nor any of the material contained herein, may be reproduced without written consent of the author.
Disclaimer
The information in this document is subject to change without notice. The manufacturer makes no representations or warranties with respect to the contents hereof and specifically disclaim any implied warranties of merchantability or fitness for any particular purpose. The manufacturer reserves the right to revise this publication and to make changes from time to time in the content hereof without obligation of the manufacturer to notify any person of such revision or changes.
Limitations of Liability
UNDER NO CIRCUMSTANCES SHALL D-LINK OR ITS SUPPLIERS BE LIABLE FOR DAMAGES OF ANY CHARACTER (E.G. DAMAGES FOR LOSS OF PROFIT, SOFTWARE RESTORATION, WORK STOPPAGE, LOSS OF SAVED DATA OR ANY OTHER COMMERCIAL DAMAGES OR LOSSES) RESULTING FROM THE APPLICATION OR IMPROPER USE OF THE D-LINK PRODUCT OR FAILURE OF THE PRODUCT, EVEN IF D-LINK IS INFORMED OF THE POSSIBILITY OF SUCH DAMAGES. FURTHERMORE, D-LINK WILL NOT BE LIABLE FOR THIRD-PARTY CLAIMS AGAINST CUSTOMER FOR LOSSES OR DAMAGES. D-LINK WILL IN NO EVENT BE LIABLE FOR ANY DAMAGES IN EXCESS OF THE AMOUNT D-LINK RECEIVED FROM THE END-USER FOR THE PRODUCT.

Table of Contents |
|
Preface .............................................................................................................. |
xii |
1. Product Overview .............................................................................................. |
1 |
1.1. About D-Link NetDefendOS ..................................................................... |
1 |
1.2. NetDefendOS Architecture ....................................................................... |
3 |
1.2.1. State-based Architecture ................................................................ |
3 |
1.2.2. NetDefendOS Building Blocks ........................................................ |
3 |
1.2.3. Basic Packet Flow ......................................................................... |
3 |
1.3. NetDefendOS Packet Flow ........................................................................ |
6 |
2. Operations and Maintenance ............................................................................... |
10 |
2.1. Configuring NetDefendOS ....................................................................... |
10 |
2.1.1. Overview ................................................................................... |
10 |
2.1.2. Default User Accounts .................................................................. |
10 |
2.1.3. Command Line Interface (CLI) ...................................................... |
11 |
2.1.4. Web Interface ............................................................................. |
13 |
2.1.5. Working with Configurations ......................................................... |
15 |
2.2. Events and Logging ................................................................................ |
21 |
2.2.1. Overview ................................................................................... |
21 |
2.2.2. Event Messages ........................................................................... |
21 |
2.2.3. Event Message Distribution ........................................................... |
21 |
2.3. RADIUS Accounting .............................................................................. |
24 |
2.3.1. Overview ................................................................................... |
24 |
2.3.2. RADIUS Accounting messages ...................................................... |
24 |
2.3.3. Interim Accounting Messages ........................................................ |
26 |
2.3.4. Activating RADIUS Accounting ..................................................... |
26 |
2.3.5. RADIUS Accounting Security ........................................................ |
26 |
2.3.6. RADIUS Accounting and High Availability ...................................... |
26 |
2.3.7. Handling Unresponsive Servers ...................................................... |
27 |
2.3.8. Accounting and System Shutdowns ................................................. |
27 |
2.3.9. Limitations with NAT'ed Networks ................................................. |
27 |
2.4. Maintenance .......................................................................................... |
28 |
2.4.1. Reset to Factory Defaults .............................................................. |
28 |
2.4.2. Configuration Backup and Restore .................................................. |
28 |
2.4.3. Auto-Update Mechanism ............................................................... |
29 |
3. Fundamentals ................................................................................................... |
31 |
3.1. The Address Book .................................................................................. |
31 |
3.1.1. Overview ................................................................................... |
31 |
3.1.2. IP Addresses ............................................................................... |
31 |
3.1.3. Ethernet Addresses ....................................................................... |
33 |
3.1.4. Address Groups ........................................................................... |
34 |
3.1.5. Auto-Generated Address Objects .................................................... |
34 |
3.2. Services ................................................................................................ |
35 |
3.2.1. Overview ................................................................................... |
35 |
3.2.2. TCP and UDP Based Services ........................................................ |
36 |
3.2.3. ICMP Services ............................................................................ |
37 |
3.2.4. Custom IP Protocol Services .......................................................... |
38 |
3.3. Interfaces .............................................................................................. |
40 |
3.3.1. Overview ................................................................................... |
40 |
3.3.2. Ethernet ..................................................................................... |
41 |
3.3.3. Virtual LAN ............................................................................... |
43 |
3.3.4. PPPoE ....................................................................................... |
43 |
3.3.5. Interface Groups .......................................................................... |
45 |
3.4. ARP .................................................................................................... |
47 |
3.4.1. Overview ................................................................................... |
47 |
3.4.2. ARP in NetDefendOS ................................................................... |
47 |
3.4.3. ARP Cache ................................................................................. |
47 |
3.4.4. Static and Published ARP Entries .................................................... |
48 |
3.4.5. Advanced ARP Settings ................................................................ |
50 |
iv

|
User Manual |
3.5. The IP Rule-Set ..................................................................................... |
52 |
3.5.1. Overview ................................................................................... |
52 |
3.5.2. Rule Evaluation ........................................................................... |
52 |
3.5.3. IP Rule components ..................................................................... |
53 |
3.5.4. Editing IP Rule-set Entries ............................................................. |
54 |
3.6. Schedules ............................................................................................. |
55 |
3.7. X.509 Certificates .................................................................................. |
57 |
3.7.1. Overview ................................................................................... |
57 |
3.7.2. The Certification Authority ............................................................ |
57 |
3.7.3. Validity Time .............................................................................. |
57 |
3.7.4. Certificate Revocation Lists ........................................................... |
57 |
3.7.5. Trusting Certificates ..................................................................... |
58 |
3.7.6. Identification Lists ....................................................................... |
58 |
3.7.7. X.509 Certificates in NetDefendOS ................................................. |
58 |
3.8. Setting Date and Time ............................................................................. |
59 |
3.8.1. General Date and Time Settings ...................................................... |
59 |
3.8.2. Time Servers .............................................................................. |
60 |
3.9. DNS Lookup ......................................................................................... |
64 |
4. Routing ........................................................................................................... |
66 |
4.1. Overview .............................................................................................. |
66 |
4.2. Static Routing ........................................................................................ |
67 |
4.2.1. Static Routing in NetDefendOS ...................................................... |
68 |
4.2.2. Route Failover ............................................................................ |
71 |
4.2.3. Proxy ARP ................................................................................. |
75 |
4.3. Policy-based Routing .............................................................................. |
76 |
4.3.1. Overview ................................................................................... |
76 |
4.3.2. Policy-based Routing Tables .......................................................... |
76 |
4.3.3. Policy-based Routing Rules ........................................................... |
76 |
4.3.4. Policy-based Routing Table Selection .............................................. |
77 |
4.3.5. The Ordering parameter ................................................................ |
77 |
4.4. Dynamic Routing ................................................................................... |
80 |
4.4.1. Dynamic Routing overview ........................................................... |
80 |
4.4.2. OSPF ........................................................................................ |
81 |
4.4.3. Dynamic Routing Policy ............................................................... |
84 |
4.5. Transparent Mode .................................................................................. |
88 |
4.5.1. Overview of Transparent Mode ...................................................... |
88 |
4.5.2. Comparison with Routing mode ..................................................... |
88 |
4.5.3. Transparent Mode implementation .................................................. |
88 |
4.5.4. Enabling Transparent Mode ........................................................... |
89 |
4.5.5. Transparent Mode example scenarios .............................................. |
89 |
5. DHCP Services ................................................................................................ |
96 |
5.1. Overview .............................................................................................. |
96 |
5.2. DHCP Servers ....................................................................................... |
97 |
5.3. Static DHCP Assignment ......................................................................... |
99 |
5.4. DHCP Relaying ................................................................................... |
100 |
6. Security Mechanisms ....................................................................................... |
102 |
6.1. Access Rules ....................................................................................... |
102 |
6.1.1. Introduction .............................................................................. |
102 |
6.1.2. IP spoofing ............................................................................... |
102 |
6.1.3. Access Rule Settings .................................................................. |
103 |
6.2. Application Layer Gateways ................................................................... |
105 |
6.2.1. Overview ................................................................................. |
105 |
6.2.2. Hyper Text Transfer Protocol ....................................................... |
105 |
6.2.3. File Transfer Protocol ................................................................. |
105 |
6.2.4. Simple Mail Transfer Protocol ...................................................... |
110 |
6.2.5. H.323 ...................................................................................... |
111 |
6.3. Intrusion Detection and Prevention .......................................................... |
125 |
6.3.1. Overview ................................................................................. |
125 |
6.3.2. IDP Availability in D-Link Models ............................................... |
125 |
6.3.3. IDP Rules ................................................................................. |
126 |
6.3.4. Insertion/Evasion Attack Prevention .............................................. |
127 |
6.3.5. IDP Pattern Matching ................................................................. |
128 |
6.3.6. IDP Signature Groups ................................................................. |
129 |
v

|
User Manual |
6.3.7. IDP Actions .............................................................................. |
131 |
6.3.8. SMTP Log Receiver for IDP Events .............................................. |
131 |
6.4. Anti-Virus .......................................................................................... |
135 |
6.4.1. Overview ................................................................................. |
135 |
6.4.2. Implementation ......................................................................... |
135 |
6.4.3. Activation ................................................................................ |
136 |
6.4.4. The Signature Database .............................................................. |
136 |
6.4.5. Subscribing to the D-Link Anti-Virus Service ................................. |
136 |
6.4.6. Anti-Virus Options ..................................................................... |
137 |
6.5. Web Content Filtering ........................................................................... |
140 |
6.5.1. Overview ................................................................................. |
140 |
6.5.2. Active Content Handling ............................................................. |
140 |
6.5.3. Static Content Filtering ............................................................... |
141 |
6.5.4. Dynamic Content Filtering .......................................................... |
143 |
6.6. Denial-Of-Service (DoS) Attacks ............................................................ |
155 |
6.6.1. Overview ................................................................................. |
155 |
6.6.2. DoS Attack Mechanisms ............................................................. |
155 |
6.6.3. Ping of Death and Jolt Attacks ..................................................... |
155 |
6.6.4. Fragmentation overlap attacks: Teardrop, Bonk, Boink and Nestea ...... |
156 |
6.6.5. The Land and LaTierra attacks ..................................................... |
156 |
6.6.6. The WinNuke attack ................................................................... |
156 |
6.6.7. Amplification attacks: Smurf, Papasmurf, Fraggle ........................... |
157 |
6.6.8. TCP SYN Flood Attacks ............................................................. |
158 |
6.6.9. The Jolt2 Attack ........................................................................ |
158 |
6.6.10. Distributed DoS Attacks ............................................................ |
158 |
6.7. Blacklisting Hosts and Networks ............................................................. |
159 |
7. Address Translation ........................................................................................ |
161 |
7.1. Dynamic Address Translation (NAT) ....................................................... |
161 |
7.1.1. Which Protocols can NAT handle? ................................................ |
162 |
7.2. Static Address Translation (SAT) ............................................................ |
164 |
7.2.1. Translation of a Single IP Address (1:1) ......................................... |
164 |
7.2.2. Translation of Multiple IP Addresses (M:N) .................................... |
167 |
7.2.3. All-to-One Mappings (N:1) ......................................................... |
169 |
7.2.4. Port Translation ......................................................................... |
170 |
7.2.5. Which Protocols can SAT handle? ................................................ |
170 |
7.2.6. Which SAT Rule is executed if several are matching? ....................... |
171 |
7.2.7. SAT and FwdFast Rules .............................................................. |
171 |
8. User Authentication ........................................................................................ |
174 |
8.1. Overview ............................................................................................ |
174 |
8.1.1. Authentication Methods .............................................................. |
174 |
8.1.2. Choosing Passwords ................................................................... |
174 |
8.1.3. User Types ............................................................................... |
175 |
8.2. Authentication Components ................................................................... |
176 |
8.2.1. The Local User Database (UserDB) ............................................... |
176 |
8.2.2. External Authentication Servers .................................................... |
176 |
8.2.3. Authentication Agents ................................................................ |
176 |
8.2.4. Authentication Rules .................................................................. |
177 |
8.3. Authentication Process .......................................................................... |
178 |
9. Virtual Private Networks .................................................................................. |
181 |
9.1. VPN overview ..................................................................................... |
181 |
9.1.1. The need for VPNs ..................................................................... |
181 |
9.1.2. The basics of VPN Encryption ..................................................... |
181 |
9.1.3. Planning a VPN ......................................................................... |
181 |
9.2. IPsec .................................................................................................. |
183 |
9.2.1. IPsec Basics .............................................................................. |
183 |
9.2.2. Proposal Lists ........................................................................... |
192 |
9.2.3. Pre-shared Keys ........................................................................ |
193 |
9.2.4. Identification Lists ..................................................................... |
193 |
9.3. IPsec Tunnels ...................................................................................... |
196 |
9.3.1. Overview of IPsec tunnels ........................................................... |
196 |
9.3.2. LAN to LAN tunnels with a Pre-shared Key ................................... |
196 |
9.3.3. Roaming Clients ........................................................................ |
196 |
9.3.4. Fetching CRLs from an alternate LDAP server ................................ |
200 |
vi

|
User Manual |
9.4. PPTP/L2TP ......................................................................................... |
202 |
9.4.1. PPTP ....................................................................................... |
202 |
9.4.2. L2TP ....................................................................................... |
203 |
10. Traffic Management ...................................................................................... |
209 |
10.1. Traffic Shaping .................................................................................. |
209 |
10.1.1. Introduction ............................................................................ |
209 |
10.1.2. Traffic Shaping Basics .............................................................. |
209 |
10.1.3. Traffic Shaping in NetDefendOS ................................................. |
210 |
10.1.4. Pipes Basics ............................................................................ |
211 |
10.1.5. Priorities and Guarantees ........................................................... |
214 |
10.1.6. Grouping Users of a Pipe ........................................................... |
219 |
10.2. Threshold Rules ................................................................................. |
221 |
10.2.1. Overview ................................................................................ |
221 |
10.2.2. Connection Rate/Total Connection Limiting .................................. |
221 |
10.2.3. Grouping ................................................................................ |
221 |
10.2.4. Rule Actions ........................................................................... |
221 |
10.2.5. Multiple Triggered Actions ........................................................ |
222 |
10.2.6. Exempted Connections .............................................................. |
222 |
10.2.7. Threshold Rules and ZoneDefense .............................................. |
222 |
10.2.8. Threshold Rule Blacklisting ....................................................... |
222 |
10.3. Server Load Balancing ........................................................................ |
223 |
10.3.1. Overview ................................................................................ |
223 |
10.3.2. Identifying the Servers .............................................................. |
224 |
10.3.3. The Load Distribution Mode ...................................................... |
224 |
10.3.4. The Distribution Algorithm ........................................................ |
224 |
10.3.5. Server Health Monitoring .......................................................... |
226 |
10.3.6. SLB_SAT Rules ...................................................................... |
226 |
11. High Availability .......................................................................................... |
229 |
11.1. Overview .......................................................................................... |
229 |
11.2. How rapid failover is accomplished ........................................................ |
231 |
11.2.1. Shared IP addresses and Failover ................................................ |
231 |
11.2.2. Cluster heartbeats ..................................................................... |
231 |
11.2.3. The synchronization interface ..................................................... |
232 |
11.3. High Availability Issues ....................................................................... |
233 |
11.3.1. High Availability Configuration .................................................. |
233 |
12. ZoneDefense ................................................................................................ |
235 |
12.1. Overview .......................................................................................... |
235 |
12.2. ZoneDefense Switches ......................................................................... |
236 |
12.3. ZoneDefense Operation ....................................................................... |
237 |
12.3.1. SNMP .................................................................................... |
237 |
12.3.2. Threshold Rules ....................................................................... |
237 |
12.3.3. Manual Blocking and Exclude Lists ............................................. |
238 |
12.3.4. Limitations ............................................................................. |
239 |
13. Advanced Settings ......................................................................................... |
241 |
13.1. IP Level Settings ................................................................................ |
241 |
13.2. TCP Level Settings ............................................................................. |
245 |
13.3. ICMP Level Settings ........................................................................... |
249 |
13.4. ARP Settings ..................................................................................... |
250 |
13.5. Stateful Inspection Settings ................................................................... |
252 |
13.6. Connection Timeouts .......................................................................... |
254 |
13.7. Size Limits by Protocol ........................................................................ |
255 |
13.8. Fragmentation Settings ........................................................................ |
257 |
13.9. Local Fragment Reassembly Settings ..................................................... |
261 |
13.10. DHCP Settings ................................................................................. |
262 |
13.11. DHCPRelay Settings ......................................................................... |
263 |
13.12. DHCPServer Settings ........................................................................ |
264 |
13.13. IPsec Settings ................................................................................... |
265 |
13.14. Transparent Mode Settings ................................................................. |
267 |
13.15. Logging Settings ............................................................................... |
269 |
13.16. High Availability Settings .................................................................. |
270 |
13.17. Time Synchronization Settings ............................................................ |
271 |
13.18. DNS Client Settings .......................................................................... |
273 |
13.19. HTTP Poster Settings ........................................................................ |
274 |
vii

|
User Manual |
13.20. PPP Settings .................................................................................... |
275 |
13.21. IDP ................................................................................................ |
276 |
13.22. Hardware Monitor Settings ................................................................. |
277 |
13.23. Packet Re-assembly Settings ............................................................... |
278 |
13.24. Miscellaneous Settings ....................................................................... |
279 |
A. Subscribing to Security Updates ........................................................................ |
281 |
B. IDP Signature Groups ..................................................................................... |
283 |
C. Anti-Virus MIME filetypes .............................................................................. |
287 |
D. The OSI Framework ....................................................................................... |
291 |
E. D-Link worldwide offices ................................................................................ |
292 |
Alphabetical Index ............................................................................................. |
294 |
viii

List of Figures |
|
1.1. Packet Flow Schematic Part I ............................................................................ |
6 |
1.2. Packet Flow Schematic Part II ........................................................................... |
7 |
1.3. Packet Flow Schematic Part III .......................................................................... |
8 |
4.1. A Route Failover Scenario for ISP Access ........................................................... |
71 |
4.2. Virtual Links Example 1 .................................................................................. |
83 |
4.3. Virtual Links Example 2 .................................................................................. |
84 |
4.4. Transparent mode scenario 1 ............................................................................ |
89 |
4.5. Transparent mode scenario 2 ............................................................................ |
91 |
6.1. IDP Database Updating ................................................................................. |
126 |
6.2. Dynamic Content Filtering Flow ..................................................................... |
143 |
9.1. The AH protocol .......................................................................................... |
190 |
9.2. The ESP protocol ......................................................................................... |
190 |
10.1. Packet flow through pipes ............................................................................ |
211 |
10.2. The Eight Pipe Precedences. ......................................................................... |
214 |
10.3. A Pipe defined with minimum precedence and maximum precedence. .................. |
215 |
10.4. A pipe with traffic in one precedence, grouped per IP address. ............................ 219 |
|
10.5. A Server Load Balancing configuration .......................................................... |
223 |
10.6. Connections from Three Clients .................................................................... |
225 |
10.7. Stickiness and Round-Robin ......................................................................... |
225 |
10.8. Stickiness and Connection Rate ..................................................................... |
226 |
11.1. High Availability Setup Example ................................................................... |
230 |
D.1. The 7 layers of the OSI model ........................................................................ |
291 |
ix

List of Examples |
|
1. Example notation ............................................................................................. |
xii |
2.1. Enabling SSH Remote Access .......................................................................... |
12 |
2.2. Enabling remote management via HTTPS. .......................................................... |
14 |
2.3. Listing Configuration Objects ........................................................................... |
16 |
2.4. Displaying a Configuration Object ..................................................................... |
16 |
2.5. Editing a Configuration Object ......................................................................... |
17 |
2.6. Adding a Configuration Object ......................................................................... |
17 |
2.7. Deleting a Configuration Object ........................................................................ |
18 |
2.8. Undeleting a Configuration Object .................................................................... |
18 |
2.9. Listing Modified Configuration Objects .............................................................. |
19 |
2.10. Activating and Committing a Configuration ....................................................... |
20 |
2.11. Enable Logging to a Syslog Host ..................................................................... |
22 |
2.12. Reset to Factory Defaults with the standard user interface ..................................... |
28 |
2.13. Configuration Backup and Restore ................................................................... |
28 |
3.1. Adding an IP Host .......................................................................................... |
32 |
3.2. Adding an IP Network ..................................................................................... |
32 |
3.3. Adding an IP Range ........................................................................................ |
32 |
3.4. Deleting an Address Object .............................................................................. |
33 |
3.5. Adding an Ethernet Address ............................................................................. |
33 |
3.6. Listing the Available Services ........................................................................... |
35 |
3.7. Viewing a Specific Service .............................................................................. |
35 |
3.8. Adding a TCP/UDP Service ............................................................................. |
37 |
3.9. Adding a IP Protocol Service ............................................................................ |
39 |
3.10. Enabling DHCP ........................................................................................... |
42 |
3.11. Defining a virtual LAN .................................................................................. |
43 |
3.12. Configuring a PPPoE client on the wan interface with traffic routed over PPPoE. .....45 |
|
3.13. Creating an Interface Group ............................................................................ |
45 |
3.14. Displaying the ARP Cache ............................................................................. |
48 |
3.15. Flushing the ARP Cache ................................................................................ |
48 |
3.16. Defining a Static ARP Entry ........................................................................... |
49 |
3.17. Setting up a Time-Scheduled Policy ................................................................. |
55 |
3.18. Uploading an X.509 Certificate ....................................................................... |
58 |
3.19. Setting the Current Date and Time ................................................................... |
59 |
3.20. Setting the Time Zone ................................................................................... |
60 |
3.21. Enabling DST .............................................................................................. |
60 |
3.22. Enabling Time Synchronization using SNTP ...................................................... |
61 |
3.23. Manually Triggering a Time Synchronization .................................................... |
62 |
3.24. Modifying the Maximum Adjustment Value ...................................................... |
62 |
3.25. Forcing Time Synchronization ........................................................................ |
62 |
3.26. Enabling the D-Link NTP Server ..................................................................... |
63 |
3.27. Configuring DNS Servers ............................................................................... |
64 |
4.1. Displaying the Routing Table ........................................................................... |
69 |
4.2. Displaying the Core Routes .............................................................................. |
70 |
4.3. Creating a Policy-Based Routing table ................................................................ |
78 |
4.4. Creating the Route .......................................................................................... |
78 |
4.5. Policy Based Routing Configuration .................................................................. |
78 |
4.6. Importing Routes from an OSPF AS into the Main Routing Table ........................... |
85 |
4.7. Exporting the Default Route into an OSPF AS ..................................................... |
86 |
4.8. Setting up Transparent Mode - Scenario 1 ........................................................... |
90 |
4.9. Setting up Transparent Mode - Scenario 2 ........................................................... |
91 |
5.1. Setting up a DHCP server ................................................................................ |
97 |
5.2. Checking the status of a DHCP server ................................................................ |
98 |
5.3. Setting up Static DHCP ................................................................................... |
99 |
5.4. Setting up a DHCP relayer ............................................................................. |
100 |
6.1. Setting up an Access Rule .............................................................................. |
104 |
6.2. Protecting an FTP Server with ALG ................................................................. |
106 |
6.3. Protecting FTP Clients .................................................................................. |
109 |
6.4. Protecting Phones Behind D-Link Firewalls ...................................................... |
113 |
x
|
User Manual |
6.5. H.323 with private IP addresses ...................................................................... |
114 |
6.6. Two Phones Behind Different D-Link Firewalls ................................................. |
115 |
6.7. Using Private IP Addresses ............................................................................ |
116 |
6.8. H.323 with Gatekeeper .................................................................................. |
118 |
6.9. H.323 with Gatekeeper and two D-Link Firewalls .............................................. |
119 |
6.10. Using the H.323 ALG in a Corporate Environment ........................................... |
120 |
6.11. Configuring remote offices for H.323 ............................................................. |
123 |
6.12. Allowing the H.323 Gateway to register with the Gatekeeper .............................. |
123 |
6.13. Configuring an SMTP Log Receiver .............................................................. |
131 |
6.14. Setting up IDP for a Mail Server .................................................................... |
132 |
6.15. Enabling Anti-Virus Scanning ....................................................................... |
138 |
6.16. Stripping ActiveX and Java applets ................................................................ |
141 |
6.17. Setting up a white and blacklist ..................................................................... |
142 |
6.18. Enable Dynamic Content Filtering ................................................................. |
144 |
6.19. Enabling Audit Mode .................................................................................. |
145 |
6.20. Reclassifying a blocked site .......................................................................... |
147 |
7.1. Adding a NAT Policy ................................................................................... |
162 |
7.2. Enabling Traffic to a Protected Web Server in a DMZ ......................................... |
164 |
7.3. Enabling Traffic to a Web Server on an Internal Network .................................... |
166 |
7.4. Translating Traffic to Multiple Protected Web Servers ........................................ |
168 |
8.1. Creating an authentication user group ............................................................... |
178 |
9.1. Using a Proposal List .................................................................................... |
192 |
9.2. Using a Pre-Shared key ................................................................................. |
193 |
9.3. Using an Identity List .................................................................................... |
194 |
9.4. Setting up a PSK based VPN tunnel for roaming clients ....................................... |
197 |
9.5. Setting up a Self-signed Certificate based VPN tunnel for roaming clients ............... |
198 |
9.6. Setting up a CA Server issued Certificate based VPN tunnel for roaming clients ....... |
199 |
9.7. Setting up an LDAP server ............................................................................. |
200 |
9.8. Setting up a PPTP server ................................................................................ |
202 |
9.9. Setting up an L2TP server .............................................................................. |
203 |
9.10. Setting up an L2TP Tunnel ........................................................................... |
204 |
10.1. Applying a Simple Bandwidth Limit .............................................................. |
211 |
10.2. Applying a Two-Way Bandwidth Limit .......................................................... |
213 |
12.1. A simple ZoneDefense scenario .................................................................... |
238 |
xi

Preface
Intended audience
The target audience for this reference guide is Administrators who are responsible for configuring and managing D-Link Firewalls which are running the NetDefendOS operating system. This guide assumes that the reader has some basic knowledge of networks and network security.
Text structure and conventions
The text is broken down into chapters and subsections. Numbered subsections are shown in the table of contents at the beginning. An index is included at the end of the document to aid with alphabetical lookup of subjects.
Where a "See section" link (such as: see ) is provided in the main text this can be clicked to take the reader directly to that reference.
Text that may appear in the user interface of the product is designated by being in Bold Case. Where is term is being introduced for the first time or being stressed it may appear in a italics.
Where console interaction is shown in the main text outside of an example this will appear in a box with a gray background:
gw-world:/>
Where a web address reference is shown in the text this will open the specified URL in a browser in a new window when clicked (some systems may not allow this). For example: ht- tp://www.dlink.com.
Examples
Examples in the text are denoted by the header Example and appear with a gray background as shown below. They contain a CLI example and/or a Web Interface example as appropriate. (The accompanying "CLI Reference Guide" documents all CLI commands).
Example 1. Example notation
Information about what the example is trying to achieve is found here, sometimes with an explanatory image.
CLI
The Command Line Interface example would appear here. It would start with the command prompt followed by the command:
gw-world:/> somecommand someparameter=somevalue
Web Interface
The Web Interface actions for the example are shown here. They are typically a numbered list showing what items in the tree-view list at the left of the interface or in the menu bar or in a context menu need to be opened followed by information about the data items that need to be entered:
1.Go to Item X > Item Y > Item Z
2.Now enter:
•DataItem1: datavalue1
•DataItem2: datavalue2
xii

Notes to the main text |
Preface |
|
|
|
|
Notes to the main text
Special sections of text which the reader should pay special attention to are indicated by icons on the the left hand side of the page followed by a short paragraph in italicized text. Such sections have the following types and purposes:
Note
This indicates some piece of information that is an addition to the preceding text. It may concern something that is being emphasised or something that is not obvious or explicitly stated in the preceding text.
Tip
This indicates a piece of non-critical information that is useful to know in certain situations but is not essential reading.
Caution
This indicates where the reader should be careful with their actions as an undesirable situation may result if care is not exercised.
Important
This is an essential point that the reader should read and understand.
Warning
This is essential reading for the user as they should be aware that a serious situation may result if certain actions are taken or not taken.
xiii

Chapter 1. Product Overview
This chapter outlines the key features of NetDefendOS.
•About D-Link NetDefendOS, page 1
•NetDefendOS Architecture, page 3
•NetDefendOS Packet Flow, page 6
1.1.About D-Link NetDefendOS
D-Link NetDefendOS is the firmware, the software engine that drives and controls all D-Link Firewall products.
Designed as a network security operating system, NetDefendOS features high throughput performance with high reliability plus super-granular control. In contrast to products built on standard operating systems such as Unix or Microsoft Windows, NetDefendOS offers seamless integration of all subsystems, in-depth administrative control of all functionality as well as a minimal attack surface which helps negate the risk of being a target for security attacks.
From the administrator's perspective the conceptual approach of NetDefendOS is to visualize operations through a set of logical building blocks or objects, which allow the configuration of the product in an almost limitless number of different ways. This granular control allows the administrator to meet the requirements of the most demanding network security scenario.
NetDefendOS is an extensive and feature-rich network operating system. The list below presents the most essential features:
IP Routing |
NetDefendOS provides a variety of options for IP routing in- |
|
cluding static routing, dynamic routing, multicast routing and |
|
advanced virtual routing capabilities. In addition, NetDefen- |
|
dOS supports features such as Virtual LANs, Route Monitor- |
|
ing, Proxy ARP and Transparency. For more information, |
|
please see Chapter 4, Routing. |
Address Translation |
For functionality as well as security reasons, NetDefendOS |
|
supports policy-based address translation. Dynamic Address |
|
Translation (NAT) as well as Static Address Translation |
|
(SAT) is supported, and resolves most types of address trans- |
|
lation needs. This feature is covered in Chapter 7, Address |
|
Translation. |
Firewalling |
At the heart of the product, NetDefendOS features stateful in- |
|
spection-based firewalling for common protocols such as |
|
TCP, UDP and ICMP. As an administrator, you have the pos- |
|
sibility to define detailed firewalling policies based on source |
|
and destination network and interface, protocol, ports, user |
|
credentials, time-of-day and much more. Section 3.5, “The IP |
|
Rule-Set”, describes how to use the firewalling aspects of |
|
NetDefendOS. |
Intrusion Detection and Preven- |
To mitigate application-layer attacks towards vulnerabilities |
tion |
in services and applications, NetDefendOS provides a power- |
|
ful Intrusion Detection and Prevention (IDP) engine. The IDP |
|
engine is policy-based and is able to perform high- |
|
performance scanning and detection of attacks and can per- |
|
form blocking and optional black-listing of attacking hosts. |
1

1.1. About D-Link NetDefendOS |
Chapter 1. Product Overview |
|
|
|
|
|
|
For more information about the IDP capabilities of NetDefen- |
|
|
dOS, please see Section 6.3, “Intrusion Detection and Preven- |
|
|
tion”. |
|
Anti-Virus |
NetDefendOS features integrated gateway anti-virus function- |
|
|
ality. Traffic passing through the gateway can be subjected to |
|
|
in-depth scanning for viruses, and attacking hosts can be |
|
|
blocked and black-listed at your choice. Section 6.4, |
|
|
“Anti-Virus”, provides more information about how to use |
|
|
the integrated anti-virus feature. |
|
Web Content Filtering |
NetDefendOS provides various mechanisms for filtering web |
|
|
content that is deemed inappropriate according to your web |
|
|
usage policy. Web content can be blocked based on category, |
|
|
malicious objects can be removed and web sites can be |
|
|
whitelisted or blacklisted in multiple policies. For more in- |
|
|
formation, please see Section 6.5, “Web Content Filtering”. |
|
Virtual Private Networking |
A device running NetDefendOS is highly suitable for parti- |
|
|
cipating in a Virtual Private Network (VPN). NetDefendOS |
|
|
supports IPsec, L2TP and PPTP based VPNs concurrently, |
|
|
can act as either server or client for all of the VPN types, and |
|
|
can provide individual security policies for each VPN tunnel. |
|
|
Virtual Private Networking is covered in detail by Chapter 9, |
|
|
Virtual Private Networks. |
|
Traffic Management |
With the support of Traffic Shaping, Threshold Rules and |
|
|
Server Load Balancing features, NetDefendOS is optimal for |
|
|
traffic management. The Traffic Shaping feature enables fine- |
|
|
granular limiting and balancing of bandwidth; Threshold |
|
|
Rules allows for implementing various types of thresholds |
|
|
where to alarm or limit network traffic, and Server Load Bal- |
|
|
ancing enables a device running NetDefendOS to distribute |
|
|
network load to multiple hosts. Chapter 10, Traffic Manage- |
|
|
ment, provides more detailed information on the various |
|
|
traffic management capabilities. |
|
Operations and Maintenance |
To facilitate management of a NetDefendOS device, adminis- |
|
|
trative control is enabled through a Web-based User Interface |
|
|
or via the Command Line Interface. In addition, NetDefen- |
|
|
dOS provides very detailed event and logging capabilities and |
|
|
support for monitoring using standards such as SNMP. For |
|
|
more information, please see Chapter 2, Operations and |
|
|
Maintenance. |
|
ZoneDefense |
NetDefendOS can be used to control D-Link switches using |
|
|
the ZoneDefense feature. |
Reading through this documentation carefully will ensure that you get the most out of your NetDefendOS product. In addition to this document, the reader should also be aware of the companion volumes:
•The NetDefendOS CLI Guide which details all NetDefendOS console commands.
•The NetDefendOS Log Reference Guide which details all NetDefendOS log event messages. These documents together form the essential documentation for NetDefendOS operation.
Note
High Availability, Anti-Virus, Web Content Filtering and ZoneDefense are not available with some models as specified in the chapters relating to those features.
2

1.2. NetDefendOS Architecture |
Chapter 1. Product Overview |
|
|
|
|
1.2. NetDefendOS Architecture
1.2.1. State-based Architecture
The NetDefendOS architecture is centered around the concept of state-based connections. Traditional IP routers or switches commonly inspect all packets and then perform forwarding decisions based on information found in the packet headers. With this approach, packets are forwarded without any sense of context which basically eliminates any possibility to detect and analyze complex protocols and enforce corresponding security policies.
A NetDefendOS device, on the contrary, will inspect and forward traffic on a per-connection basis. In other words, NetDefendOS is able to detect when a new connection is being established, and then keeps a small piece of information, a "state", for the entire life-length of that connection. By doing this, NetDefendOS is able to understand the context of the network traffic, which enables the device to perform in-depth traffic scanning, apply bandwidth management and much more. In addition, this approach provides high throughput performance with the added advantage of a design that is highly scalable.
1.2.2. NetDefendOS Building Blocks
The basic building blocks in NetDefendOS are interfaces, logical objects and various types of rules (or rule-sets).
Interfaces are the doorways for network traffic passing through, to or from the system. Without interfaces, a NetDefendOS system has no means for receiving or sending traffic. Several types of interfaces are supported; Physical Interfaces, Physical Sub-Interfaces and Tunnel Interfaces. Physical interfaces corresponds to actual physical Ethernet ports; physical sub-interfaces include VLAN and PPPoE interfaces while tunnel interfaces are used for receiving and sending traffic in VPN tunnels.
The NetDefendOS interface design is symmetric, meaning that the interfaces of the device are not fixed as being on the "insecure outside" or "secure inside" of a network topology. The notion of what is inside and outside is totally for the administrator to define.
Logical objects can be seen as pre-defined building blocks for use by the rule-sets. The address book, for instance, contains named objects representing host and network addresses. Another example of logical objects are services , representing specific protocol and port combinations. Also important objects are the Application Layer Gateway (ALG) objects, used for defining additional parameters on specific protocols such as HTTP, FTP, SMTP and H.323.
Finally, the various rule-sets are used for actually implementing the policies in the system. The most fundamental rule-set is the IP Rules, which is used to define the layer 3 IP filtering policy as well as carrying out address translation and server load balancing. The Traffic Shaping Rules define the policy for bandwidth management, the IPS Rules controls the behavior of the intrusion prevention engine and so forth.
1.2.3. Basic Packet Flow
This section outlines the basic flow for packets received and forwarded by a NetDefendOS device. Please note that this description is simplified to ease the understanding and might not be fully applicable in all scenarios. The basic principle, however, is still valid in all applications.
1.An Ethernet frame is received on one of the Ethernet interfaces in the system. Basic Ethernet frame validation is performed and the packet is dropped if the frame is invalid.
2.The packet is associated with a Source Interface. The source interface is determined as follows:
•If the Ethernet frame contains a VLAN ID (Virtual LAN identifier), the system checks for a configured VLAN interface with a corresponding VLAN ID. If one is found, that VLAN interface becomes the source interface for the packet. If no matching interface is found, the packet is dropped and the event is logged.
3

1.2.3. Basic Packet Flow |
Chapter 1. Product Overview |
|
|
|
|
•If the Ethernet frame contains a PPP payload, the system checks for a matching PPPoE interface. If one is found, that interface becomes the source interface for the packet. If no matching interface is found, the packet is dropped and the event is logged.
•If none the above is true, the receiving Ethernet interface becomes the source interface for the packet.
3.The IP datagram within the packet is passed on to the NetDefendOS Consistency Checker. The consistency checker performs a number of sanity checks on the packet, including validation of checksums, protocol flags, packet length and so forth. If the consistency checks fail, the packet gets dropped and the event is logged.
4.NetDefendOS now tries to lookup an existing connection by matching parameters from the incoming packet. A number of parameters are used in the match attempt, including the source interface, source and destination IP addresses, IP protocol and so forth.
If a match cannot be found, a connection establishment process starts which includes steps 5 to 10 below. If a match is found, the forwarding process continues at step 11 below.
5.The source interface is examined to find out if the interface is a member of a specific routing table. Also, the Virtual Routing Rules are evaluated to determine the correct routing table for the connection.
6.The Access rules are evaluated to find out if the source IP address of the new connection is allowed on the received interface. If no access rule matches then a reverse route lookup will be done. In other words, by default, an interface will only accept source IP addresses that belong to networks routed over that interface. If the access rules or the reverse route lookup determine that the source IP is invalid, then the packet is dropped and the event is logged.
7.A route lookup is being made using the appropriate routing table. The destination interface for the connection has now been determined.
8.The IP rules are now searched for a rule that matches the packet. Basically, the following parameters are part of the matching process: Source and destination interfaces, source and destination network, IP protocol (TCP, UDP, ICMP etc), TCP/UDP ports or ICMP types and schedule (time-of-day).
If a match cannot be found, the packet is dropped.
If a rule is found that matches the new connection, the Action parameter of the rule decides what NetDefendOS should do with the connection. If the action is Drop, the packet is dropped and the event is logged according to the log settings for the rule.
If the action is Allow, the packet is allowed through the system. A corresponding state will be added to the connection table for matching subsequent packets belonging to the same connection. In addition, the Service object which matched the IP protocol and ports might have contained a reference to an Application Layer Gateway (ALG) object. This information is recorded in the state so that NetDefendOS will know that application layer processing will have to be performed on the connection.
Finally, the opening of the new connection will be logged according to the log settings of the rule.
Note
There are actually a number of additional actions available such as address translation and server load balancing. The basic concept of dropping and allowing traffic is still the same.
9.The Intrusion Detection and Prevention (IDP) Rules are now evaluated in a similar way to the IP rules. If a match is found, the IDP data is recorded with the state. By doing this, NetDefendOS will know that IDP scanning is supposed to be conducted on all packets belonging to this
4

1.2.3. Basic Packet Flow |
Chapter 1. Product Overview |
|
|
|
|
connection.
10.The Traffic Shaping and the Threshold Limit Rule-sets are now searched. If a match is found, the corresponding information is recorded with the state. This will enable proper traffic management on the connection.
11.From the information in the state, NetDefendOS now knows what to do with the incoming packet:
•If ALG information is present or if IDP scanning is to be performed, the payload of the packet is taken care of by the TCP Pseudo-Reassembly subsystem, which in turn makes use of the different Application Layer Gateways, layer 7 scanning engines and so forth, to further analyze or transform the traffic.
•If the contents of the packet is encapsulated (i.e. being IPsec, L2TP/PPTP or some other type of tunneled traffic), the interface lists are checked for a matching interface. If one is found, the packet is decapsulated and the payload (the plaintext) is sent into NetDefendOS again, now with source interface being the matched tunnel interface. In other words, the process continues at step 3 above.
•If traffic management information is present, the packet might get queued or otherwise be subjected to actions related to traffic management.
12.Eventually, the packet will be forwarded out on the destination interface according to the state. If the destination interface is a tunnel interface or a physical sub-interface, additional processing such as encryption, and encapsulation and so forth might occur.
The following section provides a set of diagrams which illustrate the flow of packets through NetDefendOS.
5
1.3. NetDefendOS Packet Flow |
Chapter 1. Product Overview |
|
|
|
|
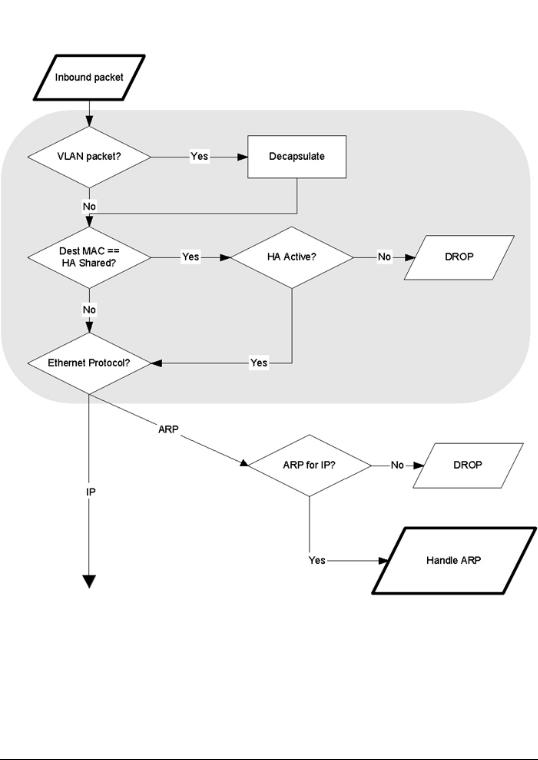
1.3. NetDefendOS Packet Flow
The diagrams in this section provide a summary of the flow of packets through the NetDefendOS state-engine. There are three diagrams, each flowing into the next.
Figure 1.1. Packet Flow Schematic Part I
The packet flow is continued on the following page.
6

1.3. NetDefendOS Packet Flow |
Chapter 1. Product Overview |
|
|
|
|
Figure 1.2. Packet Flow Schematic Part II
The packet flow is continued on the following page.
7
1.3. NetDefendOS Packet Flow |
Chapter 1. Product Overview |
|
|
|
|
Figure 1.3. Packet Flow Schematic Part III
8

1.3. NetDefendOS Packet Flow |
Chapter 1. Product Overview |
|
|
|
|
9

Chapter 2. Operations and Maintenance
This chapter describes the operations and maintenance related aspects of NetDefendOS.
•Configuring NetDefendOS, page 10
•Events and Logging, page 21
•RADIUS Accounting, page 24
•Maintenance, page 28
2.1.Configuring NetDefendOS
2.1.1. Overview
NetDefendOS is designed to give both high performance and high reliability. Not only does it provide an extensive feature set, it also enables the administrator to be in full control of almost every detail of the system. This means the product can be deployed in the most challenging environments.
A good understanding on how NetDefendOS configuration is performed is crucial for proper usage of the system. For this reason, this section provides an in-depth presentation of the configuration subsystem as well as a description of how to work with the various management interfaces.
NetDefendOS provides the following management interfaces:
Web User Interface |
The Web User Interface provides a user-friendly and intuitive |
|
graphical management interface, accessible from a standard |
|
web browser. |
Command Line Interface (CLI) |
The Command Line Interface, accessible locally via serial |
|
console port or remotely using the Secure Shell (SSH) pro- |
|
tocol, provides the most fine-granular control over all para- |
|
meters in NetDefendOS. |
Note
Microsoft Internet Explorer and Firefox are the recommended web-browsers for the web interface. Other browsers may not provide full support.
Access to a management interface is regulated by a remote management policy, where you can restrict management access based on source network, source interface, credentials and so forth. The remote management policy provides a detailed and comprehensive control of all management capabilities. For instance, access to the web interface can be permitted to administrative users on a certain network, while at the same time allowing CLI access for a remote administrator connecting through a specific IPsec tunnel.
By default, Web User Interface access is enabled for users on the network connected via the LAN interface of the firewall (on products where more than one LAN interface is available, LAN1 is the default).
2.1.2. Default User Accounts
NetDefendOS offers several possibilities for storing user information, either using local user databases or external databases.
10

2.1.3. Command Line Interface (CLI) |
Chapter 2. Operations and Maintenance |
|
|
|
|
By default, NetDefendOS has a local user database, AdminUsers, with one user account pre-defined:
•Username admin with password admin.
The admin account has full administrative rights.
Important
For security reasons, it is highly recommended that you change the default password of the default account as soon as possible.
Extra user accounts can be created. These accounts can belong to the "Administrators" user group, in which case they have complete read/write access. Or a user can belong to the "Auditors" user group, in which case they have "read-only" access. For more detailed information about user authentication, please see Chapter 8, User Authentication.
2.1.3. Command Line Interface (CLI)
NetDefendOS provides a Command Line Interface (CLI) for administrators that prefer or require a command-line approach, or who need more granular control of system configuration. The CLI is available either locally through the serial console port, or remotely using the Secure Shell ("SSH") protocol.
The CLI provides a comprehensive set of commands that allow the display and modification of configuration data as well as allowing runtime data to be displayed and allowing system maintenance tasks to be performed.
For a complete reference to all CLI commands, please see the D-Link CLI Reference Guide.
2.1.3.1. CLI Access Methods
Serial Console Port
The serial console port is a RS-232 port that enables access to the CLI through a serial connection to a PC or terminal. To locate the serial console port on your D-Link system, please see the D-Link quickstart guide .
To use the console port, you need the following equipment:
•A terminal or a (portable) computer with a serial port and the ability to emulate a terminal (i.e. using the Hyper Terminal software included in most Microsoft Windows installations). The serial console port uses the following default settings: 9600 baud, No parity, 8 bits and 1 stop bit.
•A RS-232 cable with appropriate connectors. An appliance package includes a RS-232 nullmodem cable.
To connect a terminal to the console port, follow these steps:
1.Set the terminal protocol as described previously.
2.Connect one of the connectors of the RS-232 cable directly to the console port on your system hardware.
3.Connect the other end of the cable to the terminal or the serial connector of the computer running the communications software.
4.Press the enter key on the terminal. The NetDefendOS login prompt should appear on the terminal screen.
11

2.1.4. Web Interface |
Chapter 2. Operations and Maintenance |
|
|
|
|
SSH (Secure Shell)
The SSH (Secure Shell) protocol can be used to access the CLI over the network from a remote host. SSH is a protocol primarily used for secure communication over insecure networks, providing strong authentication and data integrity.
NetDefendOS supports version 1, 1.5 and 2 of the SSH protocol.
SSH access is regulated by the remote management policy in NetDefendOS, and is disabled by default.
Example 2.1. Enabling SSH Remote Access
This example shows how to enable remote SSH access from the lannet network through the lan interface by adding a rule to the remote management policy.
CLI
gw-world:/> add RemoteManagement RemoteMgmtSSH ssh Network=lannet Interface=lan
LocalUserDatabase=AdminUsers
Web Interface
1.Go to System > Remote Management > Add > Secure Shell Management
2.Enter a Name for the SSH remote management policy, e.g. ssh.
3.Select the following from the dropdown lists:
•User Database: AdminUsers
•Interface: lan
•Network: lannet
4.Click OK.
2.1.3.2.Common CLI Operations
Logging on to the CLI
When access to the CLI has been established using one of the methods described in the earlier sections, you need to logon to the system before being able to execute any CLI command. This authentication step is needed to ensure that only trusted users can access the system, as well as providing user information for the audit mechanism.
The CLI uses the common user authentication mechanisms provided. In other words, local user databases as well as external user databases can be used to lookup user credentials for CLI access. For more information about user authentcation, please see section Chapter 8, User Authentication.
When accessing the CLI, the system will respond with the login prompt. Enter your username and press Enter, followed by your password and Enter. After a successful logon you will see the command prompt. If a welcome message has been set then it will be displayed directly after the logon:
gw-world:/>
For security reasons, it can be better to disable or anonymize the CLI welcome message.
Logging off from the CLI
After finishing working with the CLI, you should logout to avoid other people getting unauthorized access to the system. Log off by using the exit or the logout command.
12

2.1.4. Web Interface |
Chapter 2. Operations and Maintenance |
|
|
|
|
2.1.4. Web Interface
NetDefendOS provides a highly versatile web user interface for management of the system using a standard web browser. This allows you to perform remote management from virtually anywhere in the world without having to install any third-party clients.
2.1.4.1. Logging on to the Web Interface
To access the web interface, launch a standard web browser and point the browser at the IP address of the firewall. The factory default address for all D-Link Firewalls is 192.168.1.1.
You MUST use https:// as the protocol of the URL in the browser eg: https://192.168.1.1 (https will protect the username and password with encryption when they are sent to NetDefendOS). A user authentication dialog like the one below will then be presented.
Enter your username and password and click the Login button. If the user credentials are correct, you will be transferred to the main web interface page. This page, with its essential parts highlighted, is shown below.
For information about the default user name and password, please see Section 2.1.2, “Default User Accounts”.
13

2.1.4. Web Interface |
Chapter 2. Operations and Maintenance |
|
|
|
|
Note
Access to the web interface is regulated by the remote management policy. By default, the system will only allow web access from the internal network.
2.1.4.2. Interface Layout
The main web interface page is divided into three major sections:
Menu bar |
The menu bar located at the top of the web interface contains a number of but- |
|
|
tons and drop-down menus that are used to perform configuration tasks as well as |
|
|
for navigation to various tools and status pages. |
|
|
• Home - Navigates to the first page of the web interface. |
|
|
• |
Configuration |
|
|
• Save and Activate - Saves and activates the configuration. |
|
|
• Discard Changes - Discards any changes made to the configuration dur- |
|
|
ing the current session. |
|
|
• View Changes - List the changes made to the configuration since it was |
|
|
last saved. |
|
• Tools - Contains a number of tools that are useful for maintaining the system. |
|
|
• Status - Provides various status pages that can be used for system dia- |
|
|
|
gnostics. |
|
• |
Maintenance |
|
|
• Update Center - Manually update or schedule updates of the intrusion |
|
|
detection and antivirus signatures. |
|
|
• License - View license details or enter activation code. |
|
|
• Backup - Make a backup of the configuration to your local computer or |
|
|
restore a previously downloaded backup. |
|
|
• Reset - Restart the firewall or reset to factory default. |
|
|
• Upgrade - Upgrade the firewall's firmware. |
Navigator |
The navigator located on the left-hand side of the web interface contains a tree |
|
|
representation of the system configuration. The tree is divided into a number of |
|
|
sections corresponding to the major building blocks of the configuration. The tree |
|
|
can be expanded to expose additional sections. |
|
Main Window |
The main window contains configuration or status details corresponding to the |
|
|
section selected in the navigator or the menu bar. |
|
2.1.4.3. Controlling Access to the Web Interface
By default, the web interface is accessible only from the internal network. If you need to enable access from other parts of the network, you can do so by modifying the remote management policy.
Example 2.2. Enabling remote management via HTTPS.
14

2.1.5. Working with Configurations |
Chapter 2. Operations and Maintenance |
|
|
|
|
CLI
gw-world:/> add RemoteManagement RemoteMgmtHTTP https
Network=all-nets Interface=any LocalUserDatabase=AdminUsers HTTPS=Yes
Web Interface
1.Go to System > Remote Management > Add > HTTP/HTTPS Management
2.Enter a Name for the HTTP/HTTPS remote management policy, e.g. https.
3.Check the HTTPS checkbox.
4.Select the following from the dropdown lists:
•User Database: AdminUsers
•Interface: any
•Network: all-nets
5.Click OK.
Caution
The above example is provided for informational purposes only. It is never recommended to expose any management interface to any user on the Internet.
2.1.4.4. Logging out from the Web Interface
When you have finished working in the web interface, you should always logout to prevent other users with access to your workstation to get unauthorized access to the system. Logout by clicking on the Logout button at the right of the menu bar.
2.1.5. Working with Configurations
Configuration Objects
The system configuration is built up by Configuration Objects, where each object represents a configurable item of any kind. Examples of configuration objects are routing table entries, address book entries, service definitions, IP rules and so forth. Each configuration object has a number of properties that constitute the values of the object.
A configuration object has a well-defined type. The type defines the properties that are available for the configuration object, as well as the constraints for those properties. For instance, the IP4Address type is used for all configuration objects representing a named IPv4 address.
In the web user interface the configuration objects are organized into a tree-like structure based on the type of the object.
In the CLI similar configuration object types are grouped together in a category. These categories are different from the structure used in the web user interface to allow quick access to the configuration objects in the CLI. The IP4Address, IP4Group and EthernetAddress types are, for instance, grouped in a category named Address, as they all represent different addresses. Consequently, Ethernet and VLAN objects are all grouped in a category named Interface, as they are all interface objects. The categories have actually no impact on the system configuration; they are merely provided as means to simplify administration.
Listing Configuration Objects
To find out what configuration objects exist, you can retrieve a listing of the objects.
15

2.1.5. Working with Configurations |
Chapter 2. Operations and Maintenance |
|
|
|
|
Example 2.3. Listing Configuration Objects
This example shows how to list all service objects.
CLI
gw-world:/> show Service
A list of all services will be displayed, grouped by their respective type.
Web Interface
1.Go to Objects > Services
2.A web page listing all services will be presented. A list contains the following basic elements:
•Add Button - Displays a dropdown menu when clicked. The menu will list all types of configuration items that can be added to the list.
•Header - The header row displays the titles of the columns in the list. The tiny arrow images next to each title can be used for sorting the list according to that column.
•Rows - Each row in the list corresponds to one configuration item. Most commonly, each row starts with the name of the object (if the item has a name), followed by values for the columns in the list.
A single row in the list can be selected by clicking on the row on a spot where there is no hyperlink. The background color of the row will turn dark blue. Right-clicking the row will bring up a menu where you can choose to edit or delete the object as well as modify the order of the objects.
Displaying a Configuration Object
The most simple operation on a configuration object is just to show its contents, in other words the values of the object properties.
Example 2.4. Displaying a Configuration Object
This example shows how to display the contents of a configuration object representing the telnet service.
CLI
gw-world:/> show Service ServiceTCPUDP telnet
Property |
Value |
----------------- |
------- |
Name: |
telnet |
DestinationPorts: |
23 |
Type: |
TCP |
SourcePorts: |
0-65535 |
SYNRelay: |
No |
PassICMPReturn: |
No |
ALG: |
(none) |
MaxSessions: |
1000 |
Comments: |
Telnet |
The Property column lists the names of all properties in the ServiceTCPUDP class and the Value column lists the corresponding property values.
Web Interface
1.Go to Objects > Services
2.Click on the telnet hyperlink in the list.
3.A web page displaying the telnet service will be presented.
16

2.1.5. Working with Configurations |
Chapter 2. Operations and Maintenance |
|
|
|
|
Note
When accessing object via the CLI you can omit the category name and just use the type name. The CLI command in the above example, for instance, could be simplified to:
gw-world:/> show ServiceTCPUDP telnet
Editing a Configuration Object
When you need to modify the behavior of NetDefendOS, you will most likely need to modify one or several configuration objects.
Important
Changes to a configuration object will not be applied to a running system until you activate and commit the changes.
Example 2.5. Editing a Configuration Object
This example shows how to edit the Comments property of the telnet service.
CLI
gw-world:/> set Service ServiceTCPUDP telnet Comments="Modified Comment"
Show the object again to verify the new property value:
gw-world:/> show Service ServiceTCPUDP telnet
Property |
Value |
----------------- |
------- |
Name: |
telnet |
DestinationPorts: |
23 |
Type: |
TCP |
SourcePorts: |
0-65535 |
SYNRelay: |
No |
PassICMPReturn: |
No |
ALG: |
(none) |
MaxSessions: |
1000 |
Comments: |
Modified Comment |
Web Interface
1.Go to Objects > Services
2.Click on the telnet hyperlink in the list
3.In the Comments textbox, enter your new comment
4.Click OK
Verify that the new comment has been updated in the list.
Adding a Configuration Object
Example 2.6. Adding a Configuration Object
This example shows how to add a new IP4Address object, here using the IP address 192.168.10.10, to the Ad-
17
Loading...