


Full HD 180° Outdoor Wi-Fi Camera
DCS-2670L
QUICK
INSTALLATION
GUIDE
INSTALLATIONSANLEITUNG
GUIDE D’INSTALLATION
GUÍA DE INSTALACIÓN GUIDA DI INSTALLAZIONE INSTALLATIEHANDLEIDING INSTRUKCJA INSTALACJI
INSTALAČNÍ PŘÍRUČKA
TELEPÍTÉSI SEGÉDLET
INSTALLASJONSVEILEDNING INSTALLATIONSVEJLEDNING
ASENNUSOPAS
INSTALLATIONSGUIDE
GUIA DE INSTALAÇÃO
ΟΔΗΓΟΣ ΓΡΗΓΟΡΗΣ ΕΓΚΑΤΑΣΤΑΣΗΣ VODIČ ZA BRZU INSTALACIJU
KRATKA NAVODILA ZA UPORABO GHID DE INSTALARE RAPIDĂ

ENGLISH
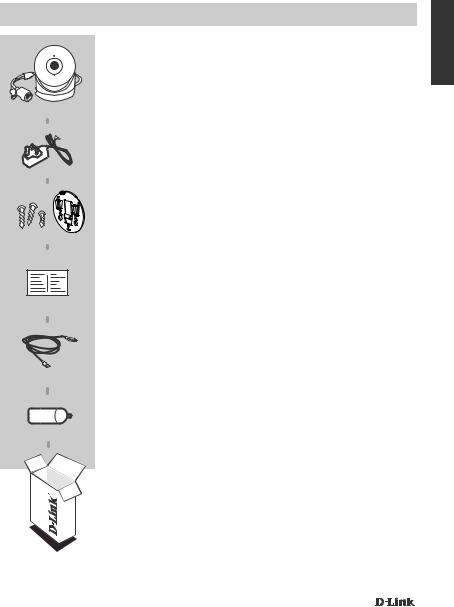
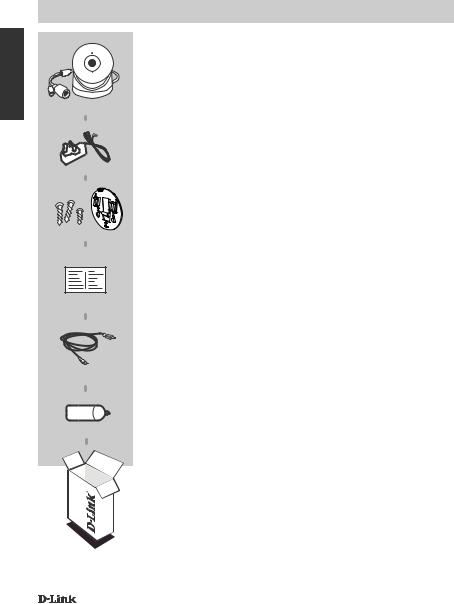
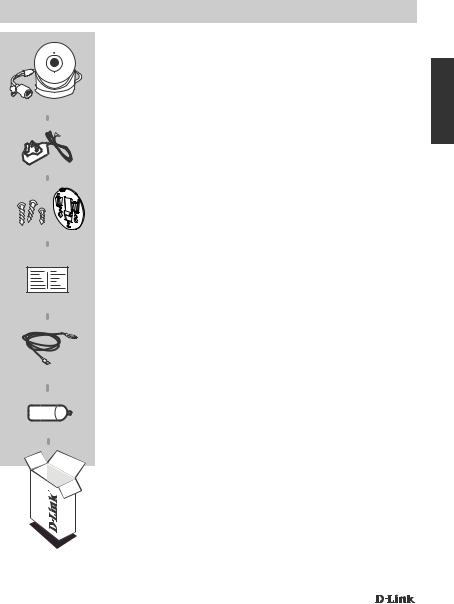
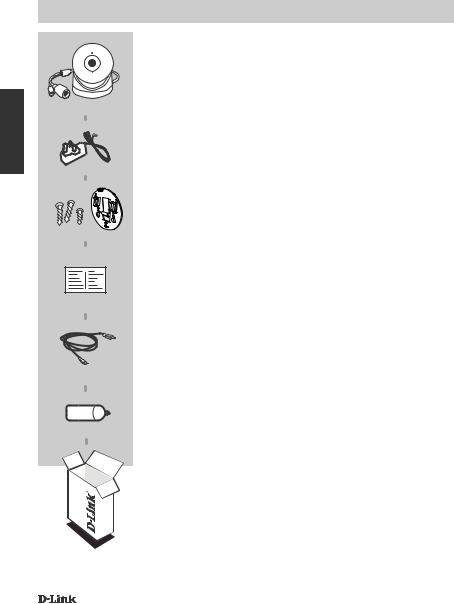
PACKAGE CONTENTS
Full HD 180° Outdoor Wi-Fi Camera
DCS-2670L
POWER ADAPTER
MOUNTING KIT
QUICK INSTALLATION CARD
ETHERNET CABLE
WATERPROOF CABLE CONNECTOR
If any of these items are missing from your package, contact your reseller.
2 |
DCS-2670L |
|
|

SYSTEM REQUIREMENTS
•A broadband Internet connection
•Existing 10/100 Ethernet-based network or 802.11 n/g/b router (a D-Link router is recommended)
•iPhone®, iPad®, iPod® touch or Android™ smartphone or tablet (please refer to the mobile app's store page to check whether your device is compatible)
•A mobile device with Bluetooth 4.0 is required for Bluetooth setup
PRODUCT SETUP
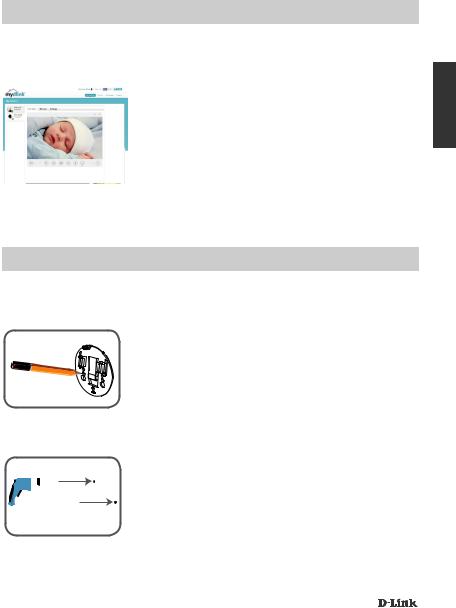
SETTING UP YOUR CAMERA WITH MYDLINK LITE
Please follow the instructions below to set up your mydlink camera.
Step 1: On your mobile device, download mydlink Lite by searching for mydlink Lite in the iTunes App Store or Google Play.
Step 2: Launch the mydlink Lite app and create a new account or sign in to your existing account.
Step 3: The app will guide you through the rest of the setup process. When asked to scan the QR code, use the code on the provided Quick Install Card or on the device label.
Congratulations, your DCS-2670L is now ready to use! Be sure to check the mydlink.com website periodically for the latest firmware updates to keep your product protected and up to date with the latest features.
Note: If you experience issues registering this camera with your mydlink account, or if you purchased an open box or resold unit, perform a hard reset by pressing and holding the Reset button on the device for 10 seconds while the device is powered on. If you are returning the device to the place of purchase, please perform the hard reset procedure to clear the device of any personal data.
DCS-2670L
ENGLISH
3
ENGLISH
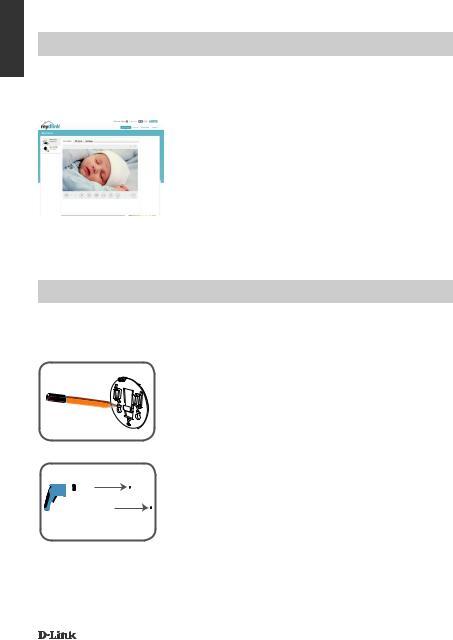
mydlink PORTAL
After registering your DCS-2670L camera with a mydlink account in the mydlink Lite mobile app, you will be able to remotely access your camera from the mydlink website.
Step 1:
Open a web browser and go to www.mydlink.com, then sign into mydlink.
Step 2:
Select your camera from the device list, and your camera’s Live View will appear.
MOUNTING THE CAMERA
Please refer to the steps below to assist you with mounting the camera. It is recommended that you configure the camera before mounting.
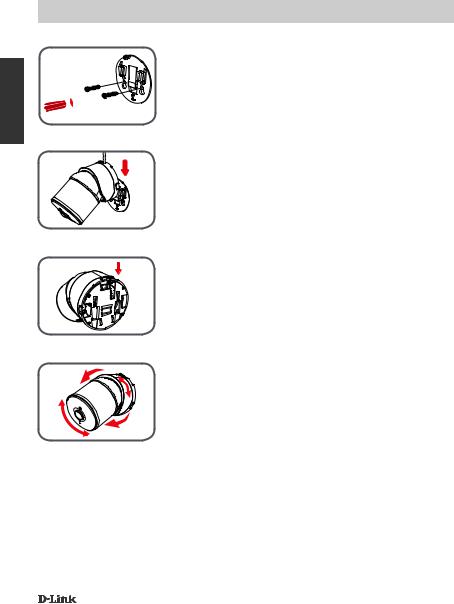
Step 1:
Place the baseplate where you want to position the camera and use a pencil to mark the holes. You can use the large holes for a removable installation, or the small holes for a fixed one. Make sure the lock arrow on the plate is pointing down.
Step 2:
Depending on the material of the wall or ceiling, use proper tools to drill holes 25 mm deep with a 6 mm drill bit where you marked. If the wall is made out of concrete, drill the holes first, then insert the plastic anchors to support the screws.
4 |
DCS-2670L |
|
|

MOUNTING THE CAMERA
Step 3:
Place the baseplate over the holes that are in the wall. Make sure to align the baseplate holes with the holes in the wall. Use the supplied screws to attach the baseplate to the surface of the wall.
Step 4:
Place the camera over the baseplate and align the nub with the hole on the camera. Attach the camera by sliding it in the direction of the arrow. Then screw the baseplate to the camera body.
Step 5:
Once the camera is secured to the baseplate, use a screwdriver to fasten the screw next to the hole at the back of the camera body.
Step 6:
Adjust the angles via the camera body and rotate the silver base until you achieve your desired viewing angle.
ENGLISH
DCS-2670L |
5 |
|
|
ENGLISH
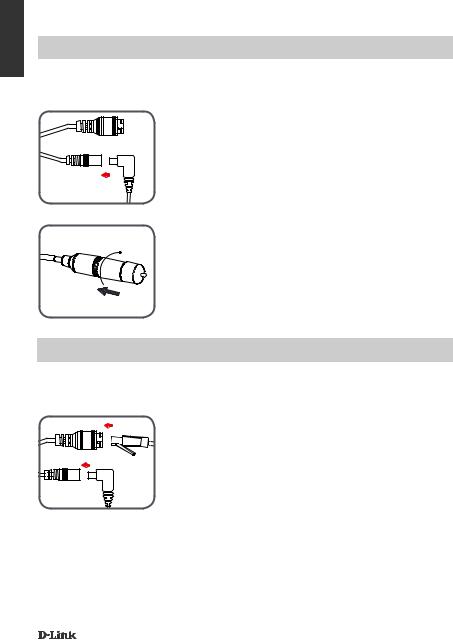
WATERPROOFING YOUR CAMERA
WATERPROOFING YOUR CONNECTORS WHEN USING WI-FI
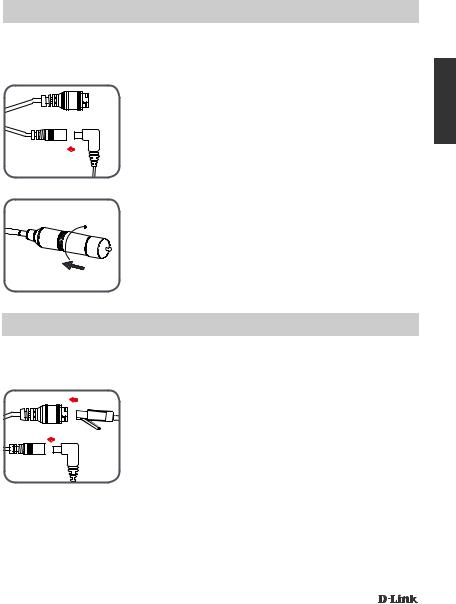
After configuring your camera, follow the instructions below to prevent water from entering the camera's Ethernet and Power Cable connections.
Step 1:
Plug the power adapter into the dongle.
Step 2:
To waterproof the Ethernet socket, align the cap according to the thread and twist it clockwise to seal it.
WATERPROOFING YOUR ETHERNET CONNECTOR
If you are using an Ethernet connection, follow the instructions below to prevent water from entering the camera's Ethernet cable connector.
Step 1:
Connect the power and Ethernet cables.
6 |
DCS-2670L |
|
|
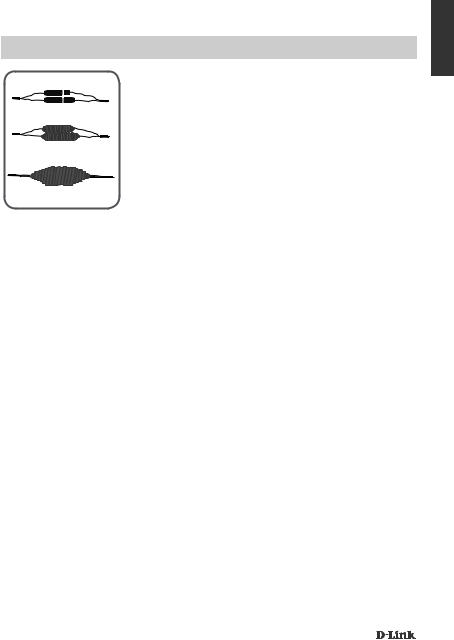
WATERPROOFING YOUR CAMERA
USING WATERPROOF TAPE
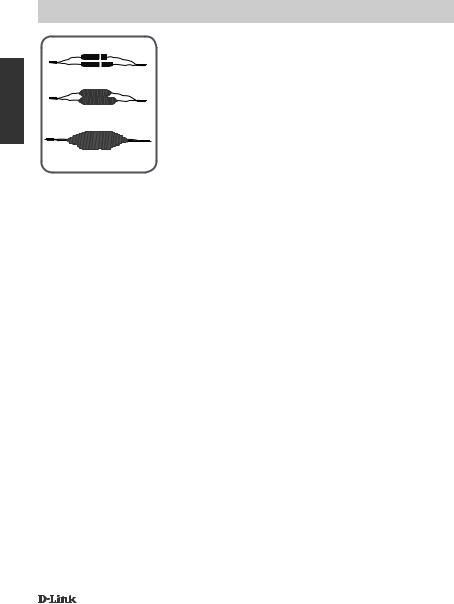
Wind waterproof tape, such as butyl rubber or vinyl tape, around the individual cables and connectors in a half-overlapping manner then wrap all the connectors together. Be sure to cover all of the connectors and any unsheathed cables.
Note: Butyl rubber tape should be wrapped by stretching the tape to about twice its length, and wrapping it around the cable. Failure to stretch the tape sufficiently will result in insufficient waterproofing performance.
Caution: Due to its IP65 rating we recommend that you install your device under a roof or a shelter to protect the Power and Ethernet connections from water seepage. However, the cables and connections need to be located away from all potential water hazards.
ENGLISH
DCS-2670L |
7 |
|
|

ENGLISH
TROUBLESHOOTING
FREQUENTLY ASKED QUESTIONS
1.WHY IS THE CAMERA VIEW HAZY OR BRIGHT WHEN USING NIGHT VISION MODE?
The IR night vision lights on the camera may be reflecting off of a nearby surface or window. Try repositioning your camera to avoid reflections or glare.
2.WHAT CAN I DO IF I FORGET MY CAMERA PASSWORD?
If you forget your camera password, you will need to perform a hard reset of your camera. This process will change all your settings back to the factory defaults.
To reset your camera, please use an unfolded paperclip to press and hold the RESET button for at least 10 seconds while your camera is plugged in.
3.WHAT CAN I DO IF MY DCS-2670L IS NOT WORKING CORRECTLY?
Reset the camera (see next step) and run the setup steps on page 3 again.
To make sure your hardware is installed correctly, make sure that:
-the power LED is green
-your Internet connection is working
-your router’s LAN & WAN connections are working
-your router supports UPnP®
-your camera is on the same network as your mobile device
-both your mobile device and camera have a working Internet connection
If your camera is still not working, check your router and make sure it has the latest firmware.
TECHNICAL SUPPORT |
dlink.com/support |
|
|
8 |
DCS-2670L |
|
|
PACKUNGSINHALT
FULL HD 180° WLAN-AUSSENKAMERA
DCS-2670L
STROMADAPTER/NETZTEIL
MONTAGESET
KURZINSTALLATIONSKARTE
ETHERNET-KABEL
WASSERDICHTER KABELANSCHLUSS
DEUTSCH
Wenn eines dieser Elemente in Ihrer Packung fehlt, wenden Sie sich bitte an Ihren Fachhändler.
DCS-2670L |
9 |
|
|

SYSTEMVORAUSSETZUNGEN
DEUTSCH |
|
|
|
|
|
• Eine Breitbandinternetverbindung |
|||
|
|
|||
|
|
• Ein bestehendes 10/100 Ethernet-basiertes Netzwerk oder einen 802.11 n/g/b |
||
|
|
Router (ein D-Link-Router wird empfohlen) |
||
|
|
• Ein iPhone®, iPad®, iPod® Touch oder Android™ Smartphone oder Tablet (Auf |
||
|
||||
|
|
der Seite des mobilen App Store können Sie überprüfen, ob Ihr Gerät kompatibel |
||
|
|
ist.) |
||
|
|
• Ein Mobilgerät mit Bluetooth 4.0 ist für die Bluetooth-Einrichtung erforderlich. |
||
|
|
EINRICHTUNG DES PRODUKTS |
||
|
|
|
||
|
|
EINRICHTEN IHRER KAMERA MIT MYDLINK LITE |
||
|
|
Führen Sie die folgenden Schritte zum Einrichten Ihrer mydlink-Kamera durch. |
||
|
|
Schritt 1: Suchen Sie nach mydlink Lite im iTunes App Store oder bei Google |
||
|
|
Play und laden Sie mydlink Lite auf Ihr Mobilgerät herunter. |
||
|
|
|
|
|
Schritt 2: Starten Sie die mydklink Lite-App und erstellen Sie ein neues Konto oder melden Sie sich mit Ihrem bestehenden Konto an.
Schritt 3: Die App führt Sie durch den weiteren Einrichtungsprozess. Wenn Sie aufgefordert werden, einen QR-Code zu scannen, verwenden Sie den Code oder auf dem Geräteaufkleber.
Ihre DCS-2670L kann nun verwendet werden. Suchen Sie in regelmäßigen Abständen auf der Website mydlink.com nach Firmware-Aktualisierungen, um anhand neuer Firmware Ihr Produkt geschützt und, was seine Funktionen betrifft, auf dem neuesten Stand zu halten.
Hinweis: Wenn Sie Probleme bei der Registrierung dieser Kamera in Ihrem mydlink-Konto haben oder wenn Sie ein gebrauchtes Gerät gekauft haben oder das Gerät weiterverkaufen, sollten Sie einen Hard Reset durchführen, indem Sie die Reset-Taste am Gerät 10 Sekunden lang gedrückt halten, während das Gerät eingeschaltet ist. Wenn Sie das Gerät am Kaufort zurückgeben, führen Sie bitte den Hard Reset durch, um alle persönlichen Daten vom Gerät zu löschen.
10 |
DCS-2670L |
|
|
mydlink PORTAL
Nach Registrierung Ihrer DCS-2670L-Kamera in einem mydlink-Konto mithilfe der mydlink mobilen Lite-App können Sie aus der Ferne (remote) über die mydlink-Website auf Ihre Kamera zugreifen.
Schritt 1:
Öffnen Sie den Internet Explorer und rufen Sie die Webseite www.mydlink.com auf. Melden Sie sich dann in mydlink an.
Schritt 2:
Wählen Sie Ihre Kamera von der Geräteliste. Es erscheint die Live-Anzeige Ihrer Kamera.
MONTAGE DER KAMERA
Nutzen Sie die unten beschriebenen Schritte als Hilfe bei der Montage der Kamera. Es ist ratsam, zuerst die Kamera zu konfigurieren, bevor Sie die Montage der Kamera vornehmen.
Schritt 1:
Halten Sie die Bodenplatte an der Stelle gegen die Wand bzw. Decke, wo Sie sie anbringen
möchten. Markieren Sie mit einem Bleistift, wo die Montagelöcher gebohrt werden sollen. Sie können die großen Öffnungen verwenden, wenn die Kamera wieder entfernt werden soll, und die kleineren Öffnungen für eine dauerhafte Befestigung. Achten Sie darauf, dass die Pfeile auf der Bodenplatte nach unten zeigen.
Schritt 2:
Verwenden Sie die für die Beschaffenheit der Wand oder Decke entsprechend geeigneten Werkzeuge, um dort Löcher 2,5 cm tief mit einem 6 mm Bohreinsatz zu bohren, wo Sie die Markierungen vorgenommen haben. Besteht die Wand aus Beton, bohren Sie zunächst die Löcher, setzen Sie dann die Kunststoffdübel und anschließend die Schrauben ein.
DEUTSCH
DCS-2670L |
11 |
|
|

DEUTSCH
MONTAGE DER KAMERA
Schritt 3:
Setzen Sie die Bodenplatte über die Löcher in der Wand. Richten Sie die Löcher der Bodenplatte genau an den Löchern in der Wand aus. Verwenden Sie die mitgelieferten Schrauben, um die Bodenplatte an der Wand anzubringen.
Schritt 4:
Platzieren Sie die Kamera über der Bodenplatte und richten Sie die Kerbe an der Öffnung an der Kamera aus. Bringen Sie die Kamera an, indem Sie sie in Pfeilrichtung einschieben. Schrauben Sie dann die Bodenplatte an das Kameragehäuse.
Schritt 5:
Sobald die Kamera an der Bodenplatte gesichert ist, verwenden Sie einen Schraubenzieher, um die Schraube neben der Öffnung auf der Rückseite des Kameragehäuses festzuziehen.
Schritt 6:
Passen Sie die Winkel über das Kameragehäuse an und drehen Sie die silberne Platte, bis Sie den gewünschten Sichtwinkel erreicht haben.
12 |
DCS-2670L |
|
|

WASSERDICHTE VERSIEGELUNG IHRER KAMERA
ABDICHTEN IHRER ANSCHLÜSSE, WENN SIE WLAN VERWENDEN
Nach der Konfiguration Ihrer Kamera befolgen Sie die Anweisungen unten um zu verhindern, dass Wasser in die Ethernetund Netzkabelanschlüsse Ihrer Kamera dringt.
Schritt 1:
Stecken Sie das Netzteil in den Dongle.
Schritt 2:
Um die Ethernet-Buchse wasserdicht zu machen, richten Sie die Kappe am Gewinde aus und schrauben sie im Uhrzeigersinn ein, um den Anschluss abzudichten.
ABDICHTEN IHRES ETHERNET-ANSCHLUSSES
Wenn Sie eine Ethernet-Verbindung verwenden, befolgen Sie die Anweisungen unten um zu verhindern, dass Wasser in den EthernetKabelanschluss Ihrer Kamera eindringt.
Schritt 1:
Schließen Sie das Netzkabel und die Ethernet-
Kabel an.
DEUTSCH
DCS-2670L |
13 |
|
|

DEUTSCH
WASSERDICHTE VERSIEGELUNG IHRER KAMERA
VERWENDUNG VON WASSERDICHTEM KLEBEBAND
Wickeln Sie wasserdichtes Klebeband wie Butylkautschukoder Vinylklebeband so um die einzelnen Kabel und Anschlüsse, dass sich die Streifen halb überlappen. Umwickeln Sie dann alle Anschlüsse gemeinsam. Achten Sie darauf, dass alle Anschlüsse und frei liegenden Kabel abgedeckt sind.
Hinweis: Butylkautschuk-Klebeband sollte beim Wickeln um das Kabel auf die doppelte Länge gedehnt werden. Wird das Band nicht ausreichend gedehnt, wird kein ausreichender Schutz vor Wasser erreicht.
Warnhinweis: Aufgrund der IP65-Schutzklasse empfehlen wir, dass Sie Ihr Gerät unter einem Dach oder Vorsprung installieren, um die Netzund
Ethernetanschlüsse vor eindringendem Wasser zu schützen. Diese Kabel und Verbindungen müssen sich jedoch fern von allen möglichen Wassergefahren befinden.
14 |
DCS-2670L |
|
|

FEHLERBEHEBUNG
HÄUFIG GESTELLTE FRAGEN
1.WARUM IST DIE ANZEIGE DER KAMERA TRÜB ODER HELL, WENN ICH DEN NACHTSICHTMODUS VERWENDE?
Möglicherweise werden die IR Nachtsicht-Leuchten auf der Kamera von einer Oberfläche oder einem Fenster in der Nähe reflektiert. Positionieren Sie die Kamera neu, um Reflexionen oder ein Blenden zu verhindern.
2.WAS KANN ICH TUN, WENN ICH MEIN KAMERA-KENNWORT VERGESSEN HABE?
Wenn Sie Ihr Kamera-Kennwort vergessen haben, müssen Sie alle Einstellungen Ihrer Kamera zurücksetzen (Hard Reset). Dieser Vorgang setzt alle Ihre Einstellungen auf die werkseitigen Standardeinstellungen zurück.
Um die Einstellungen Ihrer Kamera zurückzusetzen, verwenden Sie eine entsprechend auseinandergezogene Büroklammer (oder einen ähnlich spitzen Gegenstand) und drücken und halten Sie die RESET-Taste mindestens 10 Sekunden lang, während Ihre Kamera angeschlossen ist.
3.WAS KANN ICH TUN, WENN MEINE DCS-2670L NICHT ORDNUNGSGEMÄSS FUNKTIONIERT?
Setzen Sie die Kamera zurück (siehe nächster Schritt) und führen Sie die Einrichtungsschritte auf Seite 10 erneut durch.
Prüfen Sie Folgendes um sicherzustellen, dass die Hardware ordnungsgemäß installiert wurde:
-die Power-LED leuchtet grün
-Ihre Internetverbindung funktioniert
-die LANund WAN-Verbindungen Ihres Routers funktionieren ordnungsgemäß
-Ihr Router unterstützt UPnP®
-Ihre Kamera befindet sich im gleichen lokalen Netzwerk wie Ihr Mobilgerät
-sowohl Ihr Mobilgerät als auch die Kamera haben eine funktionierende Internetverbindung
Wenn Ihre Kamera immer noch nicht läuft, überprüfen Sie den Router und stellen sicher, dass die neueste Firmware installiert ist.
TECHNISCHER SUPPORT |
dlink.com/support |
|
|
DEUTSCH
DCS-2670L |
15 |
|
|
CONTENU DE LA BOÎTE
FRANÇAIS
CAMÉRA WI-FI D'EXTÉRIEUR FULL HD 180°
DCS-2670L
ADAPTATEUR SECTEUR
KIT DE MONTAGE
CARTE D'INSTALLATION RAPIDE
CÂBLE ETHERNET
CÂBLE DU CONNECTEUR ÉTANCHE
Contactez immédiatement votre revendeur s’il manque l’un de ces éléments de la boîte.
16 |
DCS-2670L |
|
|

CONFIGURATION SYSTÈME REQUISE
|
|
|
|
• Une connexion Internet haut débit |
|
||
FRANÇAIS |
|||
• Réseau Ethernet 10/100 ou routeur 802.11 n/g/b (un routeur D-Link est |
|||
|
|||
recommandé) |
|
||
• iPhone®, iPad®, iPod® ou Android™ (Reportez-vous à la page de la boutique |
|
||
d'applications mobiles pour vérifier si votre périphérique est compatible.) |
|
||
• Un périphérique mobile avec Bluetooth 4.0 est requis pour la configuration |
|
||
Bluetooth |
|
||
CONFIGURATION DU PRODUIT |
|
||
CONFIGURATION DE VOTRE CAMÉRA AVEC MYDLINK LITE
Veuillez suivre les instructions ci-dessous pour configurer votre caméra mydlink.
Étape 1 : Téléchargez mydlink Lite sur votre appareil mobile en recherchant mydlink Lite dans l'iTunes App Store ou Google Play.
Étape 2 : Lancez l'application mydlink Lite et créez un compte ou connectez-vous à votre compte existant.
Étape 3 : L'application vous guidera à travers le reste du processus de configuration. Lorsque l'on vous demande de scanner un code QR, utilisez le code qui se trouve sur la carte d'installation rapide incluse, ou sur l'étiquette du périphérique.
Félicitations, votre DCS-2670L est maintenant prête à l'emploi ! N'oubliez pas de visiter régulièrement le site Web mydlink.com pour rechercher les dernières mises à jour du microprogramme afin de préserver la sécurité de votre produit et de rester à jour avec les dernières fonctions.
Remarque : Si vous rencontrez des problèmes pour enregistrer cette caméra sur votre compte mydlink ou si vous avez acheté une boîte ouverte ou un périphérique de seconde main, effectuez une réinitialisation matérielle en appuyant sur le bouton Reset du périphérique pendant 10 secondes alors qu'il est sous tension.
Si vous devez renvoyer le périphérique au lieu d'achat, veuillez suivre la procédure de réinitialisation matérielle pour effacer toutes les données personnelles du périphérique.
DCS-2670L |
17 |
|
|
Portail MYDLINK
FRANÇAIS
Après avoir enregistré votre caméra DCS-2670L avec un compte mydlink dans l'application mobile mydlink Lite, vous pourrez accéder à votre caméra à distance à partir du site Web mydlink.
Étape 1 :
Ouvrez un navigateur Web et accédez à www. mydlink.com, puis inscrivez-vous à mydlink.
Étape 2 :
Sélectionnez votre caméra dans la liste de périphériques et la vidéo en direct apparaît.
INSTALLATION DE LA CAMÉRA
Reportez-vous aux étapes ci-dessous pour vous aider à monter la caméra. Nous recommandons de configurer la caméra avant de l'installer.
Étape 1 :
Placez la plaque de base à l'endroit où vous voulez placer la caméra et utilisez un crayon pour marquer les trous. Vous pouvez utiliser les grands orifices pour une installation amovible, ou les petits orifices pour une installation fixe. Assurez-vous que la flèche du verrou est orientée vers le bas.
Étape 2 :
En fonction du matériau de la paroi ou du plafond, utilisez les outils appropriés pour percer des trous de 25 mm de profondeur à l'aide d'un foret de 6 mm aux endroits où vous avez marqué. Si le mur est fait de béton, percez d'abord les trous, puis insérez les chevilles en plastique pour tenir les vis.
18 |
DCS-2670L |
|
|

INSTALLATION DE LA CAMÉRA
Étape 3 :
Placez la plaque de base sur les trous dans le mur. Assurez-vous de bien aligner les trous du socle de la caméra avec les trous dans le mur. Utilisez les vis fournies pour fixer le socle sur la surface du mur.
Étape 4 :
Placez la caméra sur la plaque de base et alignez la languette sur l'orifice de la caméra. Fixez la caméra en la faisant glisser dans le sens de la flèche. Puis, vissez la plaque de base sur le corps de la caméra.
Étape 5 :
Une fois la caméra fixée sur la plaque de base, utilisez un tournevis pour fixer la vis à côté de l'orifice, à l'arrière du corps de la caméra.
Étape 6 :
Réglez les angles via le corps de la caméra et faites pivoter la base argentée jusqu'à ce que vous atteignez l'angle de vision souhaité.
FRANÇAIS
DCS-2670L |
19 |
|
|

FRANÇAIS
ÉTANCHÉIFICATION DE VOTRE CAMÉRA
ÉTANCHÉIFICATION DE VOS CONNECTEURS LORSQUE VOUS UTILISEZ LE WI-FI
Après avoir configuré votre caméra, suivez les instructions ci-dessous pour éviter que de l'eau ne pénètre à l'intérieur des connexions Ethernet et du câble d'alimentation de la caméra.
Étape 1 :
Branchez l'adaptateur d'alimentation sur le dongle.
Étape 2 :
Pour étanchéifier la prise Ethernet, alignez le capuchon sur le pas de vis et tournez-le dans le sens des aiguilles d'une montre pour assurer l'étanchéité.
ÉTANCHÉIFICATION DU CONNECTEUR ETHERNET
Si vous utilisez une connexion Ethernet, suivez les instructions ci-dessous pour éviter que de l'eau ne pénètre dans le connecteur du câble Ethernet de la caméra.
Étape 1 :
Connectez les câbles d'alimentation et Ethernet.
20 |
DCS-2670L |
|
|
ÉTANCHÉIFICATION DE VOTRE CAMÉRA
UTILISATION D'UN RUBAN ADHÉSIF ÉTANCHE
Enroulez du ruban étanche, tel que du caoutchouc butyle de l'adhésif en vinyle autour des câbles individuels et des connecteurs selon un recouvrement partiel, puis enveloppez les connecteurs ensemble. Veillez à bien recouvrir tous les connecteurs et tous les câbles sans gaine.
Remarque : Le ruban adhésif en caoutchouc butyle doit être enroulé en l’étirant d’environ le double de sa longueur, et en l'enroulant autour du câble. Si vous n'étirez pas suffisamment le ruban adhésif, les performances d'étanchéité seront insuffisantes.
Attention : En raison de la classification IP65, nous vous recommandons d'installer votre périphérique sous un toit ou un abri afin de protéger les connexions d'alimentation et Ethernet des infiltrations. Toutefois, les câbles et les connexions doivent être éloignés de tout risque potentiel lié à l'eau.
FRANÇAIS
DCS-2670L |
21 |
|
|

RÉSOLUTION DES PROBLÈMES
FOIRE AUX QUESTIONS
FRANÇAIS |
1. POURQUOI LA VUE DE LA CAMÉRA EST-ELLE BRUMEUSE OU LUMINEUSE |
|
LORS DE L'UTILISATION DU MODE DE VISION NOCTURNE ? |
||
|
||
|
Les lumières infrarouges pour vision nocturne de la caméra peuvent être |
|
|
réfléchies par une surface ou une fenêtre proche. Essayez de repositionner |
|
|
votre caméra pour éviter les réflexions ou l'éblouissement. |
|
|
2. QUE PUIS-JE FAIRE SI J'OUBLIE LE MOT DE PASSE DE MA CAMÉRA ? |
|
|
||
|
Si vous oubliez le mot de passe de votre caméra, vous devrez réaliser une |
|
|
réinitialisation matérielle de votre appareil. Cette procédure réinitialise tous vos |
|
|
paramètres. |
|
|
Pour réinitialiser votre caméra, utilisez un trombone déplié et appuyez sur |
|
|
le bouton RÉINITIALISATION pendant au moins 10 secondes alors que la |
|
|
caméra est branchée. |
|
|
3. QUE FAIRE SI MA DCS-2670L NE FONCTIONNE PAS CORRECTEMENT ? |
|
|
Réinitialisez la caméra (voir l'étape suivante) et réexécutez les étapes de |
|
|
configuration en page 17. |
|
|
Pour vous assurer que le matériel est bien installé, vérifiez les points suivants : |
|
|
- le voyant d'alimentation est allumé en vert |
|
|
- La connexion Internet est établie |
|
|
- Les connexions LAN et WAN du routeur fonctionnent |
|
|
- Le routeur prend en charge le protocole UPnP® |
|
|
- La caméra est sur le même réseau que votre appareil mobile |
|
|
- L'appareil mobile et la caméra doivent l’un et l’autre avoir une connexion |
|
|
Internet effective |
|
|
Si la caméra ne fonctionne toujours pas, vérifiez le routeur et assurez-vous que |
|
|
la version du microprogramme est la toute dernière. |
SUPPORT TECHNIQUE |
dlink.com/support |
|
|
22 |
DCS-2670L |
|
|
¿QUÉ CONTIENE LA CAJA?
CÁMARA WI-FI EXTERIOR FULL HD 180°
DCS-2670L
ADAPTADOR DE ALIMENTACIÓN
KIT DE MONTAJE
TARJETA DE INSTALACIÓN RÁPIDA
CABLE ETHERNET
CONECTOR IMPERMEABLE DEL CABLE
Si falta cualquiera de estos componentes del paquete, póngase en contacto con el proveedor.
ESPAÑOL
DCS-2670L |
23 |
|
|

REQUISITOS DEL SISTEMA
|
|
|
|
|
|
|
|
• Una conexión a Internet de banda ancha |
|||
|
|
• Red existente basada en 10/100 Ethernet o router 802.11 n/g/b (se recomienda |
|||
|
|
un router D-Link) |
|||
ESPAÑOL |
|||||
|
• Teléfono inteligente o tableta iPhone®, iPad®, iPod® touch o Android (consulte la |
||||
|
|
página del almacén de aplicaciones móviles para comprobar si el dispositivo es |
|||
|
|
compatible) |
|||
|
|
• Se requiere un dispositivo móvil con Bluetooth 4.0 para la configuración de |
|||
|
|
Bluetooth |
|||
|
|
CONFIGURACIÓN DEL PRODUCTO |
|||
|
|
|
|||
|
|
CONFIGURACIÓN DE LA CÁMARA CON MYDLINK LITE |
|||
|
|
Siga las instrucciones que aparecen a continuación para configurar la cámara |
|||
|
|
mydlink. |
|||
|
|
Paso 1: En su dispositivo móvil, descargue mydlink Lite buscando mydlink Lite |
|||
|
|
en App Store o en Google Play. |
|||
|
|
|
|
|
|
|
|
|
|
|
|
Paso 2: Inicie la aplicación mydlink Lite y cree una nueva cuenta o inicie sesión en su cuenta existente.
Paso 3: La aplicación le guiará a través del resto del proceso de configuración. Cuando se le pida que lea el código QR, utilice el código existente en la tarjeta de instalación rápida que se proporciona o en la etiqueta del dispositivo.
Felicidades, la DCS-2670L ya esta lista para su uso. Asegúrese de consultar el sitio web mydlink.com periódicamente para buscar las últimas actualizaciones de firmware y así mantener el producto protegido y actualizado con las últimas características.
Nota: Si tiene problemas para registrar esta cámara con su cuenta de mydlink o si ha adquirido una unidad abierta o de segunda mano, lleve a cabo una
reinicialización completa pulsando y manteniendo pulsado el botón de reinicio del dispositivo durante 10 segundos mientras éste está encendido. Si va a devolver el dispositivo al lugar en el que realizó la adquisición, lleve a cabo una reinicialización completa para borrar los datos personales del dispositivo.
24 |
DCS-2670L |
|
|
Portal de MYDLINK
Después de registrar su cámara DCS-2670L con una cuenta mydlink en la aplicación móvil mydlink Lite, podrá acceder remotamente a la cámara desde el sitio web de mydlink.
Paso 1:
Abra un navegador de Internet, vaya a www.mydlink. com y, a continuación, regístrese en mydlink.
Paso 2:
Seleccione su cámara de la lista de dispositivos y aparecerá la visualización en directo de su cámara.
MONTAJE DE LA CÁMARA
ESPAÑOL
Consulte los pasos siguientes para que le ayuden con el montaje de la cámara. Se recomienda configurar la cámara antes de montarla.
Paso 1:
Coloque la placa base en el lugar en el que desee colocar la cámara y utilice un lápiz para marcar los orificios. Puede usar los orificios grandes para una instalación desmontable o los pequeños para una fija. Asegúrese de que la flecha de bloqueo en la placa apunta hacia abajo.
Paso 2:
En función del material de la pared o el techo, utilice las herramientas adecuadas para practicar orificios con una broca de 6 mm a una profundidad de 25 mm donde ha marcado. Si la pared es de hormigón, taladre primero los agujeros y, a continuación, introduzca los tacos de plástico para sujetar los tornillos.
DCS-2670L |
25 |
|
|
MONTAJE DE LA CÁMARA
ESPAÑOL
Paso 3:
Coloque la placa base sobre los orificios situados en la pared. Asegúrese de alinear los orificios de la placa base con los orificios de la pared. Utilice los tornillos suministrados para acoplar la placa base a la superficie de la pared.
Paso 4:
Disponga la cámara sobre la placa base y alinee la lengueta con el orificio situado en la cámara. Acople la cámara deslizándola en la dirección de la flecha. A continuación, enrosque la placa base al cuerpo de la cámara.
Paso 5:
Una vez asegurada la cámara a la placa base, utilice un destornillador para apretar el tornillo situado junto al orificio de la parte posterior del cuerpo de la cámara.
Paso 6:
Ajuste los ángulos a través del cuerpo de la cámara y gire la base plateada hasta que consiga el ángulo de visualización que desee.
26 |
DCS-2670L |
|
|
IMPERMEABILIZACIÓN DE LA CÁMARA
IMPERMEABILIZACIÓN DE LOS CONECTORES DURANTE EL USO DE WI-FI
Después de configurar la cámara, siga estas instrucciones para evitar que el agua entre en las conexiones Ethernet y del cable de alimentación de la cámara.
Paso 1:
Conecte el adaptador de alimentación al dispositivo.
Paso 2:
Para impermeabilizar la toma de Ethernet, alinee el tapón de acuerdo con la rosca y gírelo hacia la derecha para cerrarlo herméticamente.
IMPERMEABILIZACIÓN DEL CONECTOR ETHERNET
Si utiliza una conexión Ethernet, siga las instrucciones siguientes para evitar que el agua penetre en el conector del cable Ethernet de la cámara.
Paso 1:
Conecte los cables de alimentación y de Ethernet.
ESPAÑOL
DCS-2670L |
27 |
|
|
ESPAÑOL
IMPERMEABILIZACIÓN DE LA CÁMARA
USO DE CINTA IMPERMEABLE
Enrolle con cinta impermeable, por ejemplo caucho butílico o cinta de vinilo, los cables y conectores primero individualmente y después enrolle todos los conectores juntos. Asegúrese de cubrir todos los conectores y los cables pelados si los hubiera.
Nota: La cinta de caucho butílico deberá enrollarse estirando la cinta hasta aproximadamente el doble de su longitud, para posteriormente enrollar alrededor del cable. Si no se estira la cinta lo suficiente, la impermeabilización no sería completa.
Precaución: Debido a su clasificación IP65, recomendamos que instale el dispositivo bajo techo o bajo un resguardo para proteger las conexiones de alimentación y de Ethernet en caso de filtraciones de agua. No obstante, es necesario que los cables y las conexiones estén alejados de todos los potenciales riesgos por agua.
28 |
DCS-2670L |
|
|

SOLUCIÓN DE PROBLEMAS
PREGUNTAS MÁS FRECUENTES
1. ¿POR QUÉ ESTÁ BORROSA O BRILLANTE LA VISTA DE LA CÁMARA CUANDO
SE UTILIZA EL MODO DE VISIÓN NOCTURNA? |
|
Es posible que las luces IR de visión nocturna de la cámara se estén reflejando |
ESPAÑOL |
en una superficie o ventana cercana. Cambie la posición de la cámara para |
|
evitar reflejos o brillos. |
|
2. ¿QUÉ PUEDO HACER SI ME OLVIDO DE LA CONTRASEÑA DE MI CÁMARA? |
|
Si no recuerda la contraseña de la cámara, deberá realizar una reinicialización |
|
completa de la cámara. Este proceso cambiará todos los parámetros a los |
|
valores predeterminados de fábrica. |
|
Para restablecer la cámara, mantenga pulsado el botón RESET (Reiniciar) con |
|
el extremo de un clip durante al menos 10 segundos mientras la cámara está |
|
enchufada. |
|
3. ¿QUÉ PUEDO HACER SI LA DCS-2670L NO FUNCIONA CORRECTAMENTE? |
|
Reinicie la cámara (vea el siguiente paso) y siga los pasos de configuración de |
|
la página 24. |
|
Para verificar que el hardware está instalado correctamente, asegúrese de |
|
que: |
|
- el LED de alimentación está en verde |
|
- su conexión a Internet funciona |
|
- las conexiones LAN y WAN del router funcionan |
|
- el router admite UPNP® |
|
- la cámara se encuentre en la misma red que su dispositivo móvil |
|
- tanto el dispositivo móvil como la cámara tienen una conexión operativa a |
|
Internet |
|
Si la cámara sigue sin funcionar, compruebe el router y asegúrese de que |
|
tiene el firmware más actual. |
|
ASISTENCIA TÉCNICA |
dlink.com/support |
|
|
DCS-2670L |
29 |
|
|
CONTENUTO DELLA CONFEZIONE
ITALIANO
CAMERA WI-FI PER ESTERNI FULL HD 180°
DCS-2670L
ALIMENTATORE
KIT DI MONTAGGIO
SCHEDA DI INSTALLAZIONE RAPIDA
CAVO ETHERNET
CONNETTORE IMPERMEABILE DEL CAVO
Se uno di questi articoli non sono inclusi nella confezione, rivolgersi al rivenditore.
30 |
DCS-2670L |
|
|
 Loading...