


 Loading...
Version 1.00 | 2017/06/29
User Manual
AC750 Plus Wi-Fi Range Extender
DAP-1530

Preface
D-Link reserves the right to revise this publication and to make changes in the content hereof without obligation to notify any person or organization of such revisions or changes.
|
|
Manual Revisions |
|
|
|
|
|
Revision |
Date |
|
Description |
1.00 |
June 29, 2017 |
|
• Initial release |
|
|
|
|
Trademarks
D-Link and the D-Link logo are trademarks or registered trademarks of D-Link Corporation or its subsidiaries in the United States or other countries. All other company or product names mentioned herein are trademarks or registered trademarks of their respective companies.
Apple®, Apple logo®, Safari®, iPhone®, iPad®, iPod touch® and Macintosh® are trademarks of Apple Inc., registered in the U.S. and other countries. App StoreSM is a service mark of Apple Inc.
Chrome™ browser, Google Play™ and Android™ are trademarks of Google Inc.
Internet Explorer®, Windows® and the Windows logo are trademarks of the Microsoft group of companies.
Copyright © 2017 by D-Link Corporation. All rights reserved. This publication may not be reproduced, in whole or in part, without prior expressed written permission from D-Link Corporation.
Power Usage
This device is an Energy Related Product (ErP) with High Network Availability (HiNA), and automatically switches to a power-saving Network Standby mode within 1 minute of no packets being transmitted. If it is not needed during certain periods of time, it can be unplugged to save energy.
Network Standby: 3.54 watts
D-Link DAP-1530 User Manual |
i |

Table of Contents
Table of Contents
Preface.................................................................................. |
i |
Product Overview.............................................................. |
1 |
Package Contents......................................................................... |
1 |
System Requirements.................................................................. |
2 |
Introduction.................................................................................... |
3 |
Features.................................................................................... |
3 |
What is a Wireless Extender?............................................. |
4 |
Hardware Overview...................................................................... |
5 |
Top.............................................................................................. |
5 |
Bottom...................................................................................... |
6 |
Back............................................................................................ |
8 |
Installation.......................................................................... |
9 |
Wireless Installation Considerations...................................... |
9 |
Antenna Setup............................................................................. |
10 |
Hardware Setup........................................................................... |
11 |
Getting Started................................................................. |
12 |
WPS-PBC Configuration............................................................ |
13 |
Optimize Extender Location................................................... |
14 |
QRS Mobile App Setup.............................................................. |
15 |
Web-based Setup........................................................................ |
20 |
Setup Wizard................................................................................. |
21 |
Connecting Your Device via WPS................................... |
22 |
WPS Successful................................................................ |
23 |
WPS Unsuccessful.......................................................... |
23 |
Extend an Existing Network............................................ |
24 |
Add Wireless to Your Wired Network............................ |
27 |
Configure Administrator Password............................... |
29 |
Save Your Configuration................................................... |
30 |
Configuration................................................................... |
31 |
Home............................................................................................... |
31 |
Settings........................................................................................... |
33 |
Extender Settings................................................................ |
33 |
Network Settings................................................................. |
35 |
Autoconfiguration (SLAAC/DHCPv6)...................... |
36 |
Static IPv6.......................................................................... |
37 |
Link-local Only................................................................. |
38 |
Management................................................................................ |
39 |
Admin...................................................................................... |
39 |
System..................................................................................... |
40 |
Upgrade.................................................................................. |
41 |
Statistics.................................................................................. |
42 |
Connecting Wireless Clients to the Extended Network.43 |
|
WPS Button................................................................................... |
43 |
Windows® 8................................................................................... |
44 |
WPA/WPA2............................................................................. |
44 |
Windows® 7................................................................................... |
46 |
WPA/WPA2............................................................................. |
46 |
Windows Vista®............................................................................ |
49 |
WPA/WPA2............................................................................. |
50 |
Troubleshooting............................................................... |
52 |
D-Link DAP-1530 User Manual |
ii |

Table of Contents |
|
Wireless Basics.................................................................. |
54 |
Tips................................................................................................... |
55 |
Technical Specifications................................................... |
56 |
GPL Code Statement........................................................ |
57 |
Safety Statements............................................................ |
72 |
D-Link DAP-1530 User Manual |
iii |

Section 1 - Product Overview
Package Contents
DAP-1530 AC750 Plus Wi-Fi Range Extender
Wi-Fi Configuration Note
Wi-Fi Configuration Card
Quick Installation Guide
If any of the above items are missing, please contact your reseller.
D-Link DAP-1530 User Manual |
1 |

Section 1 - Product Overview
System Requirements
|
• A wireless router with an active Internet connection. |
|
Network Requirements |
• IEEE 802.11ac, 802.11n, 802.11g, 802.11b, or 802.11a |
|
wireless clients/devices |
||
|
||
|
|
|
|
A Computer or Mobile Device with the following: |
|
|
• Windows®, Apple® Mac OS®, or Linux-based operating system |
|
|
• Wireless adapter or Wi-Fi functionality |
|
|
• An Apple® iPhone®, iPod touch®, iPad®, or Android™ mobile |
|
Web-based Configuration |
device |
|
|
||
Utility Requirements |
Browser Requirements: |
|
|
||
|
• Internet Explorer® 9 or later |
|
|
• Firefox® 20.0 or later |
|
|
• Safari® 5.1 or later |
|
|
• Google Chrome™ 25.0 or later |
|
|
|
D-Link DAP-1530 User Manual |
2 |

Section 1 - Product Overview
Introduction
Features
Easily ExtendYour Existing Network
The DAP-1530 AC750 Plus Wi-Fi Range Extender lets you easily extend a secure wireless network with a press of a button. Connect the DAP-1530 to a router via Wi-Fi or Ethernet and share your high-speed Internet access in more places throughout your home or small office.
High-speedWireless PerformanceWithWireless 802.11acTechnology
Thanks to the latest Wireless AC technology, the DAP-1530 provides a wireless connection at up to 1200 Mbps* with other 802.11ac wireless devices. This feature lets you participate in real-time activities online, such as video streaming, online gaming, and real-time audio with smooth performance.
Simple Setup
All it takes is a press of a button to connect compatible WPS devices to the DAP-1530. Its easy-to-use web interface lets you quickly and easily connect the DAP-1530 to an uplink router, configure the extended wireless network, and manage the administrative settings. The setup wizard will even guide you through the setup process, getting your extended wireless network up and running in no time. Alternatively, connect an Ethernet cable to your existing network infrastructure to quickly and easily create a wireless network.
Compatibility
The DAP-1530 is fully compatible with now only the latest 802.11ac standard, but is also backwards compatible with IEEE 802.11n/g/ b/a wireless devices, so you can use your existing devices without sacrificing performance.
LatestWireless Network Security and Encryption
The DAP-1530 supports wireless security features to prevent unauthorized access from the wireless network. Support for WPA/ WPA2 standards ensure that you’ll be able to use the best possible encryption methods with your compatible wireless devices.
* Maximum wireless signal rate derived from standard IEEE specifications. Actual data throughput will vary. Network conditions and environmental factors, including volume of network traffic, building materials and construction, and network overhead may lower actual data throughput rate. Environmental conditions will adversely affect wireless signal range.
D-Link DAP-1530 User Manual |
3 |
Section 1 - Product Overview
What is a Wireless Extender?
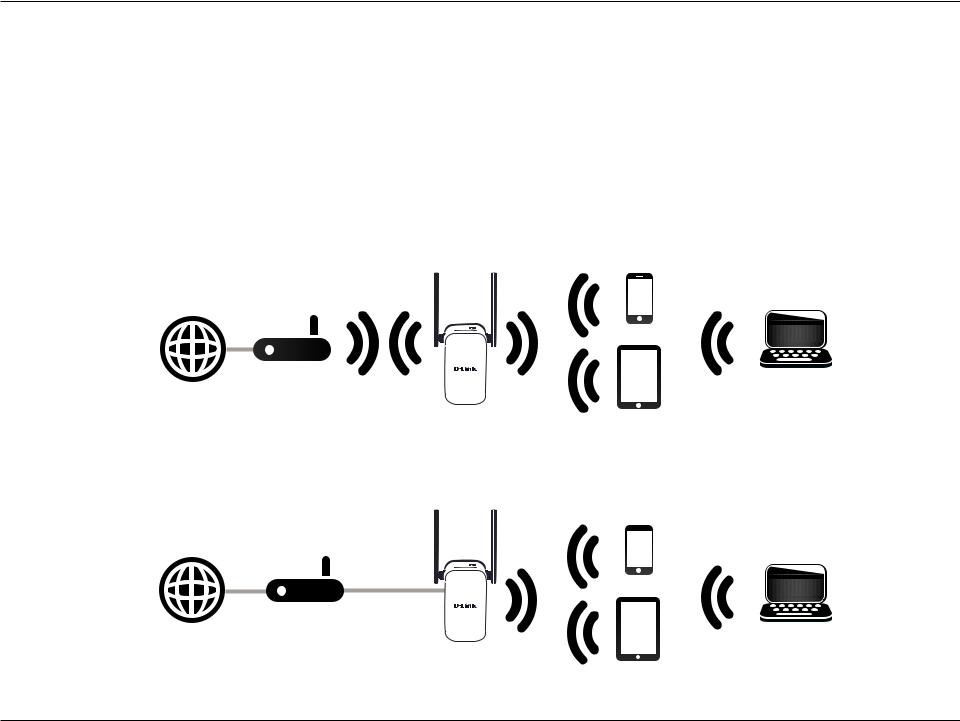
The DAP-1530 acts as a repeater to extend the range of an existing wireless network to provide a better signal for parts of your home or office that may have poor or no reception. Your existing wireless signal will be re-broadcast by the DAP-1530, allowing you to reach the farthest corners of your home or office. The extended network can simply use the same network credentials as the existing network, or you can specify a different network name and password, giving you the flexibility to control network access. You may also use the DAP-1530 as a wireless access point by connecting an Ethernet cable.
ExtendYourWireless Network usingWi-Fi
Computer
Internet |
Router |
DAP-1530 |
Wireless Devices |
|
|
Extender |
|
Create aWireless Network using Ethernet
Computer
Internet |
Router |
DAP-1530 |
Wireless Devices |
|
|
Access Point |
|
D-Link DAP-1530 User Manual |
4 |
Section 1 - Product Overview
Hardware Overview
Top
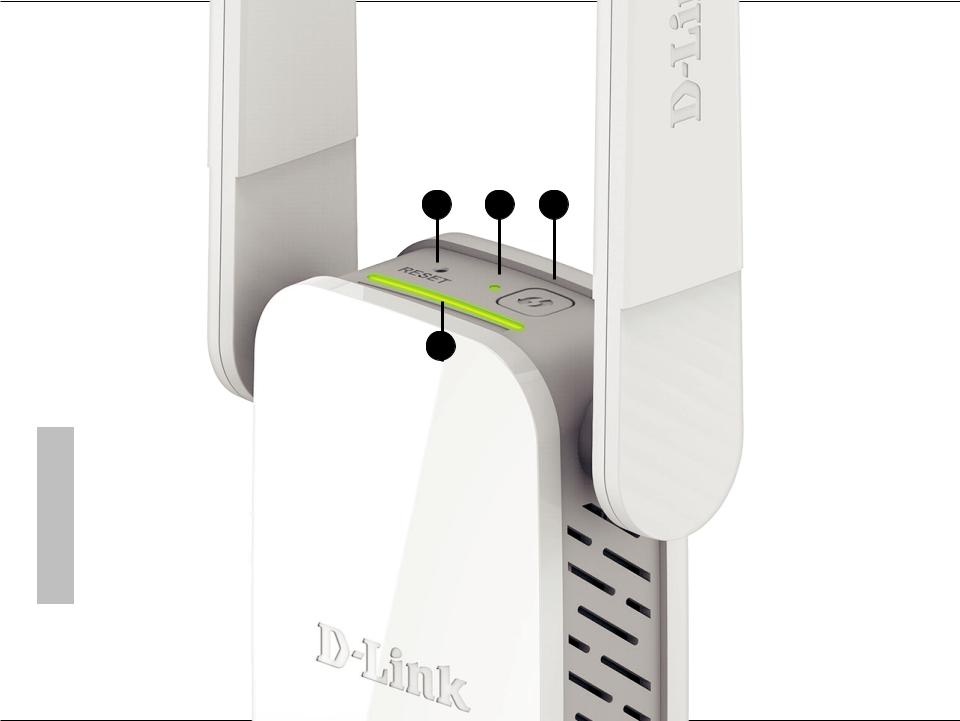
1 2 3
4
1 |
Reset Button |
Use an unfolded paperclip to press and hold the reset button on the bottom of DAP-1530 until the |
|
status LED turns red, to reset the device back to factory default settings. |
|||
|
|
||
2 |
Status/WPS LED |
This LED indicates the current status of the DAP-1530. |
|
Refer to “Status/WPS LED Indicator” on page 7 for more information. |
|||
|
|
||
3 |
WPS Button |
Press to establish a connection with another WPS compatible device. |
|
Refer to “WPS Button”on page 43 for more information. |
|||
|
|
||
4 |
Signal Indicator LED |
The more lit green bars on the Signal Indicator LED, the better the wireless signal to the host network. |
|
For more information refer to “Optimize Extender Location”on page 14. |
|||
|
|
D-Link DAP-1530 User Manual |
5 |

Section 1 - Product Overview
Hardware Overview
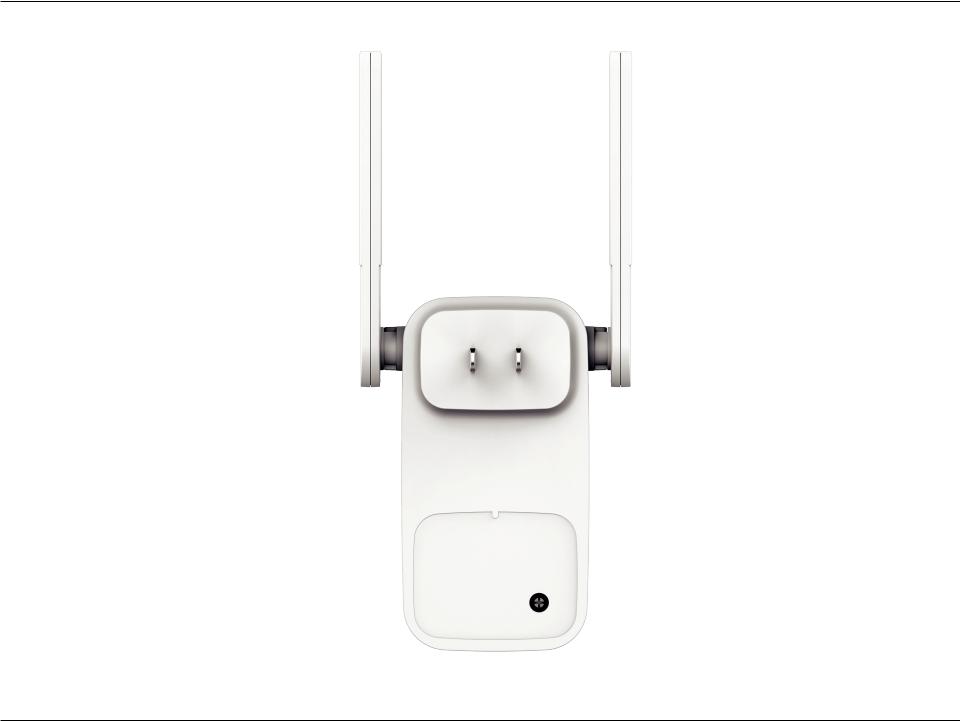
Bottom
1
1 |
LAN |
Connect an Ethernet cable if you are adding wireless to an existing wired network. |
|
|
|
D-Link DAP-1530 User Manual |
6 |
Section 1 - Product Overview
Status/WPS LED Indicator
Status/WPS LED Indicator
LED Indicator |
Color |
Status |
Description |
|
|
|
|
|
Green |
Solid |
The DAP-1530 is receiving power and connected to a host network. |
|
|
|
|
|
Blinking |
WPS mode is active and ready to add a wireless device. |
|
|
|
||
|
|
|
|
Power/Status |
Red |
Solid |
The DAP-1530 is booting or an error has occurred. |
|
|
|
|
|
Amber |
Blinking |
The DAP-1530 is not connected to a host network. |
|
|
|
|
|
None |
Off |
Device is not receiving power. Check the power outlet. |
|
|
|
|
D-Link DAP-1530 User Manual |
7 |
Section 2 - Installation
Hardware Overview
Back
You may locate the Wi-Fi name (SSID) and password for your DAP-1530. This information is printed on the specification sticker on the back of the device. You will need this information to connect your computer or mobile device to the default network (SSID) of your DAP-1530. This information is also provided on the Wi-Fi configuration card.
D-Link DAP-1530 User Manual |
8 |

Section 2 - Installation
Installation
Wireless Installation Considerations
The DAP-1530 lets you extend your existing wireless network’s coverage as long as it is within range of the uplink network. Keep in mind that the DAP-1530’s extension network’s range may be limited by the number, thickness and location of walls, ceilings, or other objects that the wireless signals must pass through.Typical ranges vary depending on the types of materials and background RF (radio frequency) noise in your home or business. The key to maximizing wireless range is to follow these basic guidelines:
1.Keep the number of walls and ceilings between the D-Link extender and other network devices to a minimum - each wall or ceiling can reduce your adapter’s range from 3-90 feet (1-30 meters.) Position your devices so that the number of walls or ceilings is minimized.
2.Be aware of the direct line between network devices. A wall that is 1.5 feet thick (0.5 meters), at a 45-degree angle appears to be almost 3 feet (1 meter) thick. At a 2-degree angle it looks over 42 feet (14 meters) thick! Position devices so that the signal will travel straight through a wall or ceiling (instead of at an angle) for better reception.
3.Building materials make a difference. A solid metal door or aluminum studs may have a negative effect on range. Try to position extenders, access points, wireless routers, and computers so that the signal passes through drywall or open doorways. Materials and objects such as glass, steel, metal, walls with insulation, water (fish tanks), mirrors, file cabinets, brick, and concrete will degrade your wireless signal.
4.Keep your product away (at least 3-6 feet or 1-2 meters) from electrical devices or appliances that generate RF noise.
5.If you are using 2.4 GHz cordless phones or X-10 (wireless products such as ceiling fans, lights, and home security systems), your wireless connection may degrade dramatically or drop completely. Make sure your 2.4 GHz phone base is as far away from your wireless devices as possible. The base transmits a signal even if the phone is not in use.
D-Link DAP-1530 User Manual |
9 |
Section 2 - Installation
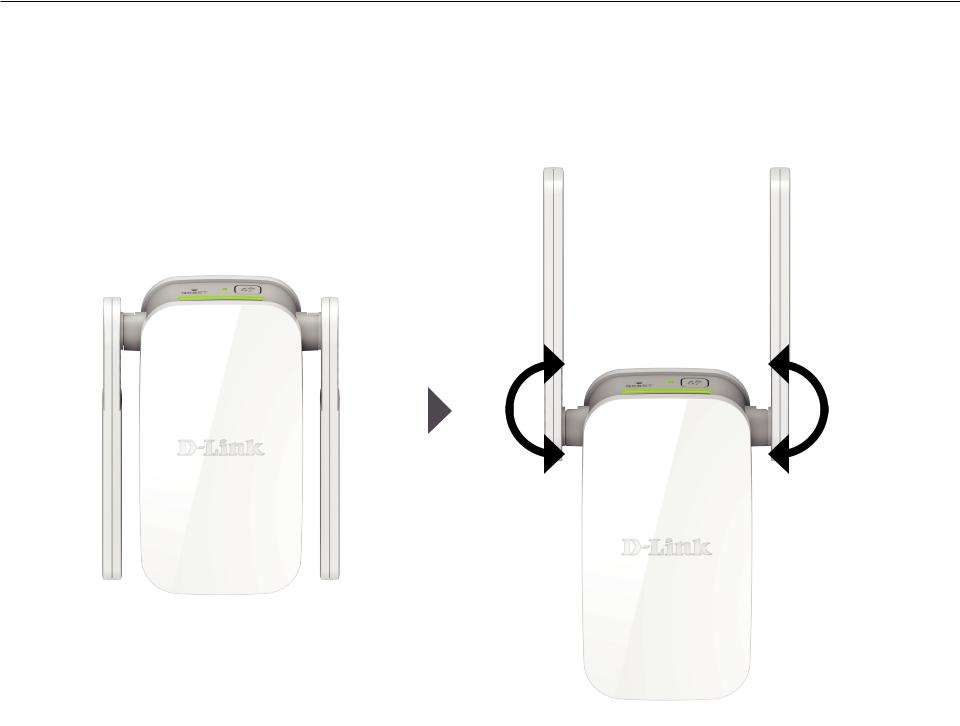
Antenna Setup
The DAP-1530 is designed to give you the fastest, most stable network connection possible. In order to maximize performance, fully extend the antennas to provide optimal wireless coverage. Keep the extender in an open area for better wireless coverage.
|
|
|
|
|
|
D-Link DAP-1530 User Manual |
10 |
|
Section 2 - Installation
Hardware Setup
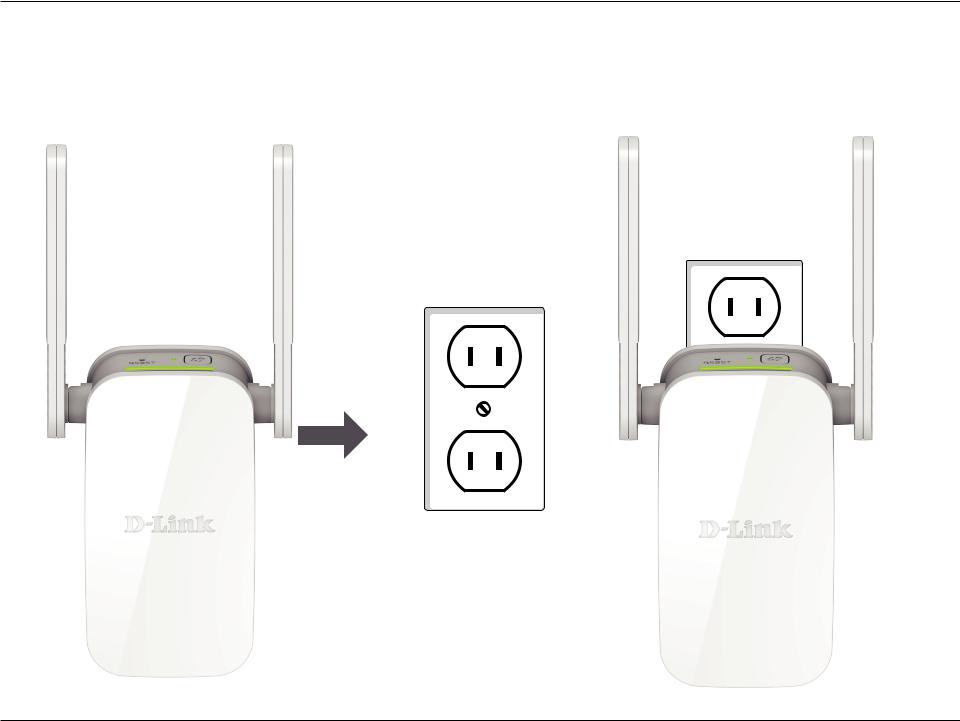
Plug the DAP-1530 into a wall outlet, and wait until the Status/WPS LED is blinking amber.
Outlet
Outlet
D-Link DAP-1530 User Manual |
11 |

Section 3 - Configuration
Getting Started
There are several configuration tools you can use to set up your DAP-1530.
•WPS PBC -To easily extend an existing wireless network refer to“WPS-PBC Configuration”on page 13 for setup instructions.
•QRS Mobile App - Use your Android device or iPhone, iPad, or iPod touch to configure your extender. Refer to “QRS Mobile App Setup” on page 15 for setup instructions.
•D-Link Setup Wizard - This wizard will launch when you log into the Extender’s web configuration utility for the first time. Refer to ”Setup Wizard” on page 21 for setup instructions.
•Manual Configuration - Advanced users who wish to manually setup extender or adjust its settings may refer to “Configuration” on page 31 for more information.
D-Link DAP-1530 User Manual |
12 |
Section 3 - Configuration
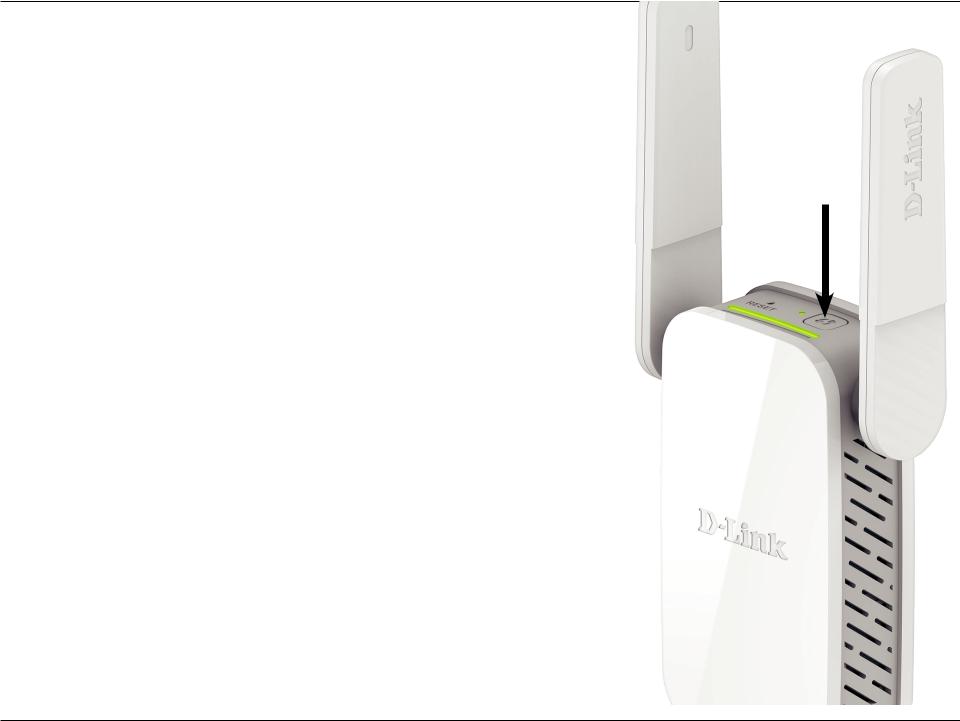
WPS-PBC Configuration
To connect to a wireless router or access point and extend the Wi-Fi network in your home, first make sure the source router or Access Point features a WPS Button or has a virtual WPS Button.
Step 1 - Initiate WPS Mode
While the Status/WPS LED is blinking amber. Push the WPS button on the source wireless router or AP, and then push the WPS button on the DAP-1530. The Status/WPS LED will start to flash green. Please allow up to two minutes for the process to finish. The Status/WPS LED will turn solid green when the DAP-1530 has connected successfully to the source wireless router or access point.
Step 2 - Connecting Devices to the DAP-1530
The DAP-1530 is now ready to share the extended Wi-Fi network with your PCs and mobile devices. You may use the WPS method to connect devices to the extension networks created by the DAP-1530 using the following network names (SSID). The password(s) will be the same as the wireless network you are extending.
• (Your router’s SSID)-EXT
D-Link DAP-1530 User Manual |
13 |

Section 3 - Configuration
Optimize Extender Location
The Status/WPS LED will turn solid green when the DAP-1530 has connected successfully to a wireless network and is extending that network. If the Smart Signal LED has a single amber bar after the connection process has finished, the DAP-1530 has established a poor quality connection. The more lit bars on the Signal Indicator LED, the better the wireless signal. To improve the connection quality, the DAP-1530 should be relocated closer to the source wireless router. If the extender has been configured as an Access Point and is connected via Ethernet cable to an uplink network, the Smart Signal LED will not be lit.
Best
Good
Ok
Poor
D-Link DAP-1530 User Manual |
14 |

Section 2 - Installation
QRS Mobile App Setup
The DAP-1530 can be set up from your iPhone, iPod touch, iPad, or Android smartphone or tablet device using the QRS Mobile app.
Note: The screenshots may be different depending on your mobile device’s OS version.
Step 1
Search for the free QRS Mobile App on the Apple App Store or Google Play.
Step 2
Once your app is installed, you may now configure your extender. Connect to the router wirelessly by going to your wireless utility on your device. Scan for the WiFi name (SSID) as listed on the supplied configuration card. Select and then enter your Wi-Fi password.
Step 3
Once wirelessly connected to the extender, launch the QRS Mobile app from the
Home screen of your device.
Note: The following steps show the iOS interface of the QRS Mobile app. If you are using an Android device, the appearance may be different to that of the screenshots, but the process is the same.
D-Link DAP-1530 User Manual |
15 |
Section 3 - Configuration
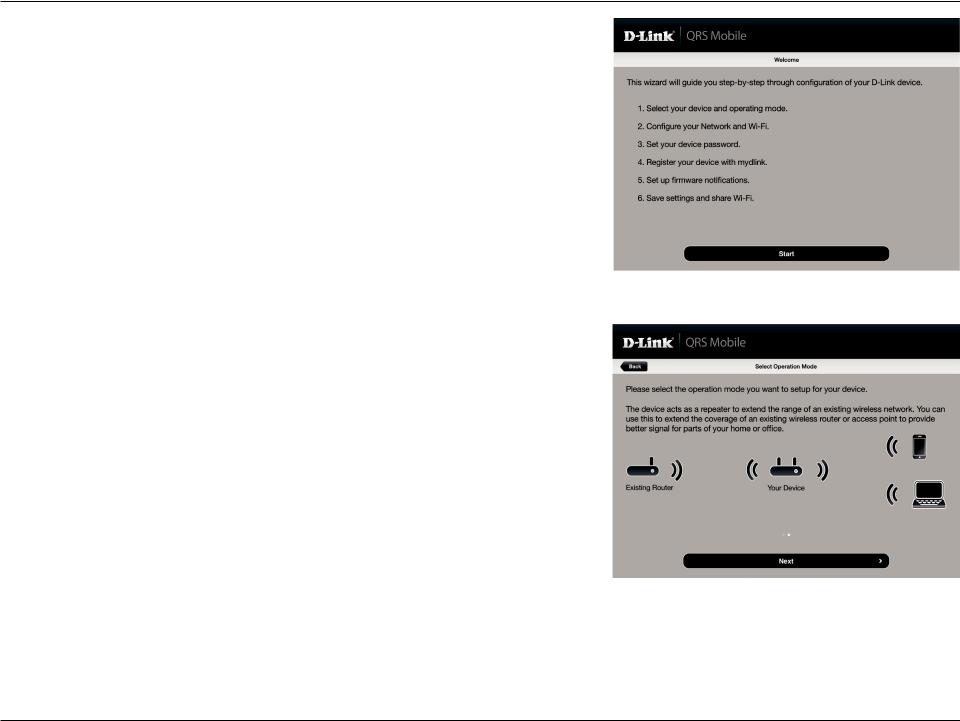
Click Start to continue.
Click Next to continue.
D-Link DAP-1530 User Manual |
16 |
Section 3 - Configuration
QRS Mobile will first detect your DAP-1530, then scan for available Wi-Fi networks. Select the network you wish to extend. Tap Rescan if your network doesn’t show up the first time.
Enter a password for the existing Wi-Fi network. Click Next to continue.
D-Link DAP-1530 User Manual |
17 |
Section 3 - Configuration
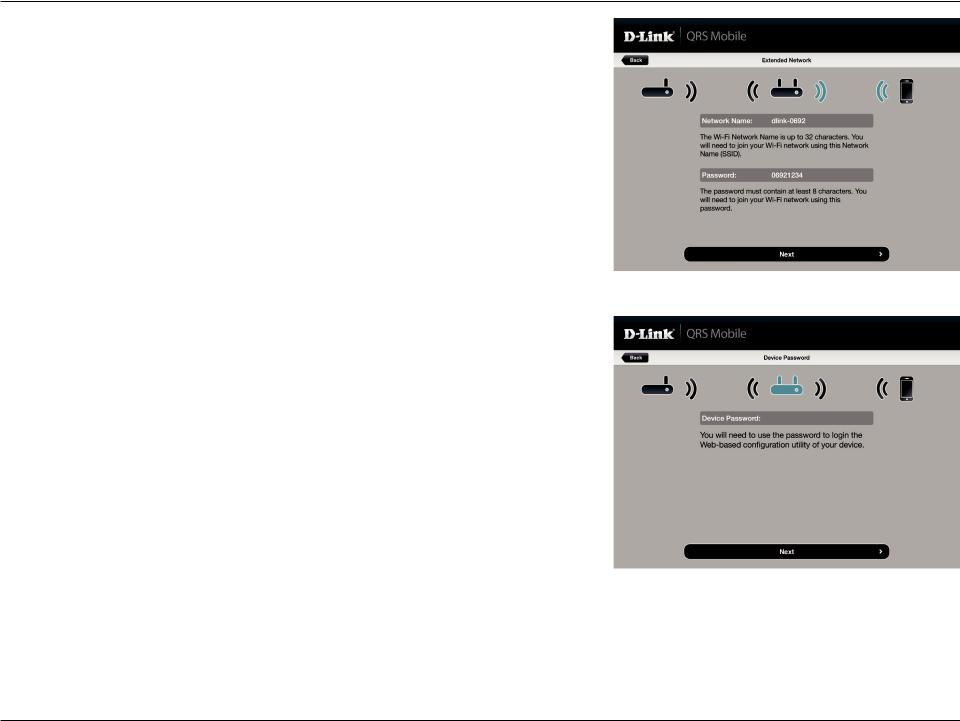
Enter a network name (SSID) and password for the extended Wi-Fi network. Click Next to continue.
Create an admin password for the DAP-1530’s web-based configuration utility. Click Next to continue.
D-Link DAP-1530 User Manual |
18 |
Section 3 - Configuration
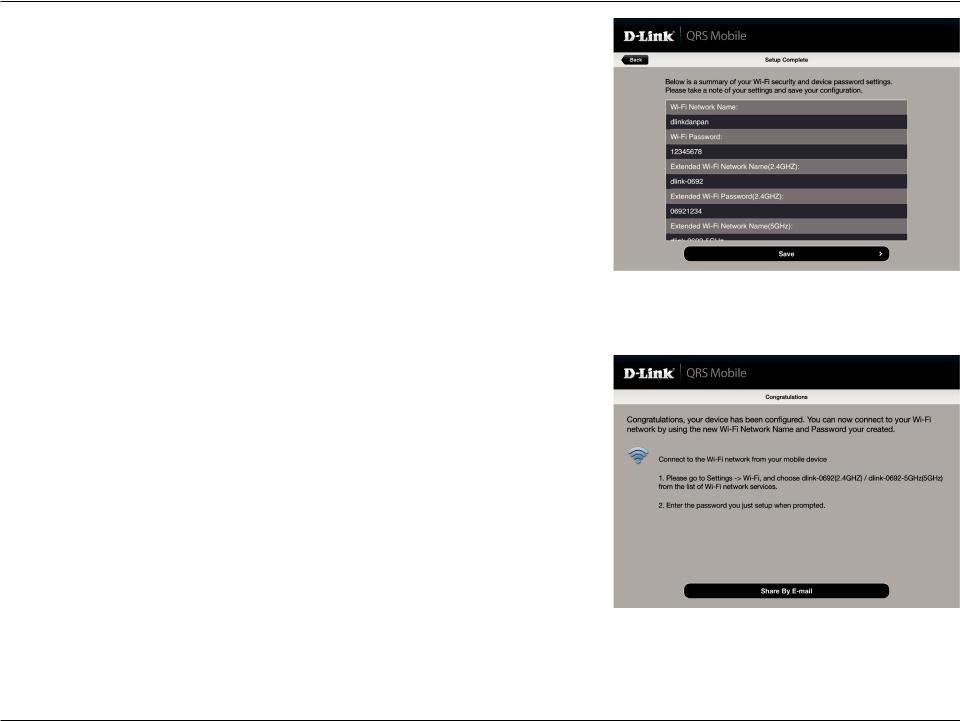
A summary of your settings will be displayed. Click Save to reboot the device and to complete the setup.
After the setup wizard is complete, the following screen will appear. To connect to the extended network, you can now change your mobile device and laptop Wi-Fi settings to the wireless network name and password you just created. You can also share your Wi-Fi information by clicking Share by E-mail.
D-Link DAP-1530 User Manual |
19 |
Section 3 - Configuration
Web-based Setup
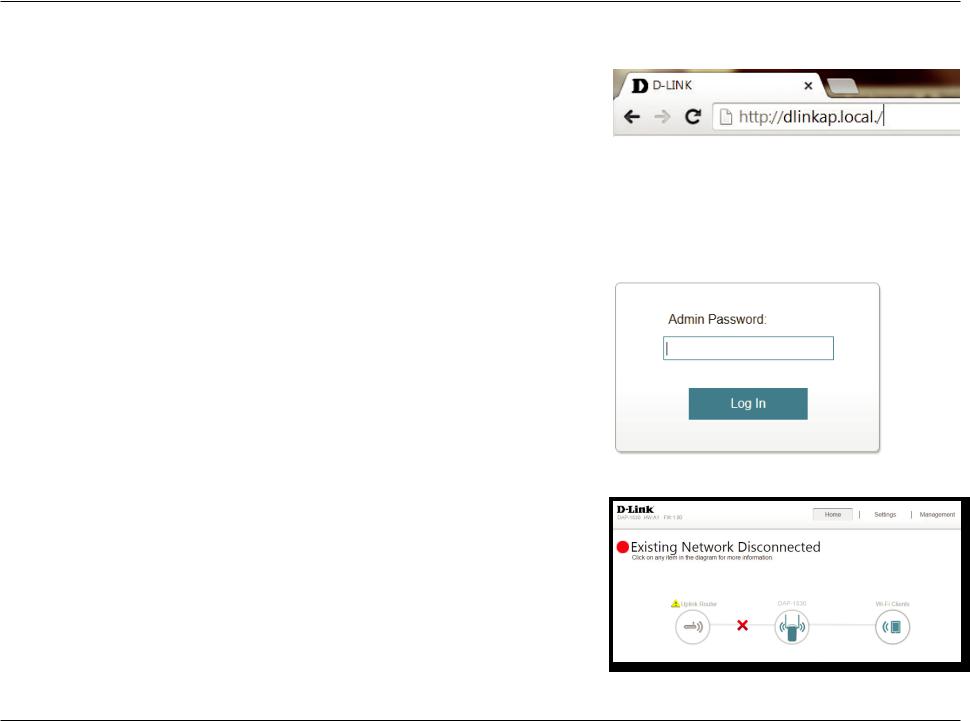
To access the setup utility for the DAP-1530 AC750 Plus Wi-Fi Range Extender on your PC, first connect to the DAP-1530 wirelessly using the Wi-Fi name (SSID) and password located on your Wi-Fi Configuration Card. Then open a web browser and enter http://dlinkap.local./ in your browser’s URL field. You may also enter the IP address* of the DAP-1530.
*The default IP address is 192.168.0.50. Once your DAP-1530 connects to the host network, it will be assigned a new IP address based on your network’s DHCP settings. You will need to log in to your router to see what IP address is assigned to your DAP-1530.
For multiple DAP-1530s, go to http://dlinkapxxxx.local. as shown on the included Wi-Fi Configuration Card, with “xxxx” being the last four digits of the DAP-1530’s MAC address.
Enter your password. By default, Admin is the username and cannot be changed, and by default, the password is blank.
The configuration interface will open, and you can configure the various settings for the DAP-1530. If you have not yet configured an uplink network, the home screen will show that there is no connection between the DAP-1530 and the uplink router.
D-Link DAP-1530 User Manual |
20 |
Loading...