


99643562_A_EN.QXP 17/12/2007 11:34 Page 1
FR |
GUIDE D'UTILISATION |
DA |
BRUGERVEJLEDNING |
DE |
BETRIEBSANLEITUNG |
EN |
USER GUIDE |
ES |
MANUAL DE UTILIZACIÓN |
IT |
MANUALE D'USO |
NL |
GEBRUIKSAANWIJZING |
PT |
MANUAL DE UTILIZAÇÃO |
Four
Ovn
Backofen
Oven
Horno
Forno
Oven
Forno

99643562_A_EN.QXP 17/12/2007 11:34 Page 74
Dear Customer,
You have purchased a DE DIETRICH oven and we would like to say thank you.
Our research teams have designed a new generation of appliances for you, which, thanks to their quality, esthetics and technological advances have resulted in exceptional products, a testament to our know-how.
Your new DE DIETRICH oven will fit in harmoniously in your kitchen, combining top cooking performance with ease of use. Our wish is to offer you a product of excellence.
In the DE DIETRICH line of products, you will also find a wide range of cookers, hobs, ventilation hoods, dishwashers, built-in refrigerators, which can be coordinated with your new DE DIETRICH oven.
Of course, in an ongoing effort to better satisfy your demands with regard to our products, our after-sales service department is at your disposal and ready to listen in order to respond to all of your questions and suggestions (contact information at the end of this booklet).
You can also log on to our web site: www.dedietrich-electromenager.com where you will find our latest innovations as well as useful and additional information.
DE DIETRICH
Setting New Values
As part of our commitment to constantly improving our products, we reserve the right to make changes to them based on advances to their technical, functional and/or aesthetic properties.
Attention:
Before installing and using your appliance, please read this Installation and Usage Guide carefully, which will allow you to quickly familiarize yourself with its operation.
74

99643562_A_EN.QXP 17/12/2007 11:34 Page 75
|
TABLE OF CONTENTS |
|
EN |
1 |
/ INFORMATION FOR THE USER |
|
|
|
• Safety instructions _________________________________________ |
76 |
|
|
• Care for the environment ____________________________________ |
77 |
|
2 |
/ INSTALLING YOUR APPLIANCE |
|
|
|
• Choice of location__________________________________________ |
78 |
|
|
• Fitting ____________________________________________________ |
78 |
|
|
• Electric connection _________________________________________ |
79 |
|
3 |
/ DESCRIPTION OF YOUR APPLIANCE |
|
|
|
• Introduction to your oven ____________________________________ |
81 |
|
|
• Accessories _______________________________________________ |
82 |
|
|
• Introduction to the programmer ______________________________ |
83 |
|
|
• Introduction to the selecting touch controls ____________________ |
83 |
|
4 |
/ USING YOUR APPLIANCE |
|
|
|
• Using the programmer |
|
|
|
º How to set the time_____________________________________ |
84 |
|
|
º Instant cooking ________________________________________ |
85 |
|
|
• Programmed cooking |
|
|
|
º Immediate start ________________________________________ |
86 |
|
|
º Delayed start __________________________________________ |
87 |
|
|
• Using the timer function _____________________________________ |
88 |
|
|
• Customising the recommended temperature ___________________ |
89 |
|
|
• Locking the controls________________________________________ |
89 |
|
5 |
/ OVEN COOKING MODES _______________________________________ |
90 |
|
6 |
/ CARING FOR AND CLEANING YOUR APPLIANCE |
|
|
|
• Cleaning the outer surfaces__________________________________ |
91 |
|
|
• Pyrolytic oven _____________________________________________ |
92 |
|
|
• Programming for immediate pyrolysis _________________________ |
93 |
|
|
• Programming for a delayed pyrolysis __________________________ |
94 |
|
7 |
/ TROUBLESHOOTING __________________________________________ |
95 |
|
|
• Changing the bulb _________________________________________ |
96 |
|
8/ AFTER-SALES SERVICE
•Repairs___________________________________________________ 97
75

99643562_A_EN.QXP 17/12/2007 11:34 Page 76
EN 1 / INFORMATION FOR THE USER
Warning
Keep this user guide with your appliance. If the appliance is ever sold or transferred to another person, ensure that the new owner receives the user guide. Please become familiar with these recommendations before installing and using your oven. They were written for your safety and the safety of others.
Warning
Accessible parts will become hot when in use.
To avoid burns and scalds, children should be kept away.
•SAFETY INSTRUCTIONS
—This oven was designed for use by private persons in their homes. It is intended solely for cooking foodstuffs. This oven does not contain any asbestos-based components.
—This appliance is not intended for use by people with (including children) impaired physical, sensorial or mental abilities, or people lacking in knowledge or experience, unless they receive prior supervision or instructions on using the appliances through a person responsible for their safety.
—Ensure that they do not touch the appliance’s control panel.
—When you receive the appliance, unpack it or have it unpacked immediately. Give it an overall inspection. Make note of any concerns or reservations on the delivery slip and make sure to keep a copy of this form.
—Your appliance is intended for standard household use. Do not use it for commercial or industrial purposes or for any other purpose than that for which it was designed.
—Do not modify or attempt to modify any of the characteristics of this appliance. This would be dangerous to your safety.
—Keep young children away from the appliance while it is in operation. In this way you will avoid the danger of them being burned by knocking over cooking recipients. Moreover, the front of your appliance is hot
both during use and during the cleaning cycle (pyrolysis).
—Never pull your appliance by the door handle.
—Before using your oven for the first time,
heat it while empty |
for |
approximately |
15 minutes. Make sure |
that |
the room is |
sufficiently ventilated. You may notice a particular odour, or a small release of smoke. All of this is normal.
—During cooking, ensure that the door of your oven is completely closed so that the seal can do its job properly.
—When in use, the appliance becomes hot. Do not touch the heating elements located inside the oven. In doing so, you would run the risk of suffering serious burns.
—When placing dishes inside or removing them from the oven, do not place your hands close to the upper heating elements, use heat-protective kitchen gloves.
—At the end of cooking, do not pick up dishes (grills, rotisserie...) with bare hands.
—Never place aluminium foil directly in contact with the oven shelf (see the chapter on oven description), the accumulated heat may cause deterioration of the enamel.
—Do not place heavy weights on the open oven door, and make sure that children are able neither to climb nor sit on it.
—In order to avoid damaging your oven controls, do not leave the door open when it is in operation or still hot.
—The oven must be turned off when cleaning inside the oven.
—Intensive and prolonged use of the appliance may give rise to the need for additional ventilation, by opening a window, or by increasing the power of the mechanical fan.
—Additionally to the accessories supplied with your oven, only use dishes which resist high temperatures (follow the manufacturer’s instructions).
—After using your oven, make sure that all the controls are in their stop position.
—Never use steam or high-pressure devices to clean the oven (requirement imposed by electrical safety concerns).
76

99643562_A_EN.QXP 17/12/2007 11:34 Page 77
1 / INFORMATION FOR THE USER |
EN |
—For your safety, your oven is equipped with an AUTOMATIC STOP, if you forget to turn off your oven by mistake. After 23-and-a-half hours of operation, the AS (Automatic Stop) feature is activated and your oven stops running. AS appears instead of the time and a series of 2 successive beeps is emitted for a short time.
—Please make sure children do not play with the appliance.
•CARE FOR THE ENVIRONMENT
—This appliance’s packing materials are recyclable. Recycle them and play a role in protecting the environment by depositing them in municipal containers provided for this purpose.
—Your appliance also contains many recyclable materials. It is therefore marked with this logo
to indicate that used appliances must not be mixed with other waste. Recycling of the appliances organised by your manufacturer will thus be undertaken in optimum conditions, in accordance with European directive EC/2002/96 relating to electrical and electronic equipment waste. Consult your city hall or your retailer to find the dropoff points for used appliances that is nearest to your home.
— We thank you for your help in protecting the environment.
Warning
Installation should only be performed by installers and qualified technicians. This appliance complies with the following European directives:
-Low Voltage Directive EEC/73/23 modified by directive EEC/93/68 for insertion of EC marking.
-Electromagnetic Compatibility Directive 89/336/EEC modified by directive 93/68/EEC for insertion of EC marking.
-EC regulation no. 1935/2004 concerning materials and objects intended for contact with food substances.
77

99643562_A_EN.QXP 17/12/2007 11:34 Page 78
EN 2 / INSTALLING YOUR APPLIANCE
22536 
 555
555
595
20 |
50 |
50 |
|
|
10 |
380
388 |
376 |
310
560-568
550 |
mini |
380 |
|
|
550 mini |
|
400 |
|
560-568 |
|
|
fig.1
• CHOICE OF LOCATION
The diagrams above determine the dimensions of a cabinet that will be able to hold your oven.
The oven can be installed under a worktop or in a column of cabinetry (open* or closed) having the appropriate dimensions for built-in installation (see diagram above).
Your oven has optimised air circulation that allows it to achieve remarkable cooking and cleaning results if the following guidelines are followed:
•Centre the oven in the cabinet so as to guarantee a minimum distance of 5 mm between the appliance and the neighbouring cabinet.
•The material or coating of the cabinet must be heat-resistant.
•For increased stability, fix the oven in the cabinet by means of 2 screws through the holes designed for this purpose on the lateral mounts (fig.1).
• FITTING
To do this:
1)Remove the rubber screw covers to access the mounting holes.
2)Drill a Ø 2 mm hole in the cabinet panel to avoid splitting the wood.
3)Attach the oven with the two screws.
4)Replace the rubber screw covers (they also serve to absorb the shock caused by closing the oven door).
(*) if the cabinet is open, its opening must be 70 mm (maximum).
Tip
To be certain that you have properly installed your appliance, do not hesitate to seek advice from a household appliance specialist.
78
99643562_A_EN.QXP 17/12/2007 11:34 Page 79
2 / INSTALLING YOUR APPLIANCE |
EN |
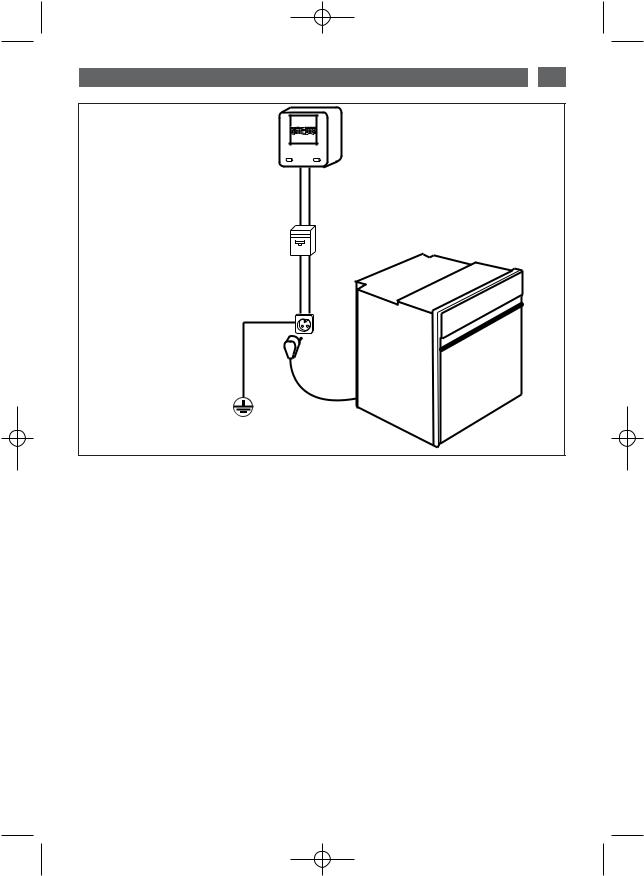
Single-phase 20A Counter 220-240V~ 50Hz
220-240 V ~ Single-phase line
16A fuse or differential circuit breaker
Electrical outlet
2 prong receptacle + earth CEI Standard 60083
Power supply cable
length 1.50 m approx.
• ELECTRIC CONNECTION
Electrical safety must be provided by a correct build-in. During fitting and maintenance operations, the appliance must be unplugged from the electrical grid; fuses must be switched off or removed.
appliance can be disconnected from the mains after installation. Disconnection can be achieved by leaving a mains switch accessible or by incorporating an interrupter in the fixed pipe in compliance with the installation rules.
The electrical connection should be performed before the appliance is installed in the cabinet.
Ensure that:
-the electrical installation has sufficient voltage,
-the electrical wires are in good condition
-the diameter of the wires complies with the installation requirements.
Your oven should be plugged in using a (standardised) power cable with 3 conductors of 1.5mm2 (1 live + 1 neutral + 1 earth) which must be connected to a 220240V~ single-phase grid. Make sure that the
 Warning
The safety wire (green-yellow) is connected to the appliance’s terminal  and must be connected to the ground lead of the
electrical set-up.
In the case of connection to an electric wall socket, it must remain accessible after installation.
The fuse in your set-up must be 16 amperes. If the power cable is damaged, it must be replaced by a cable or a special kit available from the manufacturer or its AfterSales Service Department.
79

99643562_A_EN.QXP 17/12/2007 11:34 Page 80
EN 2 / INSTALLING YOUR APPLIANCE
Warning
We cannot be held responsible for any accident or incident resulting from nonexistent, defective or incorrect earthing.
If the electrical installation in your residence requires any changes in order to hook up your appliance, call upon a professional electrician.
If the oven malfunctions in any way, unplug the appliance or remove the fuse corresponding to the sector where the oven is hooked up.
80
 Loading...