


DOD438

User Manual for Your Oven
Model : DOD438*
99634142_GB.qxd 20/01/05 13:58 Page 1
Throughout the manual,
indicates safety recommendations,
indicates advice and tips
Introduction P.3
LOWER OVEN
What does your oven look like?
Description of the appliance P.4
Accessories P.5
Safety Recommendations P.7
How do you install your oven?
Electrical connection P.8
Changing the power cable P.8
Useful dimensions for installing your oven P.9
How does your oven work?
Close-up view of your programmer P.10
How do you set the oven clock? P.11
How do you program for immediate cooking? P.12
How do you set a cooking programme? P.12-14
How does the grill work? P.15
How does the timer work? P.15
How do you change the lamp? P.15
Oven cooking functions P.16-17
How do you care for your oven? P.18-19
What do you do in case of operating malfunctions? P.20
UPPER OVEN
How do you program for immediate cooking? P.22
How does the grill work?l P.22
Oven cooking functions P.23
How do you change the lamp? P.24
2
Table of Contents
99634142_GB.qxd 20/01/05 13:58 Page 2

3
Introduction
Dear Customer,
You have just acquired a DE DIETRICH oven and we would like to thank you.
Our research teams have created a new generation of appliances for you. Their
quality, design and technological advances make them exceptional products
and reveal our unique know-how.
With modern, refined lines, your new DE DIETRICH oven blends harmoniously
into your kitchen and perfectly combines technological expertise, cooking performance and aesthetic luxury.
In the line of DE DIETRICH products, you will also find a wide range of hobs,
ventilation hoods, dishwashers, microwave ovens and refrigerators, all of which
can be built in and all of which can be coordinated with your new DE DIETRICH
oven.
Thanks to these "New Items of Value" that serve as guideposts in our everyday lives, DE DIETRICH, the reference of excellence, is truly an invitation to a
new art of living.
The DE DIETRICH brand.
99634142_GB.qxd 20/01/05 13:58 Page 3
4
What does your oven look like?
1
3
5
ECO
SET
1
3
4
5
1
2
3
4
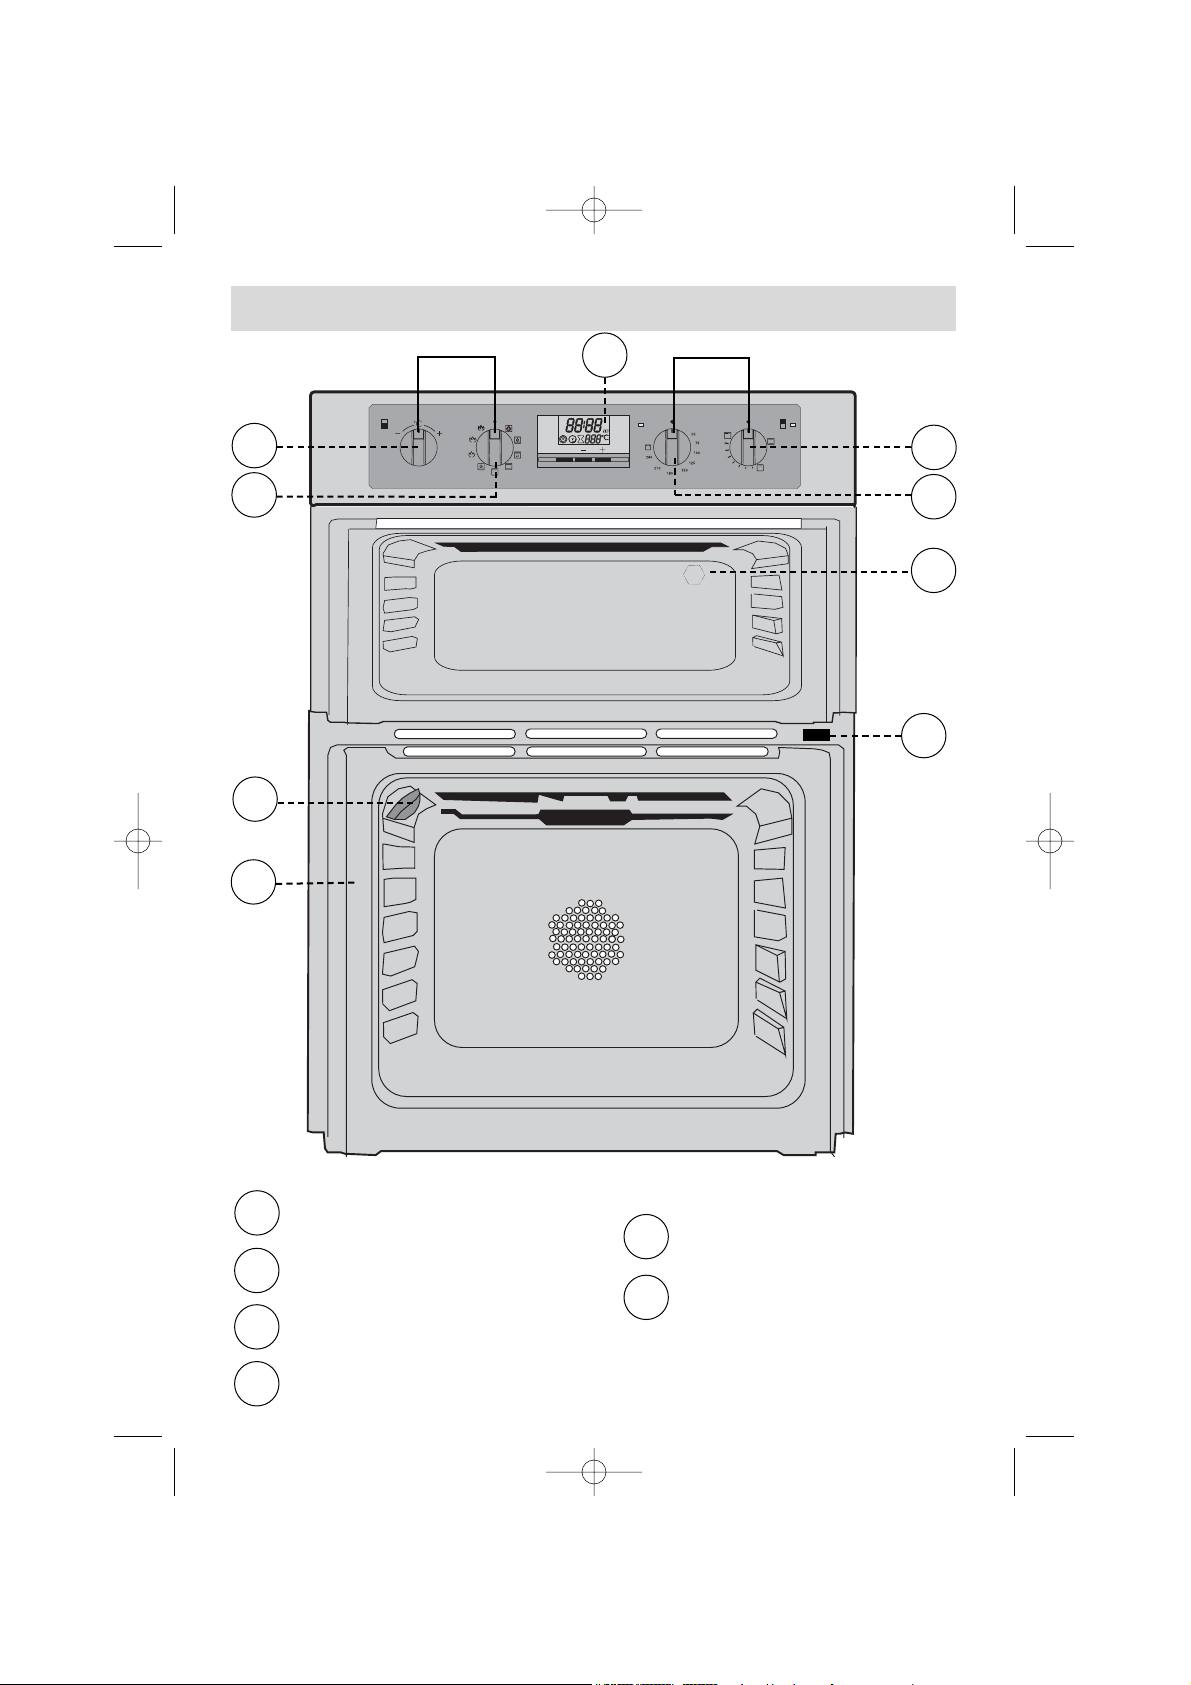
Temperature setting
Function selector
Lower oven programmer
Lamp
Shelf support indicator
Door-open detector plate
DESCRIPTION OF THE APPLIANCE
Lower oven
Upper oven
2
1
2
4
6
5
6
99634142_GB.qxd 20/01/05 13:58 Page 4
5
A
ccessories
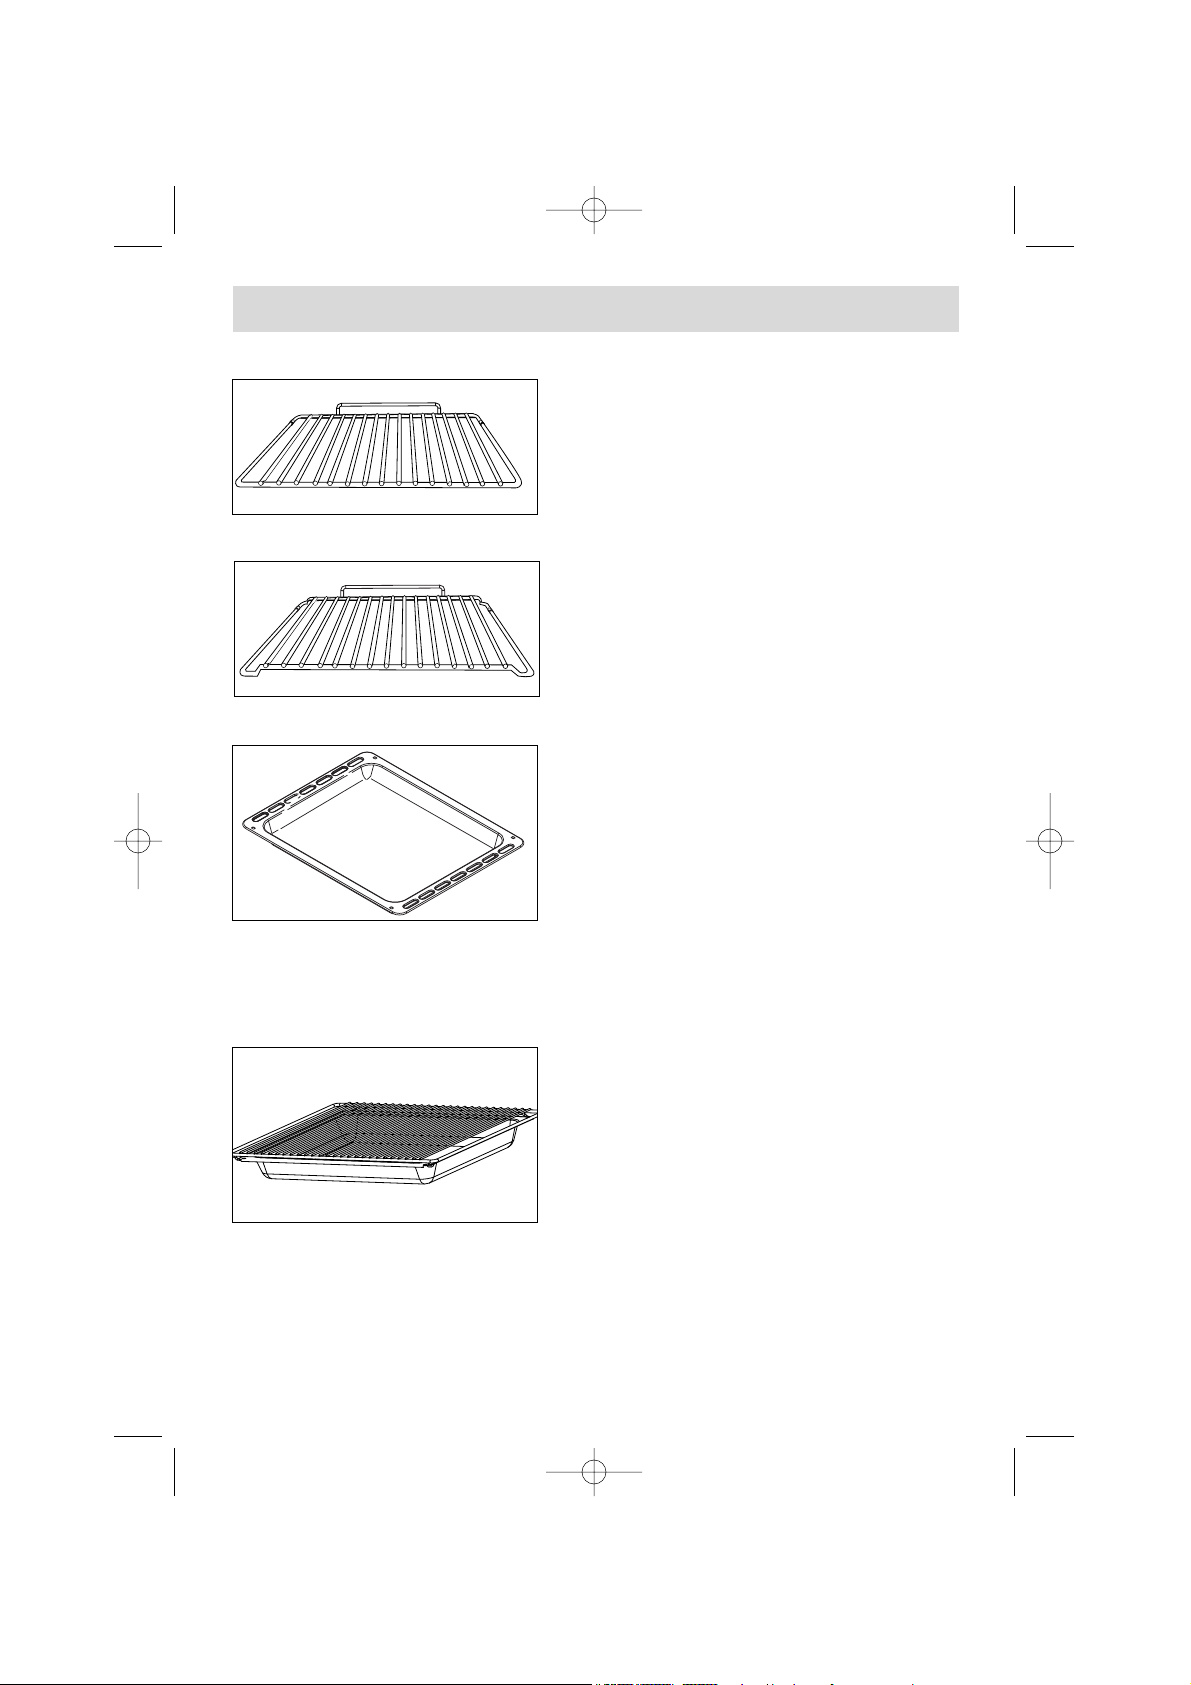
BACK
FRONT
The arched anti-drop safety
shelf
This is used in the same way as the flat shelf.
Its shape has been carefully designed to enable
you to position your dish between two runner
levels.
(to be used in the lower oven cavity)
Inserted in the runners under the shelf, this pan catches cooking juices and fat
from grilled food. It can also be used half filled with water as a double boiler.
Joints should not be cooked in this tray uncovered because fat could spit all over
the oven sides.
Multi-purpose baking tray
(
cake tray or dripping pan)
This tray has a raised edge and can be used
for baking pastries (choux buns, meringues,
small cakes, flaky pasties, etc).
Hollow dish + shelf
(
dripping pan)
Inserted under the shelf, this pan catches
cooking juices and fat from grilled food. It can
also be used half filled with water as a double
boiler. Joints should not be cooked in this tray
uncovered because fat could spit all over the
oven sides.
Anti-tip safety shelf
Food can either be placed on the shelf in a
dish or cake tin for cooking or browning.
BACK
FRONT
99634142_GB.qxd 20/01/05 13:58 Page 5
6
Safety recommendations
Please become familiar with these recommendations before installing
and using your oven. This oven was designed for household use only. It is
intended solely for cooking foodstuffs. This oven does not contain any asbestosbased components.
FIRST USE:
Before using your oven for the first time, heat it up while empty with the door
closed for approximately 15 minutes using the maximum setting in order to “cure”
the appliance. The rock wool that surrounds the oven cavity may initially release
a particular odour caused by its composition. Similarly, you may notice the release
of some smoke. All of this is normal.
SUBSEQUENT USES:
- Ensure that the door of your oven is completely closed so that the seal
can properly do its job.
- Do not let anyone lean against or sit on the oven door when it is open.
- When using the grill with the door semi-open, exposed parts
and surfaces may become hot. Keep small children away.
- When in use, the appliance becomes hot. Be careful not to touch the heat-
ing elements located inside the oven.
- After cooking, do not use bare hands to touch the dishes or accessories
(grid, rotisserie, drip tray, rotisserie support, etc.); use a potholder or heat-resistant material.
- Do not use a steam cleaner or high-pressure cleaner.
- Do not line your oven with sheets of aluminium. Otherwise, the result
could be an accumulation of heat that could have an undesirable effect on cooking and roasting results and could damage the enamel.
The oven must be turned off for all attempts to clean the cavity.
You absolutely must return the function selector to 0 to reuse
your oven.
99634142_GB.qxd 20/01/05 13:58 Page 6
7
• The supply cable (H05 RR-F, H05 RN-F or H05 W-F) must be long enough to allow
the oven to rest on the floor in front of its housing.
With the oven sitting on the floor and disconnected:
• Open the trapdoor at the bottom right hand side at the back of the oven by
removing the 2 screws and swinging the door away.
• Remove the sheath from each wire in the new cable up to 12 mm.
• Twist the ends carefully together.
• Unscrew the terminal screws and remove the wires that need changing.
• Pass the new cable through the wire clamp to the right of the terminals.
• Connect the wires up in accordance with the markings on the terminals.
• Make sure all wires are trapped under the screws.
• The brown wire (live) going to terminal marked L.
• The green and yellow wire (earth) going to the one marked .
• The blue wire (neutral) going to the terminal marked N.
• Tighten the screws and check, by tugging on each wire, that they are firmly
connected.
• Tighten the clamp to hold the cable.
• Close the trapdoor using the two screws.
Changing the power cable
We cannot be held responsible for any accident resulting from
an inexistent, defective or incorrect ground lead.
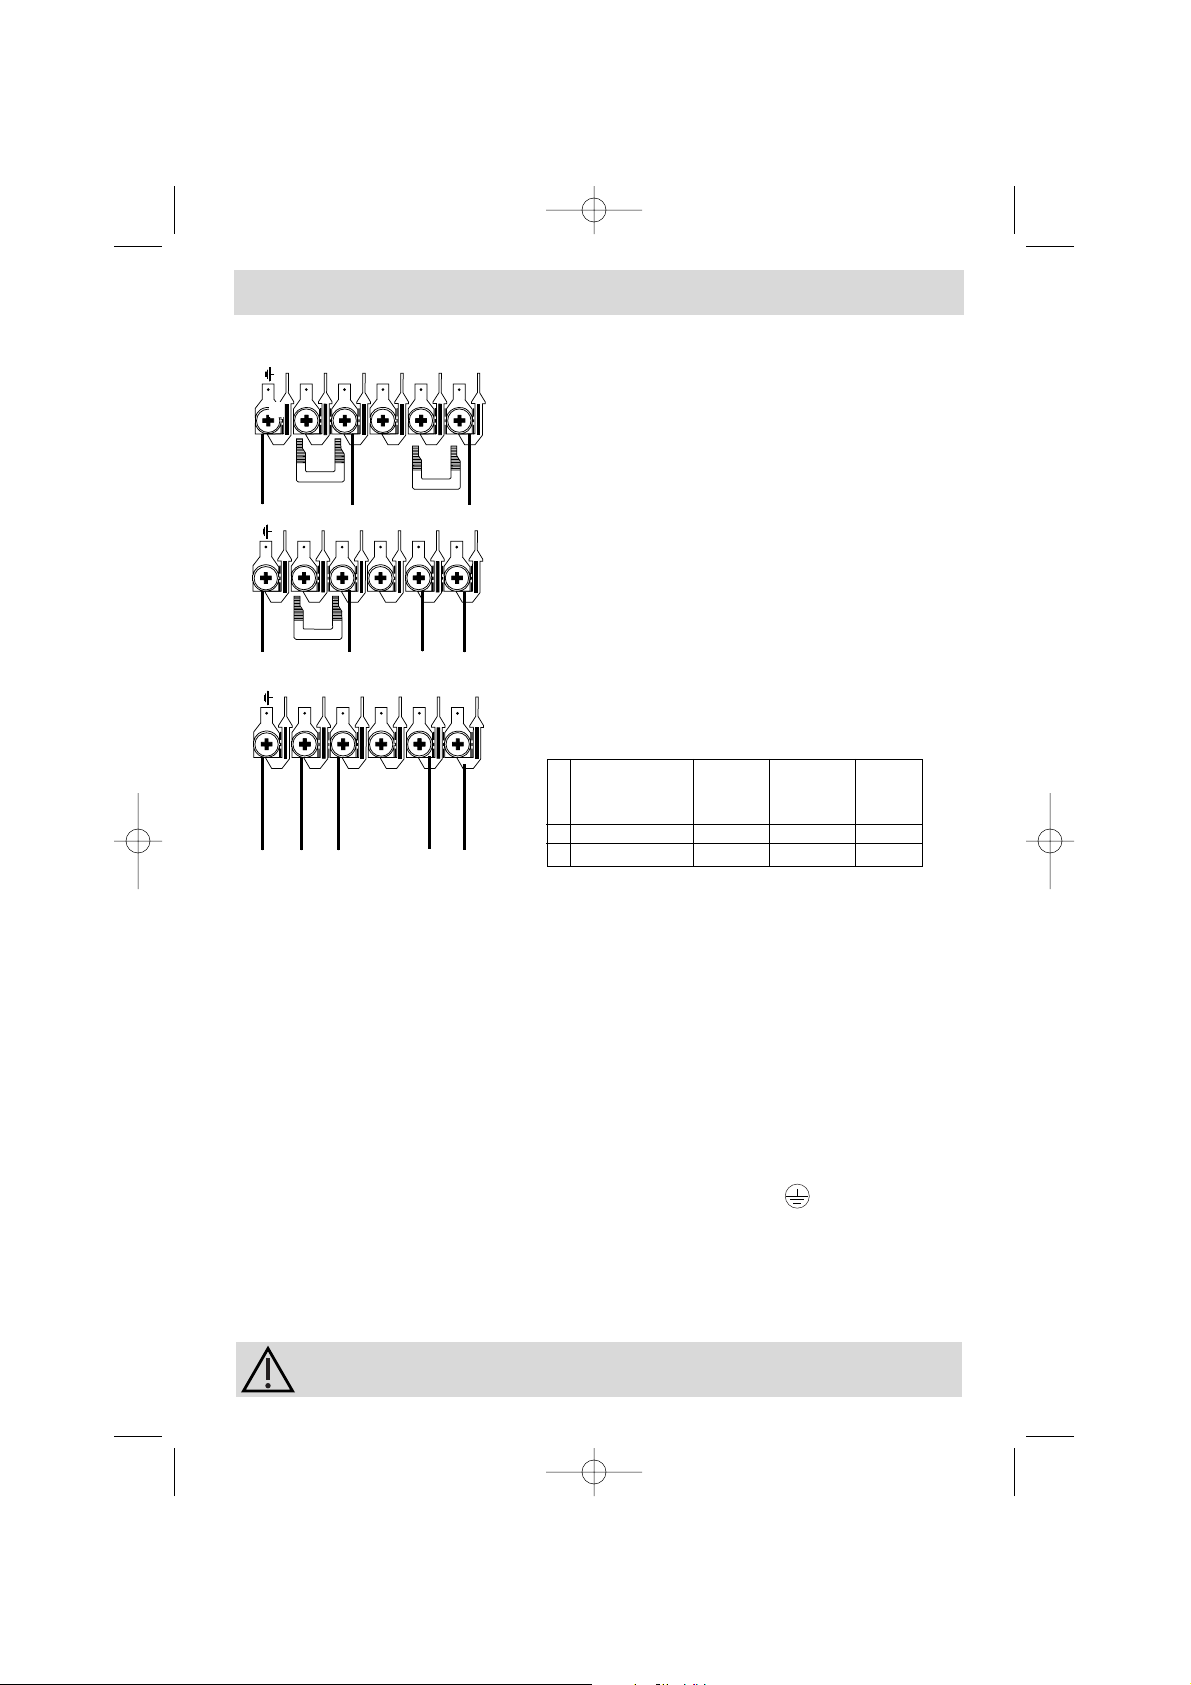
The electrical connections are made before the oven
is installed in its housing.
• Before connecting your oven, make sure you are
using the correct size cable. The cross-section should
be the same as the cable connected to the oven. The
fuse for your installation must conform to the table
shown opposite.
• Where the oven is connected using a separate plug
and socket this must be accessible after the oven has
been installed.
• Where the appliance is not connected to the mains
electricity supply by a plug, an omnipolar cutout
device (with a contacts gap of at least 3 mm) must be
fitted on the supply side of the connection to meet µ
requirements.
• The oven must be connected using a standard
power cable for which the number of conductors is
dependent upon the type of connection required and
in conformity with the table shown below.
How do you install your oven?
➀
➁
③
T
N
L
E
E
N
L 1
L 2
E
N2
L 1
L 2
N1
Electrical connections
min.
network voltage connection diameter fuse
of cable
➀ 230V- 50Hz 1 Ph + N 4 mm² 32 A
➁ 400V 2N-50Hz 2 Ph + N 1,5 mm² 16 A
④ 230V 2N-50Hz 2 Ph + N 1,5 mm² 16 A
99634142_GB.qxd 20/01/05 13:58 Page 7
5
4
5
4
2
3
3
1
2
1
5
4
2
3
1
8
To be certain that you have a proper installation, do not hesitate
to call on a household appliance specialist.
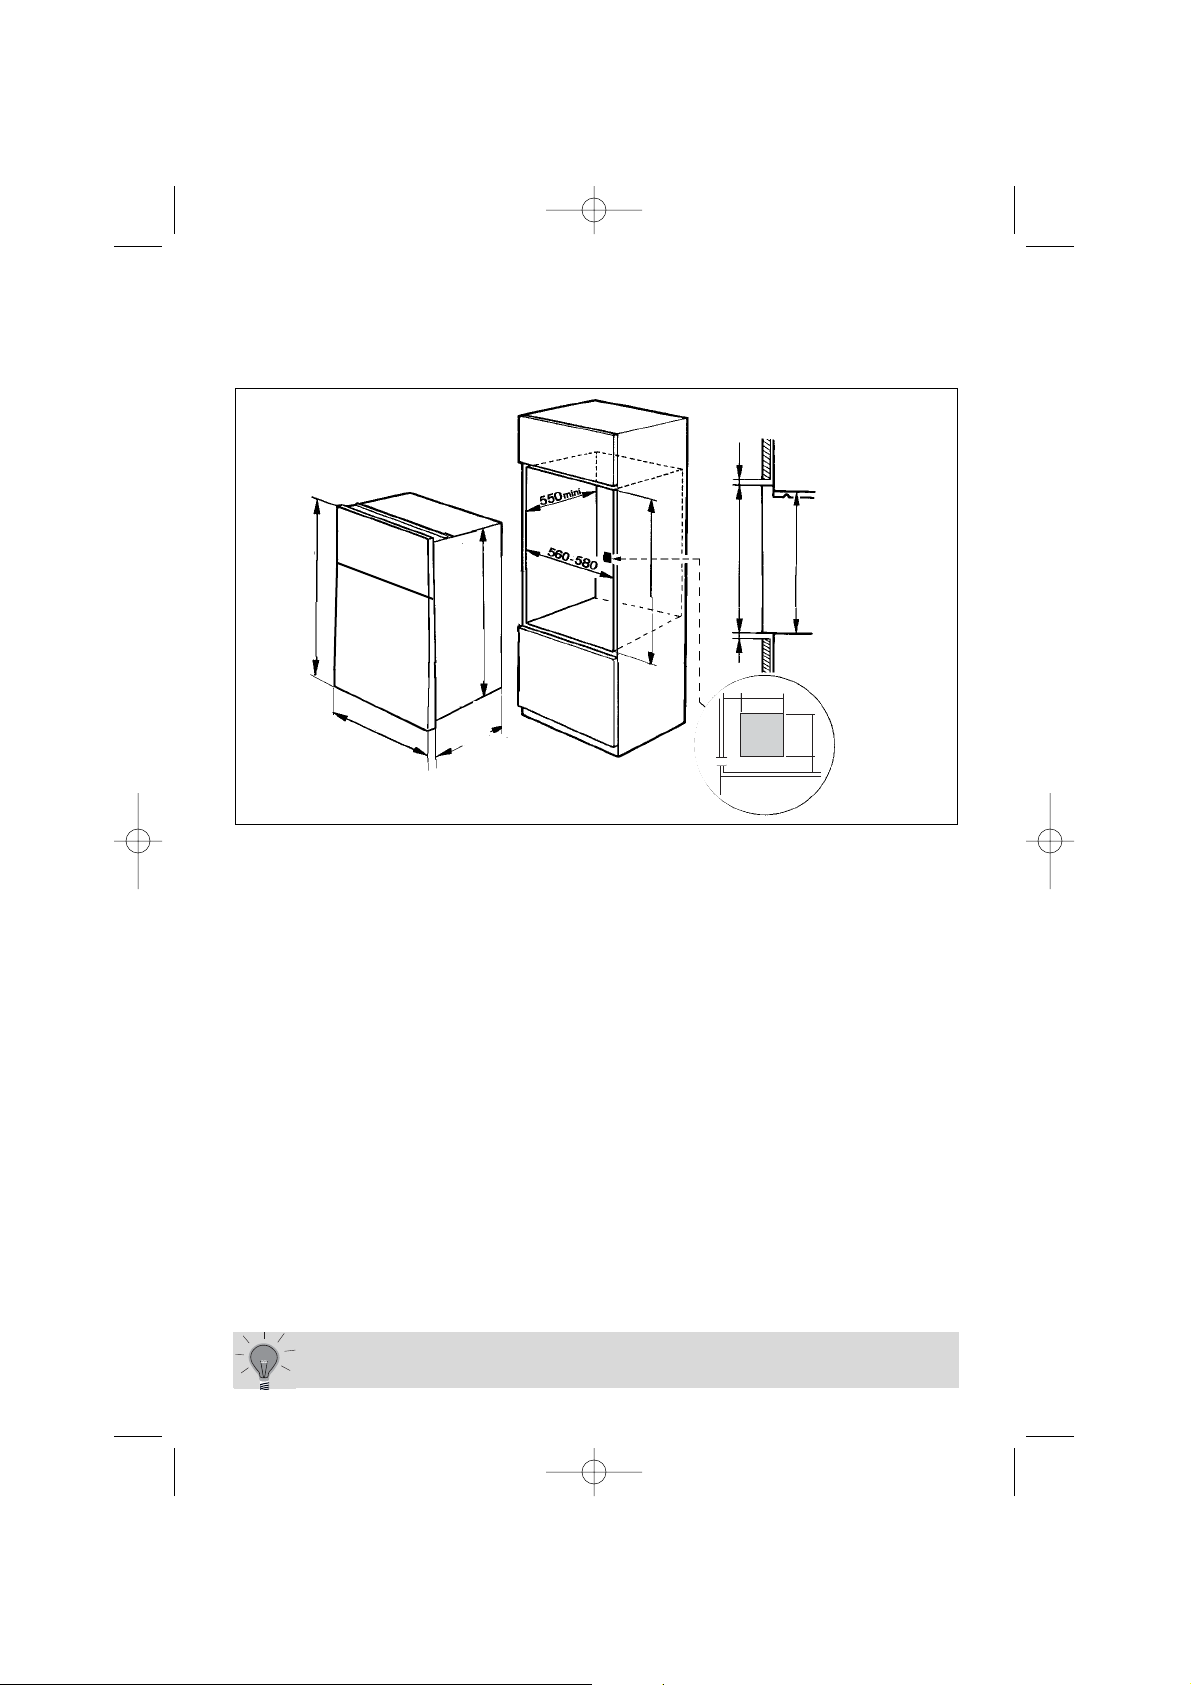
Useful dimensions for installing your oven
Your oven works at its best and produces excellent results when cooking and
cleaning itself, if its air circulation is not compromised:
• The oven must be centred in the unit so that there is a minimum distance of
5 mm between it and the surrounding unit.
• The housing unit or its outer surface must be capable of withstanding heat.
• To ensure the oven rests firmly in the housing, screw it to the housing unit using
the holes on the side uprights provided (see diagram).
To do this:
1) Remove the rubber stoppers masking the fixing holes.
2) To prevent the housing unit splintering, drill two holes 3 mm in diameter in the
wall of the housing unit opposite the fixing holes.
3) Attach the oven using the two screws.
4) Conceal the hole using the rubber stoppers. (These also help to cushion the
closing of the oven door).
(*) If the housing unit is open at the back, the gap must not be more
than 70 mm.
875 mini
5
5
888
875
875
870
595
545
20
50
50
20
How do you install your oven?
99634142_GB.qxd 20/01/05 13:58 Page 8
 Loading...