


EN USER GUIDE
Oven

Dear Customer,
When you discover De Dietrich products you experience the same feelings that only objects of value can arouse.
You are immediately attracted as soon as you see them. The quality of the design is illustrated by its timelessness, degree of refinement and elegance, and high standard of finish, resulting in perfect harmony between different appliances.
Then comes the irresistible urge to touch. De Dietrich design makes the most of sturdy and noble materials; priority is given to authenticity.
By combining the most advanced technologies with the best materials, De Dietrich makes products of the highest quality for the benefit of all those who love cooking.
We hope you are extremely satisfied with this new appliance and will be happy to receive your suggestions and to answer your questions. Please send them to our customer service department or use our Internet site.
We invite you to register your product at www.de-dietrich.com to take advantage of all the benefits the brand has to offer.
Thanking you for buying
De Dietrich
Find further details on the brand at www.de-dietrich.com Visit La Galerie De Dietrich, 6 rue de la Pépinière in Paris Open Tuesday to Saturday 10 a.m. to 7 p.m.
Customer Service : 0892 02 88 04

CONTENTS |
EN |
1 |
/ INFORMATION FOR THE USER |
|
|
• Steam cooking ____________________________________________ |
04 |
|
• Safety warnings____________________________________________ |
05 |
|
• Care of the environment ___________________________________ |
06 |
2 |
/ INSTALLING YOUR APPLIANCE |
|
|
• Choice of location__________________________________________ |
07 |
|
• Building in ________________________________________________ |
07 |
|
• Electrical connection _______________________________________ |
08 |
3 |
/ DESCRIPTION OF YOUR APPLIANCE |
|
|
• Operating principle _________________________________________ |
09 |
|
• Introduction to your oven ____________________________________ |
09 |
|
• Accessories _______________________________________________ |
10 |
|
• Introduction to the programmer ______________________________ |
11 |
4 |
/ USING YOUR APPLIANCE |
|
|
•How to set the time _________________________________________ |
12 |
|
• Programmed cooking times for different functions ___________________ |
12 |
|
• Instant steam cooking ______________________________________ |
13 |
|
• Cancelling cooking in progress _______________________________ |
14 |
|
• At the end of a cooking programme ___________________________ |
14 |
|
• Water management_________________________________________ |
14 |
|
• Delayed cooking ___________________________________________ |
15 |
|
• Using the timer function _____________________________________ |
16 |
|
• Control panel locking (child safety device)______________________ |
16 |
5 |
/ FUNCTION DESCRIPTION AND COOKING CHART _________________ |
18 |
|
• Oven cooking modes table __________________________________ |
19-20 |
6 |
/ CARING FOR AND CLEANING YOUR APPLIANCE |
|
|
• Cleaning the outer surfaces__________________________________ |
21 |
|
• Cleaning the cavity _________________________________________ |
21 |
|
• Cleaning the water intake tube _______________________________ |
21 |
|
• Cleaning the steam generator ________________________________ |
21 |
|
• Cleaning the gutter _________________________________________ |
21 |
7 |
/ TROUBLESHOOTING __________________________________________ |
22 |
|
• Changing the bulb _________________________________________ |
23 |
8 |
/ AFTER-SALES SERVICE |
|
|
• Service calls ______________________________________________ |
24 |
3

EN 1 / INFORMATION FOR THE USER
• STEAM COOKING
General comments
Steam cooking presents nothing but advantages if you follow the instructions for use. Healthy and natural, steam cooking preserves the full flavour of foods. A delicate sauce or aromatic herb seasoning adds that something extra that makes the difference.
This kind of cooking produces no cooking smells. There is no need to season the cooking water with herbs or spices; however, you can flavour a fish by placing it on a bed of seaweed or make a savoury poultry dish by adding a bunch of rosemary or tarragon.
You can cook meat, fish and vegetables simultaneously.
Steam cooking gently reheats pasta, rice and mashed potatoes with no risk of food sticking or drying out.
It facilitates cooking creams, tarts and rice pudding...covered with aluminium foil, food is not wetted by condensation water.
There is no need to add salt before cooking, nor even cooking water.
To make meat look more appetising, quickly brown it on all sides in a frying pan using hot butter.
Compared to boiling, steaming offers only advantages:
It is quick: cooking starts immediately whereas for food in a water-filled dish, the cooking time only really starts once the water returns to a full boil.
It is healthy: vitamins (those that are water soluble) and minerals are well preserved because they hardly dissolve in the condensation water that touches the food.
Moreover, no fats are used for this type of cooking.
Steam maintains the taste of food. It does not add odours, nor the taste of the grill or the pan. Furthermore, it takes nothing away because the food is not diluted in the water.
Words of advice: there is no point in using this cooking method to prepare fish that is not fresh or vegetables left in the refrigerator for a week: the results will be catastrophic!
Steam does not spread tastes or odours therefore do not hesitate to save both time and money by cooking items side by side, but not touching. For example, you can cook fish next to a dessert.
Steam is also suitable for blanching, defrosting and reheating or even keeping warm, especially sauces.
First use a very small amount of fat to heat meats like poultry, veal and pork so that they take on an appetising browned appearance. Then finish cooking them using the steam method.
Cut into pieces, food cooks faster and more evenly than if left whole.
4

1 / INFORMATION FOR THE USER |
EN |
Important
Keep this user guide with your appliance. If the appliance is ever sold or transferred to another person, ensure that the new owner receives this user guide. Please become familiar with these recommendations before installing and using your oven. They were written for your safety and the safety of others.
• SAFETY GUIDELINES
—This oven was designed for use by private persons in their homes. It is intended solely for cooking foodstuffs. This oven does not contain any asbestos-based components.
—This appliance is not intended for use by people (including children) with impaired physical, sensorial or mental abilities, or people lacking in knowledge or experience, unless they receive prior supervision or instructions on using the appliances through a person responsible for their safety.
—When you receive the appliance, unpack it or have it unpacked immediately. Check its overall condition. Make note of any concerns or reservations on the delivery slip and make sure that you keep a copy of this form.
—Your appliance is intended for standard household use. Do not use it for commercial or industrial purposes or for any other purpose than that for which it was designed.
—Do not modify or attempt to modify any of the characteristics of this appliance. That would be dangerous to your safety.
—Keep young children away from the appliance while it is in operation. That way, you will avoid the danger of them being burned by knocking over cooking pans.
—Never pull your appliance by the door handle.
—During cooking, ensure that the door of your oven is properly closed so that the seal can do its job.
—Please ensure that children do not play with the appliance.
—When in use, the appliance becomes hot. Do not touch the heating elements inside the oven. You run the risk of serious burns.
—When placing dishes inside or removing them from the oven, use heat-protective kitchen gloves.
—At the end of cooking, do not touch dishes with your bare hands.
—Do not place heavy weights on the oven door when open, and make sure that children cannot climb or sit on it.
—The oven must be turned off when cleaning the inside.
—Intensive and prolonged use of the appliance may give rise to the need for additional ventilation, by opening a window, or by increasing the power of the mechanical fan.
—In addition to the accessories supplied with your oven, only use dishes capable of withstanding high temperatures (follow the manufacturer’s instructions).
—After using your oven, make sure that all the controls are in the off position.
—Never use steam or high-pressure devices to clean the oven (electrical safety requirement).
5

EN 1 / INFORMATION FOR THE USER
•CARE FOR THE ENVIRONMENT
—This appliance’s packing materials are recyclable. Please recycle the packaging and help protect the environment by placing it in the recycling bins provided by your local council.
—Your appliance also contains various recyclable materials. It therefore carries this logo to indicate that used appliances should not be disposed of together with other waste. The manufacturer will arrange for the appliance to be recycled properly, in accordance with European directive 2002/96/EC on Waste Electrical and Electronic Equipment.
Consult your local authority or your retailer to find the drop-off points for used appliances nearest to your home.
—Thank you for helping to protect the environment.
Warning
Installation should only be performed by installers and qualified technicians. This appliance complies with the following European directives:
-Low Voltage Directive 73/23/EEC modified by directive 93/68/EEC for the application of CE marking.
-Electromagnetic Compatibility Directive 89/336/EEC modified by directive 93/68/EEC for the application of CE marking.
-EC regulation no. 1935/2004 on materials and articles intended to come into contact with food.
6
2 / INSTALLING YOUR APPLIANCE |
EN |
|
|
|
|
|
50 |
50 |
20 |
|
|
|
|
|
10 |
|
|
|
|
|
|
|
550 |
|
400 |
|
|
|
|
450 |
|
|
26 |
|
|
|
|
|
|
592 |
|
|
|
|
|
|
|
|
|
450 |
|
378 |
550 |
560 |
445 |
|
456 |
550 mini |
mini |
|
|
||||
|
|
|
|||||
|
|
|
|
|
|
|
|
|
|
560 |
|
|
|
|
|
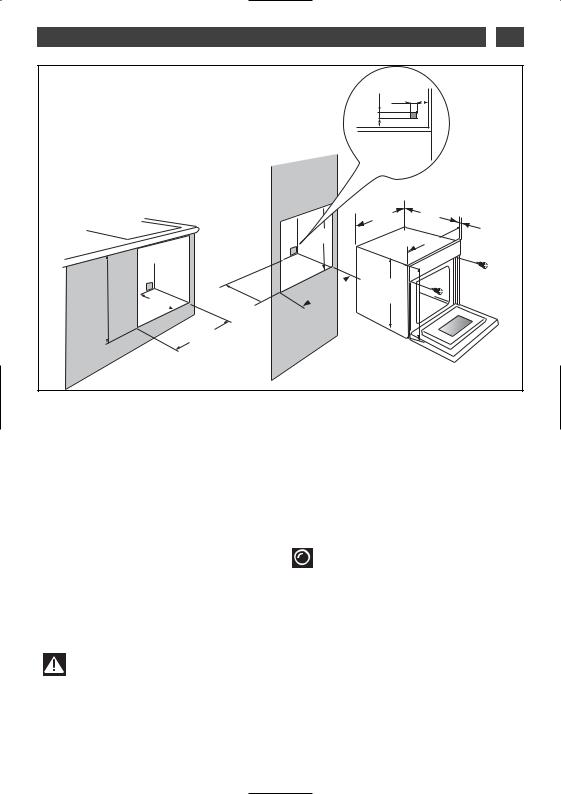
• CHOICE OF LOCATION |
• BUILDING IN |
The diagrams above show the dimensions of a cabinet suitable for accommodating your oven.
The oven may be installed either under a worktop or in a full-height unit (open or closed) that has the appropriate dimensions for built-in installation.material for installation must withstand the heat
Center the oven in the cabinet to ensure a minimum distance of 10 mm with adjacent cabinets.
• For greater stability, secure the oven in the cabinet with two screws through the holes provided for this purpose on the side panels.
To do this:
1)Drill a 2 mm diameter hole in the cabinet panel to avoid splitting the wood.
2)Attach the oven with the two screws.
Tip
 To be certain that you have installed your appliance correctly, do not
hesitate to contact a household appliance specialist.
Warning
We cannot be held responsible for any accident or incident resulting from non-existent, defective or incorrect earthing.
If the electrical installation in your residence requires any changes in order to connect your appliance, call a professional electrician.
If the oven malfunctions in any way, unplug the appliance or remove the fuse corresponding to the circuit, to which the oven is connected.
7
EN 2 / INSTALLING YOUR APPLIANCE
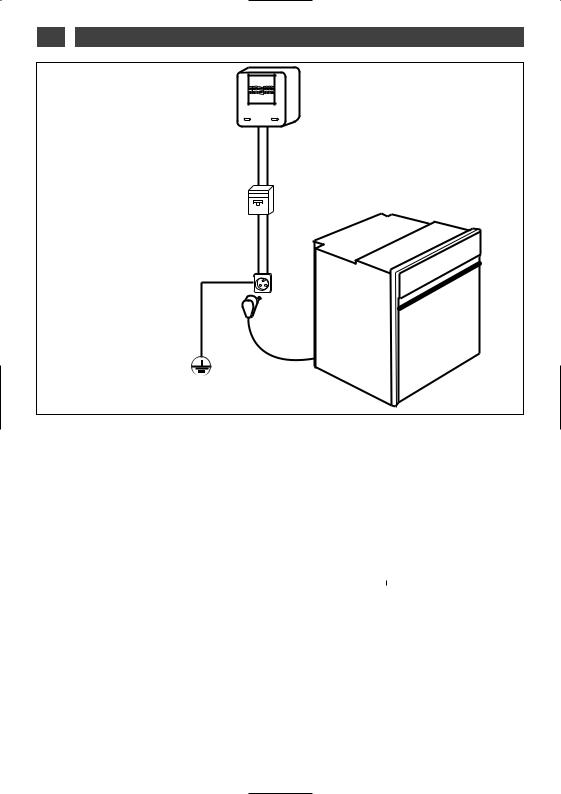
Single phase 20A Meter 220-240V~ 50Hz
220-240 V~ single-phase line
10A fuse or residual current circuit breaker
Electrical socket 2 pin +earth to IEC 60083 standard
Power supply cable
length 1.60 m approx.
• ELECTRICAL CONNECTION
The appliance must be correctly installed to ensure electrical safety. During fitting and maintenance operations, the appliance must be unplugged from the electrical system; fuses must be switched off or removed.
The electrical connections are made before the appliance is installed in its housing. Ensure that:
-the electrical installation has sufficient voltage,
-the electrical wires are in good condition,
-the diameter of the wires complies with the installation requirements.
Your oven must be connected via a (standardised) power cable with 3 conductors of 1.5mm2 (1 live + 1 neutral + earth) which must be
connected to a 220-240V~ single-phase system. by means of a 1 live + 1 neutral + earth IEC 60083 standard power socket or via an allpole cut-off device in compliance with the installation rules.
It should be possible to disconnect from the mains or using a sheet making current, or by incorporating a switch in accordance with fixed piping installation requirements.
 Warning
The safety wire (green-yellow) is connected to the appliance’s  terminal and must be
connected to the installation’s earth.
In the case of connection to an electric wall socket, it must remain accessible after installation.
The circuit should be protected with a 10 Amp fuse.
If the power cable is damaged, it must be replaced by the manufacturer, its AfterSales Service Department or a similarly qualified person to avoid danger.
8
 Loading...