


DOS1160
FR GUIDE D'UTILISATION
EN USER GUIDE
ES MANUAL DE UTILIZACIÓN
PT MANUAL DE UTILIZAÇÃO
DE BETRIEBSANLEITUNG
Four
Oven
Horno
Forno
Backofen

2
As part of our commitment to constantly improving our products, we reserve the right to make
changes to them based on advances in their technical and functional features and appearance.
Warning:
Before installing and using your appliance, please read this Installation and Use Guide
carefully, which will allow you to quickly familiarise yourself with the appliance’s operation.
Dear valued customer,
To discover a
DDee DDiieettrriicchh
product is to experience the range of unique emotions
which only high-value items can produce.
The attraction is immediate, from the moment you set eyes on the product. The
sheer quality of the design shines through thanks to the timeless style and
outstanding finishes which make each appliance an elegant and refined little
masterpiece in its own right, each in perfect harmony with the others.
Next, comes the irresistible urge to touch it.
DDee DDiieettrriicchh
's design makes extensive
use of robust and prestigious materials. The accent is placed firmly upon
authenticity.
By combining state-of-the-art technology with top quality materials,
DDee DDiieettrriicchh
produces beautifully crafted products to help you get the most from the culinary arts,
a passion shared by all lovers of cooking and fine food.
We hope that you enjoy using this new appliance and we would love to receive your
suggestions and to answer any questions you may have. Please feel free to contact
our customer service department via our website.
To benefit from the many advantages offered by the brand, we recommend that you
register your product at:
wwwwww..ddee--ddiieettrriicchh..ccoomm..
Thank you for choosing a
DDee DDiieettrriicchh
product.
DDee DDiieettrriicchh
You can find a full range of information about the brand at
wwwwww..ddee--ddiieettrriicchh..ccoomm
Visit the De Dietrich Gallery, 6 rue de la Pépinière (Paris eighth district)
Open from Tuesday to Saturday from 10 am to 7 pm
Customer service department: 0892 02 88 04

3
CONTENTS EN
1/ DESCRIPTION OF YOUR APPLIANCE
• Presentation of your oven
___________________________________
4
• Presentation of control panel
_________________________________
5
2/ USING YOUR APPLIANCE
• Cooking
__________________________________________________
6
• Settings when switching on for the first time
____________________
7
• Resetting the time
__________________________________________
7
• Using the drawer
___________________________________________
8
• Standby mode
_____________________________________________
10
• “EXPERT” function
_________________________________________
10
º Guide to “Expert” cooking
_______________________________
11
º Grill+ option
___________________________________________
14
º Starting cooking
_______________________________________
15
• “Steamer RECIPES” function
_________________________________
16
º Advice and tips
________________________________________
17
• “SETTINGS” function
_______________________________________
19
º Time
_________________________________________________
19
º Sound
________________________________________________
19
º Display
_______________________________________________
19
º Consumption
__________________________________________
20
º Language
_____________________________________________
20
º Services
______________________________________________
21
• “CLEANING” function
_______________________________________
22
• Control panel locking (child safety device)
______________________
26
3/ AFTER-SALES SERVICE
• Service calls
_______________________________________________
27
• Customer relations
_________________________________________
27
• Troubleshooting problems
___________________________________
28
4/ FUNCTION SUITABILITY TEST ___________________________________ 29
4
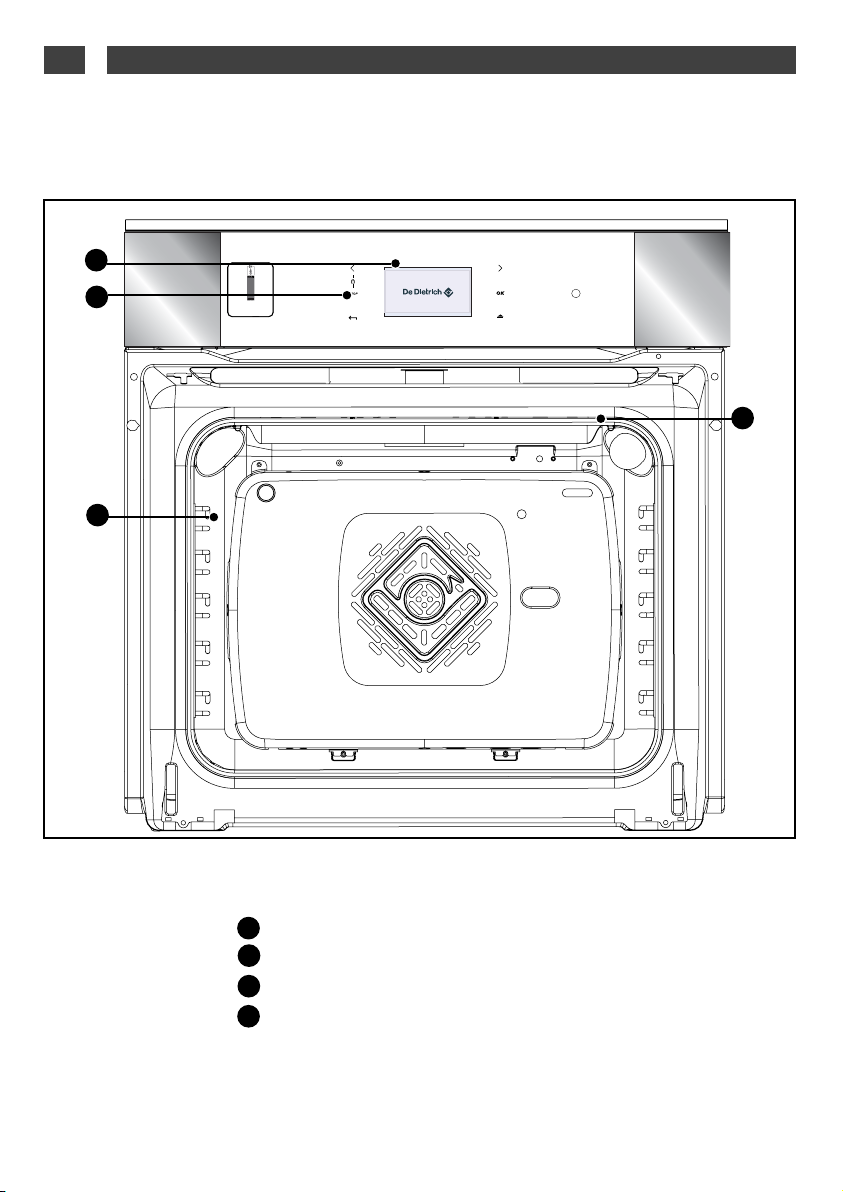
1/ DESCRIPTION OF YOUR APPLIANCEEN
INTRODUCTION TO YOUR OVEN
•
Programmer
Control buttons
Lamp
Wire shelf supports
A
B
C
D
A
B
C
D
5
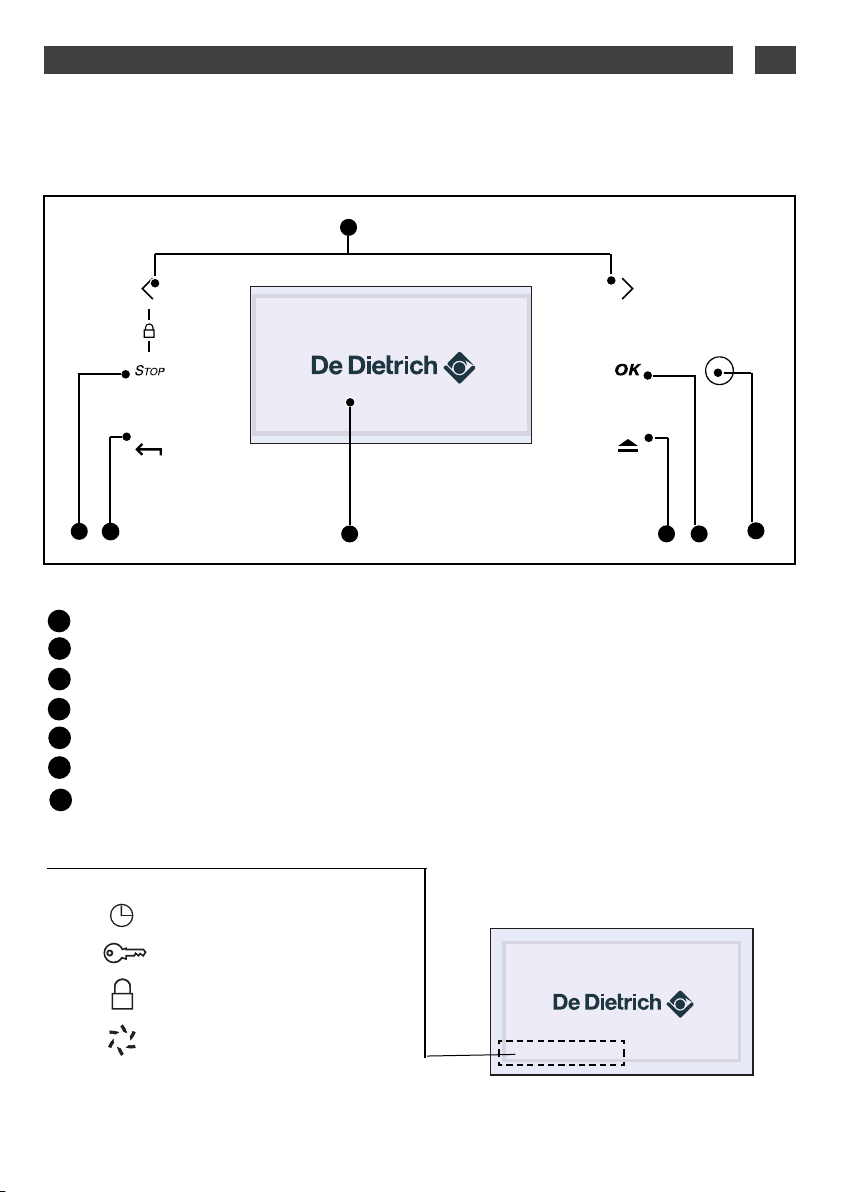
1/ DESCRIPTION OF YOUR APPLIANCE EN
List of symbols:
Programming in progress
Door locked
Keypad locked
Cleaning recommended
Selector buttons
Turn off oven or your cooking programme
Back to the previous level
Information display
Drawer opening button
Validation button
“Wake up” button (come out of standby)
A
B
C
D
D
E
Using for the first time: before using your
oven for the first time, heat it up while empty
with the door closed for approximately
15 minutes using the maximum setting in
order to “cure” the appliance. The rock wool
that surrounds the oven cavity may initially
release a particular odour caused by its
composition. Similarly, you may notice the
release of some smoke. All of this is normal.
A
B
C
E
F
F
DESCRIPTION OF CONTROLS
•
G
G
6
2/ USING YOUR APPLIANCEEN
COOKING
•
- The oven offers several modes
combined steam:
- Expert mode
With three combined steam functions, the user can
manage all aspects of cooking.
- Cooking guide
The user chooses from 24 pre-programmed recipes
(roasts, poultry, bread, cakes, cooked dishes, thawing).
- Multifunction Plus,
- 8 cooking functions,
- Reservoir capacity, 1 litre,
- Water level visible in the reservoir with blue
backlight,
- Touch sensitive water drawer opening
- De-scaling recommendation.
- 3 pyrolysis levels
• More succulent cooking
• Food that keeps its crispness
• Food that is not dried out
• Beautiful presentation, food retains the texture it had before cooking
• More gentle cooking that preserves flavour
COMBI STEAM OVEN
An efficient and economical oven
7
2/ USING YOUR APPLIANCE EN
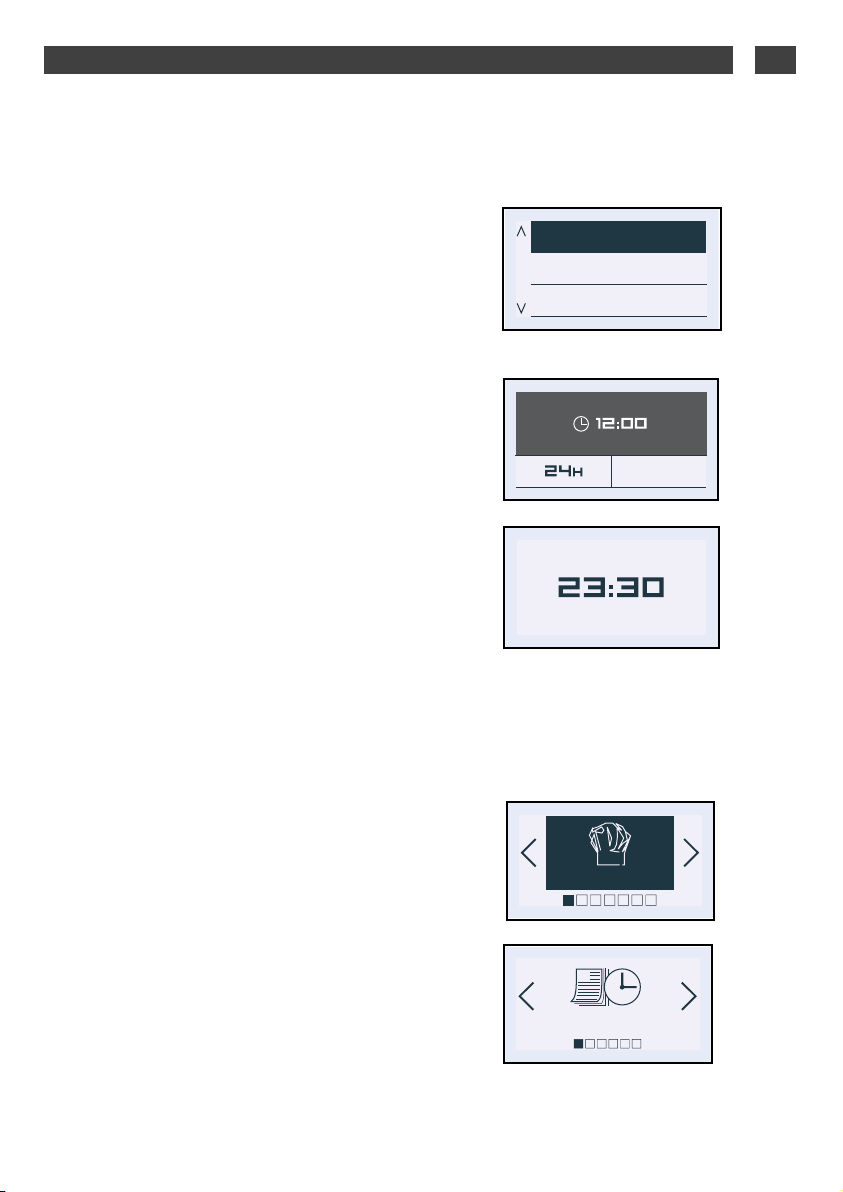
•Language
The oven automatically displays the following
screen.
It allows you to select your language by
pressing the < and > buttons.
Confirm by pressing OK.
•Time
A second screen then appears, to allow you
to set the time.
Set the time using the < and > buttons and
then press OK.
The hour display flashes, you can adjust it
using the < and > buttons and confirm by
pressing OK.
Do the same for the minutes (1).
You can choose a 12-hour (am/pm) or
24-hour display (2).
Select using the < and > buttons and then
confirm by pressing OK.
Digital display
SETTINGS WHEN SWITCHING ON FOR THE FIRST TIME
•
OK
O K
(1)
(2)
Deutsch
English
Francais
•Resetting the time
- Press the OK button.
The oven displays the following screen by
default (“Expert”) function.
- Press the < and > buttons until the “Settings”
screen appears, confirm with OK. The “time”
screen is displayed; press OK again to access
the time data screen and then proceed as for
switching on for the first time.
EXPERT
Clock
21
21

8
2/ USING YOUR APPLIANCEEN
USING THE DRAWER
•
•Filling the reservoir
— Always fill the reservoir with water before
you cook.
The reservoir capacity is as follows:
- a maximum of 1 litre.
- Only use tap water. Do not use softened
or demineralised water.
Press the button, the filling drawer pops
outs .
- Fill the reservoir.
Make sure that the reservoir is filled to its
maximum capacity.
Use the maximum level mark visible on the
front face of the drawer.
Then, close the drawer by pushing it shut .
Your oven is now ready for Combi-steam
cooking.
MAXI
MINI
Note
The reservoir capacity is a maximum
of 1 litre.
Do not use softened or demineralised
water.
Tip
When filling the reservoir, leave the
water level for a couple of seconds so
that it can settle.
Readjust the level if necessary.
MIN
MAX
9
2/ USING YOUR APPLIANCE EN
USING THE DRAWER
•
Note
The emptying cycle must be carried out after every Combi-steam Cooking. The automatic
emptying cycle lasts for about 3 minutes/
•Emptying the reservoir
— Manual emptying
- Open your oven door so that it is easier to
empty the reservoir.
Press the button, the filling drawer pops
outs.
- Place a container under the drawer to collect
any water.
- Keep your finger on the button for the
entire emptying cycle , about 3 minutes for 1
litre.
- The pump is continuously activated and the
water escapes through an opening located
under the drawer.
—
Automatic emptying
- Empty the reservoir after cooking with the
Combi-steam oven.
- Place a container under the drawer to collect
any water.
- Press OK button for automatic emptying ,
- The automatic emptying cycle begins.
The display indicates the time needed for
emptying e.g. 2 minutes 20s. The emptying is
finished when the display indicates 00
minutes. You may remove the container.Then,
close the drawer by pushing it shut.
DRAIN
 Loading...