


De dietrich DOP280BE1, DOP390BE1, DOP280WE1, DOP390ZE1, DOP390XE1 User Manual
...99625071 GB MATRICIEL.qxd 11/04/03 13:53 Page 41
Using your oven
GB
Model : DOP390*
41
99625071 GB MATRICIEL.qxd 11/04/03 13:53 Page 42
Contents
Introduction |
P.43 |
Your oven |
|
How it works |
P.44 |
Accessories |
P.45 |
Safety recommendations |
P.46 |
How to install your oven |
|
Electrical connections |
P.47 |
Changing cables |
P.48 |
Dimensions for installation use |
P.49 |
How to use your oven |
|
The oven programmer |
P.50 |
Display description |
P.50 |
Setting the date and time on the oven. |
P.51 |
Cooking a dish |
P.52 |
Using the various cooking modes. |
|
The "CHEF" function |
P.52-58 |
The "COOKING GUIDE" function |
P.59-61 |
The "ICS" function |
P.62-69 |
Accessing the various oven settings. |
|
Adjusting the Sound emitted when using the touch controls |
P.70 |
Adjusting the Screen contrast and the Standby |
P.70 |
Setting the Eolyse |
P.70 |
Setting the Electricity consumption |
P.71 |
Setting the Language |
P.71 |
De Dietrich Services |
P.72 |
The "Automatic timer" function |
P.72 |
Cleaning the oven cavity |
|
The Cleaning function |
P.73 |
When to clean by pyrolysis |
P.73 |
Carrying out the pyrolysis cleaning of your oven. |
P.74-75 |
Locking the oven controls |
P.75 |
Changing a bulb |
P.76 |
Troubleshooting |
P.76 |
Throughout this manual, |
indicates safety recommendations, |
|
indicates advice to help you make the |
|
best use of your oven |
42
99625071 GB MATRICIEL.qxd 11/04/03 13:53 Page 43
Introduction
Dear Customer,
Thank you for buying a DE DIETRICH oven. |
GB |
|
|
Our design staff have produced a new generation of kitchen equipment, to |
|
make everyday cooking a pleasure. |
|
You will find that the clean lines and modern look of your DE DIETRICH oven |
|
blends in perfectly with your kitchen décor. It is easy to use and performs to a |
|
high standard. |
|
DE DIETRICH also makes a range of products that will enhance your kitchen |
|
such as hobs, extractor hoods, built-in dishwashers, microwave ovens and refri- |
|
gerators. There are models to complement your new DE DIETRICH oven. |
|
Of course, we make every effort to ensure that our products meet all your |
|
requirements, and our Customer Relations department is at your disposal, to |
|
answer all your questions and to listen to all your suggestions (see back cover |
|
of manual). |
|
De Dietrich is certain that by setting new standards of excellence by which com- |
|
parisons can be made, customers will find that De Dietrich appliances offer a |
|
better and more exciting way of living. |
|
The DE DIETRICH name. |
|
43
99625071 GB MATRICIEL.qxd 11/04/03 13:53 Page 44
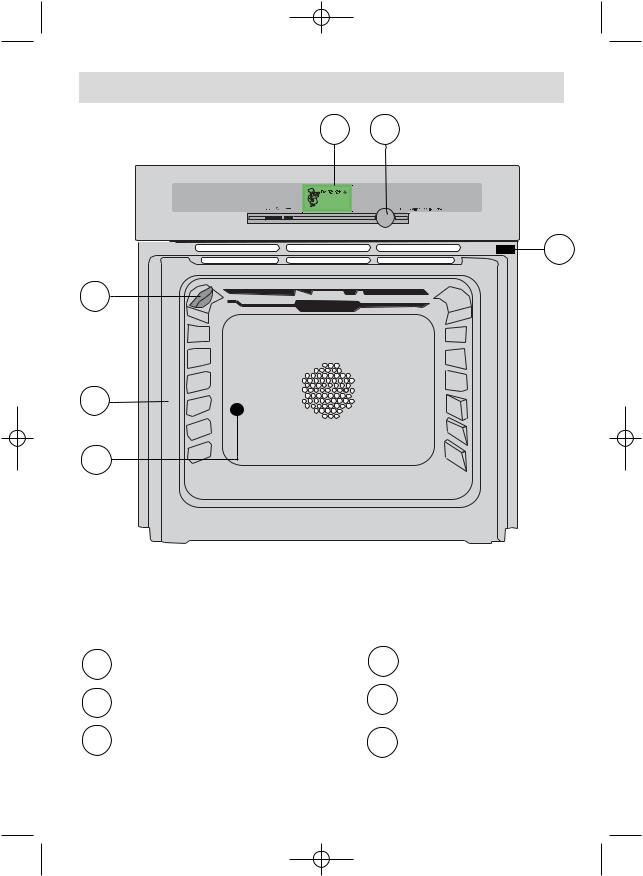
Your oven
1 2
Hello ! |
6
3
5
4 3
1
5
OVEN FEATURES
1
2
3
Programme selector
Control knob
Light
4
5
6
Rail positions
Hole for rotisserie
Door-open detector plate
44

99625071 GB MATRICIEL.qxd 11/04/03 13:53 Page 45
Accessories (Depending on model)
BACK 8
FRONT |
|
BACK |
9 |
|
|
FRONT |
|
|
10 |
Anti-tip safety shelf
Food can either be placed on the shelf in a |
|
dish or cake tin for cooking or browning. |
GB |
The arched anti-drop safety shelf
This is used in the same way as the flat shelf. Its shape has been carefully designed to enable you to position your dish between two runner levels.
Hollow dish + shelf
(dripping pan)
Inserted under the shelf,this pan catches cooking juices and fat from grilled food. It can also be used half filled with water as a double boiler. Joints should not be cooked in this tray uncovered because fat could spit all over the oven sides.
11 |
Pastry tray |
|
|
(to be placed on the shelf) |
|
|
The pastry tray should be placed on the plate |
|
|
support shelf. This is useful for cooking |
|
|
pastries, tarts, pizzas, etc. |
|
12 |
Rotisserie |
|
To use it: |
||
|
||
|
• Place the multi-purpose baking tray at |
|
|
level no. 1 to collect the cooking juices or on |
|
|
the bottom of the oven if the piece of meat |
|
|
to be roasted is too big. |
|
|
• Slide one of the forks onto the spit; put the |
|
|
piece of meat to be roasted onto the spit; |
slide on the second fork; centre and tighten the two forks.
•Place the spit on its cradle.
•Push gently to locate the tip of the spit in the turning mechanism situated at the back of the oven.
•Remove the handle by unscrewing it. After cooking, screw the handle back onto the spit to take it out without burning yourself.
At the end of the handgrip, a depression enables you to unscrew the forks.
45
99625071 GB MATRICIEL.qxd 11/04/03 13:53 Page 46
 Safety recommendations
Please read these instructions before installing and using your oven.
The oven has been designed for domestic use only for cooking food. No asbestos has been used in its construction.
USING FOR THE FIRST TIME:
Before you use your oven for the first time, leave it empty and, with the door closed, turn it on to maximum temperature and let it heat up for 15 minutes. This "runs the oven in". During this time there may be some smell from the mineral wool that insulates the oven and there could be some smoke. This is perfectly normal.
NORMAL USE:
- Always close the door properly. The oven is fitted with a seal designed to work with a closed door.
- Never lean or let anyone sit on the oven door when it is open.
- When using the grill with the door partly open, and during pyrolysis, the accessible parts or surfaces can get hot.
Always keep children at a safe distance.
- When the oven is on it will get hot. Take care not to touch the heating elements inside the oven.
- Always protect your hands with oven gloves or something similar when removing food, accessories or containers from the oven.
- Do not line your oven with kitchen foil. The metal will increase the heat produced and could ruin the food and damage the enamel.
Always check that the oven is off before you clean the inside.
Before cleaning the oven by pyrolysis, remove all dishes, pans, etc, and remove any considerable spillage.
Ensure that the function selector is returned to 0 to re-use your oven.
46
99625071 GB MATRICIEL.qxd 11/04/03 13:53 Page 47
How to install your oven
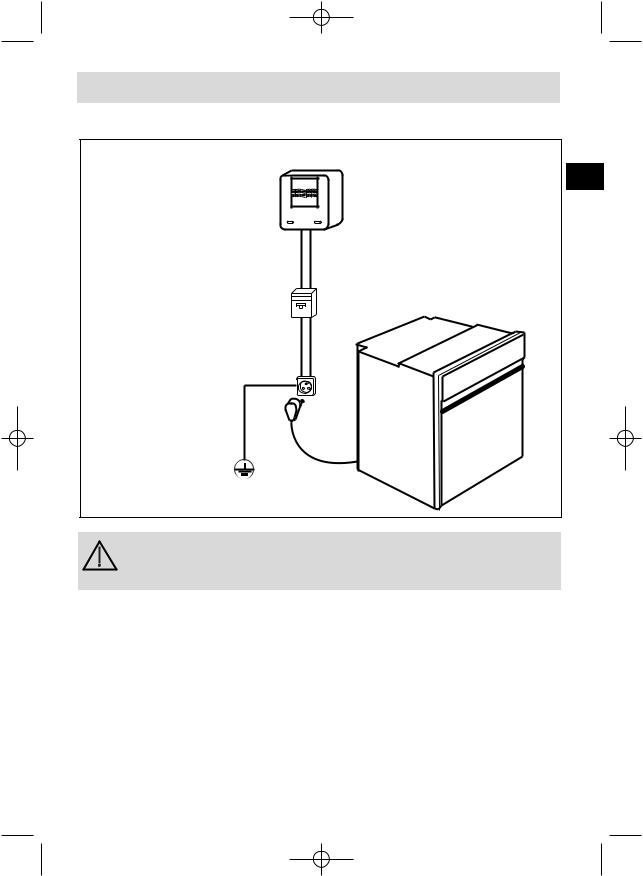
Electrical connections
Fused 16A or differential circuit breaker
Electricity meter (mains) (20A, single-phase 220-240 V alternating current 50 Hz)
220-240 V single phase alternating current supply
Socket
2 -pin with earth
Connecting cable approx 1.50 m. long
GB
Before connecting your oven, make sure you are using the correct size cable.
Use a 16-amp fuse.
The electrical connections are made before the oven is installed in its housing.
•The oven must be connected using an approved 3-core cable (live, neutral and earth) with 1.5 mm square conductors. This should be connected via a 3- pinsocket (live, neutral, and earth to the main supply which should be should be a 220-240V, alternating single-phase current. If the oven is not connected using a plug and socket, it must be connected to a multi-pole switch with a minimum gap of 3 mm between contacts. The earth wire (green and yellow) should be
connected to the terminal marked with the earth symbol  on the appliance and to the earth in the switch.
•Where the oven is connected using a separate plug and socket this must be accessible after the oven has been installed.
•The neutral wire (blue) of the oven must be connected to the neutral in the main supply.
47
99625071 GB MATRICIEL.qxd 11/04/03 13:53 Page 48
How to install your oven
Changing cables
• The supply cable (H05 RR-F, H05 RN-F or H05 W-F) must be long enough to allow the oven to rest on the floor in front of its housing.
With the oven sitting on the floor and disconnected:
•Open the trapdoor at the bottom right hand side at the back of the oven by removing the 2 screws and swinging the door away.
•Remove the sheath from each wire in the new cable up to 12 mm.
•Twist the ends carefully together.
•Unscrew the terminal screws and remove the wires that need changing.
•Pass the new cable through the wire clamp to the right of the terminals.
•Connect the wires up in accordance with the markings on the terminals.
•Make sure all wires are trapped under the screws.
•The brown wire (live) going to terminal marked L.
•The green and yellow wire (earth) going to the one marked  .
.
•The blue wire (neutral) going to the terminal marked N.
•Tighten the screws and check, by tugging on each wire, that they are firmly connected.
•Tighten the clamp to hold the cable.
•Close the trapdoor using the two screws.
We cannot accept any liability in the event of an accident resulting from non-existent or faulty earthing.
48
99625071 GB MATRICIEL.qxd 11/04/03 13:53 Page 49
How to install your oven
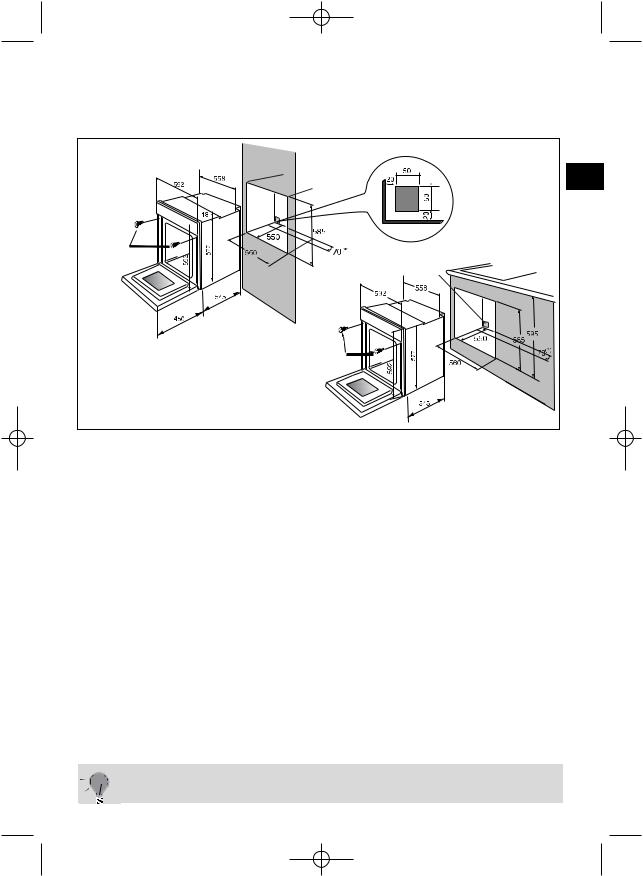
Dimensions for installation use
GB |
Fixation screw |
position |
Cutout 50 x 50 cm |
Fixation screw |
position |
The oven may be housed either under a work surface or built into a column that is open* or closed with a suitable opening.
Your oven works at its best and produces excellent results when cooking and cleaning itself, if its air circulation is not compromised:
•The oven must be centred in the unit so that there is a minimum distance of 5 mm between it and the surrounding unit.
•The housing unit or its outer surface must be capable of withstanding heat.
•To ensure the oven rests firmly in the housing, screw it to the housing unit using the holes on the side uprights provided (see diagram).
To do this:
1)Remove the rubber stoppers masking the fixing holes.
2)To prevent the housing unit splintering, drill two holes 3 mm in diameter in the wall of the housing unit opposite the fixing holes.
3)Attach the oven using the two screws.
4)Conceal the hole using the rubber stoppers. (These also help to cushion the closing of the oven door).
(*) If the housing unit is open at the back, the gap must not be more than 70 mm.


 If you are unsure about fitting this oven yourself please use a

 qualified electrician.
49
99625071 GB MATRICIEL.qxd 11/04/03 13:53 Page 50
How to use your oven
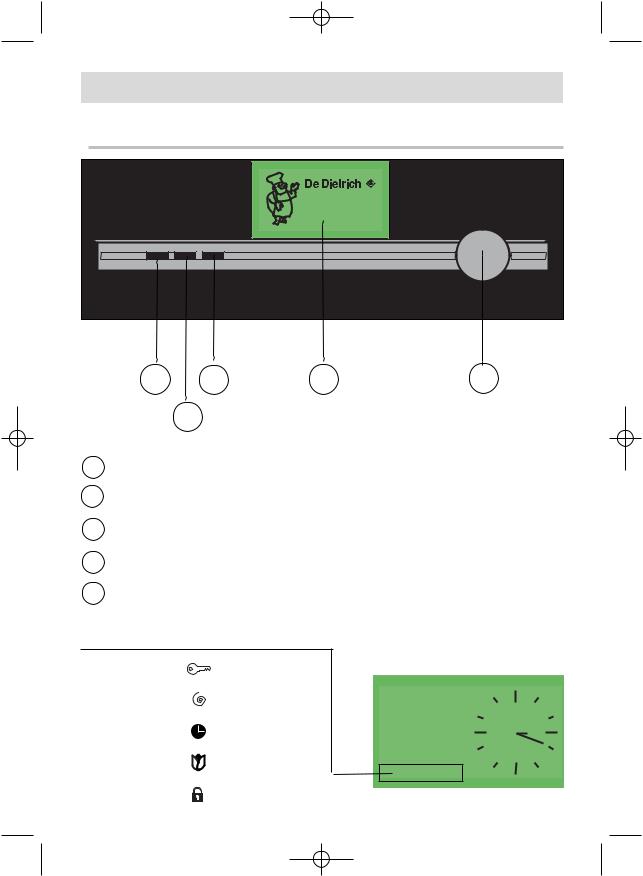
1. The oven programmer
Hello ! |
|
1 |
3 |
4 |
5 |
|
|
2 |
OVEN FEATURES |
|
|
|
|
|
|
1 |
Switch off the oven or your programme |
|
||
2 |
Lock the keypad |
|
|
|
3 Return to the previous level
4 |
Information display |
|
5 |
Selector knob |
|
|
DISPLAY DESCRIPTION: |
|
List of indicators: |
|
|
|
Key |
|
|
Pyrolysis |
Thursday |
|
|
|
|
Programming |
19 |
|
|
September |
|
Eolyse |
|
|
Lock |
|
50
99625071 GB MATRICIEL.qxd 11/04/03 13:53 Page 51
How to use your oven
2. Setting the date and time on the oven
a) When switching on the appliance
The oven displays the following screen.
Turn the selector knob until you reach the box to be adjusted then press to enter the desired information and press again to confirm this.
Date display (1).
GB
(2) |
(1) |
|
(3) |
||
12 H |
||
(4) |
Analog |
Time display (2).
Display in 12 hour or 24 hour mode (3).
Display the time (4) as :
Thursday |
|
Thursday |
3:20 |
19 |
|
19 |
|
September |
|
September |
|
An analogue clock |
or |
A digital clock |
|
b) Changing the time on the clock and the date
Turn the selector knob until you reach the "Adjustment" box. Press it, and the "Time/Date" screen appears. Press again to access the time information screen then proceed as you would when switching on the appliance.
51
 Loading...