


4 
KOMPERNASS GMBH
BURGSTRASSE 21 D-44867 BOCHUM www.kompernass.com
ID-Nr.: KH 2299-1/10-V4
Undercupboard Radio
KH 2299
 Undercupboard Radio
Operating manual
 Radio podwieszane
Instrukcja obsługi
 Beépíthető rádió
Használati utasítás
 Podelementni radio
Navodila za uporabo
 Rádio na vestavění
Návod k obsluze
 Rádio
Rádio
Návod na používanie
 Ugradbeni radio
Upute za uporabu
 Unterbau-Radio
Bedienungsanleitung
KH 2299

INDEX |
PAGE |
|
|
|
|
Intended Use |
2 |
|
|
Items supplied |
2 |
|
|
Technical data |
2 |
|
|
Safety instructions |
3 |
|
|
The appliance components |
6 |
|
|
Setting up the appliance |
6 |
|
|
Fixing the kitchen radio |
|
beneath a wall cabinet |
7 |
|
|
Setting up the kitchen radio |
7 |
|
|
The Settings menu |
8 |
|
|
Further setting possibilities |
10 |
|
|
Radio operation |
12 |
|
|
Cleaning |
16 |
|
|
Disposal |
16 |
|
|
CE Conformity |
17 |
|
|
Importer |
17 |
|
|
Warranty and Service |
17 |
Read the operating instructions carefully before using the appliance for the first time and preserve this booklet for later reference. Pass this booklet on to whoever might acquire the appliance at a future date.
- 1 -

Intended Use
This Kitchen Radio is intended for use either free-standing or for assembly beneath a wall cabinet. The intended uses for thisKitchenRadioarethereceptionofFMradiotransmissions and as an alarm/timer, using either signal tones or the radio itself.
This Kitchen Radio is not intended for utilisation in commercial or industrial applications. The warranty does not provide compensation for damage caused by improper use of the appliance!
Items supplied
1 Kitchen radio KH 2299
1 Mounting plate
4 Screws
1 Operating manual
Technical data
Power supply: |
220 - 240 V~, 50 Hz |
Power consumption: |
|
Operation: |
5 W |
Standby: |
approx. 1.8 W |
Output level: |
1 W at 10% THD |
Frequency range |
UKW (FM) 87.5 – 108 MHz |
|
MW (AM) 526,5 – 1606,5 kHz |
Operating temperature: |
+5 ~ +35°C |
Humidity: |
5 ~ 90 % |
Dimensions |
(No condensation) |
|
|
(W x H x D): |
27,5 x 15,7 x 6,4 cm |
Weight: |
1.070 g |
Protection class: |
II / |
Backup batteries |
2 x 1.5 V Type AAA/Micro |
|
(not supplied |
The technical features of this appliance enable an adjustable reception capability that exceeds the permitted frequency range of 87,5–108 MHz and 526,5–1606,5 kHz. In some countries, different nationalregulationsmayapplytothe assignedradiofrequency ranges. Please note that information received outside of the assigned radio frequency ranges may not be utilised, passed on to third parties or otherwise misused.
- 2 -

Safety instructions
•This appliance is not intended for use by individuals (includingchildren)withrestrictedphysical,physiological or intellectual abilities or deficiencies in experience and/orknowledgeunlesstheyaresupervisedbyaperson responsible for their safety or receive from this person instruction in how the appliance is to be used. Children should be supervised to ensure that they do not play with the appliance.
•Always remove the power plug before cleaning the appliance.
•Check the appliance and all parts for visible damages. The safety concept can work only if the appliance is in a faultless condition.
•The power plug must always be easily accessible, so that in the event of an emergency the appliance can be quickly disconnected from the mains power supply.
Risk of electrical shocks.
•Connect the appliance only to correctly installed and earthed mains power sockets. Ensure that the rating of the local power supply tallies completely with the details given on the rating plate of the appliance.
•Arrange for Customer Services to repair or replace connecting cables and/or appliances that are not functioning properly or have been damaged.
•NEVER submerse the appliance in water. Wipe it only with a slightly damp cloth.
•Do not expose the appliance to rain and never use it in a humid or wet environment.
•Always take hold of the power cable by the plug.
Do not pull on the cable itself and never touch the power cable with wet hands, this could result in either a short circuit or you receiving an electric shock.
•Do not place the appliance, furniture or anything else onthepowercableandensurethatitdoesnotbecome clamped.
•NEVER make a knot in the power cable and do NOT bind it together with other cables. The power cable should be positioned so that no one can step on or trip over it.
•Ensure that the power cable does not become wet during operation.
- 3 -

•You are not permitted to open the appliance housing or repair the appliance. If the housing is opened, you run the risk of receiving a potentially fatal electric shock and the warranty lapses.
•Protect the appliance against drip and spray water. Do not place any water-filled vessels (e.g. flower vases) on or near the appliance.
 Risk of fire!
•Do not use the appliance near hot surfaces.
•Do not place the appliance in locations that are subject todirectsunlight.Otherwise,itmayoverheatandbecome irreparably damaged.
•Do not locate the kitchen radio directly above hotplates. The kitchen radio may be damaged. There is a danger of fire!
•Never leave the appliance unattended while it is being used.
•Never cover the ventilation slots of the appliance while it is on.
•Do not place open fire sources, such as candles, on or near the appliance.
 Risk of personal injury!
•Keepthepowercableandapplianceawayfromchildren. Childrenfrequentlyunderestimatethedangersofelectrical appliances.
•Provide a stable location for the appliance.
•Do not operate the appliance if it has sustained a fall or is damaged.
•Arrangefortheappliancetobecheckedand/orrepaired by qualified technicians.
•Keep batteries well away from children. Children can put batteries into their mouths and swallow them.
•If a battery is swallowed medical assistance must be sought immediately.
Note:
•Someaggressivefurniturefinishescanhaveadestructive influence on the appliance's rubber pads. If necessary, place the appliance on a nonslip pad.
 Thunderstorms!
•Equipmentconnectedtoapowersupplycanbedamaged during a thunderstorm. You should therefore always remove the plug from the power socket when there is a storm.
- 4 -

Notice regarding separation from mains-power
The ON/AOT/OFF switch does not completely disconnect the appliance from the power network. Additionally, the appliance consumes power when in standbymode.
To completely separate the appliance from mains power, the power plug MUST be removed from the mains power socket.
Notice regarding electrical power surges (EFT / electrical fast transient) and electrostatic discharges:
In a case of malfunction due to an electrical fast transient (power surge) and/or electrostatic discharge, the appliance must be returned to default settings in order to re-establish normal operation. Possibly the power supply must be separated and then reconnected. The batteries (if present) must be removed and then reinserted.
Information regarding the handling of batteries
The appliance uses batteries for memory conservation. For the handling of batteries please observe the following:
 Risk of explosion!
•Do not throw batteries into a fire. Do not recharge the batteries.
•Never open batteries, never solder or weld batteries. The risk of explosions and injuries exists!
•Regularly check the condition of the batteries. Leaking batteries can cause damage to the appliance.
•Ifyoudonotintendtousetheapplianceforanextended period, remove the batteries.
•Should the batteries leak, put on a pair of protective glovesandcleanthebatterycompartmentandterminals with a dry cloth.
 Important!
No liability/warranty will be considered for damage to the Kitchen Radio caused by the effects of moisture, water penetration or overheating!
- 5 -

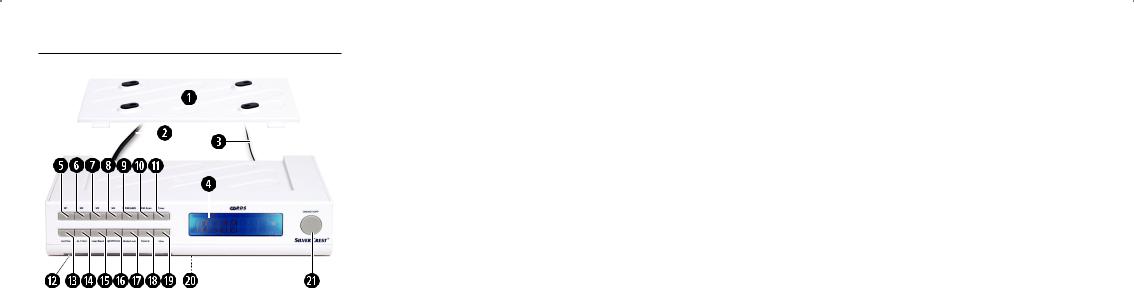
The appliance components q Mounting plate/Baseplate
w Power cable |
|
|
e Wire aerial |
|
|
t–i M1–M4 |
- Memory buttons M1–M4 |
|
o MEM/AMS |
- to save and automatically search |
|
|
|
for and save radio stations |
a MEM.SCAN |
- automatic recall of saved radio |
|
|
|
stations |
s TIMER |
- controls the timer programming |
|
d Illuminated clamp strip |
|
|
f AL2/VOL — |
- controls the alarm function 2 |
|
|
|
- Volume reduction |
g AL1/VOL + |
- controls the alarm function 1 |
|
|
|
- Volume increase |
h USER/BAND |
- User switching, |
|
|
|
Radio waveband switching |
j LIGHT/DIMMER |
- controls the display and |
|
|
|
clamp strip illumination |
k MODE/LOCK |
- recalls the settings, |
|
|
|
Button lock |
l DOWN |
- Selection button down |
|
1( |
UP |
- Selection button up |
2) |
Battery compartment |
|
2! |
ON/AOT/OFF |
- Switch the radio on/off |
|
|
controls the switch off timer |
Setting up the appliance
First take all appliance components from the packaging and remove all packing foil and tape.
Inserting the back-up batteries
The back-up batteries ensure that the time, date and alarm time setting are not lost in the event of a power cut. For this you require two 1.5 V batteries of the type AAA/Micro.
They are not supplied.
1.Openthelidofthebatterycompartment 2) on the underside of the kitchen radio.
2.Insert the batteries. Make sure the polarities are correct. Otherwise, the memory receipt will not function and damage may be caused to the appliance.
3.Close the lid of the battery compartment 2). The lid must audibly engage.
- 6 -

Note:
The back-up batteries must be checked at least once per year and, if necessary, exchanged for new ones.
Fixing the kitchen radio beneath a wall cabinet
With the supplied mounting plate q you can fix the kitchen radio below, for example, a kitchen wall cabinet:
1.Determine a suitable location for the kitchen radio.
2.Pressthetworetainingleversonthebackoftheappliance down. Push the mounting plate q back and remove it.
3.Hold the mounting plate q under the installation location.
Thereby, the front edge of the mounting plate q should be approx. 3.5 cm behind the front of the kitchen cabinet..
4.Mark the four points for the drillholes with a pencil.
5.Using a spike, make a small depression at the marking points. Firmly secure the mounting plate q with the supplied screws.
6.Hold the kitchen radio slanted, with the two recesses in the retaining lugs on the mounting plate q.
Press the kitchen radio upwards until it audibly engages.
Disassembly
•To disassemble the kitchen radio, press the two retaining levers at the rear of the appliance downwards. Then pull the radio out to the front and remove it.
•Unscrew the screws and remove the assembly plate q.
Setting up the kitchen radio
Do not set the kitchen radio up without the mounting plate q. Otherwise the speakers are covered and the sound is scarcely audible.
To fit the kitchen radio with the supplied mounting plate q:
1.Simultaneously press the two retaining levers on the back of the appliance down.
Push the mounting plate q back and remove it.
2.Push the two retainer lugs on the mounting plate q into the recesses on the lower rear side of the kitchen radio.
3.Press the mounting plate q firmly in the direction of the appliance rear until it audibly engages.
- 7 -

Providing mains power
•When you have completed installation of the appliance, insert the plug into a mains power socket. The display r is illuminated and the appliance tries to receive an RDS signal to automatically adjust the time and date.
•For as long as the appliance waits for the RDS signal, the display r shows "PLEASE WAIT FOR SETTING THANKS". This can take several minutes.
The Settings menu
Setting the time
Should this not succeed, you must set the clock manually. For this, the radio cannot be switched on (= automatic mode).
1.In automatic mode press the button MODE/LOCK k once. The time display blinks.
2.Press the buttons UP/DOWN 1(/l to set the time in minute intervals. Pressing and holding the button changes the time at ten-minute intervals.
3.Press the button MODE/LOCK k once again to save the time and switch to the date setting.
If you do not press a button for 10 seconds when making the settings, the appliance saves the current setting and returns to automatic mode.
Setting the date
1.In automatic mode press the button MODE/LOCK k twice. In the display r appears "01.01.2010", the date display flashes.
2.Press the buttons UP/DOWN 1(/l to set the date at day intervals. Pressing and holding the buttons changes the date at intervals of 10 days.
3.Press the button MODE/LOCK k once again to save the date and to switch to setting the memory function.
If you later press the DOWN button l in automatic mode, the display r briefly shows "DAY". Subsequently, the time and date display alternate themselves. To switch back to an exclusive time display, press the button DOWN l once again.
Setting the memory functions
You can programme in up to 6 dates, which the appliance will remind you of when they are reached.
1.In automatic mode press the button MODE/LOCK k three times. The display r shows alternatively a date and the SDA 1 indicator for reminder date 1.
- 8 -
2.Press the buttons UP/DOWN 1(/l to set the first desired reminder date. Pressing and holding the buttons changes the date at intervals of 10 days.
3.When you press the button TIMER s, the year number is deactivated and thus you are reminded on this date every year.
4.Should you wish to programme in further dates, press the button MEM.SCAN a to select the desired memory positions 2-6.
5.Follow the same steps with the other dates.
6.To deactivate the memory function, programme in a date that lies in the past.
7.Press the button MODE/LOCK k once again to save the settings of the memory function and to switch to setting the update function.
Setting the update function
Using this function, the appliance can automatically update the settings for the clock based on the RDS data.
1.In automatic mode press the button MODE/LOCK k four times. The display r shows "UP DATE".
2.Press the button DOWN l, to deactivate the Actual-
isation function. The blinking clock symbol  in the display r then disappears.
3.Press the button UP 1( to reactivate the update function. The hour symbol  appears.
4.Press the button MODE/LOCK k once again to save the settings of the update function and to switch to setting the 12 or 24 hour mode.
Selecting 12 or 24 hour time display
1.In automatic mode press the button MODE/LOCK k five times. In the display r appears "24 HOUR" for the 24 hour modus.
2.Press the button DOWN l to select the 12 hour modus. In the display r appears "12 HOUR". Press the button UP 1( to return to the 24 hour modus.
In the 12 hour mode "AM" appears between 0:00 and 11:59 (ante meridiem = mornings) behind the time display, from 12:00 to 23:59 "PM" (post meridiem = afternoons) is shown in the display r.
Press the button MODE/LOCK k to save the menu settings and to close it down.
- 9 -

Further setting possibilities
Setting the display brightness
Press the button LIGHT/DIMMER j repeatedly to set the brightness level at which the display should be illuminated. The brightness can be set at 3 levels.
Illuminated clamp strip
Documents, for example recipes, with a width of up to 10 cm can be inserted and automatically held in the clamp strip d. If you press and hold the button LIGHT/DIMMER j for two seconds, the downward facing lamp is switched on, which then illuminates the recipe. Press and hold the button j once again for two seconds to switch the lamp off.
Kitchen timer
1.Press the button TIMER s.
2.Using the buttons UP/DOWN 1(/l, set the desired time interval (a time span between 1 minute and 23:59 h is possible). Pressing and holding one of the buttons changes the display in ten-minute intervals. Or press one of the buttons M1–M4 t–i to recall a saved preset time for the kitchen timer. The following times are factory pre-programmed:
Button M1 t = 5 min. (Indicator = T1) Button M2 y = 10 min. (Indicator = T2) Button M3 u = 15 min. (Indicator = T3) Button M4 i = 20 min. (Indicator = T4)
3.Press the button TIMER s once again to start the kitchen timer. In the display r a clock icon running in reverse and a cooking pot symbol appears.
4.From 30 seconds before expiry of the time span an acoustic signal sounds, repeating at shorter intervals the closer the set time approaches. When the time has expired, the alarm sounds continuously and with increasing volume.
5.Press the button TIMER s to terminate the acoustic signal.
Interrupting the kitchen timer.
•To interrupt the kitchen timer, switch to the kitchen timer mode by pressing the button TIMER s.
•Then briefly press the button TIMER s to interrupt the kitchen timer.
The time is halted, the indicator blinks for 10 seconds. After this period the appliance returns to automatic modus. To restart the kitchen timer, briefly press the button TIMER s again to switch back into the kitchen timer mode.
- 10 -
•Press the button TIMER s once again. The time then continues to run.
•To completely switch the kitchen timer off, press and hold the button TIMER s for 3 seconds The clock and cooking pot symbol disappear.
Programming the kitchen timer
You can programme frequently used times for the kitchen timer into the appliance, so that you do not need to enter them in repeatedly. As the appliance can be used by several people, it has user switching, A/B. Both users can save 4 different timer periods each.
1.First,selectthedesireduser.Toswitchbetweenusers,press andholdthebuttonUSER/BAND h fortwoseconds.
2.Then press the button TIMER s.
3.Using the buttons UP/DOWN 1(/l enter in the desired time.
4.Press the button MEM/AMS o. On the right and next to the time indicator, "T" lights up.
5.Press one of the pre-set buttons M1–M4 t–i, under which the kitchen timer period should be saved. Its number is now shown to the right of the "T".
6.Press the button MEM/AMS o once again to conclude the saving.
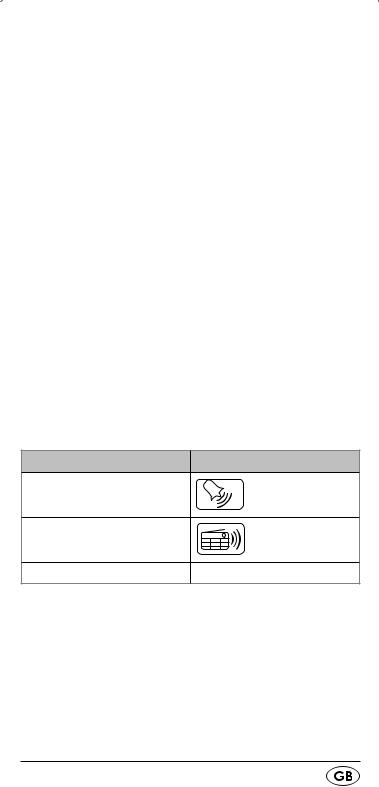
Setting alarm times (Alarms 1 and 2)
You can programme two alarm times into your kitchen radio.
Alarm function |
Symbol in the display r |
Acoustic signal |
|
Radio
Switched off |
no symbol |
1.In automatic mode press the button AL1/VOL. + g (or AL2/VOL. – f). In the display r the last set alarm time and the symbol for the type of alarm blink for 10 seconds.
2.Press the buttons UP/DOWN 1(/l to set the desired alarm time.
3.Press the button AL1/VOL. + g (or AL2/VOL. – f) repeatedly until the desired alarm function (see the table above) is indicated in the display r.
4.Repeatedly press the button TIMER s to set the weekdays on which you require the alarm function: You can select
- 11 -

between "workdays" (Mo, Tu, We, Th, Fr), "weekends" (Su, Sa) and "every day" (Su, Mo, Tu, We, Th, Fr, Sa). Thereby, orientate yourself on the weekday indicator in the display r:
Mo |
= Monday |
Tu |
= Tuesday |
We |
= Wednesday |
Th |
= Thursday |
Fr |
= Friday |
Sa |
= Saturday |
Su |
= Sunday. |
5.If you hold the button TIMER s pressed down for 2 seconds, you can also, through repeated brief pressing of the TIMER s button, select a specific weekday (e.g. only "We"). The selected setting is indicated in the display r.
6.To return to the selection of workdays, weekends or whole weeks, once again hold the button TIMER s pressed down for 2 seconds.
7.After 10 seconds the blinking in the display stops and your input is saved. The appliance then returns to automatic modus.
When the alarm signal sounds...
•and the alarm function "Radio" has been selected, the radio plays for one hour at a pre-defined alarm volume. To halt it, press the button AL1/VOL. + g (or AL2/VOL. – f).
•and the alarm function "Signaltones" has been selected, the signal tone sounds for 10 minutes, with an increasing volume.Tohaltit,pressthebuttonAL1/VOL. + g (or AL2/ VOL. – f).
The Reminder function
The appliance can remind you of a date that you have set with the reminder function. In these cases, from 8:00 –
23:00 on that day, and at every full hour, the acoustic alarm sounds for 10 minutes. In addition, the SDA-panel in the display r blinks. To stop the reminder alarm, press any button.
Radio operation
For radio reception, completely unwind the wire aerial e and, with the radio switched on, determine the most favourable positioning for it. The appliance has a built-in ferrite aerial for the reception of MW transmitters. Should the MW reception be insufficient, please turn the appliance towards a more favourable direction.
- 12 -

Switching the radio on and off
1.To switch the radio function on, press the button ON/ AOT/OFF 2!. In the display r the currently selected frequency is shown.
2.Press the button ON/AOT/OFF 2! once again to switch the radio off and return the appliance to the automatic modus.
Note:
By pressing and holding the button ON/AOT/OFF
2! you switch to the function switch-off time (see S. 15 chapter AOT Switch-off timer).
Manual station selection
1.Using the button USER/BAND h, select the required radio frequency: MW (AM) or VHF (FM).
2.Briefly press the button UP 1( repeatedly to search for stations with a higher frequency than the one shown in the display r.
3.Briefly press the button DOWN l repeatedly to search for stations with a lower frequency than the one shown in the display r.
4.Should the currently selected radio station transmit RDS
data, the  -indicator lights-up in the display r. Then the display r shows the name of the radio station, and the time is updated (if activated in the settings, see section "Setting Update function").
Automatic station search
You can have the kitchen radio search for stations.
The kitchen radio searches the frequency range until it finds a station.
1.Press and hold the button UP 1( for two seconds: the kitchen radio searches for the station with the next highest frequency.
2.Press and hold the button DOWN l for two seconds: the kitchen radio searches for the station with the next lowest frequency.
Repeat these steps until you have found a radio station to your liking.
Save and recall a radio station manually
As the appliance can be used by numerous people, it is fitted with user switching, A/B. Both users can save different radio stations. To switch between users, press and hold the button USER/BAND h for two seconds.
- 13 -

Each user can save 36 radio stations in the appliance. 32 x VHF stations and 4 x MW stations. For saving UKW stations, User "A" has available:
Preset button M1 t for the save positions A1 – A8, Preset button M2 y for the save positions B1 – B8, Preset button M3 u for the save positions C1 – C8, and Preset button M4 i for the save positions D1 – D8.
Available for User "B" are:
Preset button M1 t for the save positions 11 – 18, Preset button M2 y for the save positions 21 – 28, Preset button M3 u for the save positions 31 – 38, and Preset button M4 i for the save positions 41 – 48.
Press the corresponding preset button once to address the save position "1", press twice for "2", etc.
With MW radio stations, each preset button is for one of the 4 save positions.
1.Setting the user, the desired radio wavelength and the desired radio station.
2.Press the button MEM/AMS o. In the display r the save position indicator and "MEM" blink.
3.Press one of preset buttons M1–M4 t–i, if necessary repeatedly, to save the radio station to the desired save position. In the display r, the indicator for the save position selected by you and "MEM" blink.
4.Press the button MEM/AMS o once again. "MEM" and the save position are constantly indicated, the radio station is saved.
5.Repeat the steps 1 to 4 (for both users) until all of the desired radio stations are saved.
6.To recall the saved radio stations, press the corresponding preset buttons (M1–M4 t–i) in radio mode, several times if need be, until the number of the saved position appears in the display r.
Automatically save and recall a radio station
With the AMS function (Automatic Memory System), the radio automatically searches for radio stations and then saves them to the available save positions in the radio waveband. Previously saved radio stations are thereby erased.
1.Press and hold the button MEM/AMS o for two seconds. The kitchen radio automatically searches for sufficiently powerful radio stations and saves them in the memory.
2.The station search can be stopped by pressing on the button
MEM/AMS o.Themostrecentlyfoundradiostationplays.
- 14 -

3.When you press the button MEM.SCAN a, the saved radio stations are recalled in their sequence and each is played for 10 seconds.
4.To quickly move on to another radio station, press the button MEM.SCAN a.
5.To quit the automatic recall, press the button MODE/ LOCK k. The display r will then show the time for 10 seconds.
Adjusting the volume.
•To reduce the sound volume, in radio operation repeatedly press the button AL2/VOL — f, or hold the button down.
•To increase the sound volume, in radio operation repeatedly press the button AL1/VOL. + g, or hold the button down.
Lock function
You can lock the kitchen radio so that settings cannot be altered by unauthorised people or children.
•PressandholdthebuttonMODE/LOCKkfor3seconds. A key symbol appears in the display r.
•When a key is pressed and the lock is activated, the key symbol blinks but no other functions are carried out.
•To disable the lock function, press and hold the button MODE/LOCKk until the key symbol extinguishes.
A.O.T. - Switch-off timer
This appliance is fitted with a switch-off timer for up to 90 minutes.
1.With the radio switched on, press the button ON/AOT/ OFF 2! down for 2 seconds to recall the function.
2.Repeatedly press the button ON/AOT/OFF 2! to programme in the number of minutes, in increments of 5 minutes, for which the appliance is to remain switched on. After a few seconds the display again shows the radio station currently being played.
3.On expiry of the time period the appliance switches itself off.
4.To simply switch the radio function off, press the button ON/AOT/OFF 2!.
- 15 -
Cleaning
 Warning!
Always remove the plug before cleaning the appliance!
Moisture penetrating into the appliance creates the risk of electric shock! Additionally, the kitchen radio could become irreparably damaged!
Clean the housing of the kitchen radio with a slightly moist cloth and a mild detergent only. Ensure that moisture cannot permeate into the appliance during cleaning!
Disposal
Do not dispose of the appliance in your normal domestic waste. This product is subject to the provisions of European Directive 2002/96/EC.
Disposing of the appliance
•Arrange for the product, or parts of it, to be disposed of byaprofessionaldisposalcompanyorbyyourcommunal waste facility.
•Observe the currently applicable regulations. In case of doubt, please contact your waste disposal centre.
Disposal of batteries/accumulators
•Used batteries/rechargeable batteries may not be disposed of in household waste.
•Batteries/rechargeable batteries can contain toxic substances which may damage the environment. Therefore, dispose of the batteries/rechargeable batteries in accordance with statutory regulations.
•Every consumer is statutorily obliged to dispose of batteries/rechargeable batteries to a community collection centre in their district or to a dealer. The purpose of this obligation is to ensure that batteries are disposed of in a non-polluting manner.
•Onlydisposeofbatterieswhentheyarefullydischarged.
Disposal of packaging
Disposeofallpackagingmaterialsinanenvironmentally friendly manner.
- 16 -

CE Conformity
This device complies, regarding conformity, to the basic requirements and other relevent provisions of the Low Voltage Directive 2004/108/EC, the Directive for Low Voltage Appliances 2006/95/EC and the Eco Design Directive 2009/125/EC (Ordinance 1275/2008 Appendix II, Number 1).
Importer
KOMPERNASS GMBH
BURGSTRASSE 21
44867 BOCHUM, GERMANY www.kompernass.com
Warranty and Service
The warranty for this appliance is for 3 years from the date of purchase. The appliance has been manufactured with care and meticulously examined before delivery. Please retain your receipt as proof of purchase. In the event of a warranty claim, please make contact by telephone with our Service Department. Only in this way can a post-free despatch for your goods be assured.
The warranty covers only claims for material and maufacturing defects, but not for transport damage, for wearing parts or for damage to fragile components, e.g. buttons or batteries. This product is for private use only and is not intended for commercial use.
The warranty is void in the case of abusive and improper handling, use of force and internal tampering not carried out by our authorized service branch. Your statutory rights are not restricted in any way by this warranty.
The warranty period will not be extended by repairs made unter warranty. This applies alsoto replaced and repaired parts. Any damage and defects extant on purchase must be reported immediately after unpacking the appliance, at the latest, two days after the purchase date. Repairs made after the expiration of the warranty period are subject to payment.
 DES Ltd
Tel.: 0871 5000 700 (£ 0.10 / minute) e-mail: support.uk@kompernass.com
 Kompernass Service Ireland
Tel: 1850 930 412 (0,082 EUR/Min.)
Standard call rates apply. Mobile operators may vary. e-mail: support.ie@kompernass.com
- 17 -

- 18 -
SPIS TREŚCI |
STRONA |
|
|
|
|
Użytkowanie zgodne z przeznaczeniem |
20 |
|
|
Zakres dostawy |
20 |
|
|
Dane techniczne |
20 |
|
|
Wskazówki bezpieczeństwa |
21 |
|
|
Elementy urządzenia |
24 |
|
|
Uruchamianie urządzenia |
24 |
|
|
Montowanie radia kuchennego |
|
pod szafką wiszącą |
25 |
|
|
Ustawienie radia kuchennego |
25 |
|
|
Menu ustawień |
26 |
|
|
Pozostałe możliwości ustawień |
28 |
|
|
Słuchanie radia |
31 |
|
|
Czyszczenie |
34 |
|
|
Utylizacja |
35 |
|
|
Deklaracja zgodności CE |
35 |
|
|
Importer |
36 |
|
|
Gwarancja i serwis |
36 |
Przed pierwszym użyciem zapoznaj się z instrukcją obsługi izachowajjąwcelupóźniejszegowykorzystania.Wprzypadku przekazania urządzenia osobom trzecim należy przekazać im także instrukcję.
- 19 -

Użytkowanie zgodne z przeznaczeniem
Radio kuchenne jest przeznaczone do ustawienia lub montażu pod szafką. Radio kuchenne jest przeznaczone do odbioru stacji radiowych nadających w zakresie FM oraz do budzenia sygnałem akustycznym lub radiem.
Radio kuchenne nie jest przeznaczone do zastosowań przemysłowych lub profesjonalnych. Za szkody, powstałe w wyniku zastosowania niezgodnego z przeznaczeniem, producent nie ponosi żadnej odpowiedzialności!
Zakres dostawy
1Radio kuchenne KH 2299
1Płyta montażowa
4 Śruby
1 Instrukcja obsługi
Dane techniczne
Przyłącze sieciowe: |
220 - 240 V~, 50 Hz |
Pobór mocy |
|
Praca: |
5 W |
Tryb czuwania: |
około 1,8 W |
Moc wyjściowa: |
1 W przy 10% THD |
Zakres |
|
częstotliwości UKF: |
(FM) 87,5 – 108 MHz |
|
MW (AM) 526,5–1606,5 kHz |
Temperatura robocza : +5 do +35°C |
|
Wilgotność: |
5 - 90 % (przy braku kondensacji) |
Wymiary |
|
(Szer x Gł x Wys): |
27,5 x 15,7 x 6,4 cm |
Masa: |
1.070 g |
Klasa ochrony: |
II / |
Baterie podtrzymujące |
|
zasilanie: |
2 x baterie 1,5 V typu AAA/Micro |
|
(brak w zestawie) |
Parametry techniczne urządzenia umożliwiają odbiór częstotliwości spoza dopuszczalnego zakresu 87,5–108 MHz i 526,5–1606,5 kHz. W każdym kraju mogą obowiązywać różne przepisy odnośnie przydzielonych zakresów częstotliwości radiowych. Należy pamiętać, że informacji odbieranych poza przydzielonym zakresem częstotliwości radiowych nie można przetwarzać, przekazywać osobom trzecim ani wykorzystywać niezgodnie z ich przeznaczeniem.
- 20 -

Wskazówki bezpieczeństwa
•Urządzenie nie jest przeznaczone do użytkowania przez osoby (w tym dzieci) z ograniczoną sprawnością fizyczną, ruchową bądź umysłową lub nieposiadające doświadczenia i/lub wiedzy, chyba że będą one przebywały pod opieką osoby odpowiedzialnej za ich bezpieczeństwo lub uzyskają od niej wskazówki dotyczące właściwego używania urządzenia. Nie można pozwolić dzieciom na zabawę urządzeniem.
•Przed rozpoczęciem czyszczenia wyciągnąć wtyczkę z gniazdka.
•Sprawdzić urządzenie oraz wszelkie jego elementy pod kątem widocznych uszkodzeń. Bezpieczeństwo urządzenia gwarantowane jest wyłącznie wtedy, gdy urządzenie jest w niezawodnym stanie.
•Wtyczka musi być zawsze łatwo dostępna, aby w sytuacji awaryjnej możliwe było jak najszybsze odłączenie urządzenia od zasilania elektrycznego.
 Niebezpieczeństwo porażenia prądem elektrycznym!
•Podłączaj urządzenie tylko i wyłącznie do prawidłowo zainstalowanego i uziemionego gniazdka zasilania. Napięcie w sieci elektrycznej musi być zgodne z danymi podanymi na tabliczce znamionowej urządzenia.
•Niesprawne urządzenia lub przewody elektryczne przekaż niezwłocznie do naprawy lub wymień w punkcie obsługi klienta.
•Nie wolno zanurzać urządzenia w wodzie. Do wycierania użyj lekko zwilżonej szmatki.
•Urządzenia nie wolno wystawiać na działanie deszczu ani używać go w wilgotnym lub mokrym środowisku.
•Kabel sieciowy chwytaj zawsze za wtyczkę. Nigdy nie pociągaj za sam kabel i nie dotykaj go mokrymi rękami, gdyż może to spowodować zwarcie lub porażenie prądem elektrycznym.
•Nigdy nie stawiaj na kabel sieciowy samego radia, mebli itp. i uważaj, aby kabel nie został zakleszczony.
•Nigdy nie wiąż kabla sieciowego na supeł ani nie łącz kabla z innymi kablami. Kabel sieciowy układaj w taki sposób, aby nikt nie mógł na niego nastąpić ani potknąć się o kabel.
•Pamiętaj, aby przewód zasilania nigdy nie był wilgotny lub mokry.
- 21 -

•Nie wolno otwierać obudowy ani samodzielnie naprawiać urządzenia. Po otwarciu obudowy występuje niebez-pieczeństwo śmiertelnego porażenia prądem elektrycznym, a gwarancja ulega unieważnieniu.
•Urządzenie należy chronić przed kroplami i rozpryskami wody. Nie stawiaj na urządzeniu ani przy nim żadnych naczyń z płynami (np. wazonów na kwiaty).
 Niebezpieczeństwo pożaru!
•Nie używać urządzenia w pobliżu gorących powierzchni.
•Nie stawiać urządzenia w miejscach wystawionych bezpośrednio na działanie promieni słonecznych. Działanie wysokiej temperatury może spowodować przegrzanie urządzenia i trwałe uszkodzenie.
•Nie zawieszać radia kuchennego nad kuchenką. W przeciwnym wypadku urządzenie może ulec uszkodzeniu. Istnieje zagrożenie pożarem!
•W trakcie używania nigdy nie zostawiać urządzenia bez nadzoru.
•Przy włączonym urządzeniu nie wolno zasłaniać otworów wentylacyjnych.
•Na urządzeniu lub obok niego nie umieszczaj żadnych otwartych źródeł ognia, np. zapalonych świeczek.
 Zagrożenie odniesieniem obrażeń!
•Trzymaj dzieci z dala od przewodu przyłączeniowego i urządzenia. Dzieci potrafią lekceważyć niebezpieczeństwo, jakie niesie z sobą kontakt z urządzeniami elektrycznymi.
•Należy zadbać o ustawienie urządzenia na stabilnej powierzchni.
•Nie włączać urządzenia, jeśli spadło z wysokości lub zostało uszkodzone.
•Zleć sprawdzenie i ewentualną naprawę urządzenia wykwalifikowanemu specjaliście.
•Baterie należy trzymać w miejscu niedostępnym dla dzieci. Dziecko może połknąć baterię.
•W wypadku połknięcia baterii należy jak najszybciej skorzystać z pomocy medycznej.
UWAGA:
•Niektóre agresywne lakiery do mebli mogą uszkodzić gumowe nóżki urządzenia. W takim przypadku urządzenie należy ustawić na stabilnie leżącej podkładce.
- 22 -

 Burza!
•Podczas burzy urządzenia podłączone do sieci elektrycznej mogą ulec uszkodzeniu. Dlatego w trakcie burzy należy zawsze wyciągnąć wtyczkę z gniazdka.
 Wskazówka odnośnie oddzielenia od sieci
Przełącznik ON/AOT/OFF nie odcina urządzenia całkowicie od sieci zasilania elektrycznego. Poza tym urządzenie pobiera w trybie gotowości prąd elektryczny. Dopiero wyjęcie wtyczki z gniazdka zasilania spowoduje całkowite odcięcie urządzenia od zasilania sieciowego.
 Wskazówka odnośnie napięcia udarowego (EFT / szybkozmienne zakłócenia przejściowe) i wyładowań elektrostatycznych:
W wypadku zakłóceń w działaniu urządzenia na skutek szybkozmiennych zakłóceń przejściowych (napięcie udarowe) wzgl. wyładowań elektrostatycznych urządzenie należy wyłączyć i ponownie włączyć, w celu przywrócenia normalnego działania. Może być również koniecz-ne odłączenie urządzenia od zasilania i ponowne podłączenie. Baterie (jeśli występują) należy wyjąć i ponownie włożyć.
 Wskazówki odnośnie postępowania z bateriami
W urządzeniu zastosowano baterie do podtrzymywania pamięci. Podczas obchodzenia się z bateriami należy przestrzegać następujących zasad:
 Niebezpieczeństwo wybuchu!
•Baterii nie wolno wrzucać do ognia. Nigdy nie ładować rozładowanych baterii.
•Baterii nie wolno otwierać, lutować ani spawać. Istnieje niebezpieczeństwo wybuchu i odniesienia obrażeń!
•Regularnie sprawdzaj stan baterii. Rozlane baterie mogą spowodować uszkodzenia urządzenia.
•Wyjmij baterie z urządzenia, jeśli zamierzasz go nie używać przez dłuższy czas.
•W przypadku rozlania baterii załóż rękawice ochronne i wyczyść schowek na baterie oraz styki za pomocą suchej szmatki.
 Uwaga!
Gwarancja nie obejmuje uszkodzeń radia kuchennego wskutek działania wilgoci, przedostania się wody do jego wnętrza bądź przegrzania!
- 23 -

Elementy urządzenia
q Płyta montażowa/podstawka
w Przewód zasilający |
|
|
e Antena przewodowa |
|
|
r Wyświetlacz |
|
|
t–i M1–M4 |
- przyciski miejsc pamięci M1–M4 |
|
o MEM/AMS |
- do zapamiętywania i automaty- |
|
|
|
cznego wyszukiwania i zapamię- |
|
|
tywania stacji radiowych |
a MEM.SCAN |
- do automatycznego wybierania |
|
|
|
zapamiętanych stacji radiowych |
s TIMER |
- obsługa programowania minutnika |
|
d Podświetlana listwa zaciskowa |
||
f AL2/VOL — |
- obsługa funkcji alarmu 2 |
|
|
|
- zmniejszanie głośności |
g AL1/VOL + |
- obsługa funkcji alarmu 1 |
|
|
|
- zwiększanie głośności |
h USER/BAND |
- zmiana użytkownika, |
|
|
|
zmiana pasma radiowego |
j LIGHT/DIMMER |
- obsługa podświetlenia |
|
|
|
wyświetlacza |
|
|
i listwy zaciskowej |
k MODE/LOCK |
- otwiera ustawienia, |
|
|
|
blokada przycisków |
l DOWN |
- przycisk wyboru w dół |
|
1( |
UP |
- przycisk wyboru w górę |
2) |
Komora na baterie |
|
2! |
ON/AOT/OFF |
- włączanie / wyłączanie radia |
|
|
obsługa zegara sterującego |
|
|
czasem wyłączenia |
Uruchamianie urządzenia
Wyjmij wszystkie elementy urządzenia z opakowania i usuń wszelkie materiały opakowaniowe.
Wkładanie baterii podtrzymujących zasilanie
Dzięki bateriom podtrzymującym zasilanie w razie przerwy w dostawie prądu zachowywane są ustawienia godziny, daty oraz czasów budzenia. Potrzebne są dwie baterie 1,5 V typu AAA/Micro. Baterie te nie wchodzą w zakres dostawy.
1.Otwórz pokrywę schowka na baterie 2) na spodzie radia kuchennego.
2.Włóż baterie. Uważaj przy tym na poprawne przyłączenie biegunów. W przeciwnym wypadku pamięć nie będzie działała i urządzenie może ulec uszkodzeniu.
- 24 -

3. Zamknij pokrywę schowka na baterie 2).
Przy zamknięciu pokrywy musi być słyszalne kliknięcie.
UWAGA:
Baterie podtrzymujące zasilanie należy sprawdzać przynajmniej raz w roku i w razie potrzeby wymieniać na nowe.
Montowanieradiakuchennegopodszafkąwiszącą
Przy użyciu dołączonej płyty montażowej q radio kuchenne można zawiesić np. przy szafce kuchennej:
1.Wybierz odpowiednie miejsce do przymocowania radia kuchennego.
2.Naciśnij dwie dźwignie blokujące z tyłu obudowy w dół. Przesuń płytę montażową q do tyłu, a następnie ją zdejmij.
3.Przytrzymaj płytę montażową q pod miejscem zamontowania radia. Przednia krawędź płyty montażowej q powinna się przy tym znajdować około 3,5 cm za frontem szafki kuchennej.
4.Zaznacz ołówkiem cztery punkty na otwory.
5.Za pomocą trzpienia wykonaj małe zagłębienie w zaznaczonych miejscach. Przykręć płytę montażową q za pomocą znajdujących się w zakresie dostawy śrub.
6.Włóż radio kuchenne pod kątem dwoma otworami do nosków mocujących w płycie montażowej q. Przyciśnij radio kuchenne do góry, aż radio w słyszalny sposób zatrzaśnie się na płycie.
Demontaż
•Aby zdjąć radio, naciśnij dwie dźwignie blokujące z tyłu obudowy w dół. Wyciągnij radio do przodu i je zdejmij.
•Odkręć śruby i zdejmij płytę montażową q.
Ustawienie radia kuchennego
Radia kuchennego nie należy ustawiać bez płyty montażowej q. W przeciwnym razie głośnik będzie zasłonięty i muzyka będzie przytłumiona.
Sposób ustawienia radia kuchennego za pomocą dostarczonej płyty montażowej q:
1.Naciśnij jednocześnie dwie dźwignie blokujące z tyłu obudowy w dół. Przesuń płytę montażową q do tyłu, a następnie ją zdejmij.
- 25 -

2.Wsuń oba noski mocujące w płycie montażowej q w zagłębienia umieszczone z tyłu na spodzie radia kuchennego.
3.Płytę montażową q dociśnij mocno w kierunku tyłu urządzenia, aż do wyraźnego zatrzaśnięcia się płyty. Teraz radio kuchenne można już ustawić.
Podłączanie do zasilania prądem
•Po prawidłowym zabudowaniu lub ustawieniu urządzenia, podłącz wtyczkę do gniazdka sieciowego. Wyświetlacz r zapala się i urządzenie podejmuje próbę odebrania sygnału RDS, w celu automatycznego ustawienia czasu i daty.
•W czasie oczekiwania urządzenia na sygnał RDS, na wyświetlaczu wyświetla się napis r „PLEASE WAIT FOR SETTING THANKS”. Może to potrwać kilka minut.
Menu ustawień
Ustawianie godziny
Gdy powyższa operacja zakończy się niepowodzeniem, czas trzeba ustawić ręcznie. Radio nie może być wtedy włączone (= tryb automatyki).
1.Gdy radio jest w trybie automatyki naciśnij jeden raz przycisk MODE/LOCK k. Miga wskazanie czasu.
2.Naciskaj przyciski UP/DOWN 1(/l, by ustawić czas w przedziałach jednominutowych. Naciśnięcie i przytrzymanie przycisku powoduje zmianę w odstępach co 10 minut.
3.Naciśnij przycisk MODE/LOCK k ponownie, by zapamiętać czas i przejść do ustawiania daty.
Gdy podczas ustawiania przez 10 sekund nie zostanie naciśnięty żaden przycisk, urządzenie zapamięta ustawienie i powróci do trybu automatyki.
Ustawianie daty
1.W trybie automatycznym naciśnij dwa razy przycisk MODE/LOCK k. Na wyświetlaczu r pojawi się data „01.01.2010“, wskazanie daty miga.
2.Naciskaj przyciski UP/DOWN 1(/l, aby ustawić wskazanie daty w odstępach dziennych. Naciśnięcie i przytrzymanie przycisku powoduje zmianę w odstępach co 10 dni.
3.Naciśnij przycisk MODE/LOCK k ponownie, by zapamiętać datę i przejść do ustawienia funkcji przypominania.
- 26 -

Gdy później w trybie automatyki naciśniesz przycisk DOWN l, na wyświetlaczu r wyświetli się na chwilę napis „DAY”. Następnie naprzemiennie wyświetla się wskazanie godziny i daty. Naciśnij ponownie przycisk DOWN l, by przejść do wskazania samego czasu.
Ustawianie funkcji przypominania
Możesz zaprogramować 6 różnych terminów, o których urządzenie będzie ci przypominało.
1.Gdy radio jest w trybie automatyki naciśnij trzy razy przycisk MODE/LOCK k. Na wyświetlaczu r wyświetla się naprzemian wskazanie daty i wskazanie SDA 1 oznaczające 1 datę przypominania.
2.Naciskaj przyciski UP/DOWN 1(/l, by ustawić żądaną datę przypominania. Naciśnięcie i przytrzymanie przycisku powoduje zmianę w odstępach co 10 dni.
3.Po naciśnięciu przycisku TIMER s, wyłącza się wskazanie roku i tym samym urządzenie będzie przypominało o ustawionej dacie każdego roku.
4.By zaprogramować pozostałe daty, naciśnij przycisk MEM.SCAN a, by wybrać żądane miejsce w pamięci 2-6.
5.Tak samo postępuj w przypadku ustawiania pozostałych danych.
6.By wyłączyć funkcję przypominania, zaprogramuj datę z przeszłości.
7.Naciśnij ponownie przycisk MODE/LOCK k, by zapamiętać ustawienie funkcji przypominania i przejść do ustawienia funkcji aktualizacji.
Ustawianie funkcji aktualizacji
Za pośrednictwem tej funkcji urządzenie może automatycznie aktualizować ustawienia czasu na podstawie odbieranych danych RDS.
1.Gdy radio jest w trybie automatyki naciśnij cztery razy przycisk MODE/LOCK k. Na wyświetlaczu r wyświetla się „UP DATE”.
2.Naciśnij przycisk DOWN l, by wyłączyć funkcję aktualizacji. Gaśnie migający na wyświetlaczu r symbol zegarka  .
.
3.Naciśnij przycisk UP 1(, by ponownie włączyć funkcję aktualizacji. Wyświetla się symbol zegarka  .
.
4.Naciśnij ponownie przycisk MODE/LOCK k, by zapamiętać ustawienie funkcji aktualizacji i przejść do ustawienia trybu czasu 12lub 24-godzinnego.
- 27 -

Ustawianie wyświetlania godziny w formacie 12lub 24-godzinnym
1.Gdy radio jest w trybie automatyki naciśnij pięć razy przycisk MODE/LOCK k. Na wyświetlaczu r pokaże się wskazanie „24 HOUR“, oznaczające wyświetlanie godziny w formacie 24-godzinnym.
2.Naciśnij przycisk DOWN l, aby ustawić wyświetlanie godziny w formacie 12-godzinnym. Na wyświetlaczu r pokaże się liczba „12 HOUR“. Naciśnij przycisk UP 1(, aby ponownie przełączyć na wyświetlanie godziny w formacie 24-godzinnym.
W trybie 12-godzinnym, w przedziale czasu między 0:00 a 11:59 za wskazaniem czasu wyświetla się „AM” (ante meridiem = przed południem), zaś w przedziale czasu od 12:00 do 23:59 „PM” (post meridiem = po południu) na wyświetlaczu r.
Naciśnij przycisk MODE/LOCK k, by zapamiętać i zamknąć ustawienia menu.
Pozostałe możliwości ustawień
Ustawianie jasności wyświetlacza
Naciskaj przycisk LIGHT/DIMMER j, by ustawić jasność podświetlania wyświetlacza. Jasność można ustawiać w 3 zakresach.
Podświetlana listwa zaciskowa
Do listwy zaciskowej d możesz przyczepiać kartki, np. recepty, o szerokości około 10 cm, które będą automatycznie trzymane przez urządzenie. Po naciśnięciu przycisku LIGHT/DIMMER j i przytrzymaniu go przez 2 sekundy, włączy się oświetlenie skierowane w dół, które będzie podświetlało receptę lub inne podobne dokumenty. Naciśnij
i przytrzymaj ponownie przycisk j przez dwie sekundy, by ponownie wyłączyć światło.
Minutnik
1.Naciśnij przycisk TIMER s.
2.Za pomocą przycisków UP/DOWN 1(/l ustaw żądany czas (możliwe jest ustawienie czasu odliczania od 1 minuty do 23:59 h). Naciśnięcie i przytrzymanie jednego z przycisków spowoduje zmianę w odstępach co 10 min. Alternatywnie naciśnij jeden z przycisków M1–M4 t–i, by wybrać jeden z zaprogramowanych preselekcyjnie czasów minutnika. Fabrycznie zaprogramowano następujące czasy:
- 28 -
 Loading...