Makita DMR106 User Manual [de]

GB |
Job Site Radio |
|
Instruction manual |
|
|
|
|
|
Radio de chantier |
|
Manuel d’instructions |
F |
|
||
|
|
|
|
|
Baustellenradio |
|
Betriebsanleitung |
D |
|
||
|
|
|
|
|
Radio per luoghi di lavoro |
Istruzioni per l’uso |
|
I |
|||
|
|
|
|
|
Bouwradio |
|
Gebruiksaanwijzing |
NL |
|
||
|
|
|
|
|
Radio de Trabajo |
|
Manual de instrucciones |
E |
|
||
|
|
|
|
|
Rádio a Bateria |
|
Manual de instruções |
P |
|
||
|
|
|
|
|
Byggepladsradio |
|
Brugsanvisning |
DK |
|
||
|
|
|
|
|
α φ |
α υ |
|
GR |
|
||
|
|
|
|
|
|
Instrukcja obsługi |
|
PL |
Akum. Odbiornik Radiowy |
||
|
|
|
|
DMR106

2 |
3 |
4 |
|
|
|
5 |
|
|
|
B |
|
|
|
|
A |
|
C |
|
|
I |
|
D |
|
|
|
|
|
|
|
H |
|
E |
|
|
G |
|
|
|
|
|
|
F |
|
|
|
|
6 |
(19) |
14 |
|
|
|
||
|
|
|
3 4 5 |
|
|
|
11 |
|
|
|
|
|
6 |
|
|
|
|
7 |
|
|
|
|
8 |
|
|
|
10 |
1 |
|
(20) |
15 |
(21) |
(22) |
9 |
|
|
|
17 |
|
|
|
|
18 |
|
|
|
|
18 |
|
16 |
|
|
|
|
|
|
|
18 |
|
|
|
|
18 |
|
(23) |
|
|
(24) |
|
1 |
|
|
|
|
2 |
|
|
|
|

|
14 |
|
|
16 |
|
2 |
|
3 |
|
26 |
|
|
25 |
26 |
|
|
|
|
|
25 |
4 |
5 |
25 |
|
25 |
|
|
|
|
|
|
6 |
7 |
3

13 |
8 |
10 |
9 |
1 |
9 |
4

ENGLISH (Original instructions)
Symbols
The following show the symbols used for the equipment. Be sure that you understand their meaning before use.
Read instruction manual.
 Cd
Cd
Ni-MH
Li-ion
Only for EU countries
Do not dispose of electric equipment or battery pack together with household waste material!
In observance of the European Directives, on Waste Electric and Electronic Equipment and Batteries and Accumulators and Waste Batteries and Accumulators and their implementation in accordance with national laws, electric equipment and batteries and battery pack(s) that have reached the end of their life must be collected separately and returned to an environmentally compatible recycling facility.
IMPORTANT SAFETY
INSTRUCTIONS
 WARNING:
When using electric tools, basic safety precautions should always be followed to reduce the risk of fire, electric shock, and personal injury, including the following:
1.Read this instruction manual and the charger instruction manual carefully before use.
2.Clean only with dry cloth.
3.Do not install near any heat sources such as radiators, heat registers, stoves, or other apparatus (including amplifiers) that produce heat.
4.Only use attachments/accessories specified by the manufacturer.
5.Unplug this apparatus during lighting storms or when unused for long periods of time.
6.A battery operated radio with integral batteries or a separate battery pack must be recharged only with the specified charger for the battery. A charger that may be suitable for one type of battery may create a risk of fire when used with another battery.
7.Use battery operated radio only with specifically designated battery packs. Use of any other batteries may create a risk of fire.
8.When battery pack is not in use, keep it away from other metal objects like: paper clips, coins, keys, nails, screws, or other small metal objects that can make a connection from one terminal to another. Shorting the battery terminals together may cause sparks, burns, or a fire.
9.Avoid body contact with grounded surfaces such as pipes, radiators, ranges and refrigerators. There is an increased risk of electric shock if your body is grounded.
10.Under abusive conditions, liquid may be ejected from the battery; avoid contact. If contact accidentally occurs, flush with water. If liquid contacts eyes, additionally seek medical help. Liquid ejected from the battery may cause irritation or burns.
SAVE THESE INSTRUCTIONS.
SPECIFIC SAFETY RULES
FOR BATTERY CARTRIDGE
1.Before using battery cartridge, read all instructions and cautionary markings on (1) battery charger, (2) battery, and (3) product using battery.
2.Do not disassemble battery cartridge.
3.If operating time has become excessively shorter, stop operating immediately. It may result in a risk of overheating, possible burns and even an explosion.
4.If electrolyte gets into your eyes, rinse them out with clear water and seek medical attention right away. It may result in loss of your eyesight.
5.Do not short the battery cartridge:
(1)Do not touch the terminals with any conductive material.
(2)Avoid storing battery cartridge in a container with other metal objects such as nails, coins, etc.
(3)Do not expose battery cartridge to water or rain. A battery short can cause a large current flow, overheating, possible burns and even a breakdown.
6.Do not store the tool and battery cartridge in locations where the temperature may reach or exceed 50°C (122°F).
7.Do not incinerate the battery cartridge even if it is severely damaged or is completely worn out. The battery cartridge can explode in a fire.
8.Be careful not to drop or strike battery.
9.Do not use a damaged battery.
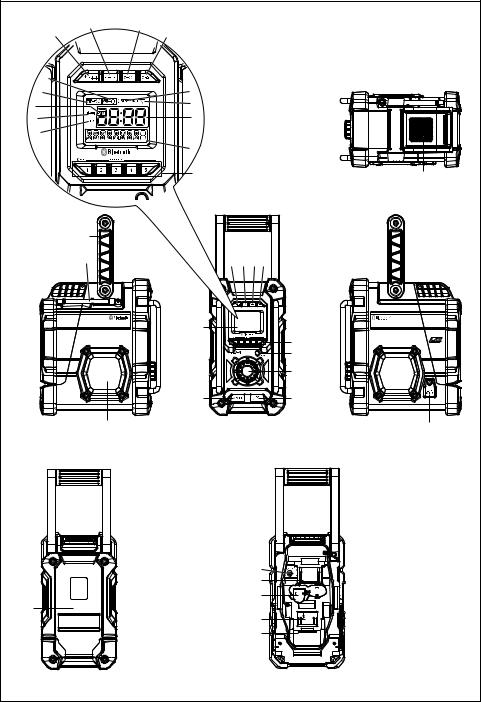
Explanation of general view (Fig. 1)
1.USB power supply port
2.Power/Sleep timer
3.Source button
4.Radio alarm
5.Buzzer alarm
6.Preset stations/Preset 1 button as Bluetooth® pair button
7.Menu/Info button
8.Volume/Tuning control/Select knob
9.DC IN socket
10.AUX IN 1
11.LCD display
12.Handle
13.Soft bended rod antenna
14.Battery compartment locker
15.Speaker
16.Battery cover
17.Input terminal (AUX IN 2)
18.Battery compartment (covering main battery pack and back up batteries)
19.Up
20.Left
21.Front
22.Right
23.Back; Battery cover closed
5

24.Back; Battery cover opened
25.Battery cartridge
26.Button
LCD display:
A.Radio alarm
B.Buzzer alarm
C.Stereo symbol
D.Low battery indicator
E.Clock
F.Frequency
G.RDS (Radio data system)
H.Sleep status
I.AM/PM for clock
Battery Installation
Note:
Keeping back up batteries inside the compartment prevent stored data in preset memories from being lost.
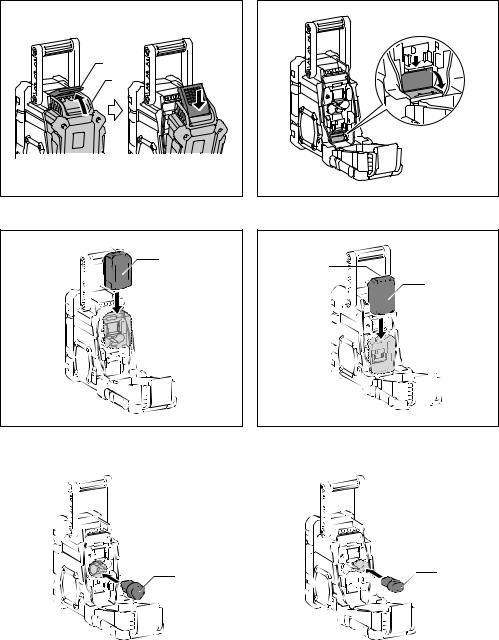
1.Pull out the battery compartment locker to release battery compartment. There are main battery pack compartment and back up battery compartment.
(Fig. 2)
2.Remove back up battery compartment cover and insert 2 fresh UM-3 (AA sizes). Make sure the batteries are with correct polarity as shown inside the compartment. Replace the battery cover. (Fig. 3)
3.After back up batteries are inserted, insert the main battery pack to power radio. The suitable battery packs for this radio listed as the following table.
The following table indicates the operating time on a single charge in Radio mode.
|
|
|
|
|
|
AT SPEAKER OUTPUT = |
|
|
|
|
Battery Cartridge Voltage |
|
50 mW + 50 mW (unit: Hour) |
||
Battery capacity |
|
|
|
|
|
(Approximately) |
|
|
|
|
|
|
|
|
|
|
|
|
|
|
|
|
In Bluetooth® |
|
|
7.2 V |
10.8 V |
14.4 V |
18 V |
In radio or AUX |
with USB |
|
|
|
|
|
|
|
charging |
|
|
|
|
|
|
|
|
1.0 Ah |
|
BL7010 |
|
|
|
5.5 |
0.8 |
|
|
|
|
|
|
|
|
|
|
|
|
BL1411G, |
|
|
1.5 |
|
|
|
|
L1451 |
|
|
|
1.1 Ah |
|
|
|
|
5.5 |
|
|
|
|
|
|
BL1811G, |
1.8 |
||
|
|
|
|
|
|
||
|
|
|
|
|
L1851 |
|
|
|
|
|
|
|
|
|
|
|
|
|
BL1013 |
|
|
|
1.5 |
|
|
|
|
BL1415, |
|
|
|
|
|
|
|
BL1413G, |
|
|
1.8 |
1.3 Ah |
|
|
|
L1453 |
|
7.5 |
|
|
|
|
|
|
BL1815, |
|
|
|
|
|
|
|
BL1813G, |
|
2.0 |
|
|
|
|
|
L1853 |
|
|
1.5 Ah |
|
|
|
BL1415N |
|
8.5 |
2.0 |
|
|
|
|
BL1815N |
2.5 |
||
|
|
|
|
|
|
||
2.0 Ah |
|
|
|
|
BL1820 |
11 |
3.2 |
3.0 Ah |
|
|
|
BL1430 |
|
16.5 |
4.0 |
|
|
|
|
BL1830 |
5.0 |
||
|
|
|
|
|
|
||
4.0 Ah |
|
|
|
BL1440 |
|
22 |
5.5 |
|
|
|
|
BL1840 |
6.5 |
||
|
|
|
|
|
|
||
5.0 Ah |
|
|
|
BL1450 |
|
27.5 |
6.5 |
|
|
|
|
BL1850 |
8 |
||
|
|
|
|
|
|
||
|
|
|
|
|
|
|
|

 : Cluster Battery

 : Slide Battery
Note:
Table regarding to the battery operating time above is for reference. The actual operating time may differ with the type of the battery, charging condition, or usage environment.
Installing or removing Slide battery cartridge (Fig. 4 & 5)
•To install the battery cartridge, align the tongue on the battery cartridge with the groove in the housing and slip it into place. Always insert it all the way until it locks in place with a little click.
•If you can see the red indicator on the upper side of the button, it is not locked completely. Install it fully until the red indicator cannot be seen. If not, it may accidentally fall out of the tool, causing injury to you or someone around you.
6
 Loading...