


Instruction Manual (page 2-18)
Instructions d’emploi (page 19-35)
Gebruiksaanwijzing (bladzijde 36-52)
DES 300
DES 350
DES 400
DES 380
Important:
Read this instruction manual carefully before putting the chain saw into operation and strictly observe the safety regulations! Keep this instruction manual!
Attention:
Lire attentivement ce manuel avant la première mise en service et observer absolument les prescriptions de sécurité! Garder avec soins le manuel des instructions d’emploi!
Belangrijk:
Lees voor de eerste inbedrijfname deze gebruiksaanwijzing zorgvuldig door en neem alle veiligheidsvoorschriften in acht. Gebruiksaanwijzing zorgvuldig bewaren!
1
Thank you for your trust in our product
We congratulate you on your new MAKITA electric chain saw. We are convinced that you will be satisfied with this modern machine.
MAKITA electric chain saws are characterized by their robust, high-efficiency motors and high chain velocities which allow an excellent cutting efficiency. They are equipped with numerous state-of-the-art safety devices, are light, handy and can be put into operation immediately wherever electric power is provided.
In order to guarantee the optimal function and performance of your electric chain saw and to ensure your personal safety we would request you to perform the following:
Read this instruction manual carefully before putting the electric chain saw into operation for the first time and strictly observe the safety regulations. Failure to do so can result in serious injury to the operator and/or bystanders.
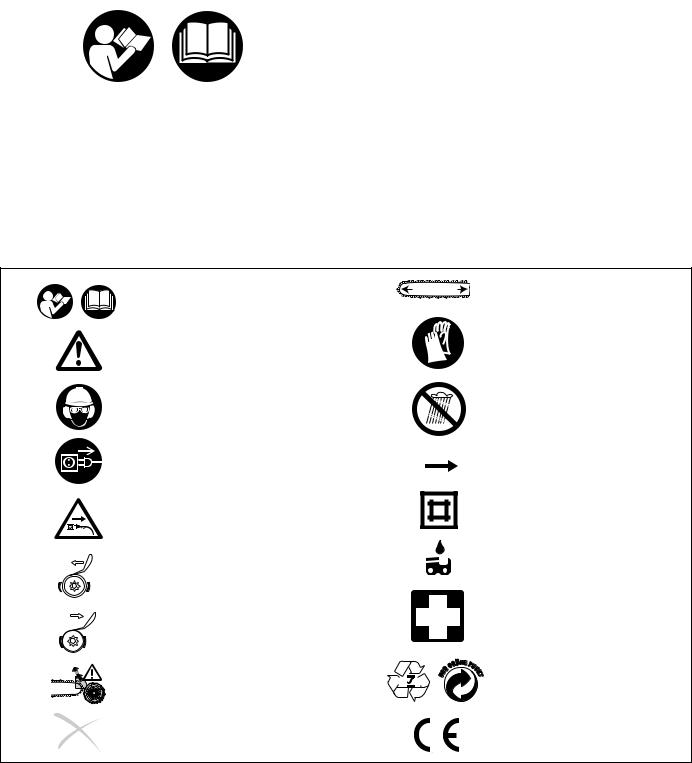
Symbols
You will notice the following symbols on the chain saw and in the instruction manual:
Table of contents |
Page |
Symbols .............................................................................. |
2 |
Delivery inventory .............................................................. |
3 |
EU conformity declaration ................................................ |
3 |
Packing ................................................................................ |
3 |
SAFETY PRECAUTIONS .................................................... |
4 |
General precautions ........................................................ |
4 |
Personal protective equipment ....................................... |
4 |
Putting into operation .................................................. |
4-5 |
Working behavior/method of working ......................... |
5-7 |
Kickback .......................................................................... |
7 |
Transport and storage .................................................... |
8 |
Maintenance .................................................................... |
8 |
First aid ........................................................................... |
8 |
Technical data .................................................................... |
9 |
Denomination of components .......................................... |
9 |
PUTTING INTO OPERATION ............................................. |
9 |
Mounting the guide bar and saw chain ................... |
10-11 |
Tightening the saw chain .............................................. |
11 |
Checking the chain tension ........................................... |
11 |
Chain brake ................................................................... |
12 |
Saw chain oil ................................................................. |
12 |
Refilling the oil tank ....................................................... |
13 |
Adjusting the chain lubrication ...................................... |
13 |
Switching on the motor ................................................. |
14 |
Checking the chain brake ............................................. |
14 |
Checking the chain lubrication ...................................... |
14 |
MAINTENANCE ................................................................. |
15 |
Sharpening the saw chain ...................................... |
15-16 |
Cleaning the guide bar .................................................. |
16 |
Replacing the saw chain ............................................... |
16 |
Trouble shooting .............................................................. |
16 |
Instructions for periodic maintenance .......................... |
17 |
Service, spare parts and guarantee ......................... |
17-18 |
Extract of spare parts list ................................................ |
18 |
Accessories ................................................................... |
18 |
Service centres (see enclosure) |
|
Read instruction manual and follow |
..... mm |
Maximum permissible cut length |
|
|
|
the warningsand safety precautions! |
|
|
Particular care and attention! |
|
Wear protective gloves! |
|
|
|
Wear protective helmet, |
|
Protect against moisture! |
eye and ear protection! |
|
|
|
|
|
Pull out the power supply plug! |
|
Direction of chain travel |
Pull out the power supply plug |
|
Double protective insulation |
if the cable is damaged! |
|
|
|
|
Saw chain oil |
Chain brake released |
|
|
Chain brake actuated |
|
First aid |
|
|
|
Caution: Kickback! |
RE Y |
Recycling |
Forbidden! |
|
CE-Marking |
2
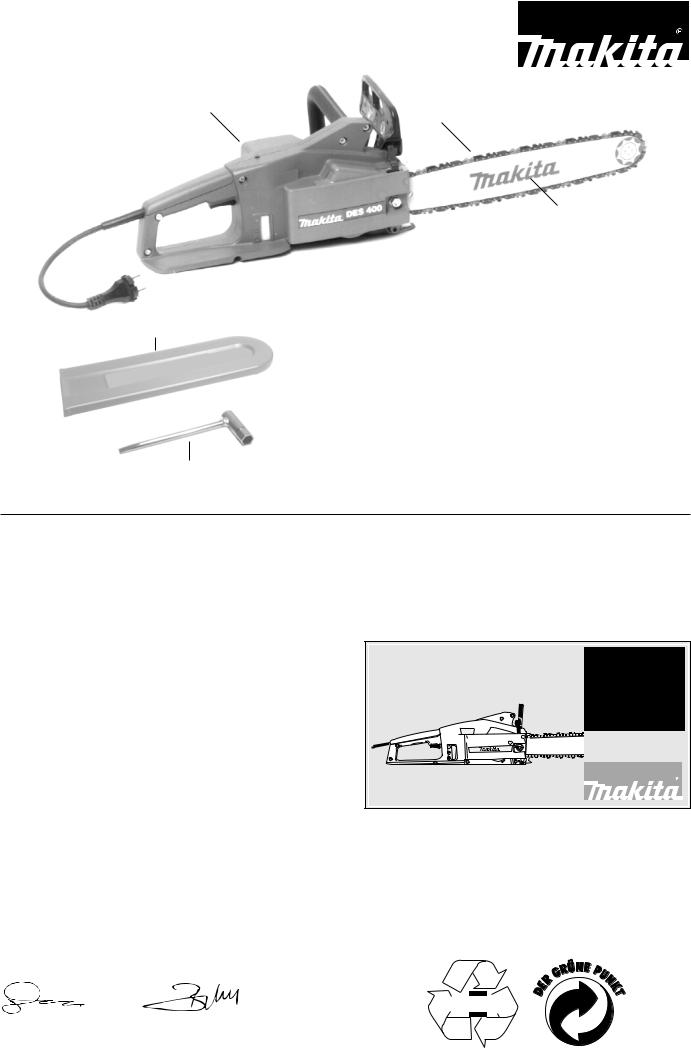
Delivery inventory
1
3
2
4
5
1.Electric chain saw
2.Guide bar
3.Saw chain
4.Chain protection cover
5.Universal wrench
6.Instruction manual (not shown)
In the case that one of the parts listed should not be included in the delivery inventory, please, consult your sales agent.
EU Conformity Declaration
The undersigned, Junzo Asada and Rainer Bergfeld, as authorized by DOLMAR GmbH, declare that the MAKITA machines,
Type |
EU prototype test certificate No. |
DES 300 |
1003 MSR |
DES 350 |
1003 MSR |
DES 400 |
1003 MSR |
DES 380 |
1003 MSR |
manufactured by DOLMAR GmbH, Jenfelder Str. 38, 22045 Hamburg, Germany, conforms to the basic safety and health requirements of the applicable EU guidelines:
EU Machine guideline 98/37/ EG
EU EMC guideline 89/336/ EWG (modified by 91/263/ EWG, 92/31/ EWG and 93/68/ EWG)
EU Low-voltage guideline 73/23/ EWG (modified by 93/68/ EWG)
The most important standards applied to properly meet the requirements of the above EU guidelines were: EN 50144-1, HD 400.1, HD 400.3, EN 55014, EN 55014-2, EN 60555-T2, - T3, -T3/A1.
EU prototype testing was carried out by: VDE Prüfund Zertifizierungsinstitut, Merianstr. 28, D-63069 Offenbach.
Hamburg, 20.12. 2000
For DOLMAR GmbH
Junzo Asada |
Rainer Bergfeld |
Managing Director |
Managing Director |
Packing
• Electric Chain Saw |
• Tronçonneuse électrique |
• Elektro-Motorsäge |
• Elettrosega |
• Motosierra eléctrica |
• Electro-motorzaag |
• El-kædesav |
The MAKITA electric chain saw will be delivered in a protective cardboard box to prevent transport damages.
Cardboard is a basic raw material and is therefore consequently reuseable or suitable for recycling (waste paper recycling).
RE Y
Y
3
SAFETY PRECAUTIONS
General precautions
-To ensure correct operation the user has to read this instruction manual to make himself familiar with the characteristics of the electric chain saw. Users insufficiently informed will risk danger to themselves as well as others due to improper handling.
-It is recommended only to lend the electric chain saw to people who have proven to be experienced with electric chain saws. Always hand over the instruction manual.
-First users should ask the dealer for basic instructions to become familiarized with the characteristics of engine powered sawing.
-Familiarize yourself with the use of an electric chain saw by cutting off lengths from a log on a sawhorse.
-Children and young persons aged under 18 years must not be allowed to operate the electric chain saw. Persons over the age of 16 years may, however, use the chain saw for the purpose of being trained while under supervision of a qualified trainer.
-Use electric chain saws always with the utmost care and attention.
-Operate the electric chain saw only if you are in good physical condition. Perform all work calm and carefully. The user has to accept liability for others.
-Never use the electric chain saw after the consumption of alcohol or drugs or medication.
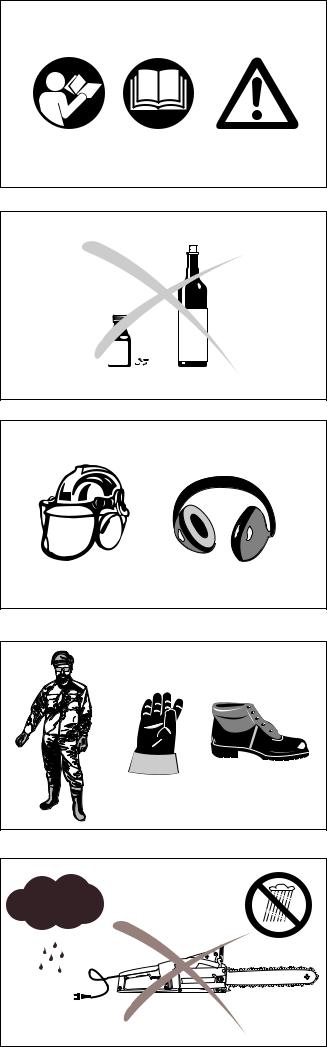
Personal protective equipment
-In order to avoid head, eye, hand or foot injuries as well as to protect your hearing the following protective equipment must be used during operation of the electric chain saw.
-The kind of clothing should be appropriate, i. e. it should be tight-fitting but not be a hindrance. Do not wear jewellery or clothing which could become entangled with bushes or shrubs.
-The protective helmet (1) is to be checked in regular intervals for damage and is to be replaced after 5 years at the latest. Use only approved protective helmets.If you have long hair wear a hairnet.
-The face shield (2) of the protective helmet (or the goggles) protect against sawdust and wood chips. During operation of the electric chain saw always wear a goggle or a face shield to prevent eye injuries.
-Wear adequate noise protection equipment (ear muffs (3), ear plugs, etc.). Octave brand analysis upon request.
-The protective brace and bib overall (4) is made of a nylon structure with 22 layers and protects against cuts. We strongly recommend its use. In any case wear a long pair of trousers made of solid material during operation of the electric chain saw.
-Protective gloves (5) made of thick leather are part of the prescribed equipment and must always be worn during operation of the electric chain saw.
-During operation of the electric chain saw safety shoes or boots (6) fitted with anti skid sole, steel toe caps and protection for the leg are always to be used. Safety shoes equipped with a protective layer provide protection against cuts and ensure a secure footing.
Putting into operation
-Do not operate the electric chain saw when it rains or in wet or moist environment because the motor is not waterproof.
-If the electric chain saw is moist, it must not be put into operation.
-Do not operate the electric chain saw next to inflammable gases or dusts. Explosion hazard.
-Do always lead the power supply cable behind the user. Take care that the cable is not clamped or cut by sharp-edged objects. Lay the cable such that nobody is endangered.
-Insert the plug only into safety sockets with approved installation. Make sure that the mains voltage corresponds to that on the identification plate. If the saw is going to be used outdoors connect it to a fault-current (FI) circuit breaker with max. 30 mA triggering current.
1
2
1
2
3
3
4
5 |
6 |
4
5
4
-Pay attention to the diameter of the extension cable. When using a cable roll the cable should be completely wound off. Use only extension cords that meet the specifications in “Technical data”. If using the saw out of doors make sure that the extension cord is approved for such use.
-Before starting work the electric chain saw must be checked for perfect function and operating safety according to the prescriptions.
Check especially the function of the chain brake, the correct mounting of the guide bar, the correct sharpening and tightening of the saw chain, the firm mounting of the sprocket guard, the easy motion of the power switch, the function of the locking button, the good mechanical condition of cable and plug and the cleanliness and dryness of the handles.
-Put the electric chain saw only into operation if it is completely assembled. Never use the electric chain saw when it is not completely assembled.
-All protective installations and guard supplied with the chain saw during operation.
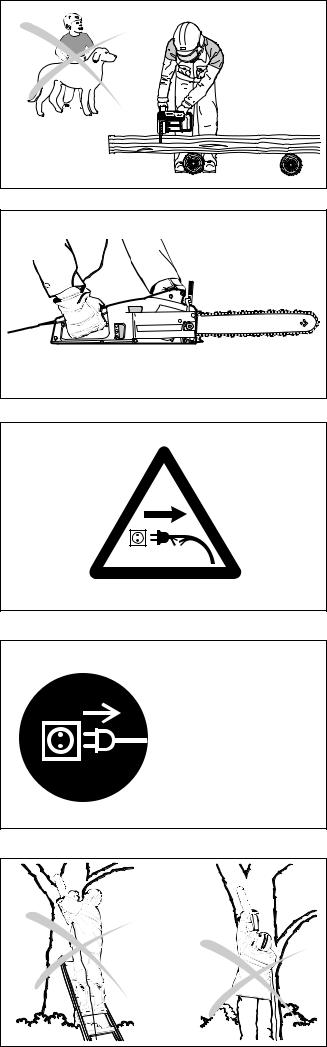
-Make sure that there are no children or other persons within the working range. Also pay attention to any animals in the working vicinity (6).
-Before switching on the electric chain saw ensure that you have a safe footing.
-When switching on the electric chain saw always hold it with both hands. Take the back handle with the right hand and the tubular handle with the left hand. Hold the handles tightly with your thumbs facing your fingers. The bar and chain must indicate away from your body (7).
-Switch on the saw only in the manner described in this manual. Do not overload your saw. It will work better and more safely if you use it within its intended performance range.
-Switch off the electric chain saw immediately if you observe a change in its operating behavior.
CAUTION:
When releasing the power switch the chain keeps on running for a short period of time (free-wheeling).
-Protect the power cord from heat, oil and sharp edges.
-If the cable is being damaged or cut, pull out the power supply plug immediately.
-If the sawing device is hit by stones, nails or other hard objects, pull out the power supply plug and check the sawing device immediately
-Pull out the power supply plug before checking the chain tension, tightening the chain, replacing it or clearing malfunctions.
-When stopping work or leaving the electric chain saw switch off the chain saw and pull out the power supply plug. Put the electric chain saw in a safe location to prevent danger to others.
-For refilling the oil tank the power supply plug must be pulled out. Do not smoke or light open fires.
-Avoid skin or eye contact with mineral oil products. Always wear gloves when refilling the oil tank.
-Take care that no chain oil oozes into the soil (environmental protection). Use an appropriate base.
-If oil has been spilt, clean the electric chain saw immediately.
Working behavior/method of working
-Do not work on your own. There must be someone around in case of an emergency (within shouting distance).
-During sawing operation always hold the electric chain saw with both hands. Thus you will be able to guide it safely.
-Only use the electric chain saw during good light and visibility periods. Be aware of slippery or wet areas, and of ice and snow (risk of slipping). The risk of slipping is extremely high when working on recently peeled wood (bark).
-Never work on unstable surfaces. Make sure that there are no obstacles in the working area, risk of stumbling. Always ensure that you have a safe footing.
-Never saw above your shoulder height.
-Never saw while standing on a ladder.
-Never climb up into trees to perform sawing with the electric chain saw.
-Never bend forward by far to perform sawing.
6 |
7 |
8
● device malfunction
● maintenance
● refill oil
● sharpen the saw chain
● stop
● transport
● shutdown
9
10
5

-Guide the electric chain saw in such a way that no part of your body is within the elongated swiveling range of the saw (11).
-Use the electric chain saw for sawing wood only.
-Do not let the chain touch the ground when it is running. If you are cutting wood lying directly on the ground, turn it over before completing the cut so that you do not cut into the ground.
-Clear the area of the cut of foreign objects such as sand, stones, nails, wire etc. Such objects can damage the blade and cause dangerous kickback.
-When sawing precut timber or thin woods use a safe support (sawing jack,12). When sawing precut timber or thin pieces use a stable support (sawhorse, 12). Do not saw stacked timber! Do not let another person steady the timber, and do not steady it with your foot!
-Secure round timber.
-When working on slopes, always work facing the slope.
-For performing crosscuts the toothed ledge (12,Z) must be applied to the timber to be cut.
-Before performing a crosscut firmly apply the toothed ledge to the timber, only then can the timber be cut with the chain running. For this the electric chain saw is lifted at the back handle and guided with the tubular handle. The toothed ledge serves as a center of rotation. Continue by slightly pressing down the tubular handle and simultaneously pulling backwards the electric chain saw. Apply the toothed ledge a little bit deeper and once again lift the back handle.
-The sawing device must be running whenever you remove the electric chain saw from the timber.
-When performing several cuts the electric chain saw must be switched off in between.
-When the timber must be pierced for cutting or longitudinal cuts are to be performed it is urgently recommended to have these works carried out by specially trained persons only (high risk of kickbacks).
-For performing longitudinal cuts (13) apply the sawing device at an angle which is as small as possible. Be very careful when carrying out this kind of work because the toothed ledge cannot be used.
-When cutting with the bottom edge of the bar the electric chain saw may be pushed in the direction of the user if the chain is clamped. For this reason use the top edge of the bar whenever possible. The electric chain saw will then be pushed away from your body (14).
-If the timber is not free of tension (15), first cut the pressure side
(A). Then the crosscut can be performed on the tension side
(B). Thus clamping of the bar is avoided.
-Be very careful when cutting splintery wood. Cut pieces of wood may be pulled along (risk of injuries).
-Never use the electric chain saw for lifting up or removing pieces of wood or other objects.
-When releasing the tension the electric chain saw should be supported on the trunk (risk of kickbacks).
-Tension releasing works must be carried out by trained persons. High risk of injuries.
-Be aware of branches under tension. Do not cut free branches from below.
-Never perform tension releasing works standing on the trunk.
-Do not use the electric chain saw for works in the forest, i. e. for cutting down trees or carrying out tension releasing works. The user's mobility and safety necessary for this kind of work are not guaranteed due to the cable connection.
11 |
Z |
12 |
13 |
14 |
B |
A |
B |
15 |
6

CAUTION:
Do not fell or debranch trees unless you are specially trained for it! There is a high risk of injury! Make sure to follow local regulations.
-Before cutting down a tree ensure that
a)only those persons are within the working range which are actually involved in cutting down the tree
b)b) all persons involved in the felling have an unhindered retreat route (the retreat path should be about 45° diagonally and to the rear away from the direction of fall). Be aware of the increased risk of stumbling from electric cables!
c)the bottom part of the trunk is free from foreign bodies, underbrush and branches. Make sure to have a safe footing (risk of stumbling).
d)the next working place is at least 2 1/2 tree lengths away (16). Before cutting down the tree check the direction of fall and make sure that there are neither other persons nor any objects within a distance of 2 1/2 tree lengths (16).
-Judging the tree:
Direction of hanging - loose or dry branches - height of the tree - natural hang over - is the tree rotten?
-Take into account the direction and the velocity of the wind. If strong gusts are occuring, do not perform any cutting down works.
-Cutting the roots:
Start with the strongest root. First perform the vertical and then the horizontal cut.
-Notching the trunk (A, 17):
The notch determines the direction of fall and guides the tree. The trunk is notched perpendicular to the direction of fall and penetrates 1/3 -1/5 of the trunk diameter. Perform the cut near the ground.
-When correcting the cut always do so over the whole width of the notch.
-Cut down the tree (B, 18) above the bottom edge of the notch
(D). The cut must be exactly horizontal. The distance between both cuts must be approx. 1/10 of the trunk diameter.
-The material between both cuts (C) serves as a hinge. Never cut it through, otherwise the tree will fall without any control. Insert felling wedges in the cut (B, 18) in good time.
-Secure the cut only with wedges made of plastic or aluminium. Do not use iron wedges.
-When cutting down a tree always stay sideways of the falling tree.
-When withdrawing after having performed the cut down be aware of falling branches.
-When working on a sloping ground the user of the electric chain saw must stay above or sidewards of the trunk to be cut or the already cut down tree.
-Be aware of trunks which may roll towards you.
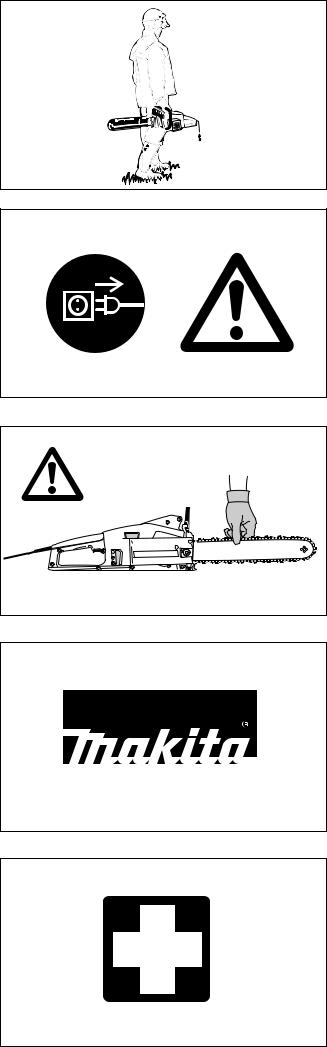
Kickback
-When working with the electric chain saw dangerous kickbacks may occur.
-Kickback occurs when the tip of the blade(especially the top quarter) inadvertently comes into contact with wood or other solid objects.
-In this case the electric chain saw is thrown without any control and with high energy potentials in the direction of the user (risk of injuries).
In order to prevent kickbacks follow the indicated instructions:
-Never apply the end of the bar when starting to make a cut. Always observe the end of the bar.
-Never use the bar end for sawing. Be careful when continuing to cut.
-When starting to perform a cut the chain must be running.
-Ensure that the chain is always sharpened correctly. Pay special attention to the hight of the depth limiter (for detailed information see the chap. "Sharpening the saw chain").
-Never cut several branches at the same time. When cutting a branch ensure that no other branch is touched.
-When crosscutting a trunk be aware of the trunks next to it. It is recommended to use a saw jack.
45o
45°
2 12
45°
45o
= cutting down range
16
A 45o
A
17
C
B |
D |
B
18 |
C |
19 |
7
Transport and storage
-Carry the electric chain saw with the tubular handle. The saw bar indicates backwards. Never carry or transport the electric chain saw with the chain running.
-Never carry the saw by the power cord. Do not disconnect the plug by pulling on the power cord.
-When changing your position during work switch of the electric chain saw and actuate the chain brake in order to prevent an inadvertent start of the chain.
-When transporting the electric chain saw over long distances the power supply plug must be pulled out and the bar protection cover, included in the delivery, must be applied (20).
-Ensure safe positioning of the electric chain saw during car transportation to avoid oil leakage.
-Store the saw in a secure, dry, lockable room out of reach of children. It must not be stored outdoors.
-For storing the electric chain saw over a long period of time or shipping it the oil tank must be completely emptied.
-Only use approved and marked containers for transporting and storing chain oil.
Maintenance
-For performing maintenance works switch of the electric chain saw, pull out the power supply plug and secure it (21).
-Before starting to work, always make sure that the saw is in safe working order, in particular the chain brake and runout brake. Make sure that the saw chain is always sharpened and tightened correctly (22).
-Have the chain brake and run-out brake inspected regularly (see “Chain brake, run-out brake”).
-Regularly check the cable to the power supply for damage of the covering.
-Regularly clean the electric chain saw.
-If the plastic case is damaged, have it immediately repaired by a skilled person.
-Regularly check the tank cap for tightness.
-Do not use the saw if the ON/OFF switch is defective. Have it repaired by a qualified person.
Observe the accident prevention instructions issued by the competent trade federations and insurance companies.
Do not perform any modifications on the electric chain saw. You will endanger your safety.
Perform only the maintenance and repair works described in the instruction manual. All other works must be carried out by the MAKITA service.
Use only original MAKITA spare parts and accessories. Applying spare parts which are not original MAKITA parts or accesories and bar/chain combinations or lengths results in a high risk of accidents. For accidents and damage resulting from using sawing devices or accesories which have not been approved we cannot accept any responsibility.
First aid
For the event of a possible accident, please, make sure that a first aid box is always immediately available close by. Immediately replace any items used from the first aid box.
Should you ask for help, please, give the following information:
-place of accident
-what happened
-number of injured persons
-kind of injuries
-your name.
NOTE
Individuals with poor circulation who are exposed to excessive vibration may experience injury to blood vessels or the nervous system.
Vibration may cause the following symptoms to occur in the fingers, hands or wrists: ”Falling asleep” (numbness), tingling, pain, stabbing sensation, alteration of skin colour or of the skin.
If any of these symptoms occur, see a physician!
20
21 |
22 |
SERVICE
23
24
8

|
Technical data |
|
|
|
|
|
|
|
|
|
DES 300 |
|
DES 350 |
|
DES 400 |
DES 380 |
|
|
|
|
|
|
||||
|
|
|
|
|
|
|
|
|
|
Power consumption |
Watt |
1400 |
|
1600 |
|
1600 |
1800 |
|
Nominal voltage |
V |
|
|
230…240 ~ |
|
|
|
|
|
|
|
|
|
|
|
|
|
Mains frequency |
Hz |
|
50 |
|
|
||
|
Nominal current |
A |
6.1 |
|
7.0 |
|
7.0 |
7.8 |
|
Fuse, electric circuit |
A |
|
16 |
|
|
||
|
Cable length |
cm |
|
30 |
|
|
||
|
Chain type |
|
|
|
092, Hobby |
|
484 |
|
|
Chain pitch |
inch |
|
3/8 |
|
|
.325 |
|
|
Length of a cut |
cm |
30 |
|
35 |
|
40 |
38 |
|
Chain velocity |
m/s |
12 |
|
11 |
|
11 |
13 |
|
Sound power level LWA av |
dB (A) |
103 |
|
103 |
|
103 |
101 |
|
per ISO 9207 1) |
|
|
|
|
|
|
|
|
Sound pressure level LpA av |
dB (A) |
93 |
|
95 |
|
95 |
92 |
|
at the workplace per ISO 7182 1) |
|
|
|
|
|
|
|
|
Vibration acceleration |
|
|
|
|
|
|
|
|
ah,w av per ISO 7505 1) |
|
|
|
|
|
|
|
|
- Tubular handle |
m/s2 |
2.2 |
|
2.2 |
|
2.2 |
2.4 |
|
- Rear handle |
m/s2 |
4.3 |
|
4.0 |
|
4.0 |
3.5 |
|
Oil pump |
|
|
|
volume control, automatic |
|
||
|
|
|
|
|
|
|
||
|
Oil tank capacity |
l |
|
0,15 |
|
|
||
|
Power transmission |
|
|
|
centrifugal clutch |
|
slip clutch |
|
|
Overload protection |
|
|
|
mechanic (clutch) |
|
mechanic (clutch) |
|
|
|
|
|
|
|
|
|
elektric (thermal circuit breaker) |
|
Chain brake |
|
|
|
manual or automatic |
|
||
|
Weight |
kg |
3.9 |
|
4.0 |
|
4.0 |
4.0 |
|
(without bar/chain) |
|
|
|
|
|
|
|
|
Radio interference suppression / EMC |
|
per EMC guidelines EWG 89/336 and EWG 92/31 |
|||||
|
Protective case |
|
|
|
class II (double protective insulation) |
|
||
|
Extension cable |
|
|
|
DIN 57282/ HO 7RN-F |
|
||
|
(not included) |
|
|
|
L= 30 m max., 3x1.5 mm2 |
|
||
1) Figures derived in equal part from full-load and top-speed operation.
Denomination of components
GB


 Europa
1 Tubular handle
2Hand guard
3Releasing lever for chain brake
4Spike bar
5Fastening nut
6Sprocket guard with chain brake
7Adjusting screw of oil pump (bottom side)
8Sightglass for oil level
9Identification plate
10Back hand guard
11Guide bar
12Saw chain
13Motor case
14Oil tank cap
15Power switch
16Power supply cable
17Locking button
18Thermal circuit breaker (DES 380 only)
1 |
2 |
3
4
|
|
|
6 |
5 |
Figure: Identification plate |
|
|
7 |
DES 400 |
||
|
|
|
|||
|
|
|
|
DES 400 |
|
|
8 |
|
|
|
|
10 9 |
|
Year of manufacture |
2001 123456 |
||
|
230...240 V~, 50 Hz, 7,0 A, 1600 W, 11 m/s |
||||
|
|
|
Serial number |
||
|
|
|
|
||
|
|
|
|
|
max. 400 mm |
|
|
|
|
|
22045 Hamburg |
|
|
|
|
|
Germany |
|
|
|
|
|
205 100 631 Typ 205 |
Identification plate
Indicate when ordering spare parts.
18  17
17
11
12 |
16 |
13 |
14 |
|
|
|
15 |
||||
|
||||
9

PUTTING INTO OPERATION
Mounting the guide bar and saw chain
Use the universal wrench delivered with the machine.
Put the electric chain saw on a stable surface and carry out the following operations for mounting the bar and chain:
Always release the chain brake before removing or replacing the sprocket guard (A/1).
|
|
2 |
A |
1 |
4 |
|
-If the hand guard (A/2) can be easily pulled about 2 cm (1") in the direction shown by the arrow, the chain brake has already been released. If this is not the case, pull the hand guard (A/2) firmly in the direction of the arrow until you feel it catch.
6
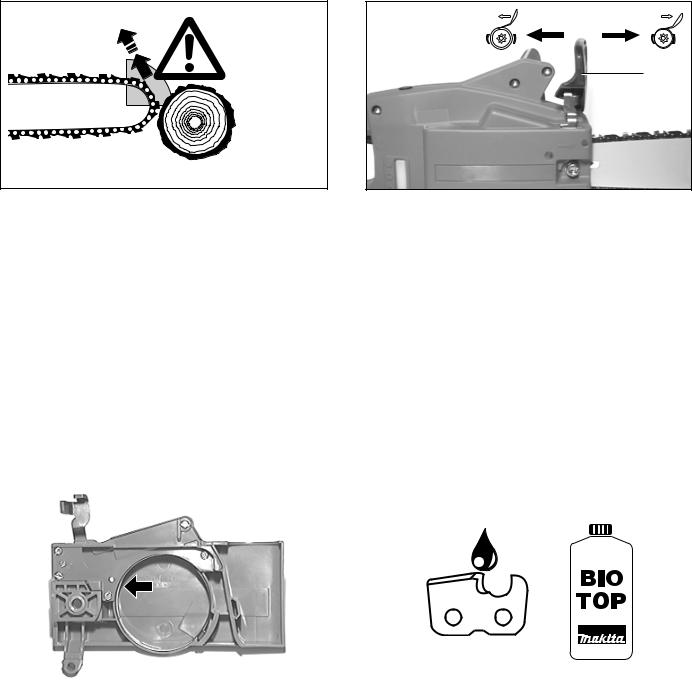
C |
7 |
-Turn the chain adjusting screw (C/6) to the left (counterclockwise) until the pin (C/7) is at the left stop.
8
9
E
-Put the saw chain (E/8) onto the sprocket behind the clutch cylinder (E/9) and insert the saw chain into the guide groove of the guide bar. The cutting edges of the top side of the bar must be oriented in the direction of the arrow.
CAUTION: When working on the guide bar or saw chain always wear protective gloves and pull out the power supply plug.
CAUTION: Switch on the electric chain saw only after having assembled it completely and inspected!
 1
1
4
B
-Remove adhesive label (A/4).
-Unscrew retaining nut (B/4).
-Pull off the sprocket guard (B/1).
D
-Position the guide bar. Take care that the pivot (C/7) of the chain tightener is inserted into the bore (see circle) of the guide bar.
10
8
F
-Lead the chain (F/8) around the sprocket nose (F/10) of the guide bar.
NOTE: The chain should be easy to pull in the direction of the arrow. The clutch drum (E/9) should turn with the chain (the sprocket engages the chain).
10
G
-Turn the chain tightener (C/6) to the right (clockwise) until the saw chain are in gear with the guide groove of the bottom side of the bar (see circle). Press the saw bar with your left hand against the case.
1 |
11 |
H |
NOTE: |
If the chain brake on the dismounted sprocket guard is actuated by accident, it must be released again prior to reassembly:
-Hold the sprocket guard (H/1) as shown (note direction of arrow) firmly with both hands and press the stop lever (H/ 11) against a hard surface (such as a board) until you hear it catch.
12
|
|
|
|
|
I |
1 |
|
4 |
|
|
||||
-Replace the sprocket guard (I/1), making sure that the pin on the stop lever fits into the space on the hand guard (circled).
-Manually tighten the retaining nut (I/4).
NOTE:
The arrow (I/12) on the sprocket guard shows the direction of chain travel.
J
Tightening the saw chain
-Slightly lift the end of the guide bar and turn the chain tightener screw (C/6) to the right (clockwise) until the saw chain rests against the bottom side of the guide bar.
-Continue to lift the guide bar end and firmly tighten the fastening nut (I/4) by means of the universal wrench.
Checking the chain tension
-The tension of the saw chain is correct if the chain rests against the bottom side of the guide bar and can still be easily turned by hand.
-While doing so the chain brake must be released.
-Check the chain tension frequently - new chains tend to get longer during use!
-When checking the chain tension the motor must be switched off and the power supply plug pulled out.
NOTE:
It is recommended to use 2-3 chains alternatively.
In order to guarantee a uniform wear of the groove in the bar the bar should be turned over whenever replacing the chain.
K
11
Chain brake
2 1
2
A |
|
B |
|
|
|
The DES 300, DES 350, DES 400 and DES 380 comes with an inertia chain brake as standard equipment. If kickback occurs due to contact of the guide-bar tip with wood (see SAFETY PRECAUTIONS, page 7), the chain brake will stop the chain through inertia if the kickback is sufficiently strong.
The chain will stop within a fraction of a second.
Engaging the chain brake (braking)
If the kickback is strong enough the sudden acceleration of the guide bar combined with the inertia of the hand guard (B/2) will automatically actuate the chain brake.
To engage the chain brake manually, simply push the hand guard (B/2) forward (towards the tip of the saw) with your left hand (arrow 1).
Releasing the chain brake
Pull the hand guard (B/2) towards you (arrow 2) until you feel it catch. The brake is now released.
Note on model DES 380
When the chain brake is actuated, the current supply to the motor will also be cut off!
Maintenance |
Saw chain oil |
|
|
|
|
|
|
|
|
C |
|
|
|
D |
|
|
|
|
|
|
|
|
|
|
|
|
|
|
|
The chain brake is a very important safety device and like any other part subject to wear and tear. Have the maintenance works regularly carried out by a MAKITA service centre for your own safety.
Before starting work carry out a functional check. Regularly clean the brake band (arrow) and the hand guard (B/2) in order to guarantee perfect operation.
Use a special oil with adhesive addition for lubricating the saw chain and bar. The adhesive addition prevents that the oil is centrifuged too fast from the sawing device.
Do not use mineral oils. In order to protect the invironment the use of biologically decomposeable oil is prescribed.
The saw chain oil sold by MAKITA, called BIOTOP, is made of special vegetable oils and is biologically decomposeable to 100%. BIOTOP has been granted the "blue angel" for being particularly favourable to the environment (RAL UZ 48).
Biologically decomposeable oil is stable only for a limited period of time. It should be consumed within 2 years from the date of manufacture (printed on the container).
BIOTOP oil is available in the following packing sizes to suit your individual requirements:
1 liter |
order number |
980 008 610 |
5 liters |
order number |
980 008 611 |
20 liters |
order number |
980 008 613 |
12
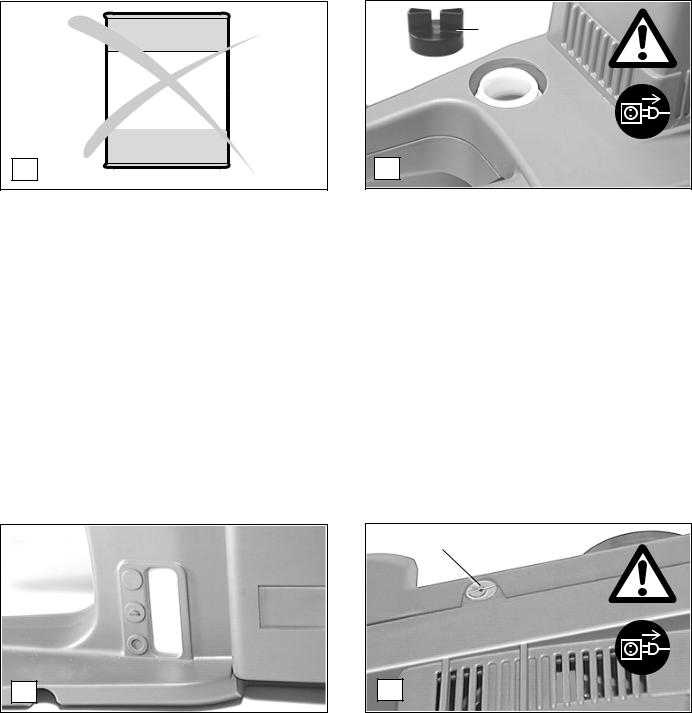
Waste oil
E
Never use waste oil
Waste oil is very dangerous for the environment.
Waste oil contains high amounts of carcinogenic substances. The residues in the waste oil result in a high degree of wear and tear at the oil pump and the sawing device.
In the case of damage caused by using waste oil or unappropriate saw chain oil the product guarantee will be null and void.
Your salesman will inform you about the use of saw chain oil.
Avoid skin and eye contacts
Mineral oil products as well as oil degrease the skin. If your skin repeatedly comes in contact with these substances for a longer period of time, it will desiccate. Various skin deseases may result. In addition, allergic reactions are known.
Eyes can be irritated by contact with oil. If oil gets into your eyes, immediately wash them with clear water. If your eyes are still irrritated, go to see a doctor.
Refilling the oil tank
13
F
Only if the motor is switched off and the power supply plug is pulled out
-Thoroughly clean the oil tank around the cap to prevent dirt from entering the tank.
-Unscrew the tank cap (F/13) and fill in chain oil until it is on a level with the bottom edge of the filler socket.
-Tightly screw on the tank cap.
-Thoroughly remove any oil that has overflown.
Important!
Before operating the saw for the first time, the oil feed system must be completely filled, until the chain oil lubricates the chain and guide bar.
With the oil pump feed rate set to maximum this process can take up to two minutes.
14
G
-The oil level can be controlled in the sight glass (G/14).
Lubricating the saw chain
In order to ensure sufficient lubrication of the saw chain there must always be enough oil in the tank. Its contents (150 ml) is sufficient for approx. 1/2 hour at continuous operation.
Important note on bio-degradable chain oils:
If you are not planning to use the saw again for an extended period of time, empty the oil tank and put in a small amount of regular engine oil (SAE 30),and then run the saw for a time. This is necessary to flush out all remaining bio-degradable oil from the oil tank, oil-feed system, chain and guide bar, as many such oils tend to leave sticky residues over time, which can cause damage to the oil pump or other parts.
The next time you use the saw, fill the tank with BIOTOP chain oil again.
Adjusting the chain lubrication
15
H
Only if the motor is switched off and the power supply plug is pulled out
The automatic oil pump can be regulated with the adjusting screw (H/15). The adjusting screw is mounted below the clutch cylinder in the bottom part of the case.
When delivered the oil pump is adjusted to a medium feed quantity. For changing the quantity use the universal wrench and carefully adjust the adjusting screw in the following way:
•turn to the right to reduce the quantity
•turn to the left to increase the quantity.
ATTENTION: Never unscrew further than the lug allows.
Note: After the saw has been turned off it is normal for residual chain oil to drip from the oil feed system, the guide bar and the chain for a time. This does not constitute a defect!
Place the saw on a suitable surface.
13
16
17
A
To guarantee a troublefree operation of the oil pump the oil guide groove (A/16) as well as the oil inlet bore in the guide bar (A/17) must be cleaned in regular intervals.
Checking the chain brake
1 |
C |
Do not work with the chain saw without first checking the chain brake!
-Start the motor as described (make sure you have a good footing, and place the chain saw on the ground in such a way that the guide bar is free of contact).
-Grasp the tubular handle firmly with one hand and hold the grip with the other.
-Switch on the motor and press the hand guard (C/1) in the direction of the arrow with the back of your hand until the chain brake engages. The chain should stop immediately.
-Switch the motor off Immediately and release the chain brake.
IMPORTANT: If the chain does not stop immediately when you test the chain brake, do NOT use the chain saw. Take the chain saw to a MAKITA service center.
Switching on the motor
20
18
19
B
-When switching on the electric chain saw always hold it with both hands.
-Take the back handle with the right hand and the tubular handle with the left hand. Hold the handles tightly with your thumbs facing your fingers. The bar and chain must not be in contact with any object.
-First depress the locking button (B/18) and then the power switch (B/19). Then release the locking button (B/18).
-Attention: The chain starts running immediately. Keep the power switch depressed as long as the motor is to run.
CAUTION:
Never lock the power switch in the ON position.
Switching off the motor:
-Release the power switch (B/19).
CAUTION:
The saw chain will continue to run for a short time. Do not deposite the chain saw before the chain is at a standstill.
Note on Model DES 380:
The DES 380 electric saw is equipped with overload protection. In the event that the electric motor should overheat, the thermal circuit breaker (B/20) will automatically pop out, interrupting the flow of current.
After allowing the motor to cool down for about 30 seconds, push the thermal circuit breaker back in to restore operation of the saw. Always allow the unit to cool down for 30 seconds!
IMPOTANT NOTE: Turning on machines causes transient voltage dips. If the conditions of the power supply network are unfavourable, there might be interference with other devices on the same network. If the impedance of the network is lower than 0,093 Ohms it can pressumed that no interference will happen.
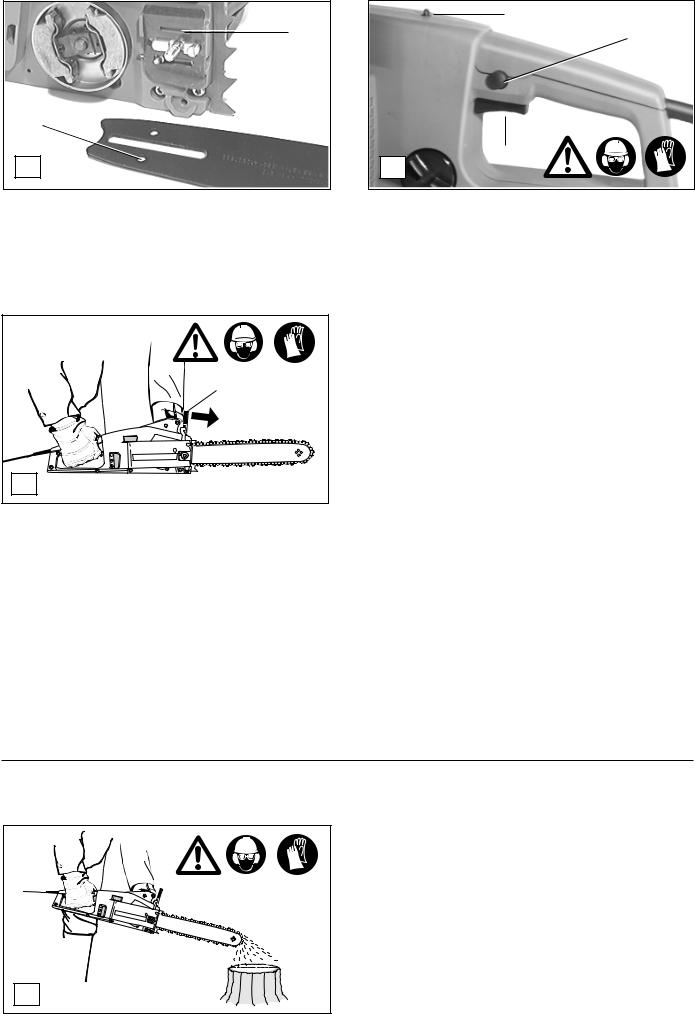
Checking the chain lubrication
D |
14 |
Never saw when a sufficient chain lubrication is not guaranteed. Otherwise the life of the sawing device will be reduced. Before starting work check the oil level in the tank and the oil feeding. Check the fed oil quantity by following the instructions below:
-Start the electric chain saw.
-Hold the running chain saw approx. 15 cm above a trunk or the ground (use an appropriate surface).
If the lubrication is sufficient, you will see a light oiltrace because oil will be centrifuged from the chain saw.
Pay attention to the direction the wind is blowing and avoid unnecessary exposure to the oil spray!
MAINTENANCE
Sharpening the saw chain
When working on the saw chain you must always pull out the power supply plug and wear protective gloves.
|
|
A |
The chain needs sharpening when:
-the sawdust from sawing humid wood looks like wood flour.
-the saw chain penetrates the wood only under great pressure.
-the cutting edge is visibly damaged.
-the sawing device is pulled to the left or the right during the sawing operation. The cause is an unequal sharpening of the saw chain.
Important: Sharpen frequently, but without removing too much metal!
Generally, 2-3 strokes of the file will be enough.
Have the chain resharpened in a service center when you have sharpened it yourself several times.
C |
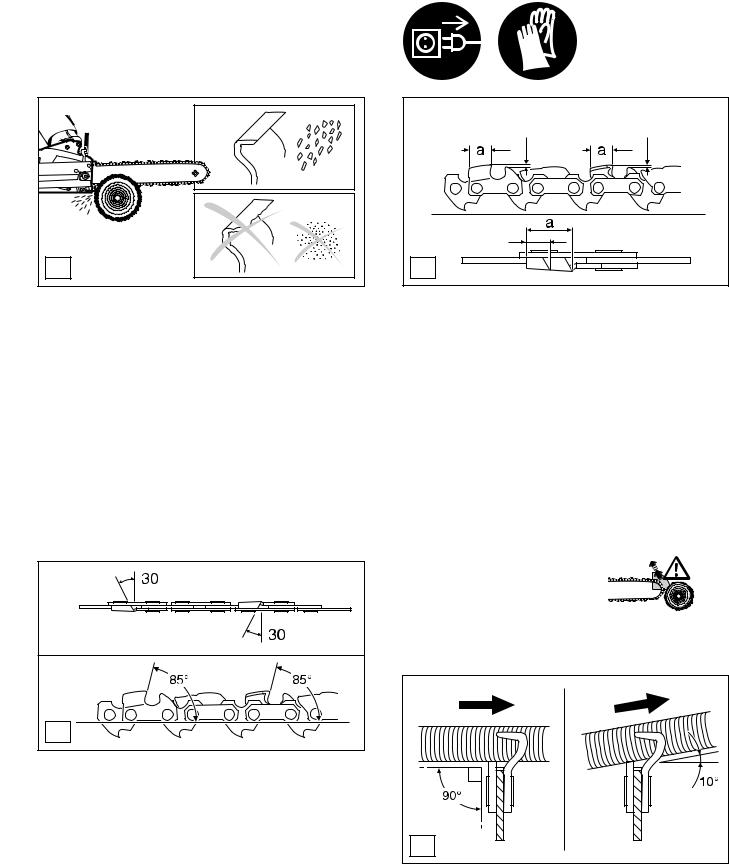
-All cutters must be sharpened to the same angle, 30°. Different angles result in a roughly, irregularly running chain, increase wear and tear and cause chain beakage.
-The 85° front rake of the cutter results from the cut depth of the round file. If the proper file is used in the right manner, the correct front rake will be obtained automatically.
0.65 mm |
0.65 mm |
(.025") |
(.025") |
min. |
|
3 mm (0.11” ) |
|
B |
|
Proper sharpening:
CAUTION:
Use only chains and guide bars designed for this saw
(see the Extract from the spare-parts list)!
-All cutters must be of the same length (dimension a). Cutters with different lengths result in rough running of the chain and can cause cracks in the chain.
-Minimum cutter length is 3 mm. Do not resharpen the chain when the minimum cutter length has been reached; at this point, the chain must be replaced (see the Extract from the spare-parts list and "Replacing the chain").
-The depth of the cut is determined by the difference in height between the depth limiter (round nose) and the cutting edge.
-The best results are obtained with a depth-limiter depth of 0.65 mm (.025").
CAUTION:
Excessive depth increases the risk of kickback!
Files and how to work with them
3/8” |
|
.325” |
D |
DES 300, 350, 400 |
DES 380 |
|
-Use a special round file for chains for sharpening the chain. 3/8” = dia. 4.0 mm, .325” = dia. 4.8 / 4.5 mm. File the first cutter half with a 4.8 mm dia. round file, the switch to a 4.5 mm dia. file. Normal round files are not appropriate for this work. See "Accessories" for the order number.
-The file should cut only when pushed forwards (arrow). Lift the file when leading it backwards.
-First sharpen the shortest cutter. The length of this cutter is then the standerd for all other cutters of the chain.
-Always guide the file as in fig. „D” shown (chain 3/8”= 900 and chain .325”=100).
15
4/5 |
30° |
E |
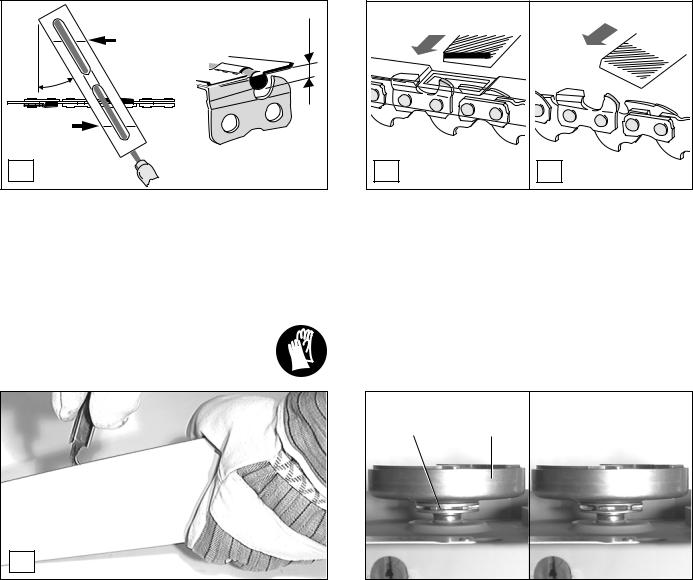
-The file holder makes file guidance easier. It is marked for the correct 30° sharpening angle (keep the marks parallel with the chain when filing, see illustration) and limits the cut depth to the correct 4/5 of the file diameter. See "Accessories" for the order number.
Cleaning the guide bar, lubricating the sprocket nose
CAUTION:
Protective gloves must be worn.
H
Regularly inspect the bearing surfaces of the guide bar for damage, and clean them with a suitable tool.
If the saw is used intensively it will be necessary to lubricate the return sprocket bearings regularly (once a week). To do this, first thoroughly clean the 2 mm hole at the tip of the guide bar, and then press in a small amount of multi-purpose grease.
Multi-purpose grease and grease guns are available as accessories.
Multi-purpose grease |
(order no. 944 360 000) |
Grease gun |
(order no. 944 350 000) |
F |
G |
-After having sharpened the chain, the height of the depth limiter must be checked by means of a chain gauge. See "Accessories" for the order number.
-Correct even the smallest excess height with a special flat file (F). See "Accessories" for the order number.
-Round off the front of the depth limiter (G).
Replacing the saw chain
CAUTION: Use only chains and guide bars designed for this saw (see the Extract from the spare-parts list)!
1 2
I |
|
J |
|
|
|
Check the sprocket (I/1) before mounting a new chain.
The sprocket is located underneath the clutch drum (I/2).
CAUTION:
Worn out sprockets (J) may damage the new chain and must therefore be replaced.
Do not attempt to replace the sprocket yourself. Sprocket replacement requires special training and tools and must be done at a MAKITA service centre.
Trouble shooting
|
Malfunction |
System |
Observation |
Cause |
|
|
|
|
|
|
chain saw does not work |
total |
electric motor does not |
no power supply, cable defective |
|
|
|
function |
|
|
|
chain brake |
chain does not start |
chain brake actuated |
|
insufficient performance |
carbon brushes |
low pulling power |
carbon brushes worn |
|
no chain lubrication |
oil tank, oil pump |
no oil on the saw chain |
oil tank empty, |
|
|
|
|
oil guide groove dirty |
|
|
|
|
oil-pump adjusting screw incorrectly adjusted |
|
Saw will not start |
overloadprotection |
saw very warm, electric |
overload protection actuated (DES 380 only) |
|
|
|
motor not running |
|
|
|
|
|
|
16 |
|
|
|
|

Instructions for periodic maintenance
To ensure long life, prevent damage and ensure the full functioning of the safety features the following maintenance must be performed regularly. Guarantee claims can be recognized only if this work is performed regularly and properly. Failure to perform the prescribed maintenance work can lead to accidents!
The user of the electric chain saw is not allowed to perform maintenance works which are not described in the instruction manual. All other works must be carried out by a MAKITA service centre.
Page
General work |
Electric chain saw |
Regularly clean the outside. |
|
|
Plastic case |
Check for cracks and ruptures. In case of damage have it |
|
|
|
immediately repaired at a service centre. |
|
|
Saw chain |
Resharpen regularly. |
|
|
|
Replace in time. |
|
|
Guide bar |
Turn over after a certain period of time so that the bearing |
|
|
|
surfaces are uniformly worn. |
|
|
|
Replace in time. |
|
|
Sprocket |
Have it replaced in time at a service centre. |
|
|
Chain brake |
Have it checked in time at a service centre. |
|
|
|
|
|
Each time before putting |
Saw chain |
Check for damage and sharpness. |
15 |
the saw into operation |
|
Check the chain tension. |
11 |
|
Guide bar |
Check for damage, and remove burrs if necessary. |
|
|
Chain lubrication |
Functional check. |
13-14 |
|
Chain brake |
Functional check. |
14 |
|
Power switch |
Functional check. |
14 |
|
Power supply cable |
In case of damage have it replaced at a service centre. |
|
|
Oil tank cap |
Check for tightness. |
|
|
|
|
|
After each shutdown |
Chain brake |
Clean the brake band (sawdust, oil). |
12 |
|
Guide bar |
Clean the oil inlet bore. |
14 |
|
Chain carrier |
Clean, especially the oil guide groove. |
14 |
|
|
|
|
Storage |
Chain oil tank |
Empty. |
13 |
|
Saw chain/guide bar |
Demount, clean and lubricate slightly. |
|
|
|
Clean the guide groove of the guide bar. |
|
|
Electric chain saw |
Store safely in a dry place. After a long storage time, have |
|
|
|
the electric chain saw checked at a service centre (resi- |
|
|
|
dual oil can become resinic and the valve of the oil pump |
|
|
|
clogged). |
|
|
|
|
|
Service, spare parts and guarantee
Maintenance and repair
The maintenance and repair work of modern electric motors as well as all safety related assemblies require qualified technical training and the availability of a special workshop equipped with special tools and testing devices.
We therefore recommend you to consult a MAKITA service centre for the performance of all work not described in this instruction manual.
The MAKITA service centres are provided with all the necessary equipment and skilled and experienced personnel to work out correct customer solutions and to advise you in all matters accordingly.
Please contact the general agent or importer indicated on the back cover of this Instruction Manual, who will gladly provide you with the address of your nearest MAKITA service centre.
Spare parts
A reliable and continuous operation as well as the safety of your chain saw is also subject to the quality of the spare parts used. Use original MAKITA spare parts only, marked: 
Only original spare parts and accessories guarantee the highest quality in material, dimensions, functioning and safety.
Original spare parts and accessories can be obtained from your local dealer. He will also have the relative spare part lists to determine the required spare part numbers, and will be constantly informed about the latest improvements and also about spare part innovations.
Please, take in mind that in the case that foreign spare parts are used instead of the original MAKITA spare parts this will automatically invalidate the MAKITA product guarantee.
17
 Loading...