


CS300
METAL DETECTOR WITH LCD METAALDETECTOR MET LCD-SCHERM DÉTECTEUR DE MÉTAUX À AFFICHEUR LCD DETECTOR DE METALES CON PANTALLA LCD METALLDETEKTOR MIT LCD-DISPLAY WYKRYWACZ METALI Z WYŚWIETLACZEM LCD
USER MANUAL
GEBRUIKERSHANDLEIDING
NOTICE D’EMPLOI
MANUAL DEL USUARIO
BEDIENUNGSANLEITUNG
INSTRUKCJA OBSŁUGI
CS300 |
2 |
VELLEMAN |
CS300 – METAL DETECTOR WITH LCD
1. Introduction
To all residents of the European Union
Important environmental information about this product
This symbol on the device or the package indicates that disposal of the device after its lifecycle could harm the environment.
Do not dispose of the unit (or batteries) as unsorted municipal waste; it should be taken to a specialized company for recycling.
This device should be returned to your distributor or to a local recycling service. Respect the local environmental rules.
If in doubt, contact your local waste disposal authorities.
Thank you for buying a Velleman product! With your CS300 metal detector, you can search for coins, relics, jewellery, gold and silver just about everywhere.
Please read the manual thoroughly before bringing this device into service. If the device was damaged in transit, don't install or use it and contact your dealer. Damage caused by disregard of certain guidelines in this manual is not covered by the warranty and the dealer will not accept responsibility for any ensuing defects or problems.
2. Main Features
Non-Motion Detection Mode: Only in ALL-METAL mode. In this setting, the metal detector will sound only when the target is located under the search coil – you will not need to sweep the detector.
Motion Detection Mode: Can be used in ALL-METAL, DISCRIMINATION, NOTCH and AUTO NOTCH modes. A
target cannot be detected unless you sweep the search coil.
 1
1
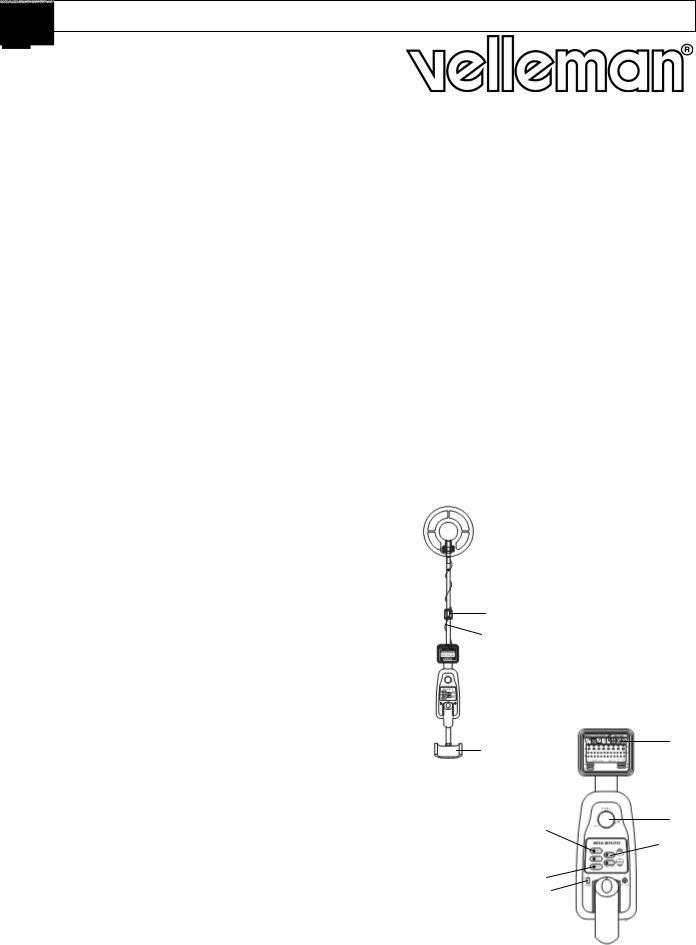
3. Description
a.The Metal Detector (fig. 1)
1.search coil
2.knob
3.locking nut
4.cable
5.armrest
6.nut
7.stem
6 
 2
2
7 
3 4
b. The Control Panel (fig. 2) |
5 |
1. target indicator |
2.LCD
3.GND BAL or ground balance
4.SURF ELIM or surface elimination – can be used in DISCRIMINATION, NOTCH and
|
AUTO NOTCH modes. Used to eliminate metallic particles in the surface. |
7 |
||
5. |
GND TRAC or Ground Trac® – can be used in ALL-METAL mode. |
|||
8 |
|
|||
|
Permits the unit to maintain optimum ground balance at all times. |
|
||
|
|
|||
6. |
VOL or volume |
9 |
||
7. |
MODE or mode selector |
10 |
||
|
|
|||
8.ADJ or adjustment button for sensitivity and discrimination range
9.ENT or enter – confirming or rejecting the target in NOTCH mode
10.POWER
1  2
2
3
4
 5
5  6
6
CS300 |
3 |
VELLEMAN |
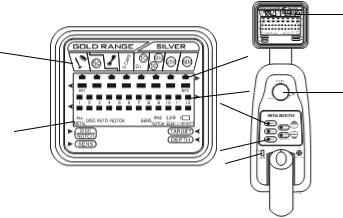
c. The LCD (fig. 3)
|
|
|
|
|
|
|
|
|
|
|
|
|
|
|
|
|
|
|
|
|
|
|
|
|
|
|
|
|
|
|
|
|
|
|
|
|
|
|
|
|
|
|
|
|
|
|
|
|
|
|
|
|
|
|
|
|
|
|
|
|
|
|
|
|
|
|
|
|
|
|
|
|
|
|
|
|
|
|
|
|
|
|
|
|
|
|
|
|
|
|
|
|
|
|
|
|
|
|
|
|
|
|
|
|
|
|
|
|
|
|
|
|
|
|
|
|
|
|
|
|
|
|
|
|
|
|
|
|
|
|
|
|
|
|
|
|
|
|
|
|
|
|
|
|
|
|
|
|
|
|
|
|
|
|
|
|
|
|
|
|
|
|
|
|
The target indicator consists of an LCD display and |
10 |
|
|
|
|
|||||||||
1. |
target icon |
1 |
|
|
|
|
|
|
|
|
|
|
|
|
2. |
DISC/NOTCH range |
|
|
|
|
|
|
|
|
|
|
|
|
|
3. |
operating mode |
2 |
|
|
|
|
|
|
|
|
||||
4. |
target indicator |
|
|
|
|
|
7 |
|
6 |
|
|
|||
5. |
depth indicator |
3 |
|
|
8 |
|
|
|
|
|
||||
6. |
sensitivity indicator |
|
|
|
|
|
|
|
||||||
|
|
|
|
|
|
|
9 |
|
|
|
|
|||
target icons. When the detector locates an object, an arrow appears below the target of the type of material that’s probably being detected. The depth of the target is also displayed.
1  2
2
3
 4
4
 5
5
 6 icon
-If the detector receives a strong signal, the arrow appears steadily. If the signal is weak, the arrow blinks or does not appear.
-The target icons are only visual references to help you decide whether or not an item is worth investigating.
GOLD RANGE
-Iron/foil ( ): indicates that the target is probably iron or foil. Some oxidized iron might actually register somewhere within the SILVER range.
-Nickel ( ): indicates that the target is probably a nickel object.
-Pull tab ( ): indicates that the target is probably a pull tab from an aluminium can. Some rough gold items might register within the pull tab category.
-S-CAPS ( ): indicates that the target is probably a type of metal like a bottle cap with whorl. Some small gold items might register within this category.
-Zinc/copper ( ): indicated that the target might be a zinc or copper object. Some larger gold items might register within the 1¢ category.
SILVER RANGE
-10¢/1¢ ( ): indicates that the target is probably an old 1¢, 10¢ or aluminium coin.
-25¢ ( ): indicates that the target is probably a 25¢ or a small silver coin. Some larger aluminium coins might register within this category.
-50¢ ( ): indicates that the target is probably a 50¢ coin. Some larger silver coins might register within this category.
3.Tones
If the detector is set to the ALL-METAL mode, it sounds a single tone when it detects any type of metal.
If you set the detector to the DISC or NOTCH modes, the built-in audio identification system sounds a unique audio tone for each of the three categories of metal. This makes it easier to identify the metal being detected.
-The detector sounds a low tone when it detects small gold objects, a nail, a bottle cap or nickel.
-The medium tone is for aluminium pull tabs, zinc or copper items. Depending on the alloys used to make them, about 15 percent of gold rings cause the detector to sound a medium tone.
-A high tone is for brass or silver items. Highly oxidized iron may generate a medium or high tone.
4.Preparation
a.Assembling your Metal Detector
Assembling your detector is easy and requires no special tools. Just follow these steps:
1.Remove the fixation system of the search coil (nut and bolt system). Insert the stem and align the holes on the search coil bracket and the stem. Push the bolt through the holes and tighten with the nut knob.
CAUTION: Do not tighten the search coil fixation too hard. Do not use tools such as pliers to tighten it.
2.Insert the arm support into the end of the stem and tighten the lock screw at the back of the control housing.
CS300 |
4 |
VELLEMAN |
3.Turn the stem’s lock nut clockwise until it loosens.
4.Adjust the stem length to have the search coil level with and about ½ to 2 inches above the ground when you stand upright with the detector in your hand, your arm relaxed at your side.
5.Turn the stem’s lock nut counter-clockwise to lock it in place.
6.Wind the search coil cable around the stem. Leave enough slack in the cable. Insert the search coil’s plug into the search coil jack on the detector’s control housing.
CAUTION: The search coil’s plug fits into the jack only one way. Do not force the plug or you could damage it.
7.Loosen the search coil fixation knob, adjust the search coil to the desired angle and tighten the nut knob. b. Installing the Batteries
1.Make sure the POWER switch is turned off.
2.At the back of the control housing, slide the battery covers off away from the middle.
3.Place a 9V battery in each battery compartment matching the polarity symbols (+ and -) marked inside.
4.Slide the battery covers back on.
About batteries
-Use only fresh alkaline batteries of required size & voltage (2 x 9V batteries, not incl.).
-Do not mix old and new batteries or different types of batteries.
-If you do not plan to use the device for a week or longer, remove the batteries. Batteries can leak chemicals that can destroy electronic parts.
-To extend battery life, switch the left and right battery after 3 ~ 4 hours of operation.
-Dispose of old batteries promptly and properly. Never bury or burn them.
5.Operation
a.Switching on your Detector
First turn the volume knob to 12 o’clock (halfway between MIN and MAX). Slide the power switch to ON. All symbols are displayed on the LCD screen. The detector sounds a low, a medium and a high tone respectively. After about 2 seconds, the detector automatically enters the stand-by mode. The LCD now displays SENS, DISC and their respective values before power-down.
b.Setting the Operating Mode
The detector has four operating modes: ALL-METAL, DISC, NOTCH and AUTO NOTCH. Select one of these modes by pressing the MODE button at the left of the control panel. The LCD will display the selected mode.
-ALL-METAL: used for detecting any type of metal. When hunting in this mode, it is important that the detector be ground balanced to offset the effects of minerals present in the soil, or to balance the effects of salt water when hunting on beaches. To do so, press GND TRAC several times to allow the detector to stabilize. Lower the search coil and slowly sweep the search coil at about one inch above the ground. When the unit passes over a metal object, the detector will display the depth of the object and emit a tone. The higher the tone, the closer you sweep over the object.
-DISC: used for target discrimination. Set the discrimination range by pressing ADJ. Increase or decrease the range with + or – respectively.
-NOTCH: used to ignore or to accept a specific type of metal. The LCD displays a row of bars below the icons. Press + or – to select an icon. You will see one of the arrows above the bar blink. Press ENT to notch the item pointed by the blinking arrow. At this time, the bar below the arrow will disappear and the detector will ignore the notched item. Press ENT again to reselect the item and to allow the detector to detect the item.
-AUTO NOTCH: used to automatically reject trash such as bottle caps, pull tabs or S-CAPS without loss of coins.
CS300 |
5 |
VELLEMAN |
REMARKS:
-In DISC, NOTCH and AUTO NOTCH modes, press ADJ to adjust the sensitivity (SENS). Press + to increase, press – to decrease.
-Set the sensitivity to a higher lever in order to detect deeply buried targets. Setting the sensitivity to the maximum level however, will make the detector prone to interference and false signals from aerials and other electric lines.
-Selection of undesired items as in the NOTCH mode is not available in the AUTO NOTCH mode.
-Ground balance and Ground Trac® are not available in DISC, NOTCH and AUTO NOTCH modes.
-Use the surface elimination function (SURF ELIM) in the DISC, NOTCH and AUTO NOTCH modes when hunting on soils containing lots of metallic trash in order to balance the signal of a relatively large object and to optimize the detection results. The surface elimination function allows the unit to discriminate deeply buried objects.
c.Testing and Using the Detector
To learn how the detector reacts to different metals, you should test it before you use it the first time. You can test the detector indoors and outdoors.
-INDOOR testing and use
NOTE: Never test the detector on a floor inside a building. Most buildings have metal of some kind in the floor, which might interfere with the objects you’re testing, or mask the signal completely.
1.Slide the POWER switch to ON.
2.Select the operating mode.
3.Place the detector on a wooden or plastic table, and remove any watches, rings or metal jewellery you are wearing.
4.Adjust the search coil so the flat part points towards the ceiling.
5.In DISC, NOTCH and AUTO NOTCH modes, slowly sweep a sample of the material you want the detector to find (such as a gold ring or a coin) 2 ~ 3 inches above the face of the search coil. When the detector detects any metal within the selected range, it sounds a tone and an arrow appears below the target icon. The LCD displays the depth of the target.
In ALL-METAL mode, hold a sample about one foot above the search coil and slowly sweep the search coil. When the detector detects the sample, it sounds a tone and the depth will be displayed.
NOTE: if you are using a coin, the detector will detect it more easily if you hold it so that a flat side is parallel with the flat side of the search coil. A sweep with the side of the coin over the search coil might cause false indication and unstable display of the arrow.
-OUTDOOR testing and use
1.Slide the POWER switch to ON.
2.Select the operating mode.
3.Find an area on the ground outside where there is no metal.
4.Place the material you want the detector to find (such as a gold ring or a coin) on the ground.
NOTE: If you are using a valuable metal sample such as gold to test the detector, mark the area where you placed the item, to help you retrieve it later. Do not place it in tall grass or weeds.
5.Hold the search coil level to the ground about 1 ~ 2 inches above the surface, slowly move the search coil over the area where you placed the sample, sweeping the search coil in a side-to-side motion.
6.If the detector detects the item, it sounds a tone, and an arrow and the depth appear on the display below the target icon.
7.If the detector does not detect the item, make sure that the target mode is set correctly for the type of metal you are searching for. Also make sure that you are moving the search coil correctly.
d.Search Coil Sweeping Hints
-Never sweep the search coil as if it were a pendulum. Raising the search coil while sweeping or at the end of a sweep will cause false readings.
CS300 |
6 |
VELLEMAN |
-Sweep slowly. Hurrying will cause you to miss targets.
-It’s better you sweep the search coil from side to side in a straight line and keep the search coil parallel with the ground.
-The detector responds with a signal when it detects most valuable metal objects. If a signal does not repeat after you’ve swept the search coil over the target a few times, the target is probably junk metal.
-False signals can be caused by trashy ground, electrical interference, or large irregular pieces of junk metal.
-False signals are usually broken or non-repeatable.
e.The Ground Balance
Ground balancing the detector is simply, the term used to describe the function of adjusting the metal detector to ignore the minerals in the soil so that they are not detected by the metal detector.
-Begin with setting the GND BAL knob to PRESET. Lift the search coil waist high. Press GND TRAC several times to stabilize the detector.
-Lower the search coil to about one inch above the ground. The detector is properly balanced when it does not emit any tones. Readjust the ground balance if necessary. To do so, lift the search coil and turn the GND BAL knob slightly to the left. Push GND TRAC several times and repeat the step above.
REMARKS:
-Ground balance the detector in an area exempt of any metal objects.
-Turn the GND BAL knob with small increments in order to achieve an optimum balance.
-Press GND TRAC after each ground balance adjustment.
f.Pinpointing a Target
Accurately pinpointing a target makes digging it up easier, but it takes practice. We suggest you practise finding sample on your own property before you start searching other locations.
Follow these steps to pinpoint a target:
1.When the detector detects a buried target, continue sweeping the search coil over the target in a narrowing side-to-side motion.
2.Make a visual note of the exact spot on the ground where the detector beeps.
3.Stop the search coil directly over this point on the ground. Then move the search coil straight forward away from you and straight back towards you a couple of times and make another visual note.
4.Repeat steps 1 to 3 at a right angle to the previous search line. Make an “X” mark on the ground. The target will be directly below the “X” at the point of the beep response.
g.Factors that Affect the Detecting
It is difficult to have an accurate detecting result. Sometimes the detecting may be restricted by some factors:
-the angle of the object buried in the soil;
-the depth of the target;
-the level of oxidization of the target;
-the size of the target;
-electro-magnetic and electrical interference surrounding the object.
Hunting patiently and correctly, and practising several times will get you satisfactory results.
h.Using Headphones
1.Make sure your headphones have a 3.5mm plug.
2.Set the VOL knob to zero.
3.Insert the headphones’ plug into the PHONE jack. The internal speaker will automatically disconnect.
4.Set the VOL knob to the desired setting. Do not listen at extremely high volume levels, as it may lead to partial or permanent hearing loss.
CS300 |
7 |
VELLEMAN |

6.Troubleshooting
∙The detector is emitting false signals.
The detector’s sensitivity may be set too high. Try cutting back the sensitivity slightly until the false signal disappears. Remember to sweep the detector slowly. Some false signals will occur on highly rusted metals, but if the signal does not appear over the same area while sweeping over it again, then the target is usually not worth further hunting.
∙The LCD readout is not locking or ID’ing while sweeping over the target. There is more than one tone being emitted over the same target.
This will usually occur with the presence of more than one object. Objects of a metal unknown to the detector will not be signalled. Sometimes, oxidation can also make the ID arrows and tones jump around. Try cutting back the sensitivity slightly if it is set at a high value.
∙Your detector is unstable and emits a pulsing, distorted tone instead of a clear tone.
The presence of interfering signals, such as power lines or another detector nearby, may disturb the frequencies of your metal detector.
7.Cleaning and Maintenance
Your CS300 metal detector is an example of superior design and craftsmanship. The following suggestions will help you take care of your metal detector so you can enjoy it for years.
-Handle the detector gently and carefully. Dropping it can damage circuit boards and cases and can cause the detector to work improperly.
-Use the detector only in normal temperature environments. Temperature extremes can shorten the life of electronic devices, or damage the detector’s exterior.
-Keep the detector away from dust and dirt, which can cause premature wear of parts.
-Wipe the detector with a damp cloth occasionally to keep it looking new. Do not use harsh chemicals, cleaning solvents or strong detergents to clean the detector.
Modifying or tampering with the detector’s internal parts may cause malfunctions. The search coil is waterproof and can be submerged in either fresh or salt water. However, do not let water enter the detector’s control housing. Rinse with fresh water after using the search coil in salt water to prevent corrosion of metal parts.
For more info concerning this product, please visit our website www.velleman.eu. The information in this manual is subject to change without prior notice.
CS300 – METAALDETECTOR MET LCD-SCHERM
1. Inleiding
Aan alle ingezetenen van de Europese Unie Belangrijke milieu-informatie betreffende dit product
Dit symbool op het toestel of de verpakking geeft aan dat, als het na zijn levenscyclus wordt weggeworpen, dit toestel schade kan toebrengen aan het milieu.
Gooi dit toestel (en eventuele batterijen) niet bij het gewone huishoudelijke afval; het moet bij een gespecialiseerd bedrijf terechtkomen voor recyclage.
U moet dit toestel naar uw verdeler of naar een lokaal recyclagepunt brengen.
Respecteer de plaatselijke milieuwetgeving.
Hebt u vragen, contacteer dan de plaatselijke autoriteiten inzake verwijdering.
CS300 |
8 |
VELLEMAN |
Dank u voor uw aankoop! Met de CS300 metaaldetector kunt u zowat overal op zoek naar muntstukken, juwelen, goud en zilver.
Lees deze handleiding grondig voor u het toestel in gebruik neemt. Werd het toestel beschadigd tijdens het transport, installeer het dan niet en raadpleeg uw dealer. De garantie geldt niet voor schade door het negeren van bepaalde richtlijnen in deze handleiding en uw dealer zal de verantwoordelijkheid afwijzen voor defecten of problemen die hier rechtstreeks verband mee houden.
2. Belangrijkste eigenschappen
Statische zoekmodus: Enkel in ALL-METAL-modus. In deze gebruiksmodus zoemt de metaaldetector enkel wanneer het voorwerp zich onder de zoekschotel bevindt – u hoeft de zoekschotel niet heen en weer te bewegen.
Dynamische zoekmodus: In ALL-METAL-, DISCRIMINATION-, NOTCHen AUTO NOTCH-modi. Een voorwerp wordt enkel opgespeurd wanneer u de zoekschotel heen en weer beweegt.
3.Omschrijving
a.De metaaldetector (zie fig. 1)
a.zoekschotel
b.knop
c.vergrendelmoer
d.kabel
e.armsteun
f.moer
g.steel
b.Het bedieningspaneel (zie fig. 2)
1. voorwerpidentificatie
2. lcd-scherm
3. GND BAL of bodembalans
4. SURF ELIM of correctie van het grondeffect – kan gebruikt worden in DISCRIMINATION-, NOTCHen AUTO NOTCH-modi. Nuttige functie om de signalen door metalen afvaldeeltjes te elimineren.
5. GND TRAC of Ground Trac® – kan gebruikt worden in ALL-METAL-modus en zorgt dat de metaaldetector te allen tijde een optimale bodembalans heeft.
6. VOL of volume
7. MODE of moduskiezer
8. ADJ of regeltoets voor de gevoeligheid en het discriminatiebereik
9. ENT of entertoets – bevestiging of verwerping van het voorwerp in NOTCH-modus 10.POWER
c.Het lcd-scherm (zie fig. 3)
1. voorwerpidentificatie
2. DISC/NOTCH-bereik
3. gebruiksmodus
4. voorwerpaanduiding
5. diepte-indicator
6. gevoeligheidsindicator
CS300 |
9 |
VELLEMAN |
De voorwerpidentificatie bestaat uit een lcd-scherm met icoontjes. Wanneer de detector een voorwerp heeft waargenomen, zal een pijl het (waarschijnlijke) materiaaltype van het voorwerp aanduiden. De diepte waar het voorwerp zich bevindt wordt eveneens van afgebeeld.
-De pijl is duidelijk zichtbaar wanneer het signaal sterk genoeg is. Bij een zwak signaal zal de pijl flitsen of helemaal niet afgebeeld worden.
-De icoontjes dienen enkel als referentie en helpen u te beslissen of opgespeurde voorwerp waardevol is.
GOUDBEREIK
-IJzer/bladmetaal ( ): betekent dat het voorwerp wellicht ijzer of bladmetaal is. Sommige verroeste ijzeren voorwerpen worden echter soms in het ZILVER-bereik aangeduid.
-Nikkel ( ): betekent dat het voorwerp wellicht een nikkel voorwerp is.
-Bliklipje ( ): betekent dat het voorwerp wellicht een lipje is van een aluminium blikje. Sommige ruwe gouden voorwerpen kunnen in dit bereik aangeduid worden.
-S-CAPS ( ): betekent dat het voorwerp wellicht een metalen voorwerp is in de aard van een schroefdop. Sommige kleine gouden voorwerpen worden soms in deze categorie aangeduid.
-Zink/koper ( ): betekent dat het voorwerp een zinken of koperen munt kan zijn. Sommige grotere gouden voorwerpen worden in deze categorie aangeduid.
ZILVERBEREIK
-10¢/1¢ ( ): betekent dat het voorwerp waarschijnlijk een aluminium muntstuk is.
-25¢ ( ): betekent dat het voorwerp waarschijnlijk een klein zilveren muntstuk is. Sommige grotere aluminium muntstukken worden soms in deze categorie aangeduid.
-50¢ ( ): betekent dat het voorwerp waarschijnlijk een 50¢-stuk is. Sommige grotere zilveren muntstukken worden soms in deze categorie aangeduid.
d.Tonen
In de ALL-METAL-modus geeft de detector een enkel geluidssignaal als hij gelijk welk metaal detecteert. Als u de detector in de DISCof NOTCH-modus zet, geeft het ingebouwde audio-identificatiesysteem een unieke toon voor elk van de 3 metaalcategorieën. Dit maakt het voor u gemakkelijker het metaaltype te bepalen.
-De detector produceert een lage toon bij een klein gouden voorwerp, een spijker, en kroonkurk of nikkel.
-De middentoon is voor aluminium lipjes, zink of koperen voorwerpen. Afhankelijk van hun legering veroorzaken ongeveer 15% van de gouden ringen een middentoon.
-Een hoge toon is voor messing of zilver. Erg verroest ijzer kan aanleiding geven tot een middenof hoge toon.
4.Voorbereiding
a.De metaaldetector monteren
U kunt uw detector gemakkelijk zelf in elkaar steken, zonder speciale werktuigen. Volg gewoon deze stappen: 1. Verwijder het bevestigingssysteem van de zoekschotel (bout en moer). Steek het uiteinde van de steel in
de steunbeugel op de zoekschotel zodat de gaten in elkaars verlengde liggen. Steek de bout door de gaten en span het bevestigingssysteem aan met de moerknop.
LET OP: Span het bevestigingssysteem niet te hard aan en gebruik ook geen tang of een ander werktuig. 2. Steek de armsteun in het uiteinde van de steel en span de schroef achteraan het bedieningspaneel aan. 3. Draai de borgmoer in wijzerzin tot de steel los komt te zitten.
4. Pas de lengte van de steel aan zodat de zoekschotel evenwijdig met, en op ongeveer 5cm van de grond komt te hangen als u het toestel vasthoudt met uw arm ontspannen langs uw lichaam.
5. Span de borgmoer terug aan door ze in wijzerzin te draaien.
6. Wind de kabel van de zoekschotel losjes rond de steel. Steek de stekker aan het uiteinde van de kabel in de daartoe voorziene contactbus aan de achterkant van het bedieningspaneel.
LET OP: De stekker past slechts op 1 manier in het contact. Forceer de stekker niet; zo beschadigt u hem.
7. Draai de bevestiging van de zoekschotel los, pas de helling van de zoekspoel aan en span de bevestiging weer aan.
CS300 |
10 |
VELLEMAN |
b.De batterijen plaatsen
1.Zorg ervoor dat het toestel uitgeschakeld is.
2.Haal, achteraan het bedieningspaneel, het dekseltje van het batterijvak (van het midden weg schuiven).
3.Plaats een 9V-batterij in het batterijvak.
4.Sluit het batterijvak.
Omtrent batterijen
-Gebruik enkel nieuwe alkalinebatterijen van het juiste formaat en de juiste spanning.
-Verwijder de batterij wanneer u het toestel niet gebruikt. Batterijen kunnen chemicaliën lekken, die de elektronica kunnen beschadigen.
-De detector is uitgerust met een extra batterijvak voor de reservebatterij. Om ze langer te laten meegaan, wisselt u de linkeren rechterbatterij best na elke 3 à 4 uur gebruik.
-Verleng de levensduur van de batterij door het toestel te gebruiken met een hoofdtelefoon. De hoofdtelefoon verbruikt minder stroom dan de ingebouwde luidspreker.
5.Bediening
a.De detector aanzetten
Zet eerst de volumeknop op 12 uur (half open). Zet de stroomschakelaar aan. Alle symbolen verschijnen op het lcd-scherm en de detector produceert respectievelijk een lage, een middenen een hoge toon. Na ongeveer 2 seconden schakelt de detector automatisch over naar stand-by. Op het lcd-scherm verschijnen SENS, DISC en hun respectievelijke waarden vóór het uitschakelen van de detector.
b.De gebruiksmodus bepalen
De detector heeft vier gebruiksmodi: ALL-METAL, DISC, NOTCH en AUTO NOTCH. U kunt de modus bepalen door op de MODE-knop links op het knoppenpaneel in te drukken. Het lcd-scherm zal de geselecteerde modus weergeven.
-ALL-METAL: voor alle metaaltypes. Het is belangrijk dat, wanneer u in deze modus zoekt, u de bodembalans van de detector instelt zodat het grondeffect, dat door de mineralen in de bodem wordt veroorzaakt, of het effect van het zoute water op de stranden, neutraliseert. Druk hiervoor meermaals op GND TRAC om de detector te stabiliseren. Laat de zoekschotel zakken en beweeg hem traag heen en weer op een hoogte van 2 à 3cm. De detector zoemt en identificeert het voorwerp wanneer deze een metalen object heeft opgespeurd. Hoe hoger de toon, des te dichter beweegt u de zoekschotel over het metalen voorwerp.
-DISC: om te discrimineren. Regel het bereik bij door op ADJ te drukken. Vermeerder of verminder het bereik met + respectievelijk –.
-NOTCH: wordt gebruikt om een bepaald type metaal te negeren of op te speuren. Het lcd-scherm geeft een onderaan de pijltjes een rij balkjes weer. Druk op + of – om een icoon te selecteren. U ziet nu een van de pijltjes boven de balkjes flitsen. Druk op ENT om de icoon door de pijl aangeduid te selecteren. Het balkje onder de pijl zal flitsen en de detector zal het geselecteerde voorwerp negeren en niet meer melden. Druk opnieuw op ENT om deze functie op te heffen.
-AUTO NOTCH: automatisch negeren van afval zoals schroefdoppen, bliklipjes of S-CAPS. Muntstukken worden wel nog opgespeurd.
OPMERKINGEN:
-In de DISC-, NOTCHen AUTO NOTCH-modi, druk op ADJ om de gevoeligheid (SENS) bij te stellen. Druk op + om te vermeerderen, druk op – om te verminderen.
-Verhoog de gevoeligheid wanneer u diep ingegraven voorwerpen wilt opspeuren. Stel de gevoeligheid echter niet op haar maximum; zo maakt u de detector vatbaar voor valse signalen van antennes en elektrische leidingen.
-Het negeren van bepaalde voorwerpen, zoals in de NOTCH-modus, is in de AUTO NOTCH-modus niet beschikbaar.
CS300 |
11 |
VELLEMAN |
-De grondbalans en de Ground Trac® zijn niet beschikbaar in de DISC-, NOTCHen AUTO NOTCH-modi.
-Gebruik de correctie van het grondeffect (SURF ELIM) in de DISC-, NOTCHen AUTO NOTCH-modi wanneer u opspeurt in bodems met veel metalen afval; zo balanceert u het signaal van een betrekkelijk groot voorwerp en optimaliseert u de resultaten. Door het grondeffect te corrigeren zult u diep ingegraven voorwerpen kunnen discrimineren.
c.De detector testen en gebruiken
Om te leren hoe de detector reageert op verschillende metaalsoorten, doet u er goed aan het toestel goed te testen voor u het de eerste keer gaat gebruiken. U kunt het toestel zowel binnen als buiten testen.
-BINNEN testen en gebruiken
OPMERKING: Test het toestel nooit op een vloer in een gebouw. Bij de meeste gebouwen zit er wel een of andere soort metaal in de vloer, waardoor de resultaten van de voorwerpen die u eigenlijk wilt testen, vervormd of zelfs helemaal verkeerd uitgelezen worden.
1.Zet de stroomschakelaar (POWER) op ON.
2.Selecteer de gebruiksmodus.
3.Plaats de detector op een houten of plastic tafel en leg alle ringen, horloges of andere metalen juwelen of voorwerpen die u op zich draagt even aan de kant.
4.Kantel de zoekschotel zodanig dat het vlakke zoekoppervlak naar boven gekeerd is.
5.Beweeg in de DISC-, NOTCHen AUTO NOTCH-modi het testmateriaal (bv. een gouden ring of een munt) langzaam een tiental centimeter boven de zoekschotel. Als de detector een metaal binnen het geselecteerde bereik bespeurt, zal hij zoemen en verschijnt er een pijl onder een icoon. De detector geeft ook weer hoe diep het voorwerp zich bevindt.
Houd in de ALL-METAL-modus het testmateriaal ongeveer 30cm boven de zoekschotel en beweeg de zoekschotel langzaam hen en weer. Als de detector het testmateriaal bespeurt, zal hij zoemen en de diepte weergeven.
OPMERKING: als u een muntstuk gebruikt, zal de detector het gemakkelijker bespeuren als u het zodanig houdt dat een vlakke zijde naar de zoekschotel is gekeerd. Als u het muntstuk met de smalle kant naar de zoekschotel houdt, kan dat aanleiding geven tot een fout resultaat of een onduidelijke detectie.
-BUITEN testen en gebruiken
1.Zet de stroomschakelaar (POWER) op ON.
2.Selecteer de gebruiksmodus.
3.Zoek een stuk grond waar geen metaal in zit.
4.Plaats het testmateriaal (bv. een gouden ring of een muntstuk) op de grond.
OPMERKING: Als u waardevol testmateriaal (goud) gebruikt, duid dan duidelijk aan waar u het gelegd hebt om het achteraf gemakkelijk terug te vinden. Let het in alle geval niet tussen hoog gras of onkruid.
5.Houd de zoekschotel evenwijdig met en ongeveer 5cm boven de grond. Beweeg de zoekschotel langzaam zijwaarts over het gebied waar u het testmateriaal gelegd hebt.
6.Als de detector het voorwerp detecteert, zal hij zoemen en zal er op het lcd-scherm een pijl verschijnen onder de toepasselijke icoon. De diepte wordt eveneens aangegeven.
7.Als de detector het voorwerp niet detecteert, controleer dan of de gebruiken regelingsmodes correct zijn ingesteld voor het type metaal dat u wilt zoeken. Zorg er ook voor dat u de zoekschotel correct beweegt.
d.Efficiënt zoeken
-Beweeg de zoekschotel niet zoals een pendel. De zoekschotel hoger heffen tijdens of op het einde van een zwaai, kan aanleiding geven tot foute resultaten.
-Beweeg de detector langzaam. Door te vlug te bewegen kunt u voorwerpen missen.
-De ideale beweging met de zoekschotel is zijwaarts en in een rechte lijn, waarbij u de zoekschotel steeds op eenzelfde afstand van de bodem houdt.
CS300 |
12 |
VELLEMAN |
 Loading...