


Arcadis Avantic
Table of contents
 Loading...
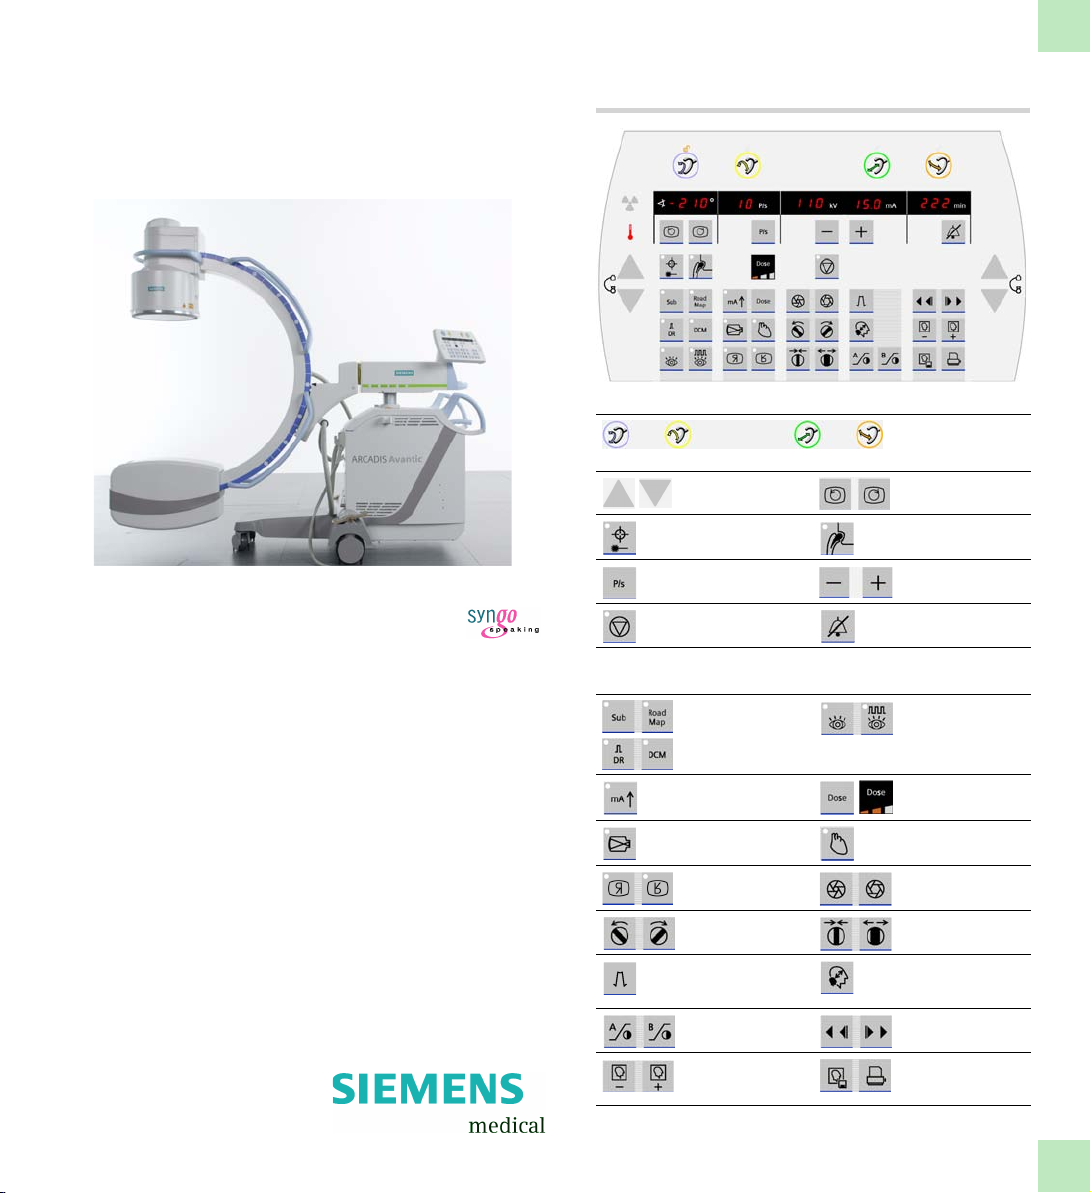
ARCADIS Avantic
C-arm control panel
upper/lateral keys
Brakes for C-Bogen
orbital, angular, horizontal longitudinal, horizontal swivel
Lift/lower
C-arm
Switch laser light
localizer on/off
Set pulse rate Reduce/enlarge kV/
Control stop
(ADR stop)
movement
Rotate imag e
Switch me tal
function on/off
mA
Switch off acousticwarning signal
VB 13C
Quick Guide
lower keypads
- Subtraction
-Roadmap
- Digital radiography
- Digital Cine Mode
Switch Power
Mode on/off
Set zoom factor for
live image
Image reversal
horizontal, vertical
Rotate slot
diaphragm
Set degree of edge
enhancement
Contrast adjustment
for left/right monitor
Read image from
memory forw.,
backw.
- Continuous
fluoroscopy
-Pulsed
fluoroscopy
Select dose level
(with display)
Selecting the noise
reduction factor
Open, close
iris diaphragm
Open, close
slot diaphragm
Enlarge/reduce
saved images (zoom
in/out)
Digital Cine Mode
review (DCM)
Save, print image
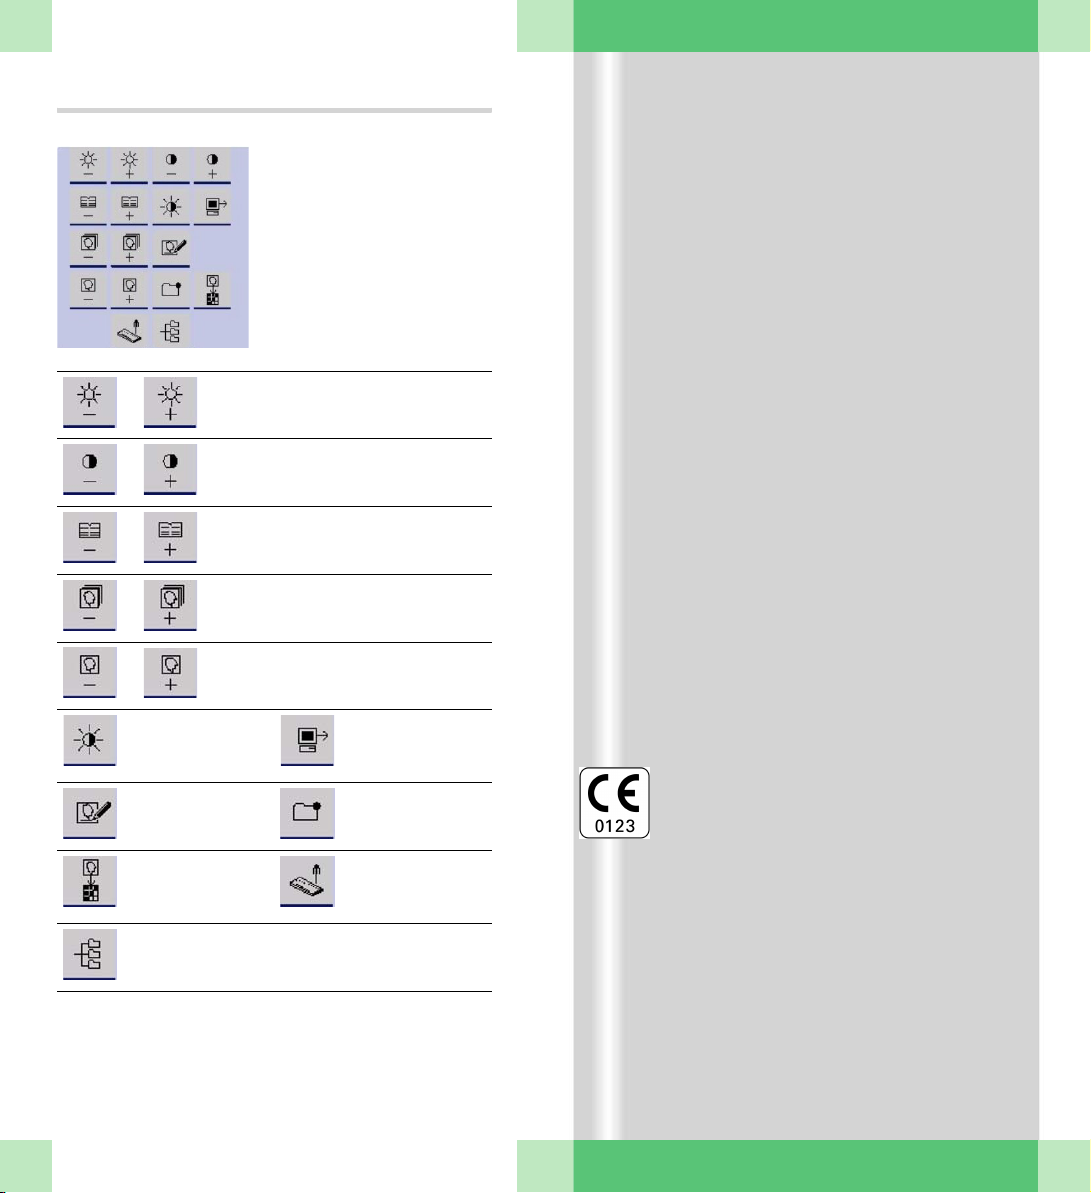
Monitor trolley symbol keypad
Brightness –/+
Contrast –/+
Scroll to previous/next study
Scroll to previous/next series
Scroll to previous/next image
Switch between
negative and positive
image
Enter a study
comment
Copy to film sheet Call up Patient
Select Patient
Browser
Send to network
node 1
Mark image
Registration
This product is provided with a CE marking in
accordance with the regulations stated in
Directive 93/42/EEC of June 14th, 1993 concerning medical devices.
The CE marking applies only to medical
devices which have been put on the market
according to the above-mentioned EC Directive.
The original language of this document is German.
This Quick Guide is available in German,
English, French, Italian and Spanish.
ARCADIS Avantic Quick Guide

Introduction
We welcome you as a user of the powerful
ARCADIS Avantic C-arm system from Siemens.
This clearly laid out Quick Guide is intended
to guide you through the operation of the system.
The Quick Guide is valid only in conjunction
with the Operator Manuals and the safety
information they contain:
❏ Please observe the Operator Manual
and all supplements/addenda
❏ Please observe all safety information
The right-hand pages contain step-by-step
instructions corresponding to the typical
workflow in the OR.
The pages to the left contain illustrations and
and supplemental notes.
The description focuses on easy and fast
operation of the ARCADIS Avantic from startup through to shutdown of the system
including optional functions such as connection to a hospital network or subtraction.
More detailed and complete descriptions can
be found in the ARCADIS Avantic Operator
Manual.
ARCADIS Avantic Quick Guide
3

Ta b l e o f Conten t s
Principles
Input devices........................................ 7
syngo user interface............................. 9
syngo control elements ...................... 11
Product overview
C-arm system..................................... 13
Monitor trolley.................................... 19
Examination procedure
Preparing the system ......................... 21
Patient registration ............................. 23
Preparation in the Examination
task card ............................................ 25
Radiation release and dose display .... 27
Power mode....................................... 31
Image rotation and reversal................ 33
Collimator setting ............................... 35
Image Quality ..................................... 37
Changing the contrast ........................ 39
Saving images .................................... 41
Fluoro Loop/LSH (option) ................... 43
Ending the examination ..................... 43
ARCADIS Avantic Quick Guide
4
Subtraction and Roadmap
Performing a subtraction scene ......... 45
Postprocessing a subtraction scene .. 47
Roadmap............................................ 55
Postprocessing
Loading patient images
into the Viewing task card .................. 57
Image display ..................................... 59
Measuring and annotations................ 61
Image manipulation............................ 65

Documentation
Printing ............................................... 69
Burning CDs ....................................... 79
Reports
Generating reports ............................. 81
Opening and printing reports ............. 83
Connectivity
Send/Storage Commitment ............... 87
Get Worklist ....................................... 91
MPPS – Modality Performed
Procedure Step .................................. 93
Query/Retrieve ................................... 95
Dismantling
Transport position .............................. 97
Switching off ...................................... 97
ARCADIS Avantic Quick Guide
5
Principles
This chapter is addressed to
ners and users with little computer experience.
(1) (2) (3)
(4)
syngo
begin-
ARCADIS Avantic Quick Guide
6
(5)
Functions of the symbol keypad see foldout cover.
(6)
(7)

Principles
This chapter provides you with basic information on the input devices of the computer at
the monitor trolley and on the
interface.
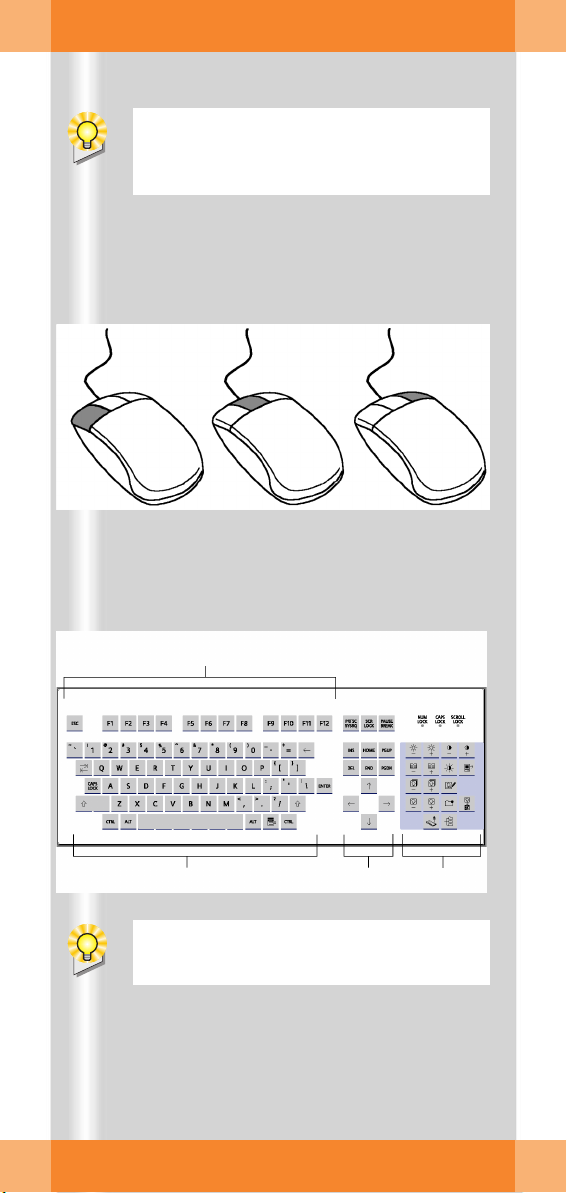
Input devices
The mouse
(1) Left button
Single click: select/mark
Double click: load data/program
Button kept pressed: drag/move
(2) Middle button
Button kept pressed: windowing (change
brightness and contrast)
(3) Right button
Single click: call up popup menu (contextsensitive)
syngo
user
The keyboard
(4) Function keys
F1 =
syngo
Online Help
(5) Alphanumeric keypad
Text input, e.g. patient data
(6) Cursor keypad
Movement of the mouse pointer in texts
(7) Symbol keypad
Direct selection of important
tions (e.g. calling up Patient Registration
or local database; image postprocessing
functions)
syngo
func-
ARCADIS Avantic Quick Guide
7
Principles
After the ARCADIS Avantic system has
been switched on, the
automatically appears on the monitor trolley screens.
(1)
(2)
(3)
(4)
syngo
user interface
(7)
(8)
(9)
ARCADIS Avantic Quick Guide
8
(5) (6)

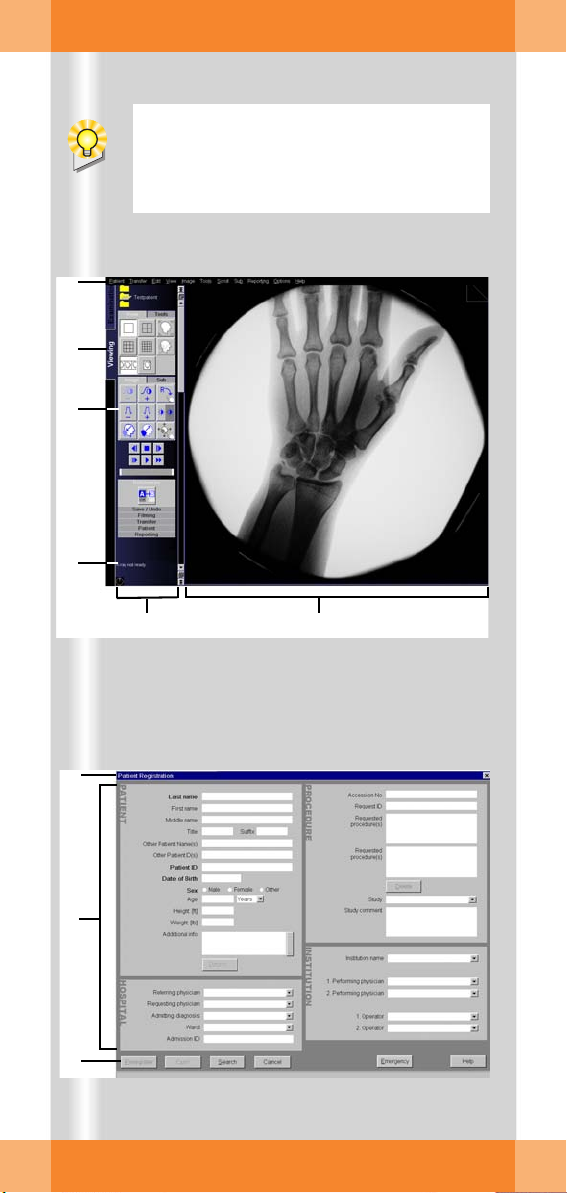
Principles
syngo user interface
syngo
consists of several stacked task cards.
These are assigned to the individual steps of
the workflow.
Task cards
(1) Menu bar
Calling up of main menus and submenus
(2) Tabs
Selection/switching of task cards
(3) Stack of subtask cards
Selection of processing tools and display
functions
Switching of subtask card via tab
(4) Status bar
Display of system messages
(5) Control area
Display of image and examination parameters, selection of functions (via subtask
cards)
(6) Image area
Display and processing of images
Windows/Dialogs
Windows are called up separately or displayed automatically.
Windows can be closed again after processing.
(7) Title bar
Name of window, "Close window" button
(8) Window content
Input and selection of data
(9) Softkeys/buttons
Confirmation or cancellation of actions
and messages
ARCADIS Avantic Quick Guide
9
Principles
(1) (2)
(3) (5)(4)
ARCADIS Avantic Quick Guide
10
(6) (7)
(8) (10)(9)

Principles
syngo control elements
Control elements on the screen are easiest
selected with the mouse.
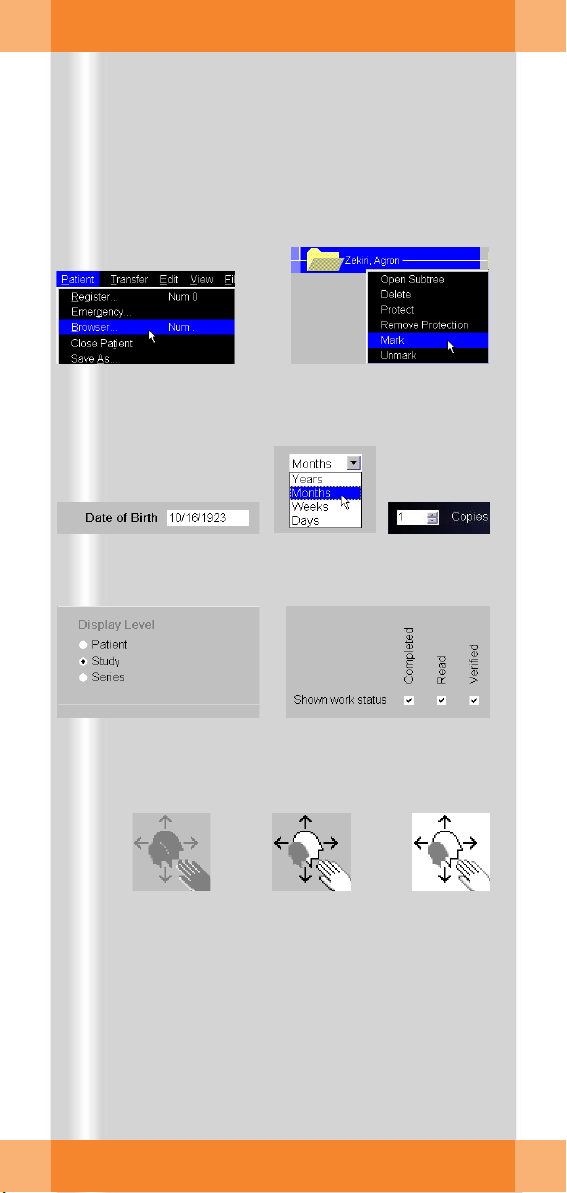
Menus
(1) Main menu
Opens by pressing left mouse button
(2) Popup menu
Opens by pressing right mouse button
The content depends on the mouse position ("mouse focus") on the screen
Input elements
(3) Text input field
(4) Selection list
Selection of preset parameters and data;
opens via arrow
(5) Spin box
Setting of values with arrow keys
(6) Radio buttons
Only one option selectable
(7) Check box
Several options selectable
Icon buttons
(8) Dimmed
Function not selectable
(9) Inactive
Function selectable, but not active
(10)Active
Function activated
ARCADIS Avantic Quick Guide
11

Product overview
(1)
(2)
(3)
(4)
(5)
(6)
(7)
As soon as you press the emergency stop
button, motorized up and down movement
of the C-arm system is disabled.
(4)
ARCADIS Avantic Quick Guide
12
(8)

Product overview
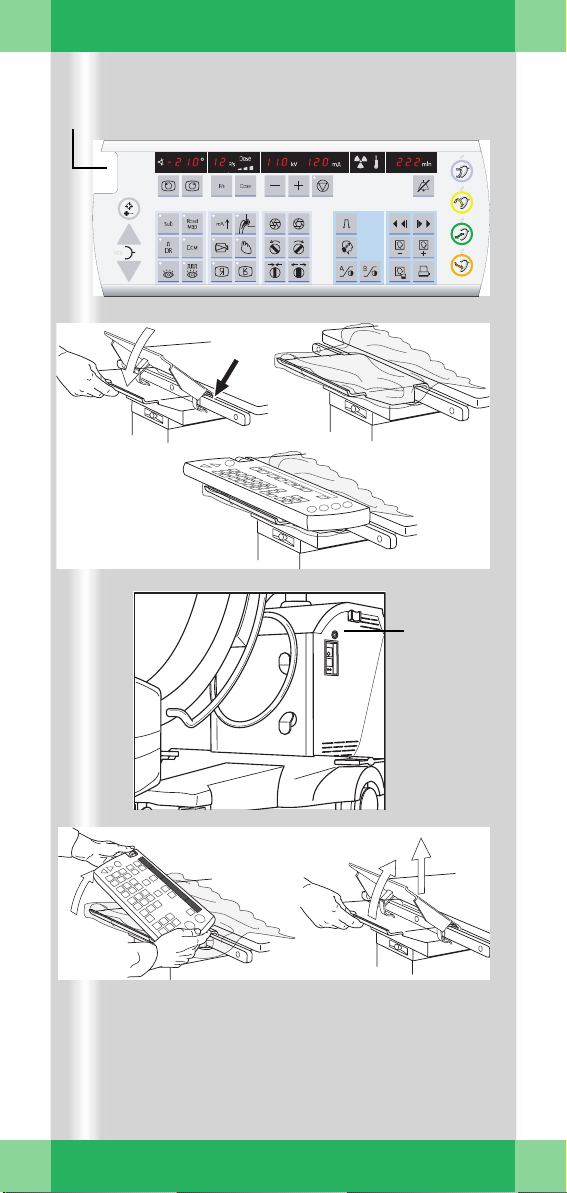
C-arm system
C-Arm
(1) Hand switch
(2) Emergency stop
(3) Control panel
(4) Steering lever
(5) Holder for footswitch
(6) Image intensifier
(7) X-ray tube
Steering
(4) Steering lever
❏ Steering lever straight:
Move C-arm system straight ahead
❏ Steering lever set to the left or right:
Move C-arm system in transverse direction e.g. parallel to the table
Brakes
(8) Electromagnetic brakes on the control
panel and optional remote control unit
❏ Brake for the desired direction of move-
ment released (display of open lock):
Move C-arm system
ARCADIS Avantic Quick Guide
13
Product overview
(1)(2)
(3a) (3b)
(3c)
ARCADIS Avantic Quick Guide
14
(4)
ARCADIS
Avantic
(5b)(5a)

Product overview
Remote control unit (option)
The remote control unit is used in the same
way as the control panel on the C-arm system.
(1) Displays and buttons of the remote con-
trol unit
(2) Integrated EMERGENCY STOP button
(3) Installation on the patient table
(a) Fit the adapter plate diagonally on the
table railing and fold it down (engages)
(b) Pull the sterile patient drapes over the
adapter plate
(c) If necessary, put the remote control
unit in the sterile cover provided and
mount it (attaches magnetically)
(4) Connection on the C-arm system (above
monitor trolley connector)
(5) Removal from the patient table
(a) Remove the remote control unit by
slightly tilting it to the side
(b) Fold the adapter plate up again and pull
it off.
➭ Storage on the side of the monitor trolley:
Attach the remote control unit magnetically. Fit the adapter plate diagonally in the
railing holder and fold it all the way down.
ARCADIS Avantic Quick Guide
15
Product overview
(1)
(2)
190° 190°
(3)
² ²
20 cm
ARCADIS Avantic Quick Guide
16
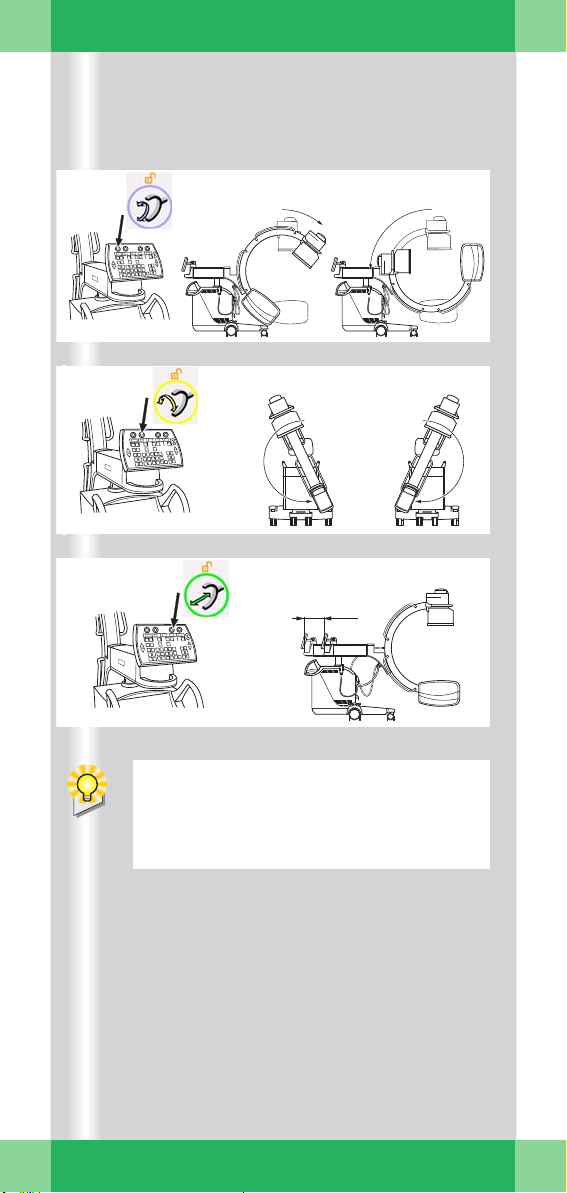
When moving the support arm from the
outer area (12 – 0) into the collision area
(0 – 8), you will have to override a slight
resistance at the 0 position (safety stop).

Product overview
Moving the C-arm system
Release the brakes to perform the following
movements.
(1) Orbital movement
Change between a.p. and lateral position
➭ Starting from the basic position (0°), the
C-arm swivels up to +90° or up to –42°
(132° in total).
(2) Angulation
Rotate C-arm about support arm in vertical plane
by up to 190° in both directions.
(3) Horizontal travel
Move C-arm horizontally
up to 20 cm
➭ Ideal for fine adjustments directly at the
OR-table.
ARCADIS Avantic Quick Guide
17

Product overview
(1)
(2)
10 ° 10 °
38 cm
(3)
ARCADIS Avantic Quick Guide
18
(4)
(5)
(6)
(7)
(8)
Description of keyboard see Basics chapter.

Product overview
(1) Swivel
Swivel C-arm about unit column in horizontal plane
by up to 10° in each direction
(2) Vertical travel (motorized)
Lift and lower C-arm
up to 38 cm
➭ Ideal for fine adjustments directly at the
OR-table.
Monitor trolley
(3) TFT flat screen monitors
(4) Keyboard
(5) Power on/off switch
(6) CD drive
(7) Direction locks on the back wheels
(8) Brakes on the front wheels
ARCADIS Avantic Quick Guide
19
Examination procedure
ARCADIS
Avantic
If an additional access control mechanism
is configured for the system, you have to
log in with your name and password.
(1) (2)
(3)
(4)
ARCADIS Avantic Quick Guide
20
(5)

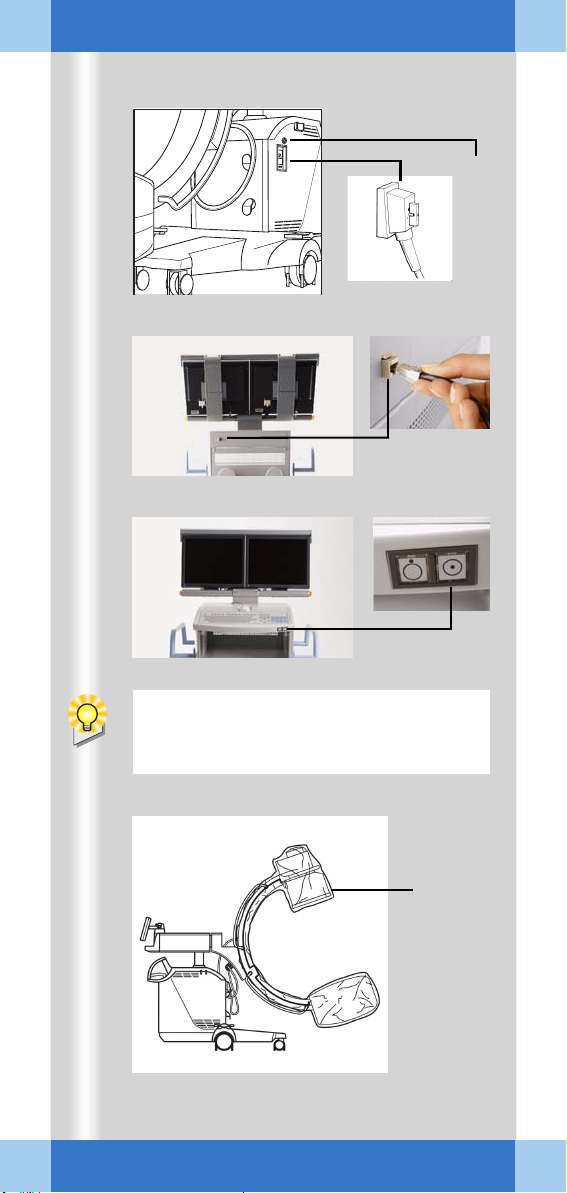
Examination procedure
Preparing the system
Connecting, switching on and booting
✧ Connect the monitor trolley connecting
cable to the C-arm system (1).
✧ If necessary, plug in the cable of the
remote control unit (2).
✧ If available, connect the network cable (if
the system is connected to an information
system or network printer) (2).
✧ Plug the power plug into the power outlet.
✧ Switch on the C-arm system at the moni-
tor trolley (3).
➭ The system boots.
Covering the C-arm with sterile covers
✧ If necessary, cover the C-arm, e.g. with
the three-part sterile cover (4).
ARCADIS Avantic Quick Guide
21
Examination procedure
During operation, the window
can be opened by pressing the
Patient Registration icon button
on the monitor trolley.
(1)
ARCADIS Avantic Quick Guide
22
(2)
(3)

Examination procedure
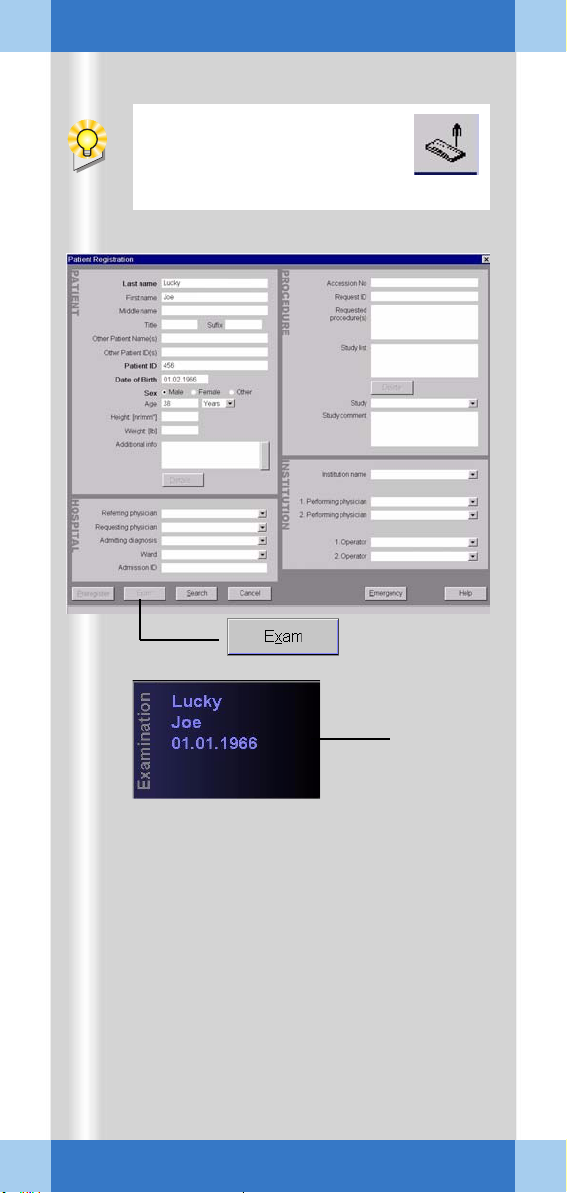
Patient registration
First, the Patient Registration window (1)
appears directly.
Here
: maximal configuration)
(
✧ Enter the patient data into this mask (1).
At a minimum, the bold fields must be filled
out.
✧ Using the mouse, click on the Exam (2)
button.
➭ The patient data appear in the Examina-
tion task card (3).
➭ The unit is now ready to start an examina-
tion.
Alternatives
❏ Preregistration/Scheduler
The patient has already been registered in the
Scheduler, from where it can be loaded into
the Patient Registration card.
❏ Emergency
If the patient data are unknown, the patient is
assigned a provisional number consisting of
the date and the time of the entry. These data
can later be corrected.
❏ Search
If an information network (e.g. hospital network) is connected, you can start a search for
registered patients here.
ARCADIS Avantic Quick Guide
23
Examination procedure
To select parameters, use the mouse to
click the monitor trolley.
(1)
(2)
(3)
(5)
(6)
(4)
(7)
(8)
ARCADIS Avantic Quick Guide
24
If the optional laser light localizer is available, the object should be positioned with
the laser light localizer, i.e. without radiation, as far as possible for reasons of radiation protection.
(9)

Examination procedure
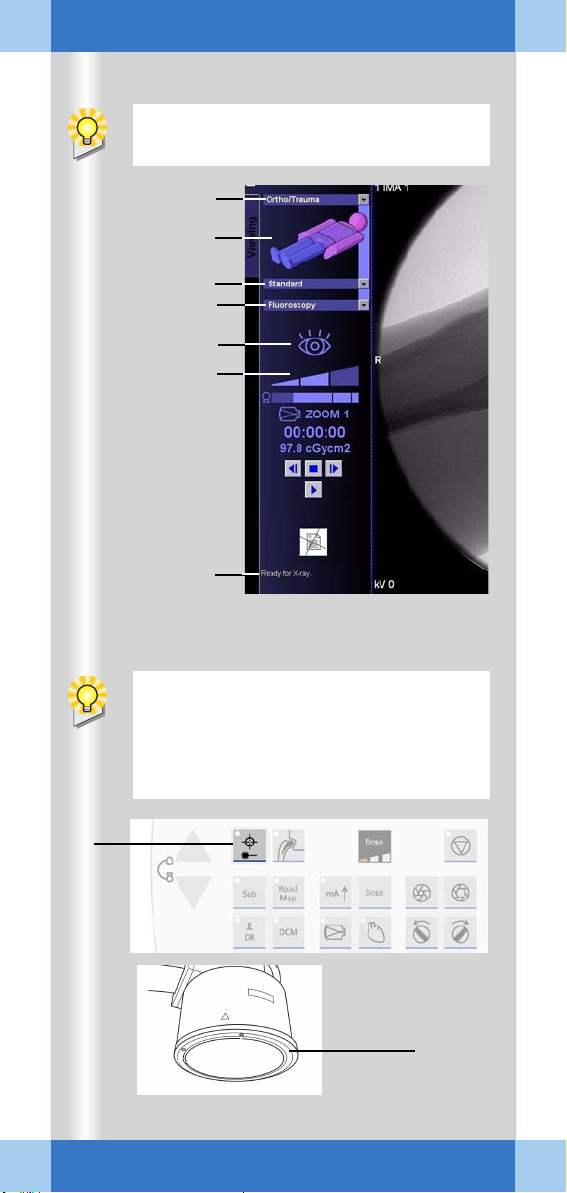
Preparation in the Examination task card
✧ Select the medical application area (1).
✧ Select the body region by clicking the VPA
(Virtual Patient Anatomy) (2).
✧ Select the required application program
(3).
➭ With the application program you simulta-
neously select a dose level (reduced,
standard, increased). This is shown by a
bar (4).
✧ Select the desired operating mode (5).
Alternative
mode on the C-arm keyboard (see cover)
or using the optional multifunctional footswitch (
➭ The selected operating mode is shown as
a symbol (6).
➭ The readiness of the C-arm is shown in
the status bar (7).
: Select/switch operating
→ Page 27).
Setting with the laser light localizer
✧ Press the button on the C-arm system (8).
➭ Depending on your system version, either
the I.I. laser aimer (9) (option) and/or the
single-tank laser targeting device (option)
is switched on.
ARCADIS Avantic Quick Guide
25

Examination procedure
SIEMENS
S
EN
SIEM
(1) (2)
If required, the footswitch assignment can
be changed by Siemens Service.
Exception: If continuous fluoroscopy is set,
pressing the footswitch releases a single
exposure.
SIEMENS
ARCADIS Avantic Quick Guide
(6)
MODE
(3)
(4) (5)
Exception: If continuous fluoroscopy is set,
pressing the footswitch releases a single
exposure.
(7)
26

Examination procedure
Radiation release and dose display
Radiation release with the footswitch
✧ Actuate the footswitch marked with the
fluoroscopy symbol (1).
➭ Continuous fluoroscopy is released.
✧ Actuate the other footswitch (2).
➭ The set operating mode is activated.
Radiation release with the multifunctional footswitch (option)
✧ To change the operating mode set, press
the operating mode button (3) several
times.
✧ Actuate the footswitch marked with the
fluoroscopy symbol (4).
➭ Continuous fluoroscopy is released.
✧ Actuate the other footswitch (5).
➭ The set operating mode is activated.
➭ Storage of the images displayed with the
save button (6).
Radiation release with the hand switch
✧ Press the release button to release the
set operating mode (7).
ARCADIS Avantic Quick Guide
27
Examination procedure
(1)
(2)
(3)
(4)
ADR stop is recommended, for example,
for
❏ Thin objects, e.g. wrist (the movement
causes the object to slide out of the
central beam, the image is underexposed)
❏ Metal (high density of the metal leads
to strong overexposure)
❏ Transition between thoracic and lumbar
spine (movement of the diaphragm/
midriff causes changes in the exposure).
ARCADIS Avantic Quick Guide
28
(7)
(6)
(5)

Examination procedure
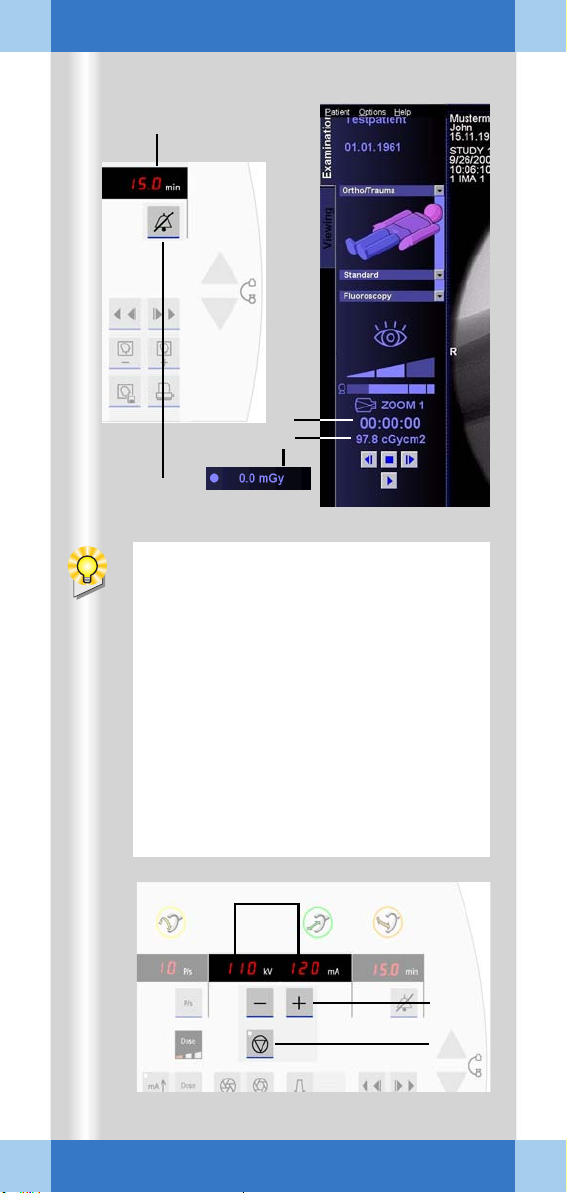
Radiation time and dose display
(1) Display of accumulated fluoroscopic time
at the C-arm system
(2) Display of accumulated fluoroscopic time
at the monitor trolley (Examination task
card)
(3) Display of accumulated dose at the moni-
tor trolley (with optional dose measuring
chamber)
Alternative
(preceding item: accumulated air kerma).
➭ After every five minutes of radiation, an
audible alarm sounds at the C-arm system.
✧ To deactivate the warning signal, press
the button (4) on the C-arm system.
Manual entry of radiation parameters
All exposures are taken with automatic exposure control.
This rule is turned off using ADR stop. The
kV/mA values can then be selected manually.
: Display of air kerma values
✧ Select ADR stop at (5).
✧ If required, set a manual value with the +/
- buttons (6).
➭ kV and mA values are shown on the dis-
play at the C-arm system (7).
➭ As long as ADR stop is activated, the
manually set value remains unchanged.
ARCADIS Avantic Quick Guide
29

Examination procedure
In the DCM mode the Power Mode function is automatically selected.
(1)
ARCADIS Avantic Quick Guide
30
Loading...