


 Loading...
s
Java User’s Guide
Siemens Cellular Engines
Version: |
12 |
DocId: |
wm_java_usersguide_v12 |
Products: |
TC65, AC65, AC75, XT65, XT75 |
User’s Guide

Java User’s Guide |
s |
|
|
|
|
Document Name: |
Java User’s Guide |
|
|
Version: |
12 |
Date: |
2008-02-25 |
DocId: |
wm_java_usersguide_v12 |
Status |
Confidential / Released |
Supported Products: |
TC65, AC65, AC75, XT65, XT75 |
|
|
GENERAL NOTES - EXCLUSION OF LIABILITY
PRODUCT IS DEEMED ACCEPTED BY RECIPIENT AND IS PROVIDED WITHOUT INTERFACE TO RECIPIENT'S PRODUCTS. THE DOCUMENTATION AND/OR PRODUCT ARE PROVIDED FOR TESTING, EVALUATION, INTEGRATION AND INFORMATION PURPOSES. THE DOCUMENTATION AND/OR PRODUCT ARE PROVIDED ON AN "AS IS" BASIS ONLY AND MAY CONTAIN DEFICIENCIES OR INADEQUACIES. THE DOCUMENTATION AND/OR PRODUCT ARE PROVIDED WITHOUT WARRANTY OF ANY KIND, EXPRESS OR IMPLIED. TO THE MAXIMUM EXTENT PERMITTED BY APPLICABLE LAW, SIEMENS FURTHER DISCLAIMS ALL WARRANTIES, INCLUDING WITHOUT LIMITATION ANY IMPLIED WARRANTIES OF MERCHANTABILITY, COMPLETENESS, FITNESS FOR A PARTICULAR PURPOSE AND NON-INFRINGEMENT OF THIRD-PARTY RIGHTS. THE ENTIRE RISK ARISING OUT OF THE USE OR PERFORMANCE OF THE PRODUCT AND DOCUMENTATION REMAINS WITH RECIPIENT. THIS PRODUCT IS NOT INTENDED FOR USE IN LIFE SUPPORT APPLIANCES, DEVICES OR SYSTEMS WHERE A MALFUNCTION OF THE PRODUCT CAN REASONABLY BE EXPECTED TO RESULT IN PERSONAL INJURY. APPLICATIONS INCORPORATING THE DESCRIBED PRODUCT MUST BE DESIGNED TO BE IN ACCORDANCE WITH THE TECHNICAL SPECIFICATIONS PROVIDED IN THESE GUIDELINES. FAILURE TO COMPLY WITH ANY OF THE REQUIRED PROCEDURES CAN RESULT IN MALFUNCTIONS OR SERIOUS DISCREPANCIES IN RESULTS. FURTHERMORE, ALL SAFETY INSTRUCTIONS REGARDING THE USE OF MOBILE TECHNICAL SYSTEMS, INCLUDING GSM PRODUCTS, WHICH ALSO APPLY TO CELLULAR PHONES MUST BE FOLLOWED. SIEMENS OR ITS SUPPLIERS SHALL, REGARDLESS OF ANY LEGAL THEORY UPON WHICH THE CLAIM IS BASED, NOT BE LIABLE FOR ANY CONSEQUENTIAL, INCIDENTAL, DIRECT, INDIRECT, PUNITIVE OR OTHER DAMAGES WHATSOEVER (INCLUDING, WITHOUT LIMITATION, DAMAGES FOR LOSS OF BUSINESS PROFITS, BUSINESS INTERRUPTION, LOSS OF BUSINESS INFORMATION OR DATA, OR OTHER PECUNIARY LOSS) ARISING OUT THE USE OF OR INABILITY TO USE THE DOCUMENTATION AND/OR PRODUCT, EVEN IF SIEMENS HAS BEEN ADVISED OF THE POSSIBILITY OF SUCH DAMAGES. THE FOREGOING LIMITATIONS OF LIABILITY SHALL NOT APPLY IN CASE OF MANDATORY LIABILITY, E.G. UNDER THE GERMAN PRODUCT LIABILITY ACT, IN CASE OF INTENT, GROSS NEGLIGENCE, INJURY OF LIFE, BODY OR HEALTH, OR BREACH OF A CONDITION WHICH GOES TO THE ROOT OF THE CONTRACT. HOWEVER, CLAIMS FOR DAMAGES ARISING FROM A BREACH OF A CONDITION, WHICH GOES TO THE ROOT OF THE CONTRACT, SHALL BE LIMITED TO THE FORESEEABLE DAMAGE, WHICH IS INTRINSIC TO THE CONTRACT, UNLESS CAUSED BY INTENT OR GROSS NEGLIGENCE OR BASED ON LIABILITY FOR INJURY OF LIFE, BODY OR HEALTH. THE ABOVE PROVISION DOES NOT IMPLY A CHANGE ON THE BURDEN OF PROOF TO THE DETRIMENT OF THE RECIPIENT. SUBJECT TO CHANGE WITHOUT NOTICE AT ANY TIME. THE INTERPRETATION OF THIS GENERAL NOTE SHALL BE GOVERNED AND CONSTRUED ACCORDING TO GERMAN LAW WITHOUT REFERENCE TO ANY OTHER SUBSTANTIVE LAW.
Copyright
Transmittal, reproduction, dissemination and/or editing of this document as well as utilization of its contents and communication thereof to others without express authorization are prohibited. Offenders will be held liable for payment of damages. All rights created by patent grant or registration of a utility model or design patent are reserved.
Copyright © Siemens AG 2008
Trademark notice
Microsoft and Windows are either registered trademarks or trademarks of Microsoft Corporation in the United States and/or other countries.
wm_java_usersguide_v12 |
Page 2 of 123 |
2008-02-25 |
Confidential / Released |
|
|

Java User’s Guide
Content
s
Content
1 |
Preface ....................................................................................................................... |
|
|
11 |
|
2 |
Overview .................................................................................................................... |
|
|
12 |
|
|
2.1 |
Related Documents ......................................................................................... |
12 |
||
|
2.2 |
Terms and Abbreviations ................................................................................. |
13 |
||
3 |
Installation ................................................................................................................. |
|
|
15 |
|
|
3.1 |
System Requirements...................................................................................... |
15 |
||
|
3.2 |
Installation CD for AC65/AC75 and XT65/XT75 .............................................. |
16 |
||
|
3.3 |
Installation CD for TC65................................................................................... |
17 |
||
|
|
3.3.1 |
Components........................................................................................ |
18 |
|
|
|
|
3.3.1.1 |
Module Exchange Suite ...................................................... |
18 |
|
|
|
3.3.1.2 |
WTK .................................................................................... |
18 |
|
|
|
3.3.1.3 |
SDK / JDK ........................................................................... |
19 |
|
|
|
3.3.1.4 |
NetBeans IDE 5.0 ............................................................... |
19 |
|
|
|
3.3.1.5 |
NetBeans IDE 5.5.1 ............................................................ |
19 |
|
|
|
3.3.1.6 Eclipse 3.1.2 IDE and Eclipse ME Plugin 1.5.x ................... |
20 |
|
|
|
|
3.3.1.7 Eclipse 3.2.2 IDE and Eclipse ME Plugin 1.5.5 or 1.6.8...... |
20 |
|
|
|
|
3.3.1.8 |
GPS Evaluation Software .................................................... |
21 |
|
|
|
3.3.1.9 Integrated Documentation Suite (IDS) ................................ |
21 |
|
|
3.4 |
Set up Java Development Environment with Eclipse IDE (Quick Start-up) ..... |
22 |
||
|
3.5 |
Siemens Mobility Toolkit Installation ................................................................ |
24 |
||
|
|
3.5.1 Installing the Standard Development Toolkit ...................................... |
24 |
||
|
|
3.5.2 Installing the SMTK Environment........................................................ |
24 |
||
|
|
3.5.3 Installing NetBeans IDE 5.0 / NetBeans IDE 5.5.1 ............................. |
26 |
||
|
|
3.5.4 Installing Eclipse 3.0, Eclipse 3.1 or Eclipse 3.2................................. |
26 |
||
|
|
3.5.5 Installing Borland JBuilder X, 2005 and 2006 Enterprise/Developer .. |
27 |
||
|
|
3.5.6 Installing Module Exchange Suite (MES)............................................ |
27 |
||
|
3.6 |
SMTK Uninstall |
................................................................................................ |
27 |
|
|
3.7 |
Upgrades ......................................................................................................... |
|
27 |
|
4 |
Software Platform ..................................................................................................... |
|
28 |
||
|
4.1 |
Software Architecture....................................................................................... |
28 |
||
|
4.2 |
Interfaces ......................................................................................................... |
|
29 |
|
|
|
4.2.1 |
ASC0 - ..........................................................................Serial Device |
29 |
|
|
|
4.2.2 |
General ...........................................................................Purpose I/O |
29 |
|
|
|
4.2.3 |
DAC/ADC............................................................................................ |
29 |
|
|
|
4.2.4 |
ASC1................................................................................................... |
|
29 |
|
|
4.2.5 Digital Audio ...............................................................Interface (DAI) |
29 |
||
|
|
4.2.6 |
I2C/SPI................................................................................................ |
|
29 |
|
|
4.2.7 |
GPS .................................................................................................... |
|
30 |
|
|
4.2.8 |
JVM Interfaces .................................................................................... |
31 |
|
|
|
|
4.2.8.1 ...................................................................... |
IP Networking |
31 |
|
|
|
4.2.8.2 .................................................................................. |
Media |
31 |
wm_java_usersguide_v12 |
Page 3 of 123 |
2008-02-25 |
Confidential / Released |
|
|

Java User’s Guide
Content
s
|
4.2.8.3 Other Interfaces .................................................................. |
31 |
4.3 |
Data Flow of a Java Application Running on the Module ................................ |
32 |
4.4 |
Handling Interfaces and Data Service Resources ........................................... |
33 |
|
4.4.1 Module States ..................................................................................... |
33 |
|
4.4.1.1 State 1: Default – No Java Running .................................... |
33 |
|
4.4.1.2 State 2: No Java Running, General Purpose I/O |
|
|
and I2C/SPI......................................................................... |
34 |
|
4.4.1.3 State 4: Default – Java Application Active........................... |
34 |
4.4.1.4State 5: Java Application Active, General Purpose I/O and I2C/SPI34
|
|
4.4.2 |
Module State Transitions .................................................................... |
35 |
5 |
Maintenance |
.............................................................................................................. |
36 |
|
|
5.1 |
IP Service......................................................................................................... |
36 |
|
|
5.2 |
Remote ........................................................................................SIM Access |
37 |
|
|
5.3 |
Power ...................................................................................................Saving |
37 |
|
|
5.4 |
Charging .......................................................................................................... |
38 |
|
|
5.5 |
Airplane ..................................................................................................Mode |
38 |
|
|
5.6 |
Alarm................................................................................................................ |
|
38 |
|
5.7 |
Shutdown ......................................................................................................... |
39 |
|
|
|
5.7.1 ........................................................................... |
Automatic Shutdown |
39 |
|
|
5.7.2 ............................................................................... |
Manual Shutdown |
39 |
|
|
5.7.3 ....................................................................... |
Restart after Switch Off |
39 |
|
|
5.7.4 ............................................................................................ |
Watchdog |
39 |
|
5.8 |
Special .............................................AT Command Set for Java Applications |
40 |
|
|
|
5.8.1 .................................. |
Switching from Data Mode to Command Mode |
40 |
|
|
5.8.2 .................................................. |
Mode Indication after MIDlet Startup |
40 |
|
|
5.8.3 ................................................................................. |
Long Responses |
40 |
|
|
5.8.4 ......................................................... |
Configuration of Serial Interface |
40 |
|
|
5.8.5 ................................................................................. |
Java Commands |
41 |
|
|
5.8.6 .............................................................................. |
AutoExec Function |
41 |
|
5.9 |
System ......................................................................................................Out |
41 |
|
|
|
5.9.1 .................................................................................. |
Serial interfaces |
41 |
|
|
5.9.2 ...................................................................................................... |
File |
42 |
|
|
5.9.3 .................................................................................................... |
UDP |
42 |
|
5.10 |
GPIO ................................................................................................................ |
|
42 |
|
5.11 |
Restrictions ...................................................................................................... |
42 |
|
|
|
5.11.1 ............................................................................... |
Flash File System |
42 |
|
|
5.11.2 ............................................................................................... |
Memory |
42 |
|
5.12 |
Performance .................................................................................................... |
43 |
|
|
|
5.12.1 .................................................................................................... |
Java |
43 |
|
|
5.12.2 ................................................................................................. |
Pin I/O |
44 |
|
|
5.12.3 ................................................................. |
Data Rates on RS - 232 API |
44 |
|
|
........................................................... |
5.12.3.1 Plain Serial Interface |
45 |
|
|
........................................................... |
5.12.3.2 Voice Call in Parallel |
45 |
|
|
........................... |
5.12.3.3 Scenarios with GPRS/EGDE Connection |
45 |
wm_java_usersguide_v12 |
Page 4 of 123 |
2008-02-25 |
Confidential / Released |
|
|

Java User’s Guide
Content
s
|
|
|
5.12.3.4 |
Upload................................................................................. |
46 |
|
|
|
5.12.3.5 |
Download ............................................................................ |
47 |
|
5.13 |
System Time .................................................................................................... |
|
49 |
|
6 |
MIDlets ....................................................................................................................... |
|
|
50 |
|
|
6.1 |
MIDlet Documentation ..................................................................................... |
50 |
||
|
6.2 |
MIDlet Life Cycle.............................................................................................. |
|
50 |
|
|
6.3 |
Hello World MIDlet ........................................................................................... |
52 |
||
7 |
File Transfer to Module............................................................................................. |
|
53 |
||
|
7.1 |
Module Exchange Suite ................................................................................... |
53 |
||
|
|
7.1.1 |
Windows Based .................................................................................. |
53 |
|
|
|
7.1.2 |
Command Line Based ........................................................................ |
53 |
|
|
7.2 |
Over the Air Provisioning ................................................................................. |
53 |
||
|
7.3 |
Security Issues................................................................................................. |
|
54 |
|
|
|
7.3.1 |
Module Exchange Suite ...................................................................... |
54 |
|
|
|
7.3.2 |
OTAP .................................................................................................. |
|
54 |
8 |
Over The Air Provisioning (OTAP) .......................................................................... |
55 |
|||
|
8.1 |
Introduction to OTAP ....................................................................................... |
55 |
||
|
8.2 |
OTAP Overview ............................................................................................... |
|
55 |
|
|
8.3 |
OTAP Parameters............................................................................................ |
56 |
||
|
8.4 |
Short Message Format .................................................................................... |
57 |
||
|
8.5 |
Java File Format .............................................................................................. |
|
58 |
|
|
8.6 |
Procedures....................................................................................................... |
|
59 |
|
|
|
8.6.1 |
Install/Update ...................................................................................... |
59 |
|
|
|
8.6.2 |
Delete.................................................................................................. |
|
60 |
|
8.7 |
Time Out Values and Result Codes................................................................. |
61 |
||
|
8.8 |
Tips and Tricks for OTAP................................................................................. |
61 |
||
|
8.9 |
OTAP Tracer.................................................................................................... |
|
62 |
|
|
8.10 |
Security |
............................................................................................................ |
|
62 |
|
8.11 |
How To............................................................................................................. |
|
|
62 |
9 |
Compile and Run a Program without a Java IDE ................................................... |
64 |
|||
|
9.1 |
Build Results .................................................................................................... |
|
64 |
|
|
9.2 |
Compile............................................................................................................ |
|
65 |
|
|
9.3 |
Run on the Module with Manual Start.............................................................. |
65 |
||
|
9.4 |
Run on the Module with Autostart.................................................................... |
66 |
||
|
|
9.4.1 |
Switch on Autostart ............................................................................. |
66 |
|
|
|
9.4.2 |
Switch off Autostart ............................................................................. |
66 |
|
10 |
Compile and Run a Program with a Java IDE......................................................... |
67 |
|||
|
10.1 |
Eclipse 3.1.2 (with ME Plugin 1.2.3) ................................................................ |
67 |
||
|
|
10.1.1 Setup a New Project ........................................................................... |
67 |
||
11 |
Debug Environment .................................................................................................. |
|
72 |
||
|
11.1 |
Data Flow of a Java Application in the Debug Environment ............................ |
72 |
||
|
11.2 |
Emulator........................................................................................................... |
|
73 |
|
wm_java_usersguide_v12 |
Page 5 of 123 |
2008-02-25 |
Confidential / Released |
|
|

Java User’s Guide
Content
s
|
11.3 |
Java IDE .......................................................................................................... |
|
75 |
|
|
11.3.1 NetBeans IDE 5.0, NetBeans 5.5 or NetBeans 5.5.x.......................... |
75 |
|
|
|
|
11.3.1.1 Switching Emulator to IMP - NG Emulator ............................ |
76 |
|
|
|
Templates............................................................................ |
77 |
|
|
|
Examples ............................................................................ |
78 |
|
|
|
Compile and Run ................................................................ |
79 |
|
|
|
11.3.1.5 Starting Debug Session without Downloading Java Files ... |
79 |
|
|
|
11.3.1.6 Displaying Java "System.out" in NetBeans IDE window ..... |
80 |
|
|
11.3.2 |
3.0 and Eclipse 3.1................................................................ |
81 |
|
|
|
Eclipse 3.0........................................................................... |
81 |
|
|
|
Eclipse 3.1........................................................................... |
81 |
|
|
|
Eclipse 3.2........................................................................... |
81 |
|
|
|
11.3.2.4 Using Eclipse with ME Plugin up to Version 1.2.3 ............... |
82 |
|
|
|
11.3.2.5 Using Eclipse with ME Plugin 1.5.x ..................................... |
83 |
|
|
|
11.3.2.6 Using Eclipse with ME Plugin 1.6.x ..................................... |
85 |
|
|
|
Import Example ................................................................... |
86 |
|
|
|
Compile and Debug ............................................................ |
87 |
|
|
|
11.3.2.9 Starting Debug Session without Downloading Java Files ... |
89 |
|
|
11.3.3 |
Borland JBuilder X .............................................................................. |
91 |
|
|
|
Examples ............................................................................ |
92 |
|
|
|
11.3.3.2 Starting Debug Session without Downloading Java Files ... |
93 |
|
|
11.3.4 Borland JBuilder 2005 and JBuilder 2006 Enterprise/Developer........ |
94 |
|
|
|
|
Examples ............................................................................ |
95 |
|
11.4 |
Breakpoints ...................................................................................................... |
|
95 |
|
11.5 |
Switching Java “System.out” to IDE Debug Window ....................................... |
96 |
|
|
11.6 |
Important Information for Java Debugging on Windows Vista ......................... |
97 |
|
12 |
Java Security |
|
98 |
|
|
12.1 |
Secure .......................................................................................Data Transfer |
98 |
|
|
|
12.1.1 ..............Create a Secure Data Transfer Environment Step by Step |
100 |
|
|
12.2 |
Execution ...........................................................................................Control |
103 |
|
|
|
12.2.1 ...................................................Change to Secured Mode Concept |
104 |
|
|
|
12.2.2 ..........................................Concept for the Signing the Java MIDlet |
105 |
|
|
12.3 |
Application .....................................................................and Data Protection |
106 |
|
|
12.4 |
Structure ..........................and Description of the Java Security Commands |
106 |
|
|
|
12.4.1 .......................................Structure of the Java Security Commands |
107 |
|
|
|
12.4.2 ..........................................................Build Java Security Command |
108 |
|
|
|
12.4.3 ...................................Send Java Security Command to the Module |
109 |
|
|
12.5 |
Create a ........................................Java Security Environment Step by Step |
110 |
|
|
|
12.5.1 .............................................................................. |
Create Key Store |
110 |
|
|
12.5.2 ...........................................................Export X.509 Root Certificate |
110 |
|
|
|
12.5.3 .....................................................Create Java Security Commands |
110 |
|
|
|
12.5.4 .................................................................................... |
Sign a MIDlet |
112 |
|
12.6 |
Attention......................................................................................................... |
|
112 |
wm_java_usersguide_v12 |
Page 6 of 123 |
2008-02-25 |
Confidential / Released |
|
|

Java User’s Guide
Content
s
13 |
Java Tutorial |
............................................................................................................ |
|
113 |
|
13.1 Using the ..........................................................................AT Command API |
113 |
||
|
13.1.1 ........................................................................... |
Class ATCommand |
113 |
|
|
......................... |
13.1.1.1 Instantiation with or without CSD Support |
113 |
|
|
|
13.1.1.2 Sending an AT Command to the Device, the send() Method .. |
||
|
|
|
114 |
|
|
.............................................................. |
13.1.1.3 |
Data Connections |
115 |
|
................................................................. |
13.1.1.4 |
Synchronization |
117 |
|
13.1.2 ......................................... |
ATCommandResponseListener Interface |
117 |
|
|
....................... |
13.1.2.1 |
Non-Blocking ATCommand.send() Method |
117 |
|
13.1.3 ......................................................... |
ATCommandListener Interface |
118 |
|
|
........................................................................... |
13.1.3.1 |
ATEvents |
118 |
|
.................................................................. |
13.1.3.2 |
Implementation |
119 |
|
...... |
13.1.3.3 Registering a Listener with an ATCommand Instance |
120 |
|
|
13.2 Programming ................................................................................the MIDlet |
121 |
||
|
13.2.1 ............................................................................................. |
Threads |
|
121 |
|
13.2.2 ............................................................................................ |
Example |
|
121 |
14 |
Differences to ..........................................................................................the TC45 |
123 |
||
wm_java_usersguide_v12 |
Page 7 of 123 |
2008-02-25 |
Confidential / Released |
|
|

Java User’s Guide
Tables
s
Tables |
|
|
Table 1: |
GPRS upload data rate with different number of timeslots, CS2 ................... |
46 |
Table 2: |
GPRS upload data rate with different number of timeslots, CS4 ................... |
46 |
Table 3: |
EDGE upload data rate with two timeslots, CS5............................................ |
46 |
Table 4: |
EDGE upload data rate with two timeslots, CS9............................................ |
46 |
Table 5: |
GPRS Download data rate with different number of timeslots, CS2 .............. |
48 |
Table 6: |
GPRS Download data rate with different number of timeslots, CS4 .............. |
48 |
Table 7: |
EDGE Download data rate with different number of timeslots, CS5 .............. |
48 |
Table 8: |
EDGE Download data rate with different number of timeslots, CS9 .............. |
48 |
Table 9: |
A typical sequence of MIDlet execution ......................................................... |
51 |
Table 10: |
Parameters and keywords ............................................................................. |
56 |
wm_java_usersguide_v12 |
Page 8 of 123 |
2008-02-25 |
Confidential / Released |
|
|

Java User’s Guide
Figures
s
Figures |
|
|
Figure 1: |
Overview ........................................................................................................ |
12 |
Figure 2: |
Installation of Eclipse ME-Plugin 1.2.3: Dialog box Feature Updates ............ |
22 |
Figure 3: |
Installation of Eclipse ME-Plugin 1.2.3: Dialog box Updates sites to visit...... |
22 |
Figure 4: |
Installation of Eclipse ME-Plugin 1.2.3: dialog box Search Results ............... |
23 |
Figure 5: |
Installation of Eclipse ME-Plugin 1.2.3: dialog box Restart Eclipse ............... |
23 |
Figure 6: |
Interface Configuration................................................................................... |
31 |
Figure 7: |
Data flow of a Java application running on the module.................................. |
32 |
Figure 8: |
Module State 1............................................................................................... |
33 |
Figure 9: |
Module State 2............................................................................................... |
34 |
Figure 10: |
Module State 4............................................................................................... |
34 |
Figure 11: |
Module State 5............................................................................................... |
34 |
Figure 12: |
Module State Transition Diagram................................................................... |
35 |
Figure 13: |
Test case for measuring Java command execution throughput..................... |
43 |
Figure 14: |
Test case for measuring Java MIDlet performance and handling pin-IO ....... |
44 |
Figure 15: |
Scenario for testing data rates on ASC1........................................................ |
45 |
Figure 16: |
Scenario for testing data rates on ASC1 with a voice call in parallel ............. |
45 |
Figure 17: |
Scenario for testing data rates on ASC1 with GPRS data upload ................. |
47 |
Figure 18: |
Scenario for testing data rates on ASC1 with GPRS data download............. |
47 |
Figure 19: |
OTAP Overview ............................................................................................. |
55 |
Figure 20: |
OTAP: Install/Update Information Flow (messages in brackets are optional) |
59 |
Figure 21: |
OTAP: Delete Information Flow (messages in brackets are optional) ........... |
60 |
Figure 22: |
Create new Eclipse project: Create a J2ME MIDP Midlet Suite..................... |
67 |
Figure 23: |
Create new Eclipse project: New J2ME Project............................................. |
67 |
Figure 24: |
Create new Eclipse project: Midlet Suite Properties ...................................... |
68 |
Figure 25: |
Create new Eclipse project: work area with new created project................... |
68 |
Figure 26: |
Create new Eclipse project: Create a J2ME Midlet........................................ |
69 |
Figure 27: |
Create new Eclipse project: Create a New J2ME Midlet................................ |
69 |
Figure 28: |
Create new Eclipse project: Edit some Java commands ............................... |
70 |
Figure 29: |
Create new Eclipse project: Edit “deployed” path to Jar file........................... |
70 |
Figure 30: |
Data flow of a Java application in the debug environment............................. |
72 |
Figure 31: |
NetBeans IDE 5.0 - installed emulators ......................................................... |
76 |
Figure 32: |
NetBeans IDE 5.0 - Switching to IMP-NG emulator....................................... |
76 |
Figure 33: |
NetBeans IDE 5.0 - Selecting an IMP-NG MIDlet template |
|
|
(e.g. project “Test”)......................................................................................... |
77 |
Figure 34: |
NetBeans IDE 5.0 - selecting sample project “Hello World Sample” ............. |
78 |
Figure 35: |
NetBeans IDE 5.0 - confirmation of sample project “Hello World Sample” .... |
78 |
Figure 36: |
NetBeans IDE 5.0 - add emulator option “-noload” |
|
|
(e.g. project “HelloSample”) ........................................................................... |
79 |
Figure 37: |
NetBeans IDE 5.0 - Displaying Java “System.out” in NetBeans IDE window |
80 |
Figure 38: |
Eclipse – Display of different integrated emulators ........................................ |
82 |
Figure 39: |
Eclipse – J2ME platform ................................................................................ |
83 |
Figure 40: |
Eclipse with ME Plugin 1.5.0 – Display of different integrated emulators ...... |
84 |
Figure 41: |
Eclipse with ME Plugin 1.5.0 – J2ME platform.............................................. |
85 |
Figure 42: |
Eclipse – Project import ................................................................................. |
86 |
Figure 43: |
Eclipse - Example .......................................................................................... |
86 |
Figure 44: |
Eclipse – Create package .............................................................................. |
87 |
Figure 45: |
Eclipse - Configuration................................................................................... |
88 |
Figure 46: |
Eclipse - Configuration................................................................................... |
89 |
wm_java_usersguide_v12 |
Page 9 of 123 |
2008-02-25 |
Confidential / Released |
|
|

Java User’s Guide
Figures
s
Figure 47: |
Eclipse 3.2.x ME1.5.x and 1.6.x select System Java Thread |
|
|
for showing breakpoint line in Java source .................................................... |
90 |
Figure 48: |
JBuilder X – JDK settings............................................................................... |
91 |
Figure 49: |
JBuilder X – Siemens Library......................................................................... |
91 |
Figure 50: |
JBuilder X – Sample Projects......................................................................... |
92 |
Figure 51: |
JBuilder X – Starting the debugging session ................................................. |
92 |
Figure 52: |
JBuilder X – Edit project properties for starting the emulator......................... |
93 |
Figure 53: |
JBuilder - Runtime Configuration ................................................................... |
93 |
Figure 54: |
JBuilder 2006 Enterprise/Developer – JDK settings ...................................... |
94 |
Figure 55: |
JBuilder 2006 Enterprise/Developer – Siemens Library ................................ |
94 |
Figure 56: |
JBuilder 2006 Enterprise/Developer – Sample Projects ................................ |
95 |
Figure 57: |
Emulator configuration file “switching Java System.out to serial port” ........... |
96 |
Figure 58: |
Using Windows Vista: Set Eclipse.exe perament to "Run as administrator".. 97 |
|
Figure 59: |
Mode 1 – Customer Root Certificate does not exist....................................... |
99 |
Figure 60: |
Mode 2 - Server Certificate and Certificate into module are identical ............ |
99 |
Figure 61: |
Mode 2 - Server Certificate and self signed root Certificate |
|
|
in module form a chain................................................................................. |
100 |
Figure 62: |
Insert Customer Root Certificate.................................................................. |
104 |
Figure 63: |
Prepare MIDlet for Secured Mode ............................................................... |
105 |
Figure 64: |
Build Java Security Command..................................................................... |
108 |
wm_java_usersguide_v12 |
Page 10 of 123 |
2008-02-25 |
Confidential / Released |
|
|
Java User’s Guide
1 Preface
s
1 Preface
This document covers the full range of IMP-NG Java products from Siemens, currently including:
1.TC65 Module
2.TC65 Terminal
3.AC75/AC65 Module
4.XT75/XT65 Module
Differences between the products are noted in the particular chapters. Throughout the document, all supported products are referred to as ME (Mobile Equipment). For use in file, directory or path names, the string “<productname>” represents the actual name of a product, for example TC65. Screenshots are provided as examples and, unless otherwise stated, apply to all supported products.
wm_java_usersguide_v12 |
Page 11 of 123 |
2008-02-25 |
Confidential / Released |
|
|

Java User’s Guide
2 Overview
s
2 Overview
The ME features an ultra-low profile and low-power consumption for data (CSD and GPRS), voice, SMS and fax. Java technology and several peripheral interfaces on the module allow you to easily integrate your application.
This document explains how to work with the ME, the installation CD and the tools provided on the installation CD.
Figure 1: Overview
2.1Related Documents
List of documents referenced throughout this manual:
[1]AT Command Set of your Siemens Wireless product
[2]Hardware Interface Description of your Siemens Wireless product
[3]Java doc \wtk\doc\html\index.html
[4]IMP-NG, JSR228, Standard
For further documents see Chapter 3.2.
wm_java_usersguide_v12 |
Page 12 of 123 |
2008-02-25 |
Confidential / Released |
|
|

Java User’s Guide
2.2 Terms and Abbreviations
s
2.2Terms and Abbreviations
Abbreviation |
Description |
|
|
API |
Application Program Interface |
|
|
ASC |
Asynchronous Serial Controller |
|
|
CLDC |
Connected Limited Device Configuration |
|
|
CSD |
Circuit-Switched Data |
|
|
DAI |
Digital Audio Interface |
|
|
DCD |
Data Carrier Detect |
|
|
DSR |
Data Set Ready |
|
|
GPIO |
General Purpose I/O |
|
|
GPRS |
General Packet Radio Service |
|
|
GPS |
Global Positioning System |
|
|
HTTP |
Hypertext Transfer Protocol |
|
|
I/O |
Input/Output |
|
|
IDE |
Integrated Development Environment |
|
|
IDS |
Integrated Documentation Suite |
|
|
IP |
Internet Protocol |
|
|
Java ME™ |
Java Mobile Edition aka. J2ME |
Java SE™ |
Java Standard Edition |
JAD |
Java Application Description |
|
|
JAR |
Java Archive |
|
|
JDK |
Java Development Kit |
|
|
JVM |
Java Virtual Machine |
|
|
LED |
Light Emitting Diode |
|
|
ME |
Mobile Equipment |
|
|
MES |
Module Exchange Suite |
|
|
MIDP |
Mobile Information Device Protocol |
|
|
OTA |
Over The Air |
|
|
OTAP |
Over The Air Provisioning of Java Applications |
|
|
PDP |
Packet Data Protocol |
|
|
PDU |
Protocol Data Unit |
|
|
SDK |
Standard Development Kit |
|
|
SMS |
Short Message Service |
|
|
SMTK |
Siemens Mobile Toolkit |
|
|
TCP |
Transfer Control Protocol |
|
|
URC |
Unsolicited Result Code |
|
|
wm_java_usersguide_v12 |
Page 13 of 123 |
2008-02-25 |
Confidential / Released |
|
|

Java User’s Guide
2.2 Terms and Abbreviations
s
Abbreviation |
Description |
|
|
URL |
Universal Resource Locator |
|
|
VBS |
Visual Basic Script |
|
|
WTK |
Wireless Toolkit |
|
|
wm_java_usersguide_v12 |
Page 14 of 123 |
2008-02-25 |
Confidential / Released |
|
|

Java User’s Guide
3 Installation
s
3 Installation
3.1System Requirements
The Siemens Mobility Toolkit (SMTK) requires that you have:
1.Windows 2000, Windows XP or Windows Vista1 installed
2.110 Mbytes free disk space for SMTK
3.Administration privileges
4.Java 2 SDK, Standard Edition 1.4. To install the JDK version 1.4.2_09 provided, follow the instructions in Section 3.5.1
Java 2 SDK, Standard Edition 1.5 is required for TC65.
If a Java IDE such as NetBeans IDE 5.0, NetBeans IDE 5.5.11, Eclipse 3.0.1, Eclipse 3.0.2, Eclipse 3.1.0, Eclipse 3.1.1, Eclipse 3.1.2, Eclipse 3.2.x1, JBuilder X, 2005 or 2006 Enterprise/ Developer is installed, it can be integrated into the SMTK environment during the installation of the SMTK. To install one of the IDEs, follow the installation instructions in Section 3.5.3 and Section 3.5.4 respectively.
If you wish to access the module via USB ensure that the USB cable is plugged between the module’s USB interface and the PC. Unless already done, install the appropriate USB modem driver. To do so, use the "usbmodem.inf" file supplied with your Siemens module.
1. Supported only for TC65
wm_java_usersguide_v12 |
Page 15 of 123 |
2008-02-25 |
Confidential / Released |
|
|

Java User’s Guide
3.2 Installation CD for AC65/AC75 and XT65/XT75
s
3.2Installation CD for AC65/AC75 and XT65/XT75
The Siemens Mobility Toolkit Installation CD includes:
•Module Exchange Suite (MES setup is distributed on CD under "MES\Setup.exe")
•WTK (is distributed as zip file on the CD e.g. "WTK\ac75_wtk.zip")
bin
-various tools doc
-html
-java docs for APIs
lib
-classes.zip src
-various examples
•Java SDK J2sdk-1_4_2_09-windows-i586-p.exe
•NetBeans IDE 5.0
netbeans-5_0-windows.exe (NetBeans IDE 5.0) netbeans_mobility-5_0-win.exe (NetBeans Mobility package 5.0)
•Eclipse 3.1.2
eclipse-SDK-3.1.2-win32.zip (Eclipse 3.1.2)
•EclipseME plugin 1.2.32
eclipseme.feature_1.2.3_site.zip (Eclipse ME Plugin 1.2.3)
•EclipseME plugin 1.5.03
eclipseme.feature_1.5.0_site.zip (Eclipse ME Plugin 1.5.0)
•EclipseME plugin WM (only required for Eclipse 3.0.1 and Eclipse 3.0.2)
•GPS Evaluation Software 4 ucentersetup.exe (GPS Evaluation SW)
•Integrated Documentation Suite (IDS) IDS.zip
•Documents: DSB75_HW_Description.pdf <productname>_AT_Command_Set.pdf <productname>_HW_Description.pdf
<productname>T_HW_Description.pdf (only if terminal version is available) <productname>_ReleaseNote.pdf
Java_UserGuide.pdf (this document) Remote_SAT_Guide.pdf AN_02_Audio.pdf AN_07_Battery.pdf AN_16_FW_Update.pdf AN_17_OTA_FW_Update.pdf AN_22_TTY.pdf AN_24_Dev_Guide.pdf AN_32_USB.pdf
Some of the content can only be accessed after the installation.
2.EclipseME plugin 1.2.1 is also supported, but not distributed as part of the CD.
3.EclipseME plugin 1.5.0 is supported by TC65, XT65/XT75 and AC65/AC75. It is distributed as part of the installation CD.
4.GPS Evaluation Software is only distributed as part of the XT75 CD (only for products with GPS)
wm_java_usersguide_v12 |
Page 16 of 123 |
2008-02-25 |
Confidential / Released |
|
|

Java User’s Guide
3.3 Installation CD for TC65
s
3.3Installation CD for TC65
The Siemens Mobility Toolkit Installation CD includes:
•Module Exchange Suite (MES setup is distributed on CD under "MES\Setup.exe")
•WTK (is distributed as zip file on the CD e.g. "WTK\tc65_wtk.zip")
bin
-various tools doc
-html
-java docs for APIs
lib
-classes.zip src
-various examples
•Java SDK jdk-1_5_0_07-windows-i586-p.exe
•NetBeans IDE 5.5.1
netbeans-5_5_1-windows.exe (NetBeans IDE 5.5.1) netbeans_mobility-5_5_1-windows.exe (NetBeans Mobility package 5.5.1)
•Eclipse 3.1.2
eclipse-SDK-3.1.2-win32.zip (Eclipse 3.1.2)
•Eclipse 3.2.2
eclipse-SDK-3.2.2-win32.zip (Eclipse 3.2.2)
•EclipseME plugin 1.5.5
eclipseme.feature_1.5.5_site.zip (Eclipse ME Plugin 1.5.5)
•EclipseME plugin 1.6.8
eclipseme.feature_1.6.8_site.zip (Eclipse ME Plugin 1.6.8)
•Integrated Documentation Suite (IDS) IDS.zip
•Documents: <productname>_Datasheet.pdf DSB75_HW_Description.pdf <productname>_AT_Command_Set.pdf <productname>_HW_Description.pdf
<productname>T_HW_Description.pdf (only if terminal version is available) <productname>_ReleaseNote.pdf
Java_UserGuide.pdf (this document) Remote_SAT_Guide.pdf AN_02_Audio.pdf AN_07_Battery.pdf AN_16_FW_Update.pdf AN_22_TTY.pdf AN_24_Dev_Guide.pdf AN_26_Power_Supply.pdf AN_32_USB.pdf AN_45_Jamming_Detection_RLS.pdf
Some of the content can only be accessed after the installation.
wm_java_usersguide_v12 |
Page 17 of 123 |
2008-02-25 |
Confidential / Released |
|
|

Java User’s Guide
3.3 Installation CD for TC65
s
3.3.1Components
3.3.1.1Module Exchange Suite
The Module Exchange Suite allows the developer to access the Flash file system on the cellular engine from the development environment over a serial interface. File transfers from PC to module are greatly facilitated by this suite.
The Module Exchange Suite (MES) will be installed under the following directories:
•MES executables (e.g. MESCopy.exe, etc.) in the windows system directory (e.g. C:\WINDOWS\system32)
The version of the MES executables can be read out by using the Windows Explorer context menu →Properties and selecting the Version tab (e.g. MESCopy.exe Version 1.0.0.12, etc.)
•MES server files under "\ModuleExchange" directory (e.g. C:\Program Files\Module-
Exchange)
The version of the dll files can be read out by using the Windows Explorer context menu → Properties and selecting the Version tab (e.g. MESShellExt.dll Version: 2.0.0.19, MESServer.exe Version: 2.0.0.38, MESSearchApp.exe Version: 2.0.0.5 )
The MES installation version can be found under Control Panel → Add or Remove Programs selecting the installed MES program and clicking on support information (e.g. version 1.00.0008).
3.3.1.2WTK
WTK is the directory where all the necessary components for product specific Java application creation and debugging are stored.
The version of the installed WTK is stored under the root of the WTK directory in a text file. (e.g. C:\Program Files\Siemens\SMTK\<product name>\WTK\VersionWTK.txt)
wm_java_usersguide_v12 |
Page 18 of 123 |
2008-02-25 |
Confidential / Released |
|
|

Java User’s Guide
3.3 Installation CD for TC65
s
3.3.1.3SDK / JDK
This is software provided by SUN to support Java application development.
SMTK emulator uses the following JDK (stored in JavaSoft Registry key) for starting the Debug Agent:
•Registry path:
HKEY_LOCAL_MACHINE\SOFTWARE\JavaSoft\Java Development Kit\1.4 HKEY_LOCAL_MACHINE\SOFTWARE\JavaSoft\Java Development Kit\1.55
•Registry key:
JavaHome |
(e.g. "C:\j2sdk1.4.2_09") |
JavaHome |
(e.g. "C:\Program Files\Java\jdk1.5.0_07")5 |
•Registry path:
HKEY_LOCAL_MACHINE\SOFTWARE\JavaSoft\Java Runtime Environment\1.4 HKEY_LOCAL_MACHINE\SOFTWARE\JavaSoft\Java Runtime Environment\1.55
•Registry key:
JavaHome (e.g. "C:\Program Files\Java\j2re1.4.2_09") JavaHome (e.g. "C:\Program Files\Java\j2re1.5.0_07")5
3.3.1.4NetBeans IDE 5.0
This is a Java IDE provided by SUN to support Java application development.
3.3.1.5NetBeans IDE 5.5.1
This is a Java IDE provided by SUN to support Java application development. NetBeans IDE 5.5.1 is only supported on TC65 CD.
5. required for TC65
wm_java_usersguide_v12 |
Page 19 of 123 |
2008-02-25 |
Confidential / Released |
|
|

Java User’s Guide
3.3 Installation CD for TC65
s
3.3.1.6Eclipse 3.1.2 IDE and Eclipse ME Plugin 1.5.x
This is a Java IDE provided by the Eclipse Foundation to support Java application development. The integration of SMTK into Eclipse with ME Plugin 1.5.0 is supported by the TC65, XT65/XT75 and AC65/AC75 CDs. Eclipse ME Plugin 1.5.5 is only distributed on TC65 CD. The installed Eclipse Version and ME Plugin can be read out after starting Eclipse and selecting:
•Eclipse menu Help → About Eclipse SDK and looking for the Eclipse version: e.g. Version: 3.1.2 Build id: M20060118-1600
•Eclipse menu Help →About Eclipse SDK, press the Feature Details button and look for the ME Plugin version:
e.g. EclipseME J2ME Development Tools for the Eclipse Version: 1.5.0
Used JDK from IDE (e.g. selecting Eclipse menu Help → About Eclipse SDK → Configuration Details and look for "java.version" and "java.vm.version").
3.3.1.7Eclipse 3.2.2 IDE and Eclipse ME Plugin 1.5.5 or 1.6.8
This is a Java IDE provided by the Eclipse Foundation to support Java application development. The integration of SMTK into Eclipse 3.2.2 with ME Plugin 1.6.8 is only supported by the TC65 CD. The installed Eclipse Version and ME Plugin can be read out after starting Eclipse and selecting:
•Eclipse menu Help → About Eclipse SDK and looking for the Eclipse version: e.g. Version: 3.2.2 Build id: M20070212-1330
•Eclipse menu Help →About Eclipse SDK, press Feature Details button and look for the ME Plugin version:
e.g. EclipseME J2ME Development Tools for the Eclipse Version: 1.5.5 e.g. EclipseME J2ME Development Tools for the Eclipse Version: 1.6.8
Used JDK from IDE (e.g. selecting Eclipse menu Help → About Eclipse SDK → Configuration Details and look for "java.version" and "java.vm.version").
wm_java_usersguide_v12 |
Page 20 of 123 |
2008-02-25 |
Confidential / Released |
|
|
Java User’s Guide
3.3 Installation CD for TC65
s
3.3.1.8GPS Evaluation Software
The GPS Evaluation Software (u-center) was developed by u-blox AG, Switzerland. This software demonstrates the capabilities of global positioning system (GPS) part incorporated in the XT75 module.
The latest version of the GPS Evaluation Software (u-center) can be downloaded for free from the internet: http://www.u-blox.com/products/u_center.html.
The installed GPS Evaluation Software Version can be read out after starting u-center and selecting:
u-center menu Help → About u-center... and looking for the u-center version: e.g. Version 4.00 Build
Inside this dialog box you will find contact and support address as well.
Please make the following preparations before using the u-center tool together with XT75 (module with GPS support):
Step 1:
Install u-center
→ GPS_Evaluation_SW\ucentersetup.exe (on XT75 CD)
Step 2:
Switch to transparent GPS mode by using the AT command AT^SGPSS=1,1
Step 3:
Configure the connected COM port (ASC0 of the XT75 module) by using the u-center menu Receiver → Port and Receiver → Baudrate
Now the XT75 module and the u-center are ready for operation.
3.3.1.9Integrated Documentation Suite (IDS)
The Integrated Documentation Suite (IDS) is installed together with SMTK and can be accessed via index.html file under the directory “\IDS” with a browser. Another possibility to access IDS is by using the IMP-NG Java documentation “Javadoc” inside the IDE and selecting the hyperlink IDS placed inside the main menu of IMP-NG Javadoc.
Please keep in mind that the internal structure of JBuilder IDE does not support opening the IDS from inside the JBuilder IDE using hyperlinks.
A further hyperlink to IDS is located in the start menu of <productname> and can be selected via “Integrated Documentation Suite (IDS)”.
wm_java_usersguide_v12 |
Page 21 of 123 |
2008-02-25 |
Confidential / Released |
|
|
Java User’s Guide |
s |
3.4 Set up Java Development Environment with Eclipse IDE (Quick Start-up) |
3.4Set up Java Development Environment with Eclipse IDE (Quick Start-up)
Please complete the following steps to set up your Eclipse Java development environment:
Step 1:
Install JDK 1.4.2_09
→ JDK 1.4\j2sdk-1_4_2_09-windows-i586-p.exe
For TC65 install JDK 1.5.0_07 , if no JDK 1.5 or higher is installed on your machine.
Step 2:
Install Eclipse 3.1.2
→ Unzip from CD ("\Eclipse\eclipse-SDK-3.1.2-win32.zip") to "C:\Program Files\Eclipse" (Installation of Eclipse 3.2.2 to be employed with TC65 is completed in the same way.)
Step 3:
Installation Eclipse ME plugin 1.2.3:
(Installation of Eclipse ME plugin 1.6.8 to be employed with TC65 is completed in the same way)
-Start Eclipse IDE
-Select the default workspace suggested by Eclipse
-Start ME plugin installer using Eclipse menu
Help → Software Updates → Find and Install.
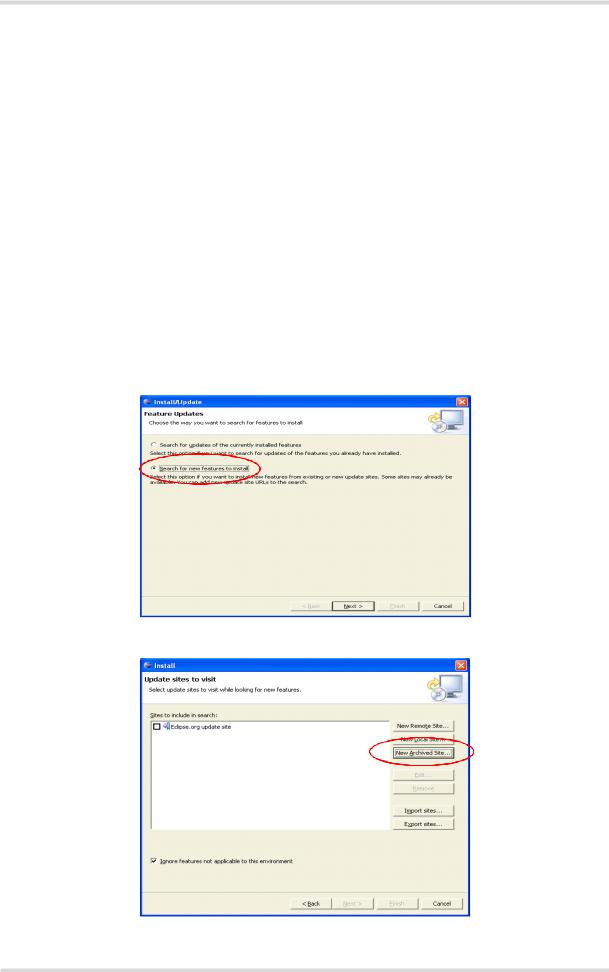
Figure 2: Installation of Eclipse ME-Plugin 1.2.3: Dialog box Feature Updates
Figure 3: Installation of Eclipse ME-Plugin 1.2.3: Dialog box Updates sites to visit
wm_java_usersguide_v12 |
Page 22 of 123 |
2008-02-25 |
Confidential / Released |
|
|
3.4Set up Java Development Environment with Eclipse IDE (Quick Start-up) s
-Select the path where Eclipse ME plugin is located on CD (EclipseMEplugin_123\.....") and select „eclipseme.feature_1.2.3_site.zip"
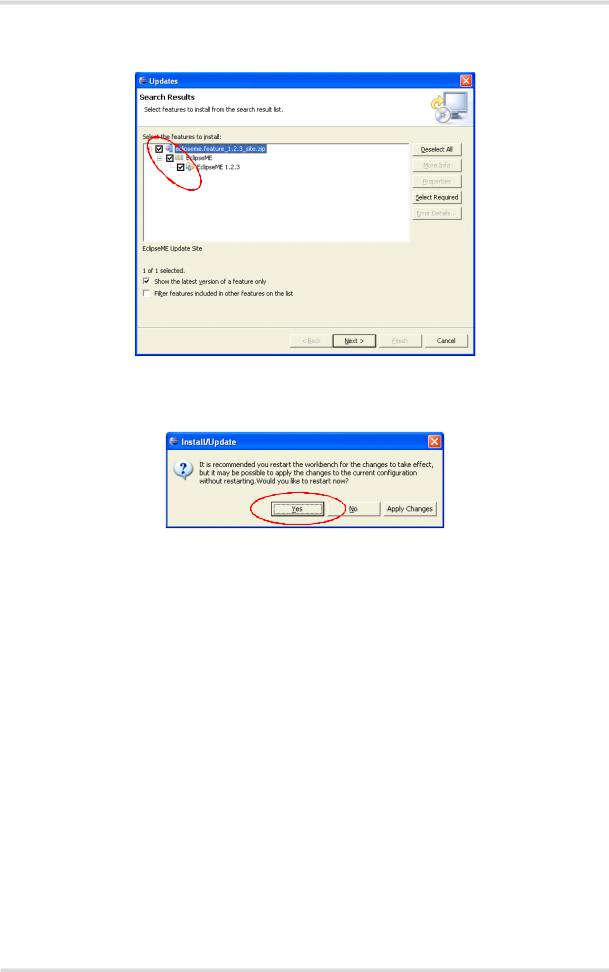
Figure 4: Installation of Eclipse ME-Plugin 1.2.3: dialog box Search Results
-In the dialog box Verification, select Install All.
-In the dialog box Install/Update, select Yes to restart Eclipse.
Figure 5: Installation of Eclipse ME-Plugin 1.2.3: dialog box Restart Eclipse
-Eclipse IDE is restarted. Please close Eclipse IDE before continuing with installation of SMTK!
Step 4:
Installation of the product’s SMTK:
-Start "setup.exe" from CD root path.
-Choose the destination folder of Eclipse "C:\Program Files\Eclipse" in the dialog box
Select Eclipse Folder.
-Select SMTK (e.g. C:\Program Files\Siemens\SMTK) in dialog box Destination Folder.
-Use the the dialog box Select COM Port to specify the connection type for on-device debugging and MES transfer (downloading the MIDlet to the module):
a)Standard 19200 Modem: Choose the COM port and set the baud rate (e.g. 115200).
b)USB modem: Select "Siemens AG WM USB Modem". Note that the USB modem has to be installed previously using Siemens "usbmodem.inf" file.
-After that, MES will be installed without further user action. Please wait until setup is complete.
-Click Finish in the summary dialog to confirm the completed installation.
A detailed description of the SMTK installation is given in the following chapters.
wm_java_usersguide_v12 |
Page 23 of 123 |
2008-02-25 |
Confidential / Released |
|
|

Java User’s Guide
3.5 Siemens Mobility Toolkit Installation
s
3.5Siemens Mobility Toolkit Installation
The SMTK comes with an installation CD. The installation program automatically installs the necessary components and IDE integrations. Software can be uninstalled and updated with the install program. The next sections cover the installation and removal of the SMTK and the installation of the SDK and the supported IDEs.
3.5.1Installing the Standard Development Toolkit
1.The JDK version 1.4.2_09 is provided on the SMTK installation disk in the subdirectory “JDK 1.4”. To begin the installation, start the “j2sdk-1_4_2_09-windows-i586-p.exe“ and follow the instructions of the JDK setup procedure. If there is no JDK installed on the target machine the installation of the provided JDK will be offered automatically during the SMTK installation process. The JDK version 1.5.0_07 is provided and required for TC65.
2.Once the toolkit has been installed, the environment variable “path” can be altered to comfortably use the JDK tools. This is not necessary for using the Siemens SMTK.
3.Open the Control Panel:
-Open System.
-Click on Advanced.
-Click on the Environment Variables button.
-Choose path from the list of system variables.
-Append the path for the bin directory of the newly installed SDK to the list of directories for the path variable.
3.5.2Installing the SMTK Environment
Before you start the installation please make sure all applications, especially the IDEs are closed.
1.Insert the CD, start setup.exe. When the dialog box appears press the Next button.
2.You will be asked to read the license agreement. If you accept the agreement, press Yes to continue with the installation.
3.A file including special information about the installation and use of the SMTK is shown. Press Next to continue.
4.You will be asked to enter the path name where Eclipse 3.0.1, 3.0.2, 3.1.0, 3.1.1, 3.1.2 or 3.2.x6 is installed. Please type in the folder where Eclipse with the ME plugin is installed and press Next. If you have not installed Eclipse or do not want to integrate the SMTK into Eclipse, please press Next without typing in a selected folder.
5.The installation software checks for the Java SDK. If there is no SDK on the system the installation procedure now offers to install the provided JDK. If this step is refused, the setup process will not continue because a properly installed JDK is mandatory for using the SMTK environment.
6.At this point, the installation software checks for a Java IDE to be integrated with the SMTK. A Java IDE is not necessary to use the SMTK. The IDE installation can be done at any time even if the SMTK is already installed. To integrate the SMTK into the Java IDE run the SMTK setup program in maintenance mode again. However, you can continue the setup procedure and install the IDE installation later or cancel the setup program at this stage and restart it after installing one of the supported Java IDEs. In case you wish to install a Java
6.Supported only for TC65
wm_java_usersguide_v12 |
Page 24 of 123 |
2008-02-25 |
Confidential / Released |
|
|

Java User’s Guide
3.5 Siemens Mobility Toolkit Installation
s
IDE please follow the instructions below and in Section 3.5.3. If no installed IDE is found the SMTK offers to install NetBeans IDE 5.0 and NetBeans Mobility package 5.0 (NetBeans 5.5.1 and NetBeans Mobility package 5.5.1 is distributed with TC65 CD). Alternatively, you can install the SUN IDE by following the instructions in Section 3.5.3.
7.If the SDK and one or more Java IDEs are found, you will be asked to choose which IDE you want integrated into the development environment. Once an IDE has been found and selected, press Next to continue. Ensure that your Java IDE is closed.
8.Select the folder where the SMTK will be installed. A folder will be suggested to you but you may browse to select a different one.
9.Choose the path that SMTK will appear under in the Start Menu.
10.In the next installation dialog box you will be asked to to create a Dial-up Network connection for on-device debugging. This Dial-up Network connection can be configured either for the Standard 119200 bps Modem integrated in Windows or the USB modem. As a result, a Dial-up Network connection will be created named "IP connection for remote debugging" (the connection will be available after the entire installation of the SMTK environment).
-If a Dial-up Network connection named "IP connection for remote debugging" is already available for another Siemens IMP-NG product, you can choose to reconfigure the existing connection by pressing Yes or leave it unchanged by pressing No.
-If you have selected Yes or if there was no on-device connection before, check either
"Serial COM port for using the standard modem installation" or "USB COM port for using the USB modem installation".
-If you have chosen the Standard 119200 bps Modem select the COM port number, click Next. In the resulting dialog box select the baud rate and click Next again.
-If you have chosen the USB modem the available USB modems will be listed. Choose
the "Siemens AG WM USB Modem" and click Next.
Note: You can reconfigure the COM port for the Dial-Up Network connection any time after the installation by starting the SMTK setup in maintenance mode and selecting “Repair” mode.
11.Select the IP address used for IMP-NG on-device debugging and the UPD port number used for switching the Java “System.out” direction to serial port output.
12.A brief summary of all entries made is shown. Press Next to continue.
13.A status message box informs you that the Module Exchange Suite (MES) will be installed now. A separate MES setup wizard opens. Please follow the setup wizard’s instructions.
14.All necessary files will be copied from the CD into the target folder.
15.This is the final step. Again, a listing of all installed components appears. Please press Finish to end the installation.
How to use the "Modify" or "Repair" mode:
To open either mode click Control Panel → Add or Remove Programs. Select SMTK installation and press “Modify” or “Repair”:
Please keep in mind, that Windows system requires the same location of the installation CD, if you like to use “Modify” or “Repair” for the SMTK installation. The installer is searching for *.msi file and an installer message box will pop up, telling the user to locate the installation CD in the corresponding drive and path. If the installation CD is not located on the displayed drive and path, please insert the CD or copy the CD contents into the required location (drive and path).
Note for installing the SMTK environment on Windows 2000 systems:
Please delete all modems with device name "Standard 19200 bps Modem" before installing the SMTK environment on a Windows 2000 system, because this modem device is used during automatic modem installation and on-device debugging.
wm_java_usersguide_v12 |
Page 25 of 123 |
2008-02-25 |
Confidential / Released |
|
|

Java User’s Guide
3.5 Siemens Mobility Toolkit Installation
s
3.5.3Installing NetBeans IDE 5.0 / NetBeans IDE 5.5.1
1.NetBeans IDE 5.0 is provided on the SMTK installation disk in the subdirectory “NETBEANS_5_0”. To begin installation, start first “netbeans-5_0-windows.exe” and follow the NetBeans IDE 5.0 setup procedure instructions.
2.Please install next the Mobility package of SunTM NetBeans IDE 5.0. The Mobility package is required before integration of SMTK!
The SunTM NetBeans IDE 5.5.1 is distributed with the TC65 CD. Please start "netbeans-5_5_1- windows.exe" for installation of SunTM NetBeans 5.5.1 and "netbeans_mobility-5_5_1-win- dows.exe" for installation of Mobility package of SunTM NetBeans IDE 5.5.1.
Note: The integration of the SMTK into SunTM NetBeans IDE 5.0 / SunTM NetBeans IDE 5.5.1 is done for all users.
3.5.4Installing Eclipse 3.0, Eclipse 3.1 or Eclipse 3.2
Eclipse 3.1.2 (CD directory “\Eclipse\”) and Eclipse ME Plugin 1.2.3 (CD directory “\EclipseME_123\”)7 or Eclipse ME Plugin 1.5.0 (CD directory “\EclipseMEplugin_150\”) are provided on the SMTK CD. The installation of Eclipse is shortly described in Section 3.4. 8
Eclipse can be freely downloaded from http://www.eclipse.org. In order to use Eclipse with the ME the EclipseME plug-in is also needed. It can be downloaded from http://eclipseme.org.
Using Eclipse 3.0.1 or Eclipse 3.0.2:
A customized version of this plug-in (CD directory “\EclipseME_WM\”)9 for Eclipse 3.0.1 and 3.0.2 comes with SMTK. It is required to use this plug-in for Eclipse 3.0.1 and Eclipse 3.0.2, because EclipseME plugin 1.2.3 requires Eclipse 3.1.0 and later and not installable for the older Eclipse versions 3.0.1 and 3.0.2.
Using Eclipse 3.1.0, Eclipse 3.1.1 or Eclipse 3.1.2:
Please use EclipseME plug-in 1.2.1 or 1.2.3 for Eclipse version 3.1.0, Eclipse 3.1.1 or Eclipse 3.1.2.
Using Eclipse 3.2. (only supported for TC65):
Please use EclipseME plug-in 1.5.5 or 1.6.x.
It is recommended to use Eclipse 3.2.2 with ME 1.5.5 for working with Java Debugging session.
Note: Only one selection for an Eclipse version at a time for SMTK integration is possible.
7.Eclipse ME Plugin 1.2.3 is not provided on TC65 CD.
8.Eclipse ME Plugin 1.5.0 is supported on the TC65, XT65/XT75 and AC65/AC75 CDs.
9."\EclipseME_WM" CD directory is not included on TC65 CD.
wm_java_usersguide_v12 |
Page 26 of 123 |
2008-02-25 |
Confidential / Released |
|
|

Java User’s Guide
3.6 SMTK Uninstall
s
3.5.5Installing Borland JBuilder X, 2005 and 2006 Enterprise/ Developer
Borland JBuilder can be purchased from http://www.borland.com/jbuilder. There are also 30 days trial versions available on the website. Installation instructions can be found there.
Note: The installation path name of JBuilder should not include space characters.
3.5.6Installing Module Exchange Suite (MES)
The Module Exchange Suite (MES) is installed during the SMTK installation. If you would like to install the Module Exchange Suite separately, repair or remove it, please use the Module Exchange Suite (MES) setup.exe, which is located on the SMTK installation disk in the subdirectory “MES”.
3.6SMTK Uninstall
The SMTK install package comes with an uninstall facility. The entire SMTK or parts of the package can be removed. To start the uninstall facility, open the Control Panel, select Add/ Remove Programs, select the desired SMTK, e.g. TC65 Software Development Kit and follow the instructions. The standard modem and Dial-Up Network connection (DUN) are uninstalled automatically, if no SMTK IMP-NG product is installed in parallel. The user will be asked for uninstall of standard modem and Dial-Up Network (DUN) in the case, that another SMTK IMPNG product is installed.
The Module Exchange Suite (MES) is not uninstalled automatically with the SMTK. If you would like to uninstall the Module Exchange Suite (MES) as well, please run the MES uninstall facility. To run the uninstall program, open the Control Panel, select Add/Remove Programs, select
Siemens Module Exchange Suite (MES) and follow the instructions.
Please keep in mind, that standard modem (or USB modem), Dial-Up Network connection and Module Exchange Suite (MES) are required for a proper work of SMTK on-device debugging.
Note for customers migrating from TC45 to TC65:
If you uninstall the TC45 software after the installation of TC65 you need to run the TC65 SDK and MES setup in maintenance mode to restore several files required for TC65. To do so, open the Windows Control Panel, double-click Add or Remove Programs, select “TC65 Software Development Kit”, press the Change/Remove button and select Repair. In the same manner, reinstall the Siemens Module Exchange Suite (MES)" As an alternative, to avoid this step, remove the TC45 package, before installing TC65 SDK and MES.
3.7Upgrades
The SMTK can be modified, repaired or removed by running the setup program on the Installation CD.
wm_java_usersguide_v12 |
Page 27 of 123 |
2008-02-25 |
Confidential / Released |
|
|

Java User’s Guide
4 Software Platform
s
4 Software Platform
In this chapter, we discuss the software architecture of the SMTK and the interfaces to it.
4.1Software Architecture
The SMTK enables a customer to develop a Java application on a PC and have it be executable on the Java enabled module. The application is then loaded onto the module. The platform comprises:
•JavaTM Micro Edition (Java METM), which forms the base of the architecture.
The Java METM is provided by SUN Microsystems, http://java.sun.com/javame/. It is specifically designed for embedded systems and has a small memory footprint. The ME uses: CLDC 1.1 HI, the connected limited device configuration hot spot implementation. IMP-NG, the information module profile 2nd generation, this is for the most part identical to MIDP 2.0 but without the lcdui package.
•Additional Java virtual machine interfaces: AT Command API
File I/O API
The data flow through these interfaces is shown in Figure 7 and Figure 29.
•Memory space for Java programs:
Flash File System: around 1700k (1200k in XT75) RAM: around 400k
Application code and data share the space in the flash file system and in RAM.
•Additional accessible periphery for Java applications
-A maximum of ten digital I/O pins usable, for example, as: Output: status LEDs
-Input: Emergency Button
-One I2C/SPI Interface.
-One Digital Analog Converter and two Analog Digital Converters.
-Serial interface (RS-232 API): This standard serial interface could be used, for example, with an external GPS device or a current meter.
For detailed information see Section 4.2.
wm_java_usersguide_v12 |
Page 28 of 123 |
2008-02-25 |
Confidential / Released |
|
|

Java User’s Guide
4.2 Interfaces
s
4.2Interfaces
4.2.1ASC0 - Serial Device
ASC0, an Asynchronous Serial Controller, is a 9-wire serial interface. It is described in [2]. Without a running Java application the module can be controlled by sending AT commands over ASC0. Furthermore, ASC0 is designed for transferring files from the development PC to the module. When a Java application is started, ASC0 can be used as an RS-232 port or/and System.out. Refer to [3] for details.
4.2.2General Purpose I/O
There are ten I/O pins that can be configured for general purpose I/O. One pin can be configured as a pulse counter. All lines can be accessed under Java by AT commands or a Java API. See [1] and [2] for information about usage and startup behavior.
4.2.3DAC/ADC
There are two analogue input lines and one analogue output line. They are accessed by AT commands. See [1] and [2] for details.
The TC65 Terminal does not feature DAC interface.
4.2.4ASC1
ASC1 is the second serial interface on the module. This is a 4-pin interface (RX, TX, RTS, CTS). It can be used as a second AT interface when a Java application is not running or by a running Java application as RS-232 port or/and System.out.
The TC65 Terminal and products with GPS do not feature ASC1.
4.2.5Digital Audio Interface (DAI)
The ME has a seven-line serial interface with one input data clock line and input/output data and frame lines to support the DAI. Refer to [1] and [2] for more information.
TC65 Terminal does not feature a DAI interface.
4.2.6I2C/SPI
There is a 4 line serial interface which can be used as I2C or SPI interface. It is described in [2]. The AT^SSPI AT command configures and drives this interface. For details see [1].
wm_java_usersguide_v12 |
Page 29 of 123 |
2008-02-25 |
Confidential / Released |
|
|

Java User’s Guide
4.2 Interfaces
s
4.2.7GPS
The on-board GPS functionality can be accessed in 4 different ways from a Java application.
•AT commands via ATCommand
•Java API JSR179
•transparent via CommConnection
•transparent via ATCommand
It is discouraged to use the forth possibility since it uses up a valuable ATCommand instance. Use Java API for non-transparent, use CommConnection for transparent GPS access. Transparent and non-transparent modes can not be used concurrently but it is possible and in some cases may be necessary to use AT commands concurrently with the Java API e.g. for GPS power saving modes. For details about AT command related GPS functionality see [1].
The usage of CommConnection for GPS access is very straight forward. Calling Connector.open with port-id “gps0” opens a transparent channel to the GPS module. Then all protocols supported by the GPS hardware can be used.
The Java location API (JSR179) offers three basic functionalities (for details see [3]):
•location listener, a periodic call-back with current location information
•proximity listener, a call-back when a specified location is close
•landmark store, a storage for landmarks/way-points
The landmark store is persistent. The stores are saved to FFS under a:/lmstores/store_X.xml, where X is the number of the store (0 is the default store).
There can be 8 stores plus 1 default store each containing up to 100 landmarks in up to 8 categories (“no category” also counts as a category). Using AddressInfo with the landmarks might decrease the maximum number of possible landmarks in a store, depending on the amount of AddressInfo data being used. An IOException indicates that a store is full.
There is only one store active at a time. The current store information is kept in RAM and only written to FFS when the application switches to a different store or terminates. Saving a store might take up to 45s! During this time period the VM is blocked, no processing can be done in parallel.
One of the examples that come with the product CD is a tracking application that uses the Java location API.
GPS is only supported in XT75/XT65.
Products with GPS do not feature ASC1. So System.out is set to “null” device by default (see Section 5.9).
wm_java_usersguide_v12 |
Page 30 of 123 |
2008-02-25 |
Confidential / Released |
|
|
Loading...