


COMBINATION CUTTER PSFS 250 A1
COMBINATION CUTTER |
FREZARKA UNIWERSALNA |
|||
Operation and Safety Notes |
Wskazówki dotyczące obsługi i bezpieczeństwa |
|||
Translation |
of original operation manual |
Tłumaczenie oryginalnej instrukcji obsługi |
||
KOMBINIRANI REZKALNIK |
KOMBINOVANÁ FRÉZA |
|||
Navodila za upravljanje in varnostna opozorila |
Pokyny pro obsluhu a bezpečnostní pokyny |
|||
Prevod |
originalnega navodila za uporabo |
Překlad |
originálního provozního návodu |
|
KOMBINOVANÁ FRÉZA |
KOMBI-FRÄSER |
|||
Pokyny pre obsluhu a bezpečnostné pokyny |
Bedienungs - und Sicherheitshinweise |
|||
Preklad |
originálneho návodu na obsluhu |
Originalbetriebsanleitung |
||
IAN 93497

Before reading, unfold the page containing the illustrations and familiarise yourself with all functions of the device.
Przed przeczytaniem proszę rozłożyć stronę z ilustracjami, a następnie proszę zapoznać się z wszystkimi funkcjami urządzenia.
Pred branjem odprite stran s slikami in se nato seznanite z vsemi funkcijami naprave.
Před čtením si otevřete stranu s obrázky a potom se seznamte se všemi funkcemi přístroje.
Pred čítaním si odklopte stranu s obrázkami a potom sa oboznámte so všetkými funkciami prístroja.
Klappen Sie vor dem Lesen die Seite mit den Abbildungen aus und machen Sie sich anschließend mit allen Funktionen des Gerätes vertraut.
GB |
Operation and Safety Notes |
Page |
5 |
PL |
Wskazówki dotyczące obsługi i bezpieczeństwa |
strona |
13 |
SI |
Navodila za upravljanje in varnostna opozorila |
stran |
23 |
CZ |
Pokyny pro obsluhu a bezpečnostní pokyny |
strana |
33 |
SK |
Pokyny pre obsluhu a bezpečnostné pokyny |
strana |
41 |
DE / AT / CH |
Bedienungsund Sicherheitshinweise |
seite |
51 |

13 |
|
1 |
|
2 |
|
3 |
|
|
|
|
|
|
|
|
|
12
|
4 |
12 |
|
11 |
5 |
10 |
|
9 |
6 |
8 
 7
7
A 

4
D 
 19
19 
 14
14 
 15
15
18
|
17 |
|
|
16 |
|
|
G

B |
2 |
E |
5 |
H |
8 |
10 |
C |
|
11 |
|
10 |
|
7 |
|
F |
|
13 |
|
I |
|
|
19 |

Table of contents
Introduction |
|
|
Intended use........................................................................................................................................ |
Page |
6 |
Features................................................................................................................................................ |
Page |
6 |
Scope of delivery................................................................................................................................ |
Page |
6 |
Technical Data..................................................................................................................................... |
Page |
6 |
General safety advice for electrical power tools |
|
|
1. Workplace safety........................................................................................................................... |
Page |
7 |
2. Electrical safety............................................................................................................................... |
Page |
7 |
3. Personal safety................................................................................................................................ |
Page |
7 |
4. Careful handling and use of electrical power tools.................................................................... |
Page |
8 |
5. Service............................................................................................................................................. |
Page |
8 |
Additional safety information for grinders and polishers.................. |
Page |
9 |
Additional safety information for routers......................................................... |
Page |
9 |
Operation |
|
|
Switching ON / OFF........................................................................................................................... |
Page |
9 |
Setting the speed................................................................................................................................ |
Page |
9 |
Changing tools.................................................................................................................................... |
Page |
9 |
Installing sanding belts....................................................................................................................... |
Page |
10 |
Setting the working depth.................................................................................................................. |
Page 10 |
|
Milling direction for edges................................................................................................................. |
Page |
10 |
Plunge cutting...................................................................................................................................... |
Page 10 |
|
Pivot handle......................................................................................................................................... |
Page 10 |
|
Using the rip fence.............................................................................................................................. |
Page 10 |
|
Cutting circles...................................................................................................................................... |
Page |
10 |
Dust extraction..................................................................................................................................... |
Page |
11 |
Continuous tool operation.................................................................................................................. |
Page |
11 |
Maintenance and Cleaning.............................................................................................. |
Page 11 |
|
Service............................................................................................................................................... |
Page 11 |
|
Warranty......................................................................................................................................... |
Page 11 |
|
Disposal............................................................................................................................................ |
Page 12 |
|
Declaration of Conformity / Manufacturer........................................................ |
Page 12 |
|
GB 5

Introduction
Combination Cutter PSFS 250 A1
Introduction
Congratulations on your new product. You have selected a high quality product. The instructions for use are a part of this product. They contain important information about safety, use and disposal. Before using the product, please familiarise yourself with all the operating and safety instructions. Only use the product as described and for the indicated purpose. When passing this product on to others please be sure to also include all of its documentation.
Intended use
This device - used with the recommended tools and accessories - is designed to deal with materials such as wood, plastic, fibre boards, wall tiles aluminium and iron sheets. It is also suitable for grinding using various cylindrical grinders and for milling using milling bits with a shank diameter of 4.8 mm. Any other use or modifying the device is considered improper use and involves considerable accident risks. The manufacturer is not liable for damage caused by improper use. Not intended for commercial use.
Features
1Locking switch
2Variable speed control
3Mains lead
4ON / OFF switch
5Wing setscrew
6Dust extraction nozzle
7Base plate
8Collet
9Wing bolt (base plate) 10 Clamping nut
11 Spindle lock button
12 Louvres
13 Stop plate
14 Open-ended spanner
15 Circle / parallel cutting guide
6 GB
16Sanding belts
17Slot cutter (HSS)
18Multi-purpose cutter (HSS)
19Adapter (dust extraction nozzle)
Scope of delivery
1 Combination cutter PSFS 250 A1
1 Parallel fence with circle cutting function
1 Dust extraction adapter
1 Open-ended spanner
1 Multi-purpose cutter (HSS)
1 Slot cutter (HSS)
1 Sanding belt tensioning arbor
6 Sanding belts
1 Operating instructions
Technical Data
Rated power input: |
250 W |
Voltage: |
230 V , 50 Hz |
Idle speed (n0): |
10,000–28,000 rpm |
Collet capacity: |
4.8 mm |
Protection class: |
II / |
Noise and vibration data:
Noise value determined according to EN 60745. The A-rated noise level of the electric tool is typically:
Sound pressure level: |
75 dB(A) |
Sound power level: |
86 dB(A) |
Uncertainty K: |
3 dB(A) |
Wear hearing protection!
Evaluated acceleration, typically:
Hand- / arm vibration ah < 2.5 m / s2 Uncertainty K = 1.5 m / s2

 The vibration level specified in these instructions was measured in accordance with an EN 60745 standardised measurement process and can be used to compare equipment. The vibration emission value specified can also serve as a preliminary assessment of the exposure.
The vibration level will change according to the application of the electrical tool and in some cases,

Introduction / General safety advice for electrical power tools
may exceed the value specified in these instructions. Regularly using the electric tool in such a way may make it easy to underestimate the vibration.
Note: If you wish to make an accurate assessment of the vibration loads experienced during a particular period of work, you should also take into account the intervening periods of time when the device is switched off or is running but is not actually in use. This can result in a much lower vibration load over the whole of the work period.
General safety advice for electrical power tools

 Please read all safety information and instructions. Failure to observe the safety information and instructions can result in electric shock, fire and / or serious injury.
For future reference keep all the safety advice and instructions in a safe place.
The term “electrical tool” used in the safety advice refers to electrical tools powered by mains electricity (by means of a mains lead) and electrical tools powered by rechargeable batteries (without a mains lead).
1. Workplace safety
a)Keep your working area clean and well lit. Untidy or poorly lit working areas can lead to accidents.
b)Do not work with the device in potentially explosive environments, which contain inflammable liquids, gases or dusts. Electrical power tools create sparks which can ignite dusts or fumes.
c)Keep children and other people away whilst operating the electrical tool.
Distractions can cause you to lose control of the device.
2. Electrical safety
a) The mains plug on the device must match the mains socket. The plug must not be modified in any way. Do not use an adapter plug with devices fitted with a protective earth. Unmodified plugs and matching sockets reduce the risk of electric shock.
b)Avoid touching grounded surfaces such as pipes, radiators, ovens, and refrigerators. There is a higher risk of electric shock if your body is earthed.
c)Keep the device away from rain or moisture. The penetration of water into the electrical device increases the risk of an electric shock.
d)Do not use the mains lead for any purpose for which it was not intended, e.g. to carry the device, to hang up the device or to pull the mains plug out of the mains socket. Keep the mains lead away from heat, oil, sharp edges or moving parts of the device. Damaged or tangled cables increase the risk of an electric shock.
e)When using electric power tools outdoors always use extension cords approved for outdoor use. The use of an extension cable suitable for outdoor use reduces the risk of electric shock.
f)Use a residual current device for protection if the operation of the electrical power tool in a moist environment cannot be avoided. The use of an residual current operated device reduces the risk of electric shock.
3. Personal safety
a)Remain alert at all times, watch what you are doing and always proceed with caution. Do not use the device if you are tired or under the influence of drugs, alcohol or medication. One moment of carelessness when using the electric tool can lead to serious injury.
GB 7

General safety advice for electrical power tools
b)Wear personal protective equipment and always wear safety glasses. The wearing of personal protective equipment such as dust masks, non-slip safety shoes, safety helmets or ear protectors, appropriate to the type of electrical power tool used and work undertaken, reduces the risk of injury.
c)Avoid unintentional operation of the device. Check that the electrical power tool is switched off before you connect it to the mains, pick it up or carry it.
Accidents can happen if you carry the device with your finger on the ON / OFF switch or with the device switched on.
d)Remove any setting tools or spanners before you switch on the device. A tool or spanner left attached to a rotating part of a device can lead to injury.
e)Avoid placing your body in an unnatural position. Keep proper footing and balance at all times. By doing this, you will be in a better position to control the electrical power tool in unforeseen circumstances.
f)Wear suitable clothing. Do not wear loose clothing or jewellery. Keep your hair, clothing and gloves clear of moving parts. Loose clothing, jewellery or long hair can become trapped in moving parts.
g)If vacuum dust extraction and collection devices are fitted, do not forget to check that they are properly connected and used correctly. The use of these devices reduces the hazard presented by dust.
4.Careful handling and use of electrical power tools
a)Do not overload the device. Always use an electrical power tool that is intended for the task you are undertaking. By using the right electrical power tool for the job, you will work more safely and achieve a better result.
b)Do not use an electrical power tool if its switch is defective. An electrical power
8 GB
tool that can no longer be switched on and off is dangerous and must be repaired.
c)Pull the mains plug from the socket before you make any adjustments to the device, change accessories or when the device is laid aside. This precaution is intended to prevent you from unintentionally starting the device.
d)Always ensure that electrical power tools are kept out of reach of children when not in use. Do not let anyone use the device if he or she is not familiar with it or has not read the instructions and advice. Electrical power tools are dangerous when they are used by inexperienced people.
e)Maintain the device carefully. Check that moving parts are working properly and move freely. Check for any parts that are broken or damaged enough to detrimentally affect the functioning of the device. Have damaged parts repaired before you use the device. Many accidents have their origins in poorly maintained electrical power tools.
f)Keep cutting tools clean and sharp.
Carefully maintained cutting tools with sharp cutting edges are less likely to jam and are easier to control.
g)Use the electrical power tool, accessories, inserted tools etc. in accordance with these instructions and advice, and the stipulations for this particular type of device. When doing this, take the working conditions into consideration, as well as the task at hand. The use of electrical power tools for purposes other than those intended can lead to dangerous situations.
5. Service
a)Only have the equipment repaired by qualified specialist personnel using OEM spare parts. This ensures that the safety of the device is maintained.

Additional safety … / Additional safety information for routers / Operation
Additional safety information for grinders and polishers
POISONOUS DUSTS! The working of materials that can produce harmful / toxic dusts presents a health risk for the operator and for people located in the close vicinity.
Avoid sanding of paints containing lead or other material detrimental to your health.
Do not work on materials containing asbestos. Asbestos is considered carcinogenic.
Wear safety glasses and a dust protection mask!
Additional safety information for routers
Hold the device by the insulated handle surfaces as there is a danger of the cutter striking the device’s mains lead. Contact with a live wire could cause metal parts of the device to become live and lead to electric shock.
Only use cutting bits with the correct size shaft diameter suitable for the speed of the electric tool.
Fix and secure the work piece to a stable surface using clamps or other means. If you only hold the work piece with your hand or against your body, it will remain unstable which could lead to a loss of control.
Operation
Never use the device for any purpose other than the intended purpose and only use it with the original parts and accessories. The use of parts or accessories other than those recommended in the operating instructions could lead to you suffering an injury. Use only an extension cable that has been completely unrolled and is undamaged with a capacity of at least 5 A.
WARNING: Do not use this tool for the creation of notches in the vicinity of installations or openings with live electric cables or in walls behind which live electric cables could potentially be laid. The bit could conduct electricity into the tool and this could involve the risk of electric shock to the operator.
Trigger the circuit breaker or remove the fuse in order to disconnect the relevant electric circuit.
Attention: Always hold the tool on the plastic housing and always wear safety goggles when working with the tool.
Switching ON / OFF (see Fig. A)
Switching on:
Press the ON / OFF switch 4 .
Switching off:
Release the ON / OFF switch 4 .
Setting the speed (see Fig. B)
Turn the speed controller 2 in a clockwise direction to increase the speed.
Turn the speed controller 2 in an anticlockwise direction to reduce the speed.
Changing tools (see Fig. C)
Note: Only use combination cutter accessory parts with a shaft diameter of ø 4.8 mm.
Hold the spindle lock button 11 pressed down. Loosen the clamping nut 10 with the wrench 14 by turning in an anticlockwise direction.
Change the tool.
Block the spindle lock, tighten the clamping nut 10 using the open-ended spanner 14 .
Bits:
The bits included are intended for the following applications (see Fig. D).
Multi-purpose cutter (HSS) 18 :
Application: wood, particle board, plastic, aluminium and iron sheets
Slot cutter (HSS) 17 :
Application: wood, particle board, plastic
Sanding belts 16 :
Application: sanding wood
GB 9

Operation
Note: Please use suitable accessories available from your speciality retailer to cut wall tiles and / or edit sheets of metal / light metal.
Installing sanding belts
Install the sanding belts 16 as shown in Figure C.
Setting the working depth (see Fig. E)
Loosen the wing bolt 5 .
Slide the base plate 7 to the desired working depth (to cut through completely set approx. 3.2 mm deeper than the material thickness). The recommended maximum cutting depth for wood is 13 mm *(only applies to multipurpose cutter (HSS) 18 ).
Retighten the wing bolt 5 .
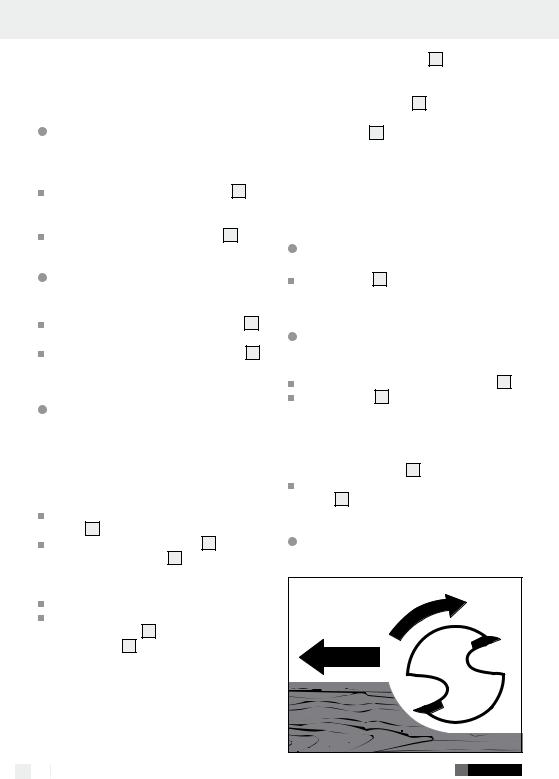
Milling direction for edges
 Plunge cutting
Insert the bit into the work piece at an angle of 45°.
Slowly straighten the bit to an angle of 90° to begin the cut.
Note: The base plate 7 must be flush with the material surface.
10 GB
7
Pivot handle (see Fig. F)
Note: Turning the grip during the start up operations is forbidden. Remove the plug from the socket and make sure that the swivel lock 13 is engaged.
Pivot to horizontal |
|
|
|
Press and hold the bevel stop |
13 |
. |
|
Turn the handle counter-clockwise |
from ver- |
||
tical to horizontal until the bevel stop locks in. |
|||
Pivot to vertical |
|
|
|
Press and hold the bevel stop |
13 |
. |
|
Turn the handle clockwise |
from horizontal |
||
to vertical until the bevel stop locks in.
 Using the rip fence (see Fig. G)
Loosen the wing bolts 9 on the base plate 7 and slide the guide bar for the circle- / rip fence 15 through the two openings in the bottom of the base plate 7 , with the rip fence facing down.
Position the tool the desired distance from the edge of the work piece. Tighten the wing bolts 9 to secure the circle- / ripe fence 15 to the foot plate 7 .
Cutting circles (see Fig. H)
Note: The position of the guide hole depends on the desired result, either inside or outside of the edge of the circle: inside for holes, outside for discs. The radius can be set from ca. 5 to 16 cm.
Operation / Maintenance and Cleaning / Service / Warranty
Make a circle on the work piece.
Mark the centre and drill a hole into the hole (plunge cut).
Drill a guide hole on the edge of the circle (plunge cut) (guide hole diameter 3 mm). Loosen the wing bolts 9 in the foot plate 7 and slide the guide rod for the circle- / rip fence set 15 through the two holes in the bottom of the base plate 7 , with the centring tip facing down.
Insert the centring tip in the middle of the circle. Adjust the distance of the circle- / rip fence set 15 so as to plunge the bit into the guide hole at the edge of the circle.
Lock the base plate 7 by tightening the wing bolts 9 .
Press and hold the ON / OFF switch 4 to power on the unit.
Slowly push the unit forward.
Clean the device with a dry cloth, never use petrol, solvents or cleaning agents harmful to plastic.
Always keep the vents clear.
Remove dust clinging to the sander with a brush.
Service

 Always have your device repaired by qualified specialist personnel using only original manufacturer parts. This will maintain the safety of the device.

 If the plug or mains lead needs to be replaced, always have the work performed by the manufacturer or its service centre. This will maintain the safety of the device.
Dust extraction (see Fig. I) |
Warranty |
The tool features a dust extraction nozzle 6 to vacuum off dust.
Insert the adapter 19 in the extraction nozzle 6 .
Connect a vacuum cleaner to the adapter 19 .
Continuous tool operation
Locking the ON / OFF switch 4 :
Activate the ON / OFF switch 4 .
Press the locking switch 1 and release the ON / OFF switch 4 .
Unlocking the ON / OFF switch 4 :
Activate the ON / OFF switch 4 and release.
Maintenance and Cleaning
The device requires no maintenance.
Clean the unit promptly after use.
The warranty for this appliance is for 3 years from the date of purchase. The appliance has been manufactured with care and meticulously examined before delivery. Please retain your receipt as proof of purchase. In the event of a warranty claim, please make contact by telephone with our Service Department. Only in this way can a post-free despatch for your goods be assured.
The warranty covers only claims for material and maufacturing defects, but not for transport damage, for wearing parts or for damage to fragile components, e.g. buttons or batteries. This product is for private use only and is not intended for commercial use.
The warranty is void in the case of abusive and improper handling, use of force and internal tampering not carried out by our authorized service branch. Your statutory rights are not restricted in any way by this warranty.
The warranty period will not be extended by repairs made unter warranty. This applies also to replaced
GB 11

Warranty / Disposal / Declaration of Conformity / Manufacturer
and repaired parts. Any damage and defects extant on purchase must be reported immediately after unpacking the appliance, at the latest, two days after the purchase date. Repairs made after the expiration of the warranty period are subject to payment.
GB
Service Great Britain Tel.: 0871 5000 720
(0,10 GBP/Min.) e-mail: kompernass@lidl.co.uk
IAN 93497
Disposal
The packaging is made of environmentally friendly materials, which may be disposed through your local recycling facilities.
Do not dispose of electrical power tools with household rubbish!
In accordance with European Directive 2002 / 96 / EC on waste electrical and electronic equipment and its implementation into national legislation, worn out electrical power tools must be collected separately and recycled in an environmentally friendly fashion.
Contact your local refuse disposal authority for more details on the disposal of worn out electrical devices.
12 GB
Declaration of Conformity /
Manufacturer 

We, KompernaSS HANDELS GmbH, the person responsible for documents: Mr Semi Uguzlu, Burg strASSE 21, 44867 Bochum, Germany, hereby declare that this product complies with the following standards, normative documents and EU directives:
Machinery Directive (2006 / 42 / EC)
EC Low Voltage Directive (2006 / 95 / EC)
Electromagnetic Compatibility (2004 / 108 / EC)
RoHS Directive (2011 / 65 / EU)
harmonised standards applied:
EN 60745-1/A11:2010
EN 60745-2-4/A11:2011
EN 60745-2-17:2010, EN 62233:2008 EN 55014-1/A2:2011
EN 55014-2:/ A2:2008
EN 61000-3-2/A2:2009 EN 61000-3-3:2008
Type / Description of product:
Combination Cutter PSFS 250 A1
Date of manufacture: 09–2013
Serial number: IAN 93497
Bochum, 30.09.2013
Semi Uguzlu
- Quality Manager -
We reserve the right to make technical modifications in the interest of product advancement.

Spis zawartości
Wstęp |
|
|
Użycie zgodne z przeznaczeniem................................................................................................. |
Strona |
14 |
Wyposażenie................................................................................................................................... |
Strona |
14 |
Zawartość......................................................................................................................................... |
Strona |
14 |
Dane techniczne.............................................................................................................................. |
Strona |
14 |
Ogólne wskazówki bezpieczeństwa dla elektronarzędzi |
|
|
1. Bezpieczeństwo miejsca pracy.................................................................................................. |
Strona |
15 |
2. Bezpieczeństwo elektryczne...................................................................................................... |
Strona |
15 |
3. Bezpieczeństwo osób................................................................................................................. |
Strona |
16 |
4. Staranne obchodzenie się i użytkowanie narzędzi elektrycznych......................................... |
Strona |
16 |
5. Serwis........................................................................................................................................... |
Strona |
17 |
Uzupełnione wskazówki bezpieczeństwa |
|
|
dla szlifierek i polerek...................................................................................................... |
Strona |
17 |
Uzupełnione wskazówki bezpieczeństwa dla frezarek |
|
|
górnowrzecionowych....................................................................................................... |
Strona |
17 |
Obsługa......................................................................................................................................... |
Strona |
17 |
Włączanie / wyłączanie................................................................................................................. |
Strona |
18 |
Ustawianie liczby obrotów.............................................................................................................. |
Strona |
18 |
Wymiana narzędzi.......................................................................................................................... |
Strona |
18 |
Montowanie taśm ściernych............................................................................................................ |
Strona |
18 |
Ustawianie głębokości pracy.......................................................................................................... |
Strona |
18 |
Kierunek frezowania przy krawędziach........................................................................................ |
Strona |
18 |
Wykonywanie cięcia wgłębnego................................................................................................... |
Strona |
19 |
Obracanie uchwytem...................................................................................................................... |
Strona |
19 |
Stosowanie równoległego prowadzenia....................................................................................... |
Strona |
19 |
Wycinanie kół................................................................................................................................... |
Strona |
19 |
Odsysanie kurzu.............................................................................................................................. |
Strona |
19 |
Stosowanie narzędzia w pracy ciągłej......................................................................................... |
Strona 20 |
|
Konserwacja i czyszczenie............................................................................................ |
Strona 20 |
|
Serwis.............................................................................................................................................. |
Strona 20 |
|
Gwarancja................................................................................................................................... |
Strona 20 |
|
Utylizacja..................................................................................................................................... |
Strona |
21 |
Deklaracja zgodności / Producent.......................................................................... |
Strona |
21 |
PL 13

Wstęp
Frezarka uniwersalna PSFS 250 A1
Q Wstęp
Gratulujemy zakupu nowego urządzenia. Tym samym zdecydowali się Państwo na zakup produktu wysokiej jakości. Instrukcja obsługi jest częścią tego produktu. Zawiera ona ważne wskazówki dotyczące bezpieczeństwa, użytkowania i utylizacji. Przed pierwszym użyciem produktu należy zapoznać się ze wszystkimi wskazówkami dotyczącymi obsługi i bezpieczeństwa. Używać produktu wyłącznie zgodnie z jego poniżej opisanym przeznaczeniem. W przypadku przekazania produktu innej osobie należy dołączyć do niego całą jego dokumentację.
Użycie zgodne z przeznaczeniem
Niniejsze urządzenie przeznaczone jest - z zalecanymi narzędziami i akcesoriami - do obróbki materiałów takich jak drewno, tworzywo sztuczne, płyty pilśniowe, kafle naścienne, płyty aluminiowe i metalowe. Nadaje się też do szlifowania różnymi okrągłymi szlifierkami jak również do frezowania frezami o średnicy trzonka 4,8 mm. Każde inne zastosowanie urządzenia lub wprowadzanie do niego zmian jest uznawane za działanie niezgodne z przeznaczeniem i wiąże się ze znacznym ryzykiem wypadku. Producent nie ponosi odpowiedzialności za szkody powstałe wskutek użycia produktu niezgodnie z jego przeznaczeniem. Urządzenie nie jest przeznaczone do celów zarobkowych.
Wyposażenie
1przełącznik blokujący
2płynny regulator prędkości obrotowej
3przewód sieciowy
4WŁĄCZNIK / WYŁĄCZNIK
5śruba nastawcza skrzydełkowa
6króciec odsysający
7płyta ślizgowa
8uchwyt mocujący
14 PL
9 śruba skrzydełkowa (płyta ślizgowa)
10nakrętka napinająca
11przycisk blokady wrzeciona
12szczeliny wentylacyjne
13blokada obrotu
14klucz szczękowy
15przystawka do cięcia po kole / linii
16taśmy ścierne
17frez wpustowy (HSS)
18frezy uniwersalne (HSS)
19adapter (króciec odsysający)
Zawartość
1 uniwersalna frezarka PSFS 250 A1
1 zderzak równoległy z funkcją cięcia po kole
1 adapter odkurzacza
1 klucz szczękowy
1 frezy uniwersalne (HSS)
1 frez wpustowy (HSS)
1 trzpień mocujący
6 taśm ściernych
1 instrukcja obsługi
Dane techniczne
Nominalne zużycie energii: |
250 W |
Napięcie: |
230 V , 50 Hz |
Liczba obrotów biegu |
|
jałowego (n0): |
10.000– |
|
28.000 / min-1 |
Mocowanie narzędzi: |
4,8 mm |
Klasa ochrony: |
II / |
Informacje dotyczące hałasu i wibracji:
Wartość pomiarowa hałasu wyznaczona zgodnie z EN 60745. Poziom hałasu elektronarzędzia wg oceny A wynosi typowo:
Poziom ciśnienia hałasu: 75 dB(A) Pozom mocy hałasu: 86 dB(A) Niepewność pomiaru K: 3 dB(A)
Zakładać ochronniki słuchu!

Wstęp / Ogólne wskazówki bezpieczeństwa dla elektronarzędzi
Określone przyśpieszenie, typowe:
Przenoszenie wibracji ah < 2,5 m / s2 Niepewność K = 1,5 m / s2

 Podany w niniejszych instrukcjach poziom drgań wyznaczony został za pomocą metody pomiarowej określonej w normie EN 60745 i może zostać użyty do porównania urządzeń. Podany poziom emisji drgań może być wykorzystywany również do wstępnego oszacowania przerw w działaniu.
Poziom drgań będzie się różnił w zależności od zastosowania elektronarzędzia i w niektórych przypadkach może przekroczyć wartość podaną w niniejszej instrukcji. Obciążenie drganiami może wydawać się mniejsze niż w rzeczywistości, jeśli elektronarzędzie będzie regularnie używane ten sposób.
Wskazówka: Celem dokładnego oszacowania obciążenia wibracjami w okresie określonego okresu czasu pracy należy uwzględnić również te okresy, w których urządzenie jest wyłączone lub wprawdzie jest włączone, ale w rzeczywistości nie pracuje.
Może to przyczynić się do znacznej redukcji obciążenia wibracjami w całym okresie czasu pracy.
Ogólne wskazówki bezpie- czeństwa dla elektronarzędzi

 Przeczytaj wszystkie wskazówki dotyczące bezpieczeństwa oraz instrukcje! Zaniedbania w przestrzeganiu wskazówek dotyczących bezpieczeństwa oraz w przestrzeganiu instrukcji mogą spowodować porażenie prądem elektrycznym, pożar i / lub ciężkie obrażenia ciała.
Przechowuj na przyszłość wszystkie wskazówki dotyczące bezpieczeństwa oraz instrukcje!
Używany we wskazówkach dotyczących bezpieczeństwa termin „narzędzie elektryczne“ odnosi się do narzędzi elektrycznych zasilanych z sieci
(z kablem sieciowym) oraz do narzędzi elektrycznych zasilanych z akumulatorów (bez kabla sieciowego).
1. Bezpieczeństwo miejsca pracy
a)Utrzymywać stanowisko pracy w czystości i dobrze oświetlone. Nieporządek i nieoświetlone obszary robocze mogą prowadzić do wypadków.
b)Nie pracuj przy użyciu urządzenia w otoczeniu zagrożonym eksplozją, w którym znajdują się palne ciecze, gazy lub pyły. Urządzenia elektryczne wytwarzają iskry, które mogą zapalić pył lub pary.
c)Podczas użytkowania urządzenia elektrycznego trzymaj dzieci i inne osoby z daleka od urządzenia. Przy odchyleniu możesz stracić kontrolę nad urządzeniem.
2. Bezpieczeństwo elektryczne
a)Wtyk sieciowy urządzenia musi pasować do wtykowego gniazdka sieciowego. W żaden sposób nie wolno zmieniać wtyku sieciowego urządzenia. Nie używaj żadnych wtyków adapterowych razem z urządzeniami wyposażonymi w uziemienie ochronne.
Niezmienione wtyki sieciowe i pasujące wtykowe gniazdka sieciowe zmniejszają ryzyko porażenia prądem elektrycznym.
b)Unikaj kontaktu fizycznego z powier zchniami uziemionymi takimi jak powierzchnie rur, grzejników, kuchni elektrycznych i lodówek. Istnieje podwyższone niebezpieczeństwo porażenia prądem elektrycznym, gdy twoje ciało jest uziemione.
c)Trzymaj urządzenie z daleka od deszczu i wilgoci. Wniknięcie wody do urządzenia elektrycznego zwiększa ryzyko porażenia prądem elektrycznym.
d)Nie używaj kabla sieciowego w sposób sprzeczny z jego przeznaczeniem, tj. do noszenia urządzenia, zawieszania urzą dzenie lub do wyciągania wtyku sieciowego z wtykowego gniazdka sieciowego. Trzymaj kabel z daleka od gorąca, oleju, ostrych krawędzi lub poruszających się części urządzeń.
PL 15

Ogólne wskazówki bezpieczeństwa dla elektronarzędzi
Uszkodzone lub poplątane kable zwiększają ryzyko porażenia prądem elektrycznym.
e)Gdy pracujesz z urządzeniem elektrycznym na dworze używaj wyłącznie przedłużaczy, które są dopuszczone również do pracy na dworze. Użycie przedłużacza przystosowanego do stosowania na dworze zmniejsza ryzyko porażenia prądem elektrycznym.
f)Jeśli praca elektronarzędzia w otoczeniu wilgotnym jest nie do uniknięcia, należy zastosować wyłącznik prądu uszkodzeniowego. Zastosowanie wyłącznika prądu uszkodzeniowego zapobiega niebezpieczeństwu porażenia prądem elektrycznym.
3. Bezpieczeństwo osób
a)Bądź stale uważny, zwracaj uwagę na to co robisz i postępuj rozsądnie w trakcie pracy z narzędziem elektrycznym. Nie używaj narzędzia, gdy jesteś zmęczony lub znajdujesz się pod wpływem narkotyków, alkoholu lub lekarstw.
Chwila nieuwagi przy użytkowaniu urządzenia może prowadzić do poważnych obrażeń ciała.
b)Noś osobiste wyposażenie ochronne i zawsze okulary ochronne. Noszenie osobistego wyposażenia ochronnego takiego jak maska przeciwpyłowa, buty antypoślizgowe, kask ochronny lub ochrona słuchu stosownie do sposobu użytkowania narzędzia elektrycznego zmniejsza ryzyko obrażeń ciała.
c)Unikaj niezamierzonego uruchomienia. Upewnij się, że narzędzie elektryczne jest wyłączone zanim podłączysz je do zasilania prądowego, uchwycisz je lub będziesz je przenosił. Jeżeli podczas przenoszenia urządzenia będziesz trzymał palec na przełączniku WŁĄCZ. / WYŁĄCZ. lub jeżeli urządzenie jest włączone, to może to prowadzić do nieszczęśliwych wypadków.
d)Usuń narzędzia do nastawiania urządzenia lub klucze płaskie zanim włączysz urządzenie. Narzędzie lub klucz, który znajduje się w obracającej się części urządzenia może prowadzić do obrażeń ciała.
16 PL
e)Unikaj nienormalnej postawy ciała. Zadbaj o pewne stanowisko i w każdej chwili utrzymuj równowagę. Dzięki temu będziesz mógł lepiej kontrolować urządzenie, zwłaszcza w nieoczekiwanych sytuacjach.
f)Noś odpowiednią odzież. Nie noś obszernej odzieży ani biżuterii. Trzymaj włosy, odzież i rękawice z daleka od poruszających się części. Luźna odzież, biżuteria lub długie włosy mogą zostać uchwycone przez poruszające się części.
g)Jeżeli zostaną zamontowane urządzenia do odsysania i wychwytywania pyłu, to upewnij się, że są one podłączone i że będą prawidłowo używane.
Używanie tych urządzeń zmniejsza zagrożenie wywoływane pyłem.
4.Staranne obchodzenie
się i użytkowanie narzędzi elektrycznych
a)Nie przeciążaj urządzenia. Używaj do swojej pracy przeznaczonego do niej narzędzia elektrycznego. Za pomocą odpowiedniego narzędzia elektrycznego pracujesz lepiej i bezpieczniej w danym zakresie robót.
b)Nie używaj żadnego narzędzia elektrycznego, którego przełącznik jest uszkodzony. Narzędzie elektryczne, które nie daje się już więcej włączyć lub wyłączyć, jest niebezpieczne i musi zostać naprawione.
c)Zanim przeprowadzisz nastawy urządzenia, wymienisz części osprzętu lub odłożysz urządzenie wyciągnij wtyczkę sieciową z sieciowego gniazdka wtykowego. Ten środek ostrożności zapobiega niezamierzonemu startowi urządzenia.
d)Przechowuj nieużywane narzędzia elektryczne poza zasięgiem dzieci. Nie pozwól na użytkowanie urządzenia osobom, które nie są z nim obznajomione lub nie przeczytały niniejszych instrukcji. Narzędzia elektryczne są niebezpieczne, gdy są używane przez osoby niedoświadczone.

... / Uzupełnione wskazówki ... / Uzupełnione wskazówki ... / Obsługa
e)Pielęgnuj starannie urządzenie. Sprawdź, czy ruchome części urządzenia funkcjonują nienagannie i nie zakleszczają się, czy części urządzenia nie są złamane lub uszkodzone w takim stopniu, że funkcjonowanie urządzenia jest uszczuplone. Zleć naprawę uszkodzonych części przed użyciem urządzenia. Przyczyną wielu wypadków są źle konserwowane narzędzia elektryczne.
f)Utrzymuj narzędzia tnące w stanie ostrym i czystym. Starannie pielęgnowane narzędzia tnące o ostrych krawędziach tnących mniej zakleszczają się i dają się łatwiej prowadzić.
g)Używaj narzędzia elektrycznego, osprzętu, narzędzi wymiennych itp. odpowiednio do niniejszych instrukcji i w taki sposób, jaki jest zalecany dla tego specjalnego typu urządzenia.
Uwzględniaj przy tym warunki robocze i wykonywane czynności. Użycie narzędzi elektrycznych do innych zastosowań niż to przewidziano może prowadzić do niebezpiecznych sytuacji.
Należy zakładać okulary ochronne oraz odpowiednią maskę przeciwpyłową!
Uzupełnione wskazówki bezpieczeństwa dla frezarek górnowrzecionowych
Narzędzie trzymać za izolowane powierzchnie uchwytu, ponieważ frezarka może trafić własny przewód sieciowy. Kontakt z przewodem sieciowym będącym pod napięciem może wprawić metalowe części urządzenia pod napięcie i doprowadzić do porażenia prądem elektrycznym. Stosować wyłącznie frezy odpowiedniej średnicy trzonka, które przeznaczone są do liczby obrotów elektronarzędzia.
Obrabiany przedmiot przymocować do stabilnego podłoża i zabezpieczyć przy pomocy zacisków lub w inny sposób. Jeśli obrabiany przedmiot trzyma się jedynie dłonią lub naprzeciw ciała to nie jest on stabilny, co może prowadzić do utraty kontroli.
5. Serwis |
Obsługa |
a)Urządzenie oddawać do naprawy tylUrządzenia nigdy nie wykorzystywać niezgodnie z ko wykwalifikowanemu personelowi jego przeznaczeniem i stosować wyłącznie z orygi-
fachowemu i tylko z użyciem oryginalnych części zamiennych. To sposób na zapewnienie bezpieczeństwa urządzenia.
Uzupełnione wskazówki bezpie- czeństwa dla szlifierek i polerek
TRUJĄCY KURZ! Obróbka szkodliwego / trującego kurzu przedstawia zagrożenie dla zdrowia osoby obsługującej lub osób znajdujących się w pobliżu.
Unikać szlifowania powierzchni pokrytych farbą zawierającą ołów lub innych materiałów szkodliwych dla zdrowia.
Obróbka materiałów zawierających azbest jest zabroniona. Azbest jest uważany za materiał wywołujący raka.
nalnymi częściami / akcesoriami. Użycie innych niż zalecanych w instrukcji obsługi części lub innych akcesoriów może oznaczać niebezpieczeństwo urazu. Stosować wyłącznie całkowicie rozwinięte kable i nieuszkodzone przedłużacze o pojemności co najmniej 5 A.
Ostrzeżenie: Narzędzia nie stosować do produkcji wycinków w otoczeniu instalacji, lub otworów z kablami elektrycznymi prowadzącymi prąd lub w ścianach, za którymi prawdopodobnie położone są kable elektryczne prowadzące prąd. Bit mógłby poprowadzić prąd do urządzenia, co połączone jest dla operatora z porażeniem prądem.
Należy zwolnić wyłącznik instalacyjny lub wyjąć bezpiecznik, aby odłączyć obwód prądu od napięcia.
PL 17
Obsługa
Uwaga: Narzędzie trzymać zawsze za obudowę z tworzywa sztucznego i przy pracy zakładać zawsze okulary ochronne.
Włączanie / wyłączanie (zobacz rys. A)
Włączanie:
Nacisnąć WŁĄCZNIK / WYŁĄCZNIK 4 .
Wyłączanie:
Zwolnić WŁĄCZNIK / WYŁĄCZNIK 4 .
Ustawianie liczby obrotów (zobacz rys. B)
Przekręcić regulator prędkości obrotowej 2 w prawo, aby podwyższyć liczbę obrotów. Przekręcić regulator prędkości obrotowej 2 w lewo, aby zmniejszyć liczbę obrotów.
Wymiana narzędzi (zobacz rys. C)
Wskazówka: Stosować wyłącznie elementy wyposażenia uniwersalnej frezarki o średnicy trzpienia wynoszącej ø 4,8 mm.
Przytrzymać wciśnięty przycisk blokady wrzeciona 11 .
Poluzować nakrętkę napinającą 10 przy pomocy klucza szczękowego 14 , w tym celu należy ją przekręcić w kierunku przeciwnym do ruchu wskazówek zegara.
Wymienić narzędzie.
Zablokować blokadę wrzeciona, zakręcić nakrętkę napinającą 10 przy pomocy klucza szczękowego 14 .
Bity:
Dołączone bity pokrywają następujące obszary zastosowania (zobacz rys. D).
Frezy uniwersalne (HSS) 18 :
Przydatność: drewno, płyty wiórowe, tworzywo sztuczne, płyty aluminiowe i blaszane.
Frez wpustowy (HSS) 17 :
Przydatność: drewno, płyta wiórowa, tworzywo sztuczne
Taśmy ścierne 16 :
Przydatność: szlifowanie drewna
Wskazówka: Do przycinania kafli naściennych lub obróbki blachy lub metali lekkich należy stosować odpowiednie akcesoria ze sklepu branżowego.
Montowanie taśm ściernych
Taśmy ścierne 16 montować jak jest to pokazane na ilustracji C.
Ustawianie głębokości pracy (zobacz rys. E)
Odkręcić śrubę nastawczą skrzydełkową 5 . Płytę ślizgową 7 przesunąć na żądaną głębokość roboczą (dla całkowitego przecięcia około 3,2 mm ponad grubość materiału).
Maksymalnie zalecana głębokość cięcia dla drewna wynosi 13 mm. (dotyczy jedynie frezu uniwersalnego (HSS) 18 ).
Dokręcić ponownie śrubę nastawczą skrzydełkową 5 .
Kierunek frezowania przy krawędziach
18 PL
 Loading...