


 Loading...
Operating Instructions
(For Basic Operations)
Facsimile Transceiver
Model No. UF-8200
UF-7200
Before operating this machine, please carefully read this manual, |
English |
and keep this documentation in a safe place for future reference. |
ENGLISH
Operating Instruction
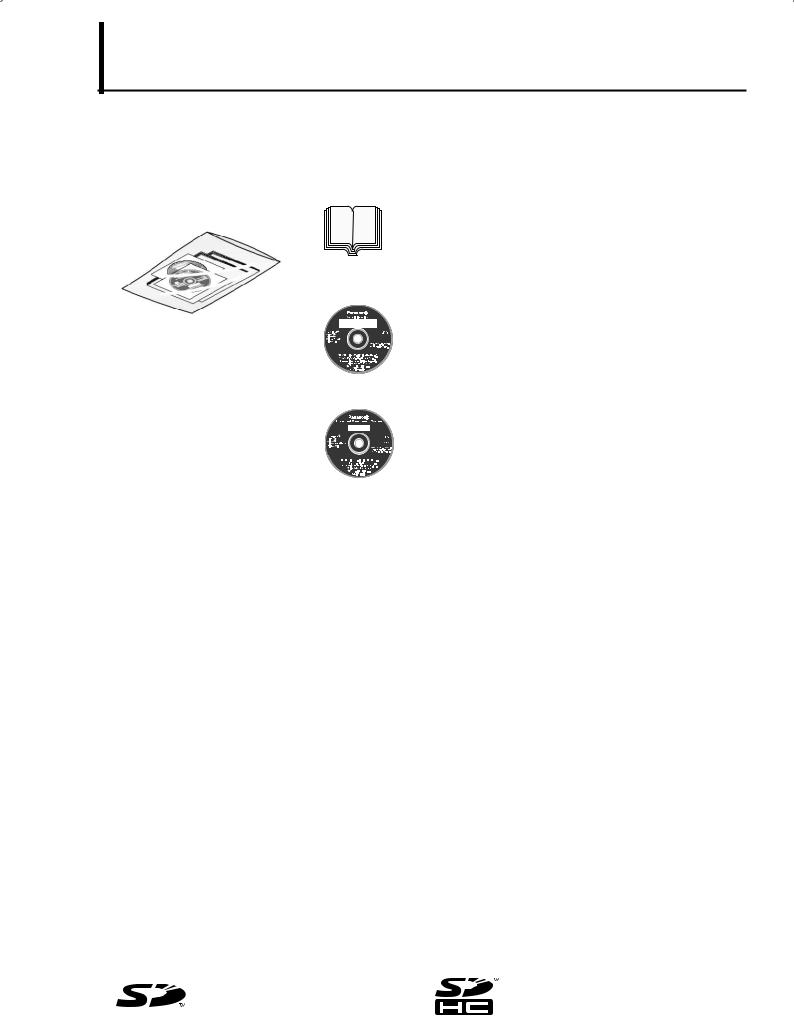
The following Operating Instruction manuals are included with this machine. Please refer to the appropriate manual and keep all manuals for future reference. If you lose the manual, contact the authorized Panasonic dealer.
Accessories |
Operating Instructions (For Basic Operations) |
|
This manual contains essential information for setting up |
|
the machine and performing basic operations. |
Operating Instructions CD (For Advanced Operations)
Contains manuals with detailed information for Copy,
Facsimile/Internet Fax, Scan/Email functions, Function
Parameters.
Document Management System CD
Contains the Panasonic Document Management System Application software, and manuals with detailed information for the Print function, and Panasonic Document Management System Application software.
Functions and Options
The functions listed below come standard on some models, and optional on others.
Functions |
UF-8200 |
UF-7200 |
|
|
|
Internet Fax Function |
Standard |
Option |
|
|
|
Network Scanner Function |
Standard |
Option |
|
|
|
2nd Paper Feed Module |
Option |
Option |
|
|
|
Dual G3 Communication Port |
Option |
Option |
|
|
|
Add-on SD Memory Card, |
Option |
Option |
SD Memory Card (add-on) |
|
|
|
|
|
Telephone Handset Kit |
Option |
Option |
|
|
|
SD Logo is a trademark. |
SDHC Logo is a trademark. |
2

Operating Instruction
How to Read This Manual
The following notations are used throughout this manual.
Sample
Programming Auto Dialer
Your machine has 2 types of Auto Dialers. The default dialer can be selected by changing the setting of Fax Parameter No.119 (QWERTY KEYBOARD).
When the setting is set to:
"1:One-Touch": You can manually select the desired One-Touch Key, ABBR. Dialing and the Program Key. "2:Quick Name Search": You can select the station by searching the Station Name, and the Program Name.
ATTENTION
•The required Six (6) Basic Internet Parameters must be set when setting Email Address. (See page 132)
•Up to 580 stations, plus additional 420 with the optional SD Memory Card installed. (See page 186)
Programming Address Book
1 |
|
|
FUNCTION |
(1-9) |
|
|
|
ENTER NO. OR |
|
2 |
|
|
ADDRESS BOOK |
(1-3) |
|
|
|
ENTER NO. OR |
|
3 |
|
|
ADD STATION |
|
|
|
|
ENTER TEL. NO. |
|
4 |
To change the input mode (between enter Email Address and |
|
|
|
Telephone Number), press |
. |
|
|
|
5 |
Enter the Telephone Number using the Number Pad (up to 36 digits) |
ENTER NAME |
|
|
or the Email Address using the QWERTY Keyboard (up to 60 |
|
|||
335 |
|
|||
characters), then press |
. |
|
||
|
|
|||
|
Ex: 335 or admin@pana |
|
ENTER NAME |
|
|
|
|
|
|
|
|
|
admin@pana |
|
6 |
Enter the Station Name using the QWERTY Keyboard (up to 15 |
ADD STATION |
|
|
characters), then press |
. |
|
||
ENTER TEL. NO. |
|
|||
|
|
|
ADD STATION |
|
|
|
|
ENTER EMAIL ADDRESS |
|
NOTE
1.Use 


 to enter a space between the num bers to make it easier to read.
2.Use 

 or
or 

 to move the cursor beyond the incorrect character, press


 then re-enter the new character.
3.If you are using Pulse dialing and you wish to change to Tone dialing in the middle of dialing,
press 


 (represented by a"/"). The dialing method will be changed from Pulse to Tone after dialing the digit "/".
4.When using Address Book Dialing, you cannot use ABBR. Number Dialing.
Continued on the next page... |
XX |
Machine
Setting Your
ATTENTION
Indicates items that need to be registered in advance.
Keys with a pointing finger indicate keys you need to press.
Ex: Press the Function Key.
Indicates pressing keys sequentially.
Ex: Press 7, 2, the Set Key in sequence.
ADD STATION
ENTER EMAIL ADDRESS
Indicates messages shown on the LCD display.
NOTE
Indicates additional information on operations or features.
Indicates keys on the Control Panel.
The shape is different from the actual keys on the machine.
The functions of some of the keys are marked in parentheses.
For details about the keys on the Control Panel, refer to Control Panel. (See page 16)
ENGLISH
3

Table of Contents
Operating Instruction ........................................................................................................ |
2 |
How to Read This Manual ................................................................................................................. |
3 |
Table of Contents ............................................................................................................. |
4 |
Safety Information.......................................................................................................... |
5 |
Precaution ........................................................................................................................ |
9 |
Security Suggestions for Key Operators .......................................................................... |
13 |
Main Unit and Accessories............................................................................................... |
14 |
External View ................................................................................................................... |
15 |
Control Panel.................................................................................................................... |
16 |
Unpacking ........................................................................................................................ |
19 |
Installing Your Machine ..................................................................................................................... |
19 |
Remove All Shipping Tapes and All Packing Materials ..................................................................... |
20 |
Load Paper ........................................................................................................................................ |
21 |
Install the Toner Cartridge ................................................................................................................. |
23 |
Installing Your Machine .................................................................................................... |
25 |
Setting the Dialing Method (Tone or Pulse) ..................................................................... |
26 |
Adjusting the Volume ....................................................................................................... |
27 |
Setting the Monitor Volume ............................................................................................................... |
27 |
Setting the Ringer Volume................................................................................................................. |
28 |
User Parameters (For Facsimile) ..................................................................................... |
29 |
Setting the User Parameters ............................................................................................................. |
29 |
Setting Your Machine ....................................................................................................... |
31 |
Programming Auto Dialer .................................................................................................................. |
31 |
Placing Documents (Facsimile/Internet Fax).................................................................... |
32 |
How to Place Documents .................................................................................................................. |
32 |
Scanning Area ................................................................................................................................... |
32 |
Document Size .................................................................................................................................. |
32 |
Sending Documents ......................................................................................................... |
33 |
Manual Number Dialing ..................................................................................................................... |
33 |
Quick Name Search Dialing............................................................................................................... |
34 |
What is Internet Fax? ....................................................................................................... |
35 |
Using the Internet Fax Feature .......................................................................................................... |
36 |
Replacing Consumables .................................................................................................. |
38 |
Adding Paper (Paper Trays: Tray-1 and Tray-2) ............................................................................... |
38 |
Replacing the Toner Cartridge........................................................................................................... |
40 |
Problem Solving ............................................................................................................... |
44 |
If You Have Any of These Problems.................................................................................................. |
44 |
User(U)/Jam(J) Error Codes.............................................................................................................. |
46 |
Removing a Misfed Paper (Paper Feed/Paper Transport) ................................................................ |
47 |
Removing a Misfed Paper (Inside the Machine)................................................................................ |
49 |
Removing a Misfed Paper (ADF)....................................................................................................... |
51 |
Information Code ............................................................................................................................... |
52 |
FCC Notice....................................................................................................................... |
56 |
FCC Notice for Users in USA ............................................................................................................ |
56 |
Notice to Users in Canada................................................................................................................. |
58 |
IMPORTANT INFORMATION .......................................................................................... |
61 |
4
Safety Information
For Your Safety
To prevent severe injury and loss of life, read this section carefully before using your machine to ensure proper and safe operation of your machine.
This section explains the graphic symbols used in this manual.
WARNING |
Denotes a potential hazard that could result in serious injury, or death. |
|
|
CAUTION |
Denotes hazards that could result in minor injury, or damage to the machine. |
|
|
This section also explains the graphic symbols used in this manual.
These symbols are used to alert operators to a specific operating procedure that must not be performed.
These symbols are used to alert operators to a specific operating procedure that must be emphasized in order to operate the machine safely.
This symbol is used to alert operators to a heated surface that may cause burns and requires close attention.
 WARNING
Power and Ground
Connection Cautions
Ensure that the plug connection is free of dust. In a damp environment, a contaminated connector can draw a significant amount of current that can generate heat and eventually cause fire over an extended period of time.
Always use the power cord provided with your machine.
If you use a cord with an unspecified current rating, the machine or plug may emit smoke or become hot to the touch externally.
Do not attempt to repair, pull, bend, chafe or otherwise damage the power cord. Do not place a heavy object on the cord. A damaged cord can cause fire or electric shocks.
Never touch a power cord with wet hands. Danger of electric shock exists.
When disconnecting the machine, grasp the plug instead of the cord. Pulling on a cord forcibly can damage it and cause fire or electric shock.
If the power cord is broken or insulated wires are exposed, contact your authorized Panasonic dealer for a replacement. Using a damaged cord can cause fire or electric shocks.
Stop operation immediately if your machine produces smoke, excessive heat, unusual noise, or smell, or if water is spilt onto the machine. These conditions can cause fire. Immediately unplug the machine, and contact your authorized Panasonic dealer.
Do not disconnect or reconnect the power cord from the machine while it is on. Disconnecting a live connector can deform the plug and cause fire.
ENGLISH
5

Safety Information
When the machine is not used over an extended period of time, unplug it. If an unused machine is left connected to a power source for a long period, degraded insulation can cause electric shocks, current leakage or fire.
Be sure to unplug the machine before accessing the interior of the machine for cleaning, maintenance or fault clearance. Access to a live machine's interior can cause electric shock.
Once a month, unplug the machine and check the power cord for the following. If you notice any unusual condition, contact your authorized Panasonic dealer.
zThe power cord is plugged firmly into the receptacle.
zThe plug is not excessively heated, rusted, or bent.
zThe plug and receptacle are free of dust.
zThe cord is not cracked or frayed.
Operating Safeguards
Do not touch areas where these caution labels are attached to the surface may be very hot, and cause severe burns.
Do not place any liquid container such as a vase or coffee cup on the machine. Spilt water can cause fire or shock hazard.
Do not place any metal parts such as staples or clips on the machine. If metal and flammable parts get into the machine, they can short-circuit internal components, and cause fire or electric shocks.
If debris (metal or liquid) gets into the machine, unplug the machine. Contact your authorized Panasonic dealer. Operating a debris contaminated machine can cause fire or electric shock.
Never open or remove machine covers that are secured with screws unless specifically instructed in the "Operating Instructions". A high-voltage component can cause electric shocks.
Do not try to alter the machine configuration or modify any parts. An unauthorized modification can cause smoke or fire.
Consumable Safeguards
Never dispose of toner or a toner cartridge into an open flame. It can cause an explosion, burns, and/or injuries.
Keep SD Memory Card/verification stamp out of the reach of children. If an SD Memory Card/stamp is swallowed accidentally, get medical treatment immediately.
6

Safety Information
 CAUTION
Installation and Relocation
Cautions
Do not place the machine near heaters or volatile, flammable, or combustible materials such as curtains that may catch fire.
Do not place the machine in a hot, humid, dusty or poorly ventilated environment.
Prolonged exposure to these adverse conditions can cause fire or electric shocks.
When moving the machine, be sure to unplug the power cord from the outlet. If the machine is moved with the power cord attached, it can cause damage to the cord which could result in fire or electric shock.
Place the machine on a level and sturdy surface that can withstand a weight of 50.7lb (23kg). If tilted, the machine may tip-over and cause injuries.
When relocating the machine, contact your authorized Panasonic dealer.
Operating Safeguards
Do not place a magnet near the safety switch of the machine. A magnet can activate the machine accidentally, resulting in injuries.
Do not use a highly flammable spray or solvent near the machine. It can cause fire.
Do not use conductive paper, e.g. folding paper, carbonic paper and coated paper. When a paper jam occurs, they can cause a short circuit and fire.
Others
Never touch a labelled area found on or near the heat roller. You can get burnt. If a sheet of paper is wrapped around the heat roller, do not try to remove it yourself to avoid injuries or burns. Disconnect the power cord from the machine immediately, and contact your authorized Panasonic dealer.
Keep the room ventilated when using the machine for an extended period of time to minimize the ozone density in the air.
Pull out paper trays slowly to prevent injuries.
When removing jammed paper, make sure that no pieces of torn paper are left in the machine. A piece of paper remaining in the machine can cause fire. If a sheet of paper is wrapped around the heat roller, or when clearing a jammed paper that is difficult or impossible to see, do not try to remove it by yourself. Doing so can cause injuries or burns. Disconnect the power cord from the machine immediately, and contact your authorized Panasonic dealer.
Consumable Safeguards
Never heat the drum cartridge, or scratch its surface. A heated or scratched drum can be hazardous to your health.
The machine has a built-in circuit for protection against lightning-induced surge current. If lightning strikes in your neighborhood, maintain ample distance from the machine and do not touch the machine until the lightning has stopped.
ENGLISH
7

Safety Information
If you notice flickering or distorted images or noises on your audio-visual units, your machine may be causing radio interference. Disconnect the power cord from the machine and if the interference disappears, the machine is the cause of the radio interference.
Perform the following procedure until the interference is corrected.
•Move the machine and the TV and/or radio away from each other.
•Reposition or reorient the machine and the TV and/or radio.
•Unplug the machine, TV and/or radio, and replug them into outlets that operate on different circuits.
•Reorient the TV and/or radio antennas and cables until the interference stops. For an outdoor antenna, ask your local electrician for support.
•Use a coaxial cable antenna.
8

Precaution
For Your Safety
The maximum power consumption is 1000 W.
A properly wired (grounded), dedicated, 15A, 120V AC outlet is required. Do not use an extension cord. The power cord on this machine must be used to disconnect the main power.
Please ensure that the machine is installed near a wall outlet and is easily accessible.
Supplies
Store the Toner Cartridge and paper in cool areas with low humidity.
•Panasonic recommends using high quality 16 - 24 lb paper, using an inferior paper may cause excessive paper curl, requiring you to empty out the Output Tray more often to avoid paper jams.
•When clearing a paper jam or other fault, follow the appropriate procedure given in this Operating Instructions.
•For optimum performance, it is recommended that only Panasonic Brand supplies are used in the machine.
•Certain types of transparency film may not be compatible and may damage your machine. Consult with an authorized Panasonic dealer for advice regarding non-standard paper types. (Panasonic has tested "3M CG3300" transparency film and found it to be compatible.)
Use of other than genuine Panasonic supplies can damage the printer. Be sure to use only genuine Panasonic Toner Cartridge (UG-5570) designed for optimum performance.
Average yield for the UG-5570 is approximately 10,000 pages (3% coverage).
Note: Average yield is based on 3% coverage of the printable area with repetitive printing of 10 pages (Letter/ A4 size, single side printing, default density). The yield of a Toner Cartridge varies depending on the coverage, temperature, humidity, media, etc. Therefore, the average yield cannot be guaranteed. Continuously printing 10% coverage of printable area will reduce the yield of the Toner Cartridge to about half as compared to 3% coverage printing. The maximum yield of the Toner Cartridge will not exceed 11,500 pages.
Dispose of Toner Cartridge and OPC Drum Unit(s) according to your local regulations.
Installation
The machine should not be installed in areas with the following conditions:
•Extremely high or low temperature and humidity. Ambient conditions:
Temperature: 50 - 86 °F
Relative humidity: 30 - 80 %
• Where temperature and humidity can change rapidly, causing condensation.
• |
Direct exposure to sunlight. |
• |
Directly in the air conditioning flow. |
• |
In areas of high dust concentration. |
• |
In areas of poor ventilation. |
• |
In areas with chemical fume concentration. |
• |
In areas with extreme vibration. |
• |
With unstable or uneven conditions (floors, etc.). |
|
|
Illegal Copies
It is unlawful to make copies of certain documents.
Copying certain documents may be illegal in your country. Penalties of fines and/or imprisonment may be imposed on those found guilty. The following are examples of items that may be illegal to copy in your country.
•Currency
•Bank notes and checks
•Bank and government bonds and securities
•Passports and identification cards
ENGLISH
9

Precaution
•Copyright material or trademarks without the consent of the owner
•Postage stamps and other negotiable instruments
This list is not inclusive and no liability is assumed for either its completeness or accuracy. In case of doubt, contact your legal counsel.
Notice:
Install your machine near a supervised area to prevent illegal copies from being made.
Ventilation
The machine should be installed in a well-ventilated area to minimize the ozone density in the air.
Handling
Do not disconnect the power cord from the machine or open the Right Cover during copying/ printing.
Energy Saver Mode Notice
•When using the Printer Function (USB Local and Network Connections), we recommend that you leave the Energy Saver Mode in the initial factory default setting (Sleep mode).
Key Operator ID Code
•The Initial Machine Modes can be checked or changed with the Function Modes, however, these modes require the Key Operator ID Code.
For Key Operator: |
When setting up this machine, please consult with your authorized Panasonic dealer, |
|
and decide on the Key Operator ID Code together, then record it and keep it in a safe |
|
place for future reference. |
Dept. (DEPARTMENT) Code
INPUT DEPT CODE
********
1 to 8-digit
When the Department Counter function is set up, the Dept. (Department) Code input screen is displayed on the LCD Display. A registered Department Code (1 to 8-digit) is required to gain access to each secured function, or the secured Fax/ Scanner function(s) cannot be used. Please consult with the Key Operator regarding the Department Code(s) for the desired function.
Procedures:
(1)Input a registered department code (1 to 8-digit).
(2)Press the SET or START Key.
Number of Copies
The maximum number of copies is up to 999 (3 digit with keypad). During the copy mode, if you input 4-8 digit numbers, they will be interpreted as being a phone number and displayed on the LCD, then the machine will switch to the Fax mode.
Auto Reset Timer
As the initial setting for Auto Reset Time is 1 minute, selected operation mode returns to default operation mode (Fax) after 1 minute, if you wish to change this Auto Reset Time, set to Fax Parameter No.121 (AUTO RESET TIME). For more details for Fax Parameter, refer to the Operating Instructions (For Advanced Operations) on the provided CD-ROM.
10
Precaution
Laser Safety
LASER SAFETY
This machine employs a laser. Only qualified service personnel should attempt to service this device due to possible eye injury.
Caution
USE OF CONTROLS, ADJUSTMENTS OR PERFORMANCE PROCEDURES OTHER THAN THOSE SPECIFIED HEREIN MAY RESULT IN HAZARDOUS RADIATION EXPOSURE.
Caution Label
Manufacturer’s Name
and Address
 Factory ID
ENGLISH
11

Precaution
 CAUTION
Denotes hazards that could result in minor injury or damage to the machine.
•TO REDUCE THE RISK OF SHOCK OR FIRE, USE ONLY NO. 26 AWG OR LARGER TELEPHONE LINE CABLE.
•DISCONNECT ALL POWER TO THE MACHINE BEFORE COVER(S) ARE REMOVED. REPLACE THE COVER(S) BEFORE THE MACHINE IS RE-ENERGIZED.

 IMPORTANT SAFETY INSTRUCTION
When using your telephone equipment, basic safety precautions should always be followed to reduce the risk of fire, electric shock and injury to persons, including the following:
•DO NOT USE THIS PRODUCT NEAR WATER, FOR EXAMPLE, NEAR A BATH TUB, WASH BOWL, KITCHEN SINK OR LAUNDRY TUB, IN A WET BASEMENT OR NEAR A SWIMMING POOL.
•AVOID USING A TELEPHONE (OTHER THAN A CORDLESS TYPE) DURING AN ELECTRICAL STORM. THERE MAY BE A REMOTE RISK OF ELECTRIC SHOCK FROM LIGHTNING.
•DO NOT USE THE TELEPHONE TO REPORT A GAS LEAK IN THE VICINITY OF THE LEAK.
SAVE THESE INSTRUCTIONS.
As an ENERGY STAR Partner, Panasonic has determined that this product meets the ENERGY STAR guidelines for energy efficiency.
This voluntary program specifies certain energy consumption and usage standards. This product will automatically "power down" after a specified
period of non-use. The use of this ENERGY STAR compliant profuct will reduce energy consumption and ultimately benefit the environment.
The default functions can be adjusted depending on your office requirements.
Please ask your Authorized Panasonic dealer for more details.
12

Security Suggestions for Key Operators
To keep your machine’s highly-sensitive document data secure, the designated Key Operators are instructed to perform the recommended security measures described below for the initial machine installation, network connection, network configuration, setup of security functions, and replacement and disposal of the machine.
1.Key Operators are required to verify the identity of the manufacturer’s service technician, or of an affiliated company’s staff, or marketing company, by requesting their ID Card.
Do not give the device information by phone or Email.
2.Always connect through a Firewall when installing your device on a network that is connected to the Internet. When connecting this device to a client PC or a server, we recommend configuring your network environment with a switching hub to prevent your device from being wiretapped.
3.A Key Operator ID Code is essential to maintaining the security of the device. Key Operators are required to change the ID Code from the initial setting, and keep the ID Code confidential and in a safe place. To change the initial Key Operator ID Code, refer to the Operating Instructions (For Advanced Operations) on the provided
CD-ROM and set up by pressing 


 and selecting [KEY OPERATOR ID CODE].
4. To prevent illicit use by unauthorized personnel, perform the following for ID/password settings.
1)Use the maximum number of digits.
2)Use a variety of the accepted character types. 3)Change the ID and password periodically.
Make sure that the setting screen can only be seen by the Key Operator when setting/changing various ID and passwords. Keep this information confidential.
5.The documents stored in the machine should be printed immediately. Upon printing, the document data is deleted, thus preventing unauthorized re-printing by a third party.
6.When finished, be sure to press the Stop Key and return to the standby screen. Also, do not reset Auto Reset Time settings.
7.When disposing of SD cards, destroy the card or use wiping software to completely delete the data. Data on SD cards are your responsibility. To delete data on SD cards, contact your local Panasonic Authorized Dealer.
8.Scanned (text and images), received and set/ registered information (addresses) are your responsibility. If the device malfunctions and the data are deleted, it cannot be recovered and is not covered in the warranty.
9.Incorrect settings may leak settings or impede use of this device. Check the details carefully when performing settings.
10.On occasion, the clock may need adjustment. (lunar inequality: ±1 minute)
*The security settings on this equipment are restricted and require the input of an 8-digit Key Operator ID Code to set, or change them. The initial ID Code setting is 00000000 (8-digit). The ID Code can be set arbitrarily.
The Key Operator plays a critical part in maintaining and controlling the security of the device and in prevention of its unauthorized access, therefore, it is of utmost importance that you understand the content described in the Operating Instructions and that you follow the suggestions herein.
ENGLISH
13

Main Unit and Accessories
Unpack the carton and check that you have all the illustrated accessories.
Machine |
Toner Cartridge |
CD-ROM
Telephone Line Cable
Power Cord
Directory Sheet Holder |
Operating Instructions
Recording Paper Tray
14
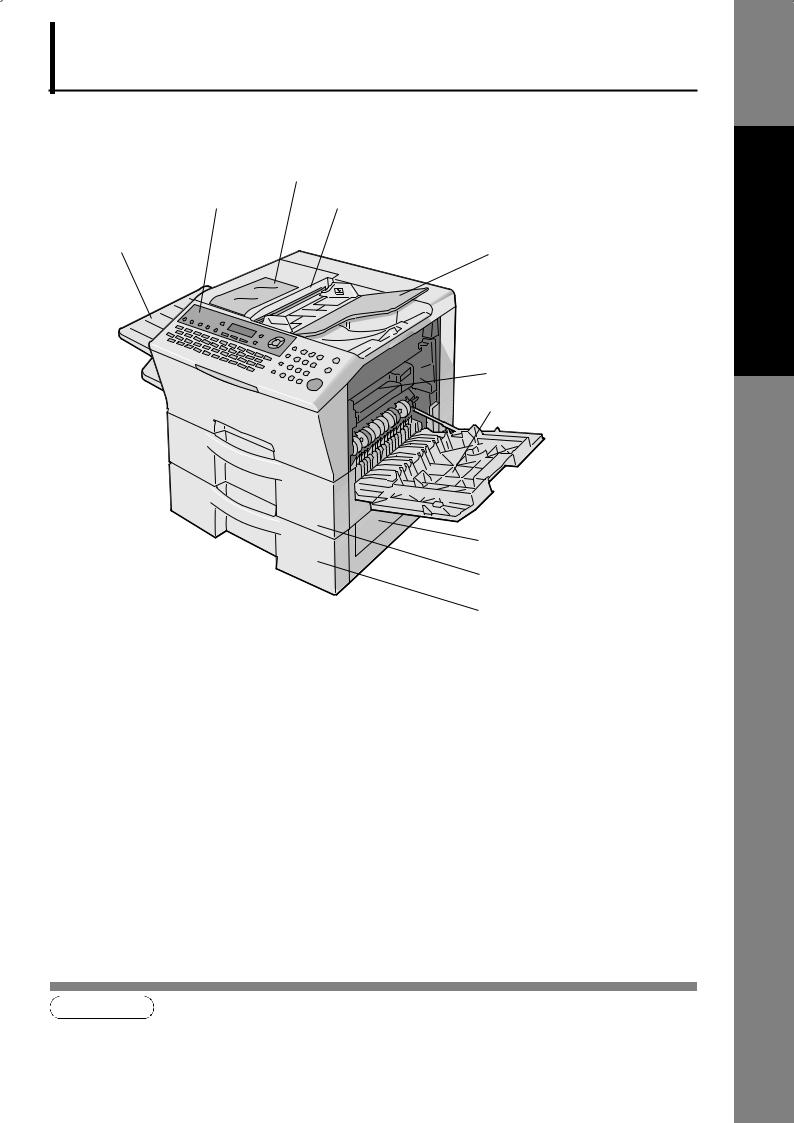
External View
|
Insert the Directory Sheet Holder. (see Note 1) |
Control Panel |
ADF (Automatic Document Feeder) |
Recording Paper Tray |
Sub Document Tray |
|
Toner Cartridge
Right Cover
Jam Cover
Paper Tray (Tray-1)
2nd Paper Tray (Tray-2) (optional)
NOTE
1.For more details, refer to the Printing the Directory Sheet in the Operating Instructions (For Advanced Operations) of provided booklet.
ENGLISH
15

Control Panel
1 |
2 |
3 |
4 |
5 |
6 |
7 |
8 |
9 |
10 11 |
12 |
13 |
14 |
15 |
16 |
17 |
18 |
26 25 24 23 22 21 20 19
No. |
Icon |
Contents |
No. |
|
Icon |
Contents |
||||
1 |
|
|
|
Print Key |
2 |
|
|
|
|
Scan/file Key |
|
|
|
|
Used for Printer function. |
|
|
|
|
|
Used for optional Network Scanner |
|
|
|
|
|
|
|
|
|
||
|
|
|
|
|
|
|
|
|
|
Function. |
|
|
|
|
|
|
|
|
|
|
(UF-7200: Available if the optional |
|
|
|
|
|
|
|
|
|
|
Internet Fax/Email/Network |
|
|
|
|
|
|
|
|
|
|
Scanner Module (UE-404093) is |
|
|
|
|
|
|
|
|
|
|
installed.) |
|
|
|
|
|
|
|
|
|
|
|
3 |
|
|
|
Email Key |
4 |
|
|
|
|
Email Report Key |
|
|
|
|
|
|
|
||||
|
|
|
|
|
|
|
||||
|
|
|
|
Used to select the EMAIL mode. |
|
|
|
|
|
Used to send the transmission |
|
|
|
|
|
|
|
|
|
||
|
|
|
|
(UF-7200: Available if the optional |
|
|
|
|
|
result notification by Email. |
|
|
|
|
Internet Fax/Email/Network |
|
|
|
|
|
(UF-8200 only) |
|
|
|
|
Scanner Module (UE-404093) is |
|
|
|
|
|
|
|
|
|
|
installed.) |
|
|
|
|
|
|
|
|
|
|
|
|
|
|
|
|
|
5 |
|
|
|
Energy Saver Key |
6 |
|
|
|
|
Stamp Key |
|
|
|
|
Used to switch the machine to |
|
|
|
|
|
Used to turn the verification stamp |
|
|
|
|
energy saving mode. |
|
|
|
|
|
ON or OFF. |
|
|
|
|
|
|
|
|
|
|
Lights when the verification stamp is |
|
|
|
|
|
|
|
|
|
|
set to ON. |
|
|
|
|
|
|
|
|
|
|
(Refer to the Operating Instructions |
|
|
|
|
|
|
|
|
|
|
(For Advanced Operations) on the |
|
|
|
|
|
|
|
|
|
|
provided CD-ROM) |
|
|
|
|
|
|
|
|
|
|
|
7 |
|
|
|
Duplex Key |
8 |
|
|
|
|
Contrast Key |
|
|
|
|
|
|
|
||||
|
|
|
|
|
|
|
||||
|
|
|
|
Used to scan the document(s) on |
|
|
|
|
|
To adjust the Exposure manually. |
|
|
|
|
both sides of the paper. |
|
|
|
|
|
(Refer to the Operating Instructions |
|
|
|
|
|
|
|
|
|
|
(For Advanced Operations) on the |
|
|
|
|
|
|
|
|
|
|
provided CD-ROM) |
|
|
|
|
|
|
|
|
|
|
|
9 |
|
|
|
Resolution Key |
10 |
|
|
|
|
Clear Key |
|
|
|
|
|
|
|
||||
|
|
|
|
|
|
|
||||
|
|
|
|
Used to set STANDARD, FINE, S- |
|
|
|
|
|
Clears the number or character on |
|
|
|
|
FINE, 600 dpi or HALFTONE |
|
|
|
|
|
the LCD display. |
|
|
|
|
(FINE, S-FINE, 600 dpi). |
|
|
|
|
|
Go back to the previous LCD |
|
|
|
|
(Refer to the Operating Instructions |
|
|
|
|
|
screen and function as Back Space |
|
|
|
|
(For Advanced Operations) on the |
|
|
|
|
|
key. |
|
|
|
|
provided CD-ROM) |
|
|
|
|
|
|
|
|
|
|
|
|
|
|
|
|
|
11 |
|
|
|
Function Key |
12 |
|
|
|
|
Set Key |
|
|
|
|
Used to start or select the function |
|
|
|
|
|
Used to set operations. |
|
|
|
|
and subfunctions. |
|
|
|
|
|
|
|
|
|
|
|
|
|
|
|
|
|
16
|
|
|
|
|
Control Panel |
No. |
Icon |
Contents |
No. |
Icon |
Contents |
13 |
Cursor Keys |
|
|
|
|
|
• |
Adjust the Monitor and Ringer volume. |
|
|
|
|
• |
Move the cursor while entering numbers and characters. |
|
||
|
• |
Search the station name for Quick Name Search and Directory Search Dialing. |
|||
|
• |
Confirm the entered station for multi-station communication. |
|
||
•Select functions.
•Confirm the current communication modes (Ex: Page Number, ID, Dialed Telephone Number or Email Address, File Number) when the machine is ON LINE.


 To select the zoom (Copy) ratio, etc.


 Use to select original size, etc.
Original Size Key
Used to select the original size manually.
|
|
Paper Tray Key |
|
|
|
|
|
|
Selects the paper tray. |
|
|
|
|
|
|
|
|
|
|
|
14 |
|
Redial/Pause Key |
15 |
|
|
Abbr Dial Key |
|
||||||
|
||||||
|
|
Used to enter a pause when |
|
|
|
Used to start ABBR. Dialing. (Refer |
|
|
|
|
|||
|
|
programming or dialing a telephone |
|
|
|
to the Operating Instructions (For |
|
|
number, or to redial the last dialed |
|
|
|
Advanced Operations) on the |
|
|
number. (Refer to the Operating |
|
|
|
provided CD-ROM) |
|
|
Instructions (For Advanced |
|
|
|
|
|
|
Operations) on the provided CD- |
|
|
|
|
|
|
ROM) |
|
|
|
|
|
|
|
|
|
|
|
16 |
|
Number Pad |
17 |
|
|
Stop Key |
|
|
Used for manual dialing, recording |
|
|
|
Press to abort the current operation |
|
|
phone numbers, and numerical |
|
|
|
and reset selected mode(s) (Email/ |
|
|
entries. |
|
|
|
Copy/Scanner Functions) and |
|
|
|
|
|
||
|
|
|
|
|
|
return to the Facsimile Function. |
|
|
|
|
|
|
|
18 |
|
Copy Key |
19 |
|
|
Start Key |
|
|
Used for Copy function. |
|
|
|
Press this key to start activation. |
20 |
|
Monitor Key |
21 |
|
|
|
Flash/Sub-addr Key |
|
|||||||
|
|||||||
|
|
Used to start On-Hook Dialing. |
|
|
|
|
Used to enter the Sub-Address or |
|
|
|
|
|
|
|
to access some features of your |
|
|
|
|
|
|
|
PBX. |
|
|
|
|
|
|
|
|
22 |
|
Lower Key |
23 |
|
|
|
Active LED (GREEN) |
|
|
Used to switch either upper or |
|
|
|
|
Flashes: |
|
|
lower row of the One-Touch Key. |
|
|
|
|
When machine is active. |
|
|
(Refer to the Operating Instructions |
|
|
|
|
Lights: |
|
|
(For Advanced Operations) on the |
|
|
|
|
When the received fax message is |
|
|
|
|
|
|
||
|
|
provided CD-ROM) |
|
|
|
|
in memory. |
ENGLISH
17

Control Panel
No. |
Icon |
|
Contents |
No. |
|
Icon |
Contents |
||
24 |
|
|
Status LED (RED) |
25 |
|
|
|
Print Data LED (GREEN) |
|
|
|
|
Lights/Flashes when trouble |
|
|
|
|
Flashes: |
|
|
|
|
occurs. |
|
|
|
|
When receiving printing data. |
|
|
|
|
Lights: |
|
|
|
|
Lights: |
|
|
|
|
The machine detected a trouble |
|
|
|
|
While printing. |
|
|
|
|
|
|
|
|
|||
|
|
|
|
|
|
|
|||
|
|
|
status, |
|
|
|
|
|
|
|
|
|
• |
No paper in the selected tray or |
|
|
|
|
|
|
|
|
|
toner has run out. |
|
|
|
|
|
|
|
|
• Machine detected trouble, such as |
|
|
|
|
|
|
|
|
|
|
paper misfed or jammed. |
|
|
|
|
|
|
|
|
Flashes: |
|
|
|
|
|
|
|
|
|
The machine detected an alarm |
|
|
|
|
|
|
|
|
|
status, |
|
|
|
|
|
|
|
|
|
• |
No paper in the Tray. (Tray not |
|
|
|
|
|
|
|
|
|
selected) |
|
|
|
|
|
|
|
|
• Toner is getting low, etc. |
|
|
|
|
|
|
|
|
|
|
|
|
|
|
|
|
265 |
QWERTY Keyboard (Character Keyboard) |
• Used to input the characters.
• Used for One-Touch Keys.
Used to enter a symbol for the LOGO, Character ID,
Station Name and for the Email Address. Use 

 or
or 

 to select the desired symbol(s).
LCD Display (Copy Function)
a |
b |
c |
d |
LTR
 LTR
LTR
 [LTR
[LTR 1] ZOOM:100% COPIES:001
e |
f |
aOriginal Size
bCopy Size
Select the zoom (Copy) ratio with the Cursor Keys ( 

 /
/ 

 ).
).
cScanned data will be rotated.
dPaper Size in Paper Tray
eZoom Ratio
f Number of Copies
18

Unpacking
Installing Your Machine
To set up your machine, follow the instructions on the page provided for each section.
ATTENTION
• Do not plug the main unit's AC Power Cord until instructed to do so.
Important
1.Unpack the carton and visually check the condition of the machine and make sure no missing accessories or any
shipping damage before installation. (See page 14)
2.Remove all Shipping Tapes and all Packing Materials. (See page 20)
3.Load Paper. (See page 21)
4.Install the Toner Cartridge. (See page 23)
5.Connect all Cables and plug the Power Cord. (See page 25)
Note: When lifting the Main Unit, grasp by both cavity handles as illustrated (Right and Left Side). Do not lift the machine by the  Paper Tray as it may cause
  damage and/or bodily injury.
Note: When moving the machine, do not lift the machine by grasping parts other than those specified herein. Doing so can cause injury.
ENGLISH
19
Loading...